
This chapter focuses on several advanced custom activity scenarios. Most of these scenarios are related to the execution of one or more children. The chapter begins with a general overview of the process that you must follow to schedule the execution of children. Your responsibilities as a parent activity are also reviewed. A simple activity that schedules a single child for execution is then demonstrated.
Following this first example, the chapter presents an activity that repeats execution of a single child while a condition is true. This example also explores the options that are available to you for handling an exception that is thrown by a child activity.
Other examples in this chapter demonstrate how to execute multiple children sequentially, or using a parallel execution pattern. An activity that supports an ActivityAction is also demonstrated. Dynamically constructing an activity using the DynamicActivity class is demonstrated next.
The chapter concludes with an example that demonstrates the use of execution properties and bookmark options.
Understanding Your Parental Responsibilities
A central theme of this chapter is the development of custom composite activities. These are parent activities that support the execution of one or more children (either child activities or delegates). Regardless of the real purpose for the parent activity, it has several responsibilities that you should consider. These responsibilities include the following:
- Configuring activity metadata
- Scheduling the execution of any children
- Reacting to the completion (successful or not) of children
- Creating bookmarks and reacting to their resumption
- Handling a cancellation request
- Reacting when the activity is aborted or terminated
These responsibilities are explored in the following sections.
![]() Note The
Note The NativeActivity or NativeActivity<TResult> is the only base activity class that allows you to schedule and manage child activities. For this reason, the discussion and subsequent examples in this chapter pertain to custom activities that derive from one of these base classes.
Configuring Activity Metadata
The workflow runtime doesn’t just blindly execute an activity. It instead employs a mechanism that provides a full description of the activity prior to its execution. This metadata about an activity includes a description of all child activities, arguments, variables, and delegates that will be used by the activity when it is executed. The metadata forms a contract between the activity and the workflow runtime and is used to validate the activity prior to its execution and to manage the relationships and dependencies between activities.
One of the responsibilities of any custom activity is to provide this metadata. For most simple custom activities, the metadata is automatically detected using reflection. However, the runtime may not always be able to accurately detect the metadata. For this reason, it is important to understand how to manually configure the metadata for an activity.
Automatically Configuring Metadata
In an activity derived from NativeActivity or NativeActivity<TResult>, the metadata is represented by an instance of the NativeActivityMetadata struct. This object is passed to the virtual CacheMetadata method of the activity. If you want to use the default metadata behavior (automatic detection using reflection), you can simply use the base version of the CacheMetadata method. If you need (or want) to configure the metadata yourself, you should override this method and provide your own implementation.
One common reason to override the CacheMetadata method is when your activity requires members that are not part of the activity’s public signature. This includes private members such as variables and child activities that are used only during the implementation of the activity. Since they are private, they are not automatically detected by the default CacheMetadata method.
The default implementation of CacheMetadata inspects the members of the activity and automatically configures metadata for these public members based on their CLR type:
- Argument members
- Variable members
- Activity members
ActivityDelegatemembers
The CacheMetadata method is executed only once as the activity is constructed but before it is executed. This makes sense since using reflection to create the metadata is relatively expensive. You wouldn’t want to perform this logic each time the activity is executed.
Manually Configuring Metadata
To manually configure the metadata for an activity, you override the virtual CacheMetadata method in your activity and provide your own implementation. An instance of the NativeActivityMetadata struct is passed to this method, and it provides a number of methods that you can use to add metadata for the activity.
Here are the most commonly used methods of the NativeActivityMetadata struct:
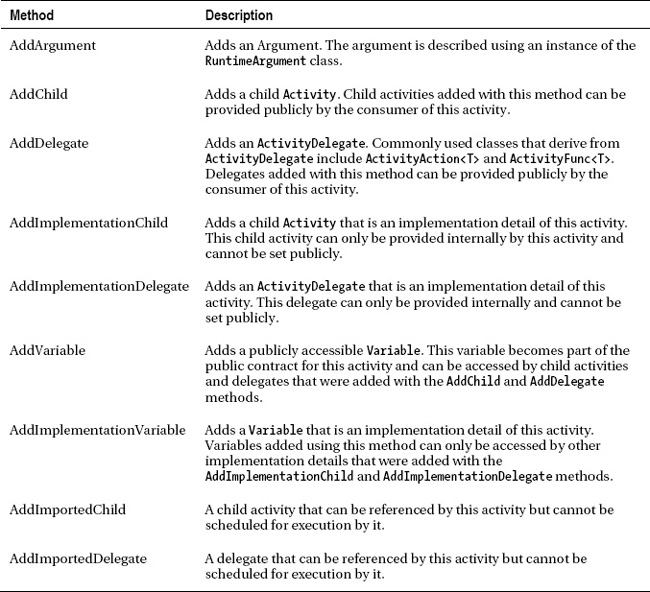
As you review the list of methods that are supported by the NativeActivityMetadata struct, you will likely see a pattern. Most of the members are organized into two distinct categories: publicly accessible members and implementation details. Examples of publicly accessible members are the Body property of the While activity or the Activities property of the Sequence activity. These properties are publicly accessible since you (the consumer of the activity) provides values for them at design time. On the other hand, implementation details are private members that are used internally during the execution of the activity. They are not assigned values at design time by the consumer of the activity.
Why would you want to manually configure metadata for an activity? There are two good reasons:
- To gain better performance
- To provide implementation details
As far as performance is concerned, reflection is used if you rely upon the automatic metadata detection. Reflection is also relatively slow, especially compared to explicitly adding the metadata yourself. And the automatic metadata detection can detect only those members that are publicly available. Any private members that are considered implementation details must be added manually.
Scheduling Child Execution
Scheduling the execution of children implies some type of execution pattern. The pattern that you implement and the internal scheduling decisions that you make really define how your custom activity is used.
For example, you might implement an activity that supports the execution of a single child activity. Do you execute this activity just one time? Do you repeat the execution a number of times? How do you determine when to stop execution? Do you evaluate a Boolean condition to determine when to stop execution of the child? Do you check that condition before or after each execution? If you support multiple children, what execution pattern will you implement? Do you schedule execution of one child at a time (similar to the Sequence activity)? Do you schedule execution of all children immediately (similar to the Parallel activity)? The execution pattern that you implement is the one that meets your particular needs.
Regardless of the pattern that you implement, you use methods provided by the NativeActivityContext object that is passed to the Execute method to schedule execution of a child activity or delegate. The NativeActivityContext class provides a very large number of methods, but here are the methods that you will most frequently use:
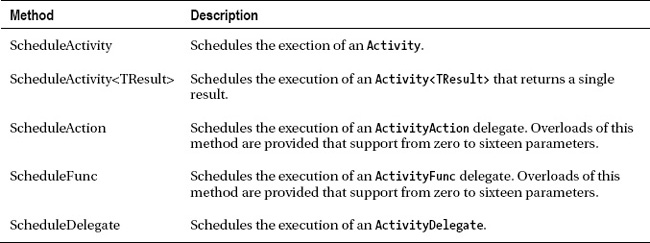
As each child is scheduled for execution it is added to a queue of work items for the workflow. The workflow runtime always executes the work item at the top (head) of the queue. You might expect that all new work items are added to the bottom (tail) of the queue. However, this is not always the case. Scheduling execution of a child adds it to the top of the queue, not the bottom. Microsoft has indicated that this was done to keep related activities closer together to, among other things, ease debugging. When you request cancellation of an activity, that also goes to the top of the queue. On the other hand, when you resume a bookmark, it is added to the bottom of the queue, as is an asynchronous callback. This was done to allow the activities that are closely related to complete before the resumption of the bookmark is processed. So, the internal queue of work items sometimes acts as a stack instead.
An ActivityInstance object is returned each time you schedule execution of a child. This object is a thin wrapper for the runtime instance of the scheduled child. It provides these properties:
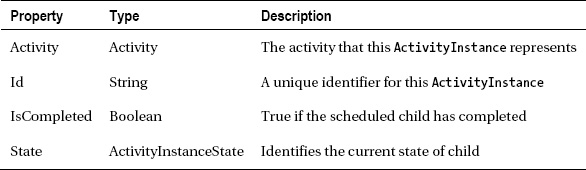
The ActivityInstanceState enum defines these possible execution states:
- Executing
- Closed
- Canceled
- Faulted
Handling Child Completion
The current activity is considered complete only when all of its scheduled children have also completed (or have been canceled). When you schedule the execution of a child, you can optionally specify these callback delegates that notify you of the completion of a child:
CompletionCallbackFaultCallback
One or both of these delegates are specified as arguments to the scheduling method (ScheduleActivity, ScheduleAction, and so on). The code that you assign to the CompletionCallback delegate is executed when the child completes normally. The code assigned to the FaultCallback is executed when an unhandled exception has occurred during execution of the child. Both delegates are passed an ActivityInstance object that identifies the child that has completed or faulted.
One common execution pattern is to execute one or more children while some condition is true (for example, the While activity). If this is the scenario that you are implementing, the CompletionCallback is your opportunity to test the condition as each child completes.
Handling Child Faults
The FaultCallback delegate is passed the unhandled exception along with a special limited version of the activity context (a NativeActivityFaultContext object). This allows you to optionally handle the exception in the parent activity instead of allowing it to propagate up the activity stack. How you choose to handle the exception is obviously up to you to decide.
If you decide to handle the exception in the parent activity, you call the HandleFault method of the NativeActivityFaultContext object to indicate that the exception has been handled. You also need to cancel further execution of the child that caused the fault. This can be accomplished with a call to the CancelChild method of the context object.
![]() Note Handling a child fault is one of the scenarios that is demonstrated later in this chapter.
Note Handling a child fault is one of the scenarios that is demonstrated later in this chapter.
Handling Bookmarks
You have already seen bookmarks used as a communication mechanism between the host application and a workflow instance. Bookmarks can also be used for communication between activities within the same workflow. When used in this way, the bookmark is created by the parent activity and resumed by one or more child activities.
A bookmark that is designed to be resumed by a child activity is created using the CreateBookmark method of the activity context. This is the same method used to create the bookmarks that you saw in earlier chapters. However, by default, the creation of a bookmark blocks further execution of the activity that created it. Execution normally continues when the bookmark has been resumed. This default behavior may not be appropriate when you are using bookmarks between a parent and child.
To remedy this, you can optionally specify a BookmarkOptions value when you create a bookmark. This enum specifies several values that may be combined when you create a bookmark. Here are the possible values for the BookmarkOptions enum:
None. This is the default if no options are specified. This creates a blocking bookmark that can be resumed only once.MultipleResume. This option creates a bookmark that can be resumed multiple times.NonBlocking. This option creates a nonblocking bookmark. When a bookmark of this type is created, execution of the activity that created the bookmark is not blocked and can complete without the bookmark ever being resumed.
![]() Note You will implement an example that uses these bookmark options later in the chapter.
Note You will implement an example that uses these bookmark options later in the chapter.
Handling a Cancellation Request
Cancellation is a request for a graceful shutdown. It doesn’t mean that you must immediately abandon all work that you have already completed. It does mean that further execution of the activity (and its children) should cease in a controlled way as soon as possible. All activities should gracefully handle a cancellation request, but this is especially important for activities that schedule execution of one or more children. It is the responsibility of the parent activity to pass the cancellation request downstream to any children that are executing or are scheduled and waiting to be executed.
An activity is notified of a cancellation request by the virtual Cancel method. The base implementation of this method cancels all children that have been scheduled. You should override this method and provide your own implementation if you want to fine-tune the cancellation logic. For example, you may need to individually cancel your children in a particular controlled sequence. Or you may use the cancellation request as an opportunity to save any partially completed work.
To cancel a child, you can call one of these methods of the NativeActivityContext object:
CancelChild. Cancels a single child (identified by anActivityInstanceobject)CancelChildren. Cancels all children that you have scheduled and either executing or waiting to be executed
Reacting to Abort and Terminate
An activity is notified that it has been aborted by a call to the virtual Abort method of the base class. The default behavior of the base class also notifies any children. You can override this method if you need to provide your own implementation. But in general, the default implementation should be sufficient. The Abort method is passed a special NativeActivityAbortContext object. This class includes an additional Reason property (an Exception) that identifies the reason that the activity is being aborted.
If you need to manually abort the execution of a child, you can invoke the AbortChildInstance method of the NativeActivityContext object.
The Abort method is invoked when the entire workflow (or just the single activity) is aborted or terminated. There is a subtle difference between the two requests, but in both cases, execution should immediately cease. If a workflow or activity is terminated, it is left in the faulted state, and it cannot be resumed. On the other hand, if it is aborted, it can be resumed from the last persistence point (if one exists).
Scheduling a Single Child
In this first example, you will develop a relatively simple custom activity that schedules the execution of a single child activity. You will need to complete these tasks for this example:
- Implement a custom activity.
- Implement a custom designer for the activity.
- Declare a workflow to test the activity.
- Implement a test application to execute the workflow.
Implementing the Custom Activity
Create a new project using the Workflow Activity Library project template. Name the project ActivityLibrary, and add it to a new solution that is named for this chapter. This project will be used for all the custom activities and most of the test workflows that you develop in this chapter. You can delete the Activity1.xaml file that is created along with the new project since it won’t be used.
At this time, you should also create another new project using the Workflow Activity Designer project template. Name this project ActivityLibrary.Design. To test the custom activities that support one or more children, you need to be able to add the children. To accomplish that using the workflow designer, each custom activity will need to use a custom activity designer. Delete the ActivityDesigner1.xaml file since it is not needed.
Add these assembly and project references to the ActivityLibrary project:
- ActivityLibrary.Design (project reference)
- PresentationCore
- PresentationFramework
- System.Activities.Presentation
- WindowsBase
Add a new Code Activity to the ActivityLibrary project, and name it MySimpleParent. The only real purpose of this activity is to schedule execution of a single child activity. As such, it doesn’t really add any value, but it does demonstrate the code that you need to schedule a execution of a child. Here is the complete code for the MySimpleParent activity:
using System;

using System.Activities;

using System.ComponentModel;


namespace ActivityLibrary

{
The new activity derives from the NativeActivity class since this is the only base activity class that allows you to schedule the execution of other activities. I’ve also included the Designer attribute that specifies the custom activity designer to be used for this activity. Since you haven’t implemented the designer yet (that’s in the next step), the code won’t build at this point.
    [Designer(typeof(ActivityLibrary.Design.MySimpleParentDesigner))]

    public class MySimpleParent : NativeActivity

    {
The activity supports a single public activity named Body. This property represents the child activity that will be scheduled for execution. Note that I included the Browsable attribute with a value of false for this property. This removes the property from the Properties window since the custom designer will provide a way to drag and drop the child activity.
In this particular case, you could have relied upon the automatic behavior of the base CacheMetadata method. Since the Body property is public and is typed as an Activity, the automatic detection logic would have added this property to the metadata. But I instead provided an override for the CacheMetadata method to demonstrate how to add the metadata for this child yourself. In general, you should configure the metadata yourself since you are intimately aware of how each member and property will be used.
I’ve also included code to write to the console each time one of these methods is executed. This will help you to better understand when each method is executed during the lifetime of the activity.
        [Browsable(false)]

        public Activity Body { get; set; }


        protected override void CacheMetadata(NativeActivityMetadata metadata)

        {

            Console.WriteLine("CacheMetadata");

            metadata.AddChild(Body);

        }
The real work of the activity takes place in the Execute method. The ScheduleActivity method of the activity context is executed to schedule execution of the activity that was assigned to the Body property. I’ve specified that the OnComplete method should be executed when the child activity completes execution. In this example, the OnComplete method displays only the fact that the child has completed along with the state of the completed activity.
        protected override void Execute(NativeActivityContext context)

        {

            Console.WriteLine("Execute Scheduled Body");

            ActivityInstance instance =

                context.ScheduleActivity(Body, OnComplete);

            Console.WriteLine("Execute: ID: {0}, State: {1}",

                instance.Id, instance.State);

        }


        private void OnComplete(NativeActivityContext context,

            ActivityInstance completedInstance)

        {

            Console.WriteLine("OnComplete: State:{0}, IsCompleted:{1}",

                completedInstance.State, completedInstance.IsCompleted);

        }
The code includes an override of the Cancel and Abort methods. The override code writes a message to the console to let you know when these methods have been invoked. The Cancel method uses the CancelChildren method of the activity context to cancel its single child. The Abort method executes the default logic by invoking the base version of Abort.
        protected override void Cancel(NativeActivityContext context)

        {

            Console.WriteLine("Cancel");

            context.CancelChildren();

        }
        protected override void Abort(NativeActivityAbortContext context)

        {

            base.Abort(context);

            Console.WriteLine("Abort: Reason: {0}", context.Reason.Message);

        }

    }

}
Implementing the Activity Designer
Add a new Activity Designer to the ActivityLibrary.Design project, and name it MySimpleParentDesigner. This designer allows you to drag and drop a single child activity onto the MySimpleParent activity. Here is the complete markup for this designer:
<sap:ActivityDesigner x:Class="ActivityLibrary.Design.MySimpleParentDesigner"

    xmlns:s="clr-namespace:System;assembly=mscorlib"

    xmlns="http://schemas.microsoft.com/winfx/2006/xaml/presentation"

    xmlns:x="http://schemas.microsoft.com/winfx/2006/xaml"

    xmlns:sap="clr-namespace:System.Activities.Presentation;

        assembly=System.Activities.Presentation"

    xmlns:sapv="clr-namespace:System.Activities.Presentation.View;

        assembly=System.Activities.Presentation"

    xmlns:sapc="clr-namespace:System.Activities.Presentation.Converters;

        assembly=System.Activities.Presentation"

    Collapsible="False" >

    <StackPanel>

        <Border Margin="5"

            MinHeight="40" BorderBrush="LightGray"  BorderThickness="1" >

            <sap:WorkflowItemPresenter HintText="Drop an activity here"

                Item="{Binding Path=ModelItem.Body, Mode=TwoWay}" />

        </Border>

    </StackPanel>

</sap:ActivityDesigner>
![]() Note As was the case when you first encountered custom activity designers in Chapter 15, each namespace in the designer markup must be entered on a single line. Because the length of many of these namespaces exceeds the maximum width allowed for this book, I’ve arbitrarily split the namespaces into multiple lines. When you enter them, make sure that the entire namespace is entered on a single line. This applies to all the designer markup shown in this chapter.
Note As was the case when you first encountered custom activity designers in Chapter 15, each namespace in the designer markup must be entered on a single line. Because the length of many of these namespaces exceeds the maximum width allowed for this book, I’ve arbitrarily split the namespaces into multiple lines. When you enter them, make sure that the entire namespace is entered on a single line. This applies to all the designer markup shown in this chapter.
Please refer to Chapter 15 for more details on creating your own custom activity designers.
Rebuild the solution to ensure that the activity and its custom designer build correctly. This also adds the custom activity to the Visual Studio Toolbox.
Declaring a Test Workflow
To test the MySimpleParent activity, you will declare a simple test workflow. Add a new Activity to the ActivityLibrary project, and name it MySimpleParentTest. Please follow these steps to declare this workflow:
- Add a
Sequenceactivity as the root of the workflow. This particular example doesn’t really require this activity. But in subsequent examples, theSequenceactivity is used to provide scope for any variables that might be used in the workflow. So, you should get in the habit of adding theSequenceas the root activity for these examples.- Add an instance of the
MySimpleParentactivity to theSequenceactivity.- Add a
Sequenceactivity as the single child ofMySimpleParent.- Add a set of three
WriteLineactivities to theSequenceactivity that you just added (the child of theMySimpleParentactivity). Set theTextproperty of theWriteLineactivities to"one","two", and"three", respectively.- Add a
Delayactivity between the"one"and"two"WriteLineactivities. Set theDelay.Durationproperty toTimeSpan.FromSeconds(1)to add a one-second delay. ADelayis introduced into this workflow to demonstrate what happens when you cancel, terminate, or abort the workflow. Without theDelayactivity, the workflow would likely complete before the host application has a chance to interact with it.
You can see the completed workflow in Figure 16-1.
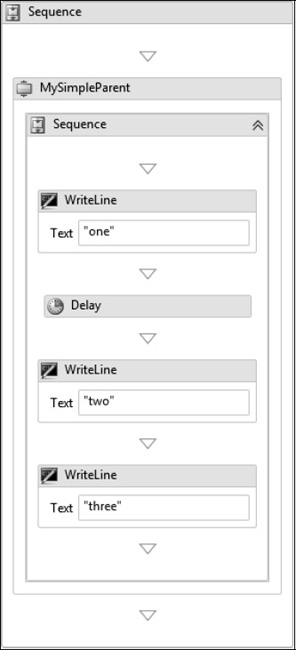
Figure 16-1. MySimpleParentTest workflow
Implementing a Test Application
To execute the MySimpleParentTest workflow, create a new Workflow Console application project named TestApplication. Add this new project to the same solution as the other projects for this chapter. Delete the Workflow1.xaml file since it won’t be used. Add these references to the project:
- ActivityLibrary
- ActivityLibrary.Design
The goal of this project is to execute the MySimpleParentTest a total of four times to test several different situations. First it will execute the workflow normally to full completion. Then it will execute the workflow again, but it will call the Cancel method of the WorkflowApplication class to request cancellation after a short pause. The third test calls the Abort method, and the final test calls Terminate.
Here is the code for the Program.cs file to execute these tests:
using System;

using System.Activities;

using System.Threading;

using ActivityLibrary;


namespace TestApplication

{

    class Program

    {

        static void Main(string[] args)

        {

            try

            {

                RunActivity(new MySimpleParentTest());


                Console.WriteLine("Press any key to exit");

                Console.ReadKey();

            }

            catch (Exception exception)

            {

                Console.WriteLine(

                    "caught unhandled exception: {0}", exception.Message);

            }

        }


        private static void RunActivity(Activity activity)

        {

            RunActivity(activity, TestType.Normal);

            RunActivity(activity, TestType.Cancel);

            RunActivity(activity, TestType.Abort);

            RunActivity(activity, TestType.Terminate);

        }
        private static void RunActivity(Activity activity, TestType testType)

        {

            Console.WriteLine("
{0} {1}", activity.DisplayName, testType);


            AutoResetEvent waitEvent = new AutoResetEvent(false);

            WorkflowApplication wfApp = new WorkflowApplication(activity);

            wfApp.Completed = (e) =>

            {

                Console.WriteLine("WorkflowApplication.Completed");

                waitEvent.Set();

            };


            wfApp.Aborted = (e) =>

            {

                Console.WriteLine("WorkflowApplication.Aborted");

                waitEvent.Set();

            };


            wfApp.OnUnhandledException = (e) =>

            {

                Console.WriteLine("WorkflowApplication.OnUnhandledException: {0}",

                    e.UnhandledException.Message);

                return UnhandledExceptionAction.Cancel;

            };


            wfApp.Run();


            switch (testType)

            {

                case TestType.Cancel:

                    Thread.Sleep(100);

                    wfApp.Cancel();

                    break;


                case TestType.Abort:

                    Thread.Sleep(100);

                    wfApp.Abort("Abort was called");

                    break;


                case TestType.Terminate:

                    Thread.Sleep(100);

                    wfApp.Terminate("Terminate was called");

                    break;

                default:

                    break;

            }


            waitEvent.WaitOne(TimeSpan.FromSeconds(60));

        }
        private enum TestType

        {

            Normal,

            Cancel,

            Abort,

            Terminate

        }

    }

}
![]() Note This test application will also be used to test other examples in this chapter. The only change necessary for these other tests is to change the name of the workflow that is constructed and passed to the
Note This test application will also be used to test other examples in this chapter. The only change necessary for these other tests is to change the name of the workflow that is constructed and passed to the RunActivity method.
Testing the Activity
After building the solution, you should be able to run the TestApplication project. Here are my test results:
MySimpleParentTest Normal


CacheMetadata


Execute Scheduled Body


Execute: ID: 4, State: Executing


one


two


three


OnComplete: State:Closed, IsCompleted:True


WorkflowApplication.Completed


MySimpleParentTest Cancel


Execute Scheduled Body


Execute: ID: 4, State: Executing


one


Cancel


OnComplete: State:Canceled, IsCompleted:True


WorkflowApplication.Completed
MySimpleParentTest Abort


Execute Scheduled Body


Execute: ID: 4, State: Executing


one


Abort: Reason: Abort was called


WorkflowApplication.Aborted


MySimpleParentTest Terminate


Execute Scheduled Body


Execute: ID: 4, State: Executing


one


Abort: Reason: Terminate was called


WorkflowApplication.Completed


Press any key to exit
Notice that the CacheMetadata method is executed only once. This is the case since the code creates only a single instance of the MySimpleParentTest workflow and executes it four times. The normal test produced the expected results, with all three of the WriteLine activities being executed. The Cancel, Abort, and Terminate tests resulted in only the first WriteLine activity being executed. This is the correct behavior since the workflow was canceled (or aborted or terminated) while the Delay activity was executing. After the Delay completed its work, the requested action to stop execution was processed.
In this example, the child of the MySimpleParent activity is actually a Sequence activity. So, the request to cease processing was passed down from the MySimpleParent activity to the Sequence activity, who in turn passed it to its children.
Repeating Execution of a Single Child
This example is similar to the previous one, but it introduces a few new features. First, the activity supports a new Condition property. This property represents a Boolean condition that must be true in order to execute the child activity. Second, the single child activity is executed repeatedly while the Condition property evaluates to true. This means that the Condition must be executed prior to starting each iteration of the child activity.
You will need to complete these tasks for this example:
- Implement a custom activity.
- Implement a designer for the activity.
- Declare a test workflow.
Implementing the Custom Activity
Add a new Code Activity to the ActivityLibrary project, and name it MyWhile (in honor of the standard While activity). Here is the complete implementation of this activity:
using System;

using System.Activities;

using System.ComponentModel;


namespace ActivityLibrary

{

    [Designer(typeof(ActivityLibrary.Design.MyWhileDesigner))]

    public class MyWhile : NativeActivity

    {
This activity has a Body property that represents the child activity to be executed. A Condition property is also included, which represents the Boolean condition to be evaluated before the Body activity is scheduled for execution. Note that the Condition property is defined as Activity<Boolean>. This is necessary since the Condition activity will be scheduled for execution just like any other activity. The Boolean result from the activity is used to determine whether or not the Body activity should be executed.
The Body and Condition activities are both added to the metadata as children.
        [Browsable(false)]

        public Activity Body { get; set; }

        [RequiredArgument]

        public Activity<Boolean> Condition { get; set; }


        protected override void CacheMetadata(NativeActivityMetadata metadata)

        {

            Console.WriteLine("CacheMetadata");

            metadata.AddChild(Body);

            metadata.AddChild(Condition);

        }
The first order of business in the Execute method is to schedule execution of the Condition. The execution pattern that this code implements checks the condition before executing the Body. The OnConditionComplete callback will be invoked when the Condition activity completes.
        protected override void Execute(NativeActivityContext context)

        {

            if (Condition != null)

            {

                Console.WriteLine("Execute Scheduled Condition");

                context.ScheduleActivity<Boolean>(Condition, OnConditionComplete);

            }

        }
The OnConditionComplete callback is executed when the Condition activity has completed. The Boolean result of the activity is checked to determine whether the Body activity should be scheduled. If the result is false, then the work of this activity is complete. If the value is true, the Body is scheduled for execution. Note that a different completion callback delegate is specified (OnComplete), along with a method to call if an unhandled exception occurs.
Also note that the IsCancellationRequested property of the context is checked before scheduling the Body. Since this activity is designed to repeatedly execute a child activity, this behavior must be short-circuited if cancellation has been requested.
        private void OnConditionComplete(NativeActivityContext context,

            ActivityInstance completedInstance, Boolean result)

        {

            Console.WriteLine(

                "OnConditionComplete: State:{0}, IsCompleted:{1}: Result:{2}",

                completedInstance.State, completedInstance.IsCompleted, result);

            if (!context.IsCancellationRequested)

            {

                if (result && (Body != null))

                {

                    Console.WriteLine("OnConditionComplete Scheduled Body");

                    context.ScheduleActivity(Body, OnComplete, OnFaulted);

                }

            }

        }
The OnComplete method is executed each time the Body activity completes. If the activity has not been canceled, the Condition activity is once again executed. After all, the assumption is that the Condition will eventually evaluate to false in order to stop the execution and complete this activity.
        private void OnComplete(NativeActivityContext context,

            ActivityInstance completedInstance)

        {

            Console.WriteLine("OnComplete: State:{0}, IsCompleted:{1}",

                completedInstance.State, completedInstance.IsCompleted);

            if (!context.IsCancellationRequested)

            {

                if (Condition != null)

                {

                    Console.WriteLine("OnComplete Scheduled Condition");

                    context.ScheduleActivity<Boolean>(

                        Condition, OnConditionComplete, OnFaulted);

                }

            }

        }
For this example, the OnFaulted method simply writes a message to the console. In a subsequent example, you will enhance this method to handle an unhandled exception that was generated by the child activity. The Cancel and Abort methods are similar to the previous example.
        private void OnFaulted(NativeActivityFaultContext faultContext,

            Exception propagatedException, ActivityInstance propagatedFrom)

        {

            Console.WriteLine("OnFaulted: {0}", propagatedException.Message);

        }
        protected override void Cancel(NativeActivityContext context)

        {

            Console.WriteLine("Cancel");

            if (context.IsCancellationRequested)

            {

                Console.WriteLine("IsCancellationRequested");

                context.CancelChildren();

            }

        }


        protected override void Abort(NativeActivityAbortContext context)

        {

            base.Abort(context);

            Console.WriteLine("Abort Reason: {0}", context.Reason.Message);

        }


    }

}
Implementing the Activity Designer
Add a new Activity Designer to the ActivityLibrary.Design project, and name it MyWhileDesigner. Here is the complete markup for this custom designer:
<sap:ActivityDesigner x:Class="ActivityLibrary.Design.MyWhileDesigner"

    xmlns:s="clr-namespace:System;assembly=mscorlib"

    xmlns="http://schemas.microsoft.com/winfx/2006/xaml/presentation"

    xmlns:x="http://schemas.microsoft.com/winfx/2006/xaml"

    xmlns:sap="clr-namespace:System.Activities.Presentation;

        assembly=System.Activities.Presentation"

    xmlns:sapv="clr-namespace:System.Activities.Presentation.View;

        assembly=System.Activities.Presentation"

    xmlns:sapc="clr-namespace:System.Activities.Presentation.Converters;

        assembly=System.Activities.Presentation"

    Collapsible="False" >


    <Grid>

        <Grid.ColumnDefinitions>

            <ColumnDefinition />

            <ColumnDefinition />

        </Grid.ColumnDefinitions>

        <Grid.RowDefinitions>

            <RowDefinition />

            <RowDefinition />

        </Grid.RowDefinitions>
        <TextBlock Text="Condition" Grid.Row ="0" Grid.Column="0"

            HorizontalAlignment="Left" VerticalAlignment="Center" />


        <sapv:ExpressionTextBox HintText="Enter a condition"

            Grid.Row ="0" Grid.Column="1" MaxWidth="150" MinWidth="150" Margin="5"

            OwnerActivity="{Binding Path=ModelItem}"

            ExpressionType="{x:Type TypeName=s:Boolean}"

            Expression="{Binding Path=ModelItem.Condition, Mode=TwoWay}" />


        <Border Grid.Row ="1" Grid.Column="0" Grid.ColumnSpan="2" Margin="5"

            MinHeight="40" BorderBrush="LightGray"  BorderThickness="1" >

            <sap:WorkflowItemPresenter HintText="Drop an activity here"

                Item="{Binding Path=ModelItem.Body, Mode=TwoWay}" />

        </Border>


    </Grid>

</sap:ActivityDesigner>
You should rebuild the solution before proceeding with the next step.
Declaring a Test Workflow
Add a new Activity to the ActivityLibrary project, and name it MyWhileTest. This workflow will be used to test the MyWhile custom activity. Please follow these steps to declare the test workflow:
- Add a
Sequenceactivity as the root of the workflow.- Add an
Int32variable namedcountthat is scoped by theSequenceactivity.- Add an instance of the
MyWhileactivity as a child of theSequenceactivity. Set theConditionproperty tocount < 3.- Add another
Sequenceactivity as the only child of theMyWhileactivity.- Add an
Assignactivity as a child of the lastSequencethat you added (the child of theMyWhileactivity). Set theAssign.Toproperty tocountand theAssign.Valueproperty tocount + 1.- Add a
WriteLineactivity below theAssignactivity. Set theWriteLine.Textproperty toString.Format("Count = {0}", count).- Add a
Delayactivity after theWriteLineactivity. Set theDelay.Durationproperty toTimeSpan.FromSeconds(1).
Figure 16-2 shows the completed MyWhileTest workflow.
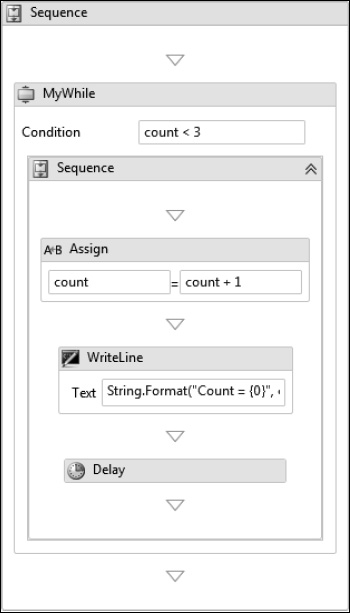
Figure 16-2. MyWhileTest workflow
Testing the Activity
You can use the same TestApplication project that you used in the previous example to also test this new workflow. To do this, you need to make one small change to the Program.cs file in the TestApplciation project. Change the type of the workflow that is created and passed to the RunActivity method to MyWhileTest like this:
RunActivity(new MyWhileTest());
After building the solution, you should be able to run the TestApplication project. Here are my results:
MyWhileTest Normal


CacheMetadata


Execute Scheduled Condition


OnConditionComplete: State:Closed, IsCompleted:True: Result:True


OnConditionComplete Scheduled Body


Count = 1


OnComplete: State:Closed, IsCompleted:True


OnComplete Scheduled Condition


OnConditionComplete: State:Closed, IsCompleted:True: Result:True


OnConditionComplete Scheduled Body


Count = 2


OnComplete: State:Closed, IsCompleted:True


OnComplete Scheduled Condition


OnConditionComplete: State:Closed, IsCompleted:True: Result:True


OnConditionComplete Scheduled Body


Count = 3


OnComplete: State:Closed, IsCompleted:True


OnComplete Scheduled Condition


OnConditionComplete: State:Closed, IsCompleted:True: Result:False


WorkflowApplication.Completed


MyWhileTest Cancel


Execute Scheduled Condition


OnConditionComplete: State:Closed, IsCompleted:True: Result:True


OnConditionComplete Scheduled Body


Count = 1


Cancel


IsCancellationRequested


OnComplete: State:Canceled, IsCompleted:True


WorkflowApplication.Completed
MyWhileTest Abort


Execute Scheduled Condition


OnConditionComplete: State:Closed, IsCompleted:True: Result:True


OnConditionComplete Scheduled Body


Count = 1


Abort Reason: Abort was called


WorkflowApplication.Aborted


MyWhileTest Terminate


Execute Scheduled Condition


OnConditionComplete: State:Closed, IsCompleted:True: Result:True


OnConditionComplete Scheduled Body


Count = 1


Abort Reason: Terminate was called


WorkflowApplication.Completed


Press any key to exit
Handling Exceptions
One of the options available to a parent activity is to handle any unhandled exceptions from its children. This is not a requirement, but it is an option if you would prefer to handle the exception rather than allowing it to rise up the activity stack unhandled.
To demonstrate how a parent activity can handle an exception, you can make a small change to the MyWhile activity that you developed in the previous example.
Throwing an Exception
Before you handle the exception, you should first experience the default behavior when an exception is thrown by a child activity. Open the MyWhileTest workflow in the designer, and add a Throw activity after the existing Delay activity. Set the Throw.Exception property to New NullReferenceException("Exception was thrown"). Figure 16-3 shows the revised MyWhileTest workflow.
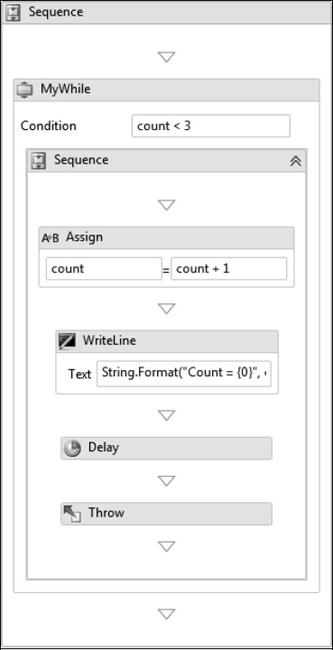
Figure 16-3. MyWhileTest workflow with Throw activity
Rebuild the solution, and run the TestApplication project to see the results when an exception is thrown by a child activity. Here are my results:
MyWhileTest Normal


CacheMetadata


Execute Scheduled Condition


OnConditionComplete: State:Closed, IsCompleted:True: Result:True


OnConditionComplete Scheduled Body


Count = 1


OnFaulted: Exception was thrown


WorkflowApplication.OnUnhandledException: Exception was thrown


Cancel


IsCancellationRequested


OnComplete: State:Canceled, IsCompleted:True


WorkflowApplication.Completed


MyWhileTest Cancel


Execute Scheduled Condition


OnConditionComplete: State:Closed, IsCompleted:True: Result:True


OnConditionComplete Scheduled Body


Count = 1


Cancel


IsCancellationRequested


OnComplete: State:Canceled, IsCompleted:True


WorkflowApplication.Completed


MyWhileTest Abort


Execute Scheduled Condition


OnConditionComplete: State:Closed, IsCompleted:True: Result:True


OnConditionComplete Scheduled Body


Count = 1


Abort Reason: Abort was called


WorkflowApplication.Aborted
MyWhileTest Terminate


Execute Scheduled Condition


OnConditionComplete: State:Closed, IsCompleted:True: Result:True


OnConditionComplete Scheduled Body


Count = 1


Abort Reason: Terminate was called


WorkflowApplication.Completed


Press any key to exit
As expected, execution of the workflow stopped at the end of the first iteration when the exception was thrown.
Handling the Exception
To handle the exception in the parent MyWhile activity, make a small addition to the OnFaulted method:
        private void OnFaulted(NativeActivityFaultContext faultContext,

            Exception propagatedException, ActivityInstance propagatedFrom)

        {

            Console.WriteLine("OnFaulted: {0}", propagatedException.Message);


            faultContext.HandleFault();

            faultContext.CancelChild(propagatedFrom);

            Console.WriteLine("OnFaulted: Exception was handled");

        }
The call to the HandleFault method handles the fault and prevents it from being passed up the activity tree as an unhandled exception. After handling the fault, the child activity that caused the fault is canceled.
Rebuild the solution, and rerun the TestApplication project. You should now see these revised results, indicating that the unhandled fault has now been handled. Since the exception is now handled, the parent activity was never canceled:
MyWhileTest Normal


CacheMetadata


Execute Scheduled Condition


OnConditionComplete: State:Closed, IsCompleted:True: Result:True


OnConditionComplete Scheduled Body


Count = 1


OnFaulted: Exception was thrown
OnFaulted: Exception was handled


OnComplete: State:Canceled, IsCompleted:True


OnComplete Scheduled Condition


OnConditionComplete: State:Closed, IsCompleted:True: Result:True


OnConditionComplete Scheduled Body


Count = 2


OnFaulted: Exception was thrown


OnFaulted: Exception was handled


OnComplete: State:Canceled, IsCompleted:True


OnComplete Scheduled Condition


OnConditionComplete: State:Closed, IsCompleted:True: Result:True


OnConditionComplete Scheduled Body


Count = 3


OnFaulted: Exception was thrown


OnFaulted: Exception was handled


OnComplete: State:Canceled, IsCompleted:True


OnComplete Scheduled Condition


OnConditionComplete: State:Closed, IsCompleted:True: Result:False


WorkflowApplication.Completed


MyWhileTest Cancel


Execute Scheduled Condition


OnConditionComplete: State:Closed, IsCompleted:True: Result:True


OnConditionComplete Scheduled Body


Count = 1


Cancel


IsCancellationRequested


OnComplete: State:Canceled, IsCompleted:True


WorkflowApplication.Completed


MyWhileTest Abort


Execute Scheduled Condition
OnConditionComplete: State:Closed, IsCompleted:True: Result:True


OnConditionComplete Scheduled Body


Count = 1


Abort Reason: Abort was called


WorkflowApplication.Aborted


MyWhileTest Terminate


Execute Scheduled Condition


OnConditionComplete: State:Closed, IsCompleted:True: Result:True


OnConditionComplete Scheduled Body


Count = 1


Abort Reason: Terminate was called


WorkflowApplication.Completed


Press any key to exit
Scheduling Multiple Children
Another common scenario is to schedule multiple child activities, instead of a single one. In this example, you will implement a custom activity that accomplishes this. The custom activity will support multiple child activities and will execute each of them just once in sequence. Prior to scheduling the execution of each child, a Condition property is checked to determine whether execution should continue.
Implementing the Custom Activity
Add a new Code Activity to the ActivityLibrary project, and name it MySequence. Here is the code for this activity:
using System;

using System.Activities;

using System.Collections.ObjectModel;

using System.ComponentModel;


namespace ActivityLibrary

{

    [Designer(typeof(ActivityLibrary.Design.MySequenceDesigner))]

    public class MySequence : NativeActivity

    {
This class includes an Activities property to support multiple child activities. In addition to this, a Condition property is also included, which is used to determine whether each child activity is executed. This class also uses a private variable to track the index to the next child activity to be scheduled.
        [Browsable(false)]

        public Collection<Activity> Activities { get; set; }

        [RequiredArgument]

        public Activity<Boolean> Condition { get; set; }


        private Variable<Int32> activityIndex =

            new Variable<int>("ActivityIndex", 0);


        public MySequence()

        {

            Activities = new Collection<Activity>();

        }
The CacheMetadata method is similar to what you have already seen in previous examples. However, since you are working with a collection of child activities, the SetChildrenCollection method is invoked to set the Activities collection as the collection of child activities. In addition, the AddImplementationVariable method is used to add the private variable to the metadata. Using this method indicates that this variable is an implementation detail that the activity will use during its execution. I could have used a CLR type for the index instead of a variable. But using a workflow variable is the preferred approach since it is then managed by the workflow runtime (made part of the activity context) and properly scoped for a single execution of this activity.
        protected override void CacheMetadata(NativeActivityMetadata metadata)

        {

            Console.WriteLine("CacheMetadata");

            metadata.SetChildrenCollection(Activities);

            metadata.AddChild(Condition);

            metadata.AddImplementationVariable(activityIndex);

        }
The Execute method begins by executing the Condition activity. The Boolean result from this activity is checked in the OnConditionComplete callback method.
        protected override void Execute(NativeActivityContext context)

        {

            if (Condition != null)

            {

                Console.WriteLine("Execute Scheduled Condition");

                context.ScheduleActivity<Boolean>(Condition, OnConditionComplete);

            }

        }
The OnConditionComplete method is executed when the Condition activity has completed. If the result of the Condition is false, no further process takes place, and the work of this activity is complete. The activityIndex variable is used to track the index of the next child activity to execute. If there are activities in the collection that are yet to be executed, the next child activity in the collection is scheduled, and the index is incremented.
        private void OnConditionComplete(NativeActivityContext context,

            ActivityInstance completedInstance, Boolean result)

        {

            Console.WriteLine(

                "OnConditionComplete:  State:{0}, IsCompleted:{1}: Result:{2}",

                completedInstance.State, completedInstance.IsCompleted, result);

            if (!context.IsCancellationRequested)

            {

                if (result)

                {

                    Int32 index = activityIndex.Get(context);

                    if (index < Activities.Count)

                    {

                        Console.WriteLine(

                            "OnConditionComplete Scheduled activity: {0}",

                                Activities[index].DisplayName);

                        context.ScheduleActivity(

                            Activities[index], OnComplete, OnFaulted);

                        index++;

                        activityIndex.Set(context, index);

                    }

                }

            }

        }


        private void OnComplete(NativeActivityContext context,

            ActivityInstance completedInstance)

        {

            Console.WriteLine("OnComplete:  State:{0}, IsCompleted:{1}",

                completedInstance.State, completedInstance.IsCompleted);

            if (!context.IsCancellationRequested)

            {

                if (Condition != null)

                {

                    Console.WriteLine("OnComplete Scheduled Condition");

                    context.ScheduleActivity<Boolean>(

                        Condition, OnConditionComplete, OnFaulted);

                }

            }

        }


        private void OnFaulted(NativeActivityFaultContext faultContext,

            Exception propagatedException, ActivityInstance propagatedFrom)

        {

            Console.WriteLine("OnFaulted: {0}", propagatedException.Message);

        }
        protected override void Cancel(NativeActivityContext context)

        {

            Console.WriteLine("Cancel");

            if (context.IsCancellationRequested)

            {

                Console.WriteLine("IsCancellationRequested");

                context.CancelChildren();

            }

        }


        protected override void Abort(NativeActivityAbortContext context)

        {

            base.Abort(context);

            Console.WriteLine("Abort Reason: {0}", context.Reason.Message);

        }

    }

}
Implementing the Activity Designer
Add a new Activity Designer to the ActivityLibrary.Design project, and name it MySequenceDesigner. Here is the markup for this designer:
<sap:ActivityDesigner x:Class="ActivityLibrary.Design.MySequenceDesigner"

    xmlns:s="clr-namespace:System;assembly=mscorlib"

    xmlns="http://schemas.microsoft.com/winfx/2006/xaml/presentation"

    xmlns:x="http://schemas.microsoft.com/winfx/2006/xaml"

    xmlns:sap="clr-namespace:System.Activities.Presentation;

        assembly=System.Activities.Presentation"

    xmlns:sapv="clr-namespace:System.Activities.Presentation.View;

        assembly=System.Activities.Presentation"

    xmlns:sapc="clr-namespace:System.Activities.Presentation.Converters;

        assembly=System.Activities.Presentation"

    Collapsible="True" >


    <sap:ActivityDesigner.Resources>

        <DataTemplate x:Key="ShowAsCollapsed">

            <TextBlock Foreground="Gray">

                <TextBlock.Text>

                    <MultiBinding StringFormat="Expand for {0} Activities">

                        <Binding Path="ModelItem.Activities.Count" />

                    </MultiBinding>

                </TextBlock.Text>

            </TextBlock>

        </DataTemplate>

        <DataTemplate x:Key="ShowAsExpanded">

            <Grid>

                <Grid.ColumnDefinitions>

                    <ColumnDefinition />

                    <ColumnDefinition />

                </Grid.ColumnDefinitions>
                <Grid.RowDefinitions>

                    <RowDefinition />

                    <RowDefinition />

                </Grid.RowDefinitions>


                <TextBlock Text="Condition" Grid.Row ="0" Grid.Column="0"

                HorizontalAlignment="Left" VerticalAlignment="Center" />

                <sapv:ExpressionTextBox HintText="Enter a condition"

                Grid.Row ="0" Grid.Column="1"

                MaxWidth="150" MinWidth="150" Margin="5"

                OwnerActivity="{Binding Path=ModelItem}"

                ExpressionType="{x:Type TypeName=s:Boolean}"

                Expression="{Binding Path=ModelItem.Condition, Mode=TwoWay}" />


                <sap:WorkflowItemsPresenter HintText="Drop activities here"

                Grid.Row ="1" Grid.Column="0" Grid.ColumnSpan="2"

                Margin="5" MinHeight="100"

                Items="{Binding Path=ModelItem.Activities}">

                    <sap:WorkflowItemsPresenter.SpacerTemplate>

                        <DataTemplate>

                            <Rectangle Width="140" Height="3"

                            Fill="LightGray" Margin="7" />

                        </DataTemplate>

                    </sap:WorkflowItemsPresenter.SpacerTemplate>

                    <sap:WorkflowItemsPresenter.ItemsPanel>

                        <ItemsPanelTemplate>

                            <StackPanel Orientation="Vertical" />

                        </ItemsPanelTemplate>

                    </sap:WorkflowItemsPresenter.ItemsPanel>

                </sap:WorkflowItemsPresenter>

            </Grid>

        </DataTemplate>

        <Style x:Key="StyleWithCollapse" TargetType="{x:Type ContentPresenter}">

            <Setter Property="ContentTemplate"

                Value="{DynamicResource ShowAsExpanded}"/>

            <Style.Triggers>

                <DataTrigger Binding="{Binding Path=ShowExpanded}" Value="False">

                    <Setter Property="ContentTemplate"

                        Value="{DynamicResource ShowAsCollapsed}"/>

                </DataTrigger>

            </Style.Triggers>

        </Style>

    </sap:ActivityDesigner.Resources>

    <Grid>

        <ContentPresenter Style="{DynamicResource StyleWithCollapse}"

            Content="{Binding}"/>

    </Grid>


</sap:ActivityDesigner>
Rebuild the solution before proceeding with the next step.
Declaring a Test Workflow
To test the MySequence activity, add a new Activity to the ActivityLibrary project, and name it MySequenceTest. Please follow these steps to declare this workflow:
- Add a
Sequenceactivity as the root of the workflow.- Add an
Int32variable namedcountthat is scoped by theSequenceactivity.- Add an instance of the new
MySequenceactivity as a child of theSequenceactivity. Set theConditionproperty of this activity tocount < 3.- Add three
WriteLineactivities as children of theMySequenceactivity. Set theTextproperty of theWriteLineactivities to"one","two", and"three", respectively.- Add a
Delayactivity below the firstWriteLineactivity. Set theDelay.Durationproperty toTimeSpan.FromSeconds(1).- Add an
Assignactivity after theDelayactivity. Set theAssign.Toproperty tocountand theAssign.Valueproperty to1. TheAssignactivity doesn’t affect the outcome of this first test and really isn’t needed. But in a subsequent test, you will assign a different value to thecountvariable to prematurely end the processing.
Figure 16-4 shows the completed MySequenceTest workflow.
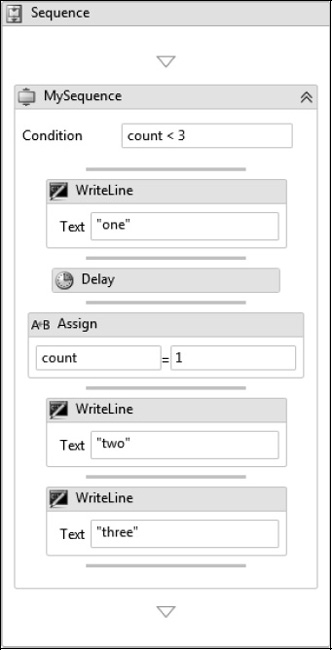
Figure 16-4. MySequenceTest workflow
Testing the Activity
You will once again use the TestApplication project to test this new activity. Modify the Program.cs file (as you did previously) to create an instance of the MySequenceTest workflow for the test. After rebuilding the solution, you can now run the TestApplication.
Your results should show that the condition is first executed and the Boolean result checked. The first WriteLine activity is then scheduled for execution. Following that, the condition is scheduled for execution again, and the result checked. The Delay activity is then scheduled for execution and then completed. This pattern continues until all the child activities have been processed. The abort, cancel, and terminate tests demonstrate that the activity is capable of correctly handling these requests.
Here are my results:
MySequenceTest Normal


CacheMetadata


Execute Scheduled Condition


OnConditionComplete:  State:Closed, IsCompleted:True: Result:True


OnConditionComplete Scheduled activity: WriteLine


one


OnComplete:  State:Closed, IsCompleted:True


OnComplete Scheduled Condition


OnConditionComplete:  State:Closed, IsCompleted:True: Result:True


OnConditionComplete Scheduled activity: Delay


OnComplete:  State:Closed, IsCompleted:True


OnComplete Scheduled Condition


OnConditionComplete:  State:Closed, IsCompleted:True: Result:True


OnConditionComplete Scheduled activity: Assign


OnComplete:  State:Closed, IsCompleted:True


OnComplete Scheduled Condition


OnConditionComplete:  State:Closed, IsCompleted:True: Result:True


OnConditionComplete Scheduled activity: WriteLine


two


OnComplete:  State:Closed, IsCompleted:True


OnComplete Scheduled Condition


OnConditionComplete:  State:Closed, IsCompleted:True: Result:True


OnConditionComplete Scheduled activity: WriteLine


three
OnComplete:  State:Closed, IsCompleted:True


OnComplete Scheduled Condition


OnConditionComplete:  State:Closed, IsCompleted:True: Result:True


WorkflowApplication.Completed


MySequenceTest Cancel


Execute Scheduled Condition


OnConditionComplete:  State:Closed, IsCompleted:True: Result:True


OnConditionComplete Scheduled activity: WriteLine


one


OnComplete:  State:Closed, IsCompleted:True


OnComplete Scheduled Condition


OnConditionComplete:  State:Closed, IsCompleted:True: Result:True


OnConditionComplete Scheduled activity: Delay


Cancel


IsCancellationRequested


OnComplete:  State:Canceled, IsCompleted:True


WorkflowApplication.Completed


MySequenceTest Abort


Execute Scheduled Condition


OnConditionComplete:  State:Closed, IsCompleted:True: Result:True


OnConditionComplete Scheduled activity: WriteLine


one


OnComplete:  State:Closed, IsCompleted:True


OnComplete Scheduled Condition


OnConditionComplete:  State:Closed, IsCompleted:True: Result:True


OnConditionComplete Scheduled activity: Delay


Abort Reason: Abort was called


WorkflowApplication.Aborted
MySequenceTest Terminate


Execute Scheduled Condition


OnConditionComplete:  State:Closed, IsCompleted:True: Result:True


OnConditionComplete Scheduled activity: WriteLine


one


OnComplete:  State:Closed, IsCompleted:True


OnComplete Scheduled Condition


OnConditionComplete:  State:Closed, IsCompleted:True: Result:True


OnConditionComplete Scheduled activity: Delay


Abort Reason: Terminate was called


WorkflowApplication.Completed


Press any key to exit
Testing the Condition Logic
To test the logic that checks the Boolean Condition property, you can make a small modification to the MySequenceTest workflow. Locate the Assign activity, and change the Assign.Value property to a number that is 3 or greater. This should cause the Condition to fail and further processing of child activities to cease.
If you build and run the TestApplication project, you should see these results, indicating that the Condition logic is working correctly:
MySequenceTest Normal


CacheMetadata


Execute Scheduled Condition


OnConditionComplete:  State:Closed, IsCompleted:True: Result:True


OnConditionComplete Scheduled activity: WriteLine


one


OnComplete:  State:Closed, IsCompleted:True


OnComplete Scheduled Condition


OnConditionComplete:  State:Closed, IsCompleted:True: Result:True


OnConditionComplete Scheduled activity: Delay


OnComplete:  State:Closed, IsCompleted:True


OnComplete Scheduled Condition


OnConditionComplete:  State:Closed, IsCompleted:True: Result:True
OnConditionComplete Scheduled activity: Assign


OnComplete:  State:Closed, IsCompleted:True


OnComplete Scheduled Condition


OnConditionComplete:  State:Closed, IsCompleted:True: Result:False


WorkflowApplication.Completed


MySequenceTest Cancel


Execute Scheduled Condition


OnConditionComplete:  State:Closed, IsCompleted:True: Result:True


OnConditionComplete Scheduled activity: WriteLine


one


OnComplete:  State:Closed, IsCompleted:True


OnComplete Scheduled Condition


OnConditionComplete:  State:Closed, IsCompleted:True: Result:True


OnConditionComplete Scheduled activity: Delay


Cancel


IsCancellationRequested


OnComplete:  State:Canceled, IsCompleted:True


WorkflowApplication.Completed


MySequenceTest Abort


Execute Scheduled Condition


OnConditionComplete:  State:Closed, IsCompleted:True: Result:True


OnConditionComplete Scheduled activity: WriteLine


one


OnComplete:  State:Closed, IsCompleted:True


OnComplete Scheduled Condition


OnConditionComplete:  State:Closed, IsCompleted:True: Result:True


OnConditionComplete Scheduled activity: Delay


Abort Reason: Abort was called


WorkflowApplication.Aborted
MySequenceTest Terminate


Execute Scheduled Condition


OnConditionComplete:  State:Closed, IsCompleted:True: Result:True


OnConditionComplete Scheduled activity: WriteLine


one


OnComplete:  State:Closed, IsCompleted:True


OnComplete Scheduled Condition


OnConditionComplete:  State:Closed, IsCompleted:True: Result:True


OnConditionComplete Scheduled activity: Delay


Abort Reason: Terminate was called


WorkflowApplication.Completed


Press any key to exit
Scheduling Parallel Execution
This example demonstrates how to schedule the execution of multiple children so that they can take advantage of parallel workflow processing. Remember that true parallel processing of multiple activities isn’t directly supported by WF. All activities execute on a single thread that is assigned to a workflow instance. But by scheduling all children immediately, other children may be given the opportunity to execute when one of the children becomes idle. This mimics the type of parallel processing that is supported by the standard Parallel activity.
Implementing the Custom Activity
Add a new Code Activity to the ActivityLibrary project, and name it MyParallel. This activity is similar in structure to the MySequence activity from the previous example. However, it differs in the execution pattern that it implements (parallel vs. sequential). It also demonstrates one way to track individual ActivityInstance objects for each scheduled child activity. This isn’t a requirement for this activity, but it does help to identify the activities that have been scheduled and have not yet completed. This is important in an activity such as this one that immediately schedules all children for execution.
Here is the code for this new activity:
using System;

using System.Activities;

using System.Collections.Generic;

using System.Collections.ObjectModel;

using System.ComponentModel;


namespace ActivityLibrary

{
The public interface to this activity is the same as the MySequence activity that you developed in the previous example. For this reason, you can use the same MySequenceDesigner that you developed for the MySequence activity.
In addition to the Activities and Condition properties, this activity also defines a private Variable named scheduledChildren. This is a dictionary of ActivityInstance objects keyed by a string and is used to track the children that have been scheduled but have not yet completed.
    [Designer(typeof(ActivityLibrary.Design.MySequenceDesigner))]

    public class MyParallel : NativeActivity

    {

        [Browsable(false)]

        public Collection<Activity> Activities { get; set; }

        [RequiredArgument]

        public Activity<Boolean> Condition { get; set; }


        private Variable<Dictionary<String, ActivityInstance>> scheduledChildren =

            new Variable<Dictionary<String, ActivityInstance>>();


        public MyParallel()

        {

            Activities = new Collection<Activity>();

        }


        protected override void CacheMetadata(NativeActivityMetadata metadata)

        {

            Console.WriteLine("CacheMetadata");

            if (Activities != null && Activities.Count > 0)

            {

                foreach (Activity activity in Activities)

                {

                    metadata.AddChild(activity);

                }

            }


            metadata.AddChild(Condition);

            metadata.AddImplementationVariable(scheduledChildren);

        }
Following the pattern that you used in previous examples, the Execute method schedules the Condition activity for execution. This activity checks the Boolean Condition only once, before any child activities have been scheduled.
        protected override void Execute(NativeActivityContext context)

        {

            if (Condition != null)

            {

                Console.WriteLine("Execute Scheduled Condition");
                scheduledChildren.Set(

                    context, new Dictionary<String, ActivityInstance>());


                context.ScheduleActivity<Boolean>(Condition, OnConditionComplete);

            }

        }
When the Condition activity completes, a go/no-go decision is made based on the result. If processing is to continue, then all child activities are immediately scheduled for execution. The ActivityInstance object that is returned from the ScheduleActivity method is added to the scheduledChildren dictionary. This object is essentially a handle or proxy to the activity that has been scheduled.
Notice that the code iterates through the collection of activities in reverse order. This is necessary to begin execute of each activity in the original sequence. Remember that the workflow runtime executes work items (in this case scheduled activities) from the top of the queue of work items. But the ScheduleActivity method also places new activities on the top of the queue. So in this case, the queue is actually acting like a stack. For this reason, new items must be pushed onto the stack in reverse order.
        private void OnConditionComplete(NativeActivityContext context,

            ActivityInstance completedInstance, Boolean result)

        {

            Console.WriteLine(

                "OnConditionComplete:  State:{0}, IsCompleted:{1}: Result:{2}",

                completedInstance.State, completedInstance.IsCompleted, result);

            if (!context.IsCancellationRequested)

            {

                if (result)

                {

                    if (Activities != null && Activities.Count > 0)

                    {

                        for (Int32 i = Activities.Count - 1; i >= 0; i--)

                        {

                            Console.WriteLine(

                                "OnConditionComplete Scheduled activity: {0}",

                                    Activities[i].DisplayName);

                            ActivityInstance instance = context.ScheduleActivity(

                                Activities[i], OnComplete, OnFaulted);

                            scheduledChildren.Get(context).Add(

                                instance.Id, instance);

                        }

                    }

                }

            }

        }
The OnComplete method is executed each time a child activity has completed. The code removes the completed activity from the scheduledChildren dictionary.
        private void OnComplete(NativeActivityContext context,

            ActivityInstance completedInstance)

        {
            Console.WriteLine(

                "OnComplete: Activity: {0}, State:{0}, IsCompleted:{1}",

                completedInstance.Activity.DisplayName,

                completedInstance.State, completedInstance.IsCompleted);


            scheduledChildren.Get(context).Remove(completedInstance.Id);

        }

        private void OnFaulted(NativeActivityFaultContext faultContext,

            Exception propagatedException, ActivityInstance propagatedFrom)

        {

            Console.WriteLine("OnFaulted: {0}", propagatedException.Message);

        }
Instead of invoking the CancelChildren method as your saw in previous examples, the Cancel method in this class calls the CancelChild method for each individual activity that has not yet completed. This was done to demonstrate that you can use either method to cancel the children. In this case, the code provides additional runtime information by displaying the name of each child that is canceled.
        protected override void Cancel(NativeActivityContext context)

        {

            Console.WriteLine("Cancel");

            if (context.IsCancellationRequested)

            {

                Console.WriteLine("IsCancellationRequested");


                foreach (ActivityInstance instance in

                    scheduledChildren.Get(context).Values)

                {

                    Console.WriteLine(

                        "Cancel scheduled child: {0}",

                            instance.Activity.DisplayName);

                    context.CancelChild(instance);

                }

            }

        }


        protected override void Abort(NativeActivityAbortContext context)

        {

            base.Abort(context);

            Console.WriteLine("Abort Reason: {0}", context.Reason.Message);

        }

    }

}
Please rebuild the solution before proceeding to the next step.
Declaring a Test Workflow
Add a new Activity to the ActivityLibrary project, and name it MyParallelTest. The MyParallel activity that you add to this workflow will contain three parallel branches of execution. Each branch is represented by a separate Sequence activity. You can follow these steps to declare the workflow that tests the MyParallel activity:
- Add a
Sequenceactivity as the root of the workflow.- Add an
Int32variable namedcountthat is scoped by theSequenceactivity.- Add an instance of the new
MyParallelactivity as a child of theSequenceactivity. Set theConditionproperty of this activity tocount < 3.- Add a
Sequenceactivity as a child of theMyParallelactivity. This activity represents the first parallel branch of execution so change theDisplayNameproperty toSequence1.- Add two
WriteLineactivities and aDelayactivity to theSequence1activity that you just added (the child of theMyParallelactivity). Move theDelayactivity between the twoWriteLineactivities. The inclusion of theDelayshould cause the activity to become idle. When this occurs, execution should immediately continue with the next branch of execution. Set theDelay.DurationtoTimeSpan.FromSeconds(1). Set theTextproperty of the firstWriteLineto"one-one"and the secondWriteLineto"one-two". Figure 16-5 shows this first branch of execution.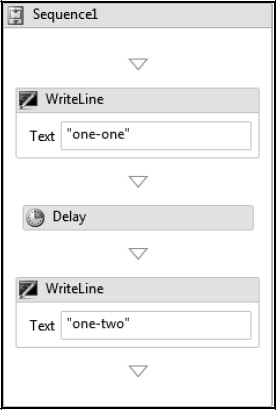
Figure 16-5. MyParallelTest Sequence1
- Copy the
Sequence1activity that you just defined, and paste the copy as the next child of theMyParallelactivity. Change theDisplayNameof this activity toSequence2to indicate that it is the second branch of parallel execution. There are no changes that you need to make to the internal structure of thisSequenceactivity; however, you do need to change theTextproperty of the twoWriteLineactivities. Change theTextto"two-one"and"two-two", respectively, to indicate that this is the second branch of execution.- Copy the
Sequence2activity and paste the copy as the next (and final) child of theMyParallelactivity. Change theDisplayNameof this activity toSequence3. Change theTextproperty of theWriteLineactivities to"three-one"and"three-two", respectively.- Delete the
Delayactivity from theSequence3activity. This will test the execution of this final branch without any opportunity for it to become idle. Figure 16-6 shows theSequence3activity.
The top-level structure of the workflow (collapsed) should look like Figure 16-7.
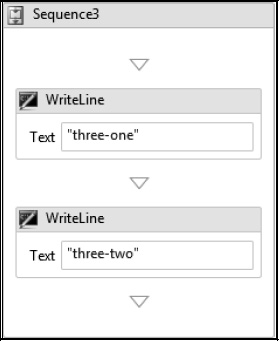
Figure 16-6. MyParallelTest Sequence3
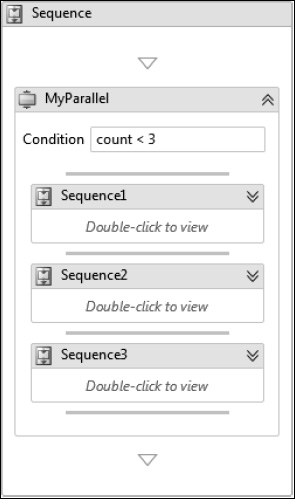
Figure 16-7. MyParallelTest workflow
Testing the Activity
To test the MyParallel activity using the TestApplication project, change the type of the workflow that is created in the Program.cs file to MyParallelTest. After rebuilding the solution, you should be able to run the project and see these results:
MyParallelTest Normal


CacheMetadata


Execute Scheduled Condition


OnConditionComplete:  State:Closed, IsCompleted:True: Result:True


OnConditionComplete Scheduled activity: Sequence3
OnConditionComplete Scheduled activity: Sequence2


OnConditionComplete Scheduled activity: Sequence1


one-one


two-one


three-one


three-two


OnComplete: Activity: Sequence3, State:Sequence3, IsCompleted:Closed


one-two


OnComplete: Activity: Sequence1, State:Sequence1, IsCompleted:Closed


two-two


OnComplete: Activity: Sequence2, State:Sequence2, IsCompleted:Closed


WorkflowApplication.Completed


MyParallelTest Cancel


Execute Scheduled Condition


OnConditionComplete:  State:Closed, IsCompleted:True: Result:True


OnConditionComplete Scheduled activity: Sequence3


OnConditionComplete Scheduled activity: Sequence2


OnConditionComplete Scheduled activity: Sequence1


one-one


two-one


three-one


three-two


OnComplete: Activity: Sequence3, State:Sequence3, IsCompleted:Closed


Cancel


IsCancellationRequested


Cancel scheduled child: Sequence2


Cancel scheduled child: Sequence1


OnComplete: Activity: Sequence1, State:Sequence1, IsCompleted:Canceled


OnComplete: Activity: Sequence2, State:Sequence2, IsCompleted:Canceled


WorkflowApplication.Completed
MyParallelTest Abort


Execute Scheduled Condition


OnConditionComplete:  State:Closed, IsCompleted:True: Result:True


OnConditionComplete Scheduled activity: Sequence3


OnConditionComplete Scheduled activity: Sequence2


OnConditionComplete Scheduled activity: Sequence1


one-one


two-one


three-one


three-two


OnComplete: Activity: Sequence3, State:Sequence3, IsCompleted:Closed


Abort Reason: Abort was called


WorkflowApplication.Aborted


MyParallelTest Terminate


Execute Scheduled Condition


OnConditionComplete:  State:Closed, IsCompleted:True: Result:True


OnConditionComplete Scheduled activity: Sequence3


OnConditionComplete Scheduled activity: Sequence2


OnConditionComplete Scheduled activity: Sequence1


one-one


two-one


three-one


three-two


OnComplete: Activity: Sequence3, State:Sequence3, IsCompleted:Closed


Abort Reason: Terminate was called


WorkflowApplication.Completed


Press any key to exit
If you examine the results for the first test (the one that ran normally to completion), you’ll see that the results are what you might expect for an activity that implements a parallel execution pattern. The first branch began execution and the “one-one” text was written to the console. But when the Delay activity executed, that branch became idle and execution began with the next scheduled activity, which was the second branch of execution. That’s why the “two-one” is displayed next in the results.
Execution continued with the second branch until it also executed a Delay activity. This caused execution to move to the third branch of execution. This branch executed to completion since it didn’t include a Delay activity. When it completed, execution returned to the last half of the first and second branches in order to complete the workflow.
The results for the cancel test show that the cancellation took place after the third branch completed. At this point, the remaining branches (one and two) were canceled, and no further processing took place. The abort and terminate tests were similar to the cancel test, except that no cancellation logic was executed.
Scheduling an ActivityAction
The ActivityAction activity is used for callback-like processing from an activity. It defines a planned extension point that must be provided with an activity to execute. The ActivityAction class is really a family of related generic classes designed to support a varying number of input arguments. For example, ActivityAction<T> supports a single input argument, while ActivityAction<T1,T2> supports two input arguments.
![]() Note The activity that you will develop in this example supports an
Note The activity that you will develop in this example supports an ActivityAction<T> with a single argument. You can also implement an activity that supports one of the other ActivityAction classes with additional arguments. The most important change to support additional arguments is to use an overload of the ScheduleAction method that matches the type of ActivityAction that you are scheduling. In a similar way, you would need to use one of the ScheduleFunc methods if you are executing an ActivityFunc instead of an ActivityAction. You can also use the ScheduleDelegate method to schedule an ActivityDelegate (the base class of ActivityAction and ActivityFunc) without regard to the number of arguments that it defines.
One example where an ActivityAction<T> class is used is with the standard ForEach<T> activity. That activity iterates over the items in a collection and invokes a single child activity for each item. The ActivityAction<T> enables you to pass a named argument to the child activity that represents the current item in the collection. This allows the child activity to make decisions or perform processing for each item.
In the example that follows, you will implement an activity that iterates over a collection of strings. For each string, an ActivityAction<String> is scheduled for execution, allowing the handler for the ActivityAction<String> to use the string value as it is invoked.
Implementing the Custom Activity
Add a new Code Activity to the ActivityLibrary project, and name it MyActivityWithAction. Here is the code for this new activity:
using System;

using System.Activities;

using System.Collections.Generic;

using System.ComponentModel;


namespace ActivityLibrary

{
The code defines a property named Notify that is an ActivityAction<String>. In this case, the generic type (String) defines the type of argument that is passed to the Handler property of the ActivityAction. The Handler property defines the activity that is the real target activity to be executed.
The Strings property defines a collection of strings. The code iterates over this collection and invokes the ActivityAction<String> for each item in the collection. A private Variable named NextIndex is also defined to track the next element of the Strings collection to be processed.
    [Designer(typeof(ActivityLibrary.Design.MyActivityWithActionDesigner))]

    public class MyActivityWithAction : NativeActivity

    {

        [Browsable(false)]

        public ActivityAction<String> Notify { get; set; }

        [RequiredArgument]

        public InArgument<List<String>> Strings { get; set; }


        private Variable<Int32> NextIndex = new Variable<Int32>();
The Notify property is initialized during construction of the activity. A DelegateInArgument<String> is assigned to the Argument property of the ActivityAction<String> and the Name property of the argument is set to message. This is the name of the argument that can be referenced by the target activity that is executed by the ActivityAction<String>.
        public MyActivityWithAction()

        {

            Notify = new ActivityAction<String>

                {

                    Argument = new DelegateInArgument<String>

                    {

                        Name = "message"

                    }

                };

        }
The code in the CacheMetadata method calls the AddDelegate method to add the ActivityAction<String> to the meteadata. The AddArgument method is also called to add the Strings argument.
        protected override void CacheMetadata(NativeActivityMetadata metadata)

        {

            Console.WriteLine("CacheMetadata");

            metadata.AddDelegate(Notify);

            metadata.AddArgument(new RuntimeArgument(

                "Strings", typeof(List<String>), ArgumentDirection.In));

            metadata.AddImplementationVariable(NextIndex);

        }
The Execute method and the OnComplete callback both invoke a private method named ScheduleNextItem to schedule execution of the ActivityAction<String>.
        protected override void Execute(NativeActivityContext context)

        {

            if (Notify != null)

            {

                ScheduleNextItem(context);

            }

        }


        private void OnComplete(NativeActivityContext context,

            ActivityInstance completedInstance)

        {

            Console.WriteLine("OnComplete:  State:{0}, IsCompleted:{1}",

                completedInstance.State, completedInstance.IsCompleted);


            if (!context.IsCancellationRequested)

            {

                ScheduleNextItem(context);

            }

        }
The ScheduleNextItem method first determines whether there are remaining items to be processed in the Strings collection. If there are, the next item is passed to the ScheduleAction<String> method as the Notify property (the ActivityAction<String>) is scheduled. The NextIndex variable is incremented to prepare for the next iteration.
        private void ScheduleNextItem(NativeActivityContext context)

        {

            List<String> collection = Strings.Get(context);

            Int32 index = NextIndex.Get(context);

            if (index < collection.Count)

            {

                Console.WriteLine(

                    "ScheduleNextItem ScheduleAction: Handler: {0}, Value: {1}",

                    Notify.Handler.DisplayName, collection[index]);

                context.ScheduleAction<String>(

                    Notify, collection[index], OnComplete);

                NextIndex.Set(context, index + 1);

            }

        }
        protected override void Cancel(NativeActivityContext context)

        {

            Console.WriteLine("Cancel");

            if (context.IsCancellationRequested)

            {

                Console.WriteLine("IsCancellationRequested");

                context.CancelChildren();

            }

        }


        protected override void Abort(NativeActivityAbortContext context)

        {

            base.Abort(context);

            Console.WriteLine("Abort Reason: {0}", context.Reason.Message);

        }

    }

}
Implementing the Activity Designer
Add a new Activity Designer to the ActivityLibrary.Design project, and name it MyActivityWithActionDesigner. Here is the markup for this custom designer:
<sap:ActivityDesigner x:Class="ActivityLibrary.Design.MyActivityWithActionDesigner"

    xmlns:s="clr-namespace:System;assembly=mscorlib"

    xmlns="http://schemas.microsoft.com/winfx/2006/xaml/presentation"

    xmlns:x="http://schemas.microsoft.com/winfx/2006/xaml"

    xmlns:sap="clr-namespace:System.Activities.Presentation;

        assembly=System.Activities.Presentation"

    xmlns:sapv="clr-namespace:System.Activities.Presentation.View;

        assembly=System.Activities.Presentation"

    xmlns:sapc="clr-namespace:System.Activities.Presentation.Converters;

        assembly=System.Activities.Presentation"

    Collapsible="False" >


    <sap:ActivityDesigner.Resources>

        <ResourceDictionary>

            <sapc:ArgumentToExpressionConverter

                x:Key="ArgumentToExpressionConverter" />

        </ResourceDictionary>

    </sap:ActivityDesigner.Resources>


    <Grid>

        <Grid.ColumnDefinitions>

            <ColumnDefinition />

            <ColumnDefinition />

        </Grid.ColumnDefinitions>

        <Grid.RowDefinitions>

            <RowDefinition />

            <RowDefinition />

        </Grid.RowDefinitions>
        <TextBlock Text="Strings" Grid.Row ="0" Grid.Column="0"

            HorizontalAlignment="Left" VerticalAlignment="Center" />


        <sapv:ExpressionTextBox HintText="List of Strings"

            Grid.Row ="0" Grid.Column="1" MaxWidth="150" MinWidth="150" Margin="5"

            OwnerActivity="{Binding Path=ModelItem}"

            Expression="{Binding Path=ModelItem.Strings, Mode=TwoWay,

                Converter={StaticResource ArgumentToExpressionConverter},

                ConverterParameter=In }" />


        <Border Grid.Row ="1" Grid.Column="0" Grid.ColumnSpan="2" Margin="5"

            MinHeight="40" BorderBrush="LightGray"  BorderThickness="1" >

            <sap:WorkflowItemPresenter

                HintText="Drop an activity action handler here"

                Item="{Binding Path=ModelItem.Notify.Handler, Mode=TwoWay}" />

        </Border>


    </Grid>

</sap:ActivityDesigner>
You should rebuild the solution before you continue with the next step.
Declaring a Test Workflow
Add a new Activity named MyActivityWithActionTest to the ActivityLibrary project. This workflow tests the new activity using a collection of string values. Please follow these steps to complete the workflow:
- Add a
Sequenceactivity as the root of the workflow.- Define a new variable that is scoped by the
Sequenceactivity. Name the variablemyStringList, and set the type toList<String>. Set the initial value of the variable to a collection of strings like this:New List(Of String) From {"One", "Two", "Three", "Four"}.- Add an instance of the new
MyActivityWithActionactivity to theSequenceactivity. Set theStringsproperty to themyStringListvariable that you defined.- Add a
Sequenceactivity as the single child of theMyActivityWithActionactivity.- Add a
WriteLineandDelayactivity as children of theSequenceactivity that you just added. Set theDelay.Durationproperty toTimeSpan.FromSeconds(1). Set theWriteLine.Textproperty tomessage. This is the argument that you defined in the constructor of theMyActivityWithActionclass.
The final MyActivityWithActionTest workflow should look like Figure 16-8.
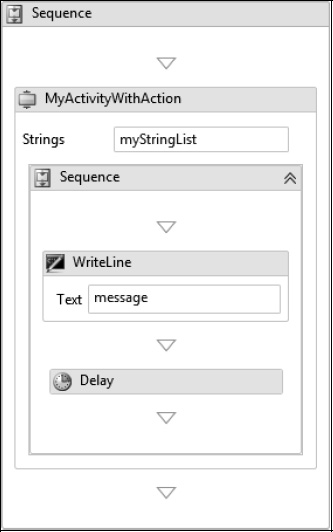
Figure 16-8. MyActivityWithActionTest workflow
Testing the Activity
As usual, you should change the type of workflow that is created in the Program.cs file to the new workflow (MyActivityWithActionTest). After rebuilding the solution, you should be able to run the TestApplication project and see these results:
MyActivityWithActionTest Normal


CacheMetadata


ScheduleNextItem ScheduleAction: Handler: Sequence, Value: One


One
OnComplete:  State:Closed, IsCompleted:True


ScheduleNextItem ScheduleAction: Handler: Sequence, Value: Two


Two


OnComplete:  State:Closed, IsCompleted:True


ScheduleNextItem ScheduleAction: Handler: Sequence, Value: Three


Three


OnComplete:  State:Closed, IsCompleted:True


ScheduleNextItem ScheduleAction: Handler: Sequence, Value: Four


Four


OnComplete:  State:Closed, IsCompleted:True


WorkflowApplication.Completed


MyActivityWithActionTest Cancel


ScheduleNextItem ScheduleAction: Handler: Sequence, Value: One


One


Cancel


IsCancellationRequested


OnComplete:  State:Canceled, IsCompleted:True


WorkflowApplication.Completed


MyActivityWithActionTest Abort


ScheduleNextItem ScheduleAction: Handler: Sequence, Value: One


One


Abort Reason: Abort was called


WorkflowApplication.Aborted


MyActivityWithActionTest Terminate


ScheduleNextItem ScheduleAction: Handler: Sequence, Value: One


One


Abort Reason: Terminate was called


WorkflowApplication.Completed


Press any key to exit
Using the DynamicActivity Class
The DynamicActivity class is one of the classes that derive from the base Activity class. It is available in normal and generic (DynamicActivity<TResult>) versions. It is used in scenarios where you dynamically create activities without creating new CLR types. You first saw this class used back in Chapter 4. In that chapter, you used the ActivityXamlServices class to load a workflow definition directly from a Xaml file. The net result of loading that file was a DynamicActivity instance. Once this object was constructed, it was executed just like any other activity.
I’ve included the DynamicActivity in this chapter because it has other uses that are somewhat specialized. Not only is it used when you deserialize Xaml files directly, but you can also use it to dynamically construct an activity entirely in code. Think of a situation where you might want to define a workflow with a structure that is different depending on runtime decisions that you make. The DynamicActivity allows you to do this. This is in contrast with a more general-purpose workflow that you declare that might make those same decisions internally based on input arguments.
In many ways, the process of constructing a DynamicActivity is similar to composing a new custom activity entirely in code. You first saw this approach to authoring in Chapter 3 when you developed multiple versions of the CalcShipping custom activity. One of those versions (named CalcShippingInCode) was constructed in code by assembling other activities.
But while the process is similar, there are some differences and restrictions when you use the DynamicActivity class:
- The example in Chapter 3 creates a new compiled CLR type containing the workflow definition.
- A
DynamicActivityis not used to create a CLR type. It is used only to construct an in-memory activity definition.- A
DynamicActivitycan define arguments and variables, but it cannot directly access runtime services such as scheduling child activities.
The Example Scenario
You are about to construct another version of the CalcChipping activity that you first developed in Chapter 3. This example will construct a DynamicActivity entirely in code and then execute it several times to test it. The test values are the same ones that you used in Chapter 3.
![]() Note Please refer to Chapter 3 for a description of the design goals, arguments, and variables that are used for this custom activity.
Note Please refer to Chapter 3 for a description of the design goals, arguments, and variables that are used for this custom activity.
However, instead of constructing an activity that makes all of its own decisions internally, you will dynamically construct two completely different workflows depending on runtime properties. In essence, some of the decision making has been moved out of the workflow and into the code that dynamically constructs it. This was intentionally done to demonstrate how you might want to combine the use of the DynamicActivity class with runtime decision-making.
Initialization Syntax vs. Procedural Code
Constructing a DynamicActivity
Create a new Workflow Console project named TestDynamicActivity. Add this new project to the same solution that you have used for other projects in this chapter. You can delete the Workflow1.xaml file since it will not be used. All the code for this example goes into the Program.cs file. Here is a complete listing of this file:
using System;

using System.Activities;

using System.Activities.Statements;

using System.Collections.Generic;


namespace TestDynamicActivity

{

    class Program

    {
The DynamicActivity is constructed and executed four times. Each time, it is executed with a slightly different set of input arguments. The string ("normal" or "express") that is passed to the CreateDynamicActivity method is used to make runtime decisions that affect the structure of the workflow. The test methods such as NormalTest are defined at the end of this code listing.
        static void Main(string[] args)

        {

            NormalTest(CreateDynamicActivity("normal"));

            NormalMinimumTest(CreateDynamicActivity("normal"));

            NormalFreeTest(CreateDynamicActivity("normal"));

            ExpressTest(CreateDynamicActivity("express"));
            Console.WriteLine("Press any key to exit");

            Console.ReadKey();

        }


        private static Activity CreateDynamicActivity(String shipVia)

        {

            Boolean isNormal = (shipVia == "normal");
A DynamicActivity<Decimal> is first constructed and assigned a name. The generic version of this activity is used since the workflow is expected to return a Decimal result value. Several input arguments and variables are then constructed.
            DynamicActivity<Decimal> a = new DynamicActivity<Decimal>();

            a.DisplayName = "DynamicCalcShipping";


            InArgument<Int32> Weight = new InArgument<int>();

            InArgument<Decimal> OrderTotal = new InArgument<decimal>();


            Variable<Boolean> isFreeShipping =

                new Variable<Boolean> { Name = "IsFreeShipping" };


            Variable<Decimal> rate = null;

            if (isNormal)

            {

                rate = new Variable<Decimal> { Name = "Rate", Default = 1.95M };

            }

            else

            {

                rate = new Variable<Decimal> { Name = "Rate", Default = 3.50M };

            }


            Variable<Decimal> minimum =

                new Variable<Decimal> { Name = "Minimum", Default = 12.95M };

            Variable<Decimal> freeThreshold =

                new Variable<Decimal> { Name = "FreeThreshold", Default = 75.00M };
Properties are defined by adding instances of the DynamicActivityProperty class to the Properties member of the DynamicActivity. Each property defines a Name, a Type, and a Value. Each Value is assigned to one of the input arguments that was already constructed.
            a.Properties.Add(new DynamicActivityProperty

            {

                Name = "Weight",

                Type = typeof(InArgument<Int32>),

                Value = Weight

            });
            a.Properties.Add(new DynamicActivityProperty

            {

                Name = "OrderTotal",

                Type = typeof(InArgument<Decimal>),

                Value = OrderTotal

            });
The Implementation property is where the body of the activity is constructed. A root Sequence activity is first added to the workflow. This allows the variables that were constructed above to be added to the Sequence activity.
Following this, the main structure of the workflow is constructed. The structure differs greatly depending on the requested shipping method that was passed to this method ("normal" or "express").
            a.Implementation = () =>

            {

                Sequence root = new Sequence();

                root.Variables.Add(isFreeShipping);

                root.Variables.Add(rate);

                //root.Variables.Add(expressRate);

                root.Variables.Add(minimum);

                root.Variables.Add(freeThreshold);


                if (isNormal)

                {

                    //normal if statement to test free threshold

                    If normalIf = new If();

                    normalIf.Condition = new InArgument<Boolean>(ac =>

                        OrderTotal.Get(ac) >= freeThreshold.Get(ac));


                    //meets free threshold

                    Assign<Boolean> isFreeAssign = new Assign<Boolean>();

                    isFreeAssign.To = new OutArgument<Boolean>(ac =>

                        isFreeShipping.Get(ac));

                    isFreeAssign.Value = true;

                    normalIf.Then = isFreeAssign;


                    //not free, so calc using normal rate

                    Assign<Decimal> calcNormalAssign = new Assign<Decimal>();

                    calcNormalAssign.To = new OutArgument<Decimal>(ac =>

                        a.Result.Get(ac));

                    calcNormalAssign.Value = new InArgument<Decimal>(ac =>

                        Weight.Get(ac) * rate.Get(ac));

                    normalIf.Else = calcNormalAssign;

                    root.Activities.Add(normalIf);

                }
                else

                {

                    //calc using express rate

                    Assign<Decimal> expressAssign = new Assign<Decimal>();

                    expressAssign.To = new OutArgument<Decimal>(ac =>

                        a.Result.Get(ac));

                    expressAssign.Value = new InArgument<Decimal>(ac =>

                        Weight.Get(ac) * rate.Get(ac));

                    root.Activities.Add(expressAssign);

                }


                //test for minimum charge

                If testMinIf = new If();

                testMinIf.Condition = new InArgument<bool>(ac =>

                    a.Result.Get(ac) < minimum.Get(ac) &&

                        (!isFreeShipping.Get(ac)));

                Assign minAssign = new Assign();

                minAssign.To = new OutArgument<Decimal>(ac => a.Result.Get(ac));

                minAssign.Value = new InArgument<Decimal>(ac => minimum.Get(ac));

                testMinIf.Then = minAssign;


                root.Activities.Add(testMinIf);


                return root;

            };


            return a;

        }
Rounding out the code is a set of four methods that test the new workflow. Each method passes a slightly different set of input arguments that are designed to test a different scenario.
        private static void NormalTest(Activity activity)

        {

            Dictionary<String, Object> parameters

                = new Dictionary<string, object>();

            parameters.Add("Weight", 20);

            parameters.Add("OrderTotal", 50M);


            IDictionary<String, Object> outputs = WorkflowInvoker.Invoke(

                activity, parameters);

            Console.WriteLine("Normal Result: {0}", outputs["Result"]);

        }


        private static void NormalMinimumTest(Activity activity)

        {

            Dictionary<String, Object> parameters

                = new Dictionary<string, object>();

            parameters.Add("Weight", 5);

            parameters.Add("OrderTotal", 50M);
            IDictionary<String, Object> outputs = WorkflowInvoker.Invoke(

                activity, parameters);

            Console.WriteLine("NormalMinimum Result: {0}", outputs["Result"]);

        }


        private static void NormalFreeTest(Activity activity)

        {

            Dictionary<String, Object> parameters

                = new Dictionary<string, object>();

            parameters.Add("Weight", 5);

            parameters.Add("OrderTotal", 75M);


            IDictionary<String, Object> outputs = WorkflowInvoker.Invoke(

                activity, parameters);

            Console.WriteLine("NormalFree Result: {0}", outputs["Result"]);

        }


        private static void ExpressTest(Activity activity)

        {

            Dictionary<String, Object> parameters

                = new Dictionary<string, object>();

            parameters.Add("Weight", 5);

            parameters.Add("OrderTotal", 50M);


            IDictionary<String, Object> outputs = WorkflowInvoker.Invoke(

                activity, parameters);

            Console.WriteLine("Express Result: {0}", outputs["Result"]);

        }

    }

}
Testing the Activity
After building the TestDynamicActivity project, you should be ready to run it. Here are the results of my test:
Normal Result: 39.00


NormalMinimum Result: 12.95


NormalFree Result: 0


Express Result: 17.50


Press any key to exit
If you compare these test results to those from Chapter 3, you should see that they are the same expected results.
It is likely that you won’t need to use the DynamicActivity class like this very often. Most of the time, you will use it when deserializing Xaml files in preparation for their execution. But this class is available for those special occasions when dynamic construction of an activity tree is just what you need.
Using Execution Properties
Most of the time, you will develop custom activities that define properties for any inputs and outputs. These properties define the public contract of the activity and allow you to alter the activity’s behavior by setting the appropriate property values. Activities such as this generally provide the flexibility to be used beside other disparate activities in the workflow model. As long as you provide the correct property values, the activity produces the correct results.
However, you can also develop families of activities that are designed to work together to solve a common problem. Instead of receiving all their input arguments via public properties, activities can also retrieve their input arguments using an execution property mechanism. In this scenario, one activity acts as a container for other related activities in the family. This parent activity acts as a scoping mechanism, providing execution property values that are retrieved and consumed by any children within its scope. Activities such as this are not designed to execute outside of their scoping parent since the parent must provide the necessary execution property values.
Execution properties are managed using the Properties member of the NativeActivityContext object. This property is an instance of the ExcecutionProperties class, which supports members to add and retrieve execution property values. Here are the most important members of this class:
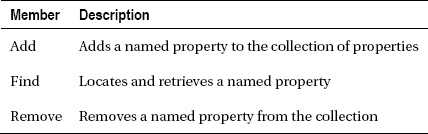
Execution properties participate in persistence along with your activity. If your activity is persisted, any serializable execution properties that you have added are persisted and restored when the activity is later loaded back into memory.
To demonstrate how you might use execution properties, you will implement two custom activities that are designed to closely work together. The example scenario is an order-processing workflow that might use several activities that all require an OrderId argument. You could implement these activities the normal way and declare an OrderId argument on each activity. But as an alternative, you will develop an OrderScope activity that is designed to manage the state of an order. This activity defines an OrderId argument and passes the value of this argument to any children using an execution property. The child activity that you will develop (named OrderAddItems in this example) retrieves the OrderId from the execution properties rather than from a public input argument.
To make this example slightly more interesting, the OrderScope activity creates a nonblocking bookmark that is also passed as an execution property. The OrderAddItems activity retrieves the bookmark and resumes it for each item that it adds to the order. This demonstrates the use of the BookmarkOptions enum that was briefly discussed earlier in the chapter.
Implementing the OrderScope Activity
Add a new Code Activity to the ActivityLibrary project, and name it OrderScope. Here is the code for this new activity:
using System;

using System.Activities;

using System.ComponentModel;


namespace ActivityLibrary

{
This activity reuses the designer that you originally developed for the MySimpleParent activity earlier in the chapter. It supports a single Body property that represents the child activity to be scheduled. This activity also defines an input OrderId argument and an output OrderTotal argument. You could also use a NativeActivity<T> to define this activity and use the built-in Result argument for the order total. However, in some cases, I prefer to have a meaningful name instead of using the Result argument.
    [Designer(typeof(ActivityLibrary.Design.MySimpleParentDesigner))]

    public class OrderScope : NativeActivity

    {

        [Browsable(false)]

        public Activity Body { get; set; }

        [RequiredArgument]

        public InArgument<Int32> OrderId { get; set; }

        public OutArgument<Decimal> OrderTotal { get; set; }
The Execute method uses the Add method of the context.Properties member to add the value of the OrderId argument as an execution property. It also creates a bookmark that is used to pass the cost of each item back to this activity. The assumption is that as items are added to the order, this activity is notified via this bookmark, and the total cost of the order is accumulated.
The bookmark that is created uses the NonBlocking and MultipleResume options. The NonBlocking option means that this activity can complete without ever receiving the bookmark. The MultipleResume option indicates that the bookmark can be resumed multiple times.
Any execution properties that are added in this way are visible to any child activities. However, they are not visible to any parent or sibling activities. They are truly scoped by this activity. After adding the execution properties, the Body activity is scheduled for execution in the usual way.
        protected override void Execute(NativeActivityContext context)

        {

            Int32 orderId = OrderId.Get(context);

            context.Properties.Add("OrderId", orderId);


            Bookmark bm = context.CreateBookmark(

                "UpdateOrderTotalBookmark", OnUpdateOrderTotal,

                BookmarkOptions.NonBlocking | BookmarkOptions.MultipleResume);

            context.Properties.Add(bm.Name, bm);


            context.ScheduleActivity(Body);

        }
        private void OnUpdateOrderTotal(NativeActivityContext context,

            Bookmark bookmark, object value)

        {

            if (value is Decimal)

            {

                OrderTotal.Set(context,

                    OrderTotal.Get(context) + (Decimal)value);

                Console.WriteLine(

                    "OrderScope.OnUpdateOrderTotal Value: {0}, Total: {1}",

                    (Decimal)value, OrderTotal.Get(context));

            }

        }


        protected override bool CanInduceIdle

        {

            get { return true; }

        }

    }

}
Implementing the OrderAddItems Activity
Add another Code Activity to the ActivityLibrary project, and name it OrderAddItems. This activity is designed to be used as a child of the OrderScope activity and simulates adding sales items to the order. Here is the complete code for this activity:
using System;

using System.Activities;

using System.Collections.Generic;


namespace ActivityLibrary

{
This activity supports a single Items input argument. This argument is defined as a List<Int32> and will contain a list of item IDs that are to be added to the order.
    public class OrderAddItems : NativeActivity

    {

        [RequiredArgument]

        public InArgument<List<Int32>> Items { get; set; }


        protected override void Execute(NativeActivityContext context)

        {
The code in the Execute method first retrieves the two properties that were passed from the OrderScope activity. It then iterates over the item IDs in the input argument and resumes the bookmark for each item, passing a demonstration price.
            Int32 orderId = (Int32)context.Properties.Find("OrderId");

            Console.WriteLine("OrderAddItems process OrderId: {0}", orderId);

            Bookmark bm = (Bookmark)context.Properties.Find(

                "UpdateOrderTotalBookmark");


            if (bm == null)

            {

                throw new NullReferenceException(

                    "UpdateOrderTotalBookmark was not provided by parent scope");

            }


            List<Int32> items = Items.Get(context);

            if (items != null && items.Count > 0)

            {

                foreach (Int32 itemId in items)

                {

                    Decimal price = ((Decimal)itemId / 100);

                    context.ResumeBookmark(bm, price);

                }

            }

        }

    }

}
Please rebuild the solution before proceeding to the next step.
Declaring a Test Workflow
Add a new Workflow Console Application to the solution for this chapter. Name the new project TestOrderScope. Unlike most other examples, you will use the Workflow1.xaml file, so don’t delete it. Add a project reference to the ActivityLibrary project. Open the Workflow1.xaml file in the workflow designer, and follow these steps to declare a test workflow:
- Add a
Sequenceactivity as the root of the workflow.- Define a
Decimalvariable namedTotalthat is scoped by theSequenceactivity.- Add an instance of the
OrderScopeactivity to theSequenceactivity. Set theOrderScope.OrderIdproperty to1001and theOrderTotalto theTotalvariable that you just defined.- Add an instance of the
OrderAddItemsactivity as the child of theOrderScopeactivity. Set theItemsproperty toNew List(Of Int32) From {123, 456, 789}to provide a few test items to process.- Add a
WriteLinebelow theOrderScope. Set theTextproperty toString.Format("Final total: {0}", Total)to display the final total that was accumulated for the order.
The completed workflow should look like Figure 16-9.
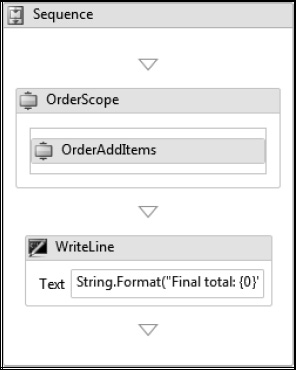
Testing the Activities
After building the TestOrderScope project, you can run it. Your results should look like mine:
OrderAddItems process OrderId: 1001


OrderScope.OnUpdateOrderTotal Value: 1.23, Total: 1.23


OrderScope.OnUpdateOrderTotal Value: 4.56, Total: 5.79


OrderScope.OnUpdateOrderTotal Value: 7.89, Total: 13.68


Final total: 13.68


Press any key to continue . . .
Summary
This chapter focused on several advanced custom activity scenarios, most of which were related to executing one or more children. The chapter began with an overview of how to schedule children for execution and other topics related to the responsibilities of a parent activity.
The first example of the chapter was a relatively simple activity that executed a single child. Following this, other examples were presented that demonstrated how to repeatedly execute an activity, how to execute and test Boolean conditions, how to execute multiple children, and how to implement a parallel execution pattern. Exception handling for child activities was also discussed and demonstrated.
The final sections of the chapter focused on the use of the DynamicActivity class, execution properties, and bookmark options.
In the next chapter, you will learn how to host the workflow designer in your own applications.