
To fully understand jQuery and its applications in modern web programming, it's important to take a moment and look back at where jQuery came from, what needs it was built to fill, and what programming in JavaScript was like before jQuery came around.
In this chapter you'll learn about JavaScript libraries and the needs they seek to fulfill, as well as why jQuery is the library of choice for the majority of web developers. You'll also learn the basics of jQuery, including how to make the library available for use in your applications and how the core of jQuery—its powerful selector engine—works.
JavaScript has a reputation for being rather unwieldy in web applications. A lack of consistent browser support, difficult debugging, and an intimidating syntax can make learning JavaScript feel impossible.
To be fair, all the things that make JavaScript seem difficult are part of what make it so powerful, but that doesn't make it any more inviting to a novice web developer looking to add JavaScript to his arsenal.
The steep learning curve associated with JavaScript has been a sore spot for developers for years, and as frustrations grew, several ambitious developers started building JavaScript libraries, also referred to as JavaScript frameworks.
These libraries aimed to simplify the use of JavaScript to make it more accessible to both new and existing developers by creating easy-to-use control functions that remove some of the heavy lifting from everyday JavaScript tasks. Libraries are especially useful in the realm of Asynchronous JavaScript and XML (AJAX) due to the complexity of performing the same tasks using straight JavaScript.
JavaScript libraries aim to provide a simpler syntax for common tasks, which translates to a faster workflow for developers and a less intimidating learning curve for beginners. They also eliminate some of the headache involved in coding cross-browser JavaScript by doing all the compatibility checks for you within their built-in methods, which is a huge time-saver when coding.
Note
The difference between using jQuery's AJAX tools versus the straight JavaScript method will be explored later on in Chapter 2.
A good number of JavaScript libraries are available. Several of the most popular currently in use are Prototype (http://www.prototypejs.org), MooTools (http://mootools.net), Yahoo! UI Library (http://developer.yahoo.com/yui), and the focus of this book, jQuery.
Every JavaScript framework has its own benefits; jQuery is no exception, providing the following benefits:
Small file size (approximately 23KB as of version 1.4)
Extremely simple syntax
Chainable methods
Easy plug-in architecture for extending the framework
A huge online community
Great documentation at
http://api.jquery.comOptional extensions of jQuery for added functionality, such as jQueryUI
The brain child of developer John Resig jQuery was first announced at BarCamp NYC in early 2006 (for more on BarCamp, see http://barcamp.org). Resig noted on his web site, that he created jQuery because he was unhappy with the currently available libraries and felt that they could be vastly improved by reducing "syntactic fluff" and adding specific controls for common actions (http://ejohn.org/blog/selectors-in-javascript/).
jQuery was a big hit in the development community and quickly gained momentum. Other developers came on to help refine the library, ultimately resulting in the first stable release of jQuery, version 1.0, on August 26, 2006.
Since then, jQuery has progressed to version 1.4.2 (at the time of this writing) and has seen a huge influx of plug-ins from the development community. A plug-in is an extension of jQuery that isn't part of the core library. You'll learn more about (and build) jQuery plug-ins in Chapter 10.
Because there's no better way to understand a new language than to just get your hands dirty, you'll need a testing environment to try out some introductory exercises with jQuery. Fortunately, setting up this testing environment is a simple two-step process: install Firefox, and install Firebug.
Throughout this book, all exercises will assume that you are using the Firefox browser with the Firebug plug-in due to its excellent JavaScript testing console.
To get Firefox up and running on your computer, navigate to http://firefox.com and download the latest version of Firefox (version 3.6 at the time of this writing). After running the installer (Firefox Setup x.x.x.exe on a PC or Firefox x.x.x.dmg on Mac), Firefox will be running.
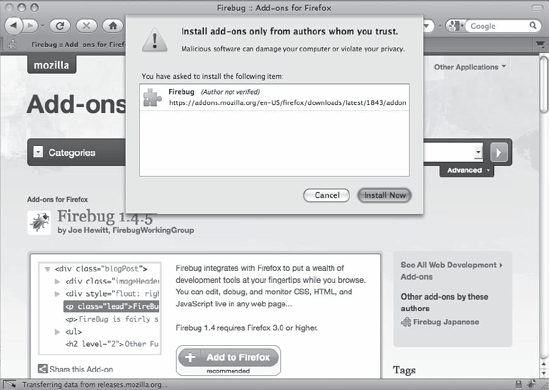
To install Firebug, use Firefox to navigate to http://getfirebug.com, and click the "Install Firebug x.x for Firefox" button. This takes you to the Firefox add-ons directory entry for Firebug. Once there, click the "Add to Firefox" button, which will bring up the installation dialog in the browser (see Figure 1-1). Click Install Now, and wait for the add-on to install. Then restart Firefox.
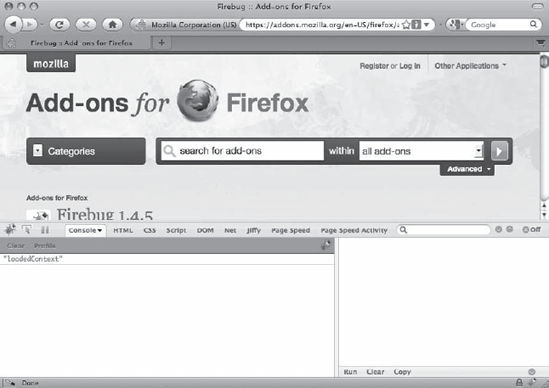
After restarting Firefox, an icon will appear in the status bar that looks like a lightning bug. Clicking that icon will bring up the Firebug controls, starting with the console (see Figure 1-2).
Note
Firebug is useful for much more than JavaScript debugging. It's an invaluable addition to any web developer's arsenal. To learn more, visit http://getfirebug.com.
To use jQuery in a project, the library needs to be loaded in your HTML document to give your script access to the library's methods. If the library is not loaded first, any scripts using jQuery syntax will likely result in JavaScript errors. Fortunately, loading jQuery is very simple, and there are several options available to developers to do so.
The first option for including jQuery in a project is to save a copy of the library within your project's file structure and include it just like any other JavaScript file:
<script type="text/javascript" src="js/jquery-1.4.2.min.js"></script>
The second option is to include a copy of the jQuery library hosted on Google Code. This is done in the hopes that visitors to your web site will have a copy of the library already cached from another site including the same file, which decreases load time for your site's users.
The remote copy is included just like the downloaded copy:
<script type="text/javascript"
src="http://ajax.googleapis.com/ajax/libs/jquery/1.4.2/jquery.min.js">
</script>
Google Code also offers an option for loading jQuery called the AJAX Libraries API (see http://code.google.com/apis/ajaxlibs). In Google's words, "The AJAX Libraries API is a content distribution network and loading architecture for the most popular, open source JavaScript libraries."
Using the AJAX Libraries API is simple and straightforward, and this is method that will be used throughout this book. To include jQuery in your web site using the AJAX Libraries API, use the following snippet:
<script type="text/javascript"
    src="http://www.google.com/jsapi"></script>
<script type="text/javascript">
    google.load("jquery", "1.4.2");
</script>Now that your testing environment is set up, create a new folder in the htdocs folder within your XAMPP installation called testing, and create a new file inside it called index.html. In the editor of your choice, insert the following HTML markup:
<!DOCTYPE html>
<html>
<head>
    <title>Testing jQuery</title>
</head>
<body>
    <p>Hello World!</p>
    <p class="foo">Another paragraph, but this one has a class.</p>
    <p><span>This is a span inside a paragraph.</span></p>
    <p id="bar">Paragraph with an id.
        <span class="foo">And this sentence is in a span.</span>
    </p>

    <script type="text/javascript"
        src="http://www.google.com/jsapi"></script>
    <script type="text/javascript">
google.load("jquery", "1.4.2");
</script>
</body>
</html>Note
Loading the JavaScript right before the closing body tag (</body>) is done to keep the scripts from blocking other page elements, such as images, from loading. Doing so also prevents JavaScript from running before the elements are fully loaded on the page, which can result in unexpected behavior or JavaScript errors.
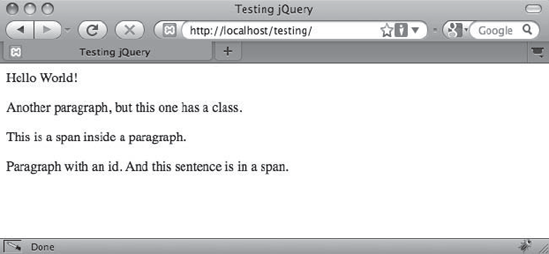
Save this file and navigate to http://localhost/testing/ in Firefox (see Figure 1-3).
You'll be using this file to get your feet wet with the basic operations of jQuery.
At the core of jQuery is the jQuery function. This function is the heart and soul of jQuery and is used in every instance where jQuery is implemented. In most implementations of jQuery, the shortcut $() is used instead of jQuery() to keep the code concise.
We won't get too deep into the programming theory that makes this function tick, but it basically creates a jQuery object and evaluates the expression passed as its parameters. It then determines how it should respond and modifies itself accordingly.
Everything in jQuery revolves around its incredibly powerful selector engine. The rest of this chapter teaches you the different methods with which you can select elements from the Document Object Model (DOM) using jQuery.
Note
The DOM is a collection of objects and nodes that make up HTML, XHTML, and XML documents. It is platform-and language-independent—this essentially means that developers can use a variety of programming languages (such as JavaScript) to access and modify DOM information on multiple platforms (such as web browsers) without compatibility issues.
One of the strongest and most alluring features of jQuery is the ease with which a developer is able to select elements within the DOM. The use of pseudo-CSS selectors[1] adds an incredible level of power to jQuery. Pseudo-CSS allows a developer to target specific instances of elements in his HTML. This is especially helpful to anyone with prior experience with CSS due to the nearly identical syntax. Essentially, using the same CSS syntax you would use to set up style rules, you're able to select elements in the following ways:
Basic selectors
Hierarchy selectors
Filters
Basic filters
Content filters
Visibility filters
Attribute filters
Child filters
Form filters
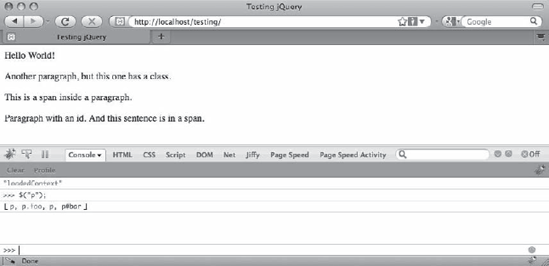
The basic selectors allow developers to select elements by tag type, class name, ID, or any combination thereof. While viewing http://localhost/testing/, launch the Firebug dialog, and click the Console tab (see Figure 1-4). If the Console panel is disabled, click the Console tab, and select Enabled. You will be using this console for all examples in this chapter.
Note
If you're familiar with CSS, you will be able to skim this section, because the selectors behave the same as their CSS counterparts.
To select an element by tag type, simply use the name of the tag (such as p, div, or span) as your selector:
element
To select all paragraph (<p>) tags in our test document, enter the following snippet at the bottom of the console:
$("p");Press Enter and the code will execute. The following results will be displayed in the console (see Figure 1-4):
>>> $("p");
[ p, p.foo, p, p#bar ]
The first line shows the command that was executed, and the second line shows what was returned from the code. There are four paragraph tags in our test document: two without class or ID attributes, one with a class foo, and one with an ID bar (you'll learn about this syntax in the next sections). When we pass the tag name to the jQuery function, all instances are found and added to the jQuery object.
Just as quickly as you can select by tag type, you can select elements by their assigned class or classes. The syntax for this is the use the class name preceded by a period (.):
.class
Select all the elements with the class foo by executing the following snippet in the console:
$(".foo");After execution, the following will show up in the console:
>>> $(".foo");
[ p.foo, span.foo ]
Both a paragraph tag and a span are returned, since they both have the class foo.
To select an element by its id attribute, the CSS syntax of the id preceded by a hash sign (#) is used.
#id
Match all elements with an ID of bar with the following:
$("#bar");Only one paragraph in our document has an id of "bar", as we see in the result:
>>> $("#bar");
[ p#bar ]In some situations, it may be necessary to isolate only certain tags that correspond to a class, which is easy to do by combining tag type and class in your selector.
Enter the following in the console to select only paragraph tags with the class foo:
$("p.foo");The results in the console confirm that the span was ignored, even though it has the class foo:
>>> $("p.foo");
[p.foo]In the event that you need to access multiple elements, multiple selectors can be used to access all of those elements at once. For instance, if you wanted to select any paragraph tag with a class of foo or any element with an ID of bar, you would use the following:
$("p.foo,#bar");This returns elements that match at least one selector specified in |the string:
>>> $("p.foo,#bar");
[ p.foo, p#bar ]Sometimes, it's not enough to be able to select by element, class, or ID. There are points at which you'll need to access elements contained within, next to, or after another element, such as removing an active class from all menu items except the one that was just clicked, grabbing all the list items out of the selected unordered list, or changing attributes on the wrapper element when a form item is selected.
Selecting descendant elements, which are elements contained within other elements, is done using the ancestor selector followed by a space and the descendant selector.
ancestor descendent
To select descendant spans in your test document, execute the following command in the Firebug console:
$("body span");This will find all spans contained within the body tag (<body>) of the document, even though the spans are also inside paragraph tags.
>>> $("body span");
[ span, span.foo ]Child elements are a more-specific style of descendant selector. Only the very next level of element is considered for matching. To select a child element, use the parent element followed by a greater than (>) symbol, followed by the child element to match:
parent>child
In your test file, try to select any spans that are child elements of the body element by entering the following command in the console:
$("body>span");Because there are no spans directly contained within the body element, the console will output the following:
>>> $("body>span");
[ ]
Next, filter all span elements that are direct children of a paragraph element:
$("p>span");The resulting output looks like this:
>>> $("p>span");
[ span, span.foo ]Occasionally in a script, you'll need to select the next element in the DOM. This is accomplished by providing an identifier for the starting element (any selector pattern works here), followed by a plus sign (+), followed by the selector to match the next instance of:
start+next
Try this in the console by typing the following command:
$(".foo+p");There is only one element with the class foo, so only one paragraph element is returned:
>>> $('.foo+p'),
[ p ]
Next, use a more general query, and select the next paragraph element after any paragraph element:
$('p+p'),There are four paragraphs in our markup, and all of them but the last have a next paragraph, so the console will display three elements in the result:
>>> $('p+p'),
[ p.foo, p, p#bar ]
This result set is the second, third, and fourth paragraphs from the HTML markup.
Sibling elements are any elements contained within the same element. Selecting sibling elements works similarly to selecting next elements, except the sibling selector will match all sibling elements after the starting element, rather than just the next one.
To select sibling elements, use the starting element selector, followed by an equivalency sign (~), and the selector to match sibling elements with:
start~siblings
To match all siblings after the paragraph with class foo, execute the following command in the console:
$(".foo~p");The result set will look like the following:
>>> $(".foo~p");
[ p, p#bar ]Filters are another very powerful method of accessing elements in the DOM. Instead of relying on element types, classes, or IDs, you're able to find elements based on their position, current state, or other variables.
The basic syntax of a filter is a colon (:) followed by the filter name:
:filter
In some filters, a parameter can be passed in parentheses:
:filter(parameter)
The most common and useful filters are covered in the next few sections.
Note
Not all available filters are covered here for the sake of getting into actual development quickly. For a complete listing of available filters, see the jQuery documentation.
One of the most common uses of filters is to determine if an element is the first or last element in a set. With filters, finding the first or last element is incredibly simple; just append the filter :first or :last to any selector:
$("p:last");This returns the following when executed in the console:
>>> $("p:last");
[ p#bar ]If you need to find all elements that don't match a selector, the :not() filter is the easiest way to go about it. Append this filter to your selector along with a selector as its parameter, and the results set will return any elements that match the original selector, but not the selector passed as a parameter to :not().
For example:
$("p:not(.foo)");Will return the following result set:
>>> $("p:not(.foo)");
[ p, p, p#bar ]Similar to :first and :last, the :even and :odd filters are syntactically simple and return exactly what you might expect: the even or odd elements from a result set, respectively.
$("p:odd");Executing the preceding line in the console will result in the following output:
>>> $("p:odd");
[ p.foo, p#bar ]In the event that you need to grab a particular element by its index, the :eq() filter allows you to specify which element is needed by passing an index as the filter's parameter:
$("p:eq(3)");This outputs the following:
>>> $("p:eq(3)");,
[ p#bar ]
Note
An element's index refers to its position among other elements in the set. Counting in programming starts a zero (0), so the first element is at index 0; the second is at index 1, and so on.
Filters are also available to select elements based on their content. These can range from containing certain text to surrounding a given element.
To select only elements that contain certain text, use the :contains() filter, where the text to be matched is passed as a parameter to the filter:
$("p:contains(Another)");When executed in the console, the preceding line will return the following:
>>> $("p:contains(Another)");
[ p.foo ]
Note
The :contains() filter is case sensitive, meaning capitalization matters for matching text. A case-insensitive version of the filter has been added to the comments of the :contains() entry on the API documentation by a member of the development community. For more on this filter, see http://api.jquery.com/contains-selector.
If you need to select only elements that contain another element, you would use the :has() filter. This works similarly to :contains(), except it accepts an element name instead of a string of text:
$("p:has(span)");When executed in the console, this outputs the following:
>>> $("p:has(span)");
[ p, p#bar ]
Only paragraphs containing span elements are returned.
To find elements that are empty (meaning the element contains neither text nor any other elements), the :empty filter comes into play.
In the HTML example you're using, the only empty elements are not visible. Select them by looking for any empty element:
$(":empty");This outputs the following:
>>> $(":empty");
[ script jsapi, script jquery.min.js, div#_firebugConsole ]
Both the second script tag and the div are dynamically generated. The script tag comes from jQuery being loaded by the Google JSAPI, and the div comes from Firebug.
The opposite of :empty, :parent will only match elements that contain children, which can be either other elements, text, or both.
Select all paragraphs that are parents using the following:
$("p:parent");Because all paragraphs in your sample HTML document contain text (and other elements in some cases), all paragraphs are returned in the result set:
>>> $("p:parent");
[ p, p.foo, p, p#bar ]
Visibility filters, :hidden and :visible, will select elements that are, respectively, hidden and visible. Select all visible paragraphs like so:
$("p:visible");Because none of the elements in your HTML example are currently hidden, this returns the following result set:
>>> $("p:visible");
[ p, p.foo, p, p#bar ]Element attributes are also a great way to select elements. An attribute is anything in the element that further defines it (this includes the class, href, ID, or title attributes). For the following examples, you'll be accessing the class attribute.
Note
Please bear in mind that it is faster (and better practice) to use ID (#id) and class (.class) selectors in production scripts whenever possible; the examples below are just to demonstrate the capabilities of the filter.
To match elements that have a given attribute and value, enclose the attribute-value pair in square brackets ([]):
[attribute=value]
To select all elements with a class attribute of foo, execute the following in the console:
$("[class=foo]");This returns the following:
>>> $("[class=foo]");
[ p.foo, span.foo ]Inversely, to select elements that do not match an attribute-value pair, insert an exclamation point (!) before the equals sign between the attribute and value:
[attribute!=value]
Select all paragraphs without the class foo by running the following command:
$("p[class!=foo]");This results in the following:
>>> $("p[class!=foo]");
[ p, p, p#bar ]
Child filters add an alternative to the use of :even, :odd, or :eq(). The main difference is that this set of filters starts indexing at 1 instead of 0 (like :eq() does).
One of the more versatile filters, :nth-child() provides four different options to pass as a parameter when selecting elements: even, odd, index, or an equation.
Like other child filters, this one starts indexing at 1 instead of 0, so the first element is at index 1, the second element at 2, and so on.
Using :odd, the result set contained the paragraphs with a class of foo and an ID of foo; select odd paragraphs using :nth-child() to see the difference in how the filters handle by executing the following command:
$("p:nth-child(odd)");The results display as follows in the console:
>>> $("p:nth-child(odd)");
[ p, p ]
Though this output may seem strange, the mismatched results are a product of the difference in how the elements index.
While very similar to :first and :last, :first-child and :last-child differ in that the returned element set can contain more than one match. For instance, to find the last span that is a child of a paragraph element, you might use the following:
$("p span:last");which returns the following in the console:
>>> $("p span:last");
[ span.foo ]
However, if you needed to find every span that was the last child of a paragraph element, you would use :last-child instead:
$("p span:last-child");This uses each parent as a reference instead of the DOM as a whole, so the results are different:
>>> $("p span:last-child");
[ span, span.foo ]Forms are a huge part of web sites these days, and their major role inspired a set of filters specifically geared toward forms.
Because your HTML example does not have any form elements in it, you'll need to append the file with some new markup for the following examples.
In index.html, add the following HTML between the last paragraph tag and the first script tag:
<form action="#" method="post">
<fieldset>
<legend>Sign Up Form</legend>
<label for="name">Name</label><br />
<input name="name" id="name" type="text" /><br />
<label for="password">Password</label><br />
<input name="password" id="password"
type="password" /><br /><br />
<label>
<input type="radio" name="loc" />
I'm on my computer
</label><br />
<label>
<input type="radio" name="loc" checked="checked" />
I'm on a shared computer
</label><br /><br />
<input type="submit" value="Log In" /><br />
<label>
<input type="checkbox" name="notify"
disabled="true" />
Keep me signed in on this computer
</label><br />
</fieldset>
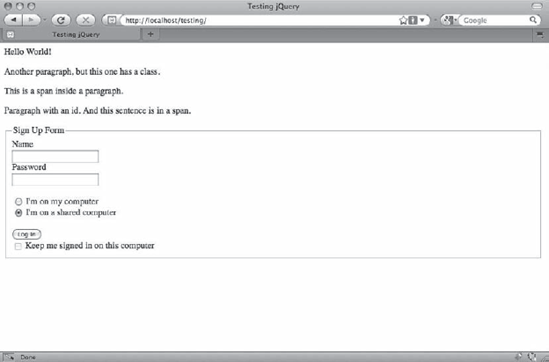
</form>After saving, reload the page in your browser at http://localhost/testing/ to see the form for testing (see Figure 1-5).
The most common form-specific filters simply match form element types. The available filters are :button, :checkbox, :file, :image, :input, :password, :radio, :submit, and :text.
To select all radio inputs, use the following code:
$("input:radio");This outputs the following in the console:
>>> $("input:radio");
[ input on, input on ]
These filters are particularly useful because all of the provided types are input elements, so matching certain types of inputs only without these filters would be a little more difficult.
Additionally, filters to select enabled or disabled form elements are available using :enabled and :disabled. To select all disabled form elements, use the following code:
$(":disabled");This outputs the following in the console:
>>> $(":disabled");
[ input on ]
The "Keep me signed in on this computer" check box is disabled, and therefore returned, by the :disabled filter.
Radio and check box inputs have a checked state, and select inputs have a selected state. Filters are provided to retrieve the form elements that are in either state using :checked or :selected, respectively.
To select the currently checked radio button in your HTML example, execute the following code in the console:
$(":checked");This returns the radio input that is currently selected in the console:
>>> $(":checked");
[ input on ]In this chapter you learned what jQuery is, why it was created, and the basics of how it works. You also went over setting up a development environment using XAMPP, Firefox, and the Firebug plugin.
At this point, you should feel comfortable selecting elements from the DOM using jQuery's powerful selector engine. This chapter was a tad dry, but it's important that you fully understand the how of jQuery before moving on to heavier bits of coding.
In the next chapter, you'll be learning how to traverse, access, and manipulate the DOM using jQuery's built-in methods.