
All Drupal source code is in standard text format, so you could use any text editor to create and edit code. For those with more macho flash than deadlines, this is certainly an option. For the rest of us, there are visual development environments. In this chapter, I cover the steps required to install the Drupal core and the tools you need to add modules and start your own development process.
To get Drupal up and running, you must first pick a hosting environment. This can be either your own server or a shared server environment. Many internet service providers (ISPs) offer Drupal as a standard application, and usually provide a Linux account with FTP and shell access.
If you have your own servers or want to put a Drupal development environment on your workstation or laptop, you'll need to install the Drupal bits yourself.
Drupal consists of a set of modules called "the Drupal Core." The core contains a number of required modules, which are automatically enabled when the service is installed. Plus, there are a number of optional modules that are handy to have, but not needed in all circumstances.
Note
The Drupal maintainers are constantly balancing the goals of making Drupal useful while keeping it simple. There are always discussions about what functionality and which modules should be included in the core distribution. This discussion became somewhat heated as the architecture of the Drupal 7 upgrade was in the works, and it will probably heat up again as the authors of contributed modules try to get their code into the Drupal 8 core.
Some modules included in the Drupal core are not enabled by default, such as the Blog module. Though blogging is common on many sites, it is certainly not universal. For this reason, Blog is included in the core, but not enabled. On the other hand, every site has pages and most have articles, so these are included in the core distribution and they are enabled. You can disable them later if you'd like.
If your service provider offers Drupal as a standard service, it probably also offers to keep the core and common modules updated according to the available releases. That's just one less thing you have to worry about.
On the down side, using an ISP's standard Drupal application usually means you are running Drupal on a machine shared with dozens or hundreds of other users and sites—which could significantly slow response time. Plus, by having your application hosted, it is difficult or impossible to carry out certain performance-tuning tasks.
Drupal Gardens, by Acquia, is an example of an easy-to-use hosted environment. It was probably the first site to use Drupal 7. Acquia has added special modules to make starting a site very easy. It is definitely designed for those who have little or even no experience with Drupal. You can get a site up and running quickly without knowing anything about programming.
On the other hand, Drupal Gardens does not allow you to upload your own modules. This model focuses on users rather than programmers.
If you want to be able to upload your own modules, you'll need to find a hosting service that allows that capability. For an exhaustive list of ISPs that host Drupal, visit http://drupal.org/hosting.
For a hosted application, most of the installation steps are already done. The provider probably has a multi-site Drupal installation running, and the provisioning of your site is just a matter of them running a script to add your domain name to their multi-site installation and adding some directories to your shell account directory structure.
If an ISP offers Drupal as an application, it probably also offers MySQL as a database. A pretty common setup is a single instance of Drupal plus 25 MySQL database instances.
Tip
You can host a number of individual sites with this single instance, each of which can use a single database or a shared database. For simplicity, it is probably best to use one database per site.
There are as many techniques for installing Drupal as there are service providers offering that service. It's best to check with your chosen provider for details.
If you are doing development, you'll probably want to set up the Drupal core code on your local machine.
The big advantages of doing your own installation are:
You have complete control over the application.
Depending on your user authorities, you can tune your setup to optimize performance and response time.
You can add custom debugging tools, particularly those that interact with the core modules.
Installing your own Drupal application is pretty straightforward. Note, though, that in taking the initiative to install your own you also are responsible for keeping the core and contributed modules uptodate. A module that is invoked by your server's scheduling system (usually cron) will tell you when modules need to be updated.
First, you should have the required services installed and ready. This includes:
Operating System. You're probably using Windows. I've tested the entire stack on Windows XP and Windows 7. Otherwise, you can use Macintosh or most Unix or Linux versions.
HTTP Server. This is sometimes called a web server. You could use IIS, but it's easier, at least to get started, to use Apache, an open source HTTP service.
Database. MySQL is the best choice for new users because of its support by the community and in the code itself. In Chapter 9 we will learn about the data abstraction layer, which isolates the programmer from a particular database engine.
PHP. For Drupal 7, you can use PHP version 5.2 or 5.3. Even though PHP 5.3 is a more advanced version with more features, PHP 5.2 remains supported by Drupal 7 because many service providers have not upgraded yet.
Fortunately, you don't need to choose all of these for yourself. I've worked with two different pre-packaged collections of tools, XAMPP and WAMPServer. They both use the same components but have different wrappers to make it easy to install and use. I prefer WampServer simply because it allows an easy change between PHP versions 5.2 and 5.3.
For information about installing WampServer and integrating everything with Visual Studio, see Appendix A.
Next, download the Drupal core bits. A tarball is available from the drupal.org site. For Windows developers, a tarball is basically a compressed library, similar to a ZIP file. In fact, your favorite unzipping tool—7Zip(a free archiver), WinZip, WinRAR, etc.—will probably recognize the .tar.gz extension and do the right thing. I use Total Commander because of its familiarity and awesome set of features.
Unpack the files wherever you like. I use the WAMP directory structure just to make things easier—C:wampwwwdrupal7. It doesn't matter where you put them, as long as you tell Apache where they are.
By default, Apache is configured to use C:wampwww as its root. If you put your Drupal installation under that directory, you will be able to access it but you'll always have to enter an extra path, i.e., http://localhost/drupal7. Just like in IIS, you can specify your root directory to be anywhere you want.
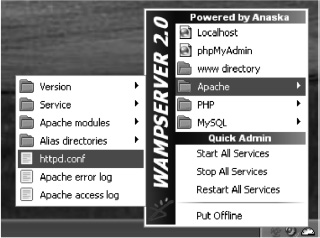
To do this in Apache, you need to edit the HTTP daemon configuration file, httpd.conf. The easiest way to do this is through the WampServer control panel, as shown in Figure 4-1.
This will bring up the configuration file in the text editor shown in Figure 4-2. Search for the line that contains DocumentRoot and change it to the directory where Drupal's index.php file is.
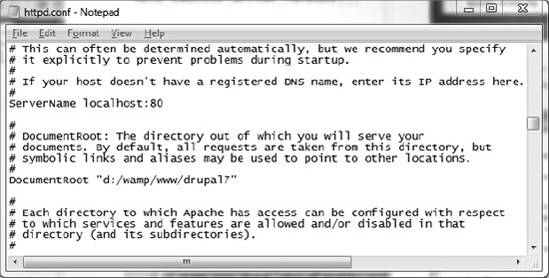
Notice that the configuration file uses forward slashes instead of the standard Windows backslashes. You could probably use either, but I've gotten into the habit of using forward slashes for any piece of software that has a Unix lineage.
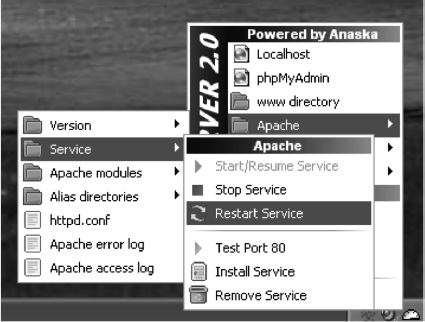
Whenever you make a change to Apache's configuration file, you need to restart the service asApache only reads the configuration file when it starts (see Figure 4-3).
Make sure the WampServer indicator is white and the needle is pegged to the right. If it isn't, there's a chance that there's something wrong with your path or that you accidentally changed something in the configuration file.
If there's a problem with Apache starting up, you can take a look at the logs. There are actually two logs, the error log, which shows any errors that Apache discovered, and the access log, which indicates the access activity of the server. Both are accessible from the WampServer control panel.
Good luck with these. They are quite voluminous.
Tip
A utility that shows only the last part of a text file (like the tail command in Linux) can be helpful in analyzing these logs, especially during debugging.
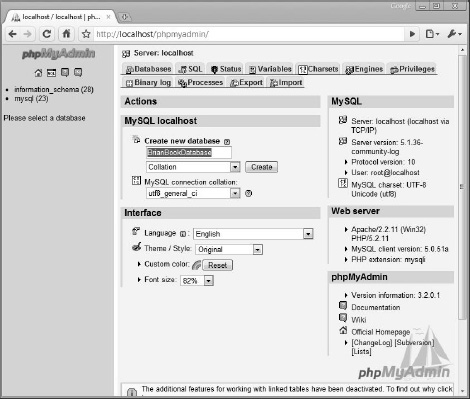
Before starting Drupal, you'll need to create a MySQL database instance to hold all of the tables. MySQL has a command-line interface you can use to create the database instance, but there's also a web-based interface, which I prefer because I just bought a new mouse. Once you're familiar with the workings of MySQL, you may want to switch to the command-line version so you can script new sites.
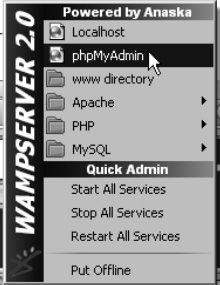
From the WampServer icon, select phpMyAdmin from the menu shown in Figure 4-4. That's the web-based interface to MySQL.
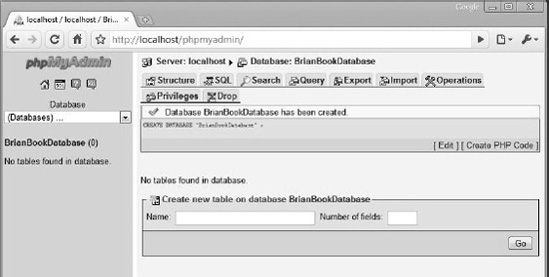
This will load the application in your default browser. You'll want to create a new database. Give it any name that feels good to you. (See Figure 4-5.)
You'll see a confirmation screen like the one in Figure 4-6.
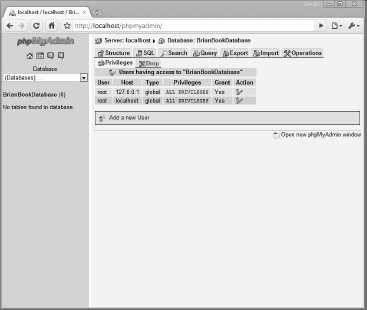
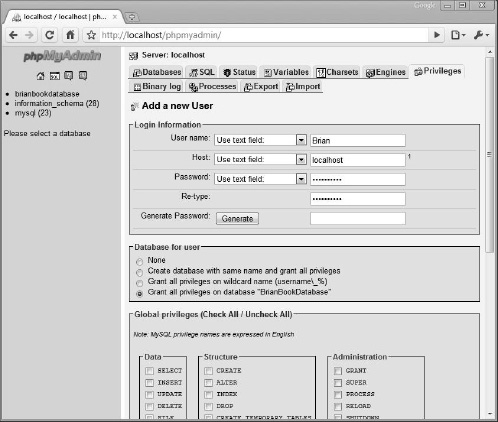
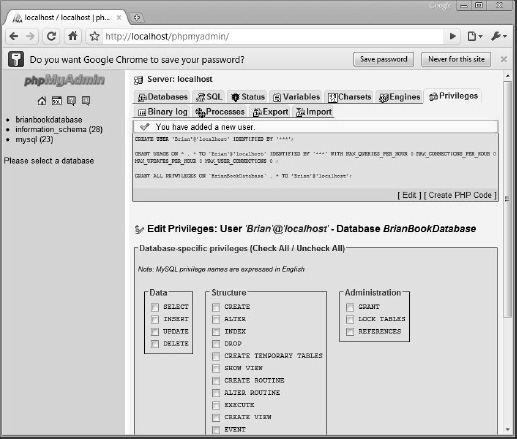
Now we need to create a user and set some privileges for the new database. Since you are the administrator of this machine, you have root access. Click on "Privileges", and then "Add a new User", as shown in Figure 4-7.
Create a user name and password. This is the account that will be used by Drupal to access all portions of the database, so we need to grant it all privileges. (See Figure 4-8.)
You'll see the confirmation shown in Figure 4-9.
That's it for the database. The Drupal installation process will create the tables and populate them with the necessary information for bootstrapping your site.
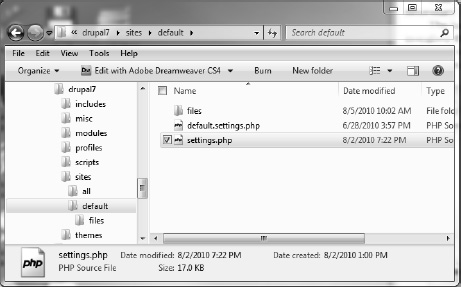
The last preinstallation step is to create a writeable settings file that the install program will use. When you installed the Drupal core bits, it included a default settings file, default.settings.php. You'll need to make a copy of this. The file is in the directory where you installed Drupal, under sites/default. Copy default.settings.php and give the copy the name settings.php. (See Figure 4-10.)
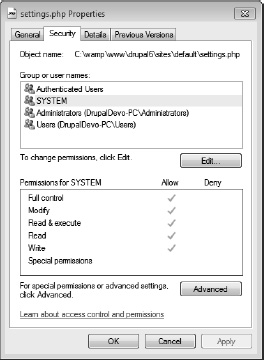
Make sure the file is writeable by SYSTEM. Right-click on settings.php and select the Security tab, as shown in Figure 4-11.
The next step is to configure the site.
Once you've created the database and settings.php file, you can open the site using a web browser and have Drupal go through its configuration process.
Load your favorite web browser. I used Google Chrome for this because of its light weight and minimal features.
Make sure the WampServer services are running and then enter http://localhost in the browser address bar. Assuming you have Apache listening on port 80 (the default), this will invoke Apache and load index.php in the server's document directory.
The Drupal core will check the new settings.php file to see if there's a database specified. Since this is a fresh install, that test will fail and you'll be directed to the site configuration page, install.php, shown in Figure 4-12. You can choose whether to load a standard set of features or a minimal set.
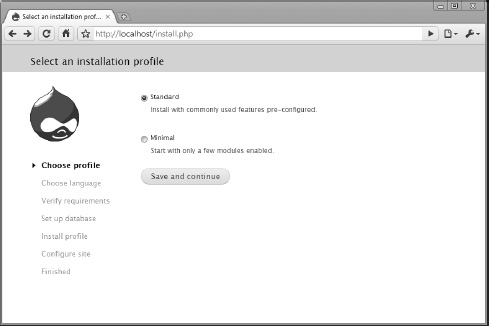
The Minimal installation profile enables only the help subsystem, user management, and vital system functions. Standard loads all of the core modules and enables the most common ones.
After clicking "Save and continue", you have the opportunity to install your language of choice (see Figure 4-13).
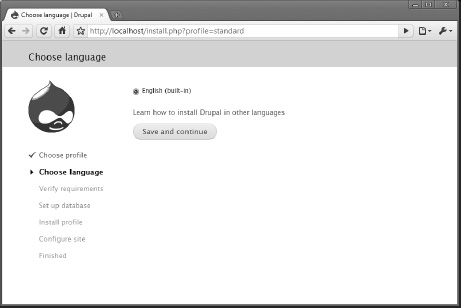
If you want to install Drupal in other languages, via con dios, amigo; you're on your own. I've only done this in English. If you need other language support, though, you'll find a great network of people devoted to localizing Drupal. The localization efforts for Drupal are centered on the community site, http://localize.drupal.org.
Now it's time to tell Drupal about your database(see Figure 4-14). Here, you insert the name of the database you created earlier, along with the username and password.
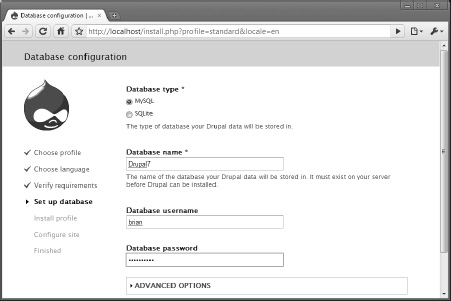
You can also specify some options here, including the name of the host if it's not localhost, and a nonstandard port for communicating with the database. There's also a setting that lets you prefix all tables. Ideally, you'll have an entire database instance to yourself for your site. But if you find yourself in a situation where you must share your database instance with other instances of Drupal, you can cause each table to be prefixed with a string so that all sites can live together. Not an optimal situation, but it's nice to know that such a capability exists.
Once the installation program has this information, it will start its work (see Figure 4-15).
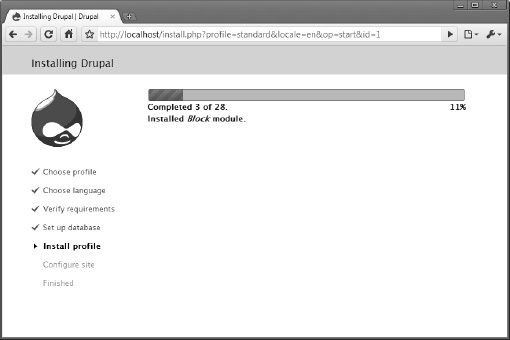
This process will take a few minutes as the modules are loaded into the database tables and enabled.
When this step finishes, you'll see a screen asking you to enter information about your site (see Figure 4-16).
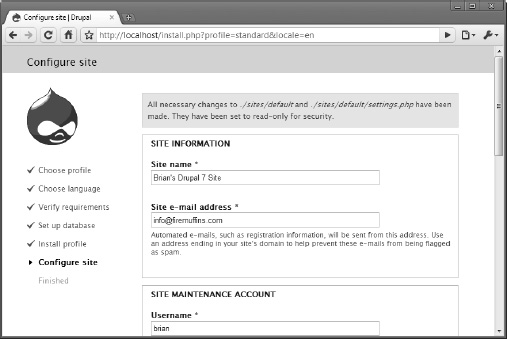
Figure 4.16. Adding information about your site, as well as the name and password of the super administrator
Now you can enter information about your site. The name and password you enter here are for the administrator. There is only one administrator, and that account has access to all aspects of the system. Later, you can create a role called "administrator" or "admin" or "site god," but that will be for just normal users that the real administrator can grant or revoke access to.
Because of the super-administrator access this user has, it's important to remember the name and password and keep it secure. There is a technique for resetting the super-administrator's password, but it requires access to the database root user if you haven't given a valid e-mail address or don't have a mail server wired up to your site.
Tip
If you forget the super administrator's password, you can have the system e-mail you the password—assuming you've set up a proper e-mail address and your SMTP server is running. As a last resort, it is possible to log on to the database and change the password for user 1. This will require salting the password and inserting it into the database. Best not to lose the password.
Once this information is set, click "Save and continue". You'll hear gears grinding and see puffs of smoke coming from the exhaust manifold as Drupal creates the tables. And then you'll see the lovely completion screen, as shown in Figure 4-17.
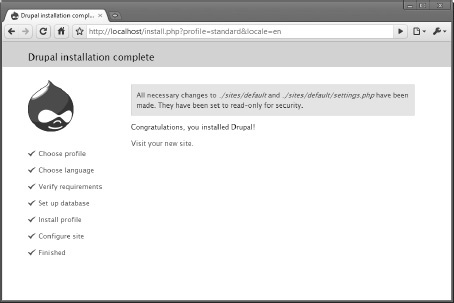
From here, clicking on "Visit your new site." will take you to your site's default page, which is now quite lonely. (See Figure 4-18.)

The first thing you'll want to do before we get into debugging is to set up Clean URLs.
By default, Drupal uses general-purpose URLs to display content. All content, regardless of its type, is stored and accessed as a thing called a "node." Each node has a number, which Drupal assigns when the node is created. This is an integer and it increments with each new node of any type.
Because of this architecture, Drupal content is accessed using URLs that contain the node identifier (nid) as part of the query: http://drupalforwindows.com/index.php?q=node/6. This isn't a very friendly way of accessing nodes, especially if you want to publish a URL for a particular page, say http://drupalforwindows.com/catalog or something like that.
Fortunately, Drupal has a way to work with your web server to rewrite friendly URLs like this into Drupal's internal format.
If you are in a hosted environment, your service provider probably already has this feature turned on, but if you loaded WampServer, it is turned off by default.
Open the httpd.conf file from the WampServer control panel as you did earlier. The configuration file will show up in your default text editor, probably Notepad. (See Figure 4-19.)
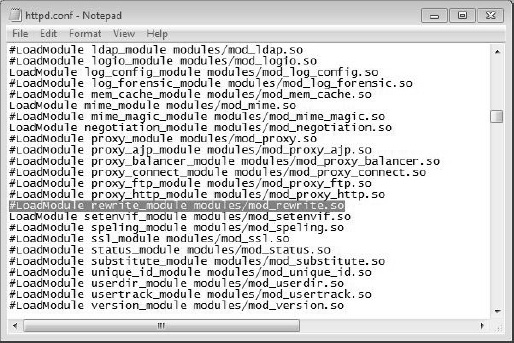
Look for the line that loads the rewrite_module. It will probably have a hash in front indicating that it is commented out. Remove the hash, save the file, and restart Apache so it can read the new settings.
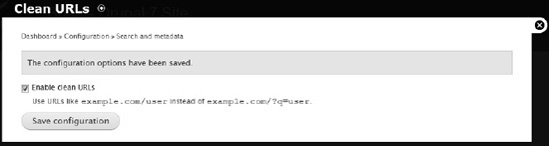
Now, go back to your new site and click "administration section," which will take you to the main administration page. Find Clean URLs under "Configuration" and click it. (See Figure 4-20.)

If you have enabled the rewrite module successfully, the "Enable clean URLs" box will be checkable. Check the box and click "Save configuration". You will see the success screen shown in Figure 4-21.
Drupal will check to see if the server has been set up to allow clean URLs. If it has, you'll get a green band of goodness and the "Enabled" radio button will be selected. There are some stubborn scenarios in which clean URLs just won't work. For a thread on various places to look, see http://drupal.org/node/128068.
Now that we've gotten all of the prerequisites, it's time to load the project into our development environment and get to work!
I'm assuming you've loaded Visual Studio and VS.Php. You'll find guidelines for this in Appendix A. For the screenshots that follow, I use Visual Studio 2010 Ultimate and VS.Php 2.9 as described in Appendix A. If you use a different combination of versions, you'll see something slightly different, but it should be similar enough to deal with.
First, let's load the Drupal core into Visual Studio with a new project. From Visual Studio, select File
Clicking "Next" takes you to the screen asking for the location of the existing code. (See Figure 4-23.)
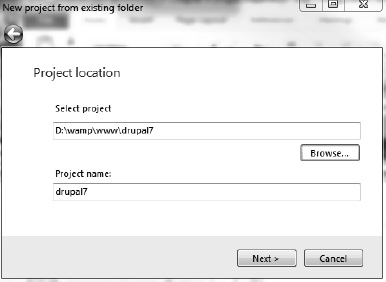
This is the directory where you installed the Drupal bits. Notice that this is the same as Apache's DocumentRoot setting. Give the project a name you like and press "Next >". This takes you to the project type screen shown in Figure 4-24.
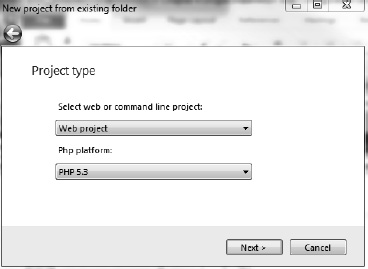
Be sure to select Web project so the appropriate tools are incorporated into the development environment. You can select either PHP version 5.2 or 5.3.
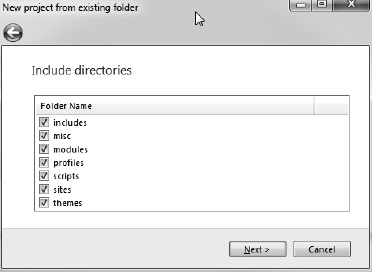
The wizard will scan the directory and ask which subdirectories to include in the solution. Since you're in the process of learning Drupal, it's probably best just to include everything for now. This will allow you to step-debug the entire core so you can see how things work. (See Figure 4-25.)
That's the last step; press "Next >" and then "Finish".
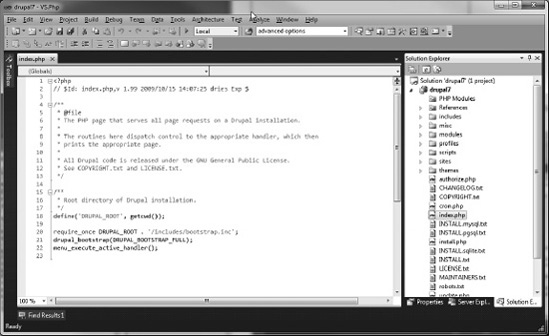
The project will load and you'll see the familiar Visual Studio environment. You are only a couple steps away from starting a debugging session! (See Figure 4-26.)
By default, Visual Studio will use Internet Explorer as the browser for the debugging session. If you'd rather use a different browser, you need to install it and set it as your default browser. Then, in Visual Studio, select Project
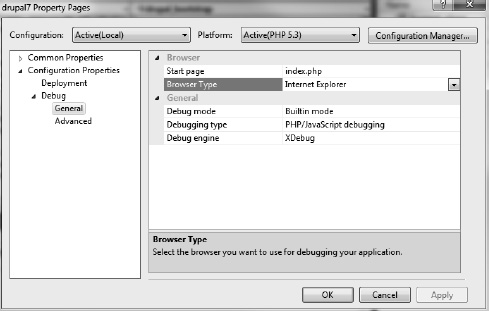
As you might expect, Internet Explorer is slightly more integrated with Visual Studio, but I've used both Google Chrome and Firefox as the default browser and debugging works well.
All Drupal calls route through index.php in the document root. This is the jump-off point for all page building. The best way to start learning how the Drupal core works is to put a breakpoint in that file just where the bootstrapping occurs.
So find the line that has the drupal_bootstrap() function call and set a breakpoint using F9. (See Figure 4-28.)

Now just press F5 to start debugging. Depending on your firewall settings, you might see a notice that VS.Php is trying to access the network, as shown in Figure 4-29.
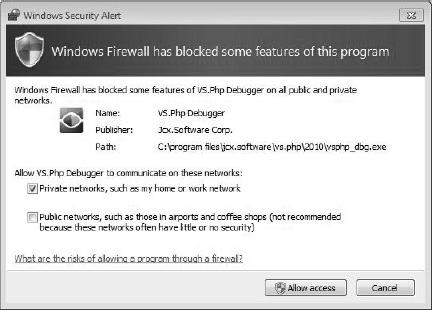
Select the options that make you feel comfortable and click "Allow access". If you don't let the program have access to at least your internal network, you won't be able to do any debugging.
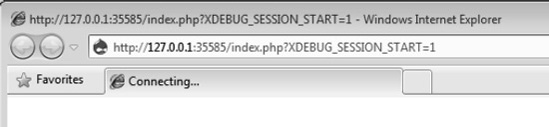
Just as it does when debugging ASP.NET, Visual Studio will start an instance of the web server, in this case Apache. Also, as with ASP.NET, it will pick a somewhat random port and fire off the web browser associated with the project. By default, this is Internet Explorer.
As a clarification, recall when we configured our Drupal installation earlier in this chapter. We accessed the site using simply http://localhost, which used the Apache installation that came with the WampServer tool. When you enter debugging mode from Visual Studio, the PHP add-in, VS.Php, will invoke its own version of Apache that has extensions for debugging using Zend. (See Figure 4-30.)
Visual Studio then attaches to this process so the breakpoints and variable interrogation work inside the tool.
Tip
If you are using the WampServer version of Apache, you'll access the configuration file, httpd.conf, from the WampServer console. However, If you are using VS.Php, the configuration file is at C:Program FilesJcx.SoftwareVS.Php2010httpd-template.conf. This is copied and a modified version is instantiated whenever a new instance of Apache is fired off from Visual Studio.
In addition, VS.Php also has its own copy of PHP, the configuration file for which is at C:Program FilesJcx.SoftwareVS.Php2010Php 5.2php.ini. VS.Php does use the MySQL installation from WampServer, however.
Now that that's out of the way, let's start exploring the Drupal core with the Visual Studio debugger.
By this time, the breakpoint you set above has been hit, and Visual Studio is waiting for you to do something. Pressing F11 will step into the drupal_bootstrap() function. (See Figure 4-31.)
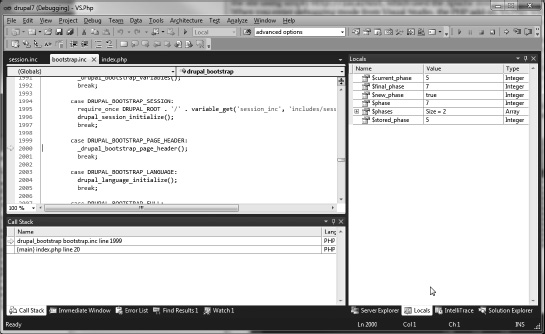
From here, you can use all of the familiar keys for stepping through the code, plus you can interrogate variable values and automatically display local variables with Visual Studio's Locals window. Of course, all of the other debugging features, like the Call Stack and Watch lists, are available.
So take a while and walk around the code to get a feel for how the Drupal core works.
In this chapter, we installed the Drupal version 7 core code, created a database, and configured a site using Drupal's installer program. We also loaded the project into Visual Studio using the VS.Php add-in. As I mentioned earlier, there are a lot of development environments you can use for PHP and Drupal, but I like Visual Studio with the VS.Php add-in because Visual Studio is the environment I'm most familiar with. You are certainly free to use whatever environment you'd like, but I'll continue to use VS2010/VS.Php in this book.
In the next chapter, we will create our first module and debug it using Visual Studio.