
Core concepts in Drupal include blocks, hooks, forms, and menus. Understanding how these things work and interact with each other is critical when you build custom modules.
The main method used to modify the Drupal core or any contributed module is through the hook framework. This is what gives Drupal its flexibility and, frankly, makes things really hard to understand at first. Without inspection tools like tracing debuggers, it is difficult to follow who is grabbing the page, processing it at what point in the page lifecycle, and what they are doing with it.
The Drupal bootstrapping framework takes care of making sure that anyone who needs to have a say in how the page is built gets to have their say.
In order for your module to "have a say," you'll need to create a function with a carefully crafted name inside of a similarly named file in a certain place in the web server file hierarchy. The bootstrapper will interrogate each module to find out who needs to be involved, and invokes the function on all interested parties.
In this chapter, we will create a custom module that will grab from the user the name of some location on earth and pass that to a weather reporting service, which will send us back an XML document containing current weather conditions and a four-day forecast.
This chapter is a hands-on tutorial for creating an entire module, using many of the features you'll use for your own custom module development. Drupal is so rich, however, that we will only touch a small number of all of the features that are available. Still, the information here should help get you through the beginning of the learning process to the point where you can start to make sense out of the incredible amount of support information that's available from the Drupal community on the Internet.
This tutorial will be using modules, blocks, hooks, menus, and web services.
Before we get started on the code, you should understand what a Drupal block is. Essentially, a block is a chunk of content that gets placed in a region on a page.
A page consists of a number of regions—based on your site's theme—that can hold dynamic content, static material, or forms. Regions have names like Header, Content, Footer, and so on. If you develop themes, you can create your own set of regions and name them whatever you want, but there are certain guidelines and customs you should follow. For more information on how regions are created and named, see Chapter 7.
The theme-based regions provide a very flexible method of building and customizing a page. You do this by placing a block into a region. Blocks are created by modules and they provide fundamental things we are interested in. For example, there's a block called "Recent content" that contains a list of content that was recently added to the site. A block called "Who's online" contains a list of currently connected users.
Blocks are created by modules and regions are created by themes. Assigning a block to a region is accomplished by going to the Blocks page, which is accessible from the Structure tab on the main menu. (See Figure 5-1.)

Figure 5.1. The Blocks page allows certain content items to be placed at various locations on the page.
On this page, you'll see all of the blocks that are available to you. These are defined by the various modules you've installed and enabled. You'll see how a block is created as we work through this tutorial.
To see your page with the block regions highlighted, click "Demonstrate block regions". (See Figure 5-2.)

Notice the Header, Sidebar first, and Sidebar second regions. Blocks can be assigned to these regions, and you can use this page to indicate what goes where and how they are ordered.
Back on the Blocks page, you can see all of the blocks that are available to be placed into these regions, as shown in Figure 5-3.
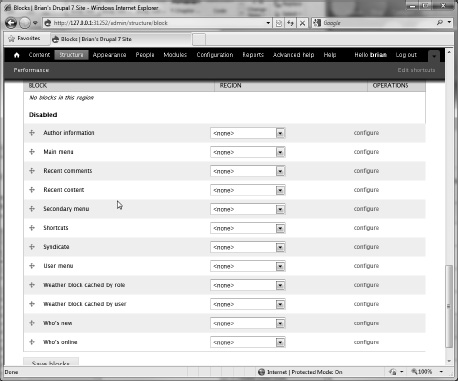
Notice that for each block, there is a pull-down menu that repeats all of the regions that are available. This page provides a graphical way of declaring what block goes in which region, and allows you to move them around using a drag-and-drop interface. Just be sure to hit the "Save blocks" button at the bottom before moving on.
There are six default regions in a Drupal theme:
Left sidebar
Right sidebar
Content
Header
Footer
Help
As you would probably expect, you can define your own regions, and many themes do just that. For now, that's not important. Our task is to create our own custom block that will display in any region that is available.
We will be creating a new module from scratch. We will do this by adding some files to the hierarchy that was defined when we installed Drupal. The first thing we need to do is to create a directory to hold our code. Under the document root directory of your site is a directory called "sites."
Note
Drupal allows for a so-called "multi-site" configuration, where you can have as many different sites as you want all share the same server and IP address. Drupal interrogates the URL to figure out where the request should go and invokes the appropriate logic.
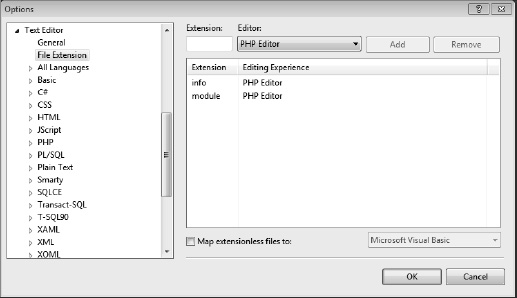
First, we need to tell Visual Studio that some nonstandard file extensions should be identified and associated with the PHP editor.
The main PHP program file for Drupal has the extension, .module. A second required file that contains metadata about the modulehas the extension .info. To make Visual Studio identify these extensions and behave accordingly, you can add them in Visual Studio at Tools
Click OK and go back to the Solution Explorer. You'll notice that there's a directory called all under the sites directory. If you have features you'd like to share among all sites, this is where you'd put your site.
Since we are creating our site in a development environment, let's just put our modules and themes in that directory.
Using Visual Studio, create two new directories if they don't already exist, modules and themes. And then, under the modules directory, create a directory that will hold our custom module, weather_info.
The Drupal community has published some guidelines for naming modules.
You should use only letters and underscores in your module's name.
Don't give your module the same name as any existing core or contributed module. You can check the list at
http://drupal.org/project/usage.You shouldn't use a core or contributed module's name in the beginning of your module name.
In the weather_info directory, create three files:
weather_info.infoweather_info.incweather_info.module
When you're done, your directory structure should look like the one in Figure 5-5.

The .info file is required for any Drupal project. It is used to tell Drupal some helpful things. At a minimum, the .info file should have some descriptive information to help Drupal when the module is enabled. (See Listing 5-1.)
Example 5.1. The .info FileTells Drupal Important Information about a Module
; $Id$
name = Weather information
description = A block that shows current weather for a particualr location.
package = Cool stuff from Brian
core = 7.x
files[] = weather_info.module
version = 7.x-0.as-alpha-as-it-gets
The .info file must contain a name, description, core, and files array. The version and package lines are optional. The files array indicates all of the files that will be included in the module. We'll be adding more as we go along.
Let's open the module file now and start coding.
Note
The Drupal.org site is a great place to get detailed information on Drupal's functions. You'll find a complete API reference there, and a lot of comments and examples.
http://api.drupal.org/api/7is a good place to start.http://api.drupal.org/api/functions/7lists functions.http://api.drupal.org/api/function/hook_block_view/7describes theblock_viewhook we are about to use.
First, we'll create a rudimentary block. This is done by utilizing a hook that will be called as part of the hook processing logic. In weather_info.module, create the weather_info_block() hook function shown in Listing 5-2.
Example 5.2. A Basic Module File for Declaring a Block
<?php
// $Id$

function weather_info_block_info() {
  $blocks['user_custom'] = array(
    'info'    => t('Weather block custom for each user'),
    );
  return $blocks;
}

function weather_info_block_view($delta='') {
  $block['subject'] = t('Get Weather'),
  $block['content'] = t('Initial content goes here.'),
  return $block;
}
The important things to note here are:
The names of the functions are critical so that Drupal can find them. A name consists of the name of the module (
weather_info), followed by the type of hook,(_block_infoand_block_view). The Drupal bootstrapper will search for all registered modules and then look for any hooks that a module may have. Eventually it will find them if the names are crafted properly.The comment
//$Id$is optional for now, but it provides a place for the revision control system to attach version information should you go that route.The variable
$blocks['user_custom']will be used in the list of blocks available for adding to page regions. We can define any number of different blocks, each with a different name and set of parameters.The
$block['subject']and$block['content']variables contain the information we actually want to render on the block when the page is built.The logic that calls this hook understands that it will be receiving a block with certain values set, so that's what we give it.
You'll notice that all text strings are enclosed in a function called
t(). This is Drupal's translate function. It is good programming practice to use this so your programs can be translated into other languages.
Tip
Even if you don't think your program ever will be translated into another language, the t() function provides some other nice features, such as string sanitizing and variable replacement. You should get into the habit of using it.
Another reason to use the translate function is that even if you don't want to localize your module, someone else might. For more information on how the Drupal community supports localization, check out http://localize.drupal.org/.
That's the minimum to get us started. Let's enable the module and add the block. First, set a couple breakpoints to your code so we can watch as things progress. You do thisjust as you would in any other Visual Studio language: click in the breakpoint margin or put the cursor on the line and press F9. (See Figure 5-6.)

Press F5 to start the debugging session. Drupal will start its bootstrapping process. For more information on how the Drupal bootstrap function works, see Chapter 2. Note that you might get the User login screen and wonder why you need to login again, as shown in Figure 5-7.
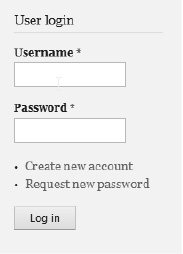
The reason is this: even if you logged in and had your browser save your username and password, every time VS.Php starts a debugging session, it picks a random port and starts the web server. Even if your browser saved the username and password the last time, it thinks you were on a different site. So get accustomed to signing in a lot.
Note
There is a way to avoid this problem. In Visual Studio, under Project
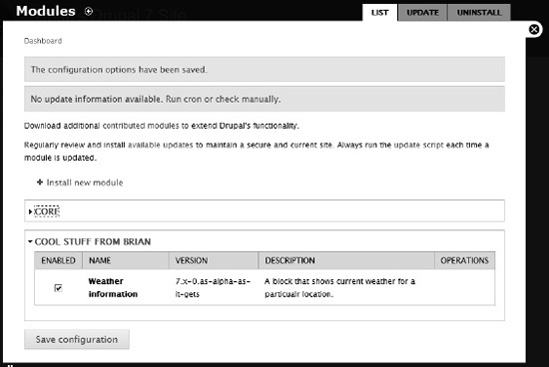
Now we need to enable the module we just created. From the administrator menu, select Modules.
Drupal will look at each directory under /sites/all/modules (among others) and look for any .info files that match the name of the directory they are in. If you did everything right, it'll find your new weather_info module. (See Figure 5-8.)

Notice that the screen shows the information as it was listed in the .info file, including the typo. The module placed the line under the "Cool stuff from Brian" area, and it grabbed the name, version, and description just the way we put it in the .info file.
Now all we need to do is to click the checkbox in the "Enabled" column and then scroll to the bottom and click "Save configuration" as shown in Figure 5-9.
We get the happy screen with a green notice indicating that our module has been added to the site's list of enabled modules.
Now, click on Structure in the main menu, and then Blocks. Notice that the breakpoint caught the weather_info_block_info() hook. (See Figure 5-10.)
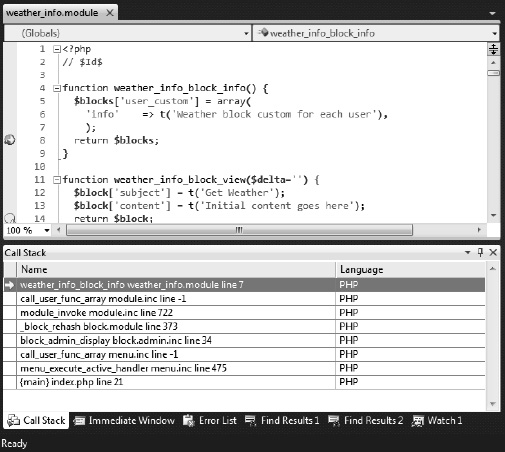
This was executed by someone who called module_invoke_all('block_info'). For more information on how the Drupal page is built, see Chapter 2.
Press F5 to continue executing. You'll see the Block screen. Scroll down to see our new block (Figure 5-11).

Notice that the name of the region, "Weather block custom for each user" was set by the 'info' property of the array created in the weather_info_block_info() function. In the pull-down next to Weather information, select "Sidebar second" and then scroll up to see where it landed. (See Figure 5-12.)

Notice that the background is a light yellow. This screen is designed so you can drag and drop the blocks to various regions, but nothing is saved until you click "Save blocks" at the bottom of the screen. When you do, the weather_info_lock_info() hook breakpoint will be hit again. Press F5 to continue execution. Close the administration window by clicking the X in the top right of the overlay.
This time you'll see that the breakpoint you set on the weather_info_lock_info() hook will be hit. This is because Drupal now wants to load your block content in the region as it builds the page. Press F5 to continue execution.
When the page appears, you'll see your new block on the right sidebar. (See Figure 5-13.)

I hope you can see exactly what's happening here, because this is the steepest part of the learning curve. From here, it's just more of the same, building piece by piece, until you understand the inner workings of Drupal.
We'll continue to build this module by getting data from an external source and then making it look good. But first, let's talk about how the hook mechanism does its work.
At certain times in the Drupal page lifecycle, the page-building engine goes through a list of modules that have been enabled, and checks to see if there are any functions with names crafted like the one we just created. The internal process is called module_invoke_all() in module.inc. It looks like the code shown in Listing 5-3.
Example 5.3. The invoke_all() Function from the Drupal Core
function module_invoke_all() {
  $args = func_get_args();
  $hook = $args[0];
  unset($args[0]);
  $return = array();
  foreach (module_implements($hook) as $module) {
    $function = $module . '_' . $hook;
    if (function_exists($function)) {
      $result = call_user_func_array($function, $args);
if (isset($result) && is_array($result)) {
$return = array_merge_recursive($return, $result);
}
elseif (isset($result)) {
$return[] = $result;
}
}
}
return $return;
}The module_implements() function queries the database for all modules that have been enabled using the Modules page.
Running this right now, I can see that 32 modules are currently enabled. They are shown in Table 5-1.
Table 5.1. A ll Currently EnabledModules
Module Name | File Name |
|---|---|
|
|
|
|
|
|
|
|
|
|
|
|
|
|
|
|
|
|
|
|
|
|
|
|
|
|
|
|
|
|
| |
|
|
|
|
|
|
|
|
|
|
|
|
|
|
|
|
|
|
|
|
|
|
|
|
|
|
|
|
|
|
|
|
Once it has a list of all loaded modules, the module_implements() function executes a native PHP function, function_exists(), to see if a function called {module_name}_{hook} exists anywhere in the code, where {module_name} is the name of the module (that is, the name of the directory in the modules directory and the name of the PHP code file with the extension .module in that same directory) and {hook} is the name of the particular hook we are looking for. Now you can see why names must be carefully crafted and placed in the proper locations.
Note
In the Drupal documentation and in other places where Drupal developers talk among themselves, you'll notice a nomenclature that looks like this: hook_validate. That's the generic way of talking about a particular hook. In this case, it's the validate hook. So if you want to register code that is to be executed when the hook-processing mechanism is performing a form validation, you'd call your function module_name_validate, where module_name is the name of your module. This makes it easy when you are searching the tubes for information on a particular hook.
The hook mechanism is illustrated in Figure 5-14.
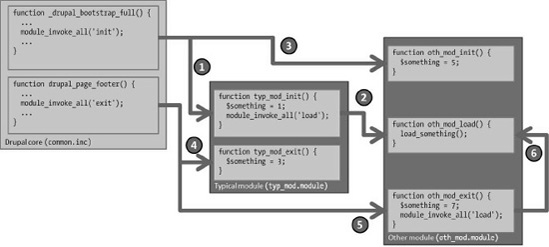
Let's walk through this a step at a time.
We start in the Drupal core file, common.inc, which contains a function that's called from the bootstrapper and executed in index.php. The function _drupal_bootstrap_full() calls, among other things, the module_invoke_all() function, passing the value 'init'. That function queries the database for all loaded modules and then starts to invoke the _init hook on every module that has an appropriately named function.
First,
typ_mod_init()is called. The modulestyp_mod.moduleandoth_mod.moduleare user-created modules.Notice that
typ_mod.modulealso has amodule_invoke_all()call. So you can see you can make use of the hook model just like the Drupal core does. Thetyp_mod_init()function passes the 'load' hook tomodule_invoke_all(), which invokes theoth_mod_load()function.When the
typ_mod_init()function finishes, control is returned to themodule_invoke_all()process of_drupal_bootstrap_all(), which looks for the next init hook to invoke, which isoth_mod_init().Other things happen in the building of the page, but at some point, the
drupal_page_footer()function is called. This function also callsmodule_invoke_all(), passing the 'exit' parameter, which causestyp_mod_exit()to be invoked.Next,
oth_mod_exit()is invoked because that function has the specially crafted name recognized as an exit hook.Notice that
oth_mod_exit()also callsmodule_invoke_all()with the 'load' parameter. It will call the sameoth_mod_load()function astyp_mod_init()did. This last step is pretty contrived, as you probably would not invoke a load hook while you are exiting, but the capability is there.
This just goes to show that anything can call anything else, and that you should be careful to understand the ramifications of using the module_invoke_all() function. With great power comes great responsibility, Peter Parker.
I encourage you to use this knowledge and the Visual Studio step debugger and watch the process as it happens. This investigation should give you basic insight into Drupal's core page processing engine, which will be helpful as you develop modules.
When you're done with your travels with the debugger, let's build more of the weather information block.
Two basic types of content will appear on your page, nodes and forms. Nodes are the main content, such as blog posts, stories, or custom types. Forms are the same as forms in any typical web application. That is, they are something in which the user can enter information and post it back to the server.
In the case of our weather information module, we want to get a small piece of information from the user, the location for which they are seeking weather information.
Our form will consist of a text input box and a submit button. The Drupal steps required to make this happen include:
Create the form itself with two fields.
Create a function to validate the information.
Create a submit function to process the request after the validation process is successful.
First, let's create our form and then tell it as we build the block where we want to put it.
Building a Drupal form requires creating a specially crafted array with the information that Drupal's form-building code will use. So, in the weather_info.module file, we'll create the form function shown in Listing 5-4.
Example 5.4. A Drupal Form forGetting a Piece of Information from the User
function weather_location_form($form_in, &$form_state) {
  $form['wx_info_title'] = array (
    '#value' => t('Location'),
    );
$form['wx_info']['weather_location'] = array (
'#type' => 'textfield',
'#size' => 20,
'#maxlengh' => 20,
);
$form['wx_info']['weather_location_submit'] = array (
'#type' => 'submit',
'#value' => t('Search'),
);
$form['#action'] = '/';
return $form;
}As you can see, this is a multi-dimensional array with a common first index, wx_info. The second index can be used to identify each element in the form when we process it on postback.
Note
The sharp-eyed reader will notice an error in one of the form attributes of the text field. If you don't see it, that's OK; we will discover it in Chapter 8.
Once we have the form, we need to include it in our block. We do that by calling the form with the drupal_get_form() function and then rendering it. The revised version of the weather_info_block_view() hook is shown in Listing 5-5.
Example 5.5. Grabbing a Form and Rendering It as HTML Output
function weather_info_block_view($delta='') {
$block['subject'] = t('Get Weather'),
$temp = drupal_get_form('weather_location_form'),
$block_content = drupal_render($temp);
$block['content'] = $block_content;
return $block;
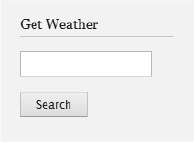
}This will render in the block as a familiar HTML form (see Figure 5-15).
There are many different values for #type, which roughly correspond to the familiar HTML form elements, as shown in Table 5-2.
Table 5.2. Drupal Form Element Types
The Drupal Forms API is available at http://api.drupal.org/api/group/form_api/7.
So now we have a form with a submit button and we need to do something with the information the user entered on the form. Drupal provides a two-step process.
First, we need to make sure the data is valid. Second, we need to process the data based on our rules. If the data doesn't validate, there's no reason to process the data.
The type of validation that is used will vary based on what the form is doing. For example, if a start date and end date are entered for some query, the validator might just check to see if the end date is greater than or equal to the start date. Or it might check to see if a field that is supposed to be entered as an integer is, in fact, an integer.
Our end result is to take the location information entered in the form and pass it to a service that returns current weather information and a four-day forecast. This service will take just about any text and try to figure out if it is a location for which it can get the weather conditions. The only way to validate that it is a proper location is to make the actual call to the service. We'll do that a little later.
We can, however, check for at least one obvious validation factor—whether the field has any text in it. Since we know that an empty request will end up as an error, that's an obvious check.
The task, then, is to utilize a hook to accept the call made by the form validator logic. This is called a validate hook, which we will name weather_location_form_validate() in our program. We create this function and declare the parameters we expect to get from the forms engine. That function is shown in Listing 5-6.
Example 5.6. Our hook_validate Function
function weather_location_form_validate($form, $form_state) {
$location = trim($form_state['values']['weather_location']);
if (!$location) {
form_set_error('weather_location', t('Location cannot be blank.'));
}
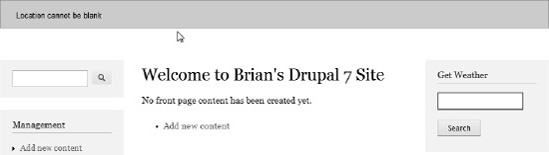
}The values of the form fields come back in the $form_state parameter inside the 'values' array item. The function removes leading and trailing whitespace characters and checks to see if the field is blank. If it is, it sets an error with the form_set_error() function. This prevents the submit hook from firing and immediately returns to the form with an error to the user. It also outlines in red the field that was listed as the first parameter. (See Figure 5-16.)
If the validate hook function (weather_location_form_validate()) executes without setting the error, the submit hook will execute. Let's create that now.
If the validate hook processes without setting the form_set_error() function, the submit hook will be called. The Drupal form-processing mechanism passes the same $form and $form_state variables to the submit hook, where we can interrogate them. Again, we need to create a carefully crafted function name consisting of the name of our form and the hook it is looking to grab, plus the parameters it is expecting to receive. Our function is shown in Listing 5-7.
Example 5.7. Our form_submit Function
function weather_location_form_submit($form, $form_state) {
  $location = trim($form_state['values']['weather_location']);
  variable_set('current_location', $location);
}
In this case, all we need to do is to save the current location in a persistent place. To do this, we use Drupal's variable facility. The variable_set(), variable_get(), and variable_del() functions maintain persistent data in your site's variables table. This is an easy way to set something that must be used later, but it comes at a price; setting or deleting a variable dirties the cache and performance could suffer as a result, especially for larger sites where caching is a requirement.
For now, though, let's use the variable facility and we'll explore another way to do it a little later.
Google provides a "secret" weather information service. It is largely undocumented, but has worked for years and I imagine it will continue to work for a while. There are other free services that return weather information, so if Google doesn't work for you, I'm sure you can find another one that does.
The URL is http://www.google.com/ig/api?weather=, followed by some location. The location can be anything that Google will be able to interpret as a valid geographical place.
Zipcodes work:
http://www.google.com/ig/api?weather=94107
shows up as
<city data="San Francisco, CA" />
Place names do, too:
http://www.google.com/ig/api?weather=paris
returns
<city data="Paris, Ile-de-France" />
The location must be URL-friendly:
http://www.google.com/ig/api?weather=san%20luis%20obispo
finds
<city data="San Luis Obispo, CA" />
If Google can't find a location, we get an error:
http://www.google.com/ig/api?weather=notaplace
returns
<problem_cause data="" />
First, let's look at the XML returned from the Google weather service.
<?xml version="1.0"?>
<xml_api_reply version="1">
  <weather module_id="0" tab_id="0" mobile_row="0" mobile_zipped="1" row="0" section="0" >
    <forecast_information>
      <city data="Paris, Ile-de-France"/>
      <postal_code data="paris"/>
      <latitude_e6 data=""/>
      <longitude_e6 data=""/>
      <forecast_date data="2010-06-08"/>
      <current_date_time data="2010-06-08 18:31:43 +0000"/>
      <unit_system data="US"/>
    </forecast_information>
    <current_conditions>
      <condition data="Mostly Cloudy"/>
      <temp_f data="68"/>
      <temp_c data="20"/>
      <humidity data="Humidity: 68%"/>
      <icon data="/ig/images/weather/mostly_cloudy.gif"/>
      <wind_condition data="Wind: S at 10 mph"/>
    </current_conditions>
    <forecast_conditions>
      <day_of_week data="Tue"/>
      <low data="58"/>
      <high data="72"/>
      <icon data="/ig/images/weather/rain.gif"/>
      <condition data="Showers"/>
    </forecast_conditions>
    <forecast_conditions>
      <day_of_week data="Wed"/>
      <low data="62"/>
      <high data="65"/>
      <icon data="/ig/images/weather/rain.gif"/>
      <condition data="Showers"/>
    </forecast_conditions>
    <forecast_conditions>
      <day_of_week data="Thu"/>
      <low data="59"/>
      <high data="71"/>
      <icon data="/ig/images/weather/rain.gif"/>
      <condition data="Showers"/>
    </forecast_conditions>
<forecast_conditions>
<day_of_week data="Fri"/>
<low data="57"/>
<high data="72"/>
<icon data="/ig/images/weather/rain.gif"/>
<condition data="Showers"/>
</forecast_conditions>
</weather>
</xml_api_reply>Hmmm. A rainy week in Paris. PHP comes with several different ways of processing an XML document, but I'd say that the easiest way is with the SimpleXMLElement object. When you load a string containing well-formed XML markup into the SimpleXMLElement object, it immediately becomes available to the programmer. The SimpleXMLElement object is a hierarchical representation of the structure of an XML document, allowing the programmer to use the element and attribute names to navigate through the document.
We are interested in the city name and the forecast in the weather information above. Getting to the city name requires just the following code (assuming $weather is the name of the SimpleXMLElement object that contains the document above):
$city_name = $weather->weather->forecast_information->city['data'];
Elements are accessed using object accessors and attributes are accessed using array index notation. You can also iterate over sub-elements using standard PHP control structures.
Now that we understand the interface, let's incorporate it into a function. PHP, being a web-savvy programming language, has a rich collection of features that provide access to the World Wide Web. Two features we'll take advantage of are file_get_contents() function and the SimpleXMLElement object.
The function that will call Google's web service could be used by other modules, so we'll include it as a separate file.
Like almost every computer language, PHP has the ability to include code from different files. In fact, PHP has four different methods.
include ('file_to_be_included.inc'),This includes and evaluates a file at that point in the source. All source will be treated as if it were written exactly at the point where theincludeis specified, even if it is inside a function. Iffile_to_be_included.incis not found, a warning is generated.require ('file_to_be_included.inc'),This works the same asinclude, except that if the file is not found, PHP will issue a fatal error and halt processing.include_once ('file_to_be_included.inc'),This works the same asinclude, except that it will do nothing if the file has already been included in the current processing run. Iffile_to_be_included.inchas not been included yet and is not found, a warning is generated.require_once ('file_to_be_included.inc'),You can probably figure out this one by its name. If the file hasn't been included and can't be found, PHP will issue a fatal error and halt processing.
I like to put function calls that don't have much to do with Drupal's processing, or functions that are called by several different modules, in include files. It helps to organize things. We will be creating a function that calls the Google weather service from one of our hook functions. This is a good place to set up an include file.
Create a new file in the same directory as weather_info.module and call it weather_info.inc. Unlike the module files that Drupal is looking for, there are no naming requirements for included files; they will just be included in the calling module or theme files.
Note
Before we go much farther, we'll need to add the included file into the .info file for our project. Add it to the files array following the weather_info.module line: files[] = weather_info.inc Your .info file should now look like this:
; $Id$
name = Weather information
description = A block that shows current weather for a particualr location.
package = Cool stuff from Brian
core = 7.x
files[] = weather_info.module
files[] = weather_info.inc
version = 7.x-0.as-alpha-as-it-gets
Listing 5-8 shows the function to call the weather. Put it in weather_info.inc. According to Drupal's programming guidelines, a function name should begin with the module name to avoid naming conflicts, but this is not a requirement to get the function to work.
Example 5.8. The weather_info_get_weather Helper Function
function weather_info_get_weather($location, $language) {
  $requestAddress = sprintf('http://www.google.com/ig/api?weather=%s&hl=%s',
    url($location), $language);
  try {
    $xml_str = utf8_encode(file_get_contents($requestAddress, 0));
    $weather = new SimplexmlElement($xml_str);

    if (isset($weather->weather->problem_cause)) {
      throw new Exception (t("Can't load %loc", array('%loc' => $location)));
    }

    if(!$weather) {
      throw new Exception ('weather failed'),
    }
  } catch (Exception $err) {
    watchdog ('weather_info', 'Cannot get weather for %location: %message',
      array('%location' => $location, '%message' => $err->getMessage()),
      WATCHDOG_ERROR);
    return null;
  }

  return $weather;
}
Note that our location could have spaces or other URL-unfriendly characters. Thus we use the sprintf() function so we can substitute a URL-encoded string. This function will make sure the string is properly formatted.
Notice as well that there's a string for the language parameter, hl. For now, we'll always pass 'en'. Later, we'll set a configuration variable so we can change it for each user.
The get_file_contents() function is pretty versatile. It can be used to return a string with the contents of a file on our machine or, as in this case, it can intercept the stream coming from an HTTP GET request and load it into a string. The SimpleXMLElement object requires a string to be encoded in UTF-8 format, but the data coming back from Google is in Unicode. The utf8_encode() function does the transformation.
This encoded string is immediately loaded into a SimpleXMLElement object. As I mentioned earlier, if the service can't parse the location string or can't find the location in its database, it will return an XML document that looks like the example in Listing 5-9.
Example 5.9. XML Document Returned with anUnfound Location
<?xml version="1.0"?>
<xml_api_reply version="1">
  <weather module_id="0" tab_id="0" mobile_row="0" mobile_zipped="1" row="0" section="0" >
    <problem_cause data=""/>
  </weather>
</xml_api_reply>"
We first check for the existence of the problem_cause element before proceeding. If there's an error, we tell the Drupal watchdog service. Watchdog writes to the log database and is accessible from the "Recent log entries" page at /admin/reports/dblog, as shown in Figure 5-17.
Clicking on the link will provide you with as much information as Drupal has on the topic. This is shown in Figure 5-18.

If everything goes fine, the $weather object| is returned, ready to be consumed. So let's write the code that calls this function. Back to the form.
While we're in weather_info.inc, there's one more function we need to write. I call it weather_info_temp() and it will return the temperature, along with the degree symbol and the measuring unit.
Warning
All function names in a PHP program must be unique. While it seems easy to keep track of this, remember that dozens or hundreds of programs may be loaded in a typical page. A function with a name like "temp" is pretty obvious, and there will likely be someone else who wants to use it. That would cause a function naming conflict and a critical error. Therefore, you should prefix your helper functions with the name of your module, which you have already determined is unique.
We need to pass the unit system that will indicate whether the units are returned in metric (SI) or British (US) units. This is hardcoded to "US" for now, but we will have to deal with it later when we change the language of the request.
The weather_info_temp() function goes in weather_info.inc and is shown in Listing 5-10.
When we last saw the form hook, we had created a text box and a submit button and had processed the form using the validate and submit hooks, which set the current_location variable. At that point, the weather_location_form_validate() function could only check to see if the location was blank. Now we have the ability to check whether the location is valid according to the weather service.
So we add a call to the function we just created to the validate hook as shown in Listing 5-11.
Example 5.11. The Form Validation Hook That Checks to See if the Location Is Valid
include_once ('weather_info.inc'),

function weather_location_form_validate($form, $form_state) {
  $location = trim($form_state['values']['weather_location']);
  $weather = weather_info_get_weather($location, 'en'),
  if (!$weather) {
    form_set_error('weather_location', t('Location %location not found.',
      array('%location' => $location)));
  }
}
Notice the include_once() directive at the top; remember that the function that gets the weather is in a different source file. We can test this by entering a location in the block form that can't be found and see what the validation function does. (See Figure 5-19.)
Now that we know the weather helper is working, it's time to modify the block hook to render the forecast above the text box and submit button. We'll do this by grabbing the XML file from the service and walking over it to find the pieces of information we need. And then, in order to make it look nice, we'll throw some HTML tags around it so we can style it later.
The new weather_info_block_view() function is shown in Listing 5-12.
Example 5.12. The block_view Hook with a Call to the Weather Service and Formatting
function weather_info_block_view($delta='') {
  $block = null;
  $block_content = null;

  $unit = 'F';
  $language = 'en';
  $location = variable_get('current_location', null);
  if ($location) {
    $weather = weather_info_get_weather($location, $language);
    if ($weather) {
      $unit_system = 'US';
      $current = $weather->weather->current_conditions;
      $block_content .= '<div class="currentConditions">';
      $block_content .= "<img src='http://www.google.com/{$current->icon['data']}'/>";
      $block_content .= "<br/>";
      $block_content .= sprintf('%s, %s<br/>',
        $current->condition['data'], weather_info_temp($current->temp_f['data'], $unit,
        $unit_system));
      $block_content .= $current->wind_condition['data'] . '<br/>';
      $block_content .= $current->humidity['data'];
      $block_content .= '</div>';

      $day = 1;
foreach($weather->weather->forecast_conditions as $new) {
$high = weather_info_temp((int)$new->high['data'], $unit, $unit_system);
$low = weather_info_temp((int)$new->low['data'], $unit, $unit_system);
$block_content .= "<div class='forecast-" . $day++ . "'>";
$block_content .= "{$new->day_of_week['data']}<br/>";
$block_content .= "<img src='http://www.google.com/{$new->icon['data']}'/><br/>";
$block_content .= "{$high}/{$low}<br/>";
$block_content .= '</div>';
}
$block['subject'] = $weather->weather->forecast_information->city['data'];
}
else {
form_set_error('weather_location',
t('Location @loc not found.', array('@loc' => $location)));
variable_set('current_location', null);
$block['subject'] = t('Get Weather'),
}
}
$temp = drupal_get_form('weather_location_form'),
$block_content .= drupal_render($temp);
$block['content'] = $block_content;
return $block;
}First, we grab the location from the variable table, then call the function we wrote earlier.
Assuming all is well and the location is found, it's time to build the HTML that will show the weather forecast. SimpleXMLElement is a hierarchical object that can be looped over depending on its structure. There are only a few items we need from the XML file—the current conditions, the forecast, and the city that was located.
First, we'll grab some pieces from the current_conditions element.
$current = $weather->weather->current_conditions;
This loads only the <current_conditions> element, along with all of its descendants, as shown in Listing 5-13.
Example 5.13. A Single Element and Its Descendants
<current_conditions> <condition data="Mostly Cloudy"/> <temp_f data="68"/> <temp_c data="20"/> <humidity data="Humidity: 68%"/> <icon data="/ig/images/weather/mostly_cloudy.gif"/> <wind_condition data="Wind: S at 10 mph"/> </current_conditions>
From here, it's easy to grab the values of individual properties, $current->wind_condition['data'] for example. Our code puts an HTML DIV wrapper with a class name so we can set CSS style properties later in our theme.
Next, we'll collect all of the forecast_conditions objects and loop over them:
foreach($weather->weather->forecast_conditions as $new)
Once we have the $new variable, it's pretty simple to access the objects inside. Just remember that attribute values are accessed as if they were keyed arrays: <day_of_week data="Tue"/> is accessed with $new->day_of_week['data']. The city name is accessed using the same technique.
Once we are finished with the looping, we have a nice little HTML div to stick in the block, as shown in Listing 5-14.
Example 5.14. HTML Generated from the block_view Hook
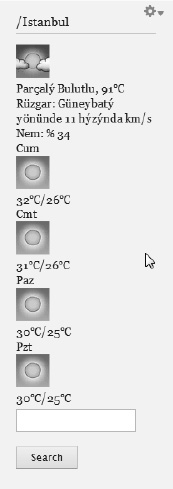
<div class="currentConditions"> <img src='http://www.google.com//ig/images/weather/sunny.gif'/><br/> Rain, 57°F<br/> Wind: W at 8 mph<br/> Humidity: 100% </div> <div class="forecast-1"> Fri<br/> <img src='http://www.google.com//ig/images/weather/mostly_sunny.gif'/><br/> 60°F/51°F<br/> </div> <div class="forecast-2"> Sat<br/> <img src='http://www.google.com//ig/images/weather/mostly_sunny.gif'/><br/> 69°F/50°F<br/> </div> <div class="forecast-3"> Sun<br/> <img src='http://www.google.com//ig/images/weather/chance_of_storm.gif'/><br/> 75°F/53°F<br/> </div> <div class="forecast-4"> Mon<br/> <img src='http://www.google.com//ig/images/weather/chance_of_storm.gif'/><br/> 77°F/59°F<br/> </div>
When we append the text box and submit button using the drupal_get_form() function and set the subject by setting the $block['subject'] array item, we get a nice display once the block is rendered. (See Figure 5-20.)

The content showed up just fine, but I'm not too happy about how it looks right now. I'd rather have all of the icons in a single horizontal row, but we'll deal with that when we theme the block.
So far, we've displayed a pretty simple block using the results from a web service call. We've actually done some pretty advanced work for the morning!
But there's more to do. I'd like to have a setting where we can indicate whether we want to see the temperatures in Fahrenheit (the default) or Celsius. While we're at it, we might as well tickle our nerd fancy and provide Kelvin and Rankine units as options. Plus, I'd like to set a default location that will be used until someone enters something else, and also specify which language we'd like see.
We'll need to create another form and a way to access it. You can access most data in Drupal is through the menu interface, so we'll need to write a menu hook function that will be found when the Drupal hook engine is searching for interested parties. The menu hook is shown in Listing 5-15.
Example 5.15. The Menu Hook for weather_info
1 function weather_info_menu() {
2 $items['admin/config/weather_info'] = array (
3 'title' => 'Weather Info Configuration',
4 'description' => 'Configuration settings for the Weather Information block.',
5 'page callback' => 'system_admin_menu_block_page',
6 'file' => 'system.admin.inc',
7 'file path' => drupal_get_path('module', 'system'),
8 'access arguments' => array('administer weather info'),
);
9 $items['admin/config/weather_info/settings'] = array (
10 'title' => 'Weather Information settings',
11 'description' => 'Set defaults and unit types for weather display.',
12 'page callback' => 'drupal_get_form',
13 'page arguments' => array('wx_admin_settings'),
14 'access arguments' => array('administer weather info'),
);
15 return $items;
}Let's take this a line at a time to see what's happening.
This is the function that declares the menu hook.
The
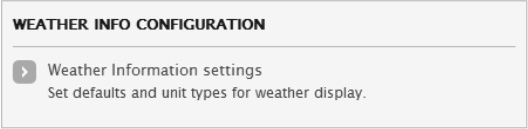
$itemsarray will contain a list of all menu items defined by this function. The key of the array is the path of this particular object. All administrative items are in the/adminhierarchy. Configuration information is in the/confighierarchy just below that. Finally, we create our specific menu name,weather_info.The title will appear in the configuration block.
The description does not appear in the configuration block, but is available to various administrative functions.
We want this item to appear on the administration menu as a block along with related administrative functions. We need to indicate the name of a function that that will process our block on the page. This is called the
pagecallbackfunction.The
fileindicates the program file where the callback function is located.The
filepathis the location on the server where the file containing the callback function is located.Only people with the proper permissions can access this information, which you specify using
access arguments. We will cover roles and permissions in Chapter 6.This item will display information and then load our custom form when it is clicked. The second item is a child of the first. We know that because the first part of the path (
admin/config/weather_info) is the same.The
titlewill appear on the configuration screen and will be a link to the form.The
descriptionalso appears on the configuration screenThe form is a standard Drupal form, which is accessed with the standard
drupal_get_formfunction. We can create a custom callback to deal with the menu, but we'll just use the default handler for now.This is the name of the function that returns our form, which is described in detail below.
Users must also have the proper permissions to access this item.
The menu hook must return an array with menu items.
When we put this in our module, the hook is called and the configuration block shown in Figure 5-21 is displayed on the main configuration screen.
On line 13, the form wx_admin_settings is specified. That form is defined as a function that returns a standard Drupal form array. This is shown in Listing 5-16.
Example 5.16. The Weather Administration Form
function wx_admin_settings() {
$form['wx_settings'] = array (
'#type' => 'fieldset',
'#title' => t('Weather defaults')
);
$form['wx_settings']['default_location'] = array (
'#type' => 'textfield',
'#title' => t('Default location'),
'#default_value' => variable_get('default_location', null),
'#size' => 20,
'#maxlengh' => 20,
'#description' => t('Enter a location on earth to act as the default for the site.'),
);
$form['wx_settings']['default_units'] = array (
'#type' => 'radios',
'#title' => t('Default units'),
'#options' => array(
'F' => t('Fahrenheit'),
'C' => t('Celsius'),
'K' => t('Kelvin'),
'R' => t('Rankine'),
),
'#default_value' => variable_get('default_units', 'F'),
'#description' => t('Select the units desired for display of temperature.'),
);$form['wx_settings']['default_language'] = array (
'#type' => 'select',
'#title' => t('Language'),
'#options' => array(
'en' => t('English'),
'fr' => t('French'),
'it' => t('Italian'),
'de' => t('German'),
'es' => t('Spanish'),
'tr' => t('Turkish'),
),
'#default_value' => variable_get('default_language', 'en'),
'#description' => t('Select the language desired.'),
);
$form['#submit'][] = 'wx_admin_settings_submit';
return system_settings_form($form);
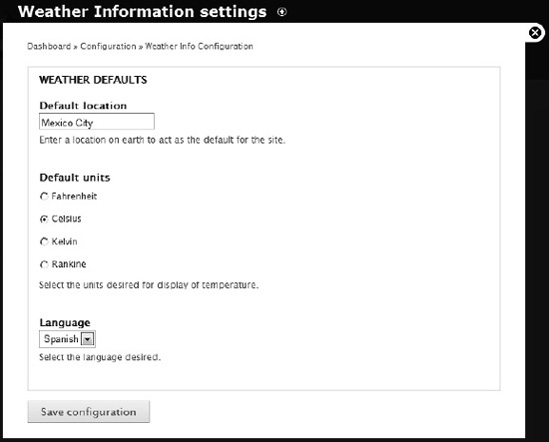
}The first entry is a fieldset, which means it acts as a container for other items on the form. The form processing function will know which items are its children by looking at the array structure. In this case, everything that is a child of ['wx_settings'] will be contained in the fieldset.
The next is a textfield, which is similar to the one we created in the block form. This will translate into a standard HTML element, <input type="text">.
You can probably figure out the next one, default_units. It will display a list of radio button controls that are linked. The #options parameter is an array with a list of all of the different radios to be rendered. The key is the value to be passed back to the server, and the value is what will be rendered on the form. The #default property allows the form to select one of the values. If this is not set, all four radios would be unselected. By the way, I'm starting a trend to express temperature using the Rankine scale. I think everyone should know how many degrees Fahrenheit they are above absolute zero. I hope it catches on.
Finally, we have a select box to hold languages and a submit button to make sure we can post back the information in the form for processing.
The last two lines require some explaining. The first form we created was the one that collected location information from the user. We created a single textbox and a submit button, and then created validate and submit hooks to process the form. That's pretty much a normal, standard form.
For administrative forms, Drupal provides a nice service that places a couple of buttons at the bottom of the form and then uses a built-in submit hook to do certain automatic processing. One of the things it does isto set variables with the same name as each of the fields on a form and it sets them to the values the user entered. By passing our $form through system_settings_form(), we get such niceties. Because of this automated processing, the normal submit hook is not called.
By adding the $form['#submit'][] = 'wx_admin_settings_submit';, we add our submit hook to the list of hooks that are called when the form is processed.
That's about it for the definition of the form. We just need to return the form to the menu system so it can be built. Selecting the Weather Information settings link from the block on the Configuration menu, or navigating directly to admin/config/weather_info/settings will display the form, as shown in Figure 5-22.
As with the form in the block above, we need to write two functions to process the data when it comes back from our form. These are the validate and submit hooks.
The name of our form is wx_admin_settings and so the submit and validate hooks must be similarly named. (See Listing 5-17.)
Example 5.17. Validate and Submit Hooks for the Weather Administration Settings Form
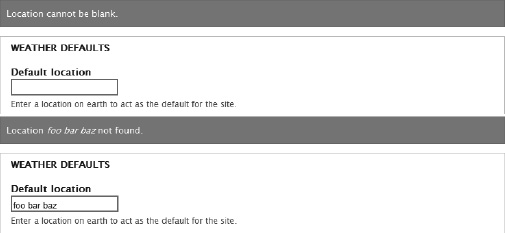
function wx_admin_settings_validate($form, &$form_state) {
$location = $form_state['values']['default_location'];
if ($location) {
$weather = weather_info_get_weather($location, 'en'),
if (!$weather) {
form_set_error('default_location', t('Location %location not found.',
array('%location' => $location)));
}
}
else {
form_set_error('default_location', t('Location cannot be blank.'));
}
}
function wx_admin_settings_submit($form, &$form_state) {variable_set('default_units', $form_state['values']['default_units']);
variable_set('default_language', $form_state['values']['default_language']);
variable_set('default_location', $form_state['values']['default_location']);
variable_set('current_location', $form_state['values']['default_location']);
}The validate hook will simply check for a blank value for location and do pretty much just what it did when we entered a blank value in the block. That is, it will put a scary red error at the top of the page and highlight the offending field. It will rerender the form and not call the submit hook. Likewise, if the location is not found by the service, the appropriate error is listed. (See Figure 5-23.)
When a happy path is made through the validate hook, the submit hook will be called, which sets to variables that we can use later. At that point, all of the work has been done and the confirmation screen will appear. (See Figure 5-24.)
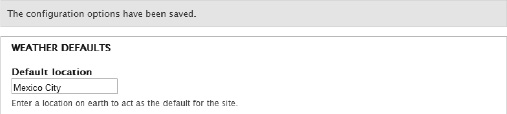
And, since we changed the current_location, we can see right away the new location's forecast when we return to the home screen.
Note
In the function wx_admin_settings_submit, there are four calls to variable_set. The purpose of setting these variables is to make sure they are available on a persistent basis. However, three are not necessary. As I mentioned earlier, the three variables that have the same names as the fields in our form (default_language, default_location, and default_units) are automatically set by the system_settings_form function. The function would work just the same as the following:
function wx_admin_settings_submit($form, &$form_state) {
variable_set('current_location', $form_state['values']['default_location']);
}Now let's use those default settings to configure our display. One of the settings, default_units, will be used to display the temperature in whatever unit the user wants. By default, the temperature comes through in Fahrenheit. We need some functions to convert from Fahrenheit and Celsius into the other units we support.
function weather_info_f_to_c($degrees_f) {
$celsius = ($degrees_f - 32) * 5 / 9;
return round($celsius);
}
function weather_info_c_to_f($degrees_c) {
$fahrenheit = ($degrees_c * 9 / 5) + 32;
return round($fahrenheit);
}
function weather_info_f_to_k($degrees_f) {
$kelvin = weather_info_f_to_c($degrees_f) + 273.15;
return round($kelvin);
}
function weather_info_c_to_k($degrees_c) {
$kelvin = $degrees_c + 273.15;
return round($kelvin);
}
function weather_info_f_to_r($degrees_f) {
$rankine = $degrees_f + 459.69;
return round($rankine);
}
function weather_info_c_to_r($degrees_c) {
$rankine = weather_info_c_to_f($degrees_c) + 459.69;
return round($rankine);
}Now we can update the weather_info_temp() function to call the appropriate conversion function according to the value of $unit and $unit_system. When the weather service returns the weather for a particular location, it also returns the system of measurement that the location natively uses. It is returned as <unit_system data="US"/>. For example, for London or San Francisco, the data attribute would be "US", but for Paris or Tokyo, it would come back as "SI", from the French Système international d'unités.The French have different words for everything and put "everything" in italics. The $unit_system variable can be only one of two values, "SI", or "US". The reason we care about this is that the temperature values in the forecast section of the XML file will adhere to that unit system. So when unit_system is US, the <low> and <high> temperatures will be expressed in Fahrenheit. When unit_system is "SI", the temperatures will be Celsius. Oddly, for the current conditions, both Fahrenheit and Celsius values are present. While this is handy for most people, it clearly shows the anti-Rankine discrimination present in so many places.
The new temp function is shown in Listing 5-18.
Example 5.18. The Temp Function Enhanced to Call the Proper Conversion Function
function weather_info_temp($in_temp, $unit, $unit_system) {
switch ($unit) {
case 'C':
if ($unit_system == 'SI') {
$out_temp = $in_temp;
}
else {
$out_temp = weather_info_f_to_c($in_temp);
}
break;
case 'F':
if ($unit_system == 'SI') {
$out_temp = weather_info_c_to_f($in_temp);
}
else {
$out_temp = $in_temp;
}
break;
case 'K':
if ($unit_system == 'SI') {
$out_temp = weather_info_c_to_k($in_temp);
}
else {
$out_temp = weather_info_f_to_k($in_temp);
}
break;
case 'R':
if ($unit_system == 'SI') {
$out_temp = weather_info_c_to_r($in_temp);
}
else {
$out_temp = weather_info_f_to_r($in_temp);
}
break;
}
return sprintf('%s°%s', $out_temp, $unit);
}Next, we need to read the value of default_units and send that to the weather_info_temp() function. In the view case of the weather_info_block function, there's a line
$unit = 'F';
It should be changed to
$unit = variable_get('default_units','F'),The last thing for this phase is to pass the appropriate language to the weather web service call. In the weather_info_block() function we hard-coded the language.
$language = 'en';
Like the default_units case above, we need to set the $language variable to get the default_language variable from our database.
$language = variable_get('default_language', 'en'),Finally, we need to grab the $unit_system value from the XML document when it comes back:
$unit_system = $weather->weather->forecast_information->unit_system['data'];
At this point, we should be able to set all three variables and have them reflected on our display. (See Figure 5-25.)
Since we made a lot of changes to the weather_info_block function, here's the final version, shown in Listing 5-19.
Example 5.19. The completed weather information block
function weather_info_block_view($delta='') {
$block = null;
$block_content = null;$unit = variable_get('default_units', 'F'),
$language = variable_get('default_language', 'en'),
$location = variable_get('current_location', null);
if ($location) {
$weather = weather_info_get_weather($location, $language);
if ($weather) {
$unit_system = $weather->weather->forecast_information->unit_system['data'];
$current = $weather->weather->current_conditions;
$block_content .= '<div class="currentConditions">';
$block_content .= "<img src='http://www.google.com/{$current->icon['data']}'/>";
$block_content .= "<br/>";
$block_content .= sprintf('%s, %s<br/>',
$current->condition['data'], weather_info_temp($current->temp_f['data'],
$unit, $unit_system));
$block_content .= $current->wind_condition['data'] . '<br/>';
$block_content .= $current->humidity['data'];
$block_content .= '</div>';
$day = 1;
foreach($weather->weather->forecast_conditions as $new) {
        $high = weather_info_temp((int)$new->high['data'], $unit, $unit_system);
        $low = weather_info_temp((int)$new->low['data'], $unit, $unit_system);

        $block_content .= "<div class='forecast-" . $day++ . "'>";
        $block_content .= "{$new->day_of_week['data']}<br/>";
        $block_content .= "<img src='http://www.google.com/{$new->icon['data']}'/><br/>";
        $block_content .= "{$high}/{$low}<br/>";
        $block_content .= '</div>';
      }
      $block['subject'] = $weather->weather->forecast_information->city['data'];
    }
    else {
      form_set_error('weather_location',
        t('Location @loc not found.', array('@loc' => $location)));
      variable_set('current_location', null);
      $block['subject'] = t('Get Weather'),
    }
  }

  $temp = drupal_get_form('weather_location_form'),
  $block_content .= drupal_render($temp);
  $block['content'] = $block_content;
  return $block;
}If you can see how the hooks interact with the core and how the validate and submit callbacks all work, you are most of the way toward understanding how Drupal does its basic work.
In this chapter, we created a module that used hooks to tie into the Drupal page-building process. We also used PHP to grab an external data source and display it in a block.
In the next chapter, we will continue this example and add permissions and a custom content type. And later we'll apply output formatting to the block by using the theming layer. After that, we'll write tests against the helper functions and the block to assure that everything is working as we intend.