
Theming is the process of taking page content that has been created by the Drupal engine and turning it into something pleasing and useful to the end user. This chapter discusses the hook and theming concepts and offers suggestions on how to trace your code so you can see what's going on.
Creating a theme for your site can be as easy as using one of the core themes that comes with Drupal, or it can be as difficult as you want to make it. A theming project can require a team of designers, programmers, and marketing people and take months, depending on the complexity of the content and the design of the site. Or, it could take you just a few hours to create your own simple theme or tweak an existing one.
When you create your first site, you'll probably want to explore themes available fromthe community at http://drupal.org/project/themes. I also like Theme Garden, http://themegarden.org, where you can see previews of each theme. Many themes are free, but some are commercially available for a price.
As with most things, you generally get what you pay for; a commercial product will probably have more direct support if you have a problem or questions, but the free themes, like the freely available modules, are typically very well built and the developers are responsive to errors in their code. Remember, though, as with any open source software, the people writing the code are probably doing it on a part-time basis and if you have a problem with the code, you might just have to fix it yourself.
A theme is far more than just adding style information in a CSS stylesheet. The theming layer is a full-blown programming framework with the same hook processing functionality as in module development.
Don't be intimidated by the complexity, however; creating a good-looking site might only require that you tweak the CSS files of a theme you like.
Since the theming layer has the ability to do the same hook-based processing as the module layer, it is tempting to do some processing in the theme layer. This brings up the issue of separating logic from presentation in your application. I've always had a bit of trouble with this one, as I'm sure you have if you've been developing applications that have a user interface component. There really aren't many hard-and-fast rules about what constitutes business logic and what constitutes presentation.
Tip
When it comes to deciding if something is in the business logic layer or the presentation layer, my general rule is that if your function touches or updates the database, it is probably business logic. If it touches the eyeballs of the user, it's probably presentation.
In any case, there are always exceptions. The important thing is to make sure your code is in the appropriate place and is maintainable by someone else—or by you three years from now when you've forgotten why you did that silly thing with the presentation layer that makes no sense now.
Things to know as you build your themes:
For better performance, the theme system caches the template files containing the theme functions that should be called. There are certain places where this can cause problems, so you should make a habit of rebuilding your theme registry every once in a while, particularly if you make a change and it doesn't seem to appear on your screen.
Drupal stores a cache of the data in
.infofiles. We'll cover subthemes in a minute, but you should know that if you modify any line in your subtheme's.infofile, you must refresh the cache by visiting the Configuration
One handy way to increase performance is by using Drupal's ability to optimize CSS and Javascript files. Rather than gather the sometimes dozens of individual CSS and Javascript files together on each page build, Drupal will combine them into single files that are cached. This greatly increases performance. On the Performance settings page (Configuration
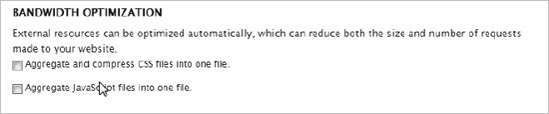
Figure 7.1. Drupal provides an administration page to optimize performance settings for your situation.
By default thesearedisabled, so you probably haven't turned them on. However, when you need to make any changes to your theme, do yourself a favor and make sure both of these are disabled. You'll thank me when you don't have to spend hours trying to figure out why your changes aren't updating to the page.
Tip
The performance page has other cache settings as well. It's probably best to turn off all caching when doing any kind of module development. It will slow things down, but you are guaranteed to get the most recent code changes if you have all caching off. Later, when you have a better understanding of how these optimizations work, you can turn off only the ones that affect what you are currently working on, or you can get into the habit of only flushing the cache when it is necessary. You can do this using the menu system or Drush. (Drush is covered in Appendix A.)
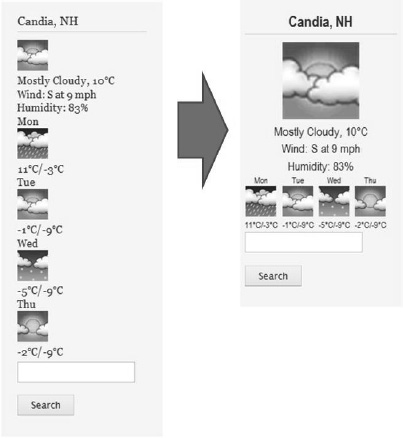
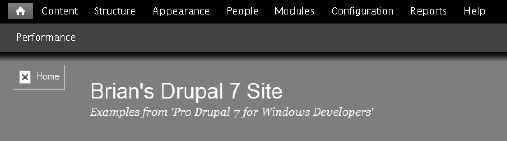
If you've been following along with the creation of my site, you've seen that we are still using Bartik, the default theme that came with Drupal 7. Rather than create new complexity, I've stuck with this theme. But now we need to make some changes, particularly in the weather module. As I mentioned earlier, I don't like the way the default theme lists the four-day weather forecast vertically. I'd like to see the days listed next to each other horizontally, and I'd also like to make some minor typographical changes, as shown in Figure 7-2.
Since we're already using the Bartik theme, we could just go into its CSS file and make a few small changes. However, this would mean modifying a theme that came with the Drupal core code.
It is not a good idea to make any modifications to the core because any code changes that come later on will overwrite the changes you made. And besides, it is well-known that whenever you hack the core, God kills a kitten. (Artist's rendition shown in Figure 7-3.)

You don't want that on your conscience, do you?
So how do we take an existing theme and make changes to it? We could just copy the theme code to our site directory and make changes there. We would have to change the name of the theme to avoid naming conflicts, but then we could change whatever we want and still get all of the code that came with the original theme.
But there's a better way. We can make a subtheme of a theme we like. Making a subtheme gives us the advantage of all of the nice things the base theme has to offer, plus the custom tweaks we want for our particular site.
Tip
For performance reasons, a subtheme isn't always the best choice. If you have a site where performance is critical, it is probably better to create a new theme without the overhead of a subtheme.
There are various ways to make a subtheme. I'll show you the way I do it so that you can see what's happening behind the scenes.
Since this is our first theme, we need to create a subdirectory in the appropriate place. When we created a new module, we created the modules directory under sites/all. Our custom themes need to be in a directory that's a sibling to that one, so create a directory called sites/all/themes, and then another one, first_subtheme, under that. If you are using Visual Studio and VS.Php, you'll see the structure in your Solution Explorer, as shown insee Figure 7-4.
Now, create a .info file with the same name as the new theme's directory. In this case, call it first_subtheme.info. The items shown in Listing 7-1 need to be in this file.
Example 7.1. The Theme's .info file Must Specify Certain Required Parts
name = My First Subtheme
description = My first subtheme, based on Bartik.
core = 7.x
base theme = bartik

regions[header] = Header
regions[help] = Help
regions[page_top] = Page top
regions[page_bottom] = Page bottom
regions[highlight] = Highlighted

regions[featured] = Featured
regions[content] = Content
regions[sidebar_first] = Sidebar first
regions[sidebar_second] = Sidebar second

regions[triptych_first] = Triptych first
regions[triptych_middle] = Triptych middle
regions[triptych_last] = Triptych last

regions[footer_firstcolumn] = Footer first column
regions[footer_secondcolumn] = Footer second column
regions[footer_thirdcolumn] = Footer third column
regions[footer_fourthcolumn] = Footer fourth column
regions[footer] = Footer
Notice that a number of regions have been declared here;they are declared in the base theme's .info file and are required in the subtheme. The regions array indicates the name of the region (the array key) and the description of each region (the array value). The region name will be used internally by Drupal and has the same naming constraints (letters and underscores, basically), while the description is what is shown to the user on the Blocks administration page.
You can also hide regions from the Blocks administration interface, though they still remain available to modules. To do this, you just populate the regions_hidden array with the names of the regions you want to hide, as shown in Listing 7-2.
Example 7.2. Hiding Regions from the Blocks Administration Page
regions[content] = Content
regions[help] = Help
regions[page_top] = Page top
regions[page_bottom] = Page bottom
regions[indicators] = Indicators
regions_hidden[] = indicators
Why would you want to hide regions? Probably because you want your module to be able to access a new region you are creating, but you don't want the administration users to be able to put whatever they want there.
Note
If you are familiar with Drupal 6, you're probably used to the idea that if a subtheme has the same regions as the base theme, you don't need to include them in your subtheme's .info file. With Drupal 7, however, you do need to indicate all regions in your subtheme file.
If you don't indicate any regions in your subtheme file, you'll get only the default regions: header, help, content, sidebar_first, sidebar_second, footer. However, if you define any regions at all, they will be available—but they'll override the defaults.
Next, you need to create the stylesheet. Let's call it first_subtheme.css. For Drupal to use this style sheet, we need to add it to the .info file, as shown in Listing 7-3.
Example 7.3. All Style Sheets Must Be Included in the .info File.
name = My First Subtheme
description = My first subtheme, based on Bartik.
core = 7.x
base theme = bartik

stylesheets[all][] = first_subtheme.css

regions[header] = Header
regions[help] = Help
...
The stylesheets array in the .info file indicates the CSS stylesheet you want to use. This adds your stylesheet to the list of stylesheets that are normally loaded. Since the stylesheets in this list will be loaded after all of the others, you have the last chance to override (cascade) any settings in the stylesheets that are loaded earlier.
For now, let's just add a single style to deal with the class we created in the weather_info module. (See Listing 7-4.)
Example 7.4. The CSS File Defines Classes
.currentConditions {
font-family:Arial Narrow;
text-align:center;
font-size:12pt;
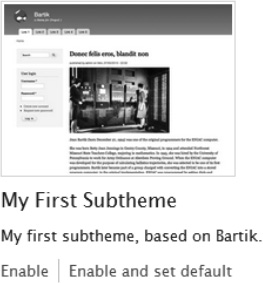
}That's the minimum we need to create our subtheme. To enable it, go to the Appearance page (/admin/build/themes), enable the theme and make it the default. (See Figure 7-5.)
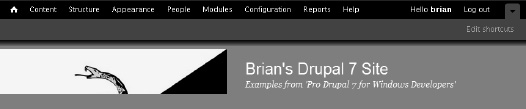
When you save the settings, you'll see that the subtheme looks almost exactly like the base theme. There is one difference that sticks out right away, though, as shown in Figure 7-6.
You can add a site logo by going to Appearance
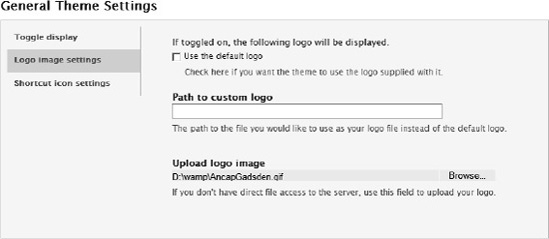
The logo image is the one that appears on the top of the site. I should say it usually appears there. It is available to the theme designer to do with as he or she pleases. The Bartik theme, from which we created our subtheme, puts it at the top. The shortcut icon image appears on the tab, but it is also available to the theme designer. (See Figure 7-8.)
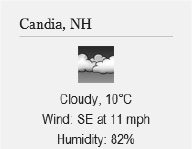
Scroll down a bit and see if our first CSS rule has taken affect. It should set the three lines under the current conditions image in 12pt Arial Narrow centered. Mine looks like the image in Figure 7-9.
If you get something else, you'll probably want to clear the theme cache.
Now that we've created our subtheme and adjusted our logos, we can do the serious theme work. We just need to do a little tweaking to the subtheme to get our weather icons to show up horizontally instead of vertically.
When it comes to creating visual representations in a graphical user interface, you need a different set of debugging tools than when you are writing code and developing and testing algorithms. You can still use the step debuggers in Visual Studio for some parts of your theme development, but you'll probably want to see exactly what kind of code is being sent to your browser so you can tweak things to make them look like you or your designer intended.
Microsoft's Internet Explorer, Google's Chrome, and Mozilla's Firefox all have developer tools that allow you to look at various aspects of the page, such as the name of form elements, CSS classes, even formatting for a particular class once it has gone through its cascading process. This type of debugging information is vital when you are trying to figure out how to get something on the page to look just right.
Internet Explorer has "Developer Tools" that can be accessed from the menu or by pressing F12. (See Figure 7-10.)
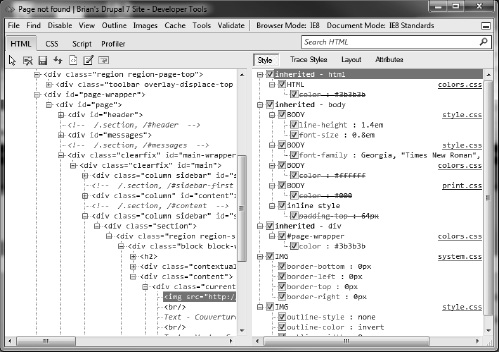
You'll find rich information about the element's properties, names, computed style, and other handy data. What we want to focus on right now are the names of the classes of the elements we want to style. Of course, since we developed the code to generate this output, we already know the names of the classes, but the functionality of this tool is perfect for changing the current style of objects on a page, and for writing new style code.
There are two more handy tools that work on your site from inside Drupal. The Devel suite of tools provides some goodies that will track things as they happen while the page is being built. The tool can trap all SQL statements, display a page timer, memory usage, and other handy metrics. It also exposes some nice debugging functions, such as dumping the values of variables on the screen so you don't have to rely on the step debugger as much. (See Figure 7-11.)

The Theme developer module is an add-on to the Devel module. It tracks theming information as your page goes through the rendering process and makes it available to you on the rendered page. The Theme developer module can also show you a list of theme templates and functions whichmay have been used for a given page. See Figure 7-12.

As a page is rendered, various functions and templates act on the page. The Theme developer module can keep track of which artifacts touch the page, which helps you debug your theme. This information is kept in a theme log and can be displayed at the bottom of the page in chronological order. (See Figure 7-13.)
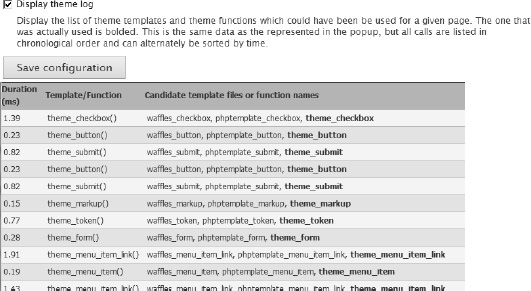
Figure 7.13. The theme log provides more information about which theming functions touched your page.
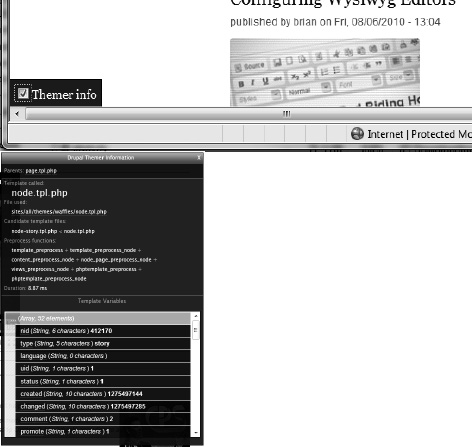
Finally, there is an interactive aspect to the Theme developer module that allows you to access information about any rendered object on your screen. Clicking the Themer info button at the bottom of the screen enables the interactive window, then clicking on any object will display the template that was called, along with any functions that were involved in creating that object. (See Figure 7-14.)
It's pretty clear that there are many tools available for the Drupal developer. Now let's continue theming our page by adding some style.
Our small task right now is to change the four-day forecast from a vertical list to a horizontal one. While we're at it, let's also magnify the current conditions graphic and change the type sizes.
We will use only CSS for this task. Going over the details of CSS syntax is beyond the scope of this book, but there are plenty of resources available for learning CSS if you don't know it already.
So let's go back to the CSS file we created when we set up our subtheme—first_subtheme.css. We need to create CSS rules for several different classes based on what we see in the HTML our site generated. Listing 7-5 shows what I came up with.
Example 7.5. CSS Styles in Drupal Rely Heavily on Classes
.block-weather-info.block {
    padding-left:5px;
    padding-right:5px;
}

.block-weather-info h2 {
  font-family:Arial Narrow;
  font-size:14pt;
  font-weight:bold;
  text-align:center;
}

.currentConditions {
  font-family:Arial Narrow;
  text-align:center;
  font-size:12pt;
}

.currentConditions img {
  width:100px;
}

.forecast-2, .forecast-3, .forecast-4 {
  font-family:Arial Narrow;
  font-size:8pt;
  text-align:center;
  float:left;
  margin-left:6px;
}

.forecast-1 {
  font-family:Arial Narrow;
  font-size:8pt;
  text-align:center;
  float:left;
}
Saving first_subtheme.css and refreshing the browser provides the style we're looking for. (See Figure 7-15.)
Figure 7.15. Setting a few CSS properties provides a horizontal view of the weather instead of the default vertical list
What you've seen is the basic process for styling your page: identify the classes, IDs, or elements that are of interest, and then create or modify the theme's CSS file to get what you want. As you might expect, there is a lot more richness built into Drupal, but you've just learned the basics.
The main goal of the presentation layer is that it does all of the presentation. One goal of the theme system is that it takes care of all HTML coding. There are some pretty good reasons for this. If you hard-code the HTML in your module's code, it becomes more difficult to perform any runtime tweaking of the output to make it compatible with various output formats. For example, what if a new browser comes out that interprets some HTML differently from other browsers? This happened, for example, when browser makers starting paying attention to the W3C HTML standards rather than just doing what seemed to work at the time. What will happen when HTML5 comes out? Or some reduced subset of HTML for mobile computing?
Your goal should be, then, to produce modules that don't create a single line of HTML that is not in a theme implementation. That way, upgrading to a different flavor of HTML—or supporting multiple flavors simultaneously—is easier because the code is all in one place.
To make this happen, your module should do as much of the data processing as possible, and then hand off the data to the presentation layer. In your module, you'll need to register the theme functions that will do the theming and then just let the presentation layer do the work.
For these reasons, it's a good idea to separate your presentation from any processing on the data. Drupal has a provision to do this—the theme hook.
First, we'll create the theme function that will generate the HTML, then we'll register that function so Drupal can find it.
The place to put a theme function is in your module file (or in an included file).
Let's create two theme functions, one to generate output for the current conditions and one to create output for each forecast day. We can simply take the code from the module where it was embedded and make a couple modifications. The first one is a theme function called 'current', but since it is a theme function, we need to put the keyword theme_ before it. (See Listing 7-6.)
Example 7.6. ATheme Function Is a Convenient Place to Generate HTML
function theme_current($variables) {
  $img = $variables['img'];
  $condition = $variables['condition'];
  $temp = $variables['temp'];
  $unit = $variables['unit'];
  $wind = $variables['wind'];
  $humidity = $variables['humidity'];

  $content = null;
  $content .= '<div class="currentConditions">';
  $content .= "<img src='http://www.google.com{$img}'/><br/>";
  $content .= sprintf('%s, %s<br/>',
    $condition, weather_info_temp($temp, $unit, 'US'));
  $content .= $wind . '<br/>';
  $content .= $humidity;
  $content .= '</div>';
  return $content;
}
Notice the argument to the function call. All variables we need will be passed in a single keyed array, with the key being the name of the variable and the value of the array being the value of the variable.
Now here's the second theme function, forecast, shown in Listing 7-7.
Example 7.7. Another Theming Function
function theme_forecast($variables) {
  static $day = 0;

  $day_of_week = $variables['day'];
  $img = $variables['img'];
  $high = $variables['high'];
  $low = $variables['low'];

  ++$day;
  $content = null;
  $content .= "<div class='forecast-{$day}'>";
  $content .= "{$day_of_week}<br/>";
  $content .= "<img src='http://www.google.com{$img}'/><br/>";
  $content .= "{$high}/{$low}<br/>";
  $content .= '</div>';
  return $content;
}
These functions are now in our program, but how does Drupal know where they are or how to call them? We need to create a theme hook. This code goes in your module. (See Listing 7-8.)
Example 7.8. The Module's Theme Hook Is the Place to Register Theme Functions
function weather_info_theme() {
  return array(
    'current' => array(
      'arguments' => array(
        'img' => NULL,
'condition' => NULL,
'temp' => NULL,
'unit' => NULL,
'wind' => NULL,
'humidity' => NULL,
)
),
'forecast' => array(
'arguments' => array(
'day' => NULL,
'img' => NULL,
'high' => NULL,
'low' => NULL,
)
),
);
}This is a theme hook, so the name of the function is carefully crafted, consisting of the name of the module with the suffix '_theme'. The theme hook returns an array with all of the theme functions that can be called. In this case, it contains information about our two theme functions along with the variables with which they will be called. The arguments array contains the names and their default values. All arguments must be given default values since there is no way to assure that a theme call will provide the proper information. If you are not sure as to what the default value should be, use NULL.
So now we've created the theme functions and registered them in our module. All that's left is to call them in our code. In the case of our weather information block, we will call them in the 'view' case of the block hook function. This will involve rewriting the code that we moved down to the theme functions. (See Listing 7-9.)
Example 7.9. Code inside the Block Hook Rewritten to Use the Theme Functions
if ($weather) {
  $unit_system = $weather->weather->forecast_information->unit_system['data'];
  $current = $weather->weather->current_conditions;

  $block_content .= theme('current',
    array(
        'img' => $current->icon['data'],
        'condition' => $current->condition['data'],
        'temp' => $current->weather_info_temp_f['data'],
        'unit' => $unit,
        'wind' => $current->wind_condition['data'],
        'humidity' => $current->humidity['data'],
        )
      );

  foreach($weather->weather->forecast_conditions as $new) {
    $block_content .= theme('forecast',
      array(
          'day' => $new->day_of_week['data'],
          'img' => $new->icon['data'],
          'high' => weather_info_temp($new->high['data'], $unit,
            $unit_system),
          'low' => weather_info_temp($new->low['data'], $unit,
            $unit_system),
          )
        );
  }
  $block['subject'] = $weather->weather->forecast_information->city['data'];
}
Notice the theme() function. The first argument is the name of the theme function without the 'theme_' prefix. This can be kind of confusing, but it makes sense once you start to get a feeling for how Drupal's module and function naming conventions are used.
Following the name of the theme function is an array containing all of the variables we created in the function and declared in the theme hook.
Now that we have everything running, you can load the page and it should look exactly the same.
Tip
When you develop themes, you need to realize that theme functions are cached. This means that when you change something in your code, it might not show up on your site—which can be very frustrating, to say the least. However, there are ways to clear the theme cache, and you should get used to doing so whenever you create a new theme function or change the name or signature. I use drush cc theme to clear the theme cache.
Using theme functions solves two problems. First, it makes the code easier to write, read, and maintain because we just pass data somewhere else instead of building up a bunch of finicky strings. Second, it solves the problem of separating our data logic from our presentation.
Drupal's theme engine relies heavily on templates to know where to put certain content and other design elements.
All template files in Drupal end in .tpl.php. If you choose to create any template files, they should all be in a directory called templates inside your theme directory.
Templates are used to direct the placement of certain pieces of content that Drupal's content management function builds as a result of a page call. These templates are retrieved as part of the page rendering function, after the content is collected into a set of arrays and objects. There are several templates that come with Drupal, but any and all can be overridden by similarly named templates in your module or theme hierarchy.
Figure 7-16 shows the relationship of certain core templates.
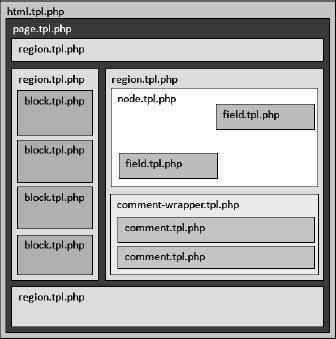
Notice the hierarchical nature of the templates. We'll see how they all work together in a bit.
Starting at the outermost level, we have the HTML template. This is fairly small and is used to bootstrap the rendering process. If you are familiar with the ASP.NET page model, you might think of the Drupal HTML template as analogous to ASP.NET's master page. The Drupal core has a default HTML template called html.tpl.php, which is shown in Listing 7-10. It mixes HTML with PHP code to specify where content and style objects are to be rendered.
Example 7.10. The Default HTML Template
<!DOCTYPE html PUBLIC "-//W3C//DTD XHTML+RDFa 1.0//EN"
  "http://www.w3.org/MarkUp/DTD/xhtml-rdfa-1.dtd">
<html xmlns="http://www.w3.org/1999/xhtml"
  xml:lang="<?php print $language->language; ?>"
  version="XHTML+RDFa 1.0"
  dir="<?php print $language->dir; ?>"<?php print $rdf_namespaces; ?>>

<head profile="<?php print $grddl_profile; ?>">
  <?php print $head; ?>
  <title><?php print $head_title; ?></title>
  <?php print $styles; ?>
  <?php print $scripts; ?>
</head>
<body class="<?php print $classes; ?>" <?php print $attributes;?>>
  <div id="skip-link">
    <a href="#main-content"><?php print t('Skip to main content'), ?></a>
</div> <?php print $page_top; ?> <?php print $page; ?> <?php print $page_bottom; ?> </body> </html>
Template files are a lot like ASP files in that they are mostly an HTML file that will be sent to your browser. However, you can mix PHP code inside the HTML by using the <?php...?> markers. All of the variables that are printed from the template are created in the module. We'll see how to create those and pass them to a template a little later.
You don't need to create your own HTML template if the default template will do what you need. If you want to create an HTML file that is different, just call it html.tpl.php and put it in the templates directory of your theme's directory and Drupal will use it instead of the default HTML template.
Notice the variables that are printed at various points on the page. These are called "template variables" and they are created in your module as members in an array variable called, $variables[]. Before we go any farther, let's see how to get information from our module into the theming engine as template variables.
Before you start working with templates as a developer, it's helpful to understand where these variables are set. That way, you can add your own—or just be satisfied with the joy of knowledge.
There is an array, $variables[], that is set as part of the theming stage. This array is built in theme.inc in the core directory structure. By the time it gets to your template, the array contains a list of variables, and the key of each is the name of the actual variable. The theming engine converts that single array with multiple values into a set of variables you can use in your template.
To give you an idea of what Drupal is doing under the covers, Listing 7-11 shows some lines from theme.inc.
Example 7.11. Standard Members of the $variables Array
$variables['footer_message']    = filter_xss_admin(variable_get('site_footer', FALSE));
$variables['head']              = drupal_get_html_head();
$variables['language']          = $GLOBALS['language'];
$variables['language']->dir     = $GLOBALS['language']->direction ? 'rtl' : 'ltr';
$variables['logo']              = theme_get_setting('logo'),
$variables['mission']           = isset($mission) ? $mission : '';
$variables['css']               = drupal_add_css();
$variables['styles']            = drupal_get_css();
During the theming process, this array is converted so that you have $footer_message, $head, $language, and so on available to you.
The Drupal core (in theme.inc) provides a default set of variables that can be used in your page template. These are shown in Table 7-1.
Table 7.1. Drupal's Default Variables (source: Drupal.org)
Description | |
|---|---|
| The placement of the template. Each time the template is used, it is incremented by one. |
| Either " |
| The theme path relative to the base install. Example: " |
| Boolean returns |
| Boolean returns |
| Boolean returns |
Boolean returns TRUE when the database is active and running. This is only useful for theming in maintenance mode where the site may run into database problems. | |
| The user object containing data for the current visitor. Some of the data contained here may not be safe. Be sure to pass potentially dangerous strings through |
This is the absolute minimum set. Most themes create many more variables, and you can create any others you like using the technique shown above.
Now what if you need to create a variable that you want to have available when the template gets rendered? It's pretty straightforward, actually. Like all things in Drupal, you just need to know where to look. In your theme or subtheme directory, open the template.php file or create a new one. (See Figure 7-17.)

In template.php, create a function that intercepts the preprocess hook. That hook gives you a reference to the $variables array, where you can add an item with a key and value. (See Listing 7-12.)
Example 7.12. Hooking into the Page Preprocessor from a Theme Template
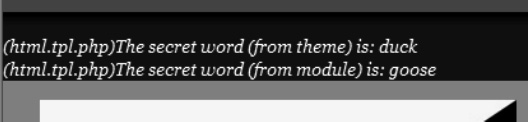
function first_subtheme_preprocess(&$vars) {
  $vars['theme_secret_word'] = 'duck';
}
The preprocess hook is a handy device for the themer, as it gives pretty much any interested party a chance to do something with the page. Suppose you want to access the variables from your module. All you need to do is to create a hook function in the module file, as shown in Listing 7-13.
Example 7.13. Hooking in to the Page Preprocessor from a Module
function weather_info_preprocess(&$variables) {
  $variables['module_secret_word'] = 'goose';
}
When this is done, we will have two more variables available in the page template. Locate the place in your HTML template where the content is rendered and put references to the two variables (See Listing 7-14).
Example 7.14. Including Variables in a Template File
<?php print $page_top; ?><i><?php print "(html.tpl.php)The secret word (from theme) is: $theme_secret_word" ?></i><br/> <i><?php print "(html.tpl.php)The secret word (from module) is: $module_secret_word" ?></i><br/><?php print $page; ?>
Tip
Whenever you make changes to the themes, particularly when creating new templates, it is important to clear the theme registry. You can do this from Configuration
As Figure 7-18 shows, this will render the variables on the page.
The preprocess hook will set the variables for pretty much any context. There are other, more specific places you can hook into the theme engine to set variables.
template_preprocess_html(&$variables): Preprocessvariables forhtml.tpl.php.template_preprocess(&$variables, $hook): Adds default helper variables for variable processors and templates. This comes in before any other preprocess function, so it can be used in default theme implementations (non-overridden theme functions.hook_preprocess_HOOK(&$variables): Preprocess theme variables for a specific theme hook. This hook allows modules to preprocess theme variables for a specific theme hook. It should only be used if a module needs to override or add to the theme preprocessing for a theme hook it didn't define.template_preprocess_page(&$variables)Preprocess variables for
page.tpl.php.Most themes utilize their own copy of
page.tpl.php. The default is located inmodules/system/page.tpl.php. Look there for the full list of variables.Uses the
arg()function to generate a series of page template suggestions based on the current path.Any changes to variables in this preprocessor should also be made in
template_preprocess_maintenance_page()to keep all variables consistent.
template_preprocess_node(&$variables)Process variables for
node.tpl.php.Most themes utilize their own copy of
node.tpl.php. The default is located inmodules/node/node.tpl.php. Look there for the full list of variables.The
$variablesarray contains the following arguments:$node$view_mode$page
template_preprocess_block(&$variables)Process varaiables for
block.tpl.php.Prepares the values passed to the
theme_blockfunction to be passed to a pluggable template engine. Uses block properties to generate a series of template file suggestions. If none are found, the defaultblock.tpl.phpis used.Most themes utilize their own copy of
block.tpl.php. The default is located inmodules/block/block.tpl.php. Look there for the full list of variables.The
$variablesarray contains the following argument:$block
template_preprocess_field(&$variables, $hook)Theme preprocess function for
theme_field()andfield.tpl.php.
template_preprocess_region(&$variables)Preprocess variables for
region.tpl.php.Prepares the values passed to the
theme_regionfunction to be passed into a pluggable template engine. Uses the region name to generate template file suggestions. If none are found, the defaultregion.tpl.phpis used.
template_preprocess_comment(&$variables)Process variables for
comment.tpl.php.
template_process_html(&$variables)Process variables for
html.tpl.php.Performs final addition and modification of variables before passing them to the template. To customize these variables, call
drupal_render()on elements in$variables['page']duringTHEME_preprocess_page().
template_process(&$variables, $hook)A default process function used to alter variables as late as possible.
template_process_field(&$variables, $hook)Theme process function for
theme_field()andfield.tpl.php.
It is customary for the template designer to place a list of all available variables at the top of the template. For example, the default region theme template, region.tpl.php, contains the following comment:
/**
 * @file
 * Default theme implementation to display a region.
 *
 * Available variables:
 * - $content: The content for this region, typically blocks.
 * - $classes: String of classes that can be used to style contextually through
 *   CSS. It can be manipulated through the variable $classes_array from
 *   preprocess functions. The default values can be one or more of the following:
 *   - region: The current template type, i.e., "theming hook".
 *   - region-[name]: The name of the region with underscores replaced with
 *     dashes. For example, the page_top region would have a region-page-top class.
 * - $region: The name of the region variable as defined in the theme's .info file.
 *
 * Helper variables:
 * - $classes_array: Array of html class attribute values. It is flattened
 *   into a string within the variable $classes.
 * - $is_admin: Flags true when the current user is an administrator.
 * - $is_front: Flags true when presented in the front page.
 * - $logged_in: Flags true when the current user is a logged-in member.
 *
 * @see template_preprocess()
 * @see template_preprocess_region()
 * @see template_process()
 */
Processing in the other templates happens in pretty much the same way, as the Drupal theming process works its way down the hierarchy. Each template exposes different variables using the technique I just described. For a list of variables exposed by each of the Drupal core templates, see Appendix C.
When Drupal renders a page, it goes through a complex but predictable series of steps to turn your structures into HTML. Once they are all rendered, there is a final construction phase that puts all of the HTML snippets where they need to go. The templates help guide that process. Let's take a look at how a typical page is rendered.
Consider a page that has a number of regions, into which blocks are placed using Drupal's Structure
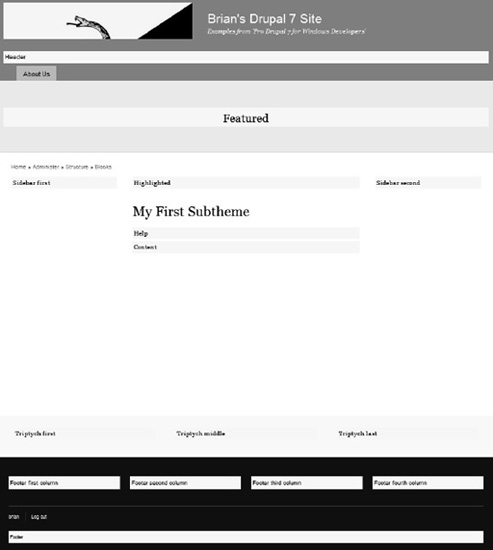
The only required block is Content, which we have placed in the region titled Content (see Figure 7-20).

There are several nodes to be rendered on our page, but we'll just focus on nodes in the Content region. The basic flow that works with any Drupal page is shown in Figure 7-21.
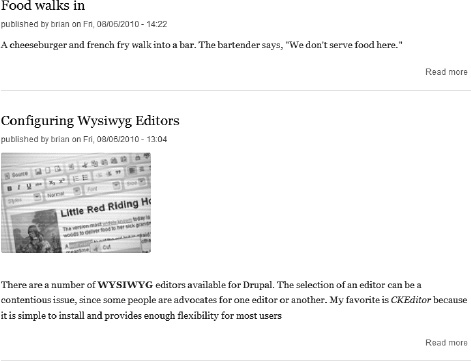
Let's start with the page that was rendered and sent to the browser. Figure 7-22 shows the content region of the page as it is rendered.
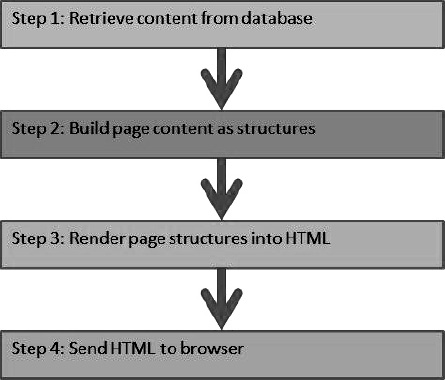
Starting with step 1, Drupal's content management engine will get all content from the database and start building the content arrays with regard to various current conditions, such as the user's permissions, the need for comments or revisions to be displayed, and the existence of cached data. The process used is illustrated in Figure 7-23.
All requests start at
index.php. First, the system is bootstrapped. This includes starting a connection to the database, checking for cached data, setting up a session, registering the language, plus a few other things. The page lifecycle is described in more detail in Chapter 2. After bootstrapping, themenu_execute_active_handler()function is called.The
menu_execute_active_handler()function checks to make sure the site is online and then callsmenu_get_item(), which returns a router item that it gets from themenu_routertable in the database. A router item is an array that is used internally. It contains information about the object, such as the function to be executed (called back) when the page is to be loaded, the access information for the current user, and certain theme information. The callback page information is what we will use for the next step.The
call_user_func_array()function is called with thecallbackandargumentsproperties of the router array. The call iscall_user_func_array($router_item['page_callback'], $router_item['page_arguments']); which resolves to call_user_func_array('node_page_default', ''),.The
node_page_default()function makes a call to the database to find all of the nodes that are to be built. In this case, there are two nodes with node identifiers (nid) of 3 and 2. Node 3 is our joke, and node 2 is an article on WYSIWYG editors. After retrieving the list ofnids, the function retrieves the nodes with$nodes = node_load_multiple($nids);. The function then callsnode_view_multiple()to build the view.The
node_view_multiple()function calls thenode_view()function once for each node in the array, then returns an array of built nodes ready for rendering.The
node_view()function calls thenode_build_content()function to do the actual building of the node for display, and then invokesdrupal_alter()to give other modules an opportunity to modify the view. This ability to alter nodes after they are built is a very powerful (and potentially scary!) feature of Drupal.The
node_build_content()function calls thefield_attach_view()function, which does the heavy lifting of creating the node. Thefield_attach_view()function callsmodule_invoke_all()to give all modules a chance to have their say into the building of the node.Now that the nodes that are to be included in the region have been built, it's time to render them into HTML for delivery back to the browser. The
drupal_deliver_page()function is called to start that process. It is called with an array,$page_callback_result, which contains a pager and the node information. A pager is a standard Drupal feature that enables the rendering of multiple pages of long lists of items. Since we only have two items, the pager won't be rendered on our page.First, the function calls
drupal_alter()to give all modules one last chance to do anything to the content before finally delivering it.The
drupal_alter()function is called with the'page_delivery_callback'argument.The
$delivery_callbackvariable contains the stringdrupal_deliver_html_page, which is called at this point. This function makes a last check to see if the page should be rendered by checking to see if the item was not found, or if the user doesn't have access, or if the site is offline. What? Shouldn't we have checked this already? While it seems like a waste to build the whole page, only to decide at the last moment that the user doesn't have access, this check is pretty important. Remember the calls todrupal_alter()? It is conceivable that one of the functions might have decided to punt and mark the page as not renderable for some reason. It would be rude to render the page after one of the modules has said not to.Now that all of the data for the page has been collected and we've gotten the green light to render the page, it's time to build the HTML. The
drupal_render_page()function calls allpage_buildhooks and a lastdrupal_alter()is called for allpagehooks.Finally, the general-purpose
drupal_render()function is called to create the actual HTML. This function is called from many different places, and acts to find the appropriate stylesheets, template files, and other theme information. Thedrupal_render()function is recursive, since there will certainly be objects inside the page that need to be rendered, and there will be objects inside those objects that need to be rendered, and so on.

At this point, HTML is generated and sent to the browser. Easy as pie.
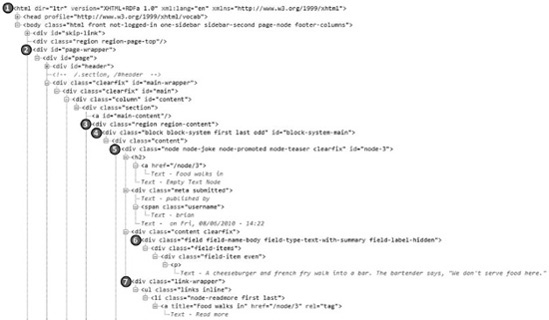
I mentioned that templates can be thought of as hierarchical. That is, templates can be contained in other templates. Figure 7-24 displays the HTML code that was generated to show the page.
First, the HTML template,
html.tpl.php, is called. Think of this as the master page that drives all other functionality. When the line<?php print $page; ?>is encountered in the HTML template, the page template is invoked.The page template,
page.tpl.php, starts with the page-wrapperdiv. The page template createsdivs withindivs until it reaches the line,<?php print render($page['content']); ?>.At this point, the page content is rendered, which means our frienddrupal_render()is called recursively to process the objects in$page['content']. During the theming process, as the rendering function is rendering the content, it discovers that there is a "theme wrapper" that is to encapsulate the nodes. The code, indrupal_render, looks like this:if (isset($elements['#theme_wrappers'])) { foreach ($elements['#theme_wrappers'] as $theme_wrapper) { $elements['#children'] = theme($theme_wrapper, $elements); } }From here, we can see how the various template files interacted to create the HTML during the
drupal_render()process described above.The variable
$theme_wrapperevaluates to 'region', which sets off a series of events, culminating in a call to$render_function($template_file, $variables);, where$render_functionevaluates totheme_render_templateand$template_fileevaluates tomodules/system/region.tpl.php. A simple include,include DRUPAL_ROOT . '/' . $template_file;, causesregion.tpl.phpto load. It is just a simple wrapper:<div class="<?php print $classes; ?>"> <?php print $content; ?> </div>
Magically, the
$contentvariable has already been rendered by hierarchical calls to the templates within, as shown in the next few steps.Inside the region there is a block that was configured using the administrative screens. Now it is time to call the template file for blocks,
block.tpl.php. The block template will output a title if we set it up in the block configuration page. In the case of our nodes, there is no title, so the block template acts pretty much as a simple wrapper.The node template,
node.tpl.php, is called, which outputs some classes and prepares to receive the content rendered by the field content generator. The node template actually does a lot of work to get the default node just right. It places information that is meaningful, such as the author, publishing date, and title, plus it can render helpful links for administrators and authors to allow them to edit or delete the node.The field wrapper is generated by the
theme_fieldfunction in the field module. This function plays the role of default field theming if a theme template file for field,field.tpl.php, is not found. There is a default field template file, but it will not be used; it is included in the Drupal core as a starting point for creating your own field template file if you want to do that.Finally, as part of the node template, if there are any links to be rendered, they are put here. In this case, the only link is "Read more," which takes us to a page that has the contents of this node in its entirety.
So that's the inside scoop on creating a simple front page for our site. As you can see, there are many steps, but once you understand the general flow of things, the design becomes logical and it gets easy to master the concepts.
In addition to the standard templates described here, you can have a template for just about any content type, and even a single instance of a content type. Suppose, for example, you want to create a page template for the front page, and a different template for all other pages. This is a pretty common practice so there's a provision in Drupal to do this. If the file page-front.tpl.php is present in the current theme's directory, it will be used when the front page is called, and page.tpl.php will be called for all other pages.
You can also create page templates for certain URL paths. For example, if you want a different template for when you add a content node, the URL looks like this: http://yoursite.com/node/add; you just need to create a page template that has the path, replacing the slashes with hyphens: page-node-add.tpl.php.
The most common template, besides page, is node. Bartik's node template (node.tpl.php) is shown in Listing 7-15.A node template indicates where node-related content is to be rendered.
Example 7.15. A Typical Node Template
<div id="node-<?php print $node->nid; ?>" class="<?php print $classes; ?> clearfix"<?php print
$attributes; ?>>

  <?php print render($title_prefix); ?>
  <?php if (!$page): ?>
    <h2<?php print $title_attributes; ?>>
      <a href="<?php print $node_url; ?>"><?php print $title; ?></a>
    </h2>
  <?php endif; ?>
  <?php print render($title_suffix); ?>
<?php if ($display_submitted): ?>
<div class="meta submitted">
<?php print $user_picture; ?>
<?php
print t('published by !username on !datetime',
array('!username' => $name, '!datetime' => $date));
?>
</div>
<?php endif; ?>
<div class="content clearfix"<?php print $content_attributes; ?>>
<?php
// We hide the comments and links now so that we can render them later.
hide($content['comments']);
hide($content['links']);
print render($content);
?>
</div>
<?php
// Remove the "Add new comment" link on the teaser page or if the comment
// form is being displayed on the same page.
if ($teaser || !empty($content['comments']['comment_form'])) {
unset($content['links']['comment']['#links']['comment-add']);
}
// Only display the wrapper div if there are links.
$links = render($content['links']);
if ($links):
?>
<div class="link-wrapper">
<?php print $links; ?>
</div>
<?php endif; ?>
<?php print render($content['comments']); ?>
</div>The node.tpl.php template will be used for all nodes, unless a more specific template is found. (See below for how specific templates are chosen.) If you want to use a generic node template for all nodes, but you want the story content type to use a different template, you can create a file called node-story.tpl.php.
Getting even more specific, you can create a template for a particular node, referenced by its node identifier (nid). To do this, you create a file in the theme's directory with the name node-123.tpl.php, where 123 is the nid. While this is rarely used and comes with the usual disclaimers of non-portability, it's nice to know it's available.
When the Drupal core theming engine is looking for the most appropriate template to use, it goes through a process called "template suggestions." During this process, Drupal makes a list of all possible templates that could be chosen at that point. It then goes down the list until it finds one of the choices. For example, in order to edit node 123, the URL looks like this: http://mysite.com/node/123/edit. Drupal builds a list with all possible template names:
page-node-edit.tpl.php
page-node-123.tpl.php
page-node.tpl.php
page.tpl.php
After the list is created, Drupal will look in the theme directory for a template and will stop when the template is found. It is possible to modify this list to affect the order of the suggested templates, but that's advanced topic beyond the scope of this book. If you need to do that, check the Drupal documentation for details.
The Drupal theming process is incredibly rich. That's a good thing, unless you are just learning to do theming "the Drupal way." I hope that after reading this chapter, you have at least a basic understanding of the theming process and can start up that learning curve. Having a step debugger is a great help in understanding how all of the pieces fit together.
Once you get the basics, you'll want to spend some time at drupal.org to get into the intricacies of the theming engine as you need to know more.
Appendix B is a working case study that shows how to theme a fairly complex site from scratch, using a Photoshop design and the Omega theme system. In the next chapter, we'll cover the important task of testing.
In the next chapter, we will go over a very important topic, Testing.