
One area of software development that has gotten more attention lately is testing. From unit testing to user interface testing to full system testing, this subjectis finally getting the attention I think it deserves. Of course, we all test our code to some extent, but automated testing tools and integration into the IDE have made the nasty task of testing much more palatable.
A formalized test strategy requires creating code that programmatically exercises every single line of your program to assure that it works as it is supposed to. Programmers have traditionally tended to avoid developing formalized test harnesses for their programs, mostly because of the extra time involved in writing the tests. This time does not directly tie into their deliverables since the testing code never leaves the developers' workstations.
I used to think the same way. Who wants to spend time writing boring tests when they know their code works? How demeaning!
Over a few small and one large projects recently, I have come to embrace the idea of unit and system testing and to see how building a formalized test suite and coding to the tests really does shorten the development cycle. I've really been able to see how this can save time and money in the long term—and create a better product with fewer defects. The value of that is incalculable.
Dries Buytaert is the original creator and project lead of Drupal. He had this to say about testing during the development of the Drupal 7 code:
For well over a year now, core development has used a test-driven development strategy combined with automated testing. I think all core developers working on Drupal 7 will unanimously agree when I say that our test infrastructure has drastically improved our velocity and effectiveness. Overall, patches get accepted faster.
The automated tests allow us to focus on the architectural and the algorithmic changes introduced by a patch, rather than having to worry about unexpected side-effects. This helps both patch reviewers and core developers contributing patches. Furthermore, thanks to the tests, we have a much better feel about the stability and the health of Drupal 7.
I am optimistic that our code freeze period for Drupal 7 could be shorter than prior releases. As the project lead, our test framework helps me sleep better at night. The stability and health of our code base is important to me, but frankly, it is at least as important for the many Drupal users, or for those people and organizations looking to adopt Drupal.
Before Drupal 7, there was a plague of incidents where someone would fix a bug in core or a contributed module, test it and solve the problem in one place, only to find out after releasing the fixed code that it broke something else in another module. Just consider the form alter hook we saw in Chapter 6, which allows us to alter a form we don't own. It would be possible for me to write code that broke your module without even touching your code. This was a very frustrating situation for everyone in the community.
There was a test module, SimpleTest, available for Drupal version 6. It never really took off, partly because there wasn't a testing zeitgeist present in the developer community. Plus, the Drupal 6 version of SimpleTest required a hack to the core. Naughty, naughty. Suffice it to say that SimpleTest did not get much traction in Drupal 6.
Fortunately, the attitude toward testing has changed in the development community, and the SimpleTest module has not only been embraced, it has been included in core. Moreover, all core modules are required to have a test suite that assures that the module works as designed.
To drive home the value of testing in Drupal, here's one more quote, this from the testing page on drupal.org:
SimpleTest is Drupal's custom testing framework. During the Drupal 7 development cycle SimpleTest has become an integral part of the workflow, and has been moved into core as the Testing module. It has significantly enhanced the way core is developed and made it possible to make major API enhancements with confidence.
Drupal 7 HEAD is much more stable than any release we [have] ever had. -chx
Drupal 7 has seen major benefits from embracing the testing framework.
So I suggest that your module have full test coverage and that you run all tests against the core and your module before you release it.
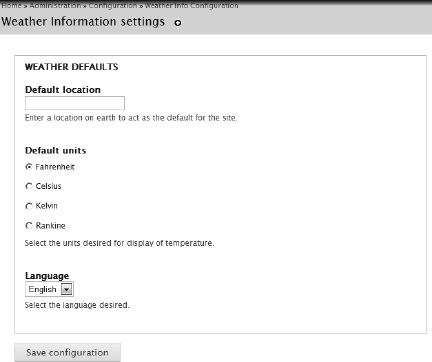
Before you do any testing in Drupal, you must do some configuration. The Testing module is installed as part of the Drupal 7 core, but you need to enable it just like you would any other module—under Modules as shown in Figure 8-1.
Save the configuration and hope for the best. If you get the banner, "The configuration options have been saved.", you're all set. But chances are you'll have a problem, as shown in Figure 8-2.
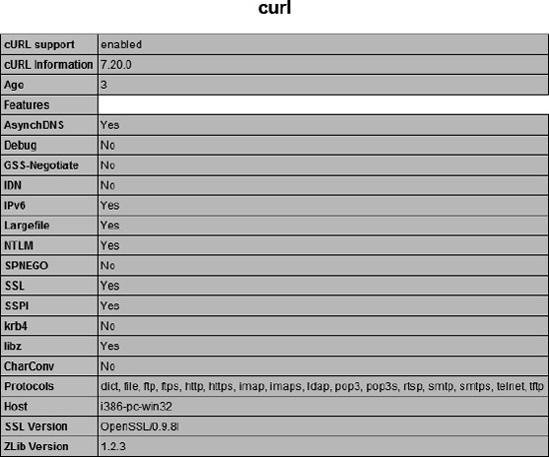
cURL is a tool used to transfer data from or to a server using a number of different protocols. The cURL functionality comes in two flavors: a command-line tool that we don't care about here, and a library that has been packaged into a PHP library called php_curl.dll. Before we run our web-based testing, we must enable the cURL library.
Installing the cURL library is pretty straightforward, but it is complicated a bit by the fact that we are running in a Windows environment using Visual Studio.
First, let's create a PHP file that gives us the status of PHP and tells us what is loaded. There is a PHP command, phpinfo(), that will print out the status of the loaded PHP interpreter and let us know the version numbers and lots of other helpful information.
Create a new file, phpinfo.php, using Visual Studio in the same directory as Drupal's index.php. It should contain just two lines, as shown in listing 8-1.
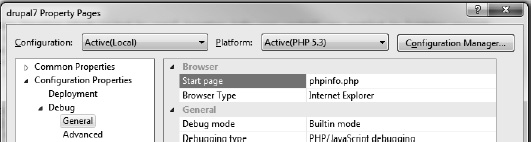
Now, set that to the default page for debugging. VS.PHP uses its own instance of PHP. To see where php.ini is loaded, we need to run this PHP script from Visual Studio. In the property pages as shown in Figure 8-3 (Project
Installing cURL requires making a change to the PHP initialization file, php.ini. Our PHP add-in, VS.PHP, has its own version of php.ini, which it copies to the web directory every time you start a debugging session. This is designed to give you a fresh copy of the initialization file each run. However, the cURL libraries are not loaded. The VS.PHP initialization file does not have cURL enabled by default, so we must create our own version of php.ini and enable cURL.
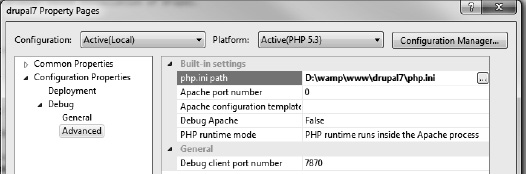
On the property pages for your project, go to the Advanced page and set the php.ini path as shown in Figure 8-4.
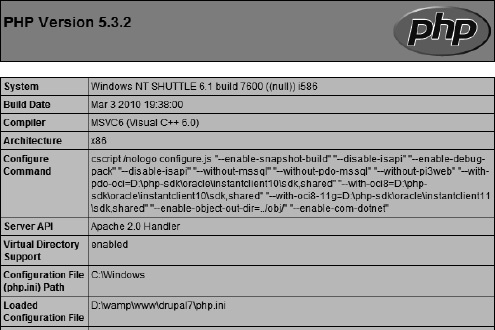
Note that the path should be where your index.php file is. Click OK and press F5 to start debugging. You'll see the PHP information in your browser, as shown in Figure 8-5, and you'll notice that the path identified with "Loaded Configuration File" is set to the path you indicated on the property page.
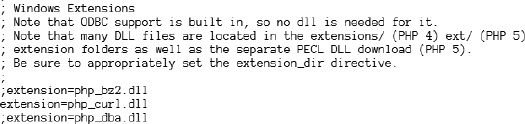
All is good so far. If you search for the string "curl", you probably won't find it. We first need to enable the extension by removing a comment from the PHP initialization file.
Using any text editor, open the php.ini file that has been copied to your home directory and search for the string "php_curl.dll". You'll notice a semicolon in front of it, which indicates a commented line. Remove the semicolon as shown in Figure 8-6.
Now save the file and restart your debugging session using Ctrl+Shift+F5. You'll see the PHP Information screen again, but now when you search for "curl", you'll see that the extension has been enabled and is working properly. It should look something like Figure 8-7.
Once the cURL library is loaded properly, we can start creating and executing tests.
Tip
The phpinfo.php page is handy, but you should definitely not put it on your production machine as it contains information that could be helpful to a hacker. The same goes for php.ini. And it should not be present in the same directory as your index.php file. Rather, it will be placed in some location defined by your system administrator (which could be you, of course!).
You should probably change the start page back to index.php for the next steps.
The Drupal test subsystem provides the ability to do unit testing like many other systems (including Visual Studio Team Edition), but it also allows more integrated testing of the entire system.
The three typical categories of software testing are: unit, integration, and system. Unit testing is pretty straightforward. A unit test suite is designed to identify (usually) small portions of code and test to see if they work. Actually, a good unit test suite will also test the boundaries of a particular piece of code to make sure that the proper errors are handled if expected inputs are not made available. Unit testing only concerns itself with the basic blocks that make up the code, usually on a function-by-function basis. As such, the unit test harness must be intimately involved with the internal capabilities of the code in order to exercise them properly.
Integration testing, on the other hand, is more concerned about how all of the individual functions operate together to provide a working system. In Drupal, we have little functions that do certain small things, but there are many tasks that require the larger system to do something before they can work. Consider the simple act of creating a node. Once a user logs in and has the right privileges to create a node, she can click a link to add a certain type of content and then be presented with a screen to enter the title, body, and whatever else the node requires.
Now, let's automate that process. Carl Sagan, in his wonderful series Cosmos, said, "If you wish to make an apple pie from scratch, you must first invent the universe." It's sort of that way with Drupal testing.
Before creating a node, the automated test routine must first log in as a user that has the rights to create a node, and then the node creation can be on its way. But before we can even create the node, it might be necessary to enable some modules, create a role, set permissions, even create the content type if it's not one that is included in the Drupal core.
One way to do this user-emulated testing would be to put a robot at the keyboard to replace the human, but that could get quite cumbersome.
Fortunately, the Drupal 7 Testing module provides an API to do integration testing without the expense of a physical robot. In the above scenario, we must first emulate the logging in of a user. But which user? Do we need to create a user for testing? Good question, and the answer is no.
Drupal's testing framework allows youto create a user with a random name and specific roles. It then lets you log in as that user, perform anynecessary tasks, and then delete anything that was created along with the temporary user. All along, the testing framework is keeping track of what the virtual user did, and the responses Drupal returned. We can test expected responses against what was returned to assert that everything is working as designed.
After unit and integration testing, the next level of testing, system, involves a comprehensive test of the entire system, including networks, hardware, and sometimes novice or experienced users. The testing that Drupal's test framework performs is somewhere between integration testing and system testing, but provides a nice way to automate our system so I'm not going to quibble about where it falls on the continuum.
Developing any nontrivial application requires some level of testing. Over the last few years, there's been a lot of talk about test-driven development—that is, developing tests first and then using those tests to define and guide the development of the application. Yeah, that sounds good, but it seems like way too much bureaucracy for my anarchist brain. Why can't I just write my program?
If you are reading this book, Drupal is probably new to you, and PHP is probably new as well. When you are learning a new technology or two, insisting on developing a test suite first can be a real buzz-kill. When you're just learning, sometimes it's best just to play around for a while to see what happens in box 2 when the red button in box 1 is pressed. Testing be damned!
In fact, that's just what I have been doing so far in this book. You get a pass fornot developing tests while you are learning a technology. But once you master the technology, doing test-driven development becomes a lot easier, and is definitely preferable for more complex systems.
Ward Cunningham is the inventor of the wiki. He maintains a wiki on test-driven development that is very accessible. He boils test-driven development down to a simple list.
Think about what you want to do.
Think about how to test it.
Write a small test. Think about the desired API.
Write just enough code to fail the test.
Run and watch the test fail. Now you know that your test is going to be executed.
Write just enough code to pass the test (and pass all your previous tests).
Run and watch all of the tests pass. If anything doesn't pass, you did something wrong, fix it now since because it's still fresh in your mind.
If you have any duplicate logic, or inexpressive code, refactor to remove duplication and increase expressiveness—this includes reducing coupling and increasing cohesion.
Run the tests again; you should still see all tests pass. If you get a failure, you made a mistake in your refactoring. Fix it now and rerun.
Repeat the steps above until you can't find any more tests that drive writing new code.
Ward points out that the first step is the most difficult, followed by the second step. Everything else is pretty easy.
Now that I've gone over the importance of test-driven development, we are about to break those rules. In this book, we've been developing a module that will provide the weather conditions and forecast for a particular location on earth. We built the module without creating any formal automated tests, but now it's time to develop those tests. This is not a total waste; having an automated test suite will allow us to be confident should we change the code or add functionality.
It's never too late to develop a test harness.
We will be creating two types of tests for our weather information module. First, we'll invoke the unit testing facility of the Drupal Testing module. This will simply exercise stand-alone functions to see if they provide the expected output for a given input. Plus, we'll do some boundary checking to see if we can get it to break by providing bad input data. Unit testing is done by instantiating the DrupalUnitTestCase class.
After that, we'll invoke the DrupalWebTestCase class to do more in-depth integration and system testing.
By now, you've probably figured out "the Drupal way" of building applications. There's a heavy emphasis on coding standards, naming conventions, and metadata. Developing a test harness for your application is an application in itself and, as such, incorporates those same development philosophies.
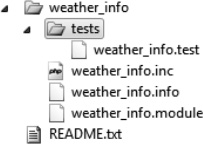
Tests are typically contained in a directory under the module directory that is being tested. To get started, create a directory called tests under the weather_info directory, which is under sites/all/modules. The hierarchy is shown in Figure 8-8.
As you might expect, we need to give Drupal some information about our test suite. We can do this by adding some lines to our project's .info file. The module's .info file should already exist in your weather_info directory. You'll need to add the bold line shown in Listing 8-2.
Example 8.2. The Information File Additions for a Test Suite
; $Id$
name = Weather information
description = A block that shows current weather for a particular location.
package = Cool stuff from Brian
core = 7.x
files[] = weather_info.module
files[] = weather_info.inc

files[] = tests/weather_info.test

version = 7.x-1.x
The file, tests/weather_info.test, is the Drupal module that contains all tests for the weather module. Next, we need to create the unit test harness.
Unit tests are developed by extending the DrupalUnitTestCase class and overriding the getInfo() function. We will first be testing the temperature functions of our weather information module. We will start by calling the weather_info_temp() function, which calls the various conversion functions: weather_info_f_to_c(), weather_info_c_to_f(), weather_info_c_to_k(), etc.
The skeleton for our unit test class is shown in Listing 8-3.
Example 8.3. Skeleton for a Unit Test Case
class WeatherTempTest extends DrupalUnitTestCase {

  public static function getInfo() {
    return array(
      'name' => 'Temperature tests',
      'description' => 'Tests temperature conversions.',
      'group' => 'Weather info',
      );
  }
// tests go here
}
Like all things Drupal, there is plenty of descriptive metadata to help build the screens and report progress. It's important to declare a getInfo() function, as the test framework will execute this when running the tests.
Everything else in the class will be considered a single test case that will be executed by the testing engine. For our simple test, we will call the weather_info_temp() function with various parameters and then assert that the resulting output returns what we expect. An example test is shown in Listing 8-4.
Example 8.4. Sample Test Case for Temperature
$out_temp = weather_info_temp(32, 'C', 'US'),
$this->assertEqual($out_temp, '0°C', 'F to C conversion.'),
Look at the second line. The DrupalUnitTestCase class has a number of assertions for checking the output. In this test, we are passing the integer value 32 to the function. The second parameter is the unit we want the temperature converted to, and the third parameter is the unit system, either 'US' for British measure, or 'SI' for metric measure. In this case, we are sending a value representing 32 degrees Fahrenheit and asking the function to return the corresponding value in Celsius. As you'll recall from earlier chapters, the weather_info_temp() function returns a handy string ready for us to output to the browser. This includes the degree entity and the unit returned.
So the assertEqual() function will compare the first parameter to the second and check to see if they are equal. If they are, the test will be considered a success. If not, it will be deemed a failure. The third parameter is a string that will be printed on reports to indicate the nature of the test.
We have several different temperature conversion combinations to test. The complete test case for this function is shown in Listing 8-5.
Example 8.5. A Unit Test Suite to Exercise the Temperature Conversion Functions
class WeatherTempTest extends DrupalUnitTestCase {

  public static function getInfo() {
    return array(
      'name' => t('Temperature tests'),
      'description' => t('Tests temperature conversions.'),
      'group' => 'Weather info',
      );
  }

  function testFtoC() {
    $out_temp = weather_info_temp(32, 'C', 'US'),
    $this->assertEqual($out_temp, '0°C', t('F to C conversion.'));

    $out_temp = weather_info_temp(32, 'F', 'US'),
    $this->assertEqual($out_temp, '32°F', t('F to F conversion.'));

    $out_temp = weather_info_temp(10, 'C', 'SI'),
    $this->assertEqual($out_temp, '10°C', t('C to C conversion.'));

    $out_temp = weather_info_temp(32, 'K', 'US'),
    $this->assertEqual($out_temp, '273°K', t('F to K conversion.'));

    $out_temp = weather_info_temp(10, 'K', 'SI'),
    $this->assertEqual($out_temp, '283°K', t('C to K conversion.'));

    $out_temp = weather_info_temp(32, 'R', 'US'),
    $this->assertEqual($out_temp, '492°R', t('F to R conversion.'));

    $out_temp = weather_info_temp(10, 'R', 'SI'),
    $this->assertEqual($out_temp, '510°R', t('C to R conversion.'));
  }
}
Let's run the tests! Get to the Configuration page and find the Testing module under Development (See Figure 8-9).

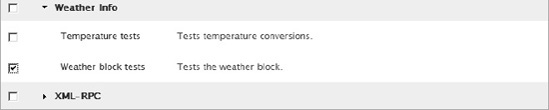
You will see a page with the available tests. All of the core modules contain tests, so you'll see them all listed. We are interested only in the Weather Info tests right now, so scroll down to see the tests as shown in Figure 8-10.
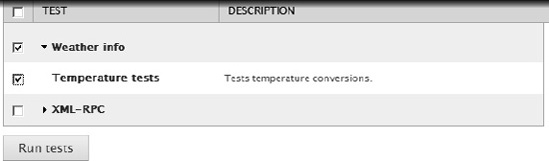
Under the Weather info group you'll see all of the test cases that inherited the test case classes. Right now, there is only one but we'll be creating more later. Click the Run tests button to start the tests.
You will see the throbber going as the tests are run and Drupal is communicating with the browser using AJAX. (See Figure 8-11.)

Unit tests run pretty quickly, so you won't see this for long. Don't worry, though, you'll spend a lot of time looking at this screen once we get into web testing.
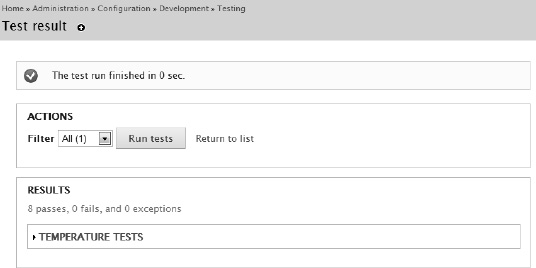
After the tests are complete, you will see a screen that displays the test results as shown in Figure 8-12.
If you want to see the details of the tests, you can click the TEMPERATURE TESTS link (see Figure 8-13).
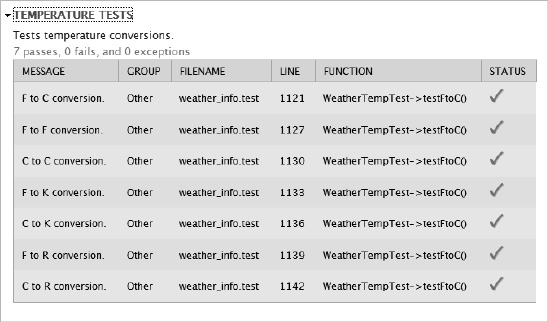
From this, you can see the relationship between the code in our test case and the report as it is displayed in the browser.
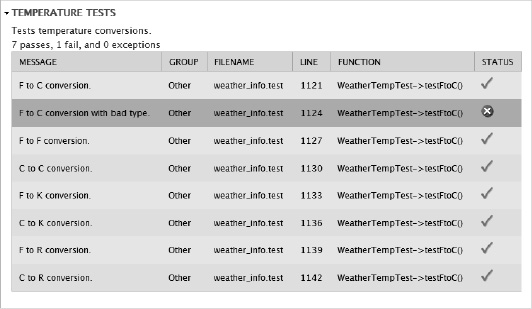
This will exercise the code, but I'm not quite happy with the coverage yet. What we've done here is pretty safe. What would happen, for example, if we passed a string to the function? It is designed to take an integer, but is it smart enough to provide some kind of error if the wrong data type is sent?
Let's suppose we think the function should return a null if it doesn't understand the temperature sent to it. Listing 8-6 shows how I would write that function.
Example 8.6. Testing Incorrect Data Type Input
$out_temp = weather_info_temp('thirty-two', 'C', 'US'),
$this->assertNull($out_temp, 'F to C conversion with bad type.'),
I'll add this to the test case and run the tests again. The results are shown in Figure 8-14.
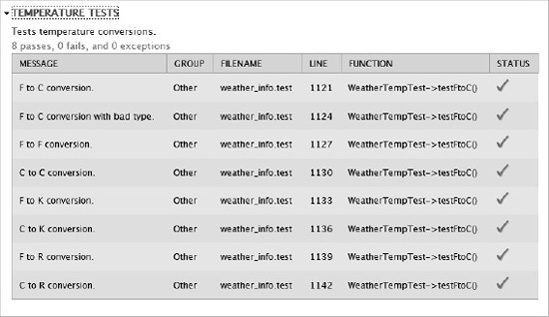
Now we're starting to test the waters of test-driven development. We have an expected return, but our function is not returning it. So we need to go into the code and do the right thing. Listing 8-7 shows a modification to the function that will check for the proper data type.
Example 8.7. Modifying our Function Will Produce the Expected Result
function weather_info_temp($in_temp, $unit, $unit_system) {
  if (is_string($in_temp)) {
    return null;
  }

  switch ($unit) {
  ...
Now we can run the tests again and get the output shown in Figure 8-15.
There are other tests that should be written in order to test the functionality of our system completely. It is up to you to come up with a list of tests and implement them in the test suite. You might consider testing a function's out-of-range condition or the presence of an array item that doesn't exist. There are many tests that can be performed on any piece of code. Like Ward said of his list, the first two steps are the hardest. Trying to figure out how to test something can be challenging, but the time spent is invested well for the time it will save you down the road.
For now, let's move on to a more complex form of testing that can invoke the entire Drupal experience, web testing.
Automated unit testing is a powerful development and debugging tool, but it can only take us so far. As I mentioned before, there are many places where unit testing doesn't allow us to do the kind of complex testing that exercises Drupal's operations.
For this, there is the DrupalWebTestCase class. Developing test cases using this class is quite a bit more complex simply due to the nature of the tests that will be conducted. The class inheritance is shown in Listing 8-8.
Example 8.8. Creating an Instance of the DrupalWebTestCase Class
class WeatherBlockTest extends DrupalWebTestCase {
...
}
To get started with web test cases, you must think of a completely blank Drupal installation. That is, just the default core modules enabled. No blocks set in regions. No users. Default theme. Get the picture? A blank slate.
The testing engine creates a copy of every table in the database and sets the state as if the site has just been installed.
From here, you must invent the universe. You can build exactly what you want, isolated from other distractions. Only then can you get a fair, repeatable test that isolates only those things that you want to test. Fortunately, the test case class provides tools to do this difficult task pretty easily.
In our case, we will check various aspects of the weather information block. First, we will initialize our blank slate by enabling the weather_info module. Then we will create a user with certain permissions and profile information. Finally, we will add the block to a region on the page. And that will get us just to the point when we can start making our apple pie. OK, I'll stop with the Sagan quote. You can start testing the functionality of the block.
Listing 8-9 shows the setUp() function that does the initial creation of our environment.
Example 8.9. Creating the Initial Environment
public function setUp() {
  // Enable any modules required for the test
  parent::setUp(array(
    'weather_info',
    'block',
  ));
The inherited (parent) class contains a setUp() function that takes an array as an argument. This array contains names of all modules that need to be enabled for the test to proceed. In our case, the weather_info and block modules must be enabled. If the modules we enable have any dependencies, the testing framework will automatically enable them.
Next, the drupalCreateUser() function is called. That function creates a temporary role with the permissions that are listed, and then creates a temporary user and assigns the user to that role. This code is shown in Listing 8-10.
Example 8.10. Creating a Test User and Logging In
// Create and log in our privileged user.
  $this->test_user = $this->drupalCreateUser(array(
    'view weather info',
    'change weather location',
    'administer weather info',
    'administer site configuration',
    'administer users',
    'access user profiles',
    'administer blocks',
    'access administration pages',
    ));
  $this->drupalLogin($this->test_user);
Finally, the user is logged in with the appropriate password. The effect of this setup is an environment that can be leveraged to do whatever testing we need.
Listing 8-11 shows the extended class for our skeleton.
Example 8.11. Extending the DrupalWebTestCase Class
class WeatherBlockTest extends DrupalWebTestCase {

  public static function getInfo() {
    return array(
      'name' => t('Weather block tests'),
      'description' => t('Tests the weather block.'),
      'group' => 'Weather info',
);
}
public function setUp() {
// Enable any modules required for the test
parent::setUp(array(
'weather_info',
'block',
));
// Create and log in our privileged user.
$this->test_user = $this->drupalCreateUser(array(
'view weather info',
'change weather location',
'administer weather info',
'administer site configuration',
'administer users',
'access user profiles',
'administer blocks',
'access administration pages',
));
$this->drupalLogin($this->test_user);
function testDoNothing() {
$this->assertNull(null, 'just a stub'),
}
//... actual tests go here
}Notice the testDoNothing() function. This is required by the test class. If there are no tests, the setup does not work.
Now to the test. The test framework makes a copy of all Drupal tables as they are when Drupal is first installed. If everything goes according to plan, they are all removed when the tests are finished. If something wrong happens, however, they hang around and can affect the next test. The system also caches the tests that are to be performed in your test suite.
Whenever you change any code in your tests, or when a test is aborted or something else goes wrong, it is a good idea to clean up the test environment using the button on the test list screen. (See Figure 8-16.)

If there were any testing artifacts left around, the status area would detail the clean-up that was done. (See Figure 8-17.)

Don't worry about cleaning the test environment; if it is already clean and you clean it, nothing bad will happen; it will just indicate that nothing needed to be cleaned, as shown in Figure 8-18.

Since we changed our test suite, however, we definitely need to clean the environment. Doing so rereads the test module and displays it on the list of tests. (See Figure 8-19.)
Start the test and let's see what happens. We can see the report in Figure 8-20.
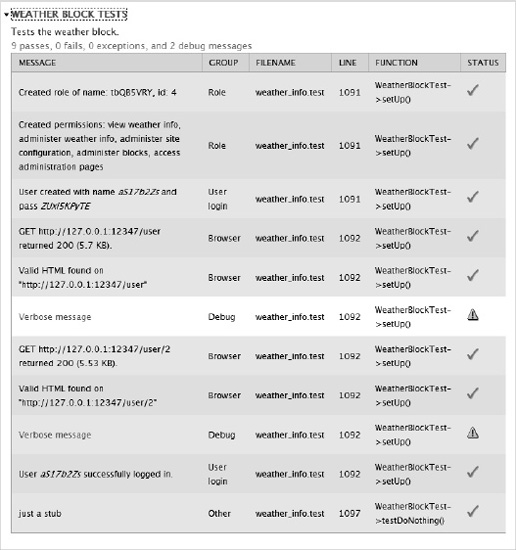
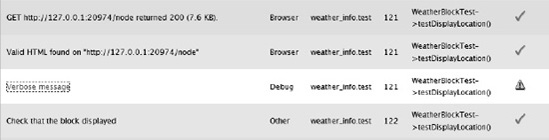
You can see the progress as the system creates a role with permissions, then creates the user and logs in with the temporary credentials. Notice the two entries labeled "Verbose message." The Drupal test engine creates a virtual browser that you can interact with. Whenever a screen is created, it will capture this screen and save the parameters in the database so you can see exactly what the testing framework "sees."
The first screen, for example, is the logon screen, which was exposed to the electronic robot. The screen is represented in Figure 8-21.
To recap, then, what have we done? Well, nothing substantial yet. It's as if we just started DOS; we've loaded the kernel and now we've got a C: prompt sitting in front of us. What can be done? Answer: plenty.
Our first task is to fire up the weather_info module as a block and assign it to the second sidebar region. Then we'll ask our virtual user to type in a location and have the module retrieve the information and display it on the screen.
The testing framework creates a virtual page and then acts on that page based on the input we give it in our test case. The best way to find out what we want this virtual page to do is to see how we interact with the real page. In order to build our test case, we need four pieces of information:
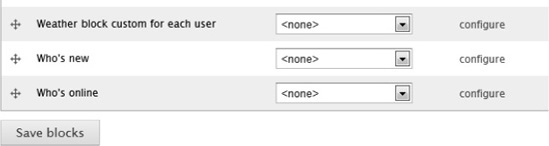
We know that there is a pull-down menu that allows us to set the region in which we want to place the weather information block. To refresh your memory, that pull-down is on the Structure Blocks page as shown in Figure 8-22.
The first piece of information we need is right there in front of us. It's the button we use to submit the form back to the server, "Save blocks".
To get the second and third required pieces, we'll need to take a look at the HTML that was generated by Drupal. From the browser, you can "Show Source" and look for the <form> tag. Specifically, we are looking for the action attribute. This is shown in Figure 8-23.
Next, we need to find the field to set. We can search the HTML source for what we know, "Weather block custom for each user". This is shown in Figure 8-24.
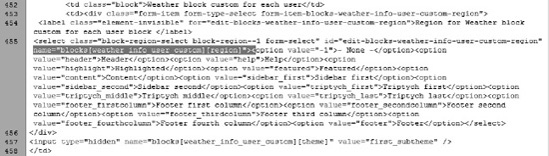
Notice the select element, <select> with the attribute name="blocks[weather_info_user_custom][region]". That's the pull-down box we want. And then we can see all of the options that populate the box. The one we want is <option value="sidebar_second">Sidebar second</option>.
Tip
Rather than viewing the HTML source as an entire page, you can use your browser's debugging mode. In Internet Explorer, pressing F12 brings up the Developer Tools. You can point to an element on the page and the tool will take you right to the source where you can interrogate the code.
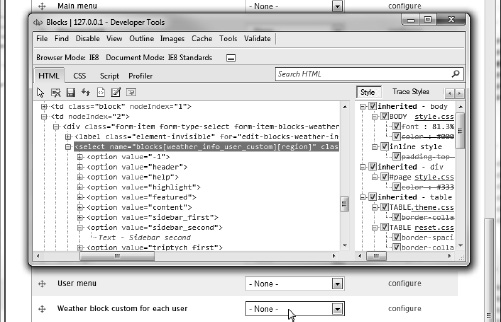
Google Chrome has a similar feature, which is accessed with Ctrl-Shift-I, and there is an extension for Firefox, Firebug, that provides even more functionality for the developer.
Finally, we need to tell the testing engine how to know if the settings have been done correctly. Return to the browser, set the value of the pull-down to "Sidebar Second" and click the "Save blocks" button. You should see, at the top of the page, the familiar green banner shown in Figure 8-25.
The fourth piece of information we need is the text on this banner. Now we have all the information we need to create a new test case. See Listing 8-12.
Example 8.12. Posting to a Form and Eevaluating the Results
$edit = array (
  'blocks[weather_info_user_custom][region]' => 'sidebar_second',
  );

$this->drupalPost('admin/structure/block', $edit, 'Save blocks'),
$this->assertRaw(t('The block settings have been updated.'),
  t('Check that configuration is saved'));
Notice the value of the $edit array. This array is sent to the drupalPost() function as a command to set the values of certain form fields. This is where we set the value of 'blocks[weather_info_user_custom][region]', to 'sidebar_second'. This array can have as many members as you need in order to set the values of fields on the form.
The drupalPost() method needs to know the address to which we are posting and the contents of the form to post. The third parameter is the name of the button to press to submit the form.
Calling drupalPost() will cause the testing engine to build the page, set the variables, and submit the fields back to the server. By the time it gets to the next line, we will have assigned the block to the second sidebar region. But to make sure, we need to assert that the happy banner is found. This is done with the assertRaw() method.
Now let's save the test and run it. Don't forget to clean the environment in order to refresh the cache since we made changes to the code.
After running the tests, you should see the report with some new lines, as shown in Figure 8-26.

The first "Verbose message" link shows the block configuration screen, and the second shows the after-post screen with the green success banner.
So far, we've been successful in creating an environment where we can perform our task. Our next test will be to load a page and then check to see if it contains information we are interested in. We will do this with the drupalGet() method. The task will be to check whether the system-wide variables are read, since this is what the weather block uses to display weather to an anonymous user or a user who has not yet set location, language, and unit preferences in her profile.
This test is straightforward and can be specified immediately after we have logged in our test user. The code is shown in Listing 8-13.
Example 8.13. Calling a Page and Checking the Results
function testDisplayLocation() {
  variable_set('default_units', 'R'),
  variable_set('default_language', 'de'),
  variable_set('default_location', 'san francisco'),

  $this->drupalGet('node'),
  $this->assertRaw(t('San Francisco, CA'), t('Check that the block displayed'));
}
Notice that this function doesn't have any environment setup calls. The testing framework will automatically call the setUp() function before each of the test functions in our test suite.
The drupalGet and drupalPost methods are similar to the HTTP GET and POST methods. That is, while drupalPost() requires an array of form data that is sent to the server, the drupalGet() method just needs an address. Both will cause the Drupal engine to build a page, which we can interrogate using the same assertion methods that we used for drupalPost().
The test results for this function are shown in Figure 8-27.
Note
The screen in Figure 8-27 shows a report of only the part defined in the testDisplayLocation() function. When you run this test, you will see the entries for creating a new user, logging-in the user, and setting the block. In other words, the steps that are declared in the setUp() function are repeated.
Now let's exercise the weather information block by asking it to get the weather report for a location that's specific for this particular user. The Weather information block provides this functionality by setting each user's location in the user profile we created in Chapter 6.
This task will require another form post, so the process will be similar to what we did when setting the block to a particular region. That is, we do the work manually on the deployed version of our environment, and learn what we need to teach the testing engine in order to perform the task automatically.
As with the previous case, we will need the same four pieces of information. By viewing the source of the page with the weather information block, we can see the code displayed in Figure 8-28.

From this, we can get the three pieces of information we need to do a drupalPost—the location to be posted to (<form ... action="/"...>), the name of the form field where we'll enter the location (<input ... name="weather_location"...>), and the value of the submit button (<input type="submit" ... value="Search"...>). When we manually enter the information into our live site, we see that we get our fourth piece of required information—the location that has been retrieved from the weather service. The code to perform these tasks is shown in Listing 8-14.
Example 8.14. Posting to a Form on a Block and Verifying the Results
function testUserLocationChange() {
  $edit = array (
    'weather_location' => 'manhattan',
    );
  $this->drupalPost('/', $edit, 'Search'),
  $this->assertRaw(t('New York, NY'), t('Check that the location was found'));
}
Notice that the location we entered is "manhattan", but that we will be looking for "New York, NY". This is a sure test that the weather service has been called and translated the informal name to the formal one.
Now, save this and rerun the tests. Don't forget to clean the test environment because we changed code.
The outcome will show a failure. You're probably wondering why it failed, and why I subjected you to this display. There's a good reason. Two, actually. First, it took me a while to figure out what was happening, so I wanted to share my pain with you. Second, lessons learned through pain tend to stick.
Figure 8-29 shows the error.

You'll see a clue if you expand the "Verbose message" link or look at the page shown in Figure 8-30.
Here we see the weather information block with the search button, but there is no weather for New York. To understand why this doesn't work, you need to recall the basics of the DrupalWebTestCase framework. Remember that we start with a completely blank slate. No users, no enabled modules (except the core defaults), and no blocks. In the setUp() method, we enabled the modules and created the user, and then established the block in the appropriate region.
But we didn't attach fields to the user entity and set the values. The Fields module is enabled by default, but we must also do all the work to establish and attach the three fields we created in Chapter 6, and then add values to those fields for our temporary user.
This requires making some calls to the Fields API. The calls are field_create_field() and field_create_instance(). Listing 8-15 shows the code for creating the three fields.
Example 8.15. Attaching Fields to the User Entity
// *
// * Weather location field
// *
$field = array(
  'field_name' => 'field_weather_location',
  'type' => 'text',
  'translatable' => TRUE,
  );
$instance = array(
  'field_name' => 'field_weather_location',
  'entity_type' => 'user',
  'bundle' => 'user',
  'label' => 'Weather location',
'widget' => array(
      'type' => 'text_textfield',
      'weight' => '15',
      ),
    'description' => st('Enter a location on earth for which you would like '
      . 'to see weather information presented.'),
    );
field_create_field($field);
field_create_instance($instance);

// *
// * Weather language field
// *
$field = array(
  'field_name' => 'field_weather_language',
  'type' => 'list_text',
  'translatable' => TRUE,
  'settings' => array(
      'allowed_values' => "en|English
es|Spanish
de|German
tr|Turkish
fr|French
",
      'allowed_values_function' => '',
      ),
    );
$instance = array(
  'field_name' => 'field_weather_language',
  'entity_type' => 'user',
  'bundle' => 'user',
  'label' => 'Weather language',
  'widget' => array(
      'type' => 'options_select',
      'weight' => '16',
      ),
    'description' => st('Enter the language in which you would like to see '
      . 'weather information presented.'),
    'default_value' => array(
      array(
        'value' => 'en',
        ),
      ),
    );
field_create_field($field);
field_create_instance($instance);

// *
// * Weather units field
// *
$field = array(
  'field_name' => 'field_weather_unit',
  'type' => 'list_text',
  'translatable' => TRUE,
  'settings' => array(
      'allowed_values' => "F|Fahrenheit
C|Celsius
K|Kelvin
R|Rankine",
      'allowed_values_function' => '',
      ),
    );
$instance = array(
  'field_name' => 'field_weather_unit',
  'entity_type' => 'user',
  'bundle' => 'user',
  'label' => 'Weather units',
  'widget' => array(
      'type' => 'options_select',
'weight' => '17',
),
'description' => st('Enter the measurement unit with which you would like '
. 'to see weather information presented.'),
'default_value' => array(
array(
'value' => 'F',
),
),
);
// Create the field and instance.
field_create_field($field);
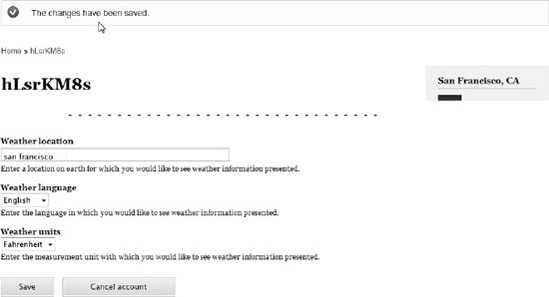
field_create_instance($instance);Once we create the three fields, we need to set some values for the fields in the user profile and see if they take. This is shown in Listing 8-16.
Example 8.16. Adding Values to the Profile Fields
$uid = $this->test_user->uid;

$edit = array (
  'field_weather_location[und][0][value]' => 'san francisco',
  'field_weather_language[und]' => 'en',
  'field_weather_unit[und]' => 'F',
  );

$this->drupalPost("user/{$uid}/edit/", $edit, 'Save'),
$this->assertRaw(t('The changes have been saved.'),
  t('Check that profile was updated'));
First, we get the identifier of the current user. This is the temporary user the test framework created for us. We'll need that in order to craft the URL later. Next, we create the array of fields that we'll be populating. A call to drupalPost() will create the page, passing the field data and pressing the submit button. And then we check for the happy text that the profile was updated. The result is shown in Figure 8-31.
The next step is to see that the block on a normal page is reading the attached fields from the user profile. That's done with the code in Listing 8-17.
Example 8.17. Testing That the Block Read from the User's Profile
$this->drupalGet('node'),
$this->assertRaw(t('San Francisco, CA'),
  t('Check that the user location displayed'));
The drupalGet() function is called, passing 'node', which displays the front page. If the profile is read properly, the block will show with the proper city and our test will pass. The page, as recorded by the testing framework, shows that it worked. (See Figure 8-32.)

That wraps up the tests on the user side. The key to a successful web test harness is to set up the environment with everything you need to do the test. If you keep this simple rule in mind, your testing will go much better.
There's one more area that needs testing, and that's the code that sets up default values from the administrator's page. As you'll recall, the system administrator can set weather information values globally, which are used by anonymous users and registered users who have not yet created their own custom location. These default fields are entered in the form shown in Figure 8-33.
We need to create a test case that exercises this screen so we can be confident that any changes to our code don't break this functionality.
To create the test, we will instantiate the DrupalWebTestCase class. This test doesn't use profiles so the setUp() method is a bit more streamlined, as shown in Listing 8-18.
Example 8.18. The Setup Function for Testing Weather Information Settings
class WeatherSettingsTest extends DrupalWebTestCase {

  public static function getInfo() {
    return array(
      'name' => 'Weather default tests',
      'description' => 'Tests default settings and weather display.',
      'group' => 'Weather info',
      );
  }

  public function setUp() {
    // Enable any modules required for the test
    parent::setUp(array('weather_info'));
    // Create and log in our privileged user.
    $this->privileged_user = $this->drupalCreateUser(array(
      'view weather info',
      'administer weather info',
      'administer site configuration',
      'access administration pages',
      ));
    $this->drupalLogin($this->privileged_user);
  }
The settings screen takes the values entered in the form variables and writes them as persistent Drupal variables. The first test is to set the defaults on the screen and then check to see if they made it successfully into Drupal variables. The code for this is in Listing 8-19.
Example 8.19. Setting Default Values and Checking for Their Persistence
function testWeatherDefaults () {
  $default_location = 'Boise';
  $default_units = 'F';
  $default_language = 'en';

  $edit['default_location'] = $default_location;
  $edit['default_units'] = $default_units;
  $edit['default_language'] = $default_language;

  $this->drupalPost('admin/config/weather_info/settings', $edit, t('Save configuration'));
  $this->assertRaw(t('The configuration options have been saved.'),
    t('Check that configuration is saved'));

  $this->assertEqual(variable_get('default_location'), $default_location,
    t('Default location variable'));
  $this->assertEqual(variable_get('current_location'), $default_location,
    t('Current location variable'));
  $this->assertEqual(variable_get('default_units'), $default_units,
    t('Default unit variable'));
  $this->assertEqual(variable_get('default_language'), $default_language,
    t('Default language variable'));
}
Three function variables are set with test values and the form fields are created as an array called $edit. Next, the drupalPost() method is called, posting the values back to the form using the submit button labeled "Save configuration". Finally, some assertions are done to check the four Drupal variables that the form sets. Figure 8-34 shows that it worked.
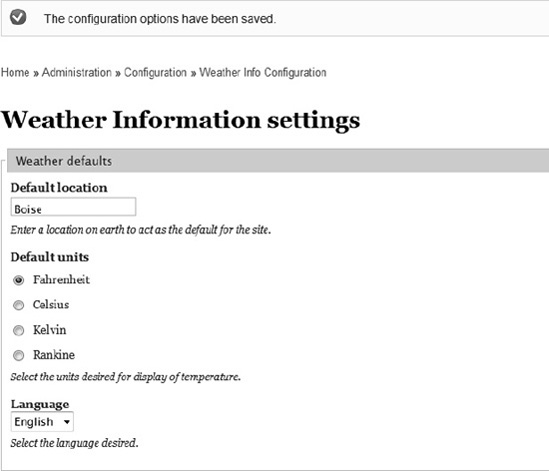
Here we can see the happy text and the new defaults.
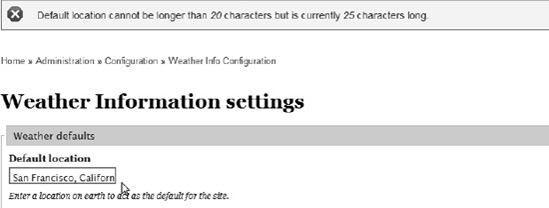
Ourlast test intentionally creates an error condition and then interrogates the page to see if the error was reported correctly. In this case, we will test the boundaries of the #maxlength attribute of the location field on the weather information settings page. In Chapter 6, we indicated that the maximum length of the data allowed in the field is 20 characters. The code in Listing 8-20 tests that limit.
Example 8.20. Testing the Length of a Field
function testMaxlengthFail () {
// this should fail because the location is longer than 20 characters
$default_location = 'San Francisco, California';
$default_units = 'C';
$default_language = 'es';
$edit['default_location'] = $default_location;
$edit['default_units'] = $default_units;
$edit['default_language'] = $default_language;
$this->drupalPost('admin/config/weather_info/settings', $edit,
t('Save configuration'));
$this->assertRaw(t('Default location cannot be longer than 20 characters'),
t('Check length error'));
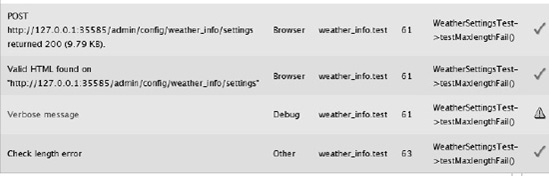
}Putting this into our DrupalWebTestCase class produces the report shown in Figure 8-35.

Something is wrong here. By checking on the saved screen behind the "Verbose message" link, we can get an idea of what went wrong, as Figure 8-36 shows.
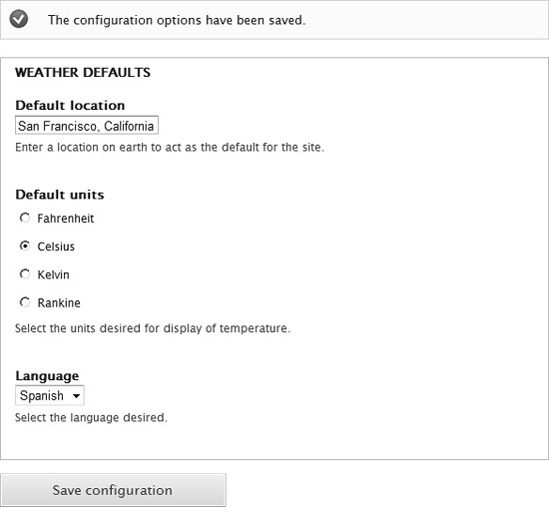
Notice that the text that should indicate a failure is showing success. I'll save you the debugging chautauqua, but I hinted at the culprit in Chapter 6 when we created this settings page. The offending code is shown in Listing 8-21.
Example 8.21. Code with a Typographical Error
$form['wx_settings']['default_location'] = array (
    '#type' => 'textfield',
    '#title' => t('Default location'),
    '#default_value' => variable_get('default_location', null),
    '#size' => 20,
    '#maxlengh' => 20,
    '#description' => t('Enter a location on earth to act as the default for the site.'),
    );
Notice that the attribute, #maxlength is misspelled. This is not recognized as an error by Drupal, which just ignores everything it doesn't recognize. But by not recognizing the attribute, the system default for #maxlength, 128, is used instead. So our 25-character test field was within the boundaries and did not raise an error. Correcting the spelling and rerunning the test gives us the results we sought. See Figures 8-37 and 8-38.
Creating tests to drive your code development is important, but it is also important to know that all parts of your code are exercised by the test harness. The term for this is "code coverage." That is, how much of your code has been tested.
Testing code coverage is a tricky business. It requires some sort of agent to keep track of source code as the tests are being run and reporting the results after the test execution finishes.
There are tools that work on PHP to do code coverage, but unfortunately, there is no comprehensive package that plugs into Drupal specifically. The code_coverage module exists, but needs some work as of this writing.
I expect there will be more work done on code coverage, since it is such a vital piece to the entire testing process. For now, just make sure your tests cover your code and that your code works as designed.
Testing is a critical part of modern software engineering. Before version 7 of the Drupal framework, testing was not taken very seriously. In fact, the testing module required a hack to the core in order to work. With Drupal 7, the developers have really placed testing where it should be: front and center for all development. In fact, no core module will be released without a comprehensive test harness and no code will be accepted without passing all automated test functions.
In this chapter, we continued development of the weather information module by creating tests for it. We even found an honest spelling error in our code that probably would not have been caught if it were not for the development of a test harness for the module.
In the next chapter, I'll delve intothe important topic of database access and how to ship installers and updaters as part of your code's deployment.