
One of the great things about Qt is its inclusion of QtWebKit and, with it, its excellent support for HTML5. Using HTML5, along with sister technologies CSS3 and JavaScript, you can build powerful standards-based applications that run simply in the web browser. Even better, you can easily build hybrid applications that combine the power of native Qt development, as we discussed in the past three chapters, with the ease and portability of web apps. Qt native development is the preferred method for developing Nokia apps, but HTML5, as supported in QtWebKit, is an acceptable secondary platform as well.
HTML5 is the fifth generation of HyperText Markup Language, the primary technology that has been used to author web pages and web applications since the beginning. HTML5 includes almost all the tags and features you have come to expect from web development (some tags that are rarely used or replaced with newer functionality have been deprecated) and adds many cool new features. We'll cover some of those features later in this chapter. CSS3 (usually when people talk about HTML5 they really mean HTML5 plus the related technologies CSS3 and JavaScript) stands for Cascading Style Sheets version 3. CSS was published as a W3C specification in 1996 as a means to clearly separate the content and styling in a web page. Now in its third generation, CSS3 adds powerful new features, such as animations, transitions, and transformations that allow web developers to add advanced graphic techniques with just a couple lines of code. Using CSS3 for these transforms also allows for hardware acceleration and, therefore, fast performance of these computationally complex graphics. (Note that CSS3 transformations provide the opportunity to use hardware acceleration, but do not guarantee that any given implementation does in fact implement this acceleration. The accelerated features will vary depending on the platform.) Last of the trio, JavaScript is a powerful scripting language that allows you to programmatically manipulate the Document Object Model (DOM) or perform other dynamic calculations.
These are the same industry standard technologies used to build the World Wide Web. Therefore, if you know how to build an application for the web, as do many developers today, it is just as easy to build an application for a mobile handset.
QtWebKit, the engine used to render HTML5, CSS3, and JavaScript, is a derivative of the WebKit open source project. (See www.webkit.org). This is the same browser core used by Google's Android, Apple's iOS, and most other mobile browser platforms. This means that web applications written using industry-standard HTML5 as supported by WebKit will run with little or no modification across most mobile platforms.
The proposal for HTML5 came originally from the WHAT (Web Hypertext Application Technology) Working Group in June 2004 (www.whatwg.org/). At that time the W3C, keeper of most of the web standards we are discussing, was promoting XHTML as the next generation web markup language. The HTML5 team, including members from Apple, Opera, and Mozilla, argued for a more evolutionary approach to the next generation web, building on the existing HTML4 markup language. HTML5 became the starting point for a new W3C HTML workgroup in 2007. This workgroup operated with an openness policy that encouraged broad participation from the community, including non-W3C members. The first HTML5 public working draft was published on Jan 22, 2008.
Today, the group continues to operate with strong industry support from players such as Nokia, Google, Apple, Microsoft, IBM, and many others. The specification has not yet reached final status as a Recommendation and may not for several years. However, much of the work exists in a fairly stable state and is implemented in several browser engines, including WebKit and Gecko. The fact that most mobile players use these common engines ensures that support is mostly equivalent across different vendor platforms.
Let's get started by looking at some real HTML5 code.
A simple hello world application is a good place to start. A really simple hello world might look something like this:
<html>
<body>
<div>Hello World!</div>
</body>
</html>
The easiest way to get started is to save this code in a text file somewhere on your computer and call it hworld.html. Why not put it in your c: emp directory? Now, fire up your browser and type file:///c: emphworld.html in the navigation bar. You should see 'Hello World!' appear in your browser.
OK, that worked, but that code is about as exciting as pounding sand. Let's spice it up with some nifty HTML5 features. Let's add just a few lines so that our code now looks like this:
<html>
<body>

<style type="text/css">

  .box {
    float: left;
    margin: 4em 1em;
    width: 100px;
    height: 60px;
    border: 2px solid green;
    line-height: 60px;
    text-align: center;
    -webkit-transition: all 1s ease-in-out;
  }

  .rotate:active {
    -webkit-transform: rotate(180deg);
  }

</style>

<div class="box rotate">Hello World!</div>

</body>
</html>
Fire it up again in your browser and take a look. This time make sure that you have a browser that supports HTML5. We like to use either Chrome or Safari. Click and hold on the text in the middle of the box. Surprised? The box with the text in it should rotate 180 degrees, then rotate back when you release. A picture of ours is shown in Figure 7-1. Let's take a more detailed look at what just happened.

First, we added a style element that contains two CSS style rules for classes .box and .rotate. The .box class has some basic CSS that defines a box drawn around our text. It describes things like placement, size, text alignment, and so on. This is interesting stuff, but has long been a part of the web design toolbox. But wait, there is something new: a property -webkit-transition: all 1s ease-in-out. This tells the rendering engine that objects of class .box should be animated with a transition animation. The all parameter means that all the properties should be animated. 1s specifies a 1 second duration for the animation. And ease-in-out tells us to use this timing function (other options include linear or cubic Bezier functions).
Now look at the .rotate class. This tells us that when the class becomes active (meaning, for example, an object of this class is clicked by the user) it should be rotated 180 degrees. Finally, look at the div that contains our text. We have added class attributes telling the renderer that the div is part of the box and rotate classes. Notice that we're really playing here with CSS3, but as we said above, most people consider this generically part of HTML5 technology.
So, when we activate the Hello World text by clicking on it, it is rotated 180 degrees. And rather than seeing the text instantly flip upside down, the rotation happens in an animation over a 1 second duration. This is HTML5!
OK, we've seen our Hello World HTML5 app running on our desktop. Now let's try it out on our handset. First, we need to serve up the HTML from a server and not from a local file. (We'll look at using local files on a handset later in this chapter, but for now let's try it from a server like a traditional web page.) So throw hworld.html on a web server and let's try it from a handset.
There is one problem, though. Nokia's support of HTML5 is based on support of QtWebKit. Nokia is committed to making QtWebKit the default platform browser moving forward, but at the time this book is written the N900's browser is based on the Gecko rendering engine, and the Symbian platform browser is based on an older version of WebKit. This means that we need to build our own version of QtWebKit and install it on a handset. (Note that the Gecko rendering engine does in fact support most important HTML5 features. But for consistency we want to use QtWebKit for both platforms we are targeting.) Eventually this step won't be required and the platform browser that ships with the handset will run HTML5 apps without problem.
For now, the easiest way to build a QtWebKit browser is to build the fancybrowser example application that comes with the Nokia Qt SDK. To begin, browse to the directory C:NokiaQtSDKExamples4.6webkit (or similar). Here there are several interesting QtWebKit examples. Open the file fancybrowser.pro in the fancybrowser directory. Build the application just like any other Qt app as described earlier in this book.
For Symbian make sure your bearer management is properly established as described earlier in Chapter 5.
Now, fire up fancybrowser on either a Symbian or Maemo device and navigate to the site where you put the hello world content. Probably you need to type something like http://mysite.com/hworld.html. Try touching the Hello World text. Does it rotate like you expect? Yes, we're in business!
There is one concern, though, with running your web applications hosted on the network like this. You must be online to access your application. This is OK for a desktop computer that is plugged into a reliable network connection, but not so good for a mobile device. For a mobile device, network connections are frequently dropped, such as when driving through a tunnel, or potentially unavailable for long periods of time when out of a coverage zone. Luckily, HTML5 has some key features to enable web applications to work offline. We will discuss one such feature, local storage, later in this chapter. The other feature, the HTML5 application cache, is a nifty way to ensure your web pages are available even when the device is offline.
Caching is a technique normally implemented as an HTTP cache anyway, but HTML5 application cache is a new mechanism that allows you, the developer, to explicitly manage caching behavior for your application. The browser is told which files to place in the application cache by a manifest.
Imagine that our hworld application uses three files: hworld.html, hworld.css, and hworld.js. Having multiple files of these types is typical for most web apps. The head element for hworld.html might include these lines:
<head>
  <title>Hello World</title>
  <script src="hworld.js"></script>
  <link rel="stylesheet" href="hworld.css">
 </head>
Normally if a user tried to open Hello World while there was no network connectivity, he would get an error because hworld.js and hworld.css are unavailable (unless they happened to already be in the local HTTP cache, but this is unreliable).
With HTML5's application cache, the developer can provide a manifest explicitly telling the browser to cache these three files. The manifest would look like this:
CACHE MANIFEST
hworld.html
hworld.css
hworld.js
This file should be saved as a text file called hworld.manifest and served up as type text/cache-manifest. You also need to add instructions to hworld.html telling the browser to use the manifest file. You do this by modifying the HTML element of hworld.html like this:
<html manifest="hworld.manifest">
Now, when the user goes to run the hworld web application, the browser will cache the files and make them available even when the user is offline. The offline cache mechanism also provides an API that allows the developer to have explicit control of the application cache.
The manifest file can contain three distinct sections indicating how different files should be handled:
CACHENETWORKFALLBACK
CACHE is the default section and says that the files in this section should be downloaded and stored in the application cache when they are accessed for the first time. Files under the NETWORK section are explicitly not cached and must be accessed over the network. This is useful when the application developer requires server side interaction, such as for tracking mechanisms. All requests to resources under NETWORK bypass the cache and are requested directly from their online location. Finally, FALLBACK allows the developer to specify resources that should be used if the primary resource is not available. The first URI is the resource, the second is the fallback. Both URIs must be relative and from the same origin as the manifest file. This is useful for the developer to put up an explicit warning or error message if some expected resource is not available.
A cache manifest with files in each section might look like this:
CACHE MANIFEST
CACHE
hworld.html
hworld.css
hworld.js

NETWORK
tracking.cgi

FALLBACK
offline.html
Once an application is cached, the browser will update the cached files only under three conditions:
The user has cleared her cache and the cached content is therefore no longer available.
The manifest file changed.
The cache is explicitly updated via JavaScript using the application APIs.
Full details can be found from the W3C specification for application cache at http://dev.w3.org/html5/spec/offline.html.
There is one last important point to keep in mind when using the HTML5 application cache. The application cache is by default disabled in QtWebKit, so you must explicitly enable it to use it. To do this, we need to set the appropriate property to true in the QWebSettings class. To do this in our fancy browser example, you need to add these lines of code to the application:
QWebSettings *GlobalSettings = QWebSettings::globalSettings();
GlobalSettings->
setAttribute(QWebSettings::OfflineWebApplicationCacheEnabled, true);
So now we can create a web application, host it online, and flag it to be cached locally so that we can run it even when we don't have network access. But we are still missing a couple of things that we would get if we were running a full native application. First, the application must be run in the web browser and accessed by the user from a bookmark or explicitly entering a URL. The user does not click an icon on the home screen to launch the application. Second, the application is not downloaded and installed like a native application. On the one hand, this is a convenience to the user since it eliminates the overhead of application installation, but on the other hand it eliminates an opportunity for the developer to monetize his application by charging per download, such as when the application is sold from the Ovi Store. (We cover the Ovi Store in more detail in Chapter 9). To address these problems, let's learn about hybrid applications.
Hybrid applications are a hybrid combination of native development, using Qt, and web development, using QtWebKit. In the last chapter we saw a sophisticated example of this where native Qt objects are embedded directly into a QWebView. In this section we focus on a simple hybrid application strategy where a very thin layer of native Qt code serves as a QtWebKit wrapper around generic HTML5 code.
In the example below, we use QWebView in a Qt C++ application, as we did previously to run our Hello World example. Another approach is to use QML to open a WebView. This would take only a few lines of code like this:
import QtQuick 1.0
import QtWebKit 1.0
WebView {
    url: http://nokia.com
}
Regardless of how we bring up the WebView, we can store our content locally on the handset then display it in a thin shell application.
The simplest way to create a hybrid application of this type is to write a thin Qt application using QWebView to render HTML5 content stored on the device in the local file system. Let's take a look at how to do this with our hworld example.
Our Qt application is called hybridshell and is available from www.apress.com for download. This app doesn't do much more than open a QWebView and display some content. The difference is that this time the URL points to content on the local file system rather than an http server on the network. To do this on Meego, for example, we use the command:
url=QUrl().fromLocalFile("/usr/local/share/web/hworld.html");On Windows we probably want to put the content somewhere else that does not use an absolute file path. On Windows we would use this command:
dir.setPath("../hybridshell/hworld.html");
url=QUrl().fromLocalFile(dir.canonicalPath());
Just make sure that the file or files you are accessing are deployed to the device at the same time that you deploy your application binary. A convenient way to do this is to use the DEPLOYMENT variable in your .pro file. This is described in detail in Chapter 9.
Note
At the time of this writing the deployment variable specified in the .pro file does not work correctly for Maemo when building with Qt Creator. To work around this, select the "build" project configurations for Maemo. Under "Build Steps," select the "Details" tab for the "Create Package" section. When the details pane is expanded, you will see a "Files to deploy" block. Here you can select files from your local file system and specify to where they should be copied on your remote device file system. This is a convenient place to specify your web content files.
There is one last thing we need to do. Many applications will need to access content on the network in addition to the content stored on the local file system. For example, in the Shake application that we present at the end of this chapter, we need to make an XmlHttpRequest call to download the earthquake feed data. By default, the QtWebKit security policy will block these requests. We need to explicitly enable this functionality by setting the LocalContentCanAccessRemoteUrls property to true like this:
QWebSettings *GlobalSettings = QWebSettings::globalSettings();
GlobalSettings->setAttribute(QWebSettings::LocalContentCanAccessRemoteUrls, true);
Run the application and there it is—our web content appears just like a web page, but now everything is local to the device. There is one last technique we should look at for building hybrid web applications: packaging the content as a resource in the application binary.
Packaging files for the local storage system is nice, but it has the problem that you need to explicitly manage the placement of these files. Each platform needs the files placed in a slightly different location. An easier way to handle this problem is to include our content as an application resource. Qt allows us to access a .qrc file just as simply as accessing content from elsewhere. Just use qrc: rather than http: to indicate your HTML content is accessed from a resource. For our sample application we just make this substitution:
url=QUrl("qrc:/hworld.html");Make sure to use Qt Creator to include your web content as application resources. Now, the content is bundled into your application binary. Management is much easier since we don't have to worry about moving around a bunch of external files. Be careful, though, too much web content stored as a resource will bloat the size of your application binary.
In this section we've shown how to use Qt to render HTML5 content using four different methods: a QtWebKit based browser that loads content off the net in the traditional manner, a QtWebKit browser that uses the HTML5 application cache to enable that same hosted application to be available without network connectivity, a hybrid app where the content is stored locally on the device file system, and a hybrid app where the content is bundled as a resource into the application binary.
In the next section we will take a more in-depth look at some of the new features in HTML5.
Note
One last option for developing web applications is the Symbian Web Runtime. This is a Nokia proprietary technology where web files such as HTML, JavaScript, and CSS can be bundled into an archive package file and installed and run on the device like a native application. It is similar to the W3C widget standard defined here: www.w3.org/TR/2009/CR-widgets-20090723/. The Symbian Web Runtime will be supported on the Symbian platform for legacy applications, but is not the recommended development path moving forward.
HTML5 has lots of new features. There are new elements such as the <audio> and <video> tags that give native support to multimedia formats that previously required additional third-party plug-ins. There are also a number of new semantic elements that allow authors to indicate the structural organization of the content. This is done with the introduction of tags such as <header>, <article>, <figure>, and others.
Three features: canvas, CSS transitions and transformations, and local storage are especially exciting. In the following sections we'll dive deeper into these new features.
Canvas is a major new enhancement to HTML5. The <canvas> element is a resolution-dependent bitmap canvas which can be drawn on programmatically using JavaScript APIs. It is useful for rendering dynamic content, such as graphs or game graphics. Before we had <canvas>, web developers had to use plug-ins such as Flash.
To use <canvas>, you must first create the <canvas> element, just as you would with any HTML element. Then you draw on it using the supplied JavaScript API. Let's walk through some of the main ideas here with some examples.
When you create a canvas you specify the width and height of the canvas like this:
<canvas id="myCanvas" width="300" height="300">
Let's add some styling so that we can see the boundaries of our canvas:
<style type="text/css">
      #myCanvas {border: 1px solid black;}
    </style>
Next, we need to add a spot where we can do some JavaScript to draw on the canvas. For this simple example, let's just execute a draw function every time the page is loaded like this:
<body onload="draw();">
Now, we can use draw to experiment with the drawing code for <canvas>. The simplest way to draw in canvas is by creating rectangles. Unlike SVG (SVG or Scalable Vector Graphics is another W3C standard based on XML used for drawing two-dimensional graphics), no other primitive shapes such as circles or triangles are supported. You can also draw with lines and arcs, but let's talk about that later.
To draw, first you need to get the graphics context to draw in. Currently only two-dimensional graphics are supported, but in the future 3D may also be supported. We get the graphics context like this:
var canvas = document.getElementById('myCanvas'),
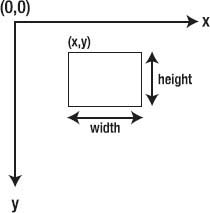
var c = canvas.getContext('2d'),Once you have the graphics context, you use the fillRect function to draw a solid rectangle. You can also use the strokeRect function to draw the outline of the rectangle with no filling. The rectangle functions take four inputs: the x and y coordinates of the rectangle's starting position (usually the top left corner of the rectangle) and the width and height of the rectangle to be drawn. The coordinate system is arranged such that point (0,0) is the top left corner. Increasing x moves to the right, and increasing y moves down. This is shown in Figure 7-2 below.
You draw a rectangle like this:
c.fillRect (125, 10, 50, 50);
This gives us a nice black rectangle starting at the point (125, 10), and 50 pixels high and 50 pixels wide (notice we are actually drawing a square, since the height and width are the same—but still, the API refers to it as a rectangle so we will also). We can use the function fillStyle to spice it up a little. fillStyle let's you describe what kind of fill you would like. Let's add the line
c.fillStyle = 'red';
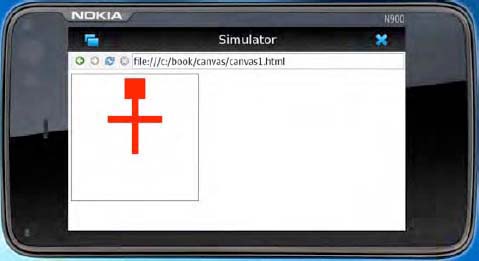
and you should see a red rectangle. Nice. OK, let's draw something more than just a rectangle. How about a stick figure? We already have the head. Let's add a body and arms. Just draw two more rectangles like this:
c.fillRect (142, 60, 16, 130); //body
c.fillRect (85, 100, 130, 16); //arm
Put it all together and you should see something like Figure 7-3 below.
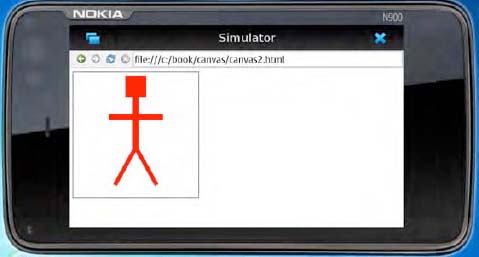
Now, we have a problem, though. How do we draw the legs? We only know how to draw rectangles. In addition to rectangles, you can also draw lines starting and stopping from arbitrary points. To do this, you use the lineTo function to define a path. First you tell the canvas that you would like to start drawing a path with the beginPath function. Next, you specify the path by listing a series of points that are to be connected by lines. First you create the starting point with the first moveTo function call. When calling moveTo(x,y) and lineTo(x,y) you pass the x and y position of the point you are describing. You now call lineTo for as many points as you would like to specify. You can close the path with a closePath call, which takes you back to the first point you started with. Or you can just call stroke, which draws the subpath you described without closing it.
In our example we would like to draw some legs. Let's add these lines:
c.beginPath();
c.moveTo(150,180); //starting position
c.lineTo(200,270); //rightleg
c.stroke();
For the left leg we want to move to the starting point without actually drawing a line. This is kind of like picking the pen up from the piece of paper when drawing. Let's call a moveTo, then a lineTo to draw the left leg like this:
c.moveTo(150,180);
c.lineTo(100,270); //left leg
Finally, we want to make our lines look like the rectangles we drew earlier. To do that, let's add this styling call:
c.lineWidth=10;
c.strokeStyle='red';
Put it all together and our stick man should look like Figure 7-4 below.
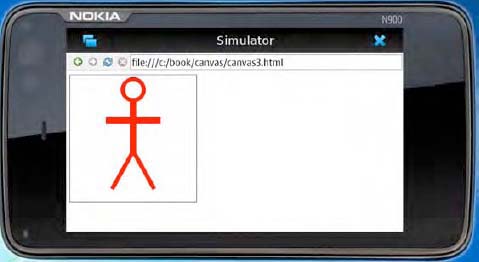
Our stick man is looking like a bit of a block head. But how do we give him a round head? We can use the arc call. It's like lineTo except that you specify an arc of a circle rather than a straight line. The parameters passed to arc are x, y, radius, startAngle, endAngle, and whether the direction is counterclockwise. The angles are expressed in radians and the value describing whether the direction is counterclockwise is boolean. (Remember from your high school math that 360 degrees equals 2π radians.) So, to draw our head, let's get rid of our block head and add a new arc path like this:
c.beginPath();
c.arc(150,35,25,Math.PI/2,3*Math.PI, false);
c.stroke();
Finally, our stick man has a real head as shown in Figure 7-5 below.
In addition to circular arcs, you can also use quadratic and Bezier curves to connect the points in your path. Let's talk about one last drawing feature in canvas before moving on.
You can apply transformations to the canvas. Let's consider this for drawing our legs. What if we wanted to continue to use rectangles to draw our legs rather than use paths as above. The problem before was that we can only draw rectangles aligned to the corner or the rectangular canvas. To get around this, now we can use a rotate function call to rotate the canvas much as we would a piece of paper before drawing on it. Before doing that, though, let's do a save function call. This saves the current state of the graphics context. By doing first a save before the rotate, we can then do a restore to restore the context to where it was before we did the rotation. This is like putting the paper back in the position it was in before we moved it.
One last thing we need to do is to translate the origin. By default the transformation will happen around point (0,0). We, however, want to rotate the rectangle with the origin of rotation near its top, so that it will be positioned properly as a leg. To add legs as rectangles rather than points, remove the code we had for creating a path and instead add these lines to draw the legs:
c.save();
c.translate(142,185);
c.rotate(Math.PI/6);
c.fillRect(0,0,10,100);
c.restore();

c.save();
c.translate(158,185);
c.rotate(-Math.PI/6);
c.fillRect(-10,0,10,100);
c.restore();
The stick man looks pretty much the same as he did in Figure 7-5 above, but this time we drew his legs using rectangles.
With that, we conclude our look at canvas. The examples we showed here, although controlled with JavaScript function calls, are in reality rather static. We draw a figure that could have just as easily been inserted as a static image. The real power of canvas comes when the API is used to create dynamic images. These could be used to power games or animations, or to generate dynamic graphs updated with the content.
Furthermore, there are several other aspects to canvas we did not talk about, such as using text and images on the canvas, compositing and clipping drawings, adding patterns and shadows, and animations. The canvas API is available for further study here: http://dev.w3.org/html5/canvas-api/canvas-2d-api.html. We leave these additional topics for investigation by the reader while we instead look at some new CSS3 effects.
Transitions and transformations are two cool new things in CSS. Transitions are implicit animations that occur when a CSS property is changed. Transformations allow elements to be translated, rotated, and scaled in 2D and 3D space. While technically not part of HTML5 (these are actually CSS features—not HTML), this new CSS functionality is one of the things people talk about when considering new features in HTML5.
We already saw some of this in our hworld.html example earlier. Let's take a closer look now. Let's start with a typical CSS declaration. In the code below we describe properties for a class called box.
.box{margin:20px 20px;width:200px;height:100px;border:1px dashed green;text-align:center;}
There are many available CSS properties. Here we specify that the box is placed 20 pixels from neighboring content. It has a width and height of 200 and 100 pixels. Any text placed in it is centered. And finally it is surrounded by a thin dashed green border.
Now, let's create some text and give it the class box like this:
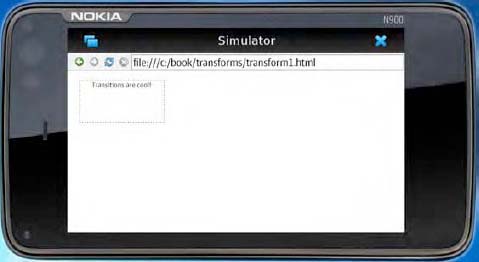
<div class="box">
Transitions are cool!
</div>
Display this in an HTML5 compliant browser and it should like Figure 7-6. (Actually we haven't gotten to the new HTML5 stuff so it should like Figure 7-6 in pretty much any browser).
Now, we can do something clever. CSS allows us to define a selector for when the box is active. In this declaration we can change some of the CSS properties we defined above. Let's add this text:
.box:active{border:8px solid red;font-size:xx-large;font-weight:bolder;}
Now render this in your web browser. Click on it and you will see the border change to a thick solid red line. And the font gets bigger and bolder. Cool, right? Well, this is all just old school CSS. When you click on the box, the properties all change instantly. Now, let's add a CSS transition. Add these lines to the box declaration block:
-webkit-transition: all 1s ease-in-out;
Click on it and watch again. Now instead of a jump, you should see the properties smoothly animate from the start to the end property. This is a CSS3 transition!
In our transition line, we told the browser that all the properties that change should be animated. You can also explicitly set which properties are animated like this:
-webkit-transition-property: border;
Now when you click on the box, the border change is animated, but the text simply jumps from a small to large size. It is also possible to use different timing functions to describe the animation. We specified ease-in-out, but you can also use other functions. such as linear and cubic Bezier.
Now let's take a look at transformations.
Transitions are nice, but you need transformations to start doing really cool things. Transformations are described with a new CSS property called –webkit-transform. This lets you move web elements by applying any of three types of transforms: translation, scaling, or rotation.
Translation means to move the element in the Cartesian plane. Scaling means to enlarge or shrink the element. And rotation means to rotate the element about an axis. When rotated about the z axis, the rotation happens on the view surface as you would expect in a 2D drawing. But you can also rotate about the X and Y axis. For example, a rotation about the X axis is like tipping the element away from you. You can also combine transformations.
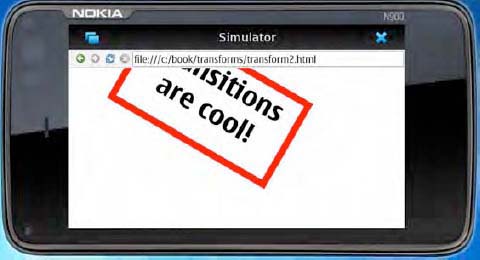
Let's take the box we were using above and transform it in all three ways. We make it grow, move, and rotate at the same time. You do this by adding this line to the .box:active declaration block:
-webkit-transform: scale(2) translate(100px, 0) rotate(30deg);
Now when you click on the box it enlarges, spins, and moves to the right. The end result is a box that looks like Figure 7-7.
Again, we have only scratched the surface on the topic of transitions and transformations. For further information, you can look at the W3C documentation here:
www.w3.org/TR/css3-2d-transformswww.w3.org/TR/css3-3d-transformswww.w3.org/TR/css3-transitions
Earlier in this chapter we discussed using the application cache to enable offline HTML5 applications. There is one thing missing to make truly robust offline applications—local data storage. HTML5 gives you two methods to store data on your client: web storage and web database.
Web storage allows you to store values in key-value pairs. This is similar to the current cookie mechanism, but unlike cookies the key-value pair is not sent to the server with every request. Web database is a JavaScript front end to a local SQL database. This provides a robust method for your HTML5 application to access a local relational database even when offline.
Local storage is disabled by default in QtWebKit. To enable it, you must set the parameter QWebSettings::LocalStorageEnabled to true. You do this in the same way that we set QWebSettings::OfflineWebApplicationCacheEnabled to true for application cache above.
Let's talk first about web storage. There are two types of web storage supported: localStorage and sessionStorage. localStorage is meant to be more for storing long-term data. The data persists in local client storage even after the host browser window is closed. Also, the key-value pairs are accessible from any browser window.
sessionStorage is meant to be more of a temporary data store for a single browser window. The data can be accessed only from the window in which it was created and the data does not persist after the window is closed.
You store a key-value pair like this:
sessionStorage.setItem("item_price", theItemPrice);and you retrieve the value based on querying the key like this:
var theItemPrice = sessionStorage.getItem("itemPrice");
// now do something with the value
document.getElementById('item_price').value = theItemPrice;
Note that these examples use sessionStorage, but the same functions can be used for localStorage. The syntax to use sessionStorage and localStorage is identical. The only difference are the rules for data persistence that we mentioned above.
Also, you can use sessionStorage.length to determine how many keys are stored in your local data store like this:
numKeys = session.storage.length;
Additionally, you can access a key based on a numeric index like this:
value = sessionStorage(index);
Finally, you can delete a single value like this:
sessionStorage.removeItem("item_price");and delete all key-value pairs in your domain like this:
sessionStorage.clear();
Web database provides a front end for a local SQL database. SQL, Structured Query Language, is an extremely popular standard to access relational databases. SQL itself is a large topic and is beyond the scope of this book. A good source of information for further investigation of SQL is the SQLite website at www.sqlite.org.
Let's explore some of the basics of using web database. First you need to create your web database. You do that with a call that looks something like this:
var db = openDatabase(shortName, version, displayName, maxSize);
Once your database is created, you do most of your work with the executeSql function. executeSql is part of a transaction object and is just a thin layer to pass SQL queries to your database. Using executeSql you do things like create tables, insert rows, and make queries. An example SQL query might look like this:
transaction.executeSql("SELECT * from items where color=?;",
    [myColor], dataHandler, errorHandler);
In this statement, the first argument is the SQL query passed to the local database to be executed. The second argument is an array of JavaScript values that can be used in the query. The third argument, dataHandler, is a callback function to handle the response. Finally, the last argument, errorHandler, is a callback for an error handling function.
In this chapter we presented only some of the more popular features of HTML5, which contains lots of cool features beyond the highlights we presented here. Furthermore, HTML5 is a dynamic standard. New features are constantly invented, with implementation following at an amazingly fast pace. For a current snapshot of the latest features supported in QtWebKit please look at the latest supported standards page at: http://trac.webkit.org/wiki/QtWebKitSupportedStandards.
So far we've learned about various tools for building web applications based on HTML5 technologies. Let's put it all together with an example of building a more comprehensive web application. Let's take the Shake application we built in Chapters 4, 5 and 6 and, instead of using native Qt technologies, let's build it with web technologies.
The focus of this book is not to give an in-depth tutorial on web development. So instead, in this section we'll highlight some of the key points you'll want to understand to get Shake running as an HTML5 web app. For a more thorough understanding of what is going on, please download the complete source code from www.apress.com and explore on your own.
Web development is most easily done in an IDE designed for web applications. Any environment used for web applications will work fine, but some popular ones are Adobe DreamWeaver or Aptana Studio. Both of these environments have Nokia plug-ins to support the legacy Symbian Web Runtime platform. Even though we're not developing for the Web Runtime environment, some of the features and templates are still useful. For example, the Shake code we are building is based on the RSS reader example that comes with the Nokia Aptana plugin. You might want to take a look at those examples as well.
Now, let's consider how we are going to design Shake for HTML5. Just as in the native Qt application, there are three things we must do: download the XML feed, parse the feed data into usable pieces, and display the data to the user. Let's get started with the user interface.
Rather than build everything from the ground up, it is usually much easier to start with some kind of JavaScript library that provides a useful widget set. Since QtWebKit is a standards compliant HTML5 browser, any widget set that runs in HTML5 should work fine. jQuery or jQuery Mobile seem especially popular, but any library should work. For this example, let's use Guarana, a UI library built by Nokia based on jQuery. More information on Guarana is available from http://wiki.forum.nokia.com/index.php/Guarana_UI:_a_jQuery-Based_UI_Library_for_Nokia_WRT
Warning
Guarana is no longer the target of active development and will likely be superseded by other widget sets in the future. However, at the time this book is written, Guarana is still the best available option from Nokia for mobile web widgets.
First, we need to include the reference to jQuery and Guarana in our code. For this, we need to add code that looks like this:
<link rel='stylesheet'
  href='lib/guarana/themes/themeroller/default-theme/Themeroller.css'
  type='text/css' media='screen'>
<script src="lib/guarana/lib/jquery/jquery.js"
  type="text/javascript" charset="utf-8"></script>
<script src="lib/guarana/lib/Guarana.js"
  type="text/javascript" charset="utf-8"></script>
Also, we need to set the appropriate path variables for Guarana. For this, we want this code:
<script type='text/JavaScript'>
NOKIA_PATH_JAVASCRIPT = 'lib/guarana/lib/';
NOKIA_PATH_STYLE_ROOT = 'lib/guarana/themes/nokia/base/';
</script>
We want to have two views for this application: our main view where we show the earthquake data and the about view where we give ourselves credit.
We use the templatedefault widget to get the basic view layout to look right. This gives us a title bar on the top with icons for home, menu, and back functionality, along with pull-down menus to let you navigate between views. After we add the templatedefault code the app should look like Figure 7-8.

Next, we want to create our two views. Let's take a moment to understand how views work. The best way to think about the Nokia.view class is as an abstract class that must be extended to form more specific types of classes, which you then use to create object instances for your application. You do this by creating callback functions that are called as certain view events are handled. These callback functions are passed as function arguments when the view is defined with the Nokia.view.extend function. Some significant events for which you can define callback functions are:
initrenderUIbindUIsyncUIshowhide
As expected, init is called to initialize the view. The next three callbacks—renderUI, bindUI, and syncUI—are part of the view lifecycle. These are abstract (empty) methods and need to be overridden for each view. renderUI is the method responsible for creating and adding the HTML nodes the view needs. It is usually the point where the DOM is first modified by the view. bindUI is the method responsible for attaching event listeners that bind the UI to the view. And syncUI is the method responsibly for synchronizing the state of the UI based on the current state of the view. show is called when the widget is shown, and hide is called when the view is hidden.
Let's take a look at the first view from our application. First, the view is defined using the Nokia.view.extend function and the init function is overridden. In this example init does nothing.
var FirstView = Nokia.View.extend({
  /*
   * Lifecycle
   */
init: function() {
  //console.log("initialize FirstView view");
},
Now, let's look at renderUI. This is where the HTML for the node is created. In this case, it is just some simple text. Later, we will add the HTML for our earthquake data in this section.
renderUI: function() {
  this._viewHeader = Nokia.dom.parseHTML('<p class="nokia-view-header">First View Header First View Header' +
  'First View Header First View Header First View Header First View Header First View Header First View Header' + '</p>'),

  Nokia.dom.append(this.getContainer(), this._viewHeader);
},
The HTML markup is attached to the DOM using the Nokia.dom.append function. This is typical jQuery syntax. Next, look at bindUI and syncUI.
bindUI: function() {
  this._viewHeader.click(function() {
  //console.log('Clicked on Header'),
  });
},

syncUI: function() {
  this._viewHeader.CSS('color', 'red'),
},
bindUI is where listeners would be bound. In this case, bindUI does nothing but log that the view was clicked. syncUI causes the text in this view to be colored red.
show does a lot of activity when the view is actually shown. The items in the menu (selected by the menu icon in the title bar) are set to the appropriate values. The title bar is updated with the appropriate view name and other elements in the title bar are also updated. And finally, this.getContainer.show is called to show the entire view.
show: function() {
     if (feedName==null){
          viewManager.show(1);
                                }
     var template = this.getTemplate();
     var topBar = template.getHeaderTopBar();

     floatingMenu.destroy();

     floatingMenu = new Nokia.FloatingMenu({
                   autoRender: false,
                   element: '.nokia-template-header-icon-menu',
                   elementHoverClass: 'nokia-template-header-icon-menu-hover',
                   offsetTop: 60,
items: [
{label: 'About', callback: function() { viewManager.show(1) }},
{label: 'Refresh', callback: function() { window.location.reload(); }}
]
});
defaultTopItems[2] = {
classname: 'nokia-template-header-icon-menu',
callback: function() {
floatingMenu.render().toggle();
}
};
defaultTopItems[4] = {
classname: 'nokia-template-header-title',
label: feedName
};
defaultTopItems[6] = {
classname: 'nokia-template-header-icon-close',
pressedStateClass: 'nokia-template-header-icon-hover',
callback: function() {
window.close();
}
}
topBar.setItems(defaultTopItems);
this.getContainer().show();
}
}The views are now defined. Now we instantiate the two views and add these views to the viewManager using the viewManager.Add function.
viewManager.add(newFeedsView()); viewManager.add(newAboutView());
The last significant piece of code is here:
Nokia.use('template-default', init);This tells the Nokia Loader to dynamically load the library code for template-default, and then execute the init function.
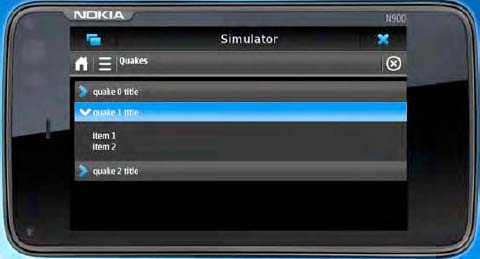
Our views are set up. Now let's think about making the views look like something we want. For the Shake view we want to show a list of seismic events as grabbed from the USGS. We want to add the ability to click on each event to get more details and an image showing where the quake hit. One way to do this is to make each event take you to a new full screen view with the additional information. Another, nicer way, though, is to use the accordion widget. Let's add it to our application.
First, we need to add a <div> for the accordion to the FeedView HTML with a recognizable div id. This div id is then referenced when the accordion is instantiated. To do this, let's add this code to the RenderUI callback in the FeedView we created above.
renderUI: function() {
  this._viewHeader = Nokia.dom.parseHTML('<div class="widget-view">'+
    '<div id="accordion"></div>'+
    '</div>'),
  Nokia.dom.append(this.getContainer(), this._viewHeader);
}
Now we've added the appropriate <div> to the view HTML. Next, we need to populate the <div> with the appropriately structured content, and then instantiate the accordion. Eventually we will populate this with the data we pull from the USGS, but for now let's get the structure right with some dummy data. Let's populate the data in a function called setFeedItems. This nicely contains this functionality so we can use this same function later for the real feed data. So now, create this function:
function setFeedItems(items)
{
  // start by removing all current feed items
  $('#accordion').children().remove();

  // create new feed items and add them to the main view
  for (var i = 0; i < items.length; i++)
  {
    var item = items[i];
    $('#accordion').append('<a ref="JavaScript:void(0);"> quake ' + i + ' title </a>'),
    $('#accordion').append('<div> <p>item 1 </p><p>item 2</p></div>'),
  }
}
Note that this again makes significant use of jQuery syntax. For now, let's call this function from the show callback of the FeedView using some dummy data. Just add this line to the FeedView callback:
setFeedItems([1,2,3]);
Last, we need to add the code to instantiate the accordion to our setFeedItems function. SetFeedItems() should look something like this:.
window.accordion1 = new Nokia.Accordion({
    element: '#accordion',
    collapsible: true,
    multiple: false,
    closed: true,
    toggle: function(event, header, content) {
    },
    create: function() {
    },
    open: function(event, header, content) {
    },
    close: function(event, header, content) {
    }
  });
This code instantiates a new Nokia.Accordion object. The first element says that <div> with div id = 'accordion' that we set earlier will become the container for the accordion. The other options specify various configurable options for the widget. The accordion widget, for example, has a configuration option to set whether or not it is collapsible. Each widget has its own set of options that you can find from the documentation provided earlier.
One last thing we need to do is to add 'Accordion' to the Nokia.use function call that specifies which libraries are to be loaded. To do this, update the function call to look like this:
Nokia.use('template-default', 'accordion', init);If all goes well, your app should work as before, but now you should see an accordion view filled with dummy earthquake data. Take a look at Figure 7-9 to see what it should look like. Now let's get some really USGS data and plug it in.
Next, we need to download and parse the XML data from the USGS. Let's use XmlHttpRequest to request the XML data. After that, we can put together some simple JavaScript to parse the result and put in HTML formatting. Finally, we plug it into the accordion widget and we are done.
There are many examples for how to request and parse XML feeds available elsewhere, so we won't go into detail here. The example code here was based on an RSS reader example that came with the Nokia Aptana plug-in.
One really cool thing about this code is that the markup in the summary received from the USGS XML feed includes an <img> tag. Without doing any fancy coding or image handling, the summary information for each quake shows a thumbnail for each quake's location in addition to the text giving details. We didn't need to do anything special to render the image. We just pasted the <img> tag as we got it from the USGS and it works!
Let's do one bit of HTML5 magic to liven things up a bit. Inside the image element, let's add this class declaration:
class='quakeImage'
And later in the CSS file, let's add this declaration block:
.quakeImage:active{-webkit-transition:all 1s ease-in-out;-webkit-transform:scale(5)translateX(50px);}
Now, when we click on the image, we use the –webkit-transform property to make the image grow and move to the right. With just a couple of lines of code we were able to add a nice zooming effect.
Finally let's package our app into a hybrid app. In this case let's package the content as resources just so we don't have to worry about installing files. Let's package and install as we did earlier in this chapter and we're done!
Figure 7-10 below shows our completed Shake application built using HTML5 and associated technologies and running in a QtWebKit container.

Because of space considerations, we could not give the depth many topics deserve. We encourage you to continue exploring these technologies on your own. Here are some sources of additional information:
Tutorials on web technologies:
www.w3schools.comThe full HTML5 specification:
dev.w3.org/html5/spec/An excellent example of a Cartoon Reader written using hybrid Qt and HTML5 technologies, including local storage:
www.forum.nokia.com/info/sw.nokia.com/id/269f8716-ca61-4036-9b6a-f567f0184f0b/QtWebKit_Cartoon_Reader_Example.htmlTips on power management:
www.forum.nokia.com/main/resources/development_process/power_management/.JavaScript performance best practices:
wiki.forum.nokia.com/index.php/JavaScript_Performance_Best_Practices#JavaScript_Performance_Best_Practices.
In this chapter we presented the basics you will need to know to write HTML5 applications for Nokia. We showed you how to build a QtWebKit-based browser and we showed several techniques for running your HTML5 application offline. We highlighted some of the more nifty HTML5 features, such as canvas, CSS transitions and transformations, and local storage. Finally, we re-implemented Shake, the application we built in the past three chapters with native Qt technologies, this time using HTML5.
Next up, we'll show you how to test and distribute your application.