
Chapter 8
Rich Media Integration
If your users aren’t using their Android device to make phone calls, then they are most likely either playing games, listening to music, or watching videos. When it comes right down to it, the consumption of audio and video may be even more important to modern consumers than the communication capabilities of their mobile devices. Fortunately, outstanding support for audio and video is one of the real strengths of the Flash platform. In fact, this is one of the primary reasons that the Flash Player has become so ubiquitous on our computers and mobile devices.
The previous chapter showed you how to capture audio and video on your Android device. This chapter builds upon those concepts and will teach you how to use the power of the Flash platform to unlock the rich media potential of an Android mobile device.
Playing Sound Effects
Sound effects are typically short sounds that you play in response to various application events such as alert pop-ups or button presses. The audio data for the sound effect should be in an MP3 file and can be embedded in your application’s SWF file or downloaded from the Internet. You embed an MP3 asset in your application by using the Embed metadata tag to identify the asset, as shown in Listing 8–1.
Listing 8–1. Embedding a Sound File with the Embed Metadata Tag
<?xml version="1.0" encoding="utf-8"?>

<s:View xmlns:fx="http://ns.adobe.com/mxml/2009"

        xmlns:s="library://ns.adobe.com/flex/spark"

        xmlns:mx="library://ns.adobe.com/flex/mx"

        title="SoundAssets">


  <fx:Script>

    <![CDATA[

      import mx.core.SoundAsset;


      [Embed(source="mySound.mp3")]

      private var MySound:Class;

      private var sound:SoundAsset = new MySound();
]]>

    </fx:Script>


  <s:Button label="Play SoundAsset" click="sound.play()"/>

</s:View>
The Embed metadata tag will cause the compiler to transcode the MP3 file and embed it in your application’s SWF file. The source attribute specifies the path and file name of the MP3 file. In this case, we have placed the file in the same package as our source file. You access the embedded sound by creating an instance of the class associated with the Embed tag, which in Listing 8–1 is a class named MySound. The MySound class is generated by the compiler and will be a subclass of mx.core.SoundAsset. Therefore it has all the necessary support for basic playback of an audio asset. In Listing 8–1, we take advantage of this support by creating an instance variable named sound and calling its play method in response to a button click.
The SoundEffect Class
Although it’s nice to know what’s going on behind the scenes, you typically don’t need to bother with creating and instancing a SoundAsset in your Flex programs. Your tool of choice will usually be the SoundEffect class, due to its ability to easily create interesting effects during the playback of the sample. It offers simple control of looping, panning, and volume effects during playback. Since it extends the base mx.effect.Effect class, it can be used anywhere a regular effect could be used. For example, you can set a SoundEffect instance as a Button’s mouseDownEffect or as the creationCompleteEffect of an Alert dialog. Listing 8–2 shows how you can do this, as well as how to play a SoundEffect manually.
Listing 8–2. Creating and Playing a Looping SoundEffect
<?xml version="1.0" encoding="utf-8"?>

<s:View xmlns:fx="http://ns.adobe.com/mxml/2009"

        xmlns:s="library://ns.adobe.com/flex/spark"

        xmlns:mx="library://ns.adobe.com/flex/mx"

        title="SoundEffects">


  <fx:Declarations>

    <mx:SoundEffect id="mySound" source="{MySound}" useDuration="false"

                    loops="2"/>

  </fx:Declarations>


  <fx:Script>

    <![CDATA[

      [Bindable]

      [Embed(source="mySound.mp3")]

      private var MySound:Class;


      private function playEffect(event:MouseEvent):void {

        mySound.end();

        mySound.play([event.target]);

      }

    ]]>

</fx:Script>
<s:VGroup horizontalCenter="0" horizontalAlign="contentJustify">

    <s:Button label="Play mouseDownEffect" mouseDownEffect="{mySound}"/>

    <s:Button label="End & Play SoundEffect" click="playEffect(event)"/>

  </s:VGroup>

</s:View>
The SoundEffect declaration that is highlighted in Listing 8–2 creates a sound effect that loops twice every time it is played. Note the useDuration attribute that is set to false. The duration of a SoundEffect is set to 500 milliseconds by default, and if useDuration is left at its default value of true, then only the first half-second of your sound will be played. Therefore you will almost always want to set this attribute to false unless you also set the duration attribute in order to play only a portion of your sound effect. The source attribute of the SoundEffect is given the class name of the embedded sound asset.
We then create two buttons to illustrate the two different ways you can play a SoundEffect. The first button simply sets the instance id of the SoundEffect as its mouseDownEffect. This plays our audio sample every time the mouse button is pressed over the button. Each time the mouse button is pressed, a new effect is created and played. If you click quickly enough, and your sound sample is long enough, it is possible to hear them playing simultaneously.
Clicking the second button will call the playEffect method, which does two things. First it will stop any instances of the effect that are currently playing by calling the end method. This ensures that the sound cannot overlap with any other instances of itself. Second, a new sound effect is played using the button as its target object. The MouseEvent’s target property provides a convenient way to refer to the button that we will be using as the target of our effect. Note that the parameter to the play method is actually an array of targets. This is why we need the extra set of square brackets around the event.target parameter.
You can see that each sound you embed in this manner requires three lines of code: two metadata tags and the line that declares a class name for the sound asset. There is a way to avoid this and embed the sound into the sound effect directly.
Embedded SoundEffect Example
You can use an @Embed directive in the source attribute of a SoundEffect declaration. This technique is used in the SoundEffectBasic sample application, which can be found in the examples/chapter-08 directory of the sample code for this book. This example application also demonstrates how to adjust the volume and panning of the sound effect as it plays. Listing 8–3 shows the main View of the application.
Listing 8–3. The Home View of the SoundEffectBasicExample Program
<?xml version="1.0" encoding="utf-8"?>

<s:View xmlns:fx="http://ns.adobe.com/mxml/2009"

        xmlns:s="library://ns.adobe.com/flex/spark"

        xmlns:mx="library://ns.adobe.com/flex/mx"

        title="Code Monkey To-Do List">
<fx:Declarations>

    <mx:SoundEffect id="coffee" source="@Embed('coffee.mp3')"

                    useDuration="false" volumeFrom="1.0" volumeTo="0.0"/>

    <mx:SoundEffect id="job" source="@Embed('job.mp3')"

                    useDuration="false" panFrom="-1.0" panTo="1.0"/>

    <mx:SoundEffect id="meeting" source="@Embed('meeting.mp3')"

                    useDuration="false" volumeFrom="1.0" volumeTo="0.0"

                    volumeEasingFunction="Back.easeOut"/>

  </fx:Declarations>


  <fx:Script>

    <![CDATA[

      import flash.net.navigateToURL;

      import mx.effects.easing.Back;


      private static const CM_URL_STR:String = "http://www.jonathancoulton.com"+

          "/2006/04/14/thing-a-week-29-code-monkey/";


      private static const CM_URL:URLRequest = new URLRequest(CM_URL_STR);


      private function play(event:MouseEvent, effect:SoundEffect):void {

        effect.end();

        effect.play([event.target]);

      }

    ]]>

  </fx:Script>


  <s:VGroup horizontalCenter="0" horizontalAlign="contentJustify" top="15" >

    <s:Button label="1. Get Coffee" click="play(event, coffee)"/>

    <s:Button label="2. Go to Job"  click="play(event, job)"/>

    <s:Button label="3. Have Meeting" mouseDownEffect="{meeting}"/>

  </s:VGroup>


  <s:Button horizontalCenter="0" bottom="5" width="90%"

            label="About Code Monkey..." click="navigateToURL(CM_URL)"/>

</s:View>
The first thing to note in Listing 8–3 is the use of the @Embed statement in the source attribute of each SoundEffect declaration. This allows you to embed a sound asset and associate it with a SoundEffect in one step. Just as before, if your sound file is in a different package from your source file, then you must include the path to the sound file in the @Embed statement in order for the compiler to find it.
Each sound effect will play a short excerpt from the song “Code Monkey,” by Jonathan Coulton. We have used the volumeFrom and volumeTo attributes of the SoundEffect class to fade the volume from 1.0 (maximum volume) to 0.0 (minimum volume) as the audio sample plays. Since we did not specify a volumeEasingFunction, it will be a linear fade. Similarly, the second sound effect will linearly pan the audio sample from -1.0 (left speaker) to 1.0 (right speaker) as the sample plays. If you want to use a different easing function for your pan effect, you would specify it using the panEasingFunction property of the SoundEffect class. The final SoundEffect declaration shows how to use one of Flex’s built-in easers to change the volume of the sample as it plays. By using the Back easer’s fadeOut method, we will fade the volume down to the target value of 0.0, overshoot it a little, and rebound back up past 0.0 again before finally settling on the end value. This creates an interesting little surge in volume at the end of the audio sample.
This example demonstrates once again the two different methods of playing sound effects. There is also a fourth button at the bottom of the screen that, when clicked, will launch Android’s native web browser and take you to the “Code Monkey” web page by using the navigateToURL method that was covered in Chapter 6. The resulting application is shown in Figure 8–1.
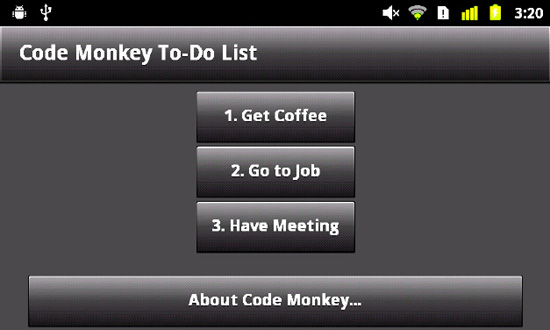
Figure 8–1. The Code Monkey sound effects example running on an Android device
The SoundEffect class is perfect for playing small sound effects in response to application events. If you need more advanced control over sound in your application, then it is time to dig deeper into the functionality that the Flash platform has to offer.
Sophisticated Sound Solutions
The SoundEffect class is a convenient abstraction for that (mostly silent) majority of applications whose needs do not extend beyond the ability to occasionally prompt or notify the user. There are some applications in which sound is one of the main ingredients. If you want to record voice memos or play music, then you need to go a little deeper into the Flash sound APIs. We will start by taking a look at the Sound class and its partners: SoundChannel and SoundTransform. All three of these classes can be found in the flash.media package.
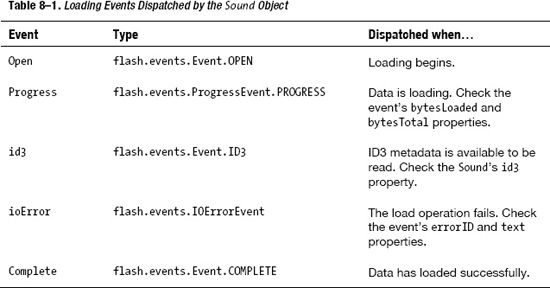
The Sound class serves as the data container for your audio file. Its main responsibilities are to provide mechanisms for loading data into its buffer and to begin playback of that data. The audio data loaded into a Sound class will typically come from either an MP3 file or from the application itself generating data dynamically. Unsurprisingly, the key methods to be aware of in this class are the load and play methods. You use the load method to provide the URL of the MP3 file that should be loaded into the Sound. Once data is loaded into a Sound, it cannot be changed. If you later want to load another MP3 file, you must create a new Sound object. Passing a URL to the constructor of the Sound object is equivalent to calling the load method. The Sound class dispatches several events during the process of loading audio data, as shown in Table 8–1.
After the data has been loaded, calling the play method of the Sound class will cause the sound to begin playing. The play method returns a SoundChannel object that can be used to track the progress of the sound’s playback and to stop it early. The SoundChannel also has a SoundTransform object associated with it that you can use to change the volume and panning of the sound as it plays. There are three optional parameters that can be passed to the play method. First there is the startTime parameter, which will cause the sound to begin playing at the specified number of milliseconds into the sample. You can also pass a loop count if you want the sound to play a certain number of times. And finally, it is also possible to provide a SoundTransform object as a parameter to the play method if you would like to set the initial transform of the sound when it begins playing. The transform you pass will be set as the SoundChannel’s SoundTransform.
A new SoundChannel object is created and returned every time the Sound.play method is called. SoundChannel serves as your main point of interaction with the sound while it is playing. It allows you to track the current position and volume of the sound. It contains a stop method, which interrupts and terminates playback of the sound. When a sound has reached the end of its data, the SoundChannel class will notify you by dispatching a soundComplete event of type flash.events.Event.SOUND_COMPLETE. And finally, you can also use its soundTransform property to manipulate the volume of the sound and to pan the sound to the left and right speakers. Figure 8–2 illustrates the relationship between these three collaborating classes.
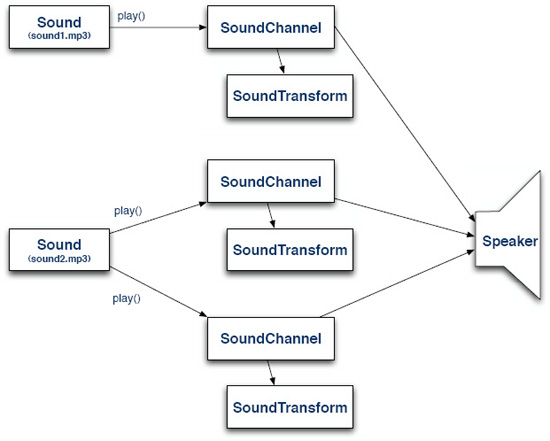
Figure 8–2. The relationship between Sound, SoundChannel, and SoundTransform
Now admittedly the path from the SoundChannel to the speaker is not as direct as Figure 8–2 implies. There are several layers (including OS drivers and digital-to-analog conversion circuitry) that exist before the audio signal reaches the speaker. There is even another class that Flash provides in the flash.media package called SoundMixer, which includes several static methods for manipulating and gathering data about the sounds being played by the application at a global level.
That wraps up our overview of the classes you need to be familiar with in order to play sound on your Android device using Flash. In the next sections, we will take a look at some examples that use these classes to play sound from in-memory buffers and from files stored on the device.
Playing Recorded Sound
We showed you in the MicrophoneBasic example application from Chapter 7 how to record audio data from the device’s microphone. Expanding on that example will provide a convenient starting point for a more in-depth exploration of Flash’s audio support. You may recall that we attached an event handler to the Microphone object to handle its sampleData event. The handler was called each time the microphone had data for our application. We didn’t actually do anything with the microphone data in that example, but it would have been a simple thing to just copy the data into a ByteArray for later playback. The question is: how do we play sound data from a ByteArray?
Generating Sound Data on the Fly
If you call the play() methodon a Sound object that has nothing loaded into it, the object is forced to go looking for sound data to play. It does so by dispatching sampleData events to request sound samples. The event’s type is SampleDataEvent.SAMPLE_DATA, and it is found in the flash.events package. This happens to be the same type of event the Microphone class uses to notify us that samples are available. The answer to our previous question is simple, then: you just attach a handler for the Sound’s sampleData event and start copying bytes into the event’s data property.
Therefore our enhanced application will have two separate handlers for the sampleData event. The first will copy data to a ByteArray when the microphone is active, and the second will copy the data from that same ByteArray to the Sound object when we are playing it back. The source code for the new application can be found in the SoundRecorder application located in the examples/chapter-08 directory. Listing 8–4 shows the sampleData event handler for the microphone data.
Listing 8–4. The Setup Code and Event Handler for the Microphone’s Data Notifications
private staticconst SOUND_RATE:uint = 44;

private staticconst MICROPHONE_RATE:uint = 22;


// Handles the View’s creationComplete event

private function onCreationComplete():void {

  if (Microphone.isSupported) {

    microphone = Microphone.getMicrophone();

    microphone.setSilenceLevel(0)

    microphone.gain = 75;

    microphone.rate = MICROPHONE_RATE;


    sound = new Sound();

    recordedBytes = new ByteArray();

  } else {

    showMessage("microphone unsupported");

  }

}


// This handler is called when the microphone has data to give us
private function onMicSample(event:SampleDataEvent):void {

  if (microphone.activityLevel > activityLevel) {

    activityLevel = Math.min(50, microphone.activityLevel);

  }


  if (event.data.bytesAvailable) {

    recordedBytes.writeBytes(event.data);

  }

}
The onCreationComplete handler is responsible for detecting the microphone, initializing it, and creating the ByteArray and Sound objects the application uses to store and play sound. Note that the microphone’s rate is set to 22 kHz. This is adequate quality for capturing a voice recording and takes up less space than does recording at the full 44 kHz.
This handler is simple. Just as before, the Microphone object’s activityLevel property is used to compute a number that is later used to determine the amplitude of the animated curves drawn on the display to indicate the sound level. Then the event’s data property, which is a ByteArray, is used to determine if any microphone data is available. If the bytesAvailable property is greater than zero, then the bytes are copied from the data array to the recordedBytes array. This will work fine for normal recordings. If you need to record hours of audio data, then you should either stream the data to a server or write it to a file on the device.
Since we are working with raw audio data, it is up to the program to keep track of what format the sound is in. In this case, we have a microphone that is giving us 22 kHz mono (1-channel) sound samples. The Sound object expects 44 kHz stereo (left and right channel) sound. This means that each microphone sample will have to be written to the Sound data twice to convert it from mono to stereo and then twice more to convert from 22 kHz to 44 kHz. So each microphone sample will nominally be copied to the Sound object’s data array four times in order to play the recording back using the same rate at which it was captured. Listing 8–5 shows the Sound’s sampleData handler that performs the copy.
Listing 8–5. The Event Handler for the Sound Object’s Data Requests
// This handler is called when the Sound needs more data

private function onSoundSample(event:SampleDataEvent):void {

  if (soundChannel) {

    var avgPeak:Number = (soundChannel.leftPeak + soundChannel.rightPeak) / 2;

    activityLevel = avgPeak * 50;

  }


  // Calculate the number of stereo samples to write for each microphone sample

  var sample:Number = 0;

  var sampleCount:int = 0;

  var overSample:Number = SOUND_RATE / MICROPHONE_RATE * freqMultiplier;


  while (recordedBytes.bytesAvailable && sampleCount < 2048/overSample) {

    sample = recordedBytes.readFloat();

    for (var i:int=0; i<overSample; ++i) {

      // Write the data twice to convert from mono to stereo

      event.data.writeFloat(sample);
event.data.writeFloat(sample);

    }

    ++sampleCount;

  }

}
Since the curves on the display should be animated during playback as well as recording, the first thing that is done in the handler is to compute the activityLevel that is used in drawing the curves. From our overview of the sound-related classes in the last section, we know that the SoundChannel class is where we need to look for information about a sound that is playing. This class has a leftPeak and a rightPeak property that indicate the amplitude of the sound. Both of these values range from 0.0 to 1.0, where 0.0 is silence and 1.0 is maximum volume. The two values are averaged and multiplied by 50 to compute an activityLevel that can be used to animate the waveform display.
Now we arrive at the interesting bits: transferring the recorded data to the sound’s data array. The overSample value is calculated first. It accounts for the difference in capture frequency vs. playback frequency. It is used in the inner for loop to control how many stereo samples are written (remember that writeFloat is called twice because each sample from the microphone is used for both the right and left channels during playback). Normally the value of the overSample variable will be two (44 / 22), which when multiplied by the two calls to writeFloat will give us the four playback samples for each microphone sample that we calculated earlier. You no doubt have noticed an extra frequency multiplier factor has also been included. This multiplier will give us the ability to speed up (think chipmunks) or slow down the frequency of the playback. The value of the freqMultiplier variable will be limited to 0.5, 1.0, or 2.0, which means that the value of overSample will be 1, 2, or 4. A value of 1 will result in only half as many samples being written as compared to the normal value of 2. That means the frequency would be doubled and we’ll hear chipmunks. An overSample value of 4 will result in a slow-motion audio playback.
The next question to be answered is: how much of our recordedBytes array should be copied to the Sound each time it asks for data? The rough answer is “between 2048 and 8192 samples.” The exact answer is “it depends.” Don’t you hate that? But in this one case the universe has shown us mercy in that the dependency is very easy to understand. Write more samples for better performance, and write fewer samples for better latency. So if your application simply plays back a sound exactly as it was recorded, use 8192. If you have to generate the sound or change it dynamically, say, to change the playback frequency, then use something closer to 2048 to reduce the lag between what users see on the screen and what they hear from the speaker. If you write fewer than 2048 samples to the buffer, then the Sound treats that as a sign that there is no more data, and playback will end after those remaining samples have been consumed. In Listing 8–5, the while loop ensures that 2048 samples are always written as long as there is enough data available in the recordedBytes array.
We now have the ability to both record and play back voice samples. All the application lacks is a way to transition between the two modes.
Handling the State Transitions
The application has four states: stopped, recording, readyToPlay, and playing. Tapping somewhere on the screen will cause the application to transition from one state to the next. Figure 8–3 illustrates this process.
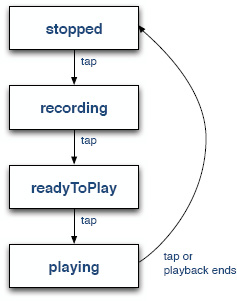
Figure 8–3. The four states of the SoundRecorder application
The application starts in the stopped state. When the user taps the screen, the application transitions to the recording state and begins recording his or her voice. Another tap stops the recording and transitions to the readyToPlay state. Another tap begins playback in the playing state when the user is ready to hear the recording. The user can then tap a fourth time to stop the playback and return to the stopped state, ready to record again. The application should also automatically transition to the stopped state if the playback ends on its own. Listing 8–6 shows the MXML for the one and only View of this application.
Listing 8–6. The Home View of the SoundRecorder Application
<?xml version="1.0" encoding="utf-8"?>

<s:View xmlns:fx="http://ns.adobe.com/mxml/2009"

        xmlns:s="library://ns.adobe.com/flex/spark"

        actionBarVisible="false"

        creationComplete="onCreationComplete()">


  <fx:Script source="SoundRecorderHomeScript.as"/>


  <s:states>

    <s:State name="stopped"/>

    <s:State name="recording"/>

    <s:State name="readyToPlay"/>

    <s:State name="playing"/>

  </s:states>
<s:transitions>

    <s:Transition toState="stopped">

      <s:Parallel>

        <s:Scale target="{stopLabel}" scaleXBy="4" scaleYBy="4"/>

        <s:Fade target="{stopLabel}" alphaFrom="1" alphaTo="0"/>

        <s:Scale target="{tapLabel}" scaleXFrom="0" scaleXTo="1"

                 scaleYFrom="0" scaleYTo="1"/>

        <s:Fade target="{tapLabel}" alphaFrom="0" alphaTo="1"/>

      </s:Parallel>

    </s:Transition>


    <s:Transition toState="readyToPlay">

      <s:Parallel>

        <s:Scale target="{stopLabel}" scaleXBy="4" scaleYBy="4"/>

        <s:Fade target="{stopLabel}" alphaFrom="1" alphaTo="0"/>

        <s:Scale target="{tapLabel}" scaleXFrom="0" scaleXTo="1"

                 scaleYFrom="0" scaleYTo="1"/>

        <s:Fade target="{tapLabel}" alphaFrom="0" alphaTo="1"/>

      </s:Parallel>

    </s:Transition>


    <s:Transition toState="*">

      <s:Parallel>

        <s:Scale target="{tapLabel}" scaleXBy="4" scaleYBy="4"/>

        <s:Fade  target="{tapLabel}" alphaFrom="1" alphaTo="0"/>

        <s:Scale target="{stopLabel}" scaleXFrom="0" scaleXTo="1"

                 scaleYFrom="0" scaleYTo="1"/>

        <s:Fade  target="{stopLabel}" alphaFrom="0" alphaTo="1"/>

      </s:Parallel>

    </s:Transition>

  </s:transitions>


  <s:Group id="canvas" width="100%" height="100%" touchTap="onTouchTap(event)"/>

  <s:Label id="messageLabel" top="0" left="0" mouseEnabled="false" alpha="0.5"

           styleName="label"/>


    <s:Label id="tapLabel" bottom="100" horizontalCenter="0" mouseEnabled="false"

           text="Tap to Record" includeIn="readyToPlay, stopped"

           styleName="label"/>

  <s:Label id="stopLabel" bottom="100" horizontalCenter="0" mouseEnabled="false"

           text="Tap to Stop" includeIn="playing, recording"

           styleName="label"/>


  <s:Label id="speedLabel" top="100" horizontalCenter="0" mouseEnabled="false"

           text="{1/freqMultiplier}x" fontSize="48" includeIn="playing"

           styleName="label"/>

</s:View>
This code includes the source file that contains the ActionScript code for this View, declares the four states of the View and the transitions between them, and lastly declares the UI components displayed in the View. The UI components include a Group that serves as both the drawing canvas for the animated waveform and the handler for the tap events that trigger the state transitions. There is also a Label for displaying error messages to the user, two Labels that display state messages to the user, and a Label that indicates the frequency of the playback.
Now the table is set; our user interface and application states are defined. The next step will be to look at the code that controls the state changes and UI components. Listing 8–7 shows the ActionScript code that controls the transitions from one state to the next.
Listing 8–7. Controlling the State Transition Order of the SoundRecorder Application
private function onTouchTap(event:TouchEvent):void {

  if (currentState == "playing" && isDrag) {

    return;

  }


  incrementProgramState();

}


private function onSoundComplete(event:Event):void {

  incrementProgramState();

}


private function incrementProgramState():void {

  switch (currentState) {

    case"stopped":

      transitionToRecordingState();

      break;

    case"recording":

      transitionToReadyToPlayState();

      break;

    case"readyToPlay":

      transitionToPlayingState();

      break;

    case"playing":

      transitionToStoppedState();

      break;

  }

}
You can see that the application state will be changed when the user taps the screen or when the recorded sound has finished playing. The onTouchTap function also performs checks to make sure that the tap event was not generated as part of a drag (which is used to control playback frequency). The incrementProgramState function simply uses the value of the currentState variable to determine which state should be entered next and calls the appropriate function to perform the housekeeping associated with entering that state. These functions are shown in Listing 8–8.
Listing 8–8. The State Transition Functions of the SoundRecorder Application
private function transitionToRecordingState():void {

  recordedBytes.clear();

  microphone.addEventListener(SampleDataEvent.SAMPLE_DATA, onMicSample);

  currentState = "recording";

}


private function transitionToReadyToPlayState():void {

  microphone.removeEventListener(SampleDataEvent.SAMPLE_DATA, onMicSample);

  tapLabel.text = "Tap to Play";

  currentState = "readyToPlay";

}
private function transitionToPlayingState():void {

  freqMultiplier = 1;

  recordedBytes.position = 0;


  canvas.addEventListener(TouchEvent.TOUCH_BEGIN, onTouchBegin);

  canvas.addEventListener(TouchEvent.TOUCH_MOVE, onTouchMove);


  sound.addEventListener(SampleDataEvent.SAMPLE_DATA, onSoundSample);

  soundChannel = sound.play();

  soundChannel.addEventListener(Event.SOUND_COMPLETE, onSoundComplete);


  currentState = "playing";

}


private function transitionToStoppedState():void {

  canvas.removeEventListener(TouchEvent.TOUCH_BEGIN, onTouchBegin);

  canvas.removeEventListener(TouchEvent.TOUCH_MOVE, onTouchMove);


  soundChannel.stop()

  soundChannel.removeEventListener(Event.SOUND_COMPLETE, onSoundComplete);

  sound.removeEventListener(SampleDataEvent.SAMPLE_DATA, onSoundSample);


  tapLabel.text = "Tap to Record";

  currentState = "stopped";

}
The transitionToRecordingState function clears any existing data from the recordedBytes array, adds the sampleData listener to the microphone so that it will start sending data samples, and finally sets the currentState variable to trigger the animated state transition. Similarly, the transitionToReadyToPlayState is called when recording is finished. It is responsible for removing the sampleData listener from the microphone, changing the Label in the UI to read “Tap to Play”, and once again setting the currentState variable to trigger the animated transition.
The transitionToPlayingState function is called when the user taps the screen to start the playback of the recorded sample. It first resets the playback frequency to 1 and resets the read position of the recordedBytes array to the beginning of the array. Next, it adds touch event listeners to the canvas Group in order to listen for the gestures that control the frequency multiplier during playback. It also installs a handler for the Sound’s sampleData event so the application can provide data for the Sound during playback. The play method is then called to start the playback of the sound. Once we have a reference to the soundChannel that controls playback, we can add a handler for the soundComplete event so we know if the sound finishes playing, so we can transition automatically back to the stopped state. And finally, the value of the View’s currentState variable is changed to trigger the animated state transition.
The last transition is the one that takes the application back to the stopped state. The transitionToStoppedState function is responsible for stopping the playback (this has no effect if the sound has finished playing) and removing all of the listeners that were added by the transitionToPlayingState function. It finally resets the text property of the Label and changes the value of the currentState variable to trigger the state transition animation.
The remaining piece of functionality to be covered is the frequency multiplier. Listing 8–9 shows the code that handles the touch events that control this variable.
Listing 8–9. Controlling the Frequency of the Playback with Touch Gestures
private function onTouchBegin(event:TouchEvent):void {

  touchAnchor = event.localY;

  isDrag = false;

}


private function onTouchMove(event:TouchEvent):void {

  var delta:Number = event.localY - touchAnchor;

  if (Math.abs(delta) > 75) {

    isDrag = true;

    touchAnchor = event.localY;

    freqMultiplier *= (delta > 0 ? 2 : 0.5);

    freqMultiplier = Math.min(2, Math.max(0.5, freqMultiplier));

  }

}
The onTouchBegin handler is called when the user first initiates a touch event. The code makes note of the initial y-location of the touch point and resets the isDrag flag to false. If a touch drag event is received, the onTouchMove handler checks to see if the movement is large enough to trigger a drag event. If so, the isDrag flag is set to true so the rest of the application knows that a frequency multipler adjustment is in progress. The direction of the drag is used to determine whether the frequency multipler should be halved or doubled. The value is then clamped to be between 0.5 and 2.0. The touchAnchor variable is also reset so the computation can be run again in the event of further movement. The result is that during playback the user can drag a finger either up or down on the screen to dynamically change the frequency of the playback.
Figure 8–4 shows the SoundRecorder sample application running on an Android device. The image on the left shows the application in recording state, while the image on the right shows the animated transition from the readyToPlay state to the playing state.
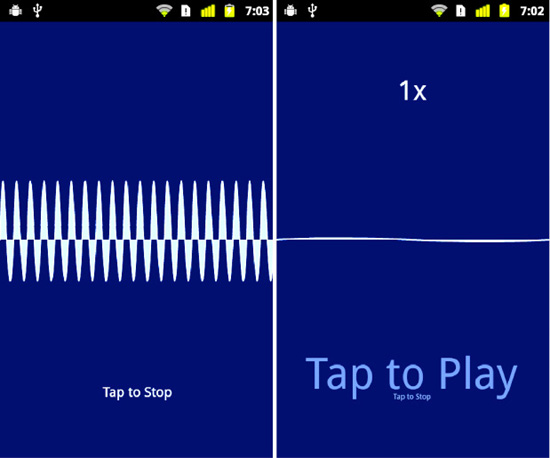
Figure 8–4. The SoundRecorder application running on an Android device
We have now shown you how to play and manipulate data that was stored in a ByteArray. It should be noted that this technique would also work if you needed to manipulate data stored in a Sound object rather than a ByteArray. You can use the extract method of the Sound class to access the raw sound data, manipulate it in some way, and then write it back to another Sound object in its sampleData handler.
Another common use for sound capabilities is in playing music, either streamed over the Internet or stored on the device in MP3 files. If you think the Flash platform would be a good fit for this type of application, you are right! The next section will show you how to write a mobile music player in Flash.
A Flash Music Player
Playing sound from MP3 files on a device is rather uncomplicated. There is more to a music player than simply playing a sound, however. This section will start by showing you how to play an MP3 file with Flash’s sound API. Once that is out of the way, we will look at the additional considerations that you will have to take into account when creating a mobile application.
Playing MP3 Files
Loading an MP3 file into a Sound object is as simple as using a URL that begins with the file protocol. Listing 8–10 shows how it can be accomplished.
Listing 8–10. Loading and Playing an MP3 File from the Filesystem
<?xml version="1.0" encoding="utf-8"?>

<s:View xmlns:fx="http://ns.adobe.com/mxml/2009"

        xmlns:s="library://ns.adobe.com/flex/spark"

        creationComplete="onCreationComplete()"

        title="Sound Loading">


  <fx:Script>

    <![CDATA[

      private var sound:Sound;


      private function onCreationComplete():void {

        var path:String = "file:///absolute/path/to/the/file.mp3";

        sound = new Sound(new URLRequest(path));

        sound.play();

      }

    ]]>

  </fx:Script>

</s:View>
The three lines shown in bold are all that’s needed to play the MP3 file. Note the third forward slash after file:// that is used to indicate that this is an absolute path to the MP3 file. You would obviously not want to use a constant path like this in a real application. We will look at strategies for handling filesystem paths in a more elegant manner later in the chapter, when we discuss the considerations that go into making real-world applications.
Reading ID3 Metadata
Playing the music file is a good start; it’s the essence of a music player, after all. Another thing that all music players do is to read the metadata embedded in the ID3tags of the file.1 This metadata includes things like the name of the artist and the album, the year it was recorded, and even the genre and track number of the song. The Sound class provides built-in support for reading these tags. Listing 8–11 shows how to add this functionality to our fledgling music player. The lines in bold indicate the new additions to the source code from Listing 8–10.
__________
Listing 8–11. Reading ID3 Metadata from an MP3 file
<?xml version="1.0" encoding="utf-8"?>

<s:View xmlns:fx="http://ns.adobe.com/mxml/2009"

        xmlns:s="library://ns.adobe.com/flex/spark"

        creationComplete="onCreationComplete()"

        title="Sound Loading">


  <fx:Script>

    <![CDATA[

      private var sound:Sound;


      private function onCreationComplete():void {

        var path:String = "file:///absolute/path/to/the/file.mp3";

        sound = new Sound(new URLRequest(path));

        sound.addEventListener(Event.ID3, onID3);

        sound.play()

      }


      private function onID3(event:Event):void {

        metaData.text = "Artist: "+sound.id3.artist+"
"+

                        "Year: "+sound.id3.year+"
";

      }

  </fx:Script>


  <s:Label id="metaData" width="100%" textAlign="center"/>

</s:View>
The onID3 handler was added as a listener for the Event.ID3 event. This handler is called when the metadata has been read from the MP3 file and is ready to be used. There are several predefined properties in the ID3Info class that correspond to the more commonly used ID3 tags. Things like album name, artist name, song name, genre, year, and track number all have properties defined in the class. Further, you can also access any of the other text information frames defined by version 2.3 of the ID3 specification.2 For example, to access the TPUB frame that contains the name of the publisher, you would use sound.id3.TPUB.
One thing that is not supported is reading images, such as album covers, from the ID3 tags. You will learn how to accomplish this using an open source ActionScript library later in this chapter.
Implementing Pause Functionality
The SoundChannel class has no direct support for pausing the playback of the sound data. However, it is easy to implement a pause feature using a combination of the class’s position property and its stop method. Listing 8–12 shows one possible technique for implementing a play/pause toggle. Once again the new code additions are shown in bold type.
__________
Listing 8–12. Implementing a Play/Pause Toggle
<?xml version="1.0" encoding="utf-8"?>

<s:View … >


  <fx:Script>

    <![CDATA[

      private var sound:Sound;

      private var channel:SoundChannel;

      private var pausePosition:Number = 0;


      [Bindable] private var isPlaying:Boolean = false;


      private function onCreationComplete():void {

        var path:String = "file:///absolute/path/to/the/file.mp3";

        sound = new Sound(new URLRequest(path));

        sound.addEventListener(Event.ID3, onID3);

      }


      private function onID3(event:Event):void { /* same as before */ }


      private function onClick():void {

        if (isPlaying) {

          pausePosition = channel.position;

          channel.stop();

          channel.removeEventListener(Event.SOUND_COMPLETE, onSoundComplete);

          isPlaying = false;

        } else {

          channel = sound.play(pausePosition);

          channel.addEventListener(Event.SOUND_COMPLETE, onSoundComplete);

          isPlaying = true;

        }

      }


      private function onSoundComplete(event:Event):void {

        isPlaying = false;

        pausePosition = 0;

      }

    ]]>

  </fx:Script>


  <s:VGroup top="5" width="100%" horizontalAlign="center" gap="20">

    <s:Label id="metaData" width="100%" textAlign="center"/>

    <s:Button label="{isPlaying ? 'Pause' : 'Play'}" click="onClick()"/>

  </s:VGroup>

</s:View>
The Sound’s play method is no longer called in the onCreationComplete handler. Instead, a button has been added to the interface whose Label is either “Play” or “Pause” depending on the value of the isPlaying flag. A tap on the button triggers a call to the onClick handler. If the sound is currently playing, the channel’s position is saved in the pausePosition instance variable, the sound is stopped, and the soundComplete event listener is removed from the channel. When the sound is next played, a new SoundChannel object will be created. Therefore, failure to remove our listener from the old SoundChannel would result in a memory leak.
If the sound is not currently playing, it is started by a call to the Sound’s play method. The pausePosition is passed as an argument to the play method so that the sound will play from the same location at which it was last stopped. A listener for the soundComplete event is attached to the new SoundChannel object returned by the play method. The handler for this event is called when the sound has finished playing all the way through to the end. When this happens, the handler will reset the values of the isPlaying flag to false and the pausePosition to zero. That way the song will be played from the beginning the next time the play button is tapped.
Adjusting the Volume
The ability to adjust the volume of the song while it is playing must surely be added to our music player as well. This is a job for the SoundTransform object that is associated with the SoundChannel of the song when it is played. Listing 8–13 illustrates how to use the SoundTransform to change both the volume and the pan of the sound while it is playing.
Listing 8–13. Implementing Volume and Panning Adjustments
<?xml version="1.0" encoding="utf-8"?>

<s:View …>

  <fx:Script>

    <![CDATA[

      /* All other code is unchanged… */


      private function onClick():void {

        if (isPlaying) {

           /* Same as before */

        } else {

          channel = sound.play(pausePosition);

          channel.addEventListener(Event.SOUND_COMPLETE, onSoundComplete);

          onVolumeChange();

          onPanChange();

          isPlaying = true;

        }

      }


      private function onVolumeChange():void {

        if (channel) {

          var xform:SoundTransform = channel.soundTransform;

          xform.volume = volume.value / 100;

          channel.soundTransform = xform;

        }

      }


      private function onPanChange():void {

        if (channel) {

          var xform:SoundTransform = channel.soundTransform;

          xform.pan = pan.value / 100;

          channel.soundTransform = xform;

        }

    ]]>

  </fx:Script>
<s:VGroup top="5" width="100%" horizontalAlign="center" gap="20">

  <s:Label id="metaData" width="100%" textAlign="center"/>

  <s:Button label="{isPlaying ? 'Pause' : 'Play'}" click="onClick()"/>

  <s:HSlider id="volume" minimum="0" maximum="100" value="100"

             change="onVolumeChange()"/>

  <s:HSlider id="pan" minimum="-100" maximum="100" value="0"

             change="onPanChange()"/>

  </s:VGroup>

</s:View>
We have added two horizontal sliders that can be used to adjust volume and panning of the sound as it plays. There may not be a good reason for a music player on a mobile device to worry about panning, but it is shown here for completeness. Perhaps this music player will someday grow into a mini mobile mixing studio. If that happens, you will have a head start on this piece of functionality!
The change event handlers are called when the sliders are moved. Note the pattern required for adjusting the SoundTransform settings. You first get a reference to the existing transform so that you start with all of the current settings. You then change the setting you’re interested in and set the transform object on the channel again. Setting the soundTransform property triggers the channel to update its settings. This way you can batch several transform changes together and pay the cost of resetting the channel’s transform only once.
The volume property of the SoundTransform expects a value between 0.0 (silence) and 1.0 (maximum volume). Similarly the pan property expects a value between -1.0 (left) and 1.0 (right). The change handlers are responsible for adjusting the slider’s values to the appropriate range. The last thing to note is that onVolumeChange and onPanChange are also called when the sound begins playing. Once again, this is necessary since a new channel is created by every call to the Sound’s play method. This new channel object will not have the new settings until those calls to onVolumeChange and onPanChange.
That wraps up our quick overview of basic music player functionality. There is no need to read any further if that is all the information you needed to know, so feel free to skip ahead to the “Playing Video” section instead. However, if you are interested in seeing all of the considerations that go into taking this minimalistic music player and turning it into a real Android application, then the next section is for you.
From Prototype to Application
We have covered the basic techniques required to play music in Flash, but it will take a lot more effort to create a real music player application. This section will talk about some of the things that will need to be done, including the following:
- Creating code that is testable, maintainable, and reusable
- Dealing with different screen densities
- Incorporating third-party libraries to provide functionality missing from Flash
- Creating a custom control to add a little more visual flair
- Handling activate and deactivate events for the application and
Views - Persisting data when the application is deactivated
We will start by looking at an architectural pattern that helps you separate a View’s logic from its presentation in order to create code that is more reusable and testable. You can follow along with this discussion by consulting the MusicPlayer sample application found in the examples/chapter-08 directory of the book’s source code.
A Better Pattern: The Presentation Model
When we have previously wanted to separate a View’s logic from its presentation, we have relied on simply moving the ActionScript code to a separate file. This file is then included in the MXML View using the source attribute of the <fx:Script> tag. This works, but you end up with script logic that is strongly coupled to the View it was written for and therefore not very reusable. There are much better options for achieving a separation of responsibilities in your user interface.
In 2004, Martin Fowler published an articlethat detailed a design pattern called the Presentation Model.3 This pattern is a slight modification of the popular MVCpattern,4 and is particularly well suited to modern frameworks, like Flash, Silverlight, WPF, and JavaFX, that include features such as data binding. Implementing this pattern typically requires three classes that work together: the data model, the presentation model, and the View. It is worth noting that the data model is usually just called the “model” or sometimes the “domain model.” Each presentation model has access to one or more data models whose contents it presents to the View for display. Although not part of the original pattern description, it is extremely common to see service classes included as a fourth component in rich Internet applications. A service class encapsulates the logic needed to access web services (or any other kind of service). A service class and a presentation model will typically pass data model objects back and forth.
This common application structure is illustrated in Figure 8–5 with a design we will implement later in our music player application. The SongListView is our MXML file that declares a View to display a list of objects. The SongListView knows only about its presentation model, the SongListViewModel. The presentation model has no knowledge about the View or Views that are using it. Its job is to collaborate with the MusicService to present a list of MusicEntry objects for display. There is a clear separation of responsibilities, and each class has limited knowledge of the rest of the system. In software engineering terms, the design has low coupling and high cohesion. This should be the goal in any application you design.
__________
3 Martin Fowler, “Presentation Model,” http://martinfowler.com/eaaDev/PresentationModel.html, July 19, 2004
4 Martin Fowler, “Model View Controller,” http://martinfowler.com/eaaCatalog/modelViewController.html
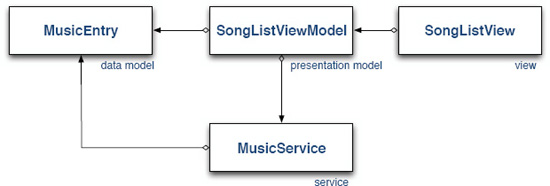
Figure 8–5. A common implementation of the Presentation Model pattern
In summary, use of the Presentation Model pattern has two main benefits:
- The
Viewknows about the presentation model, but the presentation model knows nothing of theView. This makes it easy for multipleViews to share the same presentation model. This is one way in which the Presentation Model pattern makes it easier to reuse code. - Most logic is moved out of the
Viewand into the presentation model. TheViewcan bind to properties of the presentation model in order to present data to the user. Actions such as button presses are ideally passed directly to the presentation model rather than handled in theView. This means that most of the code worth testing is in the presentation model and you don’t have to worry as much about testing UI code.
Creating the ViewNavigatorApplication
Now that the basic building blocks of the application design are understood, it is time to create a new Flex mobile project. This application will be a ViewNavigatorApplication since we will need to navigate between two different Views: a View containing a list of songs, artists, or albums, and a View containing the controls for playing a song. Once the project is created, we can set up the application’s package structure. There will be one package each for the assets, views, viewmodels, models, and services. This makes it easy to organize the various classes in the application by their responsibility. The assets package is where all of the application’s graphical assets, such as icons and splash screens, will be placed.
The main job of the ViewNavigatorApplication is to create and display the first View. This is normally done by setting the firstView attribute of the <s:ViewNavigatorApplication> tag. It will be done a little differently in this application since each View’s presentation model will be passed to it in its data property. To accomplish this, a handler is assigned to the initialize event of the ViewNavigatorApplication. In this onInitialize handler, the MusicService and the initial presentation model will be created and passed to the first View. Listing 8–14 shows the MXML for the application.
Listing 8–14. The MXML for the Main ViewNavigatorApplication
<?xml version="1.0" encoding="utf-8"?>

<s:ViewNavigatorApplication xmlns:fx="http://ns.adobe.com/mxml/2009"

                     xmlns:s="library://ns.adobe.com/flex/spark"

                     splashScreenImage="@Embed('assets/splash.png')"

                     initialize="onInitialize()"

                     applicationDPI="160">


  <fx:Script>

    <![CDATA[

      importservices.LocalMusicService;

      importservices.MusicService;

      import views.SongListView;

      import viewmodels.SongListViewModel;


      private function onInitialize():void {

        var service:MusicService = new LocalMusicService();

        navigator.pushView(SongListView, new SongListViewModel(service));

      }

    ]]>

  </fx:Script>

</s:ViewNavigatorApplication>
The concrete implementation of the MusicService interface being used in this application is a class named LocalMusicService that reads files from the device’s local filesystem. This service instance is then used to construct the presentation model, which in this case is an instance of SongListViewModel. Passing the service to the presentation model like this is preferred over letting the presentation model construct the service internally. This makes it easy to give the presentation models different versions of the service during testing or if the program’s feature set is expanded to include other types of music services. But we are getting ahead of ourselves. We will look at these classes in more detail in the next section.
NOTE: Some people prefer to let the View class create its own presentation model rather than passing it in as we did here by using the data property. We prefer to pass the presentation models to the Views since, everything else being equal, you should always prefer less coupling between your classes. However, either way works well in practice.
One final thing to be noted in Listing 8–14 is the declaration of the applicationDPI attribute of the ViewNavigatorApplication. We have set it to 160 to indicate that the application’s UI will be designed for a screen with 160 dpi. If the application is run on a higher-dpi screen, the UI will be scaled accordingly. Refer back to the “Density in Flex Applications” section of Chapter 2 for more details.
Implementing the MusicService
It is a good idea to define your service classes as an interface. Then your presentation model has a dependency only on the interface class instead of on any one concrete service implementation. This makes it possible to use different service implementations in your presentation model. For instance, you could create one implementation of the music service that reads music files from the device’s local storage, while another implementation could be used for streaming music over the Internet.
There is an even better reason for using a service interface, however; it makes it easy to unit test your presentation models. Say that you normally run your application with a MusicService implementation that reads music files from an Internet web service. If your presentation model is hardwired to use this version, then you cannot test the presentation model in isolation. You need to make sure you have a live Internet connection and that the web service is up and running, or your tests will fail. Making the presentation model depend only on the interface makes it trivial to swap in a mock service that returns a predefined list of MusicEntry objects to your presentation model. This makes your unit tests reliable and repeatable. It also makes them run a lot faster since you don’t have to download data from the web service in every test!
The job of the MusicService is simply to provide a list of MusicEntry objects given a URL path. The interface class will therefore contain a single method, as shown in Listing 8–15.
Listing 8–15. The MusicService Interface
package services

{

  import mx.collections.ArrayCollection;


  public interface MusicService {

    /**

     * A MusicService implementation knows how to use the rootPath to find

     * the list of MusicEntry objects that reside at that path.

     *

     * @return An ArrayCollection of MusicEntry objects.

     * @see models.MusicEntry

     */

    function getMusicEntries(rootPath:String = null):ArrayCollection;

  }

}
A MusicEntry object can represent either a song or a container that holds one or more other songs. In this way, we can navigate through a hierarchical list of artists, albums, and songs using multiple lists of MusicEntry objects. As with most data models, this class is a collection of properties with very little, if any, logic. The MusicEntry object is shown in Listing 8–16.
Listing 8–16. The MusicEntry Data Model
package models

{

  import flash.utils.IDataInput;
/**
* This class represents an object that can be either a song or a container
* of other songs.
*/
public class MusicEntry {
private var _name:String;
private var _url:String;
private var _streamFunc:Function;
public function MusicEntry(name:String, url:String, streamFunc:Function) {
_name = name;
_url = url;
_streamFunc = streamFunc;
}
public function get name():String {
return _name;
}
public function get url():String {
return _url;
}
/**
* @return A stream object if this is a valid song. Null otherwise.
*/
public function get stream():IDataInput {
return _streamFunc == null ? null : _streamFunc();
}
public function get isSong():Boolean {
return _streamFunc != null;
}
}
}
The MusicEntry contains properties for the name of the entry, a url that identifies the location of the entry, a stream that can be used to read the entry if it is a song, and an isSong property that can be used to tell the difference between an entry that represents a song versus one that represents a container of songs. Since we don’t know in advance what kind of stream we will need to read the song, we rely on ActionScript’s functional programming capabilities. This allows the creator of a MusicEntry object to pass a function object to the class’s constructor that, when called, takes care of creating the appropriate type of stream.
This application will play music files from the device’s local storage, so our service will provide MusicEntry objects read from the filesystem of the device. Listing 8–17 shows the LocalMusicService implementation.
Listing 8–17. An Implementation of a MusicService That Reads Songs from the Local Filesystem
package services

{

  import flash.filesystem.File;

  import flash.filesystem.FileMode;

  import flash.filesystem.FileStream;
import flash.utils.IDataInput;
import mx.collections.ArrayCollection;
import models.MusicEntry;
public class LocalMusicService implements MusicService {
private static const DEFAULT_DIR:File = File.userDirectory.resolvePath("Music");
/**
* Finds all of the files in the directory indicated by the path variable
* and adds them to the collection if they are a directory or an MP3 file.
*
* @return A collection of MusicEntry objects.
*/
public function getMusicEntries(rootPath:String=null):ArrayCollection {
var rootDir:File = rootPath ? new File(rootPath) : DEFAULT_DIR;
var songList:ArrayCollection = new ArrayCollection();
if (rootDir.isDirectory) {
var dirListing:Array = rootDir.getDirectoryListing();
for (var i:int = 0; i < dirListing.length; i++) {
var file:File = dirListing[i];
if (!shouldBeListed(file))
continue;
songList.addItem(createMusicEntryForFile(file));
}
}
return songList;
}
/**
* @return The appropriate type of MusicEntry for the given file.
*/
private function createMusicEntryForFile(file:File):MusicEntry {
var name:String = stripFileExtension(file.name);
var url:String = "file://" + file.nativePath;
var stream:Function = null;
if (!file.isDirectory) {
stream = function():IDataInput {
var stream:FileStream = new FileStream();
stream.openAsync(file, FileMode.READ);
return stream;
}
}
return new MusicEntry(name, url, stream);
}
// Other utility functions removed for brevity…
}
}
It is unsurprising that this type of service relies heavily on the classes found in the flash.filesystem package. You should always try to use the path properties defined in the File class when working with filesystem paths. The DEFAULT_DIR constant uses the File.userDirectory as the basis of its default path, which on Android points to the /mnt/sdcard directory. Therefore this service will default to looking in the /mnt/sdcard/Music directory for its files. This is a fairly standard location for music files on Android devices.
NOTE: File.userDirectory, File.desktopDirectory, and File.documentsDirectory all point to /mnt/sdcard on an Android device. File.applicationStorageDirectory points to a “Local Store” directory that is specific to your application. File.applicationDirectory is empty.
The getMusicEntries implementation in LocalMusicPlayer converts the provided rootPath string to a File, or uses the default directory if rootPath is not provided, and then proceeds to iterate through the files located at that path. It creates a MusicEntry object for any File that is either a directory (a container of other songs) or an MP3 file (a song). If the File is a song rather than a directory, the createMusicEntryForFile function creates a function closure that, when called, opens an asynchronous FileStream for reading. This function closure is then passed to the constructor of the MusicEntry object to be used if the song is played. You may recall from Listing 8–16 that the value of this closure object—regardless of whether it is null—is used to determine the type of MusicEntry the object represents.
The SongListView
Listing 8–14 showed that the first View created by the application is the SongListView. The application’s onInitialize handler instantiates the appropriate type of MusicService and uses it to construct the SongListViewModel for the View. The SongListViewModel is then passed to the View by using it as the second parameter to the navigator.pushView function. This will put a reference to the model instance in the View’s data property.
The job of the SongListViewModel is pretty straightforward. It uses the MusicService it is given to retrieve a list of MusicEntry objects for the SongListView to display. Listing 8–18 shows the source code of this presentation model.
Listing 8–18. The Presentation Model for the SongListView
package viewmodels

{

  import models.MusicEntry;

  import mx.collections.ArrayCollection;

  import services.LocalMusicService;

  import services.MusicService;


  [Bindable]

  public class SongListViewModel {
private var _entries:ArrayCollection = new ArrayCollection();

    private var _musicEntry:MusicEntry;

    private var _musicService:MusicService;


    public function SongListViewModel(service:MusicService = null,

                                      entry:MusicEntry = null ) {

      _musicEntry = entry;

      _musicService = service;


      if (_musicService) {

        var url:String = _musicEntry ? _musicEntry.url : null;

        entries = _musicService.getMusicEntries(url);

      }

   }


    public function get entries():ArrayCollection {

      return _entries;

    }


    public function set entries(value:ArrayCollection):void {

      _entries = value;

    }


    public function cloneModelForEntry(entry:MusicEntry):SongListViewModel {

      return new SongListViewModel(_musicService, entry);

    }


    public function createSongViewModel(selectedIndex:int):SongViewModel {

      return new SongViewModel(entries, selectedIndex);

    }

  }

}
The class is annotated with Bindable so the entries property can be bound to the UI component in the View class.
The constructor will store the references to the MusicService and MusicEntry instances that are passed in. If the service reference is not null, then the collection of entries is retrieved from the MusicService. If the service is null, then the entries collection will remain empty.
There are two additional public functions in the class. The cloneModelForEntry function will create a new SongListViewModel by passing along the MusicService reference it was given. The createSongViewModel will create a new presentation model for the SongView using this model’s entries collection and the index of the selected entry. This is the logical place for these functions since this presentation model has references to the data required to create new presentation models. For this reason, it is common for one presentation model to create another.
With this in mind, it is time to see how the View uses its presentation model. The source code for SongListView is shown in Listing 8–19.
Listing 8–19. The SongListView
<?xml version="1.0" encoding="utf-8"?>

<s:View xmlns:fx="http://ns.adobe.com/mxml/2009"

        xmlns:s="library://ns.adobe.com/flex/spark"

        initialize="onInitialize()"

        title="Music Player">


  <fx:Script>

    <![CDATA[

      import spark.events.IndexChangeEvent;

      import models.MusicEntry;

      import viewmodels.SongListViewModel;


      [Bindable]

      private var model:SongListViewModel;


      private function onInitialize():void {

        model = data as SongListViewModel;

      }


      private function onChange(event:IndexChangeEvent):void {

        var list:List = List(event.target);

        var selObj:MusicEntry = list.selectedItem as MusicEntry;


        if (selObj.isSong) {

          var index:int = list.selectedIndex;

          navigator.pushView(SongView, model.createSongViewModel(index));

        } else {

          navigator.pushView(SongListView, model.cloneModelForEntry(selObj));

        }

      }

    ]]>

  </fx:Script>


  <s:List width="100%" height="100%" change="onChange(event)"

          dataProvider="{model.entries}">

    <s:itemRenderer>

      <fx:Component>

        <s:IconItemRenderer labelField="name" decorator="{chevron}">

          <fx:Declarations>

            <s:MultiDPIBitmapSource id="chevron"

                                source160dpi="@Embed('assets/chevron160.png')"

                                source240dpi="@Embed('assets/chevron240.png')"

                                source320dpi="@Embed('assets/chevron320.png')"/>

          </fx:Declarations>

        </s:IconItemRenderer>

      </fx:Component>

    </s:itemRenderer>

  </s:List>

</s:View>
The onInitialize handler initializes the View’s model reference from the data property. The model is then used to access the entries that serve as the List’s dataProvider. It is also used in the List’s onChange handler. If the selected MusicEntry is a song, the model is used to create a new SongViewModel and the navigator.pushView function is used to display a SongView. Otherwise, a new SongListViewModel is created and a new SongListView is displayed using the selected MusicEntry as the path for the new collection of MusicEntry objects.
A custom IconItemRenderer is also declared for the List component. This was done in order to add a chevron to the item renderer to indicate that selecting an item leads to a new View. A MultiDPIBitmapSource was used to reference the three pre-scaled versions of the chevron image. Note that the chevron bitmap source must be contained inside the <fx:Declaration> tag that is a child element of the <s:IconItemRenderer> tag. The bitmap source will not be visible to the IconItemRenderer if it is declared as a child of the View’s <fx:Declaration> tag.
The chevron160.png file is the base size, while chevron240.png is 50% larger, and chevron320.png is twice as large. The optimal size of the chevron bitmap will be selected based on the screen properties of the device on which the program is run. Figure 8–6 shows the SongListView running on a low- and medium-dpi device. Note that the chevron has no pixilated artifacts from being scaled, as would be the case if we used the same bitmap on both screens.
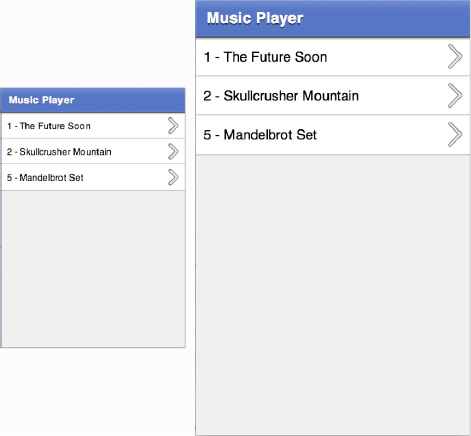
Figure 8–6. The SongListView running on devices with different dpi classifications
CAUTION: You can also use an FXG graphic as the icon or decorator of an IconItemRenderer by declaring it in the same way as the MultiDPIBitmapSource previously. Unfortunately, since the icon and decorator will be converted into a bitmap and then scaled, you will lose the benefits of using a vector graphic in the first place. For this reason, it is our recommendation that you use MultiDPIBitmapSource objects with your custom IconItemRenderers.
The SongView
That brings us to the real heart of the application: the view that lets users play music! We want this interface to have the same functionality as most other music players. We will display the song title and the album cover. It should have controls that allow the user to skip to the next or previous song, play and pause the current song, adjust the position of the current song as well as the volume and the panning (just for fun). The resulting interface is shown in Figure 8–7.
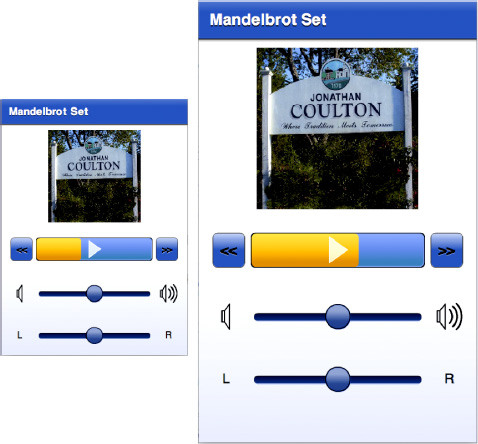
Figure 8–7. The SongView interface running at two different dpi settings
You can see from Figure 8–7 that this interface is a little more complicated than the list view. It even includes a custom control that serves not only as a play/pause button but also as a progress indicator for the play position of the current song. In addition, you can swipe your finger back and forth across the button to control the position of the song. Writing this custom control is just one of the topics that will be covered in this section.
Listing 8–20 shows part of the MXML file that defines this View. Since this is a larger interface declaration, we will break it down into smaller, more digestible pieces.
Listing 8–20. The States and the Script Sections of the SongView MXML File
<?xml version="1.0" encoding="utf-8"?>

<s:View xmlns:fx="http://ns.adobe.com/mxml/2009"

        xmlns:s="library://ns.adobe.com/flex/spark"

        xmlns:assets="assets.*"

        xmlns:views="views.*"

        initialize="onInitialize()"

        viewDeactivate="onViewDeactivate()"

        title="{model.songTitle}" >


  <s:states>

    <s:State name="portrait"/>

    <s:State name="landscape"/>

  </s:states>


  <fx:Script>

    <![CDATA[

      import viewmodels.SongViewModel;


      [Bindable]

      private var model:SongViewModel;


      private function onInitialize():void {

        model = data as SongViewModel;

        model.addEventListener(SongViewModel.SONG_ENDED, onSongEnded);

      }


      private function onViewDeactivate():void {

        model.removeEventListener(SongViewModel.SONG_ENDED, onSongEnded);

        if (model.isPlaying)

          model.onPlayPause();

      }


      private function onSongEnded(event:Event):void {

        progressButton.stop();

      }

    ]]>

  </fx:Script>

  <!-- UI components removed for now… -->

</s:View>
The <s:states> section of the file declares states for the portrait and landscape orientation of the interface. Remember from Chapter 2 that by explicitly declaring the names for these states in the View, Flex will set the state of our View appropriately when the orientation of the device changes. Having done this, you can take advantage of these state names to adjust the layout of your interface when the orientation changes.
As in the SongListView, the onInitialize handler initializes the presentation model reference from the data property. It also attaches a handler for the model’s SONG_ENDED event so the onSongEnded handler can adjust the interface appropriately when a song finishes playing. A handler for the View’s viewDeactivate event is also declared. This allows the View to stop the playback of the song when the user leaves the View.
We will now examine the UI components of this View one snippet at a time.
<s:Rect width="100%" height="100%">

  <s:fill>

    <s:LinearGradient rotation="90">

      <s:GradientEntry color="0xFFFFFF" ratio="0.40"/>

      <s:GradientEntry color="0xe2e5f4" ratio="1.00"/>

    </s:LinearGradient>

  </s:fill>

</s:Rect>
This first piece of MXML declares the background gradient that fades from white to a light blue at the bottom of the screen. The rectangle’s width and height are set to 100% so that it will automatically fill the screen no matter what orientation the device is in.
<s:Group width="100%" height="100%">

  <s:layout.landscape>

    <s:HorizontalLayout verticalAlign="middle" paddingLeft="10"/>

  </s:layout.landscape>

  <s:layout.portrait>

    <s:VerticalLayout horizontalAlign="center" paddingTop="10"/>

  </s:layout.portrait>
The foregoing snippet creates the Group that serves as the container for the rest of the interface. Once again, its width and height are set so that it always fills the screen. The Group uses a HorizontalLayout in landscape mode and a VerticalLayout in portrait mode. The state syntax ensures that the correct layout is used when the device is reoriented. Figure 8–8 shows the SongView interface on a device held in landscape orientation.

Figure 8–8. The music player interface in landscape orientation
The Group in the next bit of code is the container for the image of the album cover. The size of the Group is adjusted dynamically based on the orientation, but the width and height are always kept equal—it always forms a square.
<s:Group width.portrait="{height*0.4}" height.portrait="{height*0.4}"

         width.landscape="{width*0.4}" height.landscape="{width*0.4}">

  <s:BitmapImage id="albumCover" width="100%" height="100%"

                 source="{model.albumCover}"

                 visible="{model.albumCover != null}"/>


  <assets:DefaultAlbum id="placeHolder" width="100%" height="100%"

                       visible="{!model.albumCover}" />

</s:Group>
The source of the albumCover bitmap is bound to the model’s albumCover property. This bitmap is visible only if there actually is an albumCover image in the model. If there is not, a placeholder graphic is shown instead. The placeholder is an FXG image that is located in the application’s assets package. You can see that it is trivial to use FXG graphics in your MXML declarations. They also scale well for different screen densities since they are vector graphics.
After the album cover, we arrive at the VGroup that contains the controls for this View. This VGroup is actually made up of three separate HGroup containers. The first contains the previous song button, the custom ProgressButton control, and a next song button. The next HGroup container holds the horizontal volume slider, along with its FXG icons to indicate low and high volume levels on each side of the slider. The final HGroup contains the horizontal pan slider, along with Labels that show which direction is left and which is right. Note that the model’s volume, pan, and percentComplete properties are bound to the interface components with a two-way binding. This means that either side of the binding can set the value of the property and the other will be updated.
<s:VGroup id="controls" horizontalAlign="center" width="100%"
paddingTop="20" gap="40">
<s:HGroup width="90%">
<s:Button label="<<" height="40" click="model.previousSong()"/>
<views:ProgressButton id="progressButton" width="100%" height="40"
click="model.onPlayPause()"
percentComplete="@{model.percentComplete}"
skinClass="views.ProgressButtonSkin"/>
<s:Button label=">>" height="40" click="model.nextSong()"/>
</s:HGroup>
<s:HGroup verticalAlign="middle" width="90%">
<assets:VolLow id="volLow" width="32" height="32"/>
<s:HSlider width="100%" maximum="1.0" minimum="0.0" stepSize="0.01"
snapInterval="0.01" value="@{model.volume}" showDataTip="false"/>
<assets:VolHigh id="volHigh" width="32" height="32"/>
</s:HGroup>
<s:HGroup verticalAlign="middle" width="90%" >
<s:Label text="L" width="32" height="32" verticalAlign="middle"
textAlign="center"/>
<s:HSlider width="100%" maximum="1.0" minimum="-1.0" stepSize="0.01"
snapInterval="0.01" value="@{model.pan}" showDataTip="false"/>
<s:Label text="R" width="32" height="32" verticalAlign="middle"
textAlign="center"/>

      </s:HGroup>

    </s:VGroup>

  </s:Group>

</s:View>
Notice that there is virtually no logic in the View. It is all declarative presentation code, just as it should be. All of the hard work is delegated to the presentation model.
Unfortunately, the SongViewModel class is too large to list in its entirety, so we will limit ourselves to looking at only a few choice sections of the class. Remember that the basic functionality required to play a music file was already covered earlier in the chapter, and if you want to examine the complete source code of the class, you can refer to the MusicPlayer project included with the book’s example code. Listing 8–21 shows the declaration and the constructor for the SongViewModel class.
Listing 8–21. The Declaration of the SongViewModel Class
package viewmodels

{

  // import statements…


  [Event(name="songEnded", type="flash.events.Event")]


  [Bindable]

  public class SongViewModel extends EventDispatcher {

    public static const SONG_ENDED:String = "songEnded";


    public var albumCover:BitmapData;

    public var albumTitle:String = "";

    public var songTitle:String = "";

    public var artistName:String = "";

    public var isPlaying:Boolean = false;


    private var timer:Timer;


    public function SongViewModel(songList:ArrayCollection, index:Number) {

      this.songList = songList;

      this.currentIndex = index;


      timer = new Timer(500, 0);

      timer.addEventListener(TimerEvent.TIMER, onTimer);


      loadCurrentSong();

    }

  }

}
The class extends EventDispatcher so that it can notify any Views that might be listening when a song ends. The model dispatches the SONG_ENDED event when this happens. This model is also annotated with Bindable to ensure that Views can easily bind to properties such as the albumCover bitmap, the albumTitle, songTitle, artistName, and the isPlaying flag. The constructor takes a collection of MusicEntries and the index of the song from that collection that should be played. These parameters are saved into instance variables for later reference, as they are used when the user wants to skip to the previous or next song in the collection. The constructor also initializes a timer that goes off every 500 milliseconds. This timer reads the current position of the song and updates the class’s percentComplete variable. And lastly, the constructor causes the current song to be loaded. The next two sections present more details regarding the handling of percentComplete updates and the loadCurrentSong method.
Special Considerations for Two-Way Binding
When looking at the MXML declaration of SongView, we noted that two-way bindings were used with the model’s volume, pan, and percentComplete variables. This means that their values can be set from outside the model class. This extra bit of complexity requires some special handling in the model class. Listing 8–22 shows the code related to these properties in SongViewModel.
Listing 8–22. Handling Two-Way Binding in the Presentation Model
  private var _volume:Number = 0.5;

  private var _pan:Number = 0.0;

  private var _percentComplete:int = 0;


  public function get volume():Number {return _volume; }

  public function set volume(val:Number):void {

    _volume = val;

    updateChannelVolume();

  }


  public function get pan():Number {return _pan; }

  public function set pan(val:Number):void {

    _pan = val;

    updateChannelPan();

  }


  public function get percentComplete():int {return _percentComplete;}


  /**

   * Setting this value causes the song's play position to be updated.

   */

  public function set percentComplete(value:int):void {

    _percentComplete = clipToPercentageBounds(value)

    updateSongPosition();

  }


  /**

   * Clips the value to ensure it remains between 0 and 100 inclusive.

   */

  private function clipToPercentageBounds(value:int):int {

    return Math.max(0, Math.min(100, value));

  }


  /**

   * Set the position of the song based on the percentComplete value.

   */

  private function updateSongPosition():void {

    var newPos:Number = _percentComplete / 100.0 * song.length;

    if (isPlaying) {
pauseSong()

    playSong(newPos);

  } else {

    pausePosition = newPos;

  }

}
The public get and set functions of the volume, pan, and percentComplete properties ensure that they can be bound in the View. Simply declaring the variables as public will not work here since we need to do some extra work when they are set from outside the class. When the volume and pan properties are set, we only need to call functions that update the values in the SoundTransform, as was shown earlier in the chapter. Handling percentageComplete updates isa little more involved: we need to stop the song if it is playing and then restart it at its new position. We use the private pauseSong and playSong utility methods to handle the details. If the song is not currently playing, we only have to update the private pausePosition variable so that it begins at the updated location the next time the song begins playing.
That covers the handling of percentComplete updates from outside the class, but what about updates that come from within the class? Recall that there is a timer that reads the song’s position every half-second and then updates the value of percentComplete. In this case, we still need to notify the other side of the binding that the value of percentComplete has been changed, but we cannot use the set method to do so because we do not want to stop and restart the song every half-second. We need an alternative update path, as shown in Listing 8–23.
Listing 8–23. Updating percentComplete During Timer Ticks
/*

 * Update the song's percentComplete value on each timer tick.

 */

private function onTimer(event:TimerEvent):void {

  var oldValue:int = _percentComplete;


  var percent:Number = channel.position / song.length * 100;

  updatePercentComplete(Math.round(percent));

}


/**

 * Updates the value of _percentComplete without affecting the playback

 * of the current song (i.e. updateSongPosition is NOT called).  This

 * function will dispatch a property change event to inform any clients

 * that are bound to the percentComplete property of the update.

 */

private function updatePercentComplete(value:int):void {

  var oldValue:int = _percentComplete;

  _percentComplete = clipToPercentageBounds(value);


  var pce:Event = PropertyChangeEvent.createUpdateEvent(this,

        "percentComplete", oldValue, _percentComplete);

  dispatchEvent(pce);

}
The solution presented here is to update the value of _percentComplete directly and then manually dispatch the PropertyChangeEvent to inform the other side of the binding that the value has changed.
Integrating the Metaphile Library
It would be really nice to display the image of the album cover if one is embedded in the metadata of the MP3 file. However, the Flash’s ID3Info class does not support reading image metadata from sound files. Luckily, there is a vibrant development community that has grown around the Flex and Flash platforms over the years. This community has given birth to many third-party libraries that help fill in functionality missing from the platform. One such library is the open source Metaphilelibrary.5 This small but powerful ActionScript library provides the ability to read metadata—including images—from many popular file formats.
Using the library is as simple as downloading the latest code from the project’s web site, compiling it into an .swc file, and placing that file in your project’s libs directory. The library provides an ID3Reader class that can be used to read MP3 metadata entries, as shown in Listing 8–24. While the Sound class uses the URL provided by the current song’s MusicEntry instance, Metaphile’s ID3Reader class is set up to read its metadata. An onMetaData event handler is notified when the metadata has been parsed. The class’s autoLimit property is set to -1 so that there is no limit on the size of the metadata that can be parsed, and the autoClose property is set to true to ensure that the input stream will be closed once ID3Reader is finished reading the metadata. The final step is to call the read function of ID3Reader with the input stream created by accessing the MusicEntry’s stream property passed in as the parameter.
Listing 8–24. Loading an MP3 File and Reading Its Metadata
/**

 * Loads the song data for the entry in the songList indicated by

 * the value of currentSongIndex.

 */

private function loadCurrentSong():void {

  try {

    var songFile:MusicEntry = songList[currentIndex];


    song = new Sound(new URLRequest(songFile.url));


    var id3Reader:ID3Reader = new ID3Reader();

    id3Reader.onMetaData = onMetaData;

    id3Reader.autoLimit = -1;

    id3Reader.autoClose = true;


    id3Reader.read(songFile.stream);

  } catch (err:Error) {

    trace("Error while reading song or metadata: "+err.message);

  }
}


/**

 * Called when the song's metadata has been loaded by the Metaphile

 * library.

 */

private function onMetaData(metaData:IMetaData):void {

  var songFile:MusicEntry = songList[currentIndex];

  var id3:ID3Data = ID3Data(metaData);


  artistName = id3.performer ? id3.performer.text : "Unknown";

  albumTitle = id3.albumTitle ? id3.albumTitle.text : "Unknown";

  songTitle = id3.songTitle ? id3.songTitle.text : songFile.name;


  if (id3.image) {

    var loader:Loader = new Loader();

    loader.contentLoaderInfo.addEventListener(Event.COMPLETE,

                                              onLoadComplete)

    loader.loadBytes(id3.image);

  } else {

    albumCover = null;

  }

}


/**

 * Called when the album image is finished loading from the metadata.

 */

private function onLoadComplete(e:Event):void{

  albumCover = Bitmap(e.target.content).bitmapData

}
__________
The onMetaData handler is passed a parameter that conforms to the Metaphile library’s IMetaData interface. Since this handler is attached to an ID3Reader object, we know it is safe to cast the passed-in metaData object to an instance of an ID3Data object. Doing so gives us easy access to properties of the ID3Data class such as performer, albumTitle, and songTitle. If there is image data present in the image property of the ID3Data class, a new instance of flash.display.Loader is created to load the bytes into a DisplayObject. When the image bytes are loaded, the onLoadComplete handler uses the DisplayObject stored in the Loader’s content property to initialize the albumCover BitmapData object. Since the View is bound to the albumCover property, it will display the album cover image as soon as it is updated.
Creating a Custom Component
Creating custom mobile components is much like creating any other custom Spark component in Flex 4. You create a component class that extends SkinnableComponent and a Skin to go along with it. As long as your graphics are not too complex, you can use a regular MXML Skin. If you encounter performance problems, you may need to write your Skin in ActionScript instead. See Chapter 11 for more information about performance tuning your mobile application.
The custom component we will write is the ProgressButton. To save space in our user interface, we want to combine the functionality of the play/pause button with that of a progress monitor that indicates the current play position of the song. The control will also let the user adjust that playback position if desired. So if the user taps the control, we will treat it as a toggle of the button. If the user touches the control and then drags horizontally, it will be treated as a position adjustment.
The control will therefore have two graphical elements: an icon that indicates the state of the play/pause functionality and a progress bar that shows the playback position of the song. Figure 8–9 shows the control in its various states.
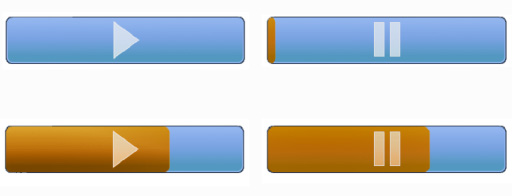
Figure 8–9. The custom ProgressButton control
When creating custom Spark controls, you can think of the Skin as your View and the SkinnableComponent as your model. Listing 8–25 shows the ProgressButton class, which extends SkinnableComponent and therefore acts as the control’s model.
Listing 8–25. The Declaration of the Component Portion of the ProgressButton
package views

{

  // imports removed…


  [SkinState("pause")]

  public class ProgressButton extends SkinnableComponent

  {

    [SkinPart(required="true")]

    public var playIcon:DisplayObject;


    [SkinPart(required="true")]

    public var pauseIcon:DisplayObject;


    [SkinPart(required="true")]

    public var background:Group;


    [Bindable]

    public var percentComplete:Number = 0;


    private var mouseDownTime:Number;

    private var isMouseDown:Boolean;


    public function ProgressButton() {
// Make sure the mouse doesn't interact with any of the skin parts

      mouseChildren = false;


      addEventListener(MouseEvent.MOUSE_DOWN, onMouseDown);

      addEventListener(MouseEvent.MOUSE_MOVE, onMouseMove);

      addEventListener(MouseEvent.MOUSE_UP, onMouseUp);

      addEventListener(MouseEvent.CLICK, onMouseClick);

    }


    override protected function getCurrentSkinState():String {

      if (isPlaying()) {

        return "play";

      } else {

        return "pause";

      }

    }


    override protected function partAdded(partName:String, instance:Object):void {

      super.partAdded(partName, instance);


      if (instance == pauseIcon) {

        pauseIcon.visible = false;

      }

    }


    override protected function partRemoved(partName:String, instance:Object):void {

      super.partRemoved(partName, instance);

    }


    // Consult Listing 8–26 for the rest of this class

  }

}
The component has two states that every Skin must support: play and pause. The component class is annotated with SkinState(“pause”) to set the default state of its Skin to the pause state. Although a Skin may declare as many parts as needed, the component requires every Skin to define at least the playIcon, the pauseIcon, and a background. The final component of the interface contract between the component and the Skin is the bindable percentComplete property that the Skin uses to draw the progress bar. The component’s constructor disables mouse interaction with any child components contained in the Skin and attaches listeners for the mouse events that it needs to handle.
There are three methods that most components will need to implement to ensure correct behavior of the custom control: getCurrentSkinState, partAdded, and partRemoved. The Skin calls the getCurrentSkinState function when it needs to update its display. The ProgressButton component overrides this function to return the state name based on the current value of the isPlaying flag. The partAdded and partRemoved functions give the component the chance to perform initialization and cleanup tasks when Skin parts are added and removed. In this case, both of these functions make sure to call their corresponding functions in the super class, and the only specialization done for ProgressButton is to make sure the pauseIcon is invisible when it is added.
Listing 8–26 shows the remainder of the functions defined in the ProgressButton class. It shows the functions that make up the rest of the class’s public interface, its mouse event handlers, and its private utility functions. SongView, for instance, calls the stop functionwhen it has been notified that the current song has finished playing.
Listing 8–26. The Remaining Functionality of the ProgressButton Component Class
/**

 * If in "play" state, stops the progress and changes the control's

 * state from "play" to "pause".

 */

public function stop():void {

  if (isPlaying()) {

    togglePlayPause();

  }

}


/**

 * @return True if the control is in "play" state.

 */

public function isPlaying():Boolean {

  return pauseIcon && pauseIcon.visible;

}


private function onMouseDown(event:MouseEvent):void {

  mouseDownTime = getTimer();

  isMouseDown = true;

}


private function onMouseMove(event:MouseEvent):void {

  if (isMouseDown && getTimer() - mouseDownTime > 250) {

    percentComplete = event.localX / width * 100;

  }

}


private function onMouseUp(event:MouseEvent):void {

  isMouseDown = false;

}


private function onMouseClick(event:MouseEvent):void {

  if (getTimer() - mouseDownTime < 250) {

    togglePlayPause();

  } else {

    event.stopImmediatePropagation();

  }

}


private function togglePlayPause():void {

  if (playIcon.visible) {

    playIcon.visible = false;

    pauseIcon.visible = true;

  } else {

    playIcon.visible = true;

    pauseIcon.visible = false;

  }

}
The MouseEvent handlers take care of distinguishing a tap from a drag gesture. If the control is pressed for less than 250 milliseconds, the gesture will be interpreted as a button press and no dragging will occur. Any touch that lasts longer than 250 milliseconds will be interpreted as a drag rather than a touch and the value of the percentComplete value will be adjusted according to the location of the mouse relative to the origin of the control. The togglePlayPause function is used by some of the other functions in the class to toggle the visibility of the icons, which then determines the state of the control.
The last step in creating a custom control is to define a Skin class. This is simply a matter of creating a new MXML Skin component. The Skin used for the ProgressButton in the MusicPlayer application is shown in Listing 8–27. Every Skin must include a metadata tag that specifies the HostComponent for which the Skin was designed. A reference to the HostComponent specified in the metadata tag is available to the Skin via its hostComponent property. Another requirement is that the Skin must declare all of the states in which it is interested. Further, the names of the states must correspond to those defined by the host component for the Skin to function correctly.
Listing 8–27. The ProgressButtonSkin Declaration
<?xml version="1.0" encoding="utf-8"?>

<s:Skin xmlns:fx="http://ns.adobe.com/mxml/2009"

        xmlns:s="library://ns.adobe.com/flex/spark"

        xmlns:assets="assets.*"

        minWidth="20" minHeight="20">


  <fx:Metadata>

    [HostComponent("views.ProgressButton")]

  </fx:Metadata>


  <s:states>

    <s:State name="play"/>

    <s:State name="pause"/>

  </s:states>


  <s:Group id="background" width="{hostComponent.width}"

           height="{hostComponent.height}">


    <s:Rect top="0" right="0" bottom="0" left="0" radiusX="5" radiusY="5">

      <s:fill>

        <s:SolidColor color="0x1A253C" />

      </s:fill>

    </s:Rect>


    <s:Rect top="1" right="1" bottom="1" left="1" radiusX="5" radiusY="5">

      <s:fill>

        <s:LinearGradient rotation="90">

          <s:GradientEntry color="0xa0b8f0" ratio="0.00"/>

          <s:GradientEntry color="0x81A1E0" ratio="0.48"/>

          <s:GradientEntry color="0x6098c0" ratio="0.85"/>

        </s:LinearGradient>

      </s:fill>

    </s:Rect>


    <s:Rect  top="1" bottom="1" left="1" right="1" radiusX="5" radiusY="5">
<s:stroke>

        <s:SolidColorStroke color="0xa0b8f0" weight="1"/>

      </s:stroke>

    </s:Rect>


    <s:Rect radiusX="5" radiusY="5" top="1" bottom="1" x="1"

          width="{(hostComponent.width-2)*hostComponent.percentComplete/100.0}">

      <s:fill>

        <s:LinearGradient rotation="90">

          <s:GradientEntry color="0xFFE080" ratio="0.00"/>

          <s:GradientEntry color="0xFFc860" ratio="0.48"/>

          <s:GradientEntry color="0xE0a020" ratio="0.85"/>

        </s:LinearGradient>

      </s:fill>

    </s:Rect>


    <assets:Play id="playIcon" verticalCenter="0" horizontalCenter="0"

                    width="{hostComponent.height-4}"

                    height="{hostComponent.height-4}"/>

    <assets:Pause id="pauseIcon" verticalCenter="0" horizontalCenter="0"

                   width="{hostComponent.height-4}"

                   height="{hostComponent.height-4}"/>


  </s:Group>

</s:Skin>
The background Group serves as a container for the rest of the graphics of the Skin. It is bound to the width and height of the hostComponent. The next three rectangles declared by the Skin serve as the borders and background fill of the component. The fourth rectangle draws the progress bar. Its width is based on a calculation involving the width of the hostComponent and its percentComplete property. It is declared after the three background and border rectangles so that it will be drawn on top of them. The final parts to be added to the Skin are the FXG graphics for the playIcon and the pauseIcon. FXG files are just as easy to use in Skin classes as they are in any other MXML file. FXG files are compiled to an optimized format and drawn as vector graphics. For this reason, they not only are fast to render but also scale nicely. You don’t have to worry about them looking bad at different resolutions and screen densities (except when used in IconItemRenderers, as noted previously!).
That concludes our look at playing sound in Flash and at creating a MusicPlayer that goes somewhat beyond a trivial example application by exploring the issues that you will have to deal with when writing real Android applications. For the rest of this chapter, we will be exploring video playback, a feature that made Flash into a household word.
Playing Video
Some recent estimates have Flash responsible for as much as 75% of the Web's video.6 Whether video is in the On2 VP6 format or in the widely used H.264 format, rest assured that it can be played in your mobile Flash and Flex applications. There are, however, some things that must be taken into account when dealing with mobile devices. Although mobile devices are growing in CPU and graphical power at an incredible rate, they are still much slower than an average desktop or notebook computer. Recent high-end mobile devices have support for hardware-accelerated decoding and rendering of H.264 video, but many do not. And new features in Flash, like Stage Video, which gives your Flash applications access to hardware-accelerated video rendering on the desktop and TV, are not yet available on Android devices—although it is only a matter of time. Until then, you must make some compromises when playing video on mobile devices. This starts with encoding, which is where our examination of mobile Flash video will begin.
Optimizing Video for Mobile Devices
Video encoding is half science and half black art. There are some great resourcesavailable that explore the topic in all of its glorious detail.7 Therefore we will only summarize some of the recent recommended best practices, while advising that you examine the sources cited in the footnotes of this page for an in-depth treatment of the subject. The main things to keep in mind when you are encoding video for mobile devices are that you are dealing with more limited hardware and you will have to cope with bandwidth that fluctuates between 3G, 4G, and Wi-Fi networks.
Adobe recommends that when encoding new video, you prefer the H.264 format at a maximum frame rate of 24 fps (frames per second) and with 44.1 kHz AAC-encoded stereo audio. If you must use the On2 VP6 format, then the same recommendation applies to frame rate and audio sampling, only with audio in MP3 format rather than AAC. If you are encoding with H.264, you will want to stick with the baseline profile if you want good performance across the greatest number of devices. If your source footage is at a frame rate that is higher than 24, you may want to consider halving it until you are below that target. For example, if your footage is at 30 fps, then you will get the best results by encoding it at 15 fps since the encoder won't have to interpolate any of the video data.
__________
6Adobe, Inc., “Delivering video for Flash Player 10.1 on mobile devices,” www.adobe.com/devnet/devices/articles/delivering_video_fp10-1.html, February 15, 2010
7Adobe, Inc., “Video encoding guidelines for Android mobile devices,” www.adobe.com/devnet/devices/articles/encoding-guidelines-android.html, December 22, 2010
Table 8–2 shows encoding recommendations gathered from recent publications from Adobe and conference sessions at Adobe Max and 360|Flex. All of these numbers assume H.264 encoding in the baseline profile. Keep in mind that these are only recommendations—they change rapidly as faster hardware becomes available, and they may not apply to your specific situation. Also, these recommendations are targeting the largest number of devices possible. If your application is specifically targeted at high-end devices running the latest versions of Android, then these numbers may be a little too conservative for your needs.
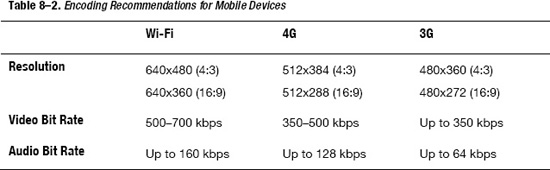
There are also several steps you can take in your application to ensure that you are getting the best performance. You should avoid the use of transforms: rotation, perspective projections, and color transforms. Avoid drop shadows, filter effects, and Pixel Bender effects. And you should avoid transparency and blending the video object with other graphics as much as possible.
It is also best to try to avoid excessive ActionScript processing. For example, if you have a timer that is updating your playhead, do not have it updating multiple times per second if it's really not necessary that it do so. The goal is to always dedicate as much processing time as possible to rendering and minimize the amount needed for program logic while playing video. For this same reason, you should also try to avoid stretching or compressing the video if at all possible. It is a better idea to use the Capabilities class, or the size of your View, to determine the size of your display area and then select the closest match. That assumes you have multiple formats of the video to choose from. If you do not, then it is best to include options in your application that will let the user determine whether to play the video at its natural resolution or to stretch it to fill the screen (and remember that with video, you nearly always want to maintain aspect ratio when stretching).
Spark VideoPlayer
The topic of playing video is too large to fit in one section, or even one chapter, of a book. We will not go into installing or connecting to a streaming server such as the Red5 Media Server or Adobe's Flash Media Server. We will not cover topics such as DRM (digital rights management)8 or CDNs (content delivery networks). Instead, we will cover the basic options for playing video in your applications. All of these options will work with either progressive downloads or with streaming servers. It is our intention to get you started in the right direction so that you know where to begin. If you then need more advanced features such as those mentioned previously, Adobe's documentation is more than adequate.
The first option we will look at is the Spark VideoPlayer component that was introduced with Flex 4. This component is built on top of the Open Source Media Framework (OSMF), a library designed to handle all of the “behind the scenes” tasks required by a full-featured video player. The idea is that you write your cool video player GUI, wire it to the functionality provided by OSMF, and you are ready to go. We'll look at OSMF in more depth later in the chapter.
So the Spark VideoPlayer, then, is a pre-packaged video player UI built on top of the pre-packaged OSMF library. It is the ultimate in convenience (and laziness) since you can add video playback functionality to your app with just a few lines of code. Listing 8–28 shows how to instantiate a VideoPlayer in a View MXML file.
Listing 8–28. Using the Spark VideoPlayer in a Mobile Application
<?xml version="1.0" encoding="utf-8"?>

<s:View xmlns:fx="http://ns.adobe.com/mxml/2009"

        xmlns:s="library://ns.adobe.com/flex/spark"

        viewDeactivate="onViewDeactivate()"

        actionBarVisible="false">


  <fx:Script/>

    <![CDATA[

      privatestaticconst sourceURL:String = "http://ia600408.us.archive.org"+

          "/26/items/BigBuckBunny_328/BigBuckBunny_512kb.mp4";


      private function onViewDeactivate():void {

        player.stop();

      }

    ]]>

  </fx:Script>


  <s:VideoPlayer id="player" width="100%" height="100%" source="{sourceURL}"

                 skinClass="views.MobileVideoPlayerSkin"/>

</s:View>
This application is set to full screen, and the View's ActionBar has been disabled to allow the VideoPlayer to take up the entire screen of the device. All the component needs is a source URL, and it will automatically begin playback as soon as sufficient data has been buffered. It truly does not get any easier. We did take care to stop the playback when the View is deactivated. It's a small thing, but there is no reason to continue buffering and playing any longer than is strictly necessary.
__________
If you use Flash Builder or consult the docs for the VideoPlayer class, you may see an ominous warning about VideoPlayer not being “optimized for mobile,” but it turns out that in this case what they really mean is “warning: no mobile skin defined yet!” You can use VideoPlayer as is, but when you run your app on a medium- or high-dpi device, the video controls will be teeny tiny (yes, that's the technical term) and hard to use. The solution is to do what we've done in this example and create your own MobileVideoPlayerSkin.
In this case, we have just used Flash Builder to create a new Skin based on the original VideoPlayerSkin and then modified it a little. We removed the drop shadow, scaled the controls a bit, and adjusted the spacing. The modified Skin can be found in the VideoPlayers sample project located in the examples/chapter-08 directory of the book's source code. The result can be seen in Figure 8–10, where we are playing that famous workhorse of example video clips: Big Buck Bunny. These images were taken from a Nexus S where the controls are now large enough to be useable.
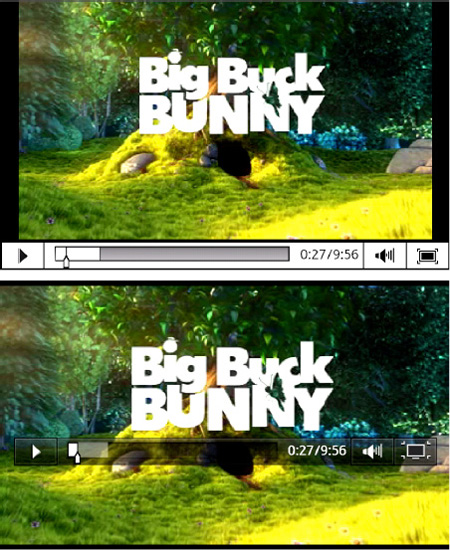
Figure 8–10. The Spark VideoPlayer running on a Nexus S in regular (top) and full-screen (bottom) modes
This was just a quick modification of the current VideoPlayerSkin, but of course you can get as fancy with your new mobile Skin as you want thanks to the skinning architecture of the Spark components introduced in Flex 4. Just remember some of the performance constraints you will face in a mobile environment.
Video with NetStream
Having a convenient, pre-packaged solution such as VideoPlayer is nice, but there are times when you really need something that is customized. Or perhaps you don't want all of the baggage that comes with an “everything's included” library like OSMF. That's where the NetConnection, NetStream, and Video classes come in. These classes allow you to build a lightweight or full-featured and fully customized video player.
In short, NetConnection handles the networking; NetStream provides the programmatic interface that controls the streaming, buffering, and playback of the video; and Video provides the display object where the decoded video ultimately appears. In this scenario, you are the one responsible for supplying the user interface for the video player. Listing 8–29 shows a very minimalistic MXML declaration for a NetStream-based video player.
Listing 8–29. The MXML File for the NetStreamVideoView
<?xml version="1.0" encoding="utf-8"?>

<s:View xmlns:fx="http://ns.adobe.com/mxml/2009"

        xmlns:s="library://ns.adobe.com/flex/spark"

        xmlns:mx="library://ns.adobe.com/flex/mx"

        initialize="onInitialize()"

        viewDeactivate="onViewDeactivate()"

        actionBarVisible="false"

        backgroundColor="black">


  <fx:Script source="NetStreamVideoViewScript.as"/>


  <mx:UIComponent id="videoContainer" width="100%" height="100%"/>


  <s:Label id="logger" width="100%" color="gray"/>


  <s:HGroup bottom="2" left="30" right="30" height="36" verticalAlign="middle">

    <s:ToggleButton id="playBtn" click="onPlayPause()" selected="true"

      skinClass="spark.skins.spark.mediaClasses.normal.PlayPauseButtonSkin"/>

    <s:Label id="timeDisplay" color="gray" width="100%" textAlign="right"/>

  </s:HGroup>

</s:View>
We have declared a UIComponent that serves as the eventual container for the Video display object. Other than that, there are just two other visible controls. The first is a ToggleButton that “borrows” the PlayPauseButtonSkin from the Spark VideoPlayer component (OK, we admit it, we flat-out stole the Skin and we're not even a little bit sorry). This gives us an easy way to display a button with the traditional triangle play icon and the double-bar pause icon. The other control is simply a Label that will display the duration of the video clip and the current play position.
There are various ActionScript functions mentioned in the MXML declaration as event handlers for the View's initialize and viewDeactivate events as well as for the Button's click event. The ActionScript code has been moved to a separate file and included with a <fx:Script> tag. Listing 8–30 shows the code for the View's onInitialize and onViewDeactivate handlers.
Listing 8–30. The View Event Handlers for the NetStreamVideoView
private static const SOURCE:String = "http://ia600408.us.archive.org/"+

  "26/items/BigBuckBunny_328/BigBuckBunny_512kb.mp4";


private var video:Video;

private var ns:NetStream;

private var isPlaying:Boolean;

private var timer:Timer;

private var duration:String = "";


private function onInitialize():void {

  video = new Video();

  videoContainer.addChild(video);


  var nc:NetConnection = new NetConnection();

  nc.connect(null);


  ns = new NetStream(nc);

  ns.addEventListener(NetStatusEvent.NET_STATUS, onNetStatus);

  ns.client = {

    onMetaData: onMetaData,

    onCuePoint: onCuePoint,

    onPlayStatus: onPlayStatus

  };


  ns.play(SOURCE);

  video.attachNetStream(ns);


  timer = new Timer(1000);

  timer.addEventListener(TimerEvent.TIMER, onTimer);

  timer.start();

}


private function onViewDeactivate():void {

  if (ns) {

    ns.close();

  }

}
The onInitialize handler takes care of all of the setup code. The Video display object is created and added to its UIComponent container. Next, a NetConnection is created, and its connect method is called with a null value. This tells the NetConnection that it will be playing an MP3 or video file from the local filesystem or from a web server. NetConnection can also be used for Flash Remoting or to connect to Flash Media Servers if different parameters are passed to its connect method.
The next step is to create the NetStream object by passing it a reference to the NetConnection in its constructor. There are several events that you may be interested in receiving from the NetStream object depending on the sophistication of your player. The NET_STATUS event will give you notifications about buffer status, playback status, and error conditions. There are also metaData, cuePoint, and playStatus events that are attached to the NetStream's client property. The client is just an Object that defines certain properties; it doesn't have to be of any particular type. In the foregoing listing, we just used an object literal to declare an anonymous object with the desired properties.
The metaData event will give you important information such as the width, height, and duration of the video. The cuePoint event will notify you whenever a cue point that was embedded in the video has been reached. Handling the playStatus will even let you know when the video has reached its end. These event handlers are shown in Listing 8–31.
The final steps are to begin playing the NetStream, attach it to the Video display object, and to create and start the timer that will update the time display once per second.
Listing 8–31. The NetStream Event Handlers
private function onMetaData(item:Object):void {

  video.width = item.width;

  video.height = item.height;


  video.x = (width - video.width) / 2;

  video.y = (height - video.height) / 2;


  if (item.duration)

    duration = formatSeconds(item.duration);

}


private function onCuePoint(item:Object):void {

  // Item has four properties: name, time, parameters, type

  log("cue point "+item.name+" reached");

}


private function onPlayStatus(item:Object):void {

  if (item.code == "NetStream.Play.Complete") {

    timer.stop();

    updateTimeDisplay(duration);

  }

}


private function onNetStatus(event:NetStatusEvent):void {

  var msg:String = "";


  if (event.info.code)

    msg += event.info.code;


  if (event.info.level)

    msg += ", level: "+event.info.level;


  log(msg);

}


private function log(msg:String, showUser:Boolean=true):void {

  trace(msg);

  if (showUser)

    logger.text += msg + "
";

}
The onMetaData handler uses the width and height of the video to center it in the View. It also saves the duration of the video to be used in the time display Label. In the onPlayStatus handler, we check to see if this is a NetStream.Play.Complete notification and, if so, stop the timer that has been updating the time display. The onCuePoint and onNetStatus handlers are there only for demonstration purposes, and their output is simply logged to the debug console and optionally to the screen.
Listing 8–32 shows the remaining code associated with the NetStreamVideoView. The onPlayPause function serves as the ToggleButton's click handler. Depending on the selected state of the ToggleButton, it will either pause or resume the NetStream and start or stop the timer that updates the timeDisplayLabel. The onTimer function is the handler for that Timer. It will use the NetStream's time property, formatted as a minutes:seconds string, to update the Label.
Listing 8–32. Playing, Pausing, and Reading Properties from the NetStream
private function onPlayPause():void {

  if (playBtn.selected) {

    ns.resume();

    timer.start();

  } else {

    ns.pause();

    timer.stop();

  }

}


private function onTimer(event:TimerEvent):void {

  updateTimeDisplay(formatSeconds(ns.time));

}


private function updateTimeDisplay(time:String):void {

  if (duration)

    time += " / "+duration;


  timeDisplay.text = time;

}


private function formatSeconds(time:Number):String {

  var minutes:int = time / 60;

  var seconds:int = int(time) % 60;


  return String(minutes+":"+(seconds<10 ? "0" : "")+seconds);

}
Figure 8–11 shows the result of all of this code running on a low-dpi Android device. A minimal player such as this one is more appropriate for this type of screen.
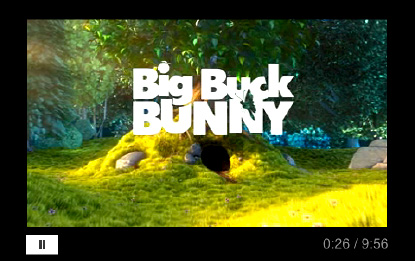
Figure 8–11. A minimal NetStream-based video player running on a low-dpi device
As you can see, there was a lot more code involved in creating our minimalistic NetStream-based video player. But if you need ultimate flexibility in a lightweight video player implementation, the combination of the NetStream and Video classes will provide all of the power you need.
We mentioned Stage Video briefly at the beginning of this section on playing video. Once supported on Android, it will allow your NetStream-based video players to take advantage of hardware-accelerated decoding and rendering of H.264 video. Adobe provides a very helpful “getting started” guideto help you convert your NetStream code to use StageVideo rather than the Video display object.9 If you prefer to future-proof yourself with very little effort, you can take advantage of the third option for writing a video player on Android: the OSMF library. It is the subject of our next section, and it will automatically take advantage of StageVideo when it becomes available on Android.
Playing Video with OSMF
The Open Source Media Framework is a project started by Adobe to create a library that captures best practices when it comes to writing Flash-based media players. It is a full-featured media player abstracted into a handful of easy-to-use classes. The library allows you to quickly create high-quality video players for use in your Flex and Flash applications. OSMF is included with the Flex 4 SDK, but you can also download the latest version from the project's web site.10 Listing 8–33 shows the MXML code for the OSMFVideoView. The user interface code shown here is almost exactly the same as the code in Listing 8–29 for the NetStreamVideoView. In essence we're just replacing the NetStream-based back end with an OSMF-based MediaPlayer implementation.
__________
9Adobe, Inc., “Getting started with stage video,” www.adobe.com/devnet/flashplayer/articles/stage_video.html, February 8, 2011
Listing 8–33. The MXML Declaration for the OSMFVideoView
<?xml version="1.0" encoding="utf-8"?>

<s:View xmlns:fx="http://ns.adobe.com/mxml/2009"

        xmlns:s="library://ns.adobe.com/flex/spark"

        xmlns:mx="library://ns.adobe.com/flex/mx"

        initialize="onInitialize()"

        viewDeactivate="onViewDeactivate()"

        actionBarVisible="false"

        backgroundColor="black">


  <fx:Script source="OSMFVideoViewScript.as"/>


  <mx:UIComponent id="videoContainer" width="100%" height="100%"/>

  <s:HGroup bottom="2" left="30" right="30" height="36" verticalAlign="middle">

    <s:ToggleButton id="playBtn" click="onPlayPause()" selected="true"


skinClass="spark.skins.spark.mediaClasses.normal.PlayPauseButtonSkin"/>

    <s:Label id="timeDisplay" color="gray" width="100%" textAlign="right"/>

  </s:HGroup>

</s:View>
Listing 8–34 shows the initialization code for the OSMF classes that will be used to implement the video player. We pass an instance of URLResource that contains the URL of our movie to the LightweightVideoElement constructor. An OSMF MediaElement is an interface to the type of media being played. LightweightVideoElement is a specialization that represents a video and supports both progressive download and simple RTMP streaming. There is also a class named VideoElement that supports more streaming protocols, but for our purposes the LightweightVideoElement has all of the functionality that is required.
Once the LightweightVideoElement is created, it is passed to the constructor of the OSMF MediaPlayer class. MediaPlayer is the class through which you will control the playback of the video. It is capable of dispatching many different events that can be used to get information about the state and status of the MediaPlayer. In the example code shown next, we handle the mediaSizeChange event to center the video display on the View, the timeChange and durationChange events to update the timeDisplayLabel, and the complete event to inform us when the video has finished playing.
The MediaPlayer is not a display object itself. Instead it provides a displayObject property that can be added to the display list. In this case, it is being added as a child of the videoContainerUIComponent. The final bit of initialization we do is to use the currentTimeUpdateInterval propertyto request that we be given updates on the currentTime of the video player only once per second instead of the default value of every 250 milliseconds. The video will begin playing automatically since the default value of the MediaPlayer's autoPlay property is true.
Listing 8–34. Initialization Code for the OSMF-Based MediaPlayer
import org.osmf.elements.VideoElement;

import org.osmf.events.DisplayObjectEvent;

import org.osmf.events.MediaElementEvent;

import org.osmf.events.TimeEvent;

import org.osmf.media.MediaPlayer;

import org.osmf.media.URLResource;

import org.osmf.net.NetLoader;


privatestaticconst sourceURL:String = "http://ia600408.us.archive.org"+

  "/26/items/BigBuckBunny_328/BigBuckBunny_512kb.mp4";


privatevar player:MediaPlayer;

privatevar duration:String;


privatefunction onInitialize():void {

  var element:LightweightVideoElement;

  element = new LightweightVideoElement(new URLResource(sourceURL));


  player = new MediaPlayer(element);

  videoContainer.addChild(player.displayObject);


  player.addEventListener(DisplayObjectEvent.MEDIA_SIZE_CHANGE, onSize);

  player.addEventListener(TimeEvent.CURRENT_TIME_CHANGE, onTimeChange);

  player.addEventListener(TimeEvent.DURATION_CHANGE, onDurationChange);

  player.addEventListener(TimeEvent.COMPLETE, onVideoComplete);

  player.currentTimeUpdateInterval = 1000;

}


privatefunction onViewDeactivate():void {

  if (player)

    player.stop();

}


privatefunction onPlayPause():void {

  if (player.playing) {

    player.play();

  } else {

    player.pause();

  }

}
In the onViewDeactivate handler just shown, we make sure to stop the player when the View is deactivated. You can also see the click handler for the play/pause ToggleButton. It simply calls the MediaPlayer's play and pause methods, depending on whether the player is currently playing.
Listing 8–35 continues the listing of the script code for the OSMFVideoView by showing the MediaPlayer event handlers. The onSize handler is called whenever the media changes size. We use this handler to center the MediaPlayer's displayObject on the View. The onDurationChange handler is called when the player learns the total duration of the video being played. We use this handler to store the duration as a formatted string that is later used by the timeDisplayLabel. The onTimeChange handler is called once per second—as we requested during initialization—so we can update the timeDisplayLabel. And finally, onVideoComplete is included for demonstration purposes. Our implementation just prints a message to the debug console.
Listing 8–35. The OSMF Event Handlers
privatefunction onSize(event:DisplayObjectEvent):void {

  player.displayObject.x = (width - event.newWidth) / 2;

  player.displayObject.y = (height - event.newHeight) / 2;

}


privatefunction onDurationChange(event:TimeEvent):void {

  duration = formatSeconds(player.duration);

}


privatefunction onTimeChange(event:TimeEvent):void {

  updateTimeDisplay(formatSeconds(player.currentTime));

}


privatefunction onVideoComplete(event:TimeEvent):void{

  trace("The video played all the way through!");

}


privatefunction updateTimeDisplay(time:String):void {

  if (duration)

    time += " / "+ duration;


  timeDisplay.text = time;

}


privatefunction formatSeconds(time:Number):String {

  var minutes:int = time / 60;

  var seconds:int = int(time) % 60;


  return String(minutes+":"+(seconds<10 ? "0" : "")+seconds);

}
With OSMF, you get all the functionality with less code when compared with rolling your own NetStream-based video player. You also get the benefit of leveraging code written by video experts. If you need all of the functionality it provides, you can't go wrong by building your video player on top of OSMF. When run, this OSMF-based video player looks and behaves exactly like the one shown in Figure 8–11.
VideoRecorder Example
The final example of this chapter will be the video analog of the SoundRecorder that was presented earlier. The VideoRecorder application will use the Android camera interface to capture a video file and then allow the user to immediately play it back in the Flex application. The source code for this example can be found in the VideoRecorder sample application located in the examples/chapter-08 directory of the book's source code.
You may recall from Chapter 7 that the CameraUI class can be used for capturing video and images using the native Android camera interface.
This example will use an OSMF MediaPlayer to play the captured video. Listing 8–36 shows the initialization code for the CameraUI class and the MediaPlayer classes.
Listing 8–36. Initializing the CameraUI and MediaPlayer Classes
import flash.media.CameraUI;

import org.osmf.elements.VideoElement;

import org.osmf.events.DisplayObjectEvent;

import org.osmf.events.MediaElementEvent;

import org.osmf.events.TimeEvent;

import org.osmf.media.MediaPlayer;

import org.osmf.media.URLResource;

import org.osmf.net.NetLoader;


privatevar cameraUI:CameraUI;

privatevar player:MediaPlayer;

privatevar duration:String;


privatefunction onInitialize():void {

  if (CameraUI.isSupported) {

    cameraUI = new CameraUI();

    cameraUI.addEventListener(MediaEvent.COMPLETE, onCaptureComplete);


    player = new MediaPlayer();


    player.addEventListener(DisplayObjectEvent.MEDIA_SIZE_CHANGE, onSize);

    player.addEventListener(TimeEvent.CURRENT_TIME_CHANGE, onTimeChange);

    player.addEventListener(TimeEvent.DURATION_CHANGE, onDurationChange);

    player.addEventListener(TimeEvent.COMPLETE, onVideoComplete);


    player.currentTimeUpdateInterval = 1000;

    player.autoPlay = false;

  }


  captureButton.visible = CameraUI.isSupported;

}
As always, we check to ensure that the CameraUI class is supported on the device. If so, a new CameraUI instance is created and a handler for its complete event is added. You learned in Chapter 7 that the CameraUI triggers this event when the image or video capture is successfully completed. Next we create our MediaPlayer and attach the usual event listeners. Note that the autoPlay property is set to false since we will want to start playback manually in this application.
Listing 8–37 shows the code that initiates the video capture with the native Android interface, as well as the handler that gets notified when the capture is completed successfully.
Listing 8–37. Starting and Completing the Video Capture
privatefunction onCaptureImage():void {

  cameraUI.launch(MediaType.VIDEO);

}


privatefunction onCaptureComplete(event:MediaEvent):void {

  player.media = new VideoElement(new URLResource(event.data.file.url));

  player.play();

  playBtn.selected = true;

  playBtn.visible = true;


  if (videoContainer.numChildren > 0)

    videoContainer.removeChildAt(0);


  videoContainer.addChild(player.displayObject);

}
When the user taps the button to start the capture, the onCaptureImage handler launches the native camera UI to capture a video file. If successful, the onCaptureComplete handler receives an event containing the MediaPromise as its data property. The MediaPromise contains a reference to the file in which the captured video was stored. We can use the file's URL to initialize a new VideoElement and assign it to the MediaPlayer's media property. Then we can start the video playing and adjust the properties of the playBtn to be consistent with the state of the application. If the videoContainer already has a displayObject added to it, we remove it and then add the player's new displayObject.
Most of the event handling code is the same as the OSMFVideoView code that was presented in the last section. There are two differences that are shown in Listing 8–38.
Listing 8–38. A Slightly Different Take on the MediaPlayer Event Handling
privatefunction onSize(event:DisplayObjectEvent):void {

  if (player.displayObject == null)

    return;


  var scaleX:int = Math.floor(width / event.newWidth);

  var scaleY:int = Math.floor(height / event.newHeight);

  var scale:Number = Math.min(scaleX, scaleY);


  player.displayObject.width = event.newWidth * scale;

  player.displayObject.height = event.newHeight * scale;


  player.displayObject.x = (width - player.displayObject.width) / 2;

  player.displayObject.y = (height - player.displayObject.height) / 2;

}


privatefunction onVideoComplete(event:TimeEvent):void{

  player.seek(0);

  playBtn.selected = false;

}
In this case, the onSize handler will try to scale the video size to be a closer match to the size of the display. Note the check to see if the player.displayObject is null. This can happen when switching from one captured video to the next. So we have to take care not to attempt to scale the displayObject when it doesn't exist. The other difference is in the onVideoComplete handler. Since users may want to watch their captured video clips multiple times, we reset the video stream by repositioning the playhead back to the beginning and resetting the state of the play/pause button. Figure 8–12 shows the application running on an Android device.
Figure 8–12. The VideoRecorder example application after capturing a short video
Summary
The ability to enjoy media on mobile devices will become more common as the devices continue to get more powerful. You now have the knowledge you need to utilize the power of the Flash media APIs in your own mobile applications. This chapter has covered a wide variety of topics having to do with playing various types of media on the Flash platform. In particular, you now know the following:
- How to embed and play sound effects using the
SoundEffectclass - How to load MP3 files using the
Soundclass - How to control the playback, volume, and panning of the sound using the
SoundChannelandSoundTransformclasses - How to play dynamically generated or recorded sound
- How to write Flex mobile applications that are maintainable and testable
- How to write custom controls for Flex 4 Mobile applications
- How to play video using the Spark
VideoPlayercomponent, theNetStreamclass, and the OSMF library - How to interface with the
CameraUIclass to capture video and then play the captured video in an AIR for Android application
We will continue the theme of writing real-world Flex mobile applications in the next chapter by taking a look at some of the aspects of working in a team and utilizing a designer-developer workflow.