
Audio Analysis
Now that we have gone over more advanced ways that AudioTrack may be used, how about looking at what else we might do with audio as it comes in through an AudioRecord object?
Capturing Sound for Analysis
As previously described, sound is vibration traveling through a substance. These vibrations can be captured by a microphone. Microphones convert the vibrations that travel through air into a constantly varying electrical current. When a microphone is used to capture sound by a computer, that sound is digitized. Specifically, amplitude samples of a specific size (sample size) are taken many times a second (sample rate). This stream of data is called a PCM (pulse code modulation) stream, which forms the foundation for digital audio. Taken all together, the samples represented in the PCM stream digitally represent the audio waveform that is captured. The higher the sample rate, the more accurate the representation and the higher the frequency of audio that can be captured.
As we learned in the previous chapter, when we started working with the AudioRecord class, these parameters may be passed into the constructor of the AudioRecord class when creating an object. To revisit what each of the parameters means, please see the “Raw Audio Recording with AudioRecord” section in Chapter 7.
NOTE: The Nyquist sampling theorem, named after Harry Nyquist, who was an engineer for Bell Labs in the early to mid-twentieth century, explains that the highest frequency that may be captured by a digitizing system is one half of the sample rate used. Therefore, in order to capture audio at 440 Hz (middle A), our system needs to capture samples at 880 Hz or higher.
Here is a quick recap of the steps required to capture audio using an object of type AudioRecord.
    int frequency = 8000;

    int channelConfiguration = AudioFormat.CHANNEL_CONFIGURATION_MONO;

    int audioEncoding = AudioFormat.ENCODING_PCM_16BIT;


    int bufferSize = AudioRecord.getMinBufferSize(frequency,

                    channelConfiguration, audioEncoding);


    AudioRecord audioRecord = new AudioRecord(

                        MediaRecorder.AudioSource.MIC, frequency,

                        channelConfiguration, audioEncoding, bufferSize);


    short[] buffer = new short[blockSize];

    audioRecord.startRecording();


    while (started) {

        int bufferReadResult = audioRecord.read(buffer, 0, blockSize);

    }


    audioRecord.stop();
The foregoing code doesn't actually do anything with the audio that is captured. Normally we would want to write it to a file or to analyze it in some other manner.
Visualizing Frequencies
One common way that people typically use to analyze audio is to visualize the frequencies that exist within it. Commonly these types of visuals are employed with equalizers that allow the adjustment of the levels of various frequency ranges.
The technique used to break an audio signal down into component frequencies employs a mathematic transformation called a discrete Fourier transform (DFT). A DFT is commonly used to translate data from a time base to a frequency base. One algorithm used to perform DFT is a fast Fourier transform (FFT), which is very efficient but unfortunately complex.
Fortunately, many implementations of FFT algorithms exist that are in the public domain or are open source and that we may employ. One such version is a Java port of the FFTPACK library, originally developed by Paul Swarztrauber of the National Center for Atmospheric Research. The Java port was performed by Baoshe Zhang of the University of Lethbridge in Alberta, Canada. Various implementations are available online at www.netlib.org/fftpack/. The one we'll be using is archived in a file called jfftpack.tgz linked off of that page. It is directly downloadable via www.netlib.org/fftpack/jfftpack.tgz.
To use this or any other package containing Java source code in an Eclipse Android project, we need to import the source into our project. This archive contains the correct directory structure for the package, so we just drag the top-level folder in the javasource directory (ca) into the src directory of our project.
Here is an example that draws the graphic portion of a graphic equalizer.
package com.apress.proandroidmedia.ch08.audioprocessing;


import android.app.Activity;

import android.graphics.Bitmap;

import android.graphics.Canvas;

import android.graphics.Color;

import android.graphics.Paint;

import android.media.AudioFormat;

import android.media.AudioRecord;

import android.media.MediaRecorder;

import android.os.AsyncTask;

import android.os.Bundle;

import android.util.Log;

import android.view.View;

import android.view.View.OnClickListener;

import android.widget.Button;

import android.widget.ImageView;
We'll import the RealDoubleFFT class in the fftpack package.
import ca.uol.aig.fftpack.RealDoubleFFT;


public class AudioProcessing extends Activity implements OnClickListener {
We'll use a frequency of 8 kHz, one audio channel, and 16 bit samples in the AudioRecord object.
    int frequency = 8000;

    int channelConfiguration = AudioFormat.CHANNEL_CONFIGURATION_MONO;

    int audioEncoding = AudioFormat.ENCODING_PCM_16BIT;
transformer will be our FFT object, and we'll be dealing with 256 samples at a time from the AudioRecord object through the FFT object. The number of samples we use will correspond to the number of component frequencies we will get after we run them through the FFT object. We are free to choose a different size, but we do need concern ourselves with memory and performance issues as the math required to the calculation is processor-intensive.
    private RealDoubleFFT transformer;

    int blockSize = 256;


    Button startStopButton;

    boolean started = false;
RecordAudio is an inner class defined here that extends AsyncTask.
RecordAudio recordTask;
We'll be using an ImageView to display a Bitmap image. This image will represent the levels of the various frequencies that are in the current audio stream. To draw these levels, we'll use Canvas and Paint objects constructed from the Bitmap.
    ImageView imageView;

    Bitmap bitmap;

    Canvas canvas;

    Paint paint;


    @Override

    public void onCreate(Bundle savedInstanceState) {

        super.onCreate(savedInstanceState);

        setContentView(R.layout.main);


        startStopButton = (Button) this.findViewById(R.id.StartStopButton);

        startStopButton.setOnClickListener(this);
The RealDoubleFFT class constructor takes in the number of samples that we'll deal with at a time. This also represents the number of distinct ranges of frequencies that will be output.
transformer = new RealDoubleFFT(blockSize);
Here is the setup of the ImageView and related object for drawing.
        imageView = (ImageView) this.findViewById(R.id.ImageView01);

        bitmap = Bitmap.createBitmap((int)256,(int)100,Bitmap.Config.ARGB_8888);

        canvas = new Canvas(bitmap);

        paint = new Paint();

        paint.setColor(Color.GREEN);

        imageView.setImageBitmap(bitmap);

    }
Most of the work in this activity is done in the following class, called RecordAudio, which extends AsyncTask. Using AsyncTask, we run the methods that will tie up the user interface on a separate thread. Anything that is placed in the doInBackground method will be run in this manner.
    private class RecordAudio extends AsyncTask<Void, double[], Void> {

        @Override

        protected Void doInBackground(Void... params) {

            try {
We'll set up and use AudioRecord in the normal manner.
                int bufferSize = AudioRecord.getMinBufferSize(frequency,

                        channelConfiguration, audioEncoding);


                AudioRecord audioRecord = new AudioRecord(

                        MediaRecorder.AudioSource.MIC, frequency,

                        channelConfiguration, audioEncoding, bufferSize);
The short array, buffer, will take in the raw PCM samples from the AudioRecord object. The double array, toTransform, will hold the same data but in the form of doubles, as that is what the FFT class requires.
                short[] buffer = new short[blockSize];

                double[] toTransform = new double[blockSize];


                audioRecord.startRecording();


                while (started) {

                    int bufferReadResult = audioRecord.read(buffer, 0, blockSize);
After we read the data from the AudioRecord object, we loop through and translate it from short values to double values. We can't do this directly by casting, as the values expected should be between -1.0 and 1.0 rather than the full range. Dividing the short by 32,768.0 will do that, as that value is the maximum value of short.
NOTE: There is a constant Short.MAX_VALUE that could be used instead.
                    for (int i = 0; i < blockSize && i < bufferReadResult; i++) {

                        toTransform[i] = (double) buffer[i] / 32768.0; // signed 16 bit

                    }
Next we'll pass the array of double values to the FFT object. The FFT object re-uses the same array to hold the output values. The data contained will be in the frequency domain rather than the time domain. This means that the first element in the array will not represent the first sample in time—rather, it will represent the levels of the first set of frequencies.
Since we are using 256 values (or ranges) and our sample rate is 8,000, we can determine that each element in the array will cover approximately 15.625 Hz. We come up with this figure by dividing the sample rate in half (as the highest frequency we can capture is half the sample rate) and then dividing by 256. Therefore the data represented in the first element of the array will represent the level of audio that is between 0 and 15.625 Hz.
transformer.ft(toTransform);
Calling publishProgress calls onProgressUpdate.
                    publishProgress(toTransform);

                }


                audioRecord.stop();

            } catch (Throwable t) {

                Log.e("AudioRecord", "Recording Failed");

            }


            return null;

        }
onProgressUpdate runs on the main thread in our activity and can therefore interact with the user interface without problems. In this implementation, we are passing in the data after it has been run through the FFT object. This method takes care of drawing the data on the screen as a series of lines at most 100 pixels tall. Each line represents one of the elements in the array and therefore a range of 15.625 Hz. The first line represents frequencies ranging from 0 to 15.625 Hz, and the last line represents frequencies ranging from 3,984.375 to 4,000 Hz. Figure 8–1 shows what this looks like in action.
        protected void onProgressUpdate(double[]... toTransform) {

            canvas.drawColor(Color.BLACK);


            for (int i = 0; i < toTransform[0].length; i++) {

                int x = i;

                int downy = (int) (100 - (toTransform[0][i] * 10));

                int upy = 100;


                canvas.drawLine(x, downy, x, upy, paint);

            }

            imageView.invalidate();

        }

    }


    public void onClick(View v) {

        if (started) {

            started = false;

            startStopButton.setText("Start");

            recordTask.cancel(true);

        } else {

            started = true;

            startStopButton.setText("Stop");

            recordTask = new RecordAudio();

            recordTask.execute();

        }

    }

}
Here is the layout XML file used by the AudioProcessing activity just defined.
<?xml version="1.0" encoding="utf-8"?>

<LinearLayout xmlns:android="http://schemas.android.com/apk/res/android"

    android:orientation="vertical"

    android:layout_width="fill_parent"

    android:layout_height="fill_parent"

    >
    <TextView

        android:layout_width="fill_parent"

        android:layout_height="wrap_content"

        android:text="@string/hello"

    />

    <ImageView android:id="@+id/ImageView01" android:layout_width="wrap_content"

 android:layout_height="wrap_content"></ImageView><Button android:text="Start"

 android:id="@+id/StartStopButton" android:layout_width="wrap_content"

 android:layout_height="wrap_content"></Button>

</LinearLayout>
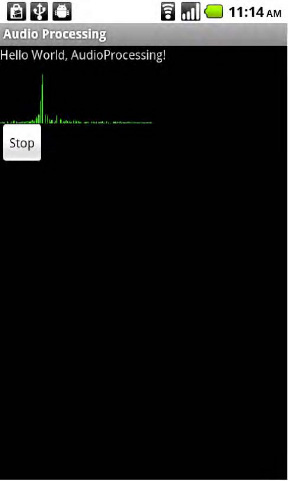
Figure 8–1. AudioProcessing activity running