
Video Playback
Technically, some mobile phones have had video capabilities previous to 2004. In reality, though, video on mobile phones didn't really take off in the US until the introduction of the iPhone in 2007. Since then, every smartphone worth its name has supported video playback, if not video capture. As we'll explore throughout this chapter, Android is no exception.
Supported Formats
Before we get into the specific mechanics of how to play video, we should look at the types of video that we can play. Although Android supports playing back a variety of video formats and the types it can play back is slowly increasing, it certainly doesn't cover the wide range of video formats available.
In general Android's support is consistent with other mobile phones. It supports the 3GP (.3gp) and MPEG-4 (.mp4) file formats. 3GP is a video standard derived from MPEG-4 specifically for use by mobile devices.
As far as codecs go, Android supports H.263, a codec designed for low-latency and low-bitrate videoconferencing applications. H.263 video is supported in either MPEG-4 (.mp4) or 3GP (.3gp) files. Android also supports MPEG-4 Simple Profile in 3GP files (.3gp) as well as H.264.
H.264 is also referred to as MPEG-4 part 10 or AVC (Advanced Video Coding). It is one of the contenders for the video codec crown and probably offers the widest amount of support across software and hardware. H.264 is supported by Silverlight, Flash, iPhone/iPod, Blu-ray devices, and so on. Android supports H.264 encoded video in the MPEG-4 container format (.mp4).
Depending on when you are reading this book, Android probably also supports WebM (Android 3.0 and later), the open and royalty-free media container that holds VP8-encoded video and Vorbis-encoded audio. WebM was introduced shortly after Google acquired On2 Technologies and released the VP8 codec into the public domain.
A large number of desktop video conversion tools work to aid the conversion of video for use with Android devices. The hard part is getting the settings correct. In general, if the tool has a preset for Android devices, you are just fine. If not, it is more than likely any presets that a tool might have for the iPhone will also work with Android devices since the range of supported formats is very close between the two.
Playback Using an Intent
As with most of Android's capabilities that we have explored in this book, simply playing back a video can be done easily, using an intent to trigger the built-in Media Player application's playback activity.
For this example, I captured a video using QuickTime X on a Mac laptop with a built-in iSight. I exported this video using QuickTime X's Save As command and selected “iPhone” as the format. This created a video that I named Test_Movie.m4v. (The .m4v extension was given by QuickTime. Unfortunately, it isn't standard, which may indicate that the file may not be a fully standards-compliant MPEG-4 file. Nevertheless, it doesn't seem to present any issues on Android devices.) This video is available online at www.mobvcasting.com/android/video/Test_Movie.m4v for you to download if you would like to test with it.
The following code requires that this video be on root of the SD card on your Android device. To do this, you should be able to connect the device to your computer via a USB cable and select the menu item in the status bar pull-down that states “USB connected. Select to copy files to/from your computer.” This should bring up a screen that allows you to “Turn on USB storage.” Doing so should cause your phone to be mounted as a removable drive to your computer, and the video file can then be copied over. Don't forget to unmount the drive and “Turn off USB storage” before attempting to run the following code. If you don't, you'll get an error as the program running on the phone cannot access the SD card to read the video file while your computer has access to it.
To create the intent that will trigger the built-in Media Player application's playback activity, we'll construct an activity using the Intent.ACTION_VIEW constant and pass in the URI and the MIME-type of the file via the setDataAndType method. This allows Android to choose the preferred activity for playback. Figure 9-1 shows the built-in Media Player from Android 2.2 playing video specified in this manner.
package com.apress.proandroidmedia.ch09.videointent;


import android.app.Activity;

import android.content.Intent;

import android.net.Uri;

import android.os.Bundle;

import android.os.Environment;
import android.view.View;

import android.view.View.OnClickListener;

import android.widget.Button;


public class VideoPlayerIntent extends Activity implements OnClickListener {

    Button playButton;


    @Override

    public void onCreate(Bundle savedInstanceState) {

        super.onCreate(savedInstanceState);

        setContentView(R.layout.main);

        playButton = (Button) this.findViewById(R.id.PlayButton);

        playButton.setOnClickListener(this);

    }


    public void onClick(View v) {

        Intent intent = new Intent(android.content.Intent.ACTION_VIEW);

        Uri data = Uri.parse(Environment.getExternalStorageDirectory().getPath() +

 "/Test_Movie.m4v");

        intent.setDataAndType(data, "video/mp4");

        startActivity(intent);

    }

}
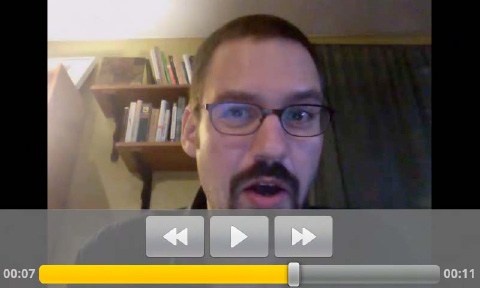
Figure 9-1. Built-in Media Player application playing video specified via an intent
Playback Using VideoView
VideoView is a View that has video playback capabilities and can be used directly in a layout. It is very straightforward to use.
The following layout XML file, main.xml, specifies a VideoView inside a LinearLayout.
<?xml version="1.0" encoding="utf-8"?>

<LinearLayout xmlns:android="http://schemas.android.com/apk/res/android"

    android:orientation="vertical"

    android:layout_width="fill_parent"

    android:layout_height="fill_parent"

    >
    <VideoView android:layout_width="wrap_content" android:layout_height="wrap_content"

     android:id="@+id/VideoView"></VideoView>

</LinearLayout>
To utilize this VideoView, we simply have to gain a reference to it in the normal way, using findViewById, passing in the ID (R.id.VideoView). Once we have the object, we can set the Uri to the video file with setVideoURI and then call the start method to play.
package com.apress.proandroidmedia.ch09.videoview;


import android.app.Activity;

import android.net.Uri;

import android.os.Bundle;

import android.os.Environment;

import android.widget.VideoView;


public class ViewTheVideo extends Activity {

    VideoView vv;


    @Override

    public void onCreate(Bundle savedInstanceState) {

        super.onCreate(savedInstanceState);

        setContentView(R.layout.main);


        vv = (VideoView) this.findViewById(R.id.VideoView);

        Uri videoUri = Uri.parse(Environment.getExternalStorageDirectory().getPath() +

 "/Test_Movie.m4v");

        vv.setVideoURI(videoUri);

        vv.start();

    }

}
Figure 9-2 shows the foregoing example in action.

Adding Controls with MediaController
The VideoView has relatively few capabilities for controlling the playback of video. Specifically it has a start and a pause method. In order to provide more controls, we can instantiate a MediaController and set it via setMediaController to be the controller of the VideoView.
The default MediaController has rewind, pause, play, and fast-forward buttons along with a scrubber and progress bar combination that can be used to seek to any point in the video.
Here is an update to our VideoView example to include a MediaController within the onCreate method after the content view is set by the setContentView method.
    vv = (VideoView) this.findViewById(R.id.VideoView);

    vv.setMediaController(new MediaController(this));

    Uri videoUri = Uri.parse(Environment.getExternalStorageDirectory().getPath() +

 "/Test_Movie.m4v");

    vv.setVideoURI(videoUri);

    vv.start();

Figure 9-3. VideoView with a default MediaController
Playback Using a MediaPlayer
In Chapters 6 and 7, those dealing with audio and networked audio, we introduced the MediaPlayer class. The very same MediaPlayer class can also be used for video playback, in much the same manner.
Using a MediaPlayer object for video playback gives us the greatest amount of flexibility in the control of the playback itself, as compared with playing video using VideoView or via an intent. In fact, the mechanism used to handle the actual playback within the VideoView and the activity triggered via the intent is a MediaPlayer.
NOTE: Unfortunately, none of the video playback classes are as flexible as the most flexible audio playback class, AudioTrack, which allows us to generate on the fly the data that will be played.
MediaPlayer States
MediaPlayer objects operate as a state machine. This means that operations need to be performed in a specific order and various methods should be called only when the object is in the correct state to handle them.
The MediaPlayer class defines several listeners that allow applications that use it to be notified of various state changes and act accordingly.
Let's go through a full MediaPlayer example to explore further. Figure 9-4 shows the diagram again for reference.
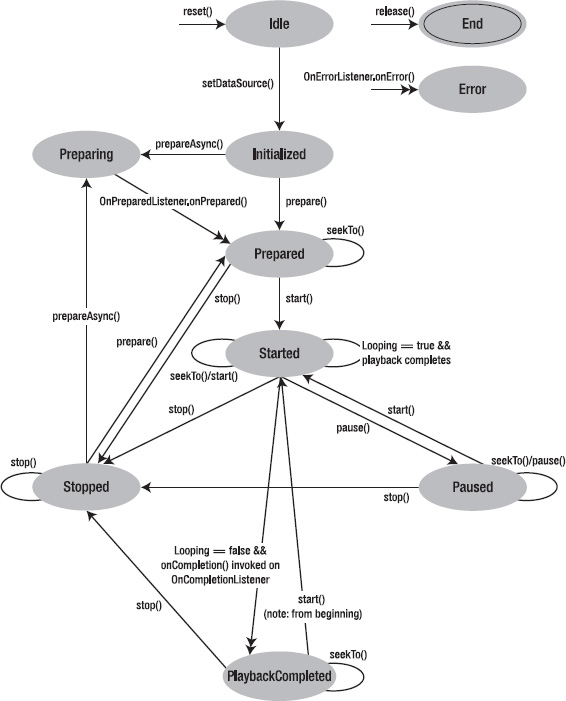
Figure 9-4. MediaPlayer state diagram from MediaPlayer class reference documentation
MediaPlayer Example
The following is a full example using the MediaPlayer to create a custom video playback application. Figure 9-5 shows the application running.
package com.apress.proandroidmedia.ch09.videoplayercustom;


import java.io.IOException;


import android.app.Activity;

import android.os.Bundle;

import android.os.Environment;

import android.util.Log;

import android.view.Display;

import android.widget.LinearLayout;
We are importing the MediaPlayer and several of its inner classes that are interfaces we'll be implementing.
import android.media.MediaPlayer;

import android.media.MediaPlayer.OnCompletionListener;

import android.media.MediaPlayer.OnErrorListener;

import android.media.MediaPlayer.OnInfoListener;

import android.media.MediaPlayer.OnPreparedListener;

import android.media.MediaPlayer.OnSeekCompleteListener;

import android.media.MediaPlayer.OnVideoSizeChangedListener;
SurfaceHolder and SurfaceView will be used to draw the video.
import android.view.SurfaceHolder;

import android.view.SurfaceView;
Our activity will implement all of the MediaPlayer state change listeners as well as the SurfaceHolder.Callback interface, which will enable us to get notified of changes to a SurfaceView.
public class CustomVideoPlayer extends Activity

    implements OnCompletionListener, OnErrorListener, OnInfoListener,

    OnPreparedListener, OnSeekCompleteListener, OnVideoSizeChangedListener,

    SurfaceHolder.Callback

{

    Display currentDisplay;


    SurfaceView surfaceView;

    SurfaceHolder surfaceHolder;
The workhorse of our application will be this MediaPlayer object.
    MediaPlayer mediaPlayer;


    int videoWidth = 0;

    int videoHeight = 0;


    boolean readyToPlay = false;


    public final static String LOGTAG = "CUSTOM_VIDEO_PLAYER";


    @Override
    public void onCreate(Bundle savedInstanceState) {

        super.onCreate(savedInstanceState);

        setContentView(R.layout.main);
After we set the content view, we can get a reference to the SurfaceView defined in the layout XML and get a reference to the SurfaceHolder, which allows us to monitor what happens to the underlying Surface.
        surfaceView = (SurfaceView) this.findViewById(R.id.SurfaceView);

        surfaceHolder = surfaceView.getHolder();
Since our activity implements SurfaceHolder.Callback, we'll assign it to be the callback listener.
surfaceHolder.addCallback(this);
We need to make sure the underlying surface is a push buffer surface, which is currently required for video playback and camera previews.
surfaceHolder.setType(SurfaceHolder.SURFACE_TYPE_PUSH_BUFFERS);
Now we start constructing the actual MediaPlayer object. We aren't passing in any parameters, getting back a generic MediaPlayer in the “idle” state.
mediaPlayer = new MediaPlayer();
We'll also specify that our activity should be the listener for the various events.
        mediaPlayer.setOnCompletionListener(this);

        mediaPlayer.setOnErrorListener(this);

        mediaPlayer.setOnInfoListener(this);

        mediaPlayer.setOnPreparedListener(this);

        mediaPlayer.setOnSeekCompleteListener(this);

        mediaPlayer.setOnVideoSizeChangedListener(this);
Before we finish the onCreate method, we'll tell the MediaPlayer object what to play. In this example, we are using the same video file that we used in previous examples. You can download it from www.mobvcasting.com/android/video/Test_Movie.m4v or create your own file.
        String filePath = Environment.getExternalStorageDirectory().getPath() + "/Test

_Movie iPhone.m4v";
The setDataSource method on the MediaPlayer can throw multiple exceptions, which we should handle gracefully. In this case, we are just quitting. In your application, you probably want to present the user with an opportunity to select a different file or explain what went wrong.
        try {

            mediaPlayer.setDataSource(filePath);

        } catch (IllegalArgumentException e) {

            Log.v(LOGTAG,e.getMessage());

            finish();

        } catch (IllegalStateException e) {

            Log.v(LOGTAG,e.getMessage());

            finish();

        } catch (IOException e) {

            Log.v(LOGTAG,e.getMessage());
            finish();

        }


        currentDisplay = getWindowManager().getDefaultDisplay();

    }
Since our activity implements SurfaceHolder.Callback and is assigned to be the callback listener, the following three methods will get triggered.
surfaceCreated will be called when the underlying Surface in SurfaceView is created.
    public void surfaceCreated(SurfaceHolder holder) {

        Log.v(LOGTAG,"surfaceCreated Called");
When the Surface is created, we can specify that the MediaPlayer use the Surface for playback by calling its setDisplay method, passing in the SurfaceHolder object.
mediaPlayer.setDisplay(holder);
Finally, after we specify the Surface, we can call prepare. The prepare method blocks rather than doing the work in the background. To have it do the work in the background, so as to not tie up the application, we could use prepareAsync instead. Either way, since we have implemented the OnPreparedListener and our activity is set to be the listener, our onPrepared method will be called when it is done.
The prepare method can throw a couple of extensions that we need to take care of. For brevity we'll just log the error and quit. In your application, you'll probably want to intelligently handle these exceptions.
        try {

            mediaPlayer.prepare();

        } catch (IllegalStateException e) {

            Log.v(LOGTAG,e.getMessage());

            finish();

        } catch (IOException e) {

            Log.v(LOGTAG,e.getMessage());

            finish();

        }

    }
surfaceChanged will be called when the width, height, or other parameter of the Surface underlying the SurfaceView changes. In this example, we don't need to do anything in this case.
    public void surfaceChanged(SurfaceHolder holder, int format, int width, int height){

        Log.v(LOGTAG,"surfaceChanged Called");

    }
surfaceDestroyed will be called when the underlying Surface of our SurfaceView is destroyed. In this example, we won't be doing anything when this occurs.
    public void surfaceDestroyed(SurfaceHolder holder) {

        Log.v(LOGTAG,"surfaceDestroyed Called");

    }
Since we implement the MediaPlayer.OnCompletionListener and register ourselves as the listener, our onCompletion method will be called when the MediaPlayer finishes playing a file. We could use this to load another video or perform some other action such as loading another screen. In this example, we'll just quit.
    public void onCompletion(MediaPlayer mp) {

        Log.v(LOGTAG,"onCompletion Called");

        finish();

    }
Our activity implements the MediaPlayer.OnErrorListener, and it is registered as the error listener for our MediaPlayer object, so the following onError method will be called when one occurs. Unfortunately, not much error information is available, just two constants as shown here.
    public boolean onError(MediaPlayer mp, int whatError, int extra) {

        Log.v(LOGTAG,"onError Called");


        if (whatError == MediaPlayer.MEDIA_ERROR_SERVER_DIED) {

            Log.v(LOGTAG,"Media Error, Server Died " + extra);

        } else if (whatError == MediaPlayer.MEDIA_ERROR_UNKNOWN) {

            Log.v(LOGTAG,"Media Error, Error Unknown " + extra);

        }
Returning false from the method indicates that the error wasn't handled. If an OnCompletionListener is registered, its onCompletion method will be called. The MediaPlayer object will be put into the “error” state. It can be put back to the “idle” state by calling the reset method.
        return false;

    }
The onInfo method, specified in the OnInfoListener, is called when specific information about the playback of the media is available or if warnings need to be issued.
    public boolean onInfo(MediaPlayer mp, int whatInfo, int extra) {

        if (whatInfo == MediaPlayer.MEDIA_INFO_BAD_INTERLEAVING) {
This will be triggered if the audio and video data in the file are not properly interleaved. A properly interleaved media file has audio and video samples arranged in an order that makes playback efficient and smooth.
            Log.v(LOGTAG,"Media Info, Media Info Bad Interleaving " + extra);

        } else if (whatInfo == MediaPlayer.MEDIA_INFO_NOT_SEEKABLE) {
This will be triggered if the media cannot be seeked (meaning it is probably a live stream).
            Log.v(LOGTAG,"Media Info, Media Info Not Seekable " + extra);

        } else if (whatInfo == MediaPlayer.MEDIA_INFO_UNKNOWN) {
This is self-explanatory, in that the information isn't specified or is otherwise unknown.
            Log.v(LOGTAG,"Media Info, Media Info Unknown " + extra);

        } else if (whatInfo == MediaPlayer.MEDIA_INFO_VIDEO_TRACK_LAGGING) {
This will be triggered if the device is having trouble playing the video. It is possible that the audio will play but the video is either too complex or the bitrate is too high.
Log.v(LOGTAG,"MediaInfo, Media Info Video Track Lagging " + extra);
} else if (whatInfo == MediaPlayer.MEDIA_INFO_METADATA_UPDATE) {
MEDIA_INFO_METADATA_UPDATE is available in Android 2.0 and higher. It is triggered when new metadata is available.
            Log.v(LOGTAG,"MediaInfo, Media Info Metadata Update " + extra);

        }

        return false;

    }
Following a successful preparation by the MediaPlayer to start playback, the onPrepared method will be called. This is specified as part of the OnPreparedListener interface that we are implementing. Once this method is called, the MediaPlayer has entered the “prepared” state and is ready to play.
    public void onPrepared(MediaPlayer mp) {

        Log.v(LOGTAG,"onPrepared Called");
Before we can play the video, we should set the size of the Surface to match the video or the display size, depending on which is smaller.
First we get the dimensions of the video using the getVideoWidth and getVideoHeight methods available on the MediaPlayer object.
        videoWidth = mp.getVideoWidth();

        videoHeight = mp.getVideoHeight();
If the width or height of the video is greater than the display, then we'll figure out the ratio we should use.
        if (videoWidth > currentDisplay.getWidth() ||

            videoHeight > currentDisplay.getHeight())

        {

            float heightRatio = (float)videoHeight/(float)currentDisplay.getHeight();

            float widthRatio = (float)videoWidth/(float)currentDisplay.getWidth();


            if (heightRatio > 1 || widthRatio > 1)

            {
We'll use whichever ratio is bigger and set the videoHeight and videoWidth by dividing the video size by the larger ratio.
                if (heightRatio > widthRatio) {

                    videoHeight = (int)Math.ceil((float)videoHeight/(float)heightRatio);

                    videoWidth = (int)Math.ceil((float)videoWidth/(float)heightRatio);

                } else {

                    videoHeight = (int)Math.ceil((float)videoHeight/(float)widthRatio);

                    videoWidth = (int)Math.ceil((float)videoWidth/(float)widthRatio);

                }

            }

        }
We can now set the size of the SurfaceView we are displaying the video in to be either the actual dimensions of the video or the resized dimensions if the video was bigger than the display.
        surfaceView.setLayoutParams(

            new LinearLayout.LayoutParams(videoWidth,videoHeight));
Finally, we can start the playback of the video by calling the start method on the MediaPlayer object.
        mp.start();

    }
onSeekComplete is specified as part of the OnSeekListener that we are implementing, and our activity is the registered listener for our MediaPlayer. It is called when a seek command has completed.
    public void onSeekComplete(MediaPlayer mp) {

        Log.v(LOGTAG,"onSeekComplete Called");

    }
onVideoSizeChanged is specified as part of the OnVideoSizeChangedListener that we are implementing, and our activity is the registered listener for our MediaPlayer. It is called when a size change occurs. It will be called at least once after the data source is specified and the video metadata is read.
    public void onVideoSizeChanged(MediaPlayer mp, int width, int height) {

        Log.v(LOGTAG,"onVideoSizeChanged Called");

    }

}
Here is the layout XML file, main.xml, for use with the foregoing activity.
<?xml version="1.0" encoding="utf-8"?>

<LinearLayout xmlns:android="http://schemas.android.com/apk/res/android"

    android:orientation="vertical"

    android:layout_width="fill_parent"

    android:layout_height="fill_parent"

   android:id="@+id/MainView"

    >

    <SurfaceView android:id="@+id/SurfaceView" android:layout_height="wrap_content"

     android:layout_width="wrap_content"></SurfaceView>

</LinearLayout>

Figure 9-5. Video playing in CustomVideoPlayer activity
MediaPlayer with MediaController
The MediaController view that we used in our VideoView example can also be used with a MediaPlayer as shown in Figure 9-6. Unfortunately, it takes significantly more work in order to have it work correctly.
First our class needs to implement MediaController.MediaPlayerControl in addition to other classes it already implements.
import android.widget.MediaController;

public class CustomVideoPlayer extends Activity

    implements OnCompletionListener, OnErrorListener, OnInfoListener,

    OnPreparedListener, OnSeekCompleteListener, OnVideoSizeChangedListener,

    SurfaceHolder.Callback, MediaController.MediaPlayerControl

{
This interface defines a series of functions that the MediaController uses to control the playback, and we need to implement them in our activity.
Here are the functions and their implementation in our CustomVideoPlayer example. For several of the functions, we just return true, meaning the capability is there. For the rest, we call the corresponding function on our MediaPlayer object.
    public boolean canPause() {

        return true;

    }
    public boolean canSeekBackward() {

        return true;

    }


    public boolean canSeekForward() {

        return true;

    }


    public int getBufferPercentage() {

        return 0;

    }


    public int getCurrentPosition() {

        return mediaPlayer.getCurrentPosition();

    }


    public int getDuration() {

        return mediaPlayer.getDuration();

    }


    public boolean isPlaying() {

        return mediaPlayer.isPlaying();

    }


    public void pause() {

        if (mediaPlayer.isPlaying()) {

            mediaPlayer.pause();

        }

    }


    public void seekTo(int pos) {

        mediaPlayer.seekTo(pos);

    }


    public void start() {

        mediaPlayer.start();

    }
Now we are free to add the actual MediaController object. We'll declare it with the rest of the instance variables.
MediaController controller;
In the onCreate method, we'll instantiate it.
controller = new MediaController(this);
We won't actually set it up and use it until after the MediaPlayer is prepared. At the end of the onPrepared method, we can add the following. First we specify the object that implements MediaController.MediaPlayerControl by calling the setMediaPlayer method. In this case, it is our activity, so we pass in this.
Then we set the root view of our activity so the MediaController can determine how to display itself. In the foregoing layout XML, we gave the root LinearLayout object an ID of MainView so we can reference it here.
Finally we enable it and show it.
    controller.setMediaPlayer(this);

    controller.setAnchorView(this.findViewById(R.id.MainView));

    controller.setEnabled(true);

    controller.show();
In order to bring the controller back up after it disappears (the default behavior of the MediaController is to auto-hide after a timeout), we can override onTouchEvent in our activity to show or hide it.
    @Override

    public boolean onTouchEvent(MotionEvent ev) {

        if (controller.isShowing()) {

            controller.hide();

        } else {

            controller.show();

        }

        return false;

    }
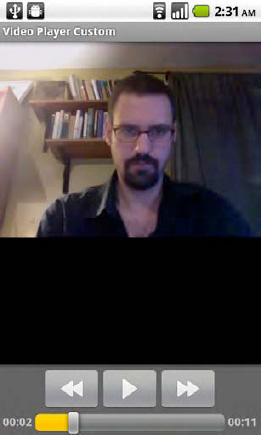
Figure 9-6. CustomVideoPlayer activity with MediaController