
MediaStore for Retrieving Video
As discussed in Chapter 1, Android provides a standard means for sharing data across applications. The ContentProvider class is the base class that enables this. Also as discussed, the classes that extend the concept of a ContentProvider for media are the various MediaStore classes. We previously looked at using the MediaStore for images and audio and their related metadata. The MediaStore for use with video behaves in much the same way.
MediaStore.Video is the nested class within the MediaStore class for use with video files in particular. Within MediaStore.Video is MediaStore.Video.Media, which contains the constants that specify the columns available in the MediaStore related to the video media itself, many of which are inherited from other classes, such as MediaStore.MediaColumns. There is also a MediaStore.Video.Thumbnails, which contains the constants that specify the columns available in the MediaStore for thumbnail image storage that is related to video files.
To query the MediaStore for video content, we utilize the Uri specified in the constant MediaStore.Video.Media.EXTERNAL_CONTENT_URI as the data source for a query.
Using the managedQuery method available in the Activity class, we also need to pass in an array of columns that we would like returned. The array specified here indicates that we want the unique ID for the video in the MediaStore, MediaStore.Video.Media._ID. This is followed by MediaStore.Video.Media.DATA, which is the path to the video file itself. The next two specify that we want the title and the MIME-type of the file.
String[] mediaColumns = {

    MediaStore.Video.Media._ID,

    MediaStore.Video.Media.DATA,

    MediaStore.Video.Media.TITLE,
    MediaStore.Video.Media.MIME_TYPE

};
To query the MediaStore for video content, we utilize the Uri specified in the constant MediaStore.Video.Media.EXTERNAL_CONTENT_URI as the data source for a query.
Cursor cursor = managedQuery(MediaStore.Video.Media.EXTERNAL_CONTENT_URI,

 mediaColumns, null, null, null);
In return we get a cursor that we can loop through and extract the data.
if (cursor.moveToFirst()) {

    do {

        Log.v("VideoGallery",

              cursor.getString(cursor.getColumnIndex(MediaStore.Video.Media.DATA));

        Log.v("VideoGallery",

              cursor.getString(cursor.getColumnIndex(MediaStore.Video.Media.TITLE));

        Log.v("VideoGallery",

              cursor.getString(cursor.getColumnIndex(MediaStore.Video.Media.MIME_TYPE));

    } while (cursor.moveToNext());

}
Video Thumbnails from the MediaStore
We could, starting with Android 2.0 (API Level 5), pull out the thumbnails associated with each video file from within the loop. We need the ID of the video file that is in our list of columns to select (MediaStore.Video.Media._ID), which we can then use in the “where” clause of the managedQuery.
int id = cursor.getInt(cursor.getColumnIndex(MediaStore.Video.Media._ID));

String[] thumbColumns = { MediaStore.Video.Thumbnails.DATA,

                          MediaStore.Video.Thumbnails.VIDEO_ID};

Cursor thumbCursor = managedQuery(MediaStore.Video.Thumbnails.EXTERNAL_CONTENT_URI,

 thumbColumns, MediaStore.Video.Thumbnails.VIDEO_ID + "=" + id, null, null);

if (thumbCursor.moveToFirst()) {

    Log.v("VideoGallery",thumbCursor.getColumnIndex(MediaStore.Video.Thumbnails.DATA));

}
Full MediaStore Video Example
Here is a full example that retrieves all of the available video files from the MediaStore and displays each of their thumbnail images and titles. Figure 10-1 shows the following example running. This example uses the MediaStore.Video.Thumbnails class which is available in Android 2.0 (API Level 5) and above.
package com.apress.proandroidmedia.ch10.videogallery;


import java.io.File;

import java.util.ArrayList;

import java.util.List;


import android.app.Activity;

import android.content.Context;

import android.content.Intent;
import android.database.Cursor;

import android.net.Uri;

import android.os.Bundle;

import android.provider.MediaStore;

import android.util.Log;

import android.view.LayoutInflater;

import android.view.View;

import android.view.ViewGroup;

import android.widget.AdapterView;

import android.widget.BaseAdapter;

import android.widget.ImageView;

import android.widget.ListView;

import android.widget.TextView;

import android.widget.AdapterView.OnItemClickListener;


public class VideoGallery extends Activity implements OnItemClickListener {

    Cursor cursor;

    @Override

    public void onCreate(Bundle savedInstanceState) {

        super.onCreate(savedInstanceState);

        setContentView(R.layout.main);
We'll use a ListView to display the list of videos.
ListView listView = (ListView) this.findViewById(R.id.ListView);
Next is the list of columns we want from the MediaStore.Video.Thumbnails queries.
        String[] thumbColumns = {

            MediaStore.Video.Thumbnails.DATA,

            MediaStore.Video.Thumbnails.VIDEO_ID

        };
Then comes the list of columns we want from the MediaStore.Video.Media query.
        String[] mediaColumns = {

            MediaStore.Video.Media._ID,

            MediaStore.Video.Media.DATA,

            MediaStore.Video.Media.TITLE,

            MediaStore.Video.Media.MIME_TYPE

        };
In the main query, we'll select all of the videos that are represented in the MediaStore.
        cursor = managedQuery(MediaStore.Video.Media.EXTERNAL_CONTENT_URI,

                              mediaColumns, null, null, null);
Each row returned by the query will create an item in the following ArrayList. Each item will be a VideoViewInfo object, which is a class defined here specifically to hold information about a video for use in this activity.
ArrayList<VideoViewInfo> videoRows = new ArrayList<VideoViewInfo>();
Here we loop through the data contained in the Cursor object, creating a VideoViewInfo object for each row and adding it to our ArrayList.
        if (cursor.moveToFirst())

        {
We are using a do while loop as we want it to run through the first row of data before moving to the next row. The do portion happens before the while clause is tested/executed. In our loop, we'll create a new VideoViewInfo object for each row of data returned.
            do {


                VideoViewInfo newVVI = new VideoViewInfo();
We can then pull out all of the relevant data from the Cursor. As just described, we'll also make another query to pull out a thumbnail image for each video. Each of these pieces of data will be stored in the VideoViewInfo object.
                int id =

                  cursor.getInt(cursor.getColumnIndex(MediaStore.Video.Media._ID));

                Cursor thumbCursor =

                  managedQuery(MediaStore.Video.Thumbnails.EXTERNAL_CONTENT_URI,

                               thumbColumns,

                               MediaStore.Video.Thumbnails.VIDEO_ID + "=" + id,

                               null, null);

                if (thumbCursor.moveToFirst())

                {

                    newVVI.thumbPath = thumbCursor.getString(

                          thumbCursor.getColumnIndex(MediaStore.Video.Thumbnails.DATA));

                    Log.v("VideoGallery","Thumb " + newVVI.thumbPath);

                }


                newVVI.filePath = cursor.getString(

                             cursor.getColumnIndexOrThrow(MediaStore.Video.Media.DATA));

                newVVI.title = cursor.getString(

                            cursor.getColumnIndexOrThrow(MediaStore.Video.Media.TITLE));

                Log.v("VideoGallery","Title " + newVVI.title);

                newVVI.mimeType = cursor.getString(

                        cursor.getColumnIndexOrThrow(MediaStore.Video.Media.MIME_TYPE));

                Log.v("VideoGallery","Mime " + newVVI.mimeType);
Finally, we add the VideoViewInfo to the videoRows ArrayList.
                videoRows.add(newVVI);

            } while (cursor.moveToNext());

        }
Once we are done getting all of the videos, we can continue on. We'll set the adapter of the ListView object to be a new instance of VideoGalleryAdapter, which is an inner class defined here. We'll also set this activity to be the OnItemClickListener for the ListView.
        listView.setAdapter(new VideoGalleryAdapter(this,videoRows));

        listView.setOnItemClickListener(this);

    }
When an item in the ListView is clicked, the onItemClick method will be called. In this method, we extract the data we need from the Cursor and create an intent to launch the default media player application on the device to play back the video. We could have created our own MediaPlayer or used the VideoView class here instead.
public void onItemClick(AdapterView<?> l, View v, int position, long id) {
        if (cursor.moveToPosition(position)) {

            int fileColumn = cursor.getColumnIndexOrThrow(MediaStore.Video.Media.DATA);

            int mimeColumn =

              cursor.getColumnIndexOrThrow(MediaStore.Video.Media.MIME_TYPE);


            String videoFilePath = cursor.getString(fileColumn);

            String mimeType = cursor.getString(mimeColumn);


            Intent intent = new Intent(android.content.Intent.ACTION_VIEW);


            File newFile = new File(videoFilePath);

            intent.setDataAndType(Uri.fromFile(newFile), mimeType);


            startActivity(intent);

        }

    }
What follows is the very basic VideoViewInfo class, which is used to hold information about each video returned.
    class VideoViewInfo

    {

        String filePath;

        String mimeType;

        String thumbPath;

        String title;

    }
Since we are using a ListView in our activity to display each of the videos returned from the MediaStore query, we'll be using the ListView to display both the title of the video and a thumbnail. In order to hand the data to the ListView, we need to construct an Adapter. Next, we create an Adapter, VideoGalleryAdapter, which extends BaseAdapter. When this class is constructed, it gets passed the ArrayList that holds all of the videos returned from the MediaStore query.
BaseAdapter is an abstract class, so in order to extend it, we need to implement several methods. Most of them are straightforward and just operate on the ArrayList we passed in, such as getCount and getItem. The method that requires the most attention is the getView method.
    class VideoGalleryAdapter extends BaseAdapter

    {

        private Context context;

        private List<VideoViewInfo> videoItems;


        LayoutInflater inflater;


        public VideoGalleryAdapter(Context _context, ArrayList<VideoViewInfo> _items) {

            context = _context;

            videoItems = _items;


            inflater =

             (LayoutInflater) context.getSystemService(Context.LAYOUT_INFLATER_SERVICE);

        }


        public int getCount() {
            return videoItems.size();

        }


        public Object getItem(int position) {

            return videoItems.get(position);

        }


        public long getItemId(int position) {

            return position;

        }
The getView method is used to return the view for each row represented in the ListView. It is passed in the position that is meant to be returned (along with a View object representing the current View and an object that represents the parent ViewGroup).
public View getView(int position, View convertView, ViewGroup parent) {
To construct the View to be returned, we need to inflate the layout that we are using for each row. In this case, we are using a layout defined in list_item.xml (shown here).
View videoRow = inflater.inflate(R.layout.list_item, null);
After the layout is inflated, we can get at the individual Views that are defined and use the data from the ArrayList of VideoViewInfo objects to define what to display. Here is how that is done for the ImageView that is used to display each video's thumbnail.
            ImageView videoThumb = (ImageView) videoRow.findViewById(R.id.ImageView);

            if (videoItems.get(position).thumbPath != null) {

                videoThumb.setImageURI(Uri.parse(videoItems.get(position).thumbPath));

            }
Here we obtain a reference to the TextView for the video title and set the text according to the data in the ArrayList of VideoViewInfo object.
            TextView videoTitle = (TextView) videoRow.findViewById(R.id.TextView);

            videoTitle.setText(videoItems.get(position).title);
Finally, we return the newly constructed View.
            return videoRow;

        }

    }

}
Here is the main.xml file defining the layout for the activity.
<?xml version="1.0" encoding="utf-8"?>

<LinearLayout xmlns:android="http://schemas.android.com/apk/res/android"

    android:orientation="vertical"

    android:layout_width="fill_parent"

    android:layout_height="fill_parent"

    >

  <ListView android:layout_width="wrap_content" android:layout_height="wrap_content" android:id="@+id/ListView"></ListView>

</LinearLayout>
Here is the list_item.xml file that is used to define the layout for each row of the ListView.
<?xml version="1.0" encoding="utf-8"?>

<LinearLayout
  xmlns:android="http://schemas.android.com/apk/res/android"

  android:layout_width="wrap_content"

  android:layout_height="wrap_content">

    <ImageView android:id="@+id/ImageView" android:layout_width="wrap_content"

 android:layout_height="wrap_content"></ImageView>

    <TextView android:text="@+id/TextView01" android:layout_width="wrap_content"

 android:layout_height="wrap_content" android:id="@+id/TextView"></TextView>

</LinearLayout>

Figure 10-1. VideoGallery activity
You'll notice that the thumbnails displayed in Figure 10-1 from our example are different sizes. They are created by the MediaScanner service to be the same size as the video itself. To display the thumbnails at the same size, we can adjust the parameters in the ImageView item listed in list_item.xml.
<ImageView android:id="@+id/ImageView" android:layout_width="50dip"

 android:layout_height="50dip"></ImageView>
Now each of the video thumbnails will be displayed at 50 dip 50 dip, as shown in Figure 10-2. (The term dip stands for “density independent pixel.” 160 dips equal 1 inch on the display no matter what the resolution or density of the pixels on the display is.)
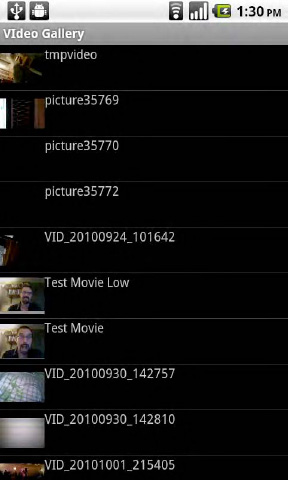
Figure 10-2. VideoGallery activity with thumbnails the same size