
In this chapter, you're going to animate shapes using nothing but the power of JavaScript and your brain. You'll start by learning how animating in canvas actually works, which you'll then put into practice by creating your very first animation loop. From there, you'll discover a method that allows you to remember everything that you want to animate, and then you'll explore a variety of ways to actually animate your shapes. The chapter ends by showing you how to give your shapes a small amount of intelligence, which enables them to bounce off the edges of the canvas instead of disappearing off, never to be seen again.
Animating in canvas is really no different from animating in general, at least in theory. If you cut it down to the basics, animation is just a bunch of images, each slightly different, that are displayed in succession at incredible speed. The trick is to show enough images per second to trick the human eye into thinking that what it sees is a moving object, not a bunch of static images being shown one after another. It's exactly how those paper flip-books work that you made back in school; if you flip the pages fast enough it looks like the little drawings are moving.
You can't flip pages in canvas, so a different approach is required. If you think about it, you only have one sheet of paper when animating using code; that sheet being the computer screen. This means that you can't physically flip through loads of pages of drawings, so instead you attack the problem from a different angle. Flipping through loads of pages of drawings is effectively the same as drawing something on the screen (the first page), clearing everything from the screen (the transition between the first and second page), and then quickly drawing something else on the screen–updating the drawing (the second page). It's the same concept as the flip-book, but it's executed in a slightly different way.
The great thing is that you already know everything that you need to know to create dynamic animations in canvas; you know how to draw something on the screen, and you know how to clear everything from the screen. That part is easy. The harder part is automating the whole process of animation so that it occurs many times a second, and also remembers exactly what you're drawing and where you want to draw it. I say it's the harder part, but what I meant to say was that it's really not that hard at all!
The animation loop is where the juicy fun stuff happens, and it's really easy to set up. I should probably point out that, although it's called a loop, it has nothing to do with for loops, or anything like that. It's called a loop because it happens over and over, which you'll see shortly.
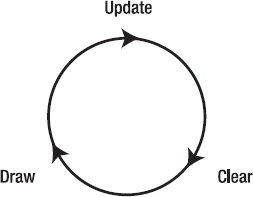
You already know the three main elements of an animation loop: updating everything that needs to be drawn (e.g., moving the position of something), clearing the canvas, and then drawing everything back on to the canvas (see Figure 6-1). For the types of animations that you'll be creating in this chapter, it doesn't really matter which order you perform the tasks in; just make sure that you don't draw before clear, because otherwise you won't see anything!
Let's jump right in and create the animation loop.
var canvas = $("#myCanvas");
var context = canvas.get(0).getContext("2d");

var canvasWidth = canvas.width();
var canvasHeight = canvas.height();

function animate() {
        setTimeout(animate, 33);
};

animate();
You're really only interested in the animate function, which you can see is very basic. As it stands, the animate function sets a timer using setTimeout that will call the animate function again in 33 milliseconds, which basically creates an endless loop. To start the loop, you just need to call the animate function outside of the loop. You probably don't want to leave the loop running forever, as it'll suck unnecessary computer resources, so it's best to stick in a kill switch.
Add the following buttons after your canvas element:
<div>
        <button id="startAnimation">Start</button>
        <button id="stopAnimation">Stop</button>
</div>
And then add the logic to deal with the buttons above the animate function:
var playAnimation = true;

var startButton = $("#startAnimation");
var stopButton = $("#stopAnimation");

startButton.hide();
startButton.click(function() {
        $(this).hide();
        stopButton.show();

        playAnimation = true;
        animate();
});

stopButton.click(function() {
        $(this).hide();
        startButton.show();

        playAnimation = false;
});
The logic here is quite simple: the playAnimation variable holds a boolean value that is used to stop or play the animation loop. The jQuery code hooks into the click event for each button, which then hides the button that you just clicked, shows the other one, and then sets the playAnimation variable to the right value. The start button is slightly different because once the animation is stopped, you need to manually start the loop again to bring it back to life. To do this you just add in an extra call to the animate function.
None of this will actually affect the animation loop yet; to do that, you need to add a single conditional statement around the setTimeout.
if (playAnimation) {
        setTimeout(animate, 33);
};
This will cause the animation loop to cease running if the playAnimation variable holds a false value. Try it out; you won't see anything animating, but the buttons should toggle between start and stop.
Note
Why are you using 33 milliseconds in the animation loop? Well, it's fairly common for animations to be between 25 and 30 frames per second. There are 1,000 milliseconds in a second, so when you divide that by 30 you get 33 milliseconds. You're more than welcome to put in a different number to speed up or slow down the animation. Anything between 30 and 40 will produce an adequate animation effect for your purposes in this chapter.
Now that the basic animation loop has been set up, you can start to add in the functionality for the update, clear, and draw processes that were mentioned earlier (refer to Figure 6-1). Let's put together a simple animation that moves a square 1 pixel to the right on every frame. The first thing you need to do is set up a variable outside of the animate function that holds the current x position of the square:
var x = 0;
Now you have a way of remembering where the square is between each loop of the animation, you can add in all three processes (update, clear, draw) in one go. Place the following inside the animate function, above the setTimeout:
x++;
context.clearRect(0, 0, canvasWidth, canvasHeight);
context.fillRect(x, 250, 10, 10);
The first line updates the x position of the square by increasing it by 1 on each loop; double plus after a variable just means add 1 to the existing value. The same line could be rewritten as the following:
x = x + 1;
The second line is the clear process, and effectively just wipes the canvas clean, ready to draw the square on line 3, which is the third and final process. Plugging the x variable into the fillRect method call means that it will always draw the square at the current x position, which is always increasing (see Figure 6-2).
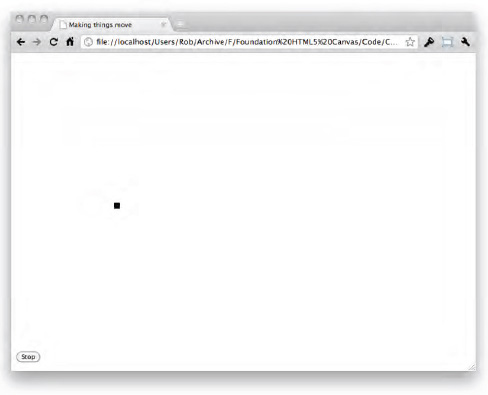
If all went well, then you should have a little black square moving across the canvas. Clicking stop will cause the square to stop moving, and clicking start will set the square moving again. You've just created your first proper animation in canvas. Awesome!
One of the main challenges to overcome once you've got an animation loop up and running is remembering exactly what you want to draw, and exactly where you want to draw it. We touched on this briefly in the last section by placing a variable outside of the loop, which held a value that described the position of the object to be drawn. Coupled with the fillRect call, within the loop that used the position variable, you have enough information to know what you're drawing, and where to draw it. But what if you want to animate multiple shapes? What if you don't even know how many shapes you're going to be animating when you create the loop? A slightly more robust approach is needed.
You might be tempted to store the position values for each shape as a separate variable outside of the animation loop. Why not? It worked for one shape, so why wouldn't it work for multiple shapes? And you'd be right — it would work, it would just be ugly, it would duplicate code, and it would be complicated to modify shapes in the future.
Here is an example of how you'd change the code in the previous section to animate multiple shapes:
var firstX = 0;
var secondX = 50;
var thirdX = 100;

function animate() {
        firstX++;
        secondX++;
        thirdX++;

        context.clearRect(0, 0, canvasWidth, canvasHeight);

        context.fillRect(firstX, 50, 10, 10);
        context.fillRect(secondX, 100, 10, 10);
        context.fillRect(thirdX, 150, 10, 10);

        if (playAnimation) {
                setTimeout(animate, 33);
        };
};

animate();
I've deliberately left out all the other code, like the button events, as we're only really interested in this part here for now.
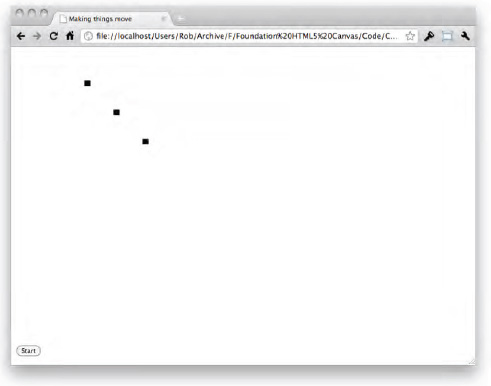
The only difference between this example and the previous one is that you're effectively writing out three times as many position variables and calls to fillRect. However, there is absolutely no reason why it wouldn't work, as you can see in Figure 6-3.
This may work fine for you, but what if you have hundreds of shapes to draw? Are you seriously telling me that you'd be alright with writing out hundreds of position variables and hundreds of calls to fillRect? Of course not! This is why you're using code to animate, because it allows you to automate things and make them easier.
So if creating multiple variables is a long and complicated way, what can you use to make things easier? In short, objects and arrays. There are essentially two issues that need to be solved; the first is how to go about storing position values for each of the shapes, regardless of how many there are, and the second is how to go about drawing each of those shapes without duplicating your code.
The solution to the first issue is simple, and it will lead you directly to the solution for the second issue. You already know the position data needed for each shape — its x value. However, you're going to take this a step further and chuck in the y value as well. So if you know that each shape has the same two types of position value, you can create a JavaScript class that creates shape objects:
var Shape = function(x, y) {
        this.x = x;
        this.y = y;
};
If you don't remember how objects work, head back to Chapter 2 and run through them again. It's an important concept to grasp, as you'll be using it a lot in the games at the end of the book. In a nutshell, objects allow you to define a template for some thing, by giving it properties (like the number of wings on a rocket) and methods (like turning a rocket's engines on).
However, defining an object isn't enough; you still need a way to store them so you don't have to manually refer to hundreds of different shapes. To do this you can store your shape objects in an array, which keeps them all neatly tucked away in a single place:
var shapes = new Array();

shapes.push(new Shape(50, 50));
shapes.push(new Shape(100, 100));
shapes.push(new Shape(150, 150));
To add the shape objects to the array, you're using the push method of the Array object. It might sound complicated, but all it does is add something to the end of an array; which, in your case, is a shape object. It is exactly the same as doing something like this:
var shapes = new Array();

shapes[0] = new Shape(50, 50);
shapes[1] = new Shape(100, 100);
shapes[2] = new Shape(150, 150);
The benefit to using push is that you don't need to know the number of the last element in the array; it automatically adds it on to the end for you. It's pretty nifty!
What you have now is a set of shapes, each with a different x and y position, which are stored away inside an array that has been assigned to the shapes variable. The next step is working out how to get all these shapes back out of the array, update their positions (to animate them), and then draw them. To do that you need to put a for loop inside of the animation loop:
function animate() {
        context.clearRect(0, 0, canvasWidth, canvasHeight);

        var shapesLength = shapes.length;
        for (var i = 0; i < shapesLength; i++) {
                var tmpShape = shapes[i];
                tmpShape.x++;
                context.fillRect(tmpShape.x, tmpShape.y, 10, 10);
        };

        if (playAnimation) {
                setTimeout(animate, 33);
        };
};
The for loop cycles through every shape in the array and assigns it to the shape variable so you can access it easily. From there you now have a reference to the current shape in the array, so all you need to do is update its x property, and then use the x and y properties to draw it in the correct position.
Here is the full code, which should give you an animation identical to the previous example (see Figure 6-4):
var canvasWidth = canvas.width();
var canvasHeight = canvas.height();

var playAnimation = true;

var startButton = $("#startAnimation");
var stopButton = $("#stopAnimation");

startButton.hide();
startButton.click(function() {
        $(this).hide();
        stopButton.show();

        playAnimation = true;
        animate();
});

stopButton.click(function() {
        $(this).hide();
        startButton.show();

        playAnimation = false;
});
var Shape = function(x, y) {
this.x = x;
this.y = y;
};
var shapes = new Array();
shapes.push(new Shape(50, 50, 10, 10));
shapes.push(new Shape(100, 100, 10, 10));
shapes.push(new Shape(150, 150, 10, 10));
function animate() {
context.clearRect(0, 0, canvasWidth, canvasHeight);
var shapesLength = shapes.length;
for (var i = 0; i < shapesLength; i++) {
var tmpShape = shapes[i];
tmpShape.x++;
context.fillRect(tmpShape.x, tmpShape.y, 10, 10);
};
if (playAnimation) {
setTimeout(animate, 33);
};
};
animate();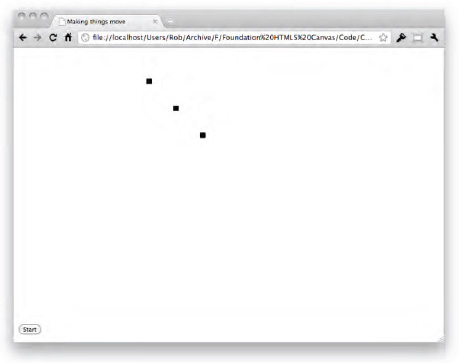
Now that you have a quick and easy way to create shapes, there's nothing to stop you randomizing their creation. The cool thing is that because you're using objects, it's dead simple. First off, you need to change the Shape class to define a width and height:
var Shape = function(x, y, width, height) {
        this.x = x;
        this.y = y;
        this.width = width;
        this.height = height;
};
Then, to randomize the starting position and size of each shape, replace the three shapes.push statements with the following:
for (var i = 0; i < 10; i++) {
        var x = Math.random()*250;
        var y = Math.random()*250;
        var width = height = Math.random()*50;
        shapes.push(new Shape(x, y, width, height));
};
The weird double assignment for the width and height variables gives them each the same value. You'll also need to change the call to fillRect to take the new width and height into consideration:
context.fillRect(tmpShape.x, tmpShape.y, tmpShape.width, tmpShape.height);
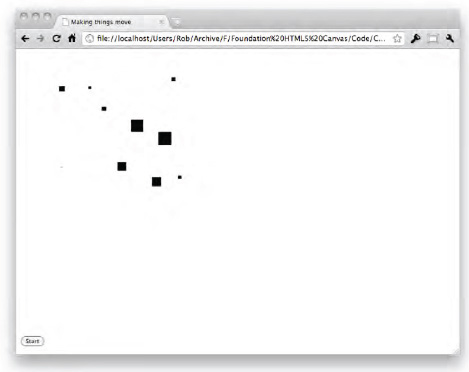
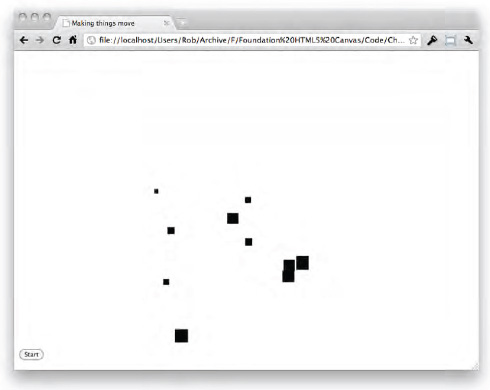
And that is all there is to it. The beauty of using classes and objects means that you really don't have to edit much to add or remove new features to your code. If you check out the new example, you should have a selection of ten shapes moving across the browser, all a different size and in a different position (see Figure 6-5).
So far we've covered how to animate, but we haven't really focused on how to control the way a shape animates. I';m not sure about you, but I'd get pretty bored of animating shapes in a straight line all the time.
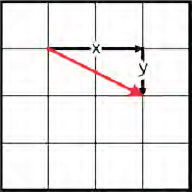
You already know about animating a shape to the right (by increasing the x value), but what about if you want to change the speed, or change the direction of the animation? It's easy; you just change the amount that you increase (or decrease) the x and y values by. If you use the same code from the previous example, you can easily cause the shapes to animate diagonally down to the right by swapping tmpShape.x++ for the following:
tmpShape.x += 2;
tmpShape.y++;
The difference here is that you're now increasing the x value by 2, instead of 1, and you're increasing the y value by 1. This has the effect of moving each shape two pixels to the right, and one pixel down on each loop of the animation; a diagonal line (see Figure 6-6).
Or, you could do something quite interesting and randomize the x and y values on each loop of the animation. This gives the effect of unpredictability and mayhem; the shapes will basically appear to be freaking out. It sounds silly, but it's a great way to make something look less scripted:
tmpShape.x += Math.random()*4-2;
tmpShape.y += Math.random()*4-2;
What you're doing here is creating a random number between 0 and 4 (Math.random gives you a number between 0 and 1, which you're then multiplying by 4), and then subtracting 2 to get a random number between −2 and 2. This will allow the shapes to move right (positive x), left (negative x), up (negative y), and down (positive y).
If you try this in the browser, the shapes will move randomly forward and backward, appearing to wiggle on the spot. Funky!
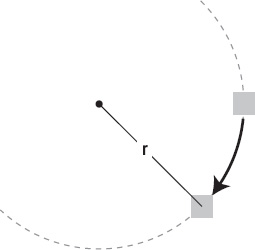
There is absolutely no reason why you should be limited to moving shapes in straight lines. What if you want to animate something to move around a circle, like an orbit (see Figure 6-7)? The good news is that it's completely possible, and it doesn't use much code; the bad news is that it uses trigonometry, which might take a little while to get your head around.
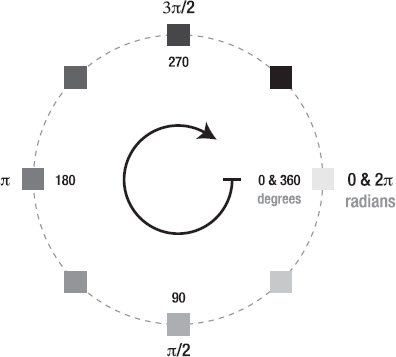
The concept is simple; you take a shape, and place it on the very edge of a circle (its perimeter). You can start at any position on the perimeter, but for the sake of simplicity you're going to place the shape at the angle of 0 radians on the perimeter; the right hand side (see Figure 6-7). From here you simply increase the angle that the shape is placed on the perimeter every loop of the animation, causing it to move around in a circular motion. It all sounds so easy when you write it out, so let's find out exactly how to do it.
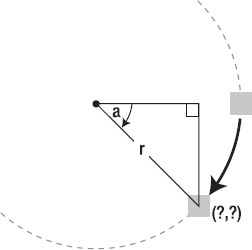
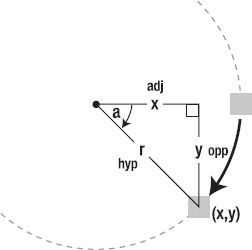
The issue that you are trying to solve, is how to calculate the (x, y) coordinate value of your shape at a position along a circle's circumference (see Figure 6-8). It sounds pretty tricky, but it's actually quite a simple problem that you're trying to solve; but you'll only notice that if you look at it in the right way.
Before you can solve anything, you need to know how big the circle actually is. You can choose any size you want; after all, it's your example! The actual size doesn't matter; what's important is that you can describe the size of a circle by its radius (the length from the center to the circumference). If you plot the radius on the circle that you're trying to animate around, at the angle that you want to move your shape to, you'll start to notice something interesting (see Figure 6-9).
See it yet? If you squint extra hard, and perhaps even tilt your head a bit, you may just, if you're lucky, see the side of a triangle. I wouldn't worry if you don't; it's quite a stretch of the imagination if this is all new to you. The triangle I';m talking about is shown in Figure 6-10.
So, there's a triangle in your circle. Awesome. But why is it useful to you? Well, this triangle gives you absolutely everything you need to know to solve the (x, y) coordinate position of the shape in its new position along the circle. The long answer is that now you have a triangle and two angles (the position around the circle, and the 90 degree corner of the triangle), you can plug in some basic trigonometry to get the values that you're after. This is why mathematics is actually pretty darn useful. However, before you jump in and solve the problem, let me briefly explain how we're going to put trigonometry to work here.
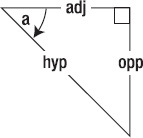
The basic gist of trigonometry is that if you know one angle of a triangle is 90 degrees, and you know one of the other angles, you can then work out the ratio of the lengths of the triangle. This ratio can then be used to calculate the lengths of the sides in whatever unit you wish, which in your case is pixels. To do this, you need to know for which sides of the triangle you need to work out the lengths, as there is a different trigonometric rule that you use for each of them. The three sides are the hypotenuse (the longest side), the adjacent (the side that is adjacent to the angle you already know that isn't 90 degrees), and the opposite (the side opposite the angle you already know). Check out Figure 6-11 for a full rundown.
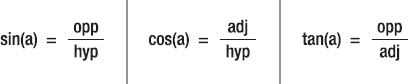
To work out the ratio of each side, you use one of the three trigonometric functions: sine (sin), cosine (cos), or tangent (tan). Sine is the ratio of the opposite leg to the hypotenuse, cosine is the ratio of the adjacent to the hypotenuse, and tangent is the ratio of the opposite to the adjacent (see Figure 6-12). You may have heard of these functions referred to as SOH-CAH-TOA, which translates to sine-opposite-hypotenuse, cosine-adjacent-hypotenuse, and tangent-opposite-adjacent. By plugging in the angle that you know to the correct function, you'll get the ratio required to work this whole thing out
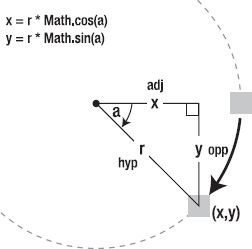
For your example, you want to know the length of the adjacent and the opposite sides of the triangle, which translate to the x and y positions respectively (see Figure 6-13). To work out the lengths, you first need to work out the ratios by plugging the known angle into the respective trigonometric functions. In JavaScript, you can work out these ratios by using the Math object:
var angle = 45;
var adjRatio = Math.cos(angle*(Math.PI/180)); // CAH
var oppRatio = Math.sin(angle*(Math.PI/180)); // SOH
You'll notice a little calculation being performed in the cos and sin methods of the Math object. The calculation is converting the angle from degrees to an angle in radians, which is the unit used by JavaScript (as discussed in Chapter 3). It's worth noting that if you deal in radians from the start, you won't have to do any converting.
These ratios are only half of the story. The other half, and with it the final answer, is comparing those ratios to the length of the hypotenuse — the length of which you already know because it's the radius (see Figure 6-14). This is achieved by multiplying the radius by the ratios, like so:
var radius = 50;
var x = radius * adjRatio;
var y = radius * oppRatio;
Now that you're able to calculate the (x, y) coordinate origin of a shape at an angle along a circle, you should have no problem putting it all together into a working example. The first step is to update the Shape class and give it a couple of new properties:
var Shape = function(x, y, width, height) {
        this.x = x;
this.y = y;
this.width = width;
this.height = height;
this.radius = Math.random()*30;
this.angle = 0;
};These two properties set the starting angle and calculate a random radius for the circle between zero and thirty. The penultimate step is to replace the existing code in the animation loop that updates the shapes, with the following:
var x = tmpShape.x+(tmpShape.radius*Math.cos(tmpShape.angle*(Math.PI/180)));
var y = tmpShape.y+(tmpShape.radius*Math.sin(tmpShape.angle*(Math.PI/180)));
tmpShape.angle += 5;
if (tmpShape.angle > 360) {
tmpShape.angle = 0;
};The first two lines are nothing new; they each calculate the x and y positions of the shape at its current angle along the circle, defined by the radius. This gives you a position value that assumes that the center of the circle is at (0, 0), so you move it into the correct position by adding it onto the (x, y) position you defined in the shape. Take note that the (x, y) position defined in the shape object now refers to the center of the circle, not the origin of the shape — the position that the shape will rotate around. The last few lines increase the angle in degrees on every loop of the animation, and reset the angle to 0 if it goes above 360 (a full circle).
Finally, plug in the new x and y variables into the fillRect method:
context.fillRect(x, y, tmpShape.width, tmpShape.height);
If everything went well, you should have a selection of shapes all moving around their own separate circles (see Figure 6-15). You'd never have guessed such a simple effect would have been so complicated to achieve!

It's been a bit of a tough section, so here is the full code for you to get your head around:
var canvas = $("#myCanvas");
var context = canvas.get(0).getContext("2d");
var canvasWidth = canvas.width();
var canvasHeight = canvas.height();
var playAnimation = true;
var startButton = $("#startAnimation");
var stopButton = $("#stopAnimation");
startButton.hide();
startButton.click(function() {
$(this).hide();
stopButton.show();
playAnimation = true;
animate();
});
stopButton.click(function() {
$(this).hide();
startButton.show();playAnimation = false;
});
var Shape = function(x, y, width, height) {
this.x = x;
this.y = y;
        this.width = width;
        this.height = height;

        this.radius = Math.random()*30;
        this.angle = 0;
};
var shapes = new Array();
for (var i = 0; i < 10; i++) {
var x = Math.random()*250;
var y = Math.random()*250;
var width = height = Math.random()*30;
shapes.push(new Shape(x, y, width, height));
};
function animate() {
context.clearRect(0, 0, canvasWidth, canvasHeight);
var shapesLength = shapes.length;
for (var i = 0; i < shapesLength; i++) {
var tmpShape = shapes[i];
var x = tmpShape.x+(tmpShape.radius*Math.cos(tmpShape.angle*(Math.PI/180)));
var y = tmpShape.y+(tmpShape.radius*Math.sin(tmpShape.angle*(Math.PI/180)));

tmpShape.angle += 5;
if (tmpShape.angle > 360) {
        tmpShape.angle = 0;
};
context.fillRect(x, y, tmpShape.width, tmpShape.height);
};
if (playAnimation) {
setTimeout(animate, 33);
};
};
animate();If you hadn't already noticed, there are effectively no boundaries to the examples used so far. What I mean by this is that nothing happens when a shape animates up to the edge of the canvas; it just disappears, never to be seen again. This may be the effect that you're after; for example, if you're only creating a short animation that stops long before you reach an edge, or if you want to animate a shape over the edge of the canvas. But, what if you don't want this behavior? What if you want shapes to be aware of their surroundings, by perhaps bouncing off the edges and reversing their direction? This is a behavior that changes an animation from something quite linear and scripted, to something more natural and unpredictable.
Before you start learning how to achieve this behavior, prepare the code using techniques learned from this chapter:
var canvasWidth = canvas.width();
var canvasHeight = canvas.height();

var playAnimation = true;

var startButton = $("#startAnimation");
var stopButton = $("#stopAnimation");

startButton.hide();
startButton.click(function() {
        $(this).hide();
        stopButton.show();

        playAnimation = true;
        animate();
});

stopButton.click(function() {
        $(this).hide();
        startButton.show();

        playAnimation = false;
});

var Shape = function(x, y, width, height) {
        this.x = x;
        this.y = y;
        this.width = width;
        this.height = height;
};

var shapes = new Array();

for (var i = 0; i < 10; i++) {
var x = Math.random()*250;
var y = Math.random()*250;
var width = height = Math.random()*30;
shapes.push(new Shape(x, y, width, height));
};
function animate() {
context.clearRect(0, 0, canvasWidth, canvasHeight);
var shapesLength = shapes.length;
for (var i = 0; i < shapesLength; i++) {
var tmpShape = shapes[i];
context.fillRect(tmpShape.x, tmpShape.y, tmpShape.width,
tmpShape.height);
};
if (playAnimation) {
setTimeout(animate, 33);
};
};
animate();All you're doing here is setting up a clean animation loop that is going through ten randomly generated shapes. As it stands, the code won't actually animate anything visually, as no modifications are made to the properties of a shape within the animation loop (like increasing the x position to move a shape to the right).
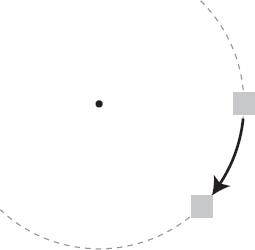
The process used to make your shapes aware of the canvas boundary is surprisingly simple. Let's assume that you have a shape that moves to the right one pixel every loop. Once that shape moves to the right edge of the canvas boundary (say 500 pixels), it will just continue on its journey, with the x value increasing, but will no longer be visible on the canvas. The behavior you actually want is for the shape to bounce off the right edge of the canvas, just like as if it were a solid wall. To do this you need to check to see if the shape is beyond the right edge of the canvas boundary and, if so, reverse its direction of travel so it appears to bounce off of it.
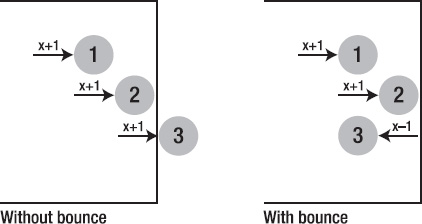
Figure 6-16 outlines the basic concept of this effect, with each loop of the animation being represented by the number within the moving ball. The left side shows how a shape would normally react, without a boundary, and the right side shows how a shape should react, if there was a boundary.
Working out whether a shape is beyond the right edge of the canvas boundary is a case of checking its x position with the width of the canvas. If the shape's x position is larger than the width of the canvas, then the shape must be beyond the right edge. The same process is used to check whether the shape is beyond the left edge of the canvas, which you know has an x origin of 0. By checking to see whether the x position of the shape is lower than 0, you will know if the shape is to the left of the left edge of the canvas, and therefore to the left of the boundary. And again, the same process is used to check whether the shape is within the top and bottom edges of the canvas; by checking if the y position is below 0 for the top edge, and checking if the y position is above the height of the canvas for the bottom edge.
By putting this all together you can create a simple set of logic that bounces the shapes off all the edges of the canvas boundary. The first step is to add a couple of new properties to the Shape class, which will define whether the shape has hit a boundary and the direction of travel needs to be reversed:
this.reverseX = false;
this.reverseY = false;
These properties are set to false by default, which means that the shapes will travel to the right and downwards in this example. The next step is to add the logic that checks whether your shape is outside of the canvas boundary. Insert the following below the call to fillRect in the animation loop:
if (tmpShape.x < 0) {
        tmpShape.reverseX = false;
} else if (tmpShape.x + tmpShape.width > canvasWidth) {
        tmpShape.reverseX = true;
};

if (tmpShape.y < 0) {
        tmpShape.reverseY = false;
} else if (tmpShape.y + tmpShape.height > canvasHeight) {
        tmpShape.reverseY = true;
};
Each of these checks will reverse the direction of travel when a shape is seen to be outside of a boundary. However, setting the boolean values won't actually change the direction of travel, to do that you need to add some more checks, this time above the call to fillRect:
if (!tmpShape.reverseX) {
        tmpShape.x += 2;
} else {
        tmpShape.x -= 2;
};

if (!tmpShape.reverseY) {
        tmpShape.y += 2;
} else {
        tmpShape.y -= 2;
};
This is where the magic happens. These checks will either move the shape to the right (by adding to the x position) if there is no reversal on the x axis, or left (by subtracting from the x position) if the x axis is reversed. The same checks are performed on the y axis.
As a result of these relatively simple checks, you should get a set of shapes that appear to bounce off the edges of the canvas (see Figure 6-17). You could even change the default values of the Shape class properties for reversing direction to change the way the shapes move.
This method of using a variety of simple checks is exactly how you'll be implementing some pretty awesome features in the side-scroller game in Chapter 9.
In this chapter, we've looked more at theory and animation techniques than at learning specifically about canvas. You've learned how animation works, with a loop and the remembering of shapes. You've also learned a variety of ways how to animate a shape, and how to change the direction of the animation, even animating the shapes around a circle. The chapter ended by showing you how to bounce shapes off the edges of the canvas, giving the appearance of basic intelligence and physical properties.
My hope is that this chapter has shown you that quite visually interesting and complicated effects can actually be produced using quite simple theories that require barely any code. The essence of animating, particularly in canvas, is often to take the simplest option, so long as it looks and feels like what you were trying to achieve. These are exactly the principles that you're going to explore in the next chapter, which is all about advanced animation with physics. Very cool stuff indeed!