
Chapter 7
User Interaction: Moving Objects Around
What we'll cover in this chapter:
- Pressing and releasing an object
- Dragging an object
- Throwing
One of the goals of these interactive animations is to create a smooth user experience, and this interaction is usually through the mouse or touch screen. Mouse and touch events were introduced in Chapter 2, but, so far, you haven't done much with them; now, you'll get some hands-on practice.
In this chapter, you take the first steps into responding to user interaction. You learn how to handle dragging, dropping, and throwing, but first, let's get started with the basics of press and release.
Pressing and releasing an object
The mouse is an effective, but simple device. It does two things, it detects motion and button clicks. The computer then uses that information to do a lot more: keeping track of the position of a mouse cursor, determining where the cursor is when the click occurs, determining how fast the mouse is moving, and figuring out when a double-click occurs. But, when you look at it in terms of events, it all comes down to clicks and movements.
You can also break clicks down into two parts: the event that occurs when the mouse button goes down and the next event when it comes up. Sometimes, those events occur almost instantaneously. Other times, the events are separated by time and motion, which is usually interpreted as a drag—click, move, and then release. In this chapter, you'll concentrate on those three things: the mouse button going down, the mouse button going up, and any motion that occurs in between the two.
In our animations, mouse events can be received by the canvas element only from the HTML DOM. Therefore, it is up to us to determine where the event occurred on the canvas and if it is over a visible graphic portion of an object drawn to the canvas. In Chapter 2, I showed you to keep track of the mouse position using the utility function utils.captureMouse. Here, we look for some additional mouse events on the canvas, and then check whether their position falls within the bounds of our objects. The mouse events that you need to know are:
mousedown: This event occurs when you press a mouse button while the mouse cursor is over an HTML element. In the book examples, this is thecanvaselement.mouseup: This event occurs when you release the mouse button while over an element.mousemove: This event occurs when you move the mouse over an element.
Sometimes you might want to know what the mouse is doing regardless of what HTML element it is over. In these cases, instead of adding an event listener to the canvas object, you add it to the global window object.
Let's see if we can use mouse events in our animations. In the next example, you use the same Ball class from the earlier chapters, but an additional method, Ball.getBounds, has been added. This returns an object that represents a rectangle containing the shape of the ball on the canvas, or its bounds. The returned object has the properties x, y, width, and height, and it uses the ball's position and radius to calculate these. This is what the updated ball.js file looks like:
function Ball (radius, color) {

  if (radius === undefined) { radius = 40; }

  if (color === undefined) { color = "#ff0000"; }

  this.x = 0;

  this.y = 0;

  this.radius = radius;

  this.vx = 0;

  this.vy = 0;

  this.rotation = 0;

  this.scaleX = 1;

  this.scaleY = 1;

  this.color = utils.parseColor(color);

  this.lineWidth = 1;

}


Ball.prototype.draw = function (context) {

  context.save();

  context.translate(this.x, this.y);

  context.rotate(this.rotation);

  context.scale(this.scaleX, this.scaleY);

  context.lineWidth = this.lineWidth;

  context.fillStyle = this.color;

  context.beginPath();

  context.arc(0, 0, this.radius, 0, (Math.PI * 2), true);

  context.closePath();
  context.fill();

  if (this.lineWidth > 0) {

    context.stroke();

  }

  context.restore();

};


Ball.prototype.getBounds = function () {

  return {

    x: this.x - this.radius,

    y: this.y - this.radius,

    width: this.radius * 2,

    height: this.radius * 2

  };
};
We also add another utility function to the utils.js file we've been importing into our documents. utils.containsPoint defines three parameters. The first is an object representing a rectangle with x, y, width, and height properties—just the kind Ball.getBounds() returns—and the second and third arguments are x and y coordinates. The utils.containsPoint function determines whether the given position falls within the boundaries of the rectangle and returns true or false accordingly. Here's the simple, but useful, function we add to the utils.js file:
utils.containsPoint = function (rect, x, y) {

  return !(x < rect.x || x > rect.x + rect.width ||

           y < rect.y || y > rect.y + rect.height);

};
And here's a complete example using the updated Ball class and the utils.containsPoint function, document 01-mouse-events.html:
<!doctype html>

<html>

 <head>

  <meta charset="utf-8">

  <title>Mouse Events</title>

  <link rel="stylesheet" href="style.css">

 </head>

 <body>

  <canvas id="canvas" width="400" height="400"></canvas>

  <textarea id="log"></textarea>

  <script src="utils.js"></script>

  <script src="ball.js"></script>

  <script>

  window.onload = function () {

    var canvas = document.getElementById('canvas'),

        context = canvas.getContext('2d'),

        mouse = utils.captureMouse(canvas),

        log = document.getElementById('log'),

        ball = new Ball();


    ball.x = canvas.width / 2;

    ball.y = canvas.height / 2;
    ball.draw(context);


    canvas.addEventListener('mousedown', function () {

      if (utils.containsPoint(ball.getBounds(), mouse.x, mouse.y)) {

        log.value = "in ball: mousedown";

      } else {

        log.value = "canvas: mousedown";

      }

    }, false);


    canvas.addEventListener('mouseup', function () {

      if (utils.containsPoint(ball.getBounds(), mouse.x, mouse.y)) {

        log.value = "in ball: mouseup";

      } else {

        log.value = "canvas: mouseup";

      }

    }, false);


    canvas.addEventListener('mousemove', function () {

      if (utils.containsPoint(ball.getBounds(), mouse.x, mouse.y)) {

        log.value = "in ball: mousemove";

      } else {

        log.value = "canvas: mousemove";

      }

    }, false);

  };

  </script>

 </body>

</html>
This sets up listeners on the canvas element for the three mouse events we've talked about: mousedown, mouseup, and mousemove. After detecting a mouse event, the handler functions test whether the mouse coordinates fall within the bounds of the ball, using Ball.getBounds and utils.containsPoint, and it prints a message. Play around with this example to see exactly when and where particular mouse events occur. Here are some things to notice:
- You get the canvas events no matter where the mouse is, even if it's over the ball.
- You won't get a
mouseupevent without first getting amousedownevent.
Using touch events
Throughout the book examples, we use a mouse for user input because it's assumed that you are on a development machine with a keyboard and mouse that is handy. But with the proliferation of touch screen devices, it's not only possible, but quite probable, you'll need to capture touch events from the user. Although touch screens and mice are different devices, thankfully for us, capturing touch events is similar to capturing mouse events from the DOM.
The touch events most compatible with the examples in this book and their mouse event counterparts are touchstart, touchend, and touchmove. The touchstart event is fired on the contact of first touch, touchend when a finger leaves the surface, and touchmove when the finger is dragged on the surface. For more details about touch events, browse the W3C Specification at http://www.w3.org/TR/touch-events/. At the time of writing, this document is still considered a work-in-progress, though it has been implemented by a number of mobile web browsers. When in doubt, test it out!
One important distinction between using a finger versus a mouse is that while a mouse cursor is always present on the screen, a finger touch is not. In Chapter 2, we created a utility function, utils.captureTouch, that tracks the touch position. The object returned by this function, also contains the property isPressed, which tests whether a touch has been detected on the surface. When we modify an example to handle touch events, we should first check that there is even a touch; otherwise, accessing the touch position might return null:
var touch = utils.captureTouch(canvas);


if (touch.isPressed) {

  console.log(touch.x, touch.y);

}
The next example, 02-touch-events.html, builds off the first example in this chapter, but it is modified to handle touch events (the new parts are in bold in the code below). For the example to work, be sure you test this in a web browser that can handle these types of events (on a touch screen device or an emulator).
In the document header, we've added a meta tag to set the viewport. This tells the browser how the content should fit on the device's screen and that the page is optimized for mobile viewing:
<meta name="viewport" content="width=device-width,initial-scale=1.0,user-scalable=no">
Here, the viewport has been set to the width of the device with an initial scale of 1. Users are also prevented from zooming the document.
<!doctype html>

<html>

 <head>

  <meta charset="utf-8">

  <meta name = "viewport" content="width=device-width,initial-scale=1.0,user-scalable=no">

  <title>Touch Events</title>

  <link rel="stylesheet" href="style.css">

 </head>

 <body>

  <canvas id="canvas" width="400" height="400"></canvas>

  <textarea id="log"></textarea>

  <script src="utils.js"></script>

  <script src="ball.js"></script>

  <script>

  window.onload = function () {

    var canvas = document.getElementById('canvas'),

        context = canvas.getContext('2d'),

        touch = utils.captureTouch(canvas),

        log = document.getElementById('log'),

        ball = new Ball();


    ball.x = canvas.width / 2;

    ball.y = canvas.height / 2;

    ball.draw(context);
    canvas.addEventListener('touchstart', function (event) {

      event.preventDefault();

      if (utils.containsPoint(ball.getBounds(), touch.x, touch.y)) {

        log.value = "in ball: touchstart";

      } else {

        log.value = "canvas: touchstart";

      }

    }, false);


    canvas.addEventListener('touchend', function (event) {

      event.preventDefault();

      log.value = "canvas: touchend";

    }, false);

    canvas.addEventListener('touchmove', function (event) {

      event.preventDefault();

      if (utils.containsPoint(ball.getBounds(), touch.x, touch.y)) {

        log.value = "in ball: touchmove";

      } else {

        log.value = "canvas: touchmove";

      }

    }, false);

  };

  </script>

 </body>

</html>
In the touch event listeners, we pass the event object to the handler function and call event.preventDefault(). This keeps the browser from continuing to process the event after the handler has been executed. It also prevents the touch event's corresponding mouse event from being delivered, which is the default behavior (though it is best not to rely on this).
Now that you understand the basics of the important interaction events, we'll move on to dragging.
Dragging an object
To drag an object around the canvas element, update the object's position to match the coordinates of the mouse cursor. The programming is straight-forward: Capture a mousedown event when the cursor is over the ball and set up a mousemove handler. This handler sets the ball's x and y coordinates to the current mouse position. Then, on the mouseup event, remove that handler.
The next example, 03-mouse-move-drag.html, should help make this clear:
<!doctype html>

<html>

 <head>

  <meta charset="utf-8">

  <title>Mouse Move Drag</title>

  <link rel="stylesheet" href="style.css">

 </head>
 <body>

  <canvas id="canvas" width="400" height="400"></canvas>

  <script src="utils.js"></script>

  <script src="ball.js"></script>

  <script>

  window.onload = function () {

    var canvas = document.getElementById('canvas'),

        context = canvas.getContext('2d'),

        mouse = utils.captureMouse(canvas),

        ball = new Ball();


    ball.x = canvas.width / 2;

    ball.y = canvas.height / 2;


    canvas.addEventListener('mousedown', function () {

      if (utils.containsPoint(ball.getBounds(), mouse.x, mouse.y)) {

        canvas.addEventListener('mouseup', onMouseUp, false);

        canvas.addEventListener('mousemove', onMouseMove, false);

      }

    }, false);


    function onMouseUp () {

      canvas.removeEventListener('mouseup', onMouseUp, false);

      canvas.removeEventListener('mousemove', onMouseMove, false);

    }


    function onMouseMove (event) {

      ball.x = mouse.x;

      ball.y = mouse.y;

    }


    (function drawFrame () {

      window.requestAnimationFrame(drawFrame, canvas);

      context.clearRect(0, 0, canvas.width, canvas.height);


      ball.draw(context);

    }());

  };

  </script>

 </body>

</html>
When the script is run initially, you listen for mousedown events only and when the mouse is over the ball. When called, this event handler adds additional listeners to the canvas element for mouseup and mousemove events. The onMouseMove function updates the ball's position to match the mouse coordinates. The onMouseUp function removes the mouseup and mousemove listeners from the canvas, because you care about these only in the dragging phase.
You might have noticed a problem with this setup. If you click the edge of the ball and drag it, you'll see that the ball suddenly jumps and centers itself on the mouse cursor. This is because you're setting the ball's position exactly equal to the mouse position. You can fix this by finding the offset of the mouse to the ball on mousedown and adding that to the ball's position as you drag, but that is a project left for you.
Combining dragging with motion code
Now you know pretty much everything about simple dragging and dropping on the canvas. But in the process, we've reverted back to a static object that just sits there unless you drag it. To make it interesting, let's add some velocity, acceleration, and bouncing.
You already have a nice setup for velocity, gravity, and bouncing in the 05-bouncing-2.html example from the previous chapter, so that will be our starting point. It seems logical to simply add your drag-and-drop code to that code, so let's try it. You should end up with something like this document (04-drag-and-move-1.html):
<!doctype html>

<html>

 <head>

  <meta charset="utf-8">

  <title>Drag and Move 1</title>

  <link rel="stylesheet" href="style.css">

 </head>

 <body>

  <canvas id="canvas" width="400" height="400"></canvas>

  <script src="utils.js"></script>

  <script src="ball.js"></script>

  <script>

  window.onload = function () {

    var canvas = document.getElementById('canvas'),

        context = canvas.getContext('2d'),

        mouse = utils.captureMouse(canvas),

        ball = new Ball(),

        vx = Math.random() * 10 - 5,

        vy = -10,

        bounce = -0.7,

        gravity = 0.2,

        isMouseDown = false;
    ball.x = canvas.width / 2;

    ball.y = canvas.height / 2;


    canvas.addEventListener('mousedown', function () {

      if (utils.containsPoint(ball.getBounds(), mouse.x, mouse.y)) {

        isMouseDown = true;

        canvas.addEventListener('mouseup', onMouseUp, false);

        canvas.addEventListener('mousemove', onMouseMove, false);

      }

    }, false);

    function onMouseUp () {

      isMouseDown = false;

      canvas.removeEventListener('mouseup', onMouseUp, false);

      canvas.removeEventListener('mousemove', onMouseMove, false);

    }


    function onMouseMove (event) {
      ball.x = mouse.x;

      ball.y = mouse.y;

    }


    function checkBoundaries () {

      var left = 0,

          right = canvas.width,

          top = 0,

          bottom = canvas.height;


      vy += gravity;

      ball.x += vx;

      ball.y += vy;


      //boundary detect and bounce

      if (ball.x + ball.radius > right) {

        ball.x = right - ball.radius;

        vx *= bounce;

      } else if (ball.x - ball.radius < left) {

        ball.x = left + ball.radius;

        vx *= bounce;

      }

      if (ball.y + ball.radius > bottom) {

        ball.y = bottom - ball.radius;

        vy *= bounce;

      } else if (ball.y - ball.radius < top) {

        ball.y = top + ball.radius;

        vy *= bounce;

      }

    }


    (function drawFrame () {

      window.requestAnimationFrame(drawFrame, canvas);

      context.clearRect(0, 0, canvas.width, canvas.height);


      if (!isMouseDown) {

        checkBoundaries();

      }

      ball.draw(context);

    }());

  };

  </script>

</body>

</html>
As you can see, we've moved all the boundary checking code into the function checkBoundaries and added the mouse event handlers. We've also declared the variable isMouseDown that is updated by the handlers to keep track of the mouse button state—so we check only the boundaries when the mouse is not pressed.
If you run this example, you can see the problem when you stop dragging the ball. Yes, the dragging works, but the motion code continues working at the same time. You need some way of switching on or off the motion code, so that it doesn't happen while you're dragging.
When you start dragging, all you're doing is dragging. When you drop the ball, the motion code resumes where it left off. The main problem now is that the velocity also resumes where it left off, which sometimes results in the ball flying off in some direction when you release it—very unnatural looking. You can easily fix that by setting vx and vy to zero, either when you start dragging or when you stop, as long as it is done before the motion code resumes. Let's put it in the mousedown event handler:
canvas.addEventListener('mousedown', function () {

  if (utils.containsPoint(ball.getBounds(), mouse.x, mouse.y)) {

    isMouseDown = true;

    vx = vy = 0;

    canvas.addEventListener('mouseup', onMouseUp, false);

    canvas.addEventListener('mousemove', onMouseMove, false);

  }

}, false);
That takes care of the problem and leaves you with a fully functional drag-and-drop feature with integrated velocity, acceleration, and bouncing. You can see the full code listing in document 05-drag-and-move-2.html.
Just one issue remains. When you drop the ball, it falls straight down—no more x-axis motion. Although this is the correct behavior, it's a bit boring. If you could throw the ball and have it fly off in whatever direction you threw it, that would be some engaging interactivity.
Throwing
What does throwing mean with regard to animation? It means you click an object to start dragging it and move it in a particular direction. When you release it, the object keeps moving in the direction you were dragging it.
For the velocity, you must determine what velocity the object has while it is being dragged, and then set the object's velocity to that value when it is dropped. In other words, if you were dragging a ball 10 pixels per frame to the left, then when you release it, its velocity should be vx = -10.
Setting the velocity should be no problem for you. Just assign new values to vx and vy, as shown in Figure 7-1. Determining what those values are might seem a little tricky, but actually, calculating the dragging velocity is almost exactly the opposite of applying velocity in your motion code. In applying velocity, you add velocity to the object's old position to come up with the object's new position. This formula is old + velocity = new. To determine the velocity of an object while it's being dragged, you simply rearrange the equation to get velocity = new - old.
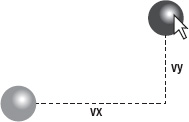
Figure 7-1. A ball dragged to a new position. The velocity is the distance from its last position to this new position.
As you drag the object, it will have a new position on each frame. If you take that position and subtract the position it was in on the previous frame, you'll know how far it moved in one frame. That's your pixels-per-frame velocity!
Here's an example, simplifying it to a single axis. A ball is dragged, and on one frame, you note that its x position is 150. On the next frame, you see that its x position is 170. Thus, in one frame, it was dragged 20 pixels on the x axis, and its x velocity at that point is +20. If you were to release it just then, you would expect it to continue moving at an x velocity of 20. So, you would set vx = 20.
This requires a few changes to the existing script. First, in the drawFrame function, check to see whether the mouse is pressed, and if so, call trackVelocity to update the dragging velocity of the ball. You need a couple of variables to hold the old x and y positions—call them oldX and oldY—and declare them at the beginning of the script. This is where you store the ball's position as soon as it starts dragging:
canvas.addEventListener('mousedown', function () {

  if (utils.containsPoint(ball.getBounds(), mouse.x, mouse.y)) {

    isMouseDown = true;

    oldX = ball.x;

    oldY = ball.y;

    canvas.addEventListener('mouseup', onMouseUp, false);

    canvas.addEventListener('mousemove', onMouseMove, false);

    }

  }, false);


  (function drawFrame () {

  window.requestAnimationFrame(drawFrame, canvas);

  context.clearRect(0, 0, canvas.width, canvas.height);


  if (isMouseDown) {

    trackVelocity();

  } else {

    checkBoundaries();

  }

  ball.draw(context);

}());
Then, in the trackVelocity function, you subtract oldX from the current x position and oldY from the current y. This gives you the current velocity, and store these values directly in vx and vy. Next, you reset oldX and oldY to the current position of the ball again:
function trackVelocity () {

  vx = ball.x - oldX;

  vy = ball.y - oldY;

  oldX = ball.x;

  oldY = ball.y; }
At this point, you don't need to do anything at all about the velocity. It has been kept track of all through the drag, and the latest velocity is already stored in vx and vy. As soon as you re-enable the motion code in checkBoundaries, the ball will move at whatever velocity it was just being dragged with, and this results in a thrown ball!
In case you got lost along the way, here is the final example (06-throwing.html):
<!doctype html>

<html>

 <head>

  <meta charset="utf-8">

  <title>Throwing</title>

  <link rel="stylesheet" href="style.css">

 </head>

 <body>

  <canvas id="canvas" width="400" height="400"></canvas>

  <script src="utils.js"></script>

  <script src="ball.js"></script>

  <script>

  window.onload = function () {

    var canvas = document.getElementById('canvas'),

        context = canvas.getContext('2d'),

        mouse = utils.captureMouse(canvas),

        ball = new Ball(),

        vx = Math.random() * 10 - 5,

        vy = -10,

        bounce = -0.7,

        gravity = 0.2,

        isMouseDown = false,

        oldX, oldY;


    ball.x = canvas.width / 2;

    ball.y = canvas.height / 2;


    canvas.addEventListener('mousedown', function () {

      if (utils.containsPoint(ball.getBounds(), mouse.x, mouse.y)) {

        isMouseDown = true;

        oldX = ball.x;

        oldY = ball.y;

        canvas.addEventListener('mouseup', onMouseUp, false);

        canvas.addEventListener('mousemove', onMouseMove, false);

      }

    }, false);


    function onMouseUp () {

      isMouseDown = false;

      canvas.removeEventListener('mouseup', onMouseUp, false);

      canvas.removeEventListener('mousemove', onMouseMove, false);

    }


    function onMouseMove (event) {

      ball.x = mouse.x;

      ball.y = mouse.y;

    }
    function trackVelocity () {

      vx = ball.x - oldX;

      vy = ball.y - oldY;

      oldX = ball.x;

      oldY = ball.y;

    }


    function checkBoundaries () {

      var left = 0,

          right = canvas.width,

          top = 0,

          bottom = canvas.height;


      vy += gravity;

      ball.x += vx;

      ball.y += vy;


      //boundary detect and bounce

      if (ball.x + ball.radius > right) {

        ball.x = right - ball.radius;

        vx *= bounce;

      } else if (ball.x - ball.radius < left) {

        ball.x = left + ball.radius;

        vx *= bounce;

      }

      if (ball.y + ball.radius > bottom) {

        ball.y = bottom - ball.radius;

        vy *= bounce;

      } else if (ball.y - ball.radius < top) {

        ball.y = top + ball.radius;

        vy *= bounce;

      }

    }


    (function drawFrame () {

      window.requestAnimationFrame(drawFrame, canvas);

      context.clearRect(0, 0, canvas.width, canvas.height);


      if (isMouseDown) {

        trackVelocity();

      } else {

        checkBoundaries();

      }

        ball.draw(context);

    }());

  };

  </script>

 </body>

</html>
Now that is interactive and a good example of a real-world physics animation created using event handlers and JavaScript. It feels like you're throwing something around. Play around with the gravity and bounce variables, and if you want, add friction to simulate some atmosphere.
Summary
Although this is not a long chapter, it covered some extremely valuable ground and made some great headway toward interactivity. By now, you should be able to drag any object, drop it, and throw it.
Most important, you've worked with a lot of the small details that go into doing a professional job with interactivity. In future chapters, you look at many other ways of allowing the user to interact with objects in your animations. The complexity is going to build up fast, but if you have these basics down, you'll do great.