
Chapter 8
Easing and Springing
What we'll cover in this chapter:
- Proportional motion
- Easing
- Springing
It's hard to believe that it took seven chapters to get through “the basics,” but here you are at Chapter 8, the beginning of the advanced stuff. Or, the point where things start to get really interesting. Up to now, each chapter covered more general techniques and concepts. Beginning with this chapter, we'll be concentrating on one or two specialized types of motion per chapter.
In this chapter, we'll look at easing (proportional velocity) and springing (proportional acceleration). But don't think that because there are only two items, this is a chapter you can skim through quickly. These techniques can be used to create some very complex motion, and you'll use them a lot. There are plenty of examples to look through, so you can get an idea of just how powerful these techniques are.
Proportional Motion
Easing and springing are closely related, both techniques involve moving an object from an existing position to a target position. In easing, the object kind of slides into the target and stops. In springing, it bounces around back and forth for a bit, and then finally settles down at the target. The two techniques have the following in common:
- You set a target.
- You determine the distance to that target.
- Your motion is proportional to that distance—the bigger the distance, the more the motion.
The difference between easing and springing is in what aspect of the motion is proportional. In easing, the speed is proportional to the distance; the further away from the target, the faster the object moves. As it gets very close to the object, it's hardly moving at all.
In springing, acceleration is proportional to the distance. If the object is far away from the target, a lot of acceleration is applied, increasing the velocity quickly. As the object gets closer to its target, less acceleration is applied, but it's still accelerating! It flies right past the target, and then acceleration pulls it back. Eventually, friction causes it to settle down.
Let's examine each technique separately, starting with easing.
Easing
There is more than one type of easing; you can “ease in” to a position, and “ease out” from a position. Also, easing can have different motion characteristics, for example, a sine wave, bouncing, elasticity, and many more. The type of easing we'll primarily discuss here is “ease out”, and a bit later in this chapter, in the “Advanced easing” section, you'll see where you can go to find out about other kinds of easing.
Simple easing
To understand simple easing, imagine you have an object over here and you want to move it over there. Since you're creating the “illusion of motion,” you want to move it there gradually, over several frames. You could simply find the angle between the two, set a speed, use some trigonometry to work out the vx and vy, and set it in motion. Then you could check the distance to the target on each frame (using the Pythagorean Theorem, as described in Chapter 3), and when it arrives there, stop it. That approach might work in some situations, but if you're trying to make something look like it's moving naturally, it won't do.
The problem is that your object would move along at a fixed velocity, reach its target, and stop dead. If you're talking about some object moving along and hitting a brick wall, yes, it might be sort of like that. But when you're moving an object to a target, this generally implies that you know where this target is, and are deliberately moving the object into place there. In such a case, the motion will start out fairly fast, and then slow down as it gets closer to the target. In other words, its velocity is going to be proportional to the distance to the target.
Let's take an example: You're driving home. When you are a few miles away, you're moving at the speed limit. When you pull off the highway and into your neighborhood, you're moving a bit slower. Once you're on your own street, a block or two away, you'll move much slower. As you approach your driveway, you're down to a few miles per hour. When you reach the last few feet of the driveway, you're moving a lot slower than when you pulled into the driveway. And inches before you stop, you're moving at a fraction of that speed.
If you take the time to look, you'll see this behavior manifests itself even in small things like closing a drawer or door. You start out fast and gradually slow down. The next time you go to close a door, make an effort to follow through with the same speed you started with; just be prepared to explain to anyone nearby why you're slamming doors. When you use easing to move an object into position, it automatically takes on a very natural appearance. One of the coolest things is that simple easing is actually very easy to do. In fact, it's probably easier than figuring out the angle, the vx, and the vy, and moving at a fixed speed.
Here is the strategy for easing:
- Decide on a number for your proportional motion. This will be a fraction of 1.
- Determine your target.
- Calculate the distance from the object to the target.
- Multiply the distance by the fraction. This is your velocity.
- Add the velocity value to the current position.
- Repeat steps 3 through 5 until the object is at the target.
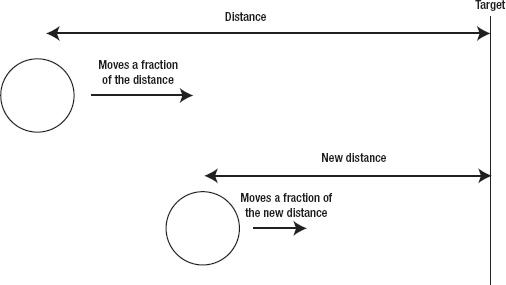
Figure 8-1. Basic easing
Let's go through these steps one at a time, and see how to program them. Don't worry about where to put the code yet, you”re just seeing how the code looks and what it means.
First, decide on a fraction to represent the proportion. As I said, the velocity will be proportional to the motion. Specifically, this means that the velocity will be a fraction of the distance, something between 0 and 1. The closer it is to 1, the quicker the object will move. The closer it is to 0, the slower it will move, but be careful, because too low a value and you'll be waiting a very long time for the object to reach its target. For starters, choose something like 0.05, and we'll call this variable easing. So you can begin with the following code:
var easing = 0.05;
Next, determine your target; this is a simple x, y position. You can make it the center of the canvas element for lack of anything better:
Then calculate the distance to the target. Assuming you have an object named ball, you just subtract the ball's x and y from the target x and y:
var dx = targetX – ball.x,

    dy = targetY - ball.y;
Your velocity is then the distance times the fraction:
var vx = dx * easing,

    vy = dy * easing;


ball.x += vx;

ball.y += vy;
These last few steps need to be repeated, so those will go in your drawFrame function. Let's take a closer look at those steps, as they can be largely simplified:
var dx = targetX – ball.x,

    dy = targetY – ball.y,

    vx = dx * easing,

    vy = dy * easing;


ball.x += vx;

ball.y += vy;
You can condense the first two lines into the second two pretty easily:
var vx = (targetX - ball.x) * easing,

    vy = (targetY - ball.y) * easing;


ball.x += vx;

ball.y += vy;
Or, you can consolidate it even further:
ball.x += (targetX - ball.x) * easing;

ball.y += (targetY - ball.y) * easing;
As you explore easing, you might want to use the more verbose descriptions to make it clearer. But once you understand how it works, the third version communicates perfectly. We'll stick with the second version here, just to reinforce the idea that you're dealing with velocity.
Now, let's see it in action. You'll need the Ball class you've been using all along, and here's the example, 01-easing-1.html:
<!doctype html>

<html>

 <head>

  <meta charset="utf-8">

  <title>Easing 1</title>

  <link rel="stylesheet" href="style.css">
 </head>

 <body>

  <canvas id="canvas" width="400" height="400"></canvas>

  <script src="utils.js"></script>

  <script src="ball.js"></script>

  <script>

  window.onload = function () {

    var canvas = document.getElementById('canvas'),

        context = canvas.getContext('2d'),

        ball = new Ball(),

        easing = 0.05,

        targetX = canvas.width / 2,

        targetY = canvas.height / 2;


    (function drawFrame () {

      window.requestAnimationFrame(drawFrame, canvas);

      context.clearRect(0, 0, canvas.width, canvas.height);


      var vx = (targetX - ball.x) * easing,

          vy = (targetY - ball.y) * easing;


      ball.x += vx;

      ball.y += vy;

      ball.draw(context);

    }());

  };

  </script>

 </body>

</html>
Play around with the easing variable to see how it affects the resulting motion.
The next thing you might want to do is drag the ball around and then have it ease back to its target. This is similar to the drag-and-drop technique you set up in Chapter 7. Here, you start dragging the ball when it is pressed with the mouse. The drawFrame function checks if the ball is being dragged, and if so, performs the easing calculations. Here's the document, 02-easing-2.html:
<!doctype html>

<html>

 <head>

  <meta charset="utf-8">

  <title>Easing 2</title>

  <link rel="stylesheet" href="style.css">

 </head>

 <body>

  <canvas id="canvas" width="400" height="400"></canvas>

  <script src="utils.js"></script>

  <script src="ball.js"></script>

  <script>

  window.onload = function () {

    var canvas = document.getElementById('canvas'),

        context = canvas.getContext('2d'),

        mouse = utils.captureMouse(canvas),
        ball = new Ball(),

        easing = 0.05,

        targetX = canvas.width / 2,

        targetY = canvas.height / 2,

        isMouseDown = false;


    canvas.addEventListener('mousedown', function () {

      if (utils.containsPoint(ball.getBounds(), mouse.x, mouse.y)) {

        isMouseDown = true;

        canvas.addEventListener('mouseup', onMouseUp, false);

        canvas.addEventListener('mousemove', onMouseMove, false);

      }

    }, false);


    function onMouseUp () {

      isMouseDown = false;

      canvas.removeEventListener('mouseup', onMouseUp, false);

      canvas.removeEventListener('mousemove', onMouseMove, false);

    }


    function onMouseMove () {

      ball.x = mouse.x;

      ball.y = mouse.y;

    }


    (function drawFrame () {

      window.requestAnimationFrame(drawFrame, canvas);

      context.clearRect(0, 0, canvas.width, canvas.height);


      if (!isMouseDown) {

        var vx = (targetX - ball.x) * easing,

            vy = (targetY - ball.y) * easing;


        ball.x += vx;

        ball.y += vy;

      }

      ball.draw(context);

    }());

   };

   </script>

  </body>

</html>
When to stop easing
If you are calculating simple easing to a single target, eventually you'll get to the point where the object is at the target and the purpose of the easing has been achieved. But, in the examples so far, the easing code continues to execute, even though the object isn't visibly moving anymore. If you are just easing to that point and leaving the object there, continuing to run the easing code is a waste of system resources. If you've reached your goal, you might as well stop trying. At first glance, this would be as simple as checking whether the object is at its target and turning off the animation loop, like so:
But it winds up being a little more tricky. I touched on this problem in earlier chapters when we applied friction, but we'll examine it in a little more detail here.
The type of easing we are discussing involves something from Zeno's Paradoxes. Zeno of Elea was a Greek philosopher who devised a set of problems to show that, contrary to what our senses tell us, there is no change, and motion is an illusion. To demonstrate this, Zeno explained motion as follows: In order for something to move from point A to point B, it first must move to a point halfway between the two. Then it needs to travel from that point to a point halfway between there and point B. And then halfway again. Since you always need to move halfway to the target, you can never actually reach the target, since it is an infinite amount of steps away.
It's a paradox because it sounds logical, but yet, our own experiences tell us that we move from point A to point B every day. Let's take a look at it where the infinite breaks down in JavaScript. On the x axis, an object is at position 0. Say you want to move it to 100 on the x axis. Make the easing variable 0.5, so it always moves half the distance to the target. It progresses like this:
- Starting at 0, after frame 1, it will be at 50.
- Frame 2 will bring it to 75.
- Now the distance is 25. Half of that is 12.5, so the new position will be 87.5.
- Following the sequence, the position will be 93.75, 96.875, 98.4375, and so on. After 20 frames, it will be 99.999809265.
As you can see, it gets closer and closer but never actually reaches the target—theoretically. However, things are a bit different when you examine what the code does. Visually, it comes down to the question: “How small can you slice a pixel?” And that answer is not specified in the HTML5 Canvas specification, rather, it's defined by the browser implementation. Vendors could implement a high-resolution canvas with a precision to many decimal places, but average viewer would have a very difficult time discerning a pixel difference at 10 steps, meaning within 0.1.
In this example, the closest we can get the position to 100 after 20 steps is 99.99990463256836.
var position = 0,

    target = 100;


for (var i = 0; i < 20; i++) {

  console.log(i + ": " + position);

  position += (target - position) * 0.5;

}
This loops through 20 times, moving the position half the distance to the target; it's just basic easing code. We”re only interested in printing the positions, not actually seeing the motion. But, what you'll find is that by the eleventh iteration, the position has reached 99.9, and when viewing this demonstration on the canvas, that's as close as our ball will get.
Even though the ball on the canvas is not getting any closer visually, mathematically it will still never actually reach its target. So, if you're doing a simple comparison, as in the previous example, your easing code will never get shut off. What you need to decide is: “How close is close enough?” This is determined by whether the distance to the target is less than a certain amount. For many examples in this book, if an object is within a pixel of its target, it's safe to say it has arrived, and the easing code will be turned off.
If you are using two dimensions, you can calculate the distance using the formula introduced in Chapter 3:
var distance = Math.sqrt(dx * dx + dy * dy);
If you have a single value for distance, as when you are moving an object on a single axis, you need to use the absolute value of that distance, as it may be negative. You can do this by using the Math.abs method.
Here's a simple example to demonstrate turning off easing (03-easing-off.html):
<!doctype html>

<html>

 <head>

  <meta charset="utf-8">

  <title>Easing Off</title>

  <link rel="stylesheet" href="style.css">

 </head>

 <body>

  <canvas id="canvas" width="400" height="400"></canvas>

  <textarea id="log"></textarea>

  <script src="utils.js"></script>

  <script src="ball.js"></script>

  <script>

  window.onload = function () {

    var canvas = document.getElementById('canvas'),

        context = canvas.getContext('2d'),

        log = document.getElementById('log'),

        ball = new Ball(),

        easing = 0.05,

        targetX = canvas.width / 2,

        animRequest;


    ball.y = canvas.height / 2;


    (function drawFrame () {

      animRequest = window.requestAnimationFrame(drawFrame, canvas);

      context.clearRect(0, 0, canvas.width, canvas.height);


      var dx = targetX – ball.x;


      if (Math.abs(dx) < 1) {

        ball.x = targetX;

        window.cancelRequestAnimationFrame(animRequest);

        log.value = "Animation done!";

      } else {

        var vx = dx * easing;

        ball.x += vx;
      }

      ball.draw(context);

    }());

  };

  </script>

 </body>

</html>
This exercise expands the easing formula a bit to first calculate the distance, since you'll need this to see whether easing should be stopped. Perhaps now you can see why you need to use the absolute value of dx. If the ball were to the right of the target, dx would be a negative number, the statement if(dx < 1) would evaluate as true, and that would be the end of things. By using Math.abs, you make sure that the actual distance is less than 1. You then place the ball where it is trying to go and disable the motion code.
Each animation frame request is stored in the variable animRequest. When we want to turn off the animation loop, we pass this variable as a parameter to window.cancelRequestAnimationFrame. If this function is not available in your browser natively, then add this cross-browser implementation to the file utils.js:
if (!window.cancelRequestAnimationFrame) {

  window.cancelRequestAnimationFrame = (window.cancelAnimationFrame ||

                                        window.webkitCancelRequestAnimationFrame ||

                                        window.mozCancelRequestAnimationFrame ||

                                        window.oCancelRequestAnimationFrame ||

                                        window.msCancelRequestAnimationFrame ||

                                        window.clearTimeout);

}
Remember that if you are doing something like a drag-and-drop with easing, you'll want to re-enable the motion code when the ball is dropped.
A moving target
In the examples so far, the target point has been a single, fixed location, but that's not a requirement. The distance is calculated on each frame, and the velocity is then calculated based on that. The code doesn't care whether or not it reaches the target, or if the target keeps moving. It just goes merrily along, wondering what the target, distance and velocity are for every frame.
You can easily make the mouse an easing target. Just plug in the mouse coordinates (mouse.x and mouse.y) where you had targetX and targetY before. Here's a version that does just that (04-ease-tomouse.html):
<!doctype html>
<html>

 <head>

  <meta charset="utf-8">

  <title>Ease to Mouse</title>

  <link rel="stylesheet" href="style.css">

 </head>

 <body>

  <canvas id="canvas" width="400" height="400"></canvas>

  <script src="utils.js"></script>
  <script src="ball.js"></script>

  <script>

  window.onload = function () {

    var canvas = document.getElementById('canvas'),

        context = canvas.getContext('2d'),

        mouse = utils.captureMouse(canvas),

        ball = new Ball(),

        easing = 0.05;


    (function drawFrame () {

      window.requestAnimationFrame(drawFrame, canvas);

      context.clearRect(0, 0, canvas.width, canvas.height);


      var vx = (mouse.x - ball.x) * easing,

          vy = (mouse.y - ball.y) * easing;


      ball.x += vx;

      ball.y += vy;

      ball.draw(context);

    }());

  };

  </script>

 </body>

</html>
Move the mouse around and see how the ball follows, and how it goes faster when you get further away.
Think of what other moving targets you could have. Maybe an object could ease to another object—you can set up some very complex looking effects by chaining together this simple technique.
Easing isn't just for motion
It's important to understand, that the examples in this book are just that: examples. In each one, we”re manipulating numbers that are used for various properties of an object. For the most part, we”re using the x and y properties to control positions of objects, but they can have many other properties that you can manipulate because most of them are represented by numbers. When you read a particular example, try it out, but don't leave it at that. Try the example, and manipulate other properties as well. Here's a few ideas to get you started.
Rotation
Set a current and target rotation. Of course, you need something that can be visibly rotated and drawn to the canvas, like the Arrow class from earlier chapters:
var rotation = 90,

    targetRotation = 270;
Then ease it:
rotation += (targetRotation - rotation) * easing;
arrow.rotation = rotation * Math.PI / 180; //degrees to radians
Colors
Try easing on 24-bit colors. You'll need to start with red, green, and blue initial values and target values, perform the easing on each separate component color, and then combine them into a color value. For instance, you could ease from red to blue. Start with the initial and target colors:
var red = 255,

    green = 0,

    blue = 0,

    redTarget = 0,

    greenTarget = 0,

    blueTarget = 255;
Then in your drawFrame function, perform easing on each one:
red += (redTarget - red) * easing;

green += (greenTarget - green) * easing;

blue += (blueTarget - blue) * easing;
Then combine the three components into a single value (as described in Chapter 4), and apply:
var color = red << 16 | green << 8 | blue;
Transparency
Apply easing to the alpha component of a CSS-style color string. Start out by setting it to 0, and making the target 1 (remember that alpha is a value from 0.0 to 1.0):
var alpha = 0,

    targetAlpha = 1;
Then in the drawFrame function, fade it in with easing, and concatenate a RGBA string:
alpha += (targetAlpha - alpha) * easing;

ball.color = "rgba(255, 0, 0," + alpha + ")";
Or reverse the 0 and 1 to make it fade out.
Advanced easing
Now that you've seen how simple easing works, you might consider using more complex easing formulas for additional effects. For instance, you might want something to start slowly, build up speed, and then slow down as it approaches its target. Or you might want to ease something into position over a certain time period or number of frames.
Robert Penner has collected numerous easing formulas, cataloged them, and implemented them in Flash. You can find his easing formulas at http://robertpenner.com, and I've ported that code to JavaScript for you to look at, and perhaps include in your own animations. You can browse this code, along with the other book examples, at http://github.com/lamberta/html5-animation
Springing
Springing is one of the most powerful and useful physics concepts in programmed animation. It seems like you can do almost anything with a spring, but of course, it's just another technique. Since you can do so much with a spring, let's take a look at what it is and how you can program it.
As mentioned at the beginning of the chapter, the acceleration of a spring is proportional to its distance from a target. Think about a real, physical spring, or better yet, a ball on the end of a rubber band. You attach the other end to something solid. As the ball is hanging there with no force applied, that's its target point. That's where it wants to be. Now pull it away a tiny bit and let it go. At that point, the ball's velocity is zero, but the rubber band applies force to it, pulling it back to the target. Now pull it away as far as you can and let it go. The rubber band applies a lot more force. The ball zooms right past its target and starts going the other way. Its velocity is very high. But when it gets a little bit past the target, the rubber band starts pulling it back a bit—changes its velocity. The ball keeps going, but the farther it goes, the more the band pulls back on it. Eventually, the velocity reaches zero, the direction reverses, and the whole thing starts over again. Finally, after bouncing back and forth a few times, it slows down and comes to a stop at—you guessed where—its target.
Now, let's start translating this into code so you can use it. To keep things simple, let's start off with one dimension.
Springing in one dimension
Once again, we'll use the red ball to demonstrate this idea. You'll leave it over at its default x position of zero and have it spring to the middle of the canvas. As with easing, you'll need a variable to hold the proportionate value of the spring. You can think of this as the proportion of the distance that will be added to the velocity. A high spring value will make a very stiff spring. Something lower will look more like a loose rubber band. You'll start off with 0.1, and here's the initial code:
var spring = 0.1,

    targetX = canvas.width / 2,

    vx = 0;
Again, don't worry about where to put this just yet. Just make sure you know what these variables and statements are doing.
Then we begin the motion code and find the distance to the target:
var dx = targetX - ball.x;
Now, compute some acceleration. The acceleration will be proportional to that distance, in fact, it will be the distance multiplied by the spring value:
var ax = dx * spring;
Once you have a value for acceleration, you should be back on familiar ground. Add the acceleration to the velocity and add the velocity to the position:
vx += ax;

ball.x += vx;
Before you write any code, we'll simulate it with some sample numbers. Let's say the x position is 0, vx is 0, the target x is 100, and the spring variable is 0.1. Here is how it might progress:
- Multiply distance (100) by
spring, and you get 10. Add that tovx, which then becomes 10. Add velocity to position, making the x position 10. - Next round, distance (100 - 10) is 90. Acceleration is 90 times 0.1, or 9 this time. This gets added to
vx, which becomes 19. The x position becomes 29. - Next round, distance is 71, acceleration is 7.1, which added to
vxmakes it 26.1. The x position becomes 55.1 - Next round, distance is 44.9, acceleration is 4.49, and
vxbecomes 30.59. The x position is then 85.69.
The acceleration on each frame becomes less and less as the object approaches its target, but the velocity continues to build. It's not building as rapidly as it was on previous frames, but it's still moving faster and faster.
After a couple more rounds, the object goes right past the target to an x position of around 117. The distance is now 100 - 117, which is -17. A fraction of this gets added to the velocity, slowing the object down a bit.
Now that you understand how springing works, let's make a real example. As usual, make sure the Ball class is available to your document, and use the following file (05-spring-1.html):
<!doctype html>

<html>

 <head>

  <meta charset="utf-8">

  <title>Spring 1</title>

  <link rel="stylesheet" href="style.css">

 </head>

 <body>

  <canvas id="canvas" width="400" height="400"></canvas>

  <script src="utils.js"></script>

  <script src="ball.js"></script>

  <script>

  window.onload = function () {

    var canvas = document.getElementById('canvas'),

        context = canvas.getContext('2d'),

        ball = new Ball(),

        spring = 0.03,

        targetX = canvas.width / 2,

        vx = 0;


    ball.y = canvas.height / 2;


    (function drawFrame () {

      window.requestAnimationFrame(drawFrame, canvas);

      context.clearRect(0, 0, canvas.width, canvas.height);


      var dx = targetX – ball.x,

          ax = dx * spring;
      vx += ax;

      ball.x += vx;

      ball.draw(context);

    }());

  };

  </script>

 </body>

</html>
Test this in your browser, and you'll see something spring-like going on. The problem is that it kind of goes on forever. Earlier, when the spring was described, we said that it slows down and comes to a stop. But in this example, the ball builds up the same velocity on each leg of its swing, so it keeps bouncing back and forth at the same speed. You need something to reduce its velocity and slow it down—which means you need to apply some friction. Easy enough, just create a friction variable, with a value like 0.95 for starters. This goes up at the top of the script with the rest of the variables:
var friction = 0.95;
Then multiply vx by friction somewhere in the drawFrame function. Here's the corrected section of the script (06-spring-2.html):
(function drawFrame () {

  window.requestAnimationFrame(drawFrame, canvas);

  context.clearRect(0, 0, canvas.width, canvas.height);


  var dx = targetX – ball.x,

      ax = dx * spring;


  vx += ax;

  vx *= friction;

  ball.x += vx;

  ball.draw(context);

}());
At this point, you have a full-fledged, albeit one-dimensional, spring. Play with this one a lot, and see what different values for spring and friction do and how they interact. Check out how a different starting position or target position affects the action of the system, the speed of the ball, and the rate at which it slows down and comes to a stop.
Just like with easing, the animation loop will continue to apply the minute motion values long after the code has any visual effects. Again, you can save some calculations by checking if the number is larger than a minimum distance before applying the friction, like so:
if (Math.abs(vx) > 0.001) {

  vx += ax;

  vx *= friction;

  ball.x += vx;

}
Understanding this spring example will take you a long way. Now you're ready to move on to a two-dimensional spring.
Springing in two dimensions
The previous spring moved our ball along the x axis, or left-right. If we want the ball to spring along the x axis and y axis—left-right and top-bottom—we need a two-dimensional spring. Creating this is as easy as adding a second target, velocity, and acceleration; as we see in the next example, 07-spring-3.html:
<!doctype html>

<html>

 <head>

  <meta charset="utf-8">

  <title>Spring 3</title>

  <link rel="stylesheet" href="style.css">

 </head>

 <body>

  <canvas id="canvas" width="400" height="400"></canvas>

  <script src="utils.js"></script>

  <script src="ball.js"></script>

  <script>

  window.onload = function () {

    var canvas = document.getElementById('canvas'),

        context = canvas.getContext('2d'),

        ball = new Ball(),

        spring = 0.03,

        friction = 0.95,

        targetX = canvas.width / 2,

        targetY = canvas.height / 2,

        vx = 0,

        vy = 0;


    (function drawFrame () {

      window.requestAnimationFrame(drawFrame, canvas);

      context.clearRect(0, 0, canvas.width, canvas.height);


      var dx = targetX – ball.x,

          dy = targetY – ball.y,

          ax = dx * spring,

          ay = dy * spring;


      vx += ax;

      vy += ay;

      vx *= friction;

      vy *= friction;

      ball.x += vx;

      ball.y += vy;

      ball.draw(context);

    }());

  };

  </script>

 </body>

</html>
Here, the only difference from the previous example is all the references to the y-axis. The problem is that it still seems rather one-dimensional. Yes, the ball is now moving on the x and y axes, but it's just going in a straight line. That's because its velocity starts out as zero, and the only force acting on it is the pull toward the target, so it goes in a straight line toward its target.
To make things a little more interesting, initialize vx to something other than 0—try something like 50. Now, you have motion that looks a little more loose and fluid. But you're only getting started, it gets a lot cooler.
Springing to a moving target
It probably won't surprise you that springing doesn't require the target to be the same on each frame. When we covered easing, you saw a quick and easy example of the ball following the mouse. It's pretty easy to adapt that example to make the ball spring to the mouse. Instead of the targetX and targetY you've been using, use the mouse coordinates. In springing, as with easing, the distance to the target is always calculated newly on each frame. Acceleration is based on that, and that acceleration is added to the velocity.
The effect is very cool, and the code isn't all that different. In the preceding example, simply change these lines:
var dx = targetX – ball.x,

    dy = targetY - ball.y;
So they look like this:
var dx = mouse.x – ball.x,

    dy = mouse.y - ball.y;
Remember to include var mouse = utils.captureMouse(canvas) at the top of your script. You can also remove the lines that declare the targetX and targetY variables, since you won't be needing them. The updated document is available as 08-spring-4.html.
This is another good place to stop and play. Get a good feel for how all these variables work, and try out many variations. Break it, and find out what breaks it. Have fun with it!
So where's the spring?
At this point, you have a very realistic-looking ball on the end of a rubber band. But it seems to be an invisible rubber band. Well, you can fix that with a few lines of code from the canvas drawing API.
Since you have a fairly simple file without much else going on, you can safely add your drawing code directly to the drawFrame function. In a more complex application, you might want to create another object to hold your drawing commands and use that as a kind of drawing layer.
In each frame, after the ball is in position, you begin a new path and move the drawing cursor to the ball's position, then, simply draw a line to current mouse position. Remember to add a stroke so that line is visible on the canvas element:
context.beginPath();

context.moveTo(ball.x, ball.y);

context.lineTo(mouse.x, mouse.y);

context.stroke();
Now, how about adding some gravity so the ball looks like it's actually hanging off the end of the mouse? Just add a gravity variable and add that to the vy for each frame. The following code (09-spring-5.html) uses the line drawing and gravity additions:
<!doctype html>

<html>

 <head>

  <meta charset="utf-8">

  <title>Spring 5</title>

  <link rel="stylesheet" href="style.css">

 </head>

 <body>

  <canvas id="canvas" width="400" height="400"></canvas>

  <script src="utils.js"></script>

  <script src="ball.js"></script>

  <script>

  window.onload = function () {

    var canvas = document.getElementById('canvas'),

        context = canvas.getContext('2d'),

        mouse = utils.captureMouse(canvas),

        ball = new Ball(),

        spring = 0.03,

        friction = 0.9,

        gravity = 2,

        vx = 0,

        vy = 0;


    (function drawFrame () {

      window.requestAnimationFrame(drawFrame, canvas);

      context.clearRect(0, 0, canvas.width, canvas.height);


      var dx = mouse.x – ball.x,

          dy = mouse.y – ball.y,

          ax = dx * spring,

          ay = dy * spring;


      vx += ax;

      vy += ay;

      vy += gravity;

      vx *= friction;

      vy *= friction;

      ball.x += vx;

      ball.y += vy;


      context.beginPath();

      context.moveTo(ball.x, ball.y);

      context.lineTo(mouse.x, mouse.y);

      context.stroke();

      ball.draw(context);

    }());

  };

  </script>

 </body>

</html>
When you test this version, you should see something like Figure 8-2.
Notice how we've increased the gravity value to 2 so the ball actually hangs down. Much less than that, and the force of the spring overcomes the force of gravity and you don't see the effect.
Here's another point where we've deviated from real-world physics. Of course, you can't go around “increasing gravity” on objects! Gravity is a constant, based on the size and mass of the planet you happen to be on. What you can do is increase the mass of the object, so that gravity has more of an effect on it. So, technically we should keep gravity at something like 0.5, and then create a mass property and make it something like 10. Then we could multiply mass by gravity and come up with 5 again. But as long as you understand that I'm referring to the force that gravity is exerting on the object based on its mass, we'll just call it gravity.
Figure 8-2. Springing from the mouse, with a visible spring
Again, experiment with this example. Try decreasing the gravity and spring values, try changing the friction value. You'll see you can have a nearly endless number of combinations, allowing you to create all kinds of systems.
Chaining springs
Now we'll chain a few springs together. In the easing section, we discussed chaining briefly, where one object eases to the mouse, another object eases to that object, and so on. Here we'll take a look at some examples that use that same idea, only with springs.
Here's the plan, start off by creating three balls, named ball0, ball1, and ball2. The first one, ball0, will behave pretty much like the single ball did in the previous example. Then ball1 will spring to ball0, and ball2 will spring to ball1. All will have gravity, so they should kind of hang down in a chain. You've seen all this code before, it's just a little more complex. Here it is, in example 10-chain.html:
<!doctype html>

<html>

 <head>

  <meta charset="utf-8">

  <title>Chain</title>

  <link rel="stylesheet" href="style.css">

 </head>

 <body>

  <canvas id="canvas" width="400" height="400"></canvas>

  <script src="utils.js"></script>

  <script src="ball.js"></script>

  <script>

  window.onload = function () {

    var canvas = document.getElementById('canvas'),
        context = canvas.getContext('2d'),

        mouse = utils.captureMouse(canvas),

        ball0 = new Ball(),

        ball1 = new Ball(),

        ball2 = new Ball(),

        spring = 0.03,

        friction = 0.9,

        gravity = 2;


    function move (ball, targetX, targetY) {

      ball.vx += (targetX - ball.x) * spring;

      ball.vy += (targetY - ball.y) * spring;

      ball.vy += gravity;

      ball.vx *= friction;

      ball.vy *= friction;

      ball.x += ball.vx;

      ball.y += ball.vy;

    }


    (function drawFrame () {

      window.requestAnimationFrame(drawFrame, canvas);

      context.clearRect(0, 0, canvas.width, canvas.height);


      move(ball0, mouse.x, mouse.y);

      move(ball1, ball0.x, ball0.y);

      move(ball2, ball1.x, ball1.y);


      //draw spring

      context.beginPath();

      context.moveTo(mouse.x, mouse.y);

      context.lineTo(ball0.x, ball0.y);

      context.lineTo(ball1.x, ball1.y);

      context.lineTo(ball2.x, ball2.y);

      context.stroke();

      //draw balls

      ball0.draw(context);

      ball1.draw(context);

      ball2.draw(context);

    }());

  };

  </script>

 </body>

</html>
If you take another look at the Ball class, you'll see that each object instance gets its own vx and vy properties, and these are initialized to 0. So, at the top of the script, you just need to create each ball.
Then in the drawFrame function, you perform all the springing and drawing. Rather than duplicating the same code three times for each ball, we include a move function, which handles all of the motion code. This takes a reference to a ball and an x and y target. You call the function for each ball, passing in the x and y mouse position for the first ball, and the location of the first and second balls as targets for the second and third.
Finally, when all of the balls are in place, you begin a new path, move the drawing cursor to the mouse position, and then draw a line to each successive ball, creating the rubber band holding them all together. The friction in this example was pushed to 0.9 to force things to settle down a bit quicker.
You could make this example a bit more flexible, by creating an array to hold references to each object in the chain, and iterating through that array to move each one, and then draw the lines. This would just take a few changes. First, you'd need a couple of new variables for the array and the number of objects to create:
var balls = [],

    numBalls = 5;
At the top of the script in a while loop, we initialize each ball and add it to the array:
while (numBalls--) {

  balls.push(new Ball(20)); }
Finally, in drawFrame we pass each ball to the new draw function. This function takes two arguments, an instance of our Ball class, and it's index position in an array (which is provided by Array.forEach). We move the first ball to the mouse position, and each remaining ball to the ball prior to it, drawing a line between them. It loops through all the balls in the array, moving and drawing a line to each one in turn. You can add as many objects as you want simply by changing the value of the one variable, numBalls.
function draw (ballB, i) {

  //if first ball, move to mouse

  if (i === 0) {

    move(ballB, mouse.x, mouse.y);

    context.moveTo(mouse.x, mouse.y);

  } else {

    var ballA = balls[i-1];

    move(ballB, ballA.x, ballA.y);

    context.moveTo(ballA.x, ballA.y);

  }

  context.lineTo(ballB.x, ballB.y);

  context.stroke();

  ballB.draw(context);

}


(function drawFrame () {

  window.requestAnimationFrame(drawFrame, canvas);

  context.clearRect(0, 0, canvas.width, canvas.height);


  context.beginPath();

  balls.forEach(draw);

}());
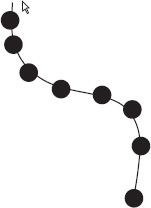
You can see the result in Figure 8-3 and can find this in document 11-chain-array.html.
Springing to multiple targets
Back when the subjects of velocity and acceleration were introduced in Chapter 5, we saw how you could have multiple forces acting on an object. Each type of force is represented as a value, which we add to a cumulative velocity value, that is then applied to the motion of the object. Since a spring is nothing more than something exerting acceleration on an object, it's pretty simple to create multiple springs acting on a single object.
To demonstrate springing to multiple targets, we'll create three “handles”—which will be instances of the Ball class—and give them simple drag-and-drop functionality. These will also act as targets for the ball to spring to. The ball will try to spring to all three of them at once and find its equilibrium somewhere between them. Or, to put it another way, each target will exert a certain amount of acceleration on the ball, and its motion will be the sum total of all of those forces.
This example gets pretty complex, with several methods in place to handle the various behaviors. First, here's the complete example (document 12-multi-spring.html), then we'll discuss it section by section. Figure 8-4 shows an example of the results of this code.
<!doctype html>

<html>

 <head>

  <meta charset="utf-8">

  <title>Multi Spring</title>

  <link rel="stylesheet" href="style.css">

 </head>

 <body>

  <canvas id="canvas" width="400" height="400"></canvas>

  <script src="utils.js"></script>

  <script src="ball.js"></script>

  <script>

  window.onload = function () {

    var canvas = document.getElementById('canvas'),

        context = canvas.getContext('2d'),

        mouse = utils.captureMouse(canvas),

        ball = new Ball(20),
        handles = [],

        numHandles = 3,

        spring = 0.03,

        friction = 0.9,

        movingHandle = null;


    for (var handle, i = 0; i < numHandles; i++) {

      handle = new Ball(10, "#0000ff");

      handle.x = Math.random() * canvas.width;

      handle.y = Math.random() * canvas.height;

      handles.push(handle);

    }


    canvas.addEventListener('mousedown', function () {

      handles.forEach(function (handle) {

        if (utils.containsPoint(handle.getBounds(), mouse.x, mouse.y)) {

          movingHandle = handle;

        }

      });

    }, false);


    canvas.addEventListener('mouseup', function () {

      if (movingHandle) {

        movingHandle = null;

      }

    }, false);


    canvas.addEventListener('mousemove', function () {

      if (movingHandle) {

        movingHandle.x = mouse.x;

        movingHandle.y = mouse.y;

      }

    }, false);


    function applyHandle (handle) {

      var dx = handle.x – ball.x,

          dy = handle.y – ball.y;


      ball.vx += dx * spring;

      ball.vy += dy * spring;

    }


    function drawHandle (handle) {

      context.moveTo(ball.x, ball.y);

      context.lineTo(handle.x, handle.y);

      context.stroke();

      handle.draw(context);

    }


    (function drawFrame () {

      window.requestAnimationFrame(drawFrame, canvas);

      context.clearRect(0, 0, canvas.width, canvas.height);


      handles.forEach(applyHandle);
      ball.vx *= friction;

      ball.vy *= friction;

      ball.x += ball.vx;

      ball.y += ball.vy;


      context.beginPath();

      handles.forEach(drawHandle);

      ball.draw(context);

    }());

  };

  </script>

 </body>

</html>
At the top of the script, we create a ball and three handles, randomly positioning the handles and setting up their drag-and-drop behavior.
The drawFrame function loops through each handle, springing the ball toward it by calling the applyHandle function. It then applies the ball's new velocity to its position, and loops through the handles again, drawing a line from the ball to each handle. Then, finally, we draw the ball.
The mousedown event listener iterates over each handle, and if it finds one that contains the current position of our mouse cursor, it sets that handle to movingHandle. In the mouseup event hander, if a handle has been dragged, then it is stopped.
You can easily change the number of handles to use by changing the numHandles variable.
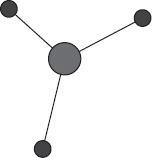
Figure 8-4. Multiple springs
Offsetting the target
If you took a real spring—an actual coil of bouncy metal—and attached one end of it to something solid and the other end to a ball or some other object, what would be the target? Would the target be the point where the spring is attached? No, not really. The ball would never be able to reach that point, because the spring itself would be in the way. Furthermore, once the spring had contracted to its normal length, it wouldn't be applying any more force on the ball. So, the target would actually be the position of the loose end of the spring when it's not stretched. But that point could vary as the spring pivots around the fixed point.
To find the actual target, you need to first find the angle between the object and the fixed point, and then move out from the fixed point at that angle—the length of the spring. In other words, if the length of the spring were 50, and the angle between the ball and fixed point were 45, you would move out 50 pixels from the fixed point, at an angle of 45 degrees, and that would be the ball's target to spring to. Figure 8-5 illustrates how this works.
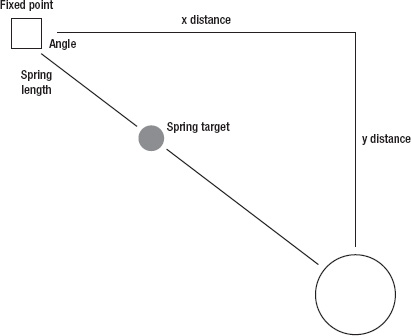
Figure 8-5. Offsetting a spring
The code to find the target in this case would be:
var dx = ball.x – fixedX,

    dy = ball.y – fixedY,

    angle = Math.atan2(dy, dx),

    targetX = fixedX + Math.cos(angle) * springLength,

    targetY = fixedY + Math.sin(angle) * springLength;
The result is that the object will spring toward the fixed point, but will come to rest some distance away from it. Although we”re calling it a “fixed point,” this just means the point to which the spring is fixed, it doesn't mean that point cannot move. Perhaps it's better just to see it in action. You'll go back to using the mouse position, but this time, it will be the spring's fixed point. The spring's length will be 100 pixels. Here's the example (document 13-offset-spring.html):
<!doctype html>

<html>

 <head>

  <meta charset="utf-8">

  <title>Offset Spring</title>

  <link rel="stylesheet" href="style.css">

 </head>
 <body>

  <canvas id="canvas" width="400" height="400"></canvas>

  <script src="utils.js"></script>

  <script src="ball.js"></script>

  <script>

  window.onload = function () {

    var canvas = document.getElementById('canvas'),

        context = canvas.getContext('2d'),

        mouse = utils.captureMouse(canvas),

        ball = new Ball(),

        spring = 0.03,

        friction = 0.9,

        springLength = 100,

        vx = 0,

        vy = 0;


    (function drawFrame () {

      window.requestAnimationFrame(drawFrame, canvas);

      context.clearRect(0, 0, canvas.width, canvas.height);


      var dx = ball.x – mouse.x,

          dy = ball.y – mouse.y,

          angle = Math.atan2(dy, dx),

          targetX = mouse.x + Math.cos(angle) * springLength,

          targetY = mouse.y + Math.sin(angle) * springLength;


      vx += (targetX - ball.x) * spring;

      vy += (targetY - ball.y) * spring;

      vx *= friction;

      vy *= friction;

      ball.x += vx;

      ball.y += vy;


      context.beginPath();

      context.moveTo(ball.x, ball.y);

      context.lineTo(mouse.x, mouse.y);

      context.stroke();

      ball.draw(context);

    }());

  };

  </script>

 </body>

</html>
Even though you can see what is happening here, it might not be obvious where you would find this technique useful. Well, the next section will give you a specific example.
Attaching multiple objects with springs
Since we know how to spring an object to a point, and that the point does not have to be fixed. You could have one object spring to another object, and have the other object spring back to the first one, so that these two objects are linked together by a spring. Move either one, and the other object springs to it.
That's the general strategy, but to use the terms discussed in this chapter: object A has object B as its target. It springs toward it. Object B in turn has object A as its target, and this is where the offset is important. If each object had the other as a direct target, they would collapse in on each other and occupy the same point. By applying an offset, you keep them apart a bit, as shown in Figure 8-6.

Figure 8-6. Two objects connected
For this next example, you'll create two instances of the Ball connected by a spring, and we'll call them ball0 and ball1. ball0 springs to ball1 with an offset, and ball1 springs to ball0 with an offset. Rather than writing out all the offset, spring, and motion code twice, it's all put into a function named springTo. You can spring ball0 to ball1 by calling springTo(ball0, ball1), and then spring ball1 to ball0 by calling springTo(ball1, ball0). There are also a couple of variables that have been added: ball0_dragging and ball1_dragging, to disable the springing for each ball when it is being dragged. Here's the document (14-double-spring.html):
<!doctype html>

<html>

 <head>

  <meta charset="utf-8">

  <title>Double Spring</title>

  <link rel="stylesheet" href="style.css">

 </head>

 <body>

  <canvas id="canvas" width="400" height="400"></canvas>

  <script src="utils.js"></script>

  <script src="ball.js"></script>

  <script>

  window.onload = function () {

    var canvas = document.getElementById('canvas'),

        context = canvas.getContext('2d'),

        mouse = utils.captureMouse(canvas),

        ball0 = new Ball(20),

        ball1 = new Ball(20),

        ball0_dragging = false,

        ball1_dragging = false,

        spring = 0.03,

        friction = 0.9,

        springLength = 100,

        vx = 0,

        vy = 0;


    ball0.x = Math.random() * canvas.width;

    ball0.y = Math.random() * canvas.height;

    ball1.x = Math.random() * canvas.width;

    ball1.y = Math.random() * canvas.height;

    canvas.addEventListener('mousedown', function () {
      if (utils.containsPoint(ball0.getBounds(), mouse.x, mouse.y)) {

        ball0_dragging = true;

      }

      if (utils.containsPoint(ball1.getBounds(), mouse.x, mouse.y)) {

        ball1_dragging = true;

      }

    }, false);


    canvas.addEventListener('mouseup', function () {

      if (ball0_dragging || ball1_dragging) {

        ball0_dragging = false;

        ball1_dragging = false;

      }

    }, false);


    canvas.addEventListener('mousemove', function () {

      if (ball0_dragging) {

        ball0.x = mouse.x;

        ball0.y = mouse.y;

      }

      if (ball1_dragging) {

        ball1.x = mouse.x;

        ball1.y = mouse.y;

      }

    }, false);


    function springTo (ballA, ballB) {

      var dx = ballB.x – ballA.x,

          dy = ballB.y – ballA.y,

          angle = Math.atan2(dy, dx),

          targetX = ballB.x - Math.cos(angle) * springLength,

          targetY = ballB.y - Math.sin(angle) * springLength;


      ballA.vx += (targetX - ballA.x) * spring;

      ballA.vy += (targetY - ballA.y) * spring;

      ballA.vx *= friction;

      ballA.vy *= friction;

      ballA.x += ballA.vx;

      ballA.y += ballA.vy;

    }


    (function drawFrame () {

      window.requestAnimationFrame(drawFrame, canvas);

      context.clearRect(0, 0, canvas.width, canvas.height);


      if (!ball0_dragging) {

        springTo(ball0, ball1);

      }

      if (!ball1_dragging) {

        springTo(ball1, ball0);

      }

      context.beginPath();
      context.moveTo(ball0.x, ball0.y);

      context.lineTo(ball1.x, ball1.y);

      context.stroke();

      ball0.draw(context);

      ball1.draw(context);

    }());

  };

  </script>

 </body>

</html>
For this example, the balls are placed on the canvas element and are set up for drag-and-drop. drawFrame calls the springTo function for each ball, if they are not being dragged:
if (!ball0_dragging) {

  springTo(ball0, ball1);

}

if (!ball1_dragging) {

  springTo(ball1, ball0); }
The springTo function is where all the action happens, and everything here should be familiar to you. First, it finds the distance and angle to the other ball, and calculates a target point based on that. It then performs basic spring mechanics on that target point. When the function is called again, with the parameters reversed, the balls swap roles, and the original target ball springs toward the other one.
You'll see that neither ball is attached to any fixed point or the mouse; they are both free-floating. Their only constraint is that they maintain a certain distance from each other. The great thing about this setup is that it is now very easy to add additional objects. For example, let's create a third ball in example 15-triple-spring.html. Add two new variables: ball2 and ball2_dragging; and some additional code for the mouse event handlers, and animation loop (shown in bold below). You can follow this pattern to keep adding as many balls as you'd like.
<!doctype html>

<html>

 <head>

  <meta charset="utf-8">

  <title>Triple Spring</title>

  <link rel="stylesheet" href="style.css">

 </head>

 <body>

  <canvas id="canvas" width="400" height="400"></canvas>

  <script src="utils.js"></script>

  <script src="ball.js"></script>

  <script>

  window.onload = function () {

    var canvas = document.getElementById('canvas'),

        context = canvas.getContext('2d'),

        mouse = utils.captureMouse(canvas),

        ball0 = new Ball(20),

        ball1 = new Ball(20),
        ball2 = new Ball(20),

        ball0_dragging = false,

        ball1_dragging = false,

        ball2_dragging = false,

        spring = 0.03,

        friction = 0.9,

        springLength = 100,

        vx = 0,

        vy = 0;


    ball0.x = Math.random() * canvas.width;

    ball0.y = Math.random() * canvas.height;

    ball1.x = Math.random() * canvas.width;

    ball1.y = Math.random() * canvas.height;

    ball2.x = Math.random() * canvas.width;

    ball2.y = Math.random() * canvas.height;


    canvas.addEventListener('mousedown', function () {

      if (utils.containsPoint(ball0.getBounds(), mouse.x, mouse.y)) {

        ball0_dragging = true;

      }

      if (utils.containsPoint(ball1.getBounds(), mouse.x, mouse.y)) {

        ball1_dragging = true;

      }

      if (utils.containsPoint(ball2.getBounds(), mouse.x, mouse.y)) {

        ball2_dragging = true;

      }

    }, false);


    canvas.addEventListener('mouseup', function () {

      if (ball0_dragging || ball1_dragging || ball2_dragging) {

        ball0_dragging = false;

        ball1_dragging = false;

        ball2_dragging = false;

      }

    }, false);


    canvas.addEventListener('mousemove', function () {

      if (ball0_dragging) {

        ball0.x = mouse.x;

        ball0.y = mouse.y;

      }

      if (ball1_dragging) {

        ball1.x = mouse.x;

        ball1.y = mouse.y;

      }

      if (ball2_dragging) {

        ball2.x = mouse.x;

        ball2.y = mouse.y;

      }

    }, false);


    function springTo (ballA, ballB) {
      var dx = ballB.x - ballA.x,

          dy = ballB.y - ballA.y,

          angle = Math.atan2(dy, dx),

          targetX = ballB.x - Math.cos(angle) * springLength,

          targetY = ballB.y - Math.sin(angle) * springLength;


      ballA.vx += (targetX - ballA.x) * spring;

      ballA.vy += (targetY - ballA.y) * spring;

      ballA.vx *= friction;

      ballA.vy *= friction;

      ballA.x += ballA.vx;

      ballA.y += ballA.vy;

    }


    (function drawFrame () {

      window.requestAnimationFrame(drawFrame, canvas);

      context.clearRect(0, 0, canvas.width, canvas.height);


      if (!ball0_dragging) {

        springTo(ball0, ball1);

        springTo(ball0, ball2);

      }

      if (!ball1_dragging) {

        springTo(ball1, ball0);

        springTo(ball1, ball2);

      }

      if (!ball2_dragging) {

        springTo(ball2, ball0);

        springTo(ball2, ball1);

      }


      context.beginPath();

      context.moveTo(ball0.x, ball0.y);

      context.lineTo(ball1.x, ball1.y);

      context.lineTo(ball2.x, ball2.y);

      context.lineTo(ball0.x, ball0.y);

      context.stroke();

      ball0.draw(context);

      ball1.draw(context);

      ball2.draw(context);

    }());

  };

  </script>

 </body>

</html>
This will create a triangle formation, as shown in Figure 8-7. Once you get the hang of this, you can move on to creating a square, and from there, all kinds of complex springy structures.
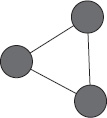
Figure 8-7. Three objects connected by a spring
Important formulas in this chapter
Once again, it's time to review the important formulas presented in this chapter.
Simple easing, long form
var dx = targetX – object.x,

    dy = targetY – object.y;

vx = dx * easing;

vy = dy * easing;

object.x += vx;

object.y += vy;
Simple easing, abbreviated form
vx = (targetX - object.x) * easing;

vy = (targetY - object.y) * easing;

object.x += vx;

object.y += vy;
Simple easing, short form
object.x += (targetX - object.x) * easing;

object.y += (targetY – object.y) * easing;
Simple spring, long form
var ax = (targetX - object.x) * spring,

    ay = (targetY - object.y) * spring;

vx += ax;

vy += ay;

vx *= friction;

vy *= friction;

object.x += vx;

object.y += vy;
Simple spring, abbreviated form
vx += (targetX - object.x) * spring;

vy += (targetY - object.y) * spring;

vx *= friction;

vy *= friction;

object.x += vx;

object.y += vy;
Simple spring, short form
vx += (targetX - object.x) * spring;

vy += (targetY - object.y) * spring;

object.x += (vx *= friction);

object.y += (vy *= friction);
Offset spring
var dx = object.x – fixedX,

    dy = object.y – fixedY,

    angle = Math.atan2(dy, dx),

    targetX = fixedX + Math.cos(angle) * springLength,

    targetY = fixedX + Math.sin(angle) * springLength;

//spring to targetX, targetY as above
Summary
This chapter covered the two basic techniques of proportional motion: easing and springing. You've learned that easing is proportional motion and springing is proportional velocity. You should have a very good understanding of how to apply both of these techniques, and have begun to play with them and create some really fun and interesting effects yourself.
Now that you've learned all sorts of ways of moving things around, let's move on to the next chapter, where you'll find out what to do when they start hitting eachother!