
Chapter 9
Collision Detection
What we'll cover in this chapter:
- Collision detection methods
- Geometric hit testing methods
- Distance-based collision detection
- Multiple-object collision detection strategies
As you've progressed through the book, you've seen how to make objects move and make them interact with the space they occupy. Now, you're going to make these objects interact with each other. For the most part, this will involve determining when two objects have touched each other. This is a subject known as collision detection or hit testing.
This chapter will attempt to cover just about everything you need to know about detecting collisions. This includes hit testing between two objects, hit testing between an object and a point, distance-based collision detection, and multiple-object collision testing strategies. First, let's see what options are available for collision detection.
Collision detection methods
Collision detection, or hit testing, is a simple concept: You want to know whether two objects are occupying any part of the same space at the same time. Of course, you may have more than two objects, and you may want to know whether any of them are hitting any others. But when you break it down, you need to test each object, one at a time, against each other object.
There are a couple of ways of performing collision detection:
- You can test the geometry of each object; that is, does the shape of this object overlap the shape of that object? Wen'll use the object's rectangular bounds to determine this.
- You can test the distance between objects; that is, are these objects close enough for them to be colliding? You must calculate the distance and decide when the objects are close enough.
Each method has its uses, and we'll look at both in detail in this chapter.
However, there won't be many details about what to do when you detect a collision, or, how should two objects react when they bump into each other? That subject is covered in Chapter 11, where we discuss the conservation of momentum.
Geometric hit testing methods
In Chapter 7, we added a getBounds method to our Ball class, something that is used a number of times in this chapter. Just to refresh your memory, this method returns an object representing a rectangle with properties x, y, width, and height. This rectangle designates a bounding box that contains the shape of ball in relation to the canvas element.
Using this rectangle, we can determine if another rectangle intersects with it, or if a coordinate falls within its area. We will use these methods to test if one object is hitting another, or if an object is hitting a specific point.
Hit testing two objects
Now given that two objects each have a getBounds method defined, we can determine if the objects are touching by testing if the two bounding rectangles intersect. First, we need to add the utility function utils.intersects to our utils.js file:
utils.intersects = function (rectA, rectB) {

  return !(rectA.x + rectA.width < rectB.x ||

           rectB.x + rectB.width < rectA.x ||

           rectA.y + rectA.height < rectB.y ||

           rectB.y + rectB.height < rectA.y);

};
Nothing fancy here, just simple geometry. You call the function by passing it two rectangle arguments, it returns true if they overlap, and false if they don't. It is invoked like this:
utils.intersects(rectA, rectB)
When testing if two bounding boxes are touching, this will usually go within an if statement, like so:
if (utils.intersects(objectA.getBounds(), objectB.getBounds()) {

  //react to collision

}
In this snippet, utils.intersects will return true if there is a collision between objectA and objectB, and the statements within the if block will execute. This is probably the simplest method of collision detection, and also the easiest to program.
However, as with all things, there is a trade-off. As collision detection methods get easier, they get less accurate. As they get more accurate, they become more complex and computationally-intensive. So, while this is the easiest method, it is also the least accurate.
What do we mean by hit testing accuracy—either something is hitting or it's not, right? Well, it goes back to this question: Based on the positions of two objects, how do you determine if they are hitting?
In the bounding rectangle method that was just described, you take the first object and draw a rectangle around it. The top edge of the rectangle goes on the topmost visible pixel of the object's shape, the bottom edge goes on the lowest visible pixel, and the left and right edges are on their furthest visible pixels. Then you do the same for the object you're testing against. Finally, you check whether these two rectangles are intersecting in any way, and if so, you have a collision.

Figure 9-1. A bounding box
This rectangle around the object is known as a bounding box, and it's calculated for our ball based on its position and size. It's normally invisible, so it is explicitly drawn as rectangle around the shape in Figure 9-1 so you can see it.
Why would this be inaccurate? You might think that if the bounding boxes intersected, the objects must be touching. Well, take a look at the pictures in Figure 9-2. Which pairs would you say are touching each other?
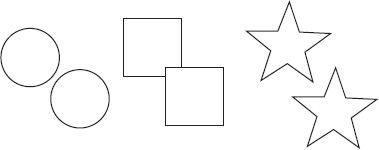
Figure 9-2. Which ones are touching?
Obviously, only the squares are actually hitting, right? Well, let's draw in the bounding boxes and see what the calculation sees. Figure 9-3 shows the results.
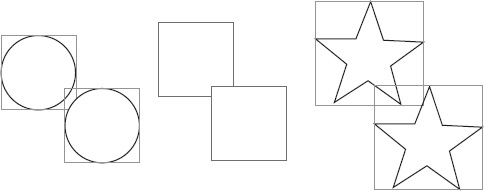
Figure 9-3. Not what you expected?
Each pair of shapes are colliding as far as our code is concerned. If you don't believe me, test the following document, 01-object-hit-test.html. It uses the Ball class we created earlier, so make sure that script has been imported along with the updated utils.js file.
<!doctype html>

<html>

 <head>

  <meta charset="utf-8">

  <title>Object Hit Test</title>

  <link rel="stylesheet" href="style.css">

 </head>

 <body>

  <canvas id="canvas" width="400" height="400"></canvas>

  <textarea id="log"></textarea>

  <script src="utils.js"></script>

  <script src="ball.js"></script>

  <script>

  window.onload = function () {

    var canvas = document.getElementById('canvas'),

        context = canvas.getContext('2d'),

        log = document.getElementById('log'),

        mouse = utils.captureMouse(canvas),

        ballA = new Ball(),

        ballB = new Ball();


    ballA.x = canvas.width / 2;

    ballA.y = canvas.height / 2;


    (function drawFrame () {

      window.requestAnimationFrame(drawFrame, canvas);

      context.clearRect(0, 0, canvas.width, canvas.height);


      ballB.x = mouse.x;

      ballB.y = mouse.y;


      if (utils.intersects(ballA.getBounds(), ballB.getBounds())) {

        log.value = "Hit!";

      } else {
        log.value = '';

      }


      ballA.draw(context);

      ballB.draw(context);

    }());

  };

  </script>

 </body>

</html>
This example creates two instances of the Ball class and sets one of them to be dragged with the mouse. The utils.intersects function is called on each frame to check whether the two balls are hitting. If you approach the stationary ball from the top, bottom, or sides, it is accurate, but you always get a false positive if you come in diagonally. If you were to try drawing some other shapes instead of a ball, you would see that rectangular shapes work perfectly, but the more irregular the shape you use, the more inaccuracies you'll find. Be careful about using this method for anything other than rectangular shapes.
To visualize each ball's bounding box, simply draw these rectangles to the canvas. Try adding the following code to the end of the drawFrame animation loop:
var boundsA = ballA.getBounds(),

    boundsB = ballB.getBounds();


context.strokeRect(boundsA.x, boundsA.y, boundsA.width, boundsA.height);

context.strokeRect(boundsB.x, boundsB.y, boundsB.width, boundsB.height);
Now we'll look at an exercise that demonstrates using utils.intersects with rectangles. The example uses a new Box class that is very similar to Ball, and which I'm sure you'll have no trouble understanding. Here it is:
function Box (width, height, color) {

  if (width === undefined) { width = 50; }

  if (height === undefined) { height = 50; }

  if (color === undefined) { color = "#ff0000"; }

  this.x = 0;

  this.y = 0;

  this.width = width;

  this.height = height;

  this.vx = 0;

  this.vy = 0;

  this.rotation = 0;

  this.scaleX = 1;

  this.scaleY = 1;

  this.color = utils.parseColor(color);

  this.lineWidth = 1;

}


Box.prototype.draw = function (context) {

  context.save();

  context.translate(this.x, this.y);

  context.rotate(this.rotation);

  context.scale(this.scaleX, this.scaleY);
  context.lineWidth = this.lineWidth;

  context.fillStyle = this.color;

  context.beginPath();

  context.rect(0, 0, this.width, this.height);

  context.closePath();

  context.fill();

  if (this.lineWidth > 0) {

    context.stroke();

  }

  context.restore();

};
You'll notice that we left off the getBounds method in the Box class. Since the rectangle objects already contain the required properties, we can pass them directly to the utils.intersects function to test for a collision.
In this next example, a box is created at the top of the canvas element and falls to the bottom. When the box is placed, it falls down until it hits the bottom of the canvas or collides with another box. If it hits another box, it positions itself so it is sitting right on top of it. Here's the code for document 02-boxes.html:
<!doctype html>

<html>

 <head>

  <meta charset="utf-8">

  <title>Boxes</title>

  <link rel="stylesheet" href="style.css">

 </head>

 <body>

  <canvas id="canvas" width="400" height="400"></canvas>

  <script src="utils.js"></script>

  <script src="box.js"></script>

  <script>

  window.onload = function () {

    var canvas = document.getElementById('canvas'),

        context = canvas.getContext('2d'),

        boxes = [],

        activeBox = createBox(),

        gravity = 0.2;


    function createBox () {

      var box = new Box(Math.random() * 40 + 10, Math.random() * 40 + 10);

      box.x = Math.random() * canvas.width;

      boxes.push(box);

      return box;

    }


    function drawBox (box) {

      if (activeBox !== box && utils.intersects(activeBox, box)) {

        activeBox.y = box.y − activeBox.height;

        activeBox = createBox();

      }

      box.draw(context);
    }


    (function drawFrame () {

      window.requestAnimationFrame(drawFrame, canvas);

      context.clearRect(0, 0, canvas.width, canvas.height);


      activeBox.vy += gravity;

      activeBox.y += activeBox.vy;


      if (activeBox.y + activeBox.height > canvas.height) {

        activeBox.y = canvas.height - activeBox.height;

        activeBox = createBox();

      }

      boxes.forEach(drawBox);

    }());

  };

  </script>

 </body>

</html>
In the drawFrame function, the code checks whether the box has gone below the bottom of the canvas element. And if so, it stops it and creates a new box. Then it iterates over the boxes array passing each box to the drawBox function, which checks the active box against all the other boxes. First, it makes sure it is not doing a hit test against itself, and then, at the heart of the program, utils.intersects determines whether the box has hit another one. If it has, the code repositions the moving box to the top of the one it just hit, and then creates a new box. Run this code for a minute or so, and you'll see something that looks like in Figure 9.4.

Figure 9-4. Collision detection with a rectangle's bounding box.
If you really want to see the inaccuracy of this method in action, instead of a rectangle, try drawing a circle, or some other irregular shape. Some objects will appear to hover in mid-air as they “hit” other objects, as shown in Figure 9.5.
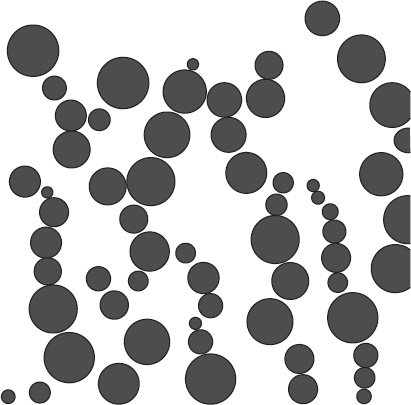
Figure 9-5. Collision detection with a circle's bounding box.
Hit testing an object and a point
In Chapter 7, the utility function utils.containsPoint was introduced, but here we will see how it relates to hit testing; although, it's not very useful for testing for the collision between two objects. As mentioned previously, the function takes three arguments: the first is a rectangle object with x, y, width, and height properties, and the remaining two arguments define x and y coordinates. It returns true or false, depending if that point is hitting the rectangle in question. Here's the function again so you don't have to look it up, but it should already be in your utils.js file:
utils.containsPoint = function (rect, x, y) {

  return !(x < rect.x || x > rect.x + rect.width ||

           y < rect.y || y > rect.y + rect.height);

};
It might be used like this when testing if point (100, 100) falls within a rectangle:
if (utils.containsPoint(rect, 100, 100)) {

  //react to collision

}
But once again, we come back to the question: What constitutes a hit? And, once again, we see the bounding box coming into play—the code only checks if the point is within an object's bounding box.
Let's do a quick test to see that in action with example 03-point-hit-test.html:
<!doctype html>

<html>

 <head>

  <meta charset="utf-8">

  <title>Point Hit Test</title>

  <link rel="stylesheet" href="style.css">

 </head>

 <body>

  <canvas id="canvas" width="400" height="400"></canvas>

  <textarea id="log"></textarea>

  <script src="utils.js"></script>

  <script src="ball.js"></script>

  <script>

  window.onload = function () {

    var canvas = document.getElementById('canvas'),

        context = canvas.getContext('2d'),

        mouse = utils.captureMouse(canvas),

        log = document.getElementById('log'),

        ball = new Ball();


    ball.x = canvas.width / 2;

    ball.y = canvas.height / 2;

    ball.draw(context);


    canvas.addEventListener('mousemove', function () {

      if (utils.containsPoint(ball.getBounds(), mouse.x, mouse.y)) {

        log.value = "Hit!";

      } else {

        log.value = '';

      }

    }, false);

  };

  </script>

 </body>

</html>
This uses the mouse cursor as the point which the ball hit tests against. As you move the mouse close to the ball, you will see that it probably starts registering a hit before you actually touch the shape, especially if you come at it from a corner, as shown in Figure 9.6. Try it again with a square and it should be perfectly accurate. So again, this method seems to be useful only for rectangle-shaped objects.
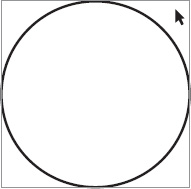
Figure 9-6. Collision detection using a circle's bounding box causes a false positive.
To use this method for more accurate collision detection, you can test several points along the shape's outline. This gives you a more precise definition of the object boundaries, but also means the program has to run more tests. And depending on the shape complexity, all these tests could slow down the web browser. For example, if you had a star-shaped object, you could calculate the position its five points, and do a hit test from another object to each of those five points. But then if you had two stars, you would need to test each one against the other's five points. For a star, this would probably work pretty well; but a more complex shape would obviously need more points. You can see this gets very complex and computationally-intensive very quickly. Just two stars, and you're up to ten times the number of hit tests you would use for the more simple method. Accuracy costs you.
If you must perform collision detection against an irregular shape, a good strategy is to break complex shapes into smaller rectangles, and test against those. This will give you greater accuracy, but also increase the amount of calculations, so find a balance between the two. For greater efficiency, first test against the entire shape's bounding box, and then only if it's a hit, break the object up into smaller rectangles to test against.
Summary of geometric hit testing
Collision detection between two irregularly shaped objects, so that if any part of one touches the other, is not readily supported using our simple geometric methods. But there are a few options:
- For roughly rectangular objects, use
utils.intersects(rectA, rectB). - For irregularly shaped objects, you either live with the inaccuracy or custom program a solution, probably using
utils.containsPoint(rect, x, y).
Of course, the chapter is far from done yet, and there are solutions beyond what we've covered here. If you have circular or roughly circular objects, distance-based collision detection will probably be your best bet. You'd be surprised at how many shapes can be characterized as “roughly rectangular” or “roughly circular”.
Distance-based collision detection
In this section, you'll abandon the geometric hit testing functions and take collision detection into your own hands. This involves using the distance between two objects to determine whether they have collided.
As an example of this idea in the real world, let's say the center of your car is 100 feet from the center of my car. Given this space, you know that the two cars are far enough apart that they couldn't possibly be touching. However, if both of our cars are 6 feet wide and 12 feet long, and the center of my car is 5 feet from the center of your car, you can be pretty certain that we're in trouble. In other words, there is no way for the centers to be that close together without some parts of the cars touching. That's the whole concept behind distance-based testing. You determine the minimum distance required to separate the two objects, calculate the current distance, and compare the two. If the current distance is less than the minimum, you know they are hitting.
And of course, there is a trade-off. Where the simplest rectangle intersection worked perfectly with rectangles, but was less accurate using other shapes, this method works perfectly with circles. It's problem is that non-circle shapes that appear to be touching don't register a collision because their centers are still not close enough.
Simple distance-based collision detection
Let's start out with the ideal situation: a couple of perfectly round circles. When doing this type of collision detection, we should measure from the exact center of the circle; we can use our Ball class for this. Building off the first example in this chapter, create two balls and set up one of them to be dragged with the mouse. You'll also perform your collision detection in the drawFrame function, but instead of using utils.intersects to check for a collision, you'll be using the distance between the two balls. You should already know how to compute the distance between two objects using the Pythagorean Theorem from back in Chapter 3. So, you start off with something like this:
var dx = ballB.x - ballA.x,

    dy = ballB.y - ballA.y,

    dist = Math.sqrt(dx * dx + dy * dy);
Now you have the distance, but how do you know whether that distance is small enough to consider that a collision has occurred? Well, take a look at the picture in Figure 9-7.
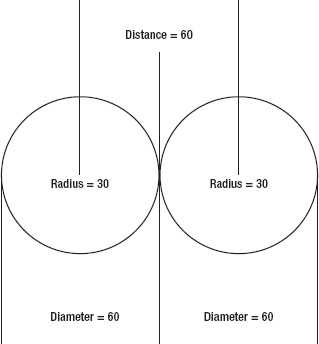
Figure 9-7. The distance of a collision
You can see the two circular objects in a position where they are just touching. Consider that each ball is 60 pixels across, which gives it a radius of 30. Thus, at the exact moment they touch, they are exactly 60 pixels apart—there's the answer. For two circular objects of the same size, if the distance is less than their diameter, they are colliding. Here's the code for this example (04-distance-1.html):
<!doctype html>

<html>

 <head>

  <meta charset="utf-8">

  <title>Distance 1</title>

  <link rel="stylesheet" href="style.css">

 </head>

 <body>

  <canvas id="canvas" width="400" height="400"></canvas>

  <textarea id="log"></textarea>

  <script src="utils.js"></script>

  <script src="ball.js"></script>

  <script>

  window.onload = function () {

    var canvas = document.getElementById('canvas'),

        context = canvas.getContext('2d'),

        mouse = utils.captureMouse(canvas),

        log = document.getElementById('log'),

        ballA = new Ball(30),

        ballB = new Ball(30);


    ballA.x = canvas.width / 2;

    ballA.y = canvas.height / 2;
    canvas.addEventListener('mousemove', drawFrame, false);

    drawFrame();


    function drawFrame () {

      context.clearRect(0, 0, canvas.width, canvas.height);


      ballB.x = mouse.x;

      ballB.y = mouse.y;


      var dx = ballB.x - ballA.x,

          dy = ballB.y - ballA.y,

          dist = Math.sqrt(dx * dx + dy * dy);


      if (dist < 60) {

        log.value = "Hit!";

      } else {

        log.value = '';

      }


      ballA.draw(context);

      ballB.draw(context);

    }

  };

  </script>

 </body>

</html>
When you run this, you'll notice that it doesn't matter from which angle you approach the target ball. It doesn't register a hit until that exact point when the shapes overlap.
It's already been mentioned that hard-coding numbers into code is generally bad style. You would need to change the code every time you had different-sized objects. Furthermore, what about the case where the two objects are not the same size? We need to abstract this concept into some kind of formula that will fit any situation.
Figure 9-8 shows two balls of different sizes, again, just touching. The one on the left is 60 pixels across, and the one on the right is 40 pixels. Thus, the radius of one is 30, and the radius of the other is 20. So, the distance between them at the moment they touch is exactly 50. Of course, in the case of the Ball class, we've already programmed in this radius property, so we can check it directly.
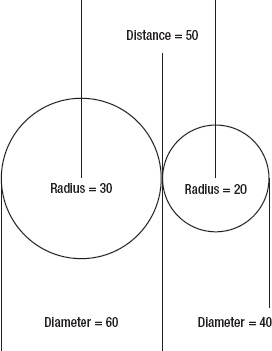
Figure 9-8. The distance of a collision between two different-sized objects
A pattern begins to emerge. The distance is the radius of one ball, plus the radius of the other. You can now remove all hard-coded numbers from the code and modify the drawFrame function to this (which can be found in document 05-distance-2.html):
function drawFrame () {

  context.clearRect(0, 0, canvas.width, canvas.height);


  ballB.x = mouse.x;

  ballB.y = mouse.y;


  var dx = ballB.x - ballA.x,

      dy = ballB.y - ballA.y,

      dist = Math.sqrt(dx * dx + dy * dy);


  if (dist < ballA.radius + ballB.radius) {

    log.value = "Hit!";

  } else {

    log.value = '';

  }


  ballA.draw(context);

  ballB.draw(context);

}
Go ahead and change the size of one or both of the balls (remember, you can pass in a radius as the first parameter when instantiating the object) and see that this code works, even if one circle is huge and one circle is tiny. In fact, in the full example mentioned earlier, the balls are declared like this:
This way, they will be different sized each time the code is run, and yet the collision detection always works perfectly.
Collision-based springing
The problem with giving you a good working example of distance-based hit testing is that a complete program would involve a lot of issues related to things that haven't been covered yet, such as the reaction of two objects when they hit, and how to efficiently handle interactions between many objects. But we'll create an example that demonstrates hit testing without too much code that you haven't already seen.
The basic idea is to place one large ball, called centerBall, in the center of the canvas. Then add in a bunch of smaller balls, giving them random sizes and velocities. These will move with basic motion code and bounce off the walls. On each frame, perform a distance-based collision check between each moving ball and the center ball. If you detect a collision, calculate an offset spring target based on the angle between the two balls and the minimum distance to avoid collision. All it really means is that if a moving ball collides with the center ball, you make it spring back out again. You do this by setting a target just outside the center ball, and the moving ball springs to that target. Then, once it reaches the target, it is no longer colliding, so the spring action ends, and it just moves with its regular motion code.
The result is kind of like bubbles bouncing off a large bubble, as shown in Figure 9-9. The little bubbles enter into the big one a bit, depending on how fast they are going, but then spring back out.
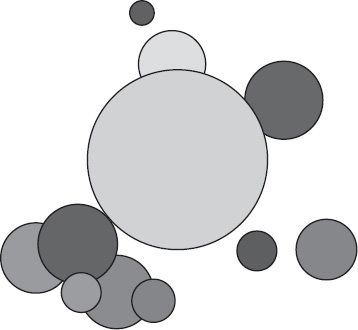
Figure 9-9. Collision-based springing
Here is the code for the example (document 06-bubbles-1.html):
<!doctype html>

<html>

 <head>

  <meta charset="utf-8">

  <title>Bubbles 1</title>

  <link rel="stylesheet" href="style.css">

 </head>

 <body>

  <canvas id="canvas" width="400" height="400"></canvas>

  <script src="utils.js"></script>

  <script src="ball.js"></script>

  <script>

  window.onload = function () {

    var canvas = document.getElementById('canvas'),

        context = canvas.getContext('2d'),

        centerBall = new Ball(100, "#cccccc"),

        balls = [],

        numBalls = 10,

        spring = 0.03,

        bounce = -1;


    centerBall.x = canvas.width / 2;

    centerBall.y = canvas.height / 2;


    for (var ball, i = 0; i < numBalls; i++) {

      ball = new Ball(Math.random() * 40 + 5, Math.random() * 0xffffff);

      ball.x = Math.random() * canvas.width / 2;

      ball.y = Math.random() * canvas.height / 2;

      ball.vx = Math.random() * 6 − 3;

      ball.vy = Math.random() * 6 − 3;

      balls.push(ball);

    }


    function move (ball) {

      ball.x += ball.vx;

      ball.y += ball.vy;


      if (ball.x + ball.radius > canvas.width) {

        ball.x = canvas.width − ball.radius;

        ball.vx *= bounce;

      } else if (ball.x - ball.radius < 0) {

        ball.x = ball.radius;

        ball.vx *= bounce;

      }

      if (ball.y + ball.radius > canvas.height) {

        ball.y = canvas.height − ball.radius;

        ball.vy *= bounce;

      } else if (ball.y - ball.radius < 0) {

        ball.y = ball.radius;

        ball.vy *= bounce;

      }

    }


    function draw (ball) {
      var dx = ball.x − centerBall.x,

        dy = ball.y − centerBall.y,

        dist = Math.sqrt(dx * dx + dy * dy),

        min_dist = ball.radius + centerBall.radius;


      if (dist < min_dist) {

        var angle = Math.atan2(dy, dx),

            tx = centerBall.x + Math.cos(angle) * min_dist,

            ty = centerBall.y + Math.sin(angle) * min_dist;

        ball.vx += (tx - ball.x) * spring;

        ball.vy += (ty - ball.y) * spring;

      }

      ball.draw(context);

    }


    (function drawFrame () {

      window.requestAnimationFrame(drawFrame, canvas);

      context.clearRect(0, 0, canvas.width, canvas.height);


      balls.forEach(move);

      balls.forEach(draw);

      centerBall.draw(context);

    }());

  };

  </script>

 </body>

</html>
This is a lot of code, but you've already seen most of these techniques in earlier chapters. Let's walk through it quickly.
Starting at the top of the script, you create the centerBall and then loop through and create the smaller, moving, balls. They are given a random size, position, color, and velocity.
Within the drawFrame animation loop, we iterate over the balls twice. To separate functionality, the motion code has been placed in a function called move. This takes a reference to one of the balls and applies all the basic motion code to it—it's basic velocity code with bouncing. Then, in the draw function, you find the distance from a given ball to the centerBall, and compute the minimum distance to determine a collision. If there is a collision, you find the angle between the two, and use that plus the minimum distance to calculate a target x and y. This target will be right on the outer edge of the centerBall.
From there, you just apply basic spring code to spring to that point (as described in Chapter 8). Of course, once it reaches that point, it's no longer colliding and will fly off in whatever direction it's heading. We then draw the balls to the canvas.
See how you can build up and layer simple techniques to wind up with some very complex motion?
Multiple-object collision detection strategies
When you have just a couple of objects moving around the screen, it's pretty simple to test them against each other. But when you get several objects, or even dozens, you need some kind of strategy for how to test them so that you don't miss any possible collisions. Furthermore, as you have more and more objects being tested, it becomes very important to perform your tests with some kind of efficiency in mind.
Basic multiple-object collision detection
With just two objects, only one collision is possible—A versus B. With three objects, you have three possibilities: A-B, B-C, and C-A. Four objects give you six collisions, and five objects give you ten collisions. When you get up to 20 objects, you need to take into account 190 separate collisions! That means that in your drawFrame function, you need to run a collision detection calculation 190 times.
That's enough as it is, so you certainly don't need to be adding any more unnecessary hit testing. But many beginners wind up doing not just a few extra hit tests, but exactly twice as many as necessary! For 20 objects, they do 380 hit test (20 objects each testing 19 others, or 20 × 19 = 380). You can see why you should have a solid understanding of this subject.
To understand the problem, let's take a look at what needs to be done, and how it is often approached. Say you have six objects, named object0, object1, object2, object3, object4, and object5. You have them moving around nicely, bouncing or whatever, and you want to know when any one of the objects hits any other one. The obvious solution is to make two nested loops. The outer one iterates through each of the six objects, gets a reference to each one in turn, and then loops through again, comparing it to each of the others. Here it is in pseudo-code:
objects.forEach(function (objectA, i) {

  for (var j = 0; j < objects.length; j++) {

    var objectB = objects[j];

    if (hitTestObject(objectA, objectB)) {

      //do something

    }

  }

});
That's 36 hit tests for six objects. Seems reasonable, but this code has two huge problems.
First, take a look what happens the first time through it. The variables i and j will both equal 0. So objectA will hold a reference to object0, as will objectB. That means you're testing an object against itself, which is a waste of a calculation. You could make sure that objectA != objectB before performing the hit test, or you could even go simpler and just make sure i != j. Then you get something like this:
objects.forEach(function (objectA, i) {

  for (var j = 0; j < objects.length; j++) {

    var objectB = objects[j];

    if (i !== j && hitTestObject(objectA, objectB)) {

      //do something

    }

  }

});
That eliminated six hit tests, so you're down to 30, but this is still too many. Let's write out the exact tests you're doing. You are comparing the following:
object0  with  object1, object2, object3, object4, object5

object1  with  object0, object2, object3, object4, object5

object2  with  object0, object1, object3, object4, object5

object3  with  object0, object1, object2, object4, object5

object4  with  object0, object1, object2, object3, object5

object5  with  object0, object1, object2, object3, object4
Look at the first test on the first row: object0 with object1. Now look at the first test on the second row: object1 with object0—that's the same thing! If object0 is not hitting object1, object1 is also not hitting object0. Or if one is hitting the other, you can be sure the other is hitting the first. There are many of these double checks in there. If you remove all the duplicate tests, you get this:
object0  with  object1, object2, object3, object4, object5

object1  with  object2, object3, object4, object5

object2  with  object3, object4, object5

object3  with  object4, object5

object4  with  object5

object5  with  nothing!
You see that in the first round of tests, you're testing object0 with every other object. Because no other object needs to test against that one again, you drop object0 off the list. Then object1 tests against the remaining objects, and you drop it off the list. By the time you get to the last one, object5, every other object has already tested itself for a collision with it. There's no need to test it against anything. The result is that you're down to 15 tests, so you see why our initial solution ends up being double what is needed.
To code this, you still have two nested loops—a for loop within the forEach iteration—but now it looks like this:
objects.forEach(function (objectA, i) {

  for (var j = i + 1; j < objects.length; j++) {

    var objectB = objects[j];

    if (hitTestObject(objectA, objectB) {

      //do whatever

    }

  }

});
In the inner for loop, you always start with one higher than the index of the outer iteration. This is because you've already tested everything lower, and you don't want to test the same index, which, as you saw, would be testing an object against itself. This lets you get rid of that check. The result is just a few characters different from the original code, but gives you a 100% performance increase!
Also, even beyond its performance impact, in many cases, doing double hit testing might have unwanted results. If you're changing the velocity or some other value when you detect a collision, you may wind up changing it twice, resulting in an undetermined, and hard to debug, effect.
If this topic interests you, and you'd like to dig a lot deeper, this is all a part of Combinatorics, a field of math concerned with problems of selection and arrangement, or: How to count without counting.
Multiple-object springing
Let's make another quick example to see this in action. Again, we'll go with the bubble-type reaction, but this time, all bubbles can bounce off of each other. Figure 9-10 illustrates the effect.
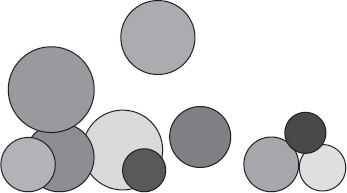
Figure 9-10. Multiple-object collision
Here's the code in document 07-bubbles-2.html:
<!doctype html>

<html>

 <head>

  <meta charset="utf-8">

  <title>Bubbles 2</title>

  <link rel="stylesheet" href="style.css">

 </head>

 <body>

  <canvas id="canvas" width="400" height="400"></canvas>

  <script src="utils.js"></script>

  <script src="ball.js"></script>

  <script>

  window.onload = function () {

    var canvas = document.getElementById('canvas'),

        context = canvas.getContext('2d'),

        balls = [],

        numBalls = 10,

        bounce = -0.5,

        spring = 0.03,

        gravity = 0.1;


    for (var ball, i = 0; i < numBalls; i++) {

      ball = new Ball(Math.random() * 30 + 20, Math.random() * 0xffffff);

      ball.x = Math.random() * canvas.width / 2;

      ball.y = Math.random() * canvas.height / 2;

      ball.vx = Math.random() * 6 − 3;

      ball.vy = Math.random() * 6 − 3;

      balls.push(ball);

    }


    function checkCollision (ballA, i) {
      for (var ballB, dx, dy, dist, min_dist, j = i + 1; j < numBalls; j++) {

        ballB = balls[j];

        dx = ballB.x − ballA.x;

        dy = ballB.y − ballA.y;

        dist = Math.sqrt(dx * dx + dy * dy);

        min_dist = ballA.radius + ballB.radius;


        if (dist < min_dist) {

          var angle = Math.atan2(dy, dx),

              tx = ballA.x + Math.cos(angle) * min_dist,

              ty = ballA.y + Math.sin(angle) * min_dist,

              ax = (tx - ballB.x) * spring * 0.5,

              ay = (ty - ballB.y) * spring * 0.5;


          ballA.vx -= ax;

          ballA.vy -= ay;

          ballB.vx += ax;

          ballB.vy += ay;

        }

      }

    }


    function move (ball) {

      ball.vy += gravity;

      ball.x += ball.vx;

      ball.y += ball.vy;


      if (ball.x + ball.radius > canvas.width) {

        ball.x = canvas.width − ball.radius;

        ball.vx *= bounce;

      } else if (ball.x - ball.radius < 0) {

        ball.x = ball.radius;

        ball.vx *= bounce;

      }

      if (ball.y + ball.radius > canvas.height) {

        ball.y = canvas.height − ball.radius;

        ball.vy *= bounce;

      } else if (ball.y - ball.radius < 0) {

        ball.y = ball.radius;

        ball.vy *= bounce;

      }

    }


    function draw (ball) {

      ball.draw(context);

    }


    (function drawFrame () {

      window.requestAnimationFrame(drawFrame, canvas);

      context.clearRect(0, 0, canvas.width, canvas.height);


      balls.forEach(checkCollision);

      balls.forEach(move);

      balls.forEach(draw);
    }());

  };

  </script>

 </body>

</html>
Here, you are simply using the double-nested iteration to perform collision detection. In this case, the reaction might need some additional explanation. Here's the collision reaction code located in the checkCollision function:
if (dist < min_dist) {

  var angle = Math.atan2(dy, dx),

      tx = ballA.x + Math.cos(angle) * min_dist,

      ty = ballA.y + Math.sin(angle) * min_dist,

      ax = (tx - ballB.x) * spring * 0.5,

      ay = (ty - ballB.y) * spring * 0.5;


  ballA.vx -= ax;

  ballA.vy -= ay;

  ballB.vx += ax;

  ballB.vy += ay;

}
Remember that this occurs once a collision is found between ballA and ballB. Essentially, it starts out the same as the earlier example with the unmoving center ball. For now, let ballA take the place of that center ball. You find the angle between the two, and get a target x and y. This is the point that you would need to place ballB so that the two balls would not be touching. Based on that, you get the x and y acceleration that would cause ballB to spring to that point, then we cut it in half (which I explain next). These are ax and ay.
But then you do something a little tricky. In this case, not only does ballB need to spring away from ballA, but ballA must spring away from ballB. The acceleration would be the same force and exactly the opposite direction. So rather than calculate it twice, you just add ax and ay to ballB's velocity, and subtract them from ballA's velocity! You get the same result, and you just saved a bunch of calculation. You might be thinking that this doubles the final acceleration, as it's being applied twice; and that's true. To compensate, we cut the the spring product in half, multiplying it by 0.5, when we calculated ax and ay. You can remove these two multiplication operations by halving the spring variable when you declare it, to 0.015.
While we're discussing optimization tricks, here's another one here. The preceding code calculates the angle using Math.atan2, and then uses Math.cos and Math.sin to find the target point:
var angle = Math.atan2(dy, dx),

    tx = ballA.x + Math.cos(angle) * min_dist,

    ty = ballA.y + Math.sin(angle) * min_dist;
But remember that sine is opposite over hypotenuse, and cosine is adjacent over hypotenuse. And since the opposite side of the angle is dy, the adjacent side is dx, and the hypotenuse is dist. Thus, you could actually shorten these three lines to just two:
Which just wiped out three calls to trigonometry functions and replaced them with two simple divisions.
You can view this example that includes all the optimization updates in document 08-bubbles-3.html, which can be downloaded from www.apress.com. Before you move on, take some time to play with the springing bubbles example. You can adjust many variables, so try changing the spring, gravity, number, and size of the balls. You might want to try adding some friction or some mouse interaction.
Important formulas in this chapter
It's time to review the two important formulas presented in this chapter.
Distance-based collision detection
//starting with objectA and objectB

//if using an object without a radius property,

//you can use width or height divided by 2

var dx = objectB.x − objectA.x,

    dy = objectB.y − objectA.y,

    dist = Math.sqrt(dx * dx + dy * dy);


if (dist < objectA.radius + objectB.radius) {

    //handle collision

}
Multiple-object collision detection
objects.forEach(function (objectA, i) {

  for (var j = i + 1; j < objects.length; j++) {

    //evaluate reference using j. For example:

    var objectB = objects[j];

    //perform collision detection between objectA and objectB

  }

});
Summary
This chapter covered just about everything you need to know about collision detection, including using geometric ht testing methods, distance-based collision checking, and how to efficiently track collisions among many objects. You should know the pros and cons of each method, and situations where each works well or does not perform satisfactorily. You'll be using all of this material as you move forward in the book, and no doubt, you'll be using it extensively in your own projects.
In the next chapter, you'll look at collisions between objects and angled surfaces, using a technique known as coordinate rotation. This technique will also be used in Chapter 11, where you'll find out what to do to create a realistic reaction to the collisions you learned how to detect here.