
Chapter 10
Coordinate Rotation and Bouncing Off Angles
What we'll cover in this chapter:
- Simple coordinate rotation
- Advanced coordinate rotation
- Bouncing off an angle
This chapter covers a technique known as coordinate rotation, which as its name implies, involves rotating a coordinate around a point. While useful all by itself, coordinate rotation is indispensable for several very interesting effects, including how to bounce something off an angled surface. We'll cover how to do that in this chapter.
Coordinate rotation is also useful for calculating the reactions of two objects that bounce off each other. You'll see how to do that in the next chapter, where we discuss the conservation of momentum. Since the next chapter builds off the knowledge presented in this chapter, make sure you have a fairly good understanding of coordinate rotation before moving on.
Simple coordinate rotation
The technique for simple coordinate rotation was covered in Chapter 3 when discussing trigonometry. You have a center point, an object, a radius (orbit), and an angle (in radians). You increase or decrease the angle, and use basic trigonometry to place the object around the center point. You can set a variable such as vr (velocity/speed of rotation) to control how much the angle is increased or decreased. Using pseudo-code, the program setup would look like this:
With these calculations inside the animation loop:
object.x = centerX + cos(angle) * radius

object.y = centerY + sin(angle) * radius

angle += vr
You're using trigonometry to set the x and y position of the object based on the angle and the radius, and changing the angle on each frame. Figure 10-1 illustrates a frame from an animation where the object is positioned around a center point.
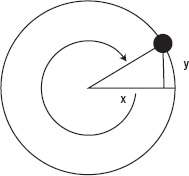
Figure 10-1. Positioning the object along an orbital path around a center point.
Here's an example to demonstrate this formula, document 01-rotate-1.html:
<!doctype html>

<html>

 <head>

  <meta charset="utf-8">

  <title>Rotate 1</title>

  <link rel="stylesheet" href="style.css">

 </head>

 <body>

  <canvas id="canvas" width="400" height="400"></canvas>

  <script src="utils.js"></script>

  <script src="ball.js"></script>

  <script>

  window.onload = function () {

    var canvas = document.getElementById('canvas'),

        context = canvas.getContext('2d'),

        ball = new Ball(),

        vr = 0.05,

        angle = 0,

        radius = 150,

        centerX = canvas.width / 2,
        centerY = canvas.height / 2;

    (function drawFrame () {

      window.requestAnimationFrame(drawFrame, canvas);

      context.clearRect(0, 0, canvas.width, canvas.height);


      ball.x = centerX + Math.cos(angle) * radius;

      ball.y = centerY + Math.sin(angle) * radius;

      angle += vr;

      ball.draw(context);

    }());

  };

  </script>

 </body>

</html>
This approach works great when you know the angle and radius from a center point.
But what if you only have the position of the object and the center point? Well, it isn't too hard to calculate the current angle and radius based on the x and y positions. Once you have them, you can carry on as before. Figure 10-2 shows the general layout of our calculation, and here's the code:
var dx = ball.x − centerX,

    dy = ball.y − centerY,

    angle = Math.atan2(dy, dx),

    radius = Math.sqrt(dx * dx + dy * dy);
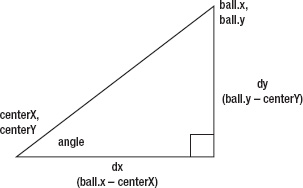
Figure 10-2. Getting ready to calculate the angle and radius.
This method of coordinate rotation is fine for a single object, especially in a situation where you only need to determine the angle and radius once. But in a more dynamic example, you could have many objects to rotate, and their relative positions to the center rotation point could be changing. So, for each object, you would need to compute its distance, angle, and radius, then add the vr to the angle, and finally calculate the new x, y position, on each frame. This is neither elegant, nor efficient, but fortunately, there is a better way.
Advanced coordinate rotation
The next formula is great if you are rotating objects around a point, and you only know their positions. The equation just needs the x, y position of the object in relation to the center point and the angle to rotate by. It returns the new x, y position of the object, rotated around the center point. Here's the formula:
x1 = x * cos(rotation) − y * sin(rotation)

y1 = y * cos(rotation) + x * sin(rotation)
The result of this formula is illustrated in Figure 10-3. You are rotating the coordinates x and y, but more specifically, they're the coordinates of that object in relation to the center point it is rotating around. Thus, you could also write the formula like this:
x1 = (x - centerX) * cos(rotation) − (y - centerY) * sin(rotation)

y1 = (y - centerY) * cos(rotation) + (x - centerX) * sin(rotation)
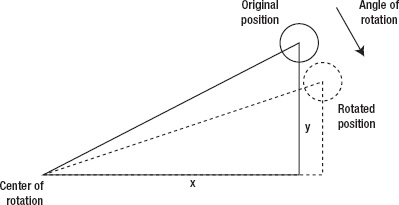
Figure 10-3. Coordinates rotated around a center point by specifying the angle of rotation.
The rotation angle is how much the object has rotated in this step. It's not the current angle, or the resulting angle, but the difference between the two. In other words, if the object is at a 45-degree angle from the center point, and the rotation here is 5 degrees, you will rotate the object another 5 degrees to put it at 50. And of course, this angle will be in radians, not degrees. Using this technique, you probably don't know, and don't really care about, the initial and final angles. You're just interested in how much rotation is occurring.
This equation may seem a little like magic, but we can understand how it works by breaking it down. Now this isn't necessary to use the formula, but it's here in case the math is useful for you. Start with the equation for simple coordinate rotation from the previous section (centerX and centerY have been removed since we're rotating around point 0, 0):
x  = radius * cos(angle)

y  = radius * sin(angle)

x1 = radius * cos(angle + rotation)

y1 = radius * sin(angle + rotation)
The cosine of the sum of two angles is given by the formula:
And the corresponding formula for the sine is:
sin(a + b) = sin(a) * cos(b) + cos(a) * sin(b)
So, after expanding the equations for x1 and x2, we get:
x1 = radius * cos(angle) * cos(rotation) − radius * sin(angle) * sin(rotation)

y1 = radius * sin(angle) * cos(rotation) + radius * cos(angle) * sin(rotation)
Therefore, after we substitute in the x and y variables from above, we have our equation:
x1 = x * cos(rotation) − y * sin(rotation)

y1 = y * cos(rotation) + x * sin(rotation)
We're just using this equation, so it's not necessary for you to understand how we got it, as much as what it does. So let's see what we can do with it.
Rotating a single object
This example places a single ball at a random location and then uses the advanced coordinate rotation technique from the previous section to rotate it. It builds on the first example in this chapter, with the added code in bold (document 02-rotate-2.html):
<!doctype html>

<html>

 <head>

  <meta charset="utf-8">

  <title>Rotate 2</title>

  <link rel="stylesheet" href="style.css">

 </head>

 <body>

  <canvas id="canvas" width="400" height="400"></canvas>

  <script src="utils.js"></script>

  <script src="ball.js"></script>

  <script>

  window.onload = function () {

    var canvas = document.getElementById('canvas'),

        context = canvas.getContext('2d'),

        ball = new Ball(),

        vr = 0.05,

        cos = Math.cos(vr),

        sin = Math.sin(vr),

        centerX = canvas.width / 2,

        centerY = canvas.height / 2;


    ball.x = Math.random() * canvas.width;

    ball.y = Math.random() * canvas.height;


    (function drawFrame () {

      window.requestAnimationFrame(drawFrame, canvas);

      context.clearRect(0, 0, canvas.width, canvas.height);
      var x1 = ball.x - centerX,

          y1 = ball.y - centerY,

          x2 = x1 * cos − y1 * sin,

          y2 = y1 * cos + x1 * sin;


      ball.x = centerX + x2;

      ball.y = centerY + y2;

      ball.draw(context);

    }());

  };

  </script>

 </body>

</html>
Here, you are setting vr to the same value of 0.05 you used before. Then you're calculating the sine and cosine of that angle. Since those values won't change during this simple example, you can calculate it once at the top of the script, rather than recalculating it every frame. The x1 and y1 positions are calculated in relation to the point they will rotate around—the center of the canvas. Then you apply the coordinate rotation formula as just described. This gives you x2 and y2, the new position of the ball. Again, this is in relation to the center point, so you need to add x2 and y2 to the center point to get the final position of the ball.
Try it out, and you'll see it should work exactly the same as the earlier version. Now, why bother going through this new, more complex, formula when the results look the same? Well, in a simple situation like this, you might not. But let's look at some examples where this setup actually simplifies things. First, consider rotating multiple objects.
Rotating multiple objects
Suppose there are many objects to rotate, say a bunch of objects in an array called balls. Moving each ball would look something like this:
balls.forEach(function (ball) {

  var dx = ball.x − centerX,

      dy = ball.y − centerY,

      angle = Math.atan2(dy, dx),

      dist = Math.sqrt(dx * dx + dy * dy);


  angle += vr;

  ball.x = centerX + Math.cos(angle) * dist;

  ball.y = centerY + Math.sin(angle) * dist;

});
Whereas the advanced coordinate rotation method would look like this:
var cos = Math.cos(vr),

    sin = Math.sin(vr);


balls.forEach(function (ball) {

  var x1 = ball.x − centerX,

      y1 = ball.y − centerY,
      x2 = x1 * cos − y1 * sin,

      y2 = y1 * cos + x1 * sin;


  ball.x = centerX + x2;

  ball.y = centerY + y2;

});
The first version includes four calls to Math functions within the iteration, meaning that all four are executed once for each object being rotated. The second version has just two calls to Math functions, both outside the loop, so they are executed only once, regardless of how many objects there are. For example, if you have 30 objects, you're looking at 120 function calls on each frame with the first version, as compared to 2 with the second version—that's quite a difference!
In the previous example, you were able to place the sin and cos calculations outside the drawFrame function because you were using a fixed angle. However in many cases, these angles of rotation may change, and you'll need to recalculate the sine and cosine each time it changes.
To demonstrate these latest concepts, let's build an example where the mouse position is controlling the speed of rotation of multiple objects. If the mouse is in the center of the canvas, no rotation happens. As it moves to the left, the objects move faster and faster in a counterclockwise direction. As it moves to the right, they rotate in a clockwise direction. This example will start out quite similarly to the previous one, except you'll create multiple instances of Ball, storing them in an array named balls. Here's the document (03-rotate-3.html):
<!doctype html>

<html>

 <head>

  <meta charset="utf-8">

  <title>Rotate 3</title>

  <link rel="stylesheet" href="style.css">

 </head>

 <body>

  <canvas id="canvas" width="400" height="400"></canvas>

  <script src="utils.js"></script>

  <script src="ball.js"></script>

  <script>

  window.onload = function () {

    var canvas = document.getElementById('canvas'),

        context = canvas.getContext('2d'),

        mouse = utils.captureMouse(canvas),

        balls = [],

        numBalls = 10,

        vr = 0.05,

        centerX = canvas.width / 2,

        centerY = canvas.height / 2,

        cos, sin; //referenced by move and drawFrame


    for (var ball, i = 0; i < numBalls; i++) {

      ball = new Ball();

      ball.x = Math.random() * canvas.width;

      ball.y = Math.random() * canvas.height;

      balls.push(ball);
    }


    function move (ball) {

      var x1 = ball.x - centerX,

          y1 = ball.y - centerY,

          x2 = x1 * cos − y1 * sin,

          y2 = y1 * cos + x1 * sin;

      ball.x = centerX + x2;

      ball.y = centerY + y2;

    }

    function draw (ball) {

      ball.draw(context);

    }


    (function drawFrame () {

      window.requestAnimationFrame(drawFrame, canvas);

      context.clearRect(0, 0, canvas.width, canvas.height);


      var angle = (mouse.x - centerX) * 0.0005;

      cos = Math.cos(angle);

      sin = Math.sin(angle);


      balls.forEach(move);

      balls.forEach(draw);

    }());

  };

  </script>

 </body>

</html>
You'll revisit this formula when you get to the discussion of 3D in Chapter 15. In fact, you'll be using it twice within the same function, to rotate things around two axes and three dimensions. But don't get scared off yet, there is still a lot to do before you get there.
Bouncing off an angle
We've already bounced off walls, but in real situations, surfaces are not always horizontal or vertical—sometimes they're angled. This is not the most straightforward equation, but if we break it down to a few steps you can see how simple the concept is. All we need to do is rotate the whole system so the surface is flat, do the bounce, then rotate it all back. This means rotating the surface, rotating the coordinates of the object in question, and rotating the object's velocity vector.
Rotating velocity may sound complex, but you've been storing velocity in vx and vy variables. The vx and vy define a vector, which is an angle and a magnitude, or length. If you know the angle, you can rotate it directly. But if you just know the vx and vy, you can apply the advanced coordinate rotation formula to it and get the same result, just as you did for the position of the ball.
In Figure 10-4, you see the angled surface, the ball, which has hit the surface, and the vector arrow representing the ball's direction.
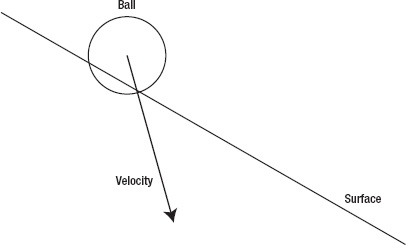
Figure 10-4. A ball hitting an angled surface
In Figure 10-5, you see that the entire scene has been rotated and the surface is now horizontal, just like the bottom barrier on the original bouncing example. Here, the velocity vector has been rotated right along with everything else.
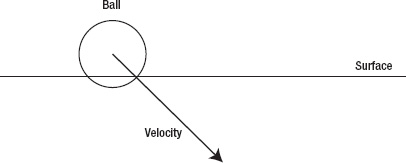
Figure 10-5. The same scene, rotated
The way the diagram now looks, it's pretty simple to perform a bounce, right? Adjust the position, and change the y velocity, as in Figure 10-6.
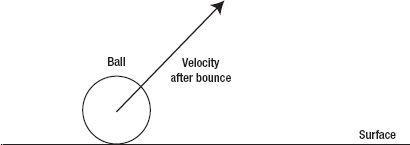
Figure 10-6. After the bounce
You now have a new position and velocity for the ball. Next, rotate everything back to the original angle, as shown in Figure 10-7.
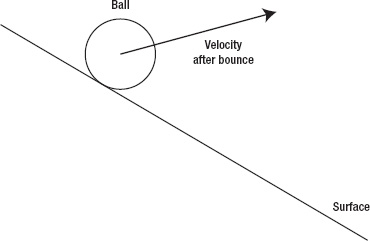
Figure 10-7. After rotating back
You've just detected the collision, adjusted the position, and changed the velocity, all on an angled surface. That's the theory behind it anyway, let's move on to some real code.
Performing the rotation
Before we get started, we're going to need something to act as an angled surface. This is more for your eyes than for any mathematical necessity. For bouncing off of flat surfaces, you can use the boundaries of the canvas. But for an angled surface, it will help to draw a line at an angle, so you can see the ball bouncing on it.
For this, we're going to create a new Line class that we can position and draw a horizontal line using the canvas drawing API. It also contains a fairly comprehensive getBounds method that will allow us to perform collision detection with it—even when rotated—so we can create an angled surface. Place this class in the file line.js which we'll import into our examples:
function Line (x1, y1, x2, y2) {

  this.x = 0;

  this.y = 0;

  this.x1 = (x1 === undefined) ? 0 : x1;

  this.y1 = (y1 === undefined) ? 0 : y1;

  this.x2 = (x2 === undefined) ? 0 : x2;

  this.y2 = (y2 === undefined) ? 0 : y2;

  this.rotation = 0;

  this.scaleX = 1;

  this.scaleY = 1;

  this.lineWidth = 1;

}


Line.prototype.draw = function (context) {

  context.save();
  context.translate(this.x, this.y);

  context.rotate(this.rotation);

  context.scale(this.scaleX, this.scaleY);

  context.lineWidth = this.lineWidth;

  context.beginPath();

  context.moveTo(this.x1, this.y1);

  context.lineTo(this.x2, this.y2);

  context.closePath();

  context.stroke();

  context.restore();

};


Line.prototype.getBounds = function () {

  if (this.rotation === 0) {

    var minX = Math.min(this.x1, this.x2),

        minY = Math.min(this.y1, this.y2),

        maxX = Math.max(this.x1, this.x2),

        maxY = Math.max(this.y1, this.y2);

    return {

      x: this.x + minX,

      y: this.y + minY,

      width: maxX − minX,

      height: maxY − minY

    }

  } else {

    var sin = Math.sin(this.rotation),

        cos = Math.cos(this.rotation),

        x1r = cos * this.x1 + sin * this.y1,

        x2r = cos * this.x2 + sin * this.y2,

        y1r = cos * this.y1 + sin * this.x1,

        y2r = cos * this.y2 + sin * this.x2;

    return {

      x: this.x + Math.min(x1r, x2r),

      y: this.y + Math.min(y1r, y2r),

      width: Math.max(x1r, x2r) - Math.min(x1r, x2r),

      height: Math.max(y1r, y2r) - Math.min(y1r, y2r)

    };

  }

};
We'll continue to use the Ball class, which you should know to keep handy by now. When you position everything, make sure the ball is above the line, so it can fall onto it. Here is the document for the next example (04-angle-bounce.html):
<!doctype html>

<html>

 <head>

  <meta charset="utf-8">

  <title>Angle Bounce</title>

  <link rel="stylesheet" href="style.css">

 </head>

 <body>

  <canvas id="canvas" width="400" height="400"></canvas>
  <script src="utils.js"></script>

  <script src="ball.js"></script>

  <script src="line.js"></script>

  <script>

  window.onload = function () {

    var canvas = document.getElementById('canvas'),

        context = canvas.getContext('2d'),

        ball = new Ball(),

        line = new Line(0, 0, 300, 0),

        gravity = 0.2,

        bounce = -0.6;


    ball.x = 100;

    ball.y = 100;


    line.x = 50;

    line.y = 200;

    line.rotation = 10 * Math.PI / 180; //10 degrees to radians


    //get sine and cosine of angle

    var cos = Math.cos(line.rotation),

        sin = Math.sin(line.rotation);


    (function drawFrame () {

      window.requestAnimationFrame(drawFrame, canvas);

      context.clearRect(0, 0, canvas.width, canvas.height);


      //normal motion code

      ball.vy += gravity;

      ball.x += ball.vx;

      ball.y += ball.vy;


      //get position of ball, relative to line

      var x1 = ball.x − line.x,

          y1 = ball.y − line.y,


          //rotate coordinates

          x2 = x1 * cos + y1 * sin,

          y2 = y1 * cos − x1 * sin,


          //rotate velocity

          vx1 = ball.vx * cos + ball.vy * sin,

          vy1 = ball.vy * cos - ball.vx * sin;


      //perform bounce with rotated values

      if (y2 > -ball.radius) {

        y2 = -ball.radius;

        vy1 *= bounce;

      }


      //rotate everything back

      x1 = x2 * cos - y2 * sin;

      y1 = y2 * cos + x2 * sin;
      ball.vx = vx1 * cos - vy1 * sin;

      ball.vy = vy1 * cos + vx1 * sin;

      ball.x = line.x + x1;

      ball.y = line.y + y1;


      ball.draw(context);

      line.draw(context);

    }());

  };

  </script>

 </body>

</html>
You start out by declaring variables for the ball, the line, gravity, and bounce. Then position the ball and line, and calculate the cos and sin of the line's rotation. The normal motion code is placed near the top of the drawFrame function.
Then you get the initial x, y position of the ball in relation to the line, by subtracting the line position from the ball position.
And now you're ready to rotate something! But, when you look at the next couple of lines of code, you may notice something that seems wrong:
//rotate coordinates

x2 = x1 * cos + y1 * sin,

y2 = y1 * cos - x1 * sin,
The plus and minus are reversed from the original formula you were given for coordinate rotation, which is:
x1 = x * cos(rotation) − y * sin(rotation);

y1 = y * cos(rotation) + x * sin(rotation);
That's not a mistake, remember, we want to rotate the line so it's a flat surface. If the line is rotated 10 degrees, then using the original formula, you would wind up rotating it 10 degrees more, making it 20 degrees—that's going the wrong way! You actually want to rotate it -10 degrees to put it at 0. You could have calculated the sine and cosine to be Math.sin(-angle) and Math.cos(-angle), but eventually, you'll need the sine and cosine of the original angle, in order to rotate everything back.
Rather than making two cosine and sine variables (at double the cost of calculation), you can use an alternative form of coordinate rotation to rotate everything in the opposite direction. It's as simple as reversing the plus and minus, as you just saw. If the line is at 10 degrees rotation, this will rotate everything -10 degrees, putting it at 0 degrees, or flat. Then do the same to the velocity.
You don't need to actually rotate the line instance, because it's just there for your eyes—to let you see where the ball is supposed to bounce. It's also a handy place to store the angle and position of the surface, since you can move and rotate with code.
Then you can perform the bounce. You do this using the x2, y2 position values and the vx1, vy1 velocity values. Because y2 is in relation to the line instance, the “bottom” boundary is the line itself, which will be 0. Taking into account the size of the ball, you check to see whether y2 is greater than 0 − ball.radius, which looks like this:
The rest of the bounce should be obvious.
Then you rotate everything back, using the original formula. This gives you updated values for x1, y1, ball.vx, and ball.vy. All you need to do is reset the actual position of the ball instance by adding x1 and y1 to line.x and line.y.
Take some time to test this example. Try different rotations of the line, and different positions of both the line and ball. Make sure it all works fine.
Optimizing the code
You've already seen some examples of changing code a bit to make it more optimized. This usually involves doing things once instead of multiple times, or not doing them at all, unless you're sure they need to be done.
The code in the previous example was written for clarity; there's a lot happening on every frame that doesn't need to be. Much of that code needs to execute only when the ball has actually hit the line. Most of the time, you just need the basic motion code, and the bare minimum of calculation to check whether the ball has hit the line. In other words, you just need to be able to calculate the if statement:
if (y2 > -ball.radius) {

  //do bounce

}
Here, you do need the y2 variable. And in order to get that, you need x1 and y1, and sin and cos. But if the ball hasn't hit the line, you don't need x2, or vx1 and vy1—those can go inside the if statement.
Also, if there's no hit, there's no need to rotate anything back or reset the ball position. So, all the stuff after the if statement can go inside the if statement as well. You wind up with this optimized version of the drawFrame function (which you'll find in 05-angle-bounce-opt.html):
(function drawFrame () {

  window.requestAnimationFrame(drawFrame, canvas);

  context.clearRect(0, 0, canvas.width, canvas.height);


  //normal motion code

  ball.vy += gravity;

  ball.x += ball.vx;

  ball.y += ball.vy;


  //get position of ball, relative to line

  var x1 = ball.x − line.x,

      y1 = ball.y − line.y,


      //rotate coordinates

      y2 = y1 * cos - x1 * sin;


  //perform bounce with rotated values
  if (y2 > -ball.radius) {

    //rotate coordinates

    var x2 = x1 * cos + y1 * sin,


        //rotate velocity

        vx1 = ball.vx * cos + ball.vy * sin,

        vy1 = ball.vy * cos - ball.vx * sin;


    y2 = -ball.radius;

    vy1 *= bounce;


    //rotate everything back

    x1 = x2 * cos - y2 * sin;

    y1 = y2 * cos + x2 * sin;

    ball.vx = vx1 * cos - vy1 * sin;

    ball.vy = vy1 * cos + vx1 * sin;

    ball.x = line.x + x1;

    ball.y = line.y + y1;

  }


  ball.draw(context);

  line.draw(context);

}());
All the code in bold has been moved from outside the if statement to inside the statement, so it will execute only if a hit actually occurs, rather than every single frame. This has saved quite a number of calculations. As your animations get more complex, it becomes important to think about things like this.
Making it dynamic
You can now start to make the action a little more dynamic. Using the previous example, let's adjust the angle of the line in real time using the mouse. Like prior examples, add our mouse tracking utility function to the top of the script:
var mouse = utils.captureMouse(canvas);
We'll use the mouse location to affect the line's rotation angle. Inside the drawFrame function, after the normal motion code, move the assignment for line.rotation and the calculations for cos and sin, since we'll need these for each frame:
line.rotation = ((canvas.width / 2 - mouse.x) * 0.1) * Math.PI / 180;


var cos = Math.cos(line.rotation),

    sin = Math.sin(line.rotation);
Now you can move your mouse back and forth, and the line will tilt one way or the other. The ball should constantly adjust itself accordingly. Remember that we are converting our degrees to radians here before drawing the line to the canvas. You can find this exercise implemented in document 06-angle-bounce-rotate.html.
Fixing the “not falling off the edge” problem
You've probably noticed that the ball will continue to roll along the angle of the line, even if it has gone past the edge of it. This may look strange, but remember that the ball is not actually interacting with the line object at all—it's all done mathematically. But the results are so exact, it's easy to forget that nothing is actually “hitting” anything. Since the ball doesn't “know” anything about the line object, it doesn't know where it starts or ends. But you can tell it where the line is—using either a simple hit test or a more precise bounds check.
Hit testing
The easiest way to find the line's location is to wrap everything but the basic motion code inside a hit test. We'll use the utils.intersects function from Chapter 9—and added to our utils.js file—to determine if the ball's bounding box and the line's bounding box overlap (example 07-angle-bounce-hit-test.html):
(function drawFrame () {

  window.requestAnimationFrame(drawFrame, canvas);

  context.clearRect(0, 0, canvas.width, canvas.height);


  //rotate line with mouse

  line.rotation = ((canvas.width / 2 - mouse.x) * 0.1) * Math.PI / 180;


  //normal motion code

  ball.vy += gravity;

  ball.x += ball.vx;

  ball.y += ball.vy;


  if (utils.intersects(ball.getBounds(), line.getBounds())) {

    //all the rest of the code that was in this function

  }


  ball.draw(context);

  line.draw(context);

}());
You can see that for the ball to fall off the edge, its entire bounding box must clear the line. While that might suffice for some implementations, there's another way to do it that's a little more exact. But naturally, that means it's a little more complex.
Bounds checking
The getBounds method we defined on the Line and Ball classes returns an object representing a rectangle, with the properties x, y, width, and height. The reference position of the bounding box is the global space, meaning the absolute position as drawn to canvas element, with the top-left point being 0, 0. This is opposed to the relative position of one object to another, though we can calculate this by subtracting one object's global position from the other.
Let's try it out. Create an instance of the Ball class and then run the following code:
var bounds = ball.getBounds();

console.log(bounds.x);

console.log(bounds.y);

console.log(bounds.width);

console.log(bounds.height);
This prints the ball's bounding box from the viewpoint of the canvas element. Remember that the ball is drawn from its origin point in the center. The left and top bounds are the ball's radius subtracted from its position, while the right and bottom bounds are the radius added to its position.
But back to our problem of the ball not falling off the edge of the line. You can call getBounds on the line, and determine its left and right boundaries from the returned rectangle. If the ball's bounding box is less than bounds.x (left edge), or if it is greater than bounds.x + bounds.width (right edge), it has gone past the end of the line segment. We'll put this test in the if statement after the normal motion code:
(function drawFrame () {

  window.requestAnimationFrame(drawFrame, canvas);

  context.clearRect(0, 0, canvas.width, canvas.height);


  var bounds = line.getBounds();


  //rotate line with mouse

  line.rotation = ((canvas.width / 2 - mouse.x) * 0.1) * Math.PI / 180;


  //normal motion code

  ball.vy += gravity;

  ball.x += ball.vx;

  ball.y += ball.vy;


  if (ball.x + ball.radius > bounds.x && ball.x − ball.radius < bounds.x + bounds.width) {

    //all the rest of the code that was in this function

  }


  ball.draw(context);

  line.draw(context);

}());
You can see these changes implemented in the file 08-angle-bounce-bounds.html.
Fixing the “under the line” problem
When detecting these collisions, you're first finding out if the ball is in the vicinity of the line, and then performing coordinate rotation to get the adjusted positions and velocities. At that point, you check if the y2 rotated y position of the ball is past the line, and if so, perform a bounce.
But what if the ball passes under the line? Say the line is in the middle of the canvas, and the ball is bouncing around on the “floor.” If either the hit test or the bounds check comes back true, our program will react as the ball has just bounced on the line, and will transport the ball from below the line to above it.
A solution to this is to compare vy1 with y2, and bounce only if vy1 is greater. Take a look at the diagram in Figure 10-8.
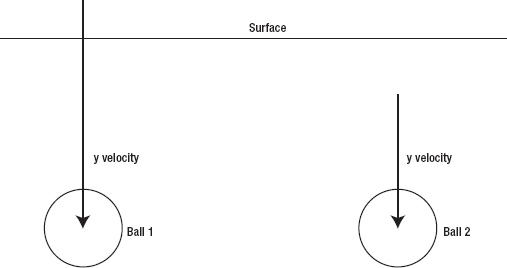
Figure 10-8. Did it go through or just pass under?
With the ball on the left, the y velocity is greater than the y position in relation to the line. This means that just before it moved, it had to be above the line. With the ball on the right, the velocity is less than the relative y position. In other words, it's below the line on this frame, and it was below the line on the last frame; so it's just moving underneath the line. The only time you want to do a bounce is when the ball goes from above the line to below it, so we'll alter the code to do that. Here's a section out of the drawFrame function:
//rotate coordinates

var y2 = y1 * cos − x1 * sin;


//perform bounce with rotated values

if (y2 > -ball.radius) {

  //rotate coordinates

  var x2 = x1 * cos + y1 * sin,


      //rotate velocity

      vx1 = ball.vx * cos + ball.vy * sin,

      vy1 = ball.vy * cos - ball.vx * sin;
You need to add y2 < vy1 into your if statement:
if (y2 > -ball.radius && y2 < vy1) { ...
But in order to do that, you need to calculate vy1 beforehand. So that part comes out of the if statement, and the snippet is modified to this:
//rotate coordinates

var y2 = y1 * cos - x1 * sin,


    //rotate velocity

    vy1 = ball.vy * cos - ball.vx * sin;


//perform bounce with rotated values
if (y2 > -ball.radius && y2 < vy1) {

  //rotate coordinates

  var x2 = x1 * cos + y1 * sin,


      //rotate velocity

      vx1 = ball.vx * cos + ball.vy * sin;
Using this code, you need to do a few extra calculations on each frame, with the payoff of greater accuracy and realism—that familiar trade-off which you'll need to balance. The test may not even be necessary if you have a setup where it's not possible for the ball to go under a line. If you don't need to worry about this, and you can move the vy1 calculation back inside the if statement and remove the extra check.
The document 09-angle-bounce-final.html adds bouncing off the floors and walls, so that you can eventually see the ball go under the line.
Bouncing off multiple angles
So far, you've just been bouncing off a single line, or angled surface. Bouncing off multiple surfaces is not much more complicated—you just make a bunch of surfaces and loop through them. You can abstract the angle-bouncing code into its own function and just call that from within the loop.
The next exercise is a complete program, using all the techniques you've seen in prior chapters. The setup is similar to the last few examples, with the same ball and basic line object, except now the lines are a bit smaller so there is room for more of them. The ball is added along with five lines positioned around the canvas, which are in an array named lines. You can see the result in Figure 10-9.
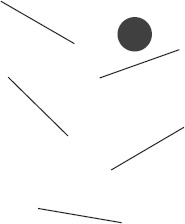
Figure 10-9. Multiple lines
Here's the code for the exercise (which you'll find in 10-multi-angle-bounce.html):
<!doctype html>

<html>

 <head>

  <meta charset="utf-8">

  <title>Multi Angle Bounce</title>

  <link rel="stylesheet" href="style.css">

 </head>
 <body>

  <canvas id="canvas" width="400" height="400"></canvas>

  <script src="utils.js"></script>

  <script src="ball.js"></script>

  <script src="line.js"></script>

  <script>

  window.onload = function () {

    var canvas = document.getElementById('canvas'),

        context = canvas.getContext('2d'),

        ball = new Ball(20),

        lines = [],

        gravity = 0.2,

        bounce = -0.6;


    ball.x = 100;

    ball.y = 50;


    //create 5 lines, position and rotate

    lines[0] = new Line(-50, 0, 50, 0);

    lines[0].x = 100;

    lines[0].y = 100;

    lines[0].rotation = 30 * Math.PI / 180;


    lines[1] = new Line(-50, 0, 50, 0);

    lines[1].x = 100;

    lines[1].y = 200;

    lines[1].rotation = 45 * Math.PI / 180;


    lines[2] = new Line(-50, 0, 50, 0);

    lines[2].x = 220;

    lines[2].y = 150;

    lines[2].rotation = -20 * Math.PI / 180;


    lines[3] = new Line(-50, 0, 50, 0);

    lines[3].x = 150;

    lines[3].y = 330;

    lines[3].rotation = 10 * Math.PI / 180;


    lines[4] = new Line(-50, 0, 50, 0);

    lines[4].x = 230;

    lines[4].y = 250;

    lines[4].rotation = -30 * Math.PI / 180;


    function checkLine (line) {

      var bounds = line.getBounds();


      if (ball.x + ball.radius > bounds.x && ball.x − ball.radius < bounds.x + bounds.width) {

        //get sine and cosine of angle

        var cos = Math.cos(line.rotation),

            sin = Math.sin(line.rotation),


            //get position of ball, relative to line

            x1 = ball.x − line.x,
            y1 = ball.y − line.y,


            //rotate coordinates

            y2 = y1 * cos - x1 * sin,


            //rotate velocity

            vy1 = ball.vy * cos - ball.vx * sin;


        //perform bounce with rotated values

        if (y2 > -ball.radius && y2 < vy1) {

          //rotate coordinates

          var x2 = x1 * cos + y1 * sin,


              //rotate velocity

              vx1 = ball.vx * cos + ball.vy * sin;


          y2 = -ball.radius;

          vy1 *= bounce;


          //rotate everything back

          x1 = x2 * cos - y2 * sin;

          y1 = y2 * cos + x2 * sin;

          ball.vx = vx1 * cos - vy1 * sin;

          ball.vy = vy1 * cos + vx1 * sin;

          ball.x = line.x + x1;

          ball.y = line.y + y1;

        }

      }

    }


    function drawLine (line) {

      checkLine(line);

      line.draw(context);

    }


    (function drawFrame () {

      window.requestAnimationFrame(drawFrame, canvas);

      context.clearRect(0, 0, canvas.width, canvas.height);


      //normal motion code

      ball.vy += gravity;

      ball.x += ball.vx;

      ball.y += ball.vy;


      //bounce off ceiling, floor, and walls

      if (ball.x + ball.radius > canvas.width) {

        ball.x = canvas.width − ball.radius;

        ball.vx *= bounce;

      } else if (ball.x - ball.radius < 0) {

        ball.x = ball.radius;

        ball.vx *= bounce;

      }

      if (ball.y + ball.radius > canvas.height) {

        ball.y = canvas.height − ball.radius;
        ball.vy *= bounce;

      } else if (ball.y - ball.radius < 0) {

        ball.y = ball.radius;

        ball.vy *= bounce;

      }


      lines.forEach(drawLine);

      ball.draw(context);

    }());

  };

  </script>

 </body>

</html>
This example contains a lot of code, but it's all stuff you should recognize by now. Complex programs are not necessarily composed of complex pieces—they are frequently built from smaller pieces, and put together in just right way. In this case, the body of the checkLine function is identical to what was in drawFrame in the previous example, it's just being called five times each frame.
Important formulas in this chapter
Here's a reminder of the two main formulas introduced in this chapter.
Coordinate rotation
x1 = x * Math.cos(rotation) − y * Math.sin(rotation);

y1 = y * Math.cos(rotation) + x * Math.sin(rotation);
Reverse coordinate rotation
x1 = x * Math.cos(rotation) + y * Math.sin(rotation);

y1 = y * Math.cos(rotation) − x * Math.sin(rotation);
Summary
As you've seen in this chapter, coordinate rotation can give you some very complex behavior, but it all boils down to a couple of equations that never change. Once you're comfortable with the formulas, you can use them anywhere. I hope you're starting to see how you can create very complicated and richly realistic motion just by adding in more simple techniques.
You'll be using the coordinate rotation formula quite a bit in the next chapter, where you'll learn how to handle the results of collisions of objects with different velocities and masses.