
Chapter 15
3D Basics
What we'll cover in this chapter:
- The third dimension and perspective
- Velocity and acceleration
- Bouncing
- Gravity
- Wrapping
- Easing and springing
- Coordinate rotation
- Collision detection
Up to now, everything in this book has been in just two (and sometimes only one) dimensions, and you've created some pretty interesting animations. Now, let's take it to the next level.
Creating graphics in 3D is exciting because the extra dimension seems to make things really come to life. We move through the basics of programming 3D fairly quickly, and after that, we'll see how the motion effects discussed in the previous chapters can be done with a third dimension. Specifically, this chapter covers velocity, acceleration, friction, gravity, bouncing, wrapping, easing, springing, coordinate rotation, and collision detection.
For now, you are primarily concerned with taking an object and moving it around in 3D space, using perspective to calculate its size and position on the screen. The object we draw is flat, of course. It won't have a back, side, top, or bottom that you can see. Over the next couple of chapters, you do some modeling of points, lines, shapes, and solids in 3D.
It's worth mentioning there is currently, at the time of writing, a 3D specification in development for the canvas element, called WebGL. However, it is not considered part of the HTML5 specification, and is not supported across all the major web browsers at this time (and it is not known if it ever will be). WebGL is, by design, a low-level means to execute code on the computer's graphics card. Although WebGL is a powerful way to run hardware-accelerated graphics in the browser, it's rather advanced and uses JavaScript more as a way to tie together other programs, called shaders, which are written in a separate shader language and are compiled when the browser loads the document. But WebGL could provide the foundation for the next generation of web-based graphics, on which other, easier to use, libraries and 3D-engines are built. There are still a number of issues facing its broad adoption by all browsers, but it does offer a glimpse into the future of graphics and games on the web.
The third dimension and perspective
The main concept behind 3D is the existence of another dimension beyond the x and y axes. This is the dimension of depth, and it is usually labeled z.
The canvas element does not have a built-in z dimension, but it isn't too difficult to create one with JavaScript. And it's actually less complex than a lot of the stuff you did in the previous chapters!
The z axis
To begin with, you must decide which direction the z-axis will go: in or out. If you recall back to the description of the canvas coordinate system in Chapter 3, it is in some ways opposite to most other commonly used coordinate systems. The y axis goes down instead of up, and angles are measured clockwise instead of counterclockwise.
If an object's z position increases, is it going away from you or toward you on the z-axis? Neither way is necessarily more correct than the other. In fact, this subject has been addressed enough times that there are even names to describe the two methods: left-hand system and right-hand system.
Take either hand, and point the fingers in the direction of the positive x-axis and curl them toward the positive y-axis. The direction your thumb points, either toward you or away from you, is the direction that the positive z-axis points for that coordinate system. So, if you take your right-hand, point it away from you following the positive x-axis, and then curl the fingers to the ground, toward the positive y-axis, your thumb will point in front of you—the positive z-axis for the right-handed coordinate system. So in code, this means the z-axis increases as it goes away from the viewer, and decreases as it goes toward the viewer, as shown in Figure 15-1.
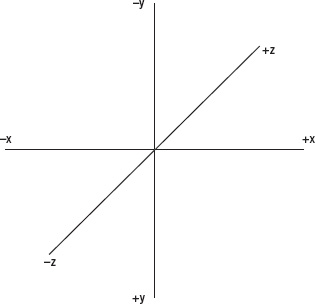
Figure 15-1. Right-hand coordinate system
If you try it with your left hand, you get the opposite result—your thumb is pointing behind you. Figure 15-2 shows the left-hand coordinate system.

Figure 15-2. Left-hand coordinate system
We use the right-hand coordinate system (refer to Figure 15-1) for the examples here, so as an object's z position increases, it moves further in front of us. But that is just the preference of this book, there's no reason that you couldn't make a left-hand system.
The next step in creating a third (z) dimension is to figure out how to simulate perspective.
Perspective
Perspective is how we determine whether something is closer to us or farther away, or—to put it another way—how we make something look like it is closer or farther. There are a number of techniques for presenting perspective, but we concentrate on two here:
- Things get smaller as they get farther away.
- Things converge on a vanishing point as they get farther away.
You've probably seen examples of train tracks coming to a point on the horizon to illustrate the vanishing point. So, when you move something on the z axis, you need to do two things:
- Scale it up or down.
- Move it closer to or farther away from the vanishing point.
When working with only two dimensions, you can get away with using the screen x and y coordinates for your object's x and y position—you just do a one-to-one mapping. But this won't work in 3D, because two objects can have the same x and y position, and yet, due to their depth, have a different position on the screen. Each object you move in 3D should have its own x, y, and z coordinates that have nothing to do with the screen position, these coordinates describe the object's position in virtual space. The perspective calculation tells you where to put the object on the screen.
The perspective formula
The idea is that as something moves farther away (z increases), its scale approaches 0 and its x, y position converges on the 0, 0 of the vanishing point. Because the ratio of distance to scale is the same as the ratio of distance to convergence, you need to figure out what that ratio is for a given distance and use it in both places. The diagram in Figure 15-3 helps to explain this concept.
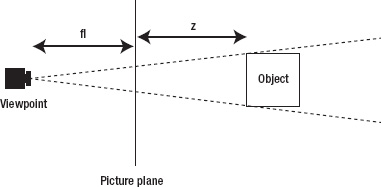
Figure 15-3. Perspective seen from the side
Here, you have an object off in the distance, a viewpoint we look from (the camera), and a picture plane, which we look through to see the scene. You have the distance of the object to the picture plane, which is the z value, and, you have the distance from the viewpoint to the picture plane. This last one is similar to the focal length of a camera lens, so we use the variable fl to represent it. A long focal length can be compared to a telephoto lens on a camera, with a narrow view that compresses the distance between objects. A short focal length is like a wide-angle lens, where you see a lot of the scene, but with a lot of distortion. A medium focal length approximates what the human eye sees, and uses a value for fl that's between 200 and 300. Here's the perspective formula:
scale = fl / (fl + z)
This usually yields a number between 0.0 and 1.0, which is your ratio for scaling and converging on the vanishing point. However, as z approaches -fl, (fl + z) approaches 0 and scale approaches infinity. This is the coding equivalent to being poked in the eye.
What do you do with this scale value? Well, you can adjust the scale of the canvas context before drawing the object. For example, in the Ball class we've used throughout the book, there are scaleX and scaleY properties that are referenced in its draw method, like so:
context.scale(this.scaleX, this.scaleY);
Once the scale as been determined, you multiply the object's x and y position by this factor to find its screen x and y position.
Let's look at an example where we use 250 as the focal length. If z is zero—in other words, the object is exactly on the picture plane—then the scale will be 250 / (250 + 0). This comes out to exactly 1.0. That's your scaleX and scaleY (remember that for scale, 1.0 means 100%). Multiplying 1.0 by the object's x and y positions gives the same numbers back as a result, so the object's screen position is exactly equal to its x and y.
Now move it out so that z is 250. That makes the scale equal to 250 / (250 + 250), or 0.5 for scaleX and scaleY. It also moves the object's screen position. If the object were at 200, 300 on the x and y axis, its screen position would now be 100, 150—it has moved halfway to the vanishing point. (Actually, the screen position would be in relation to the vanishing point, which you see shortly.)
Move z out to 9750. This makes the scale equal to 250/10000, or 0.025 for scaleX and scaleY. The object becomes just a speck that is close to the vanishing point.
Now we see how to write all of this in code.
Programming perspective
We use the Ball class again for these examples, and for interaction, let's get fancy and use the mouse and keyboard. The mouse controls the ball's x and y position, and the up and down keys on the keyboard move the ball forward and back on the z-axis. The variables xpos, ypos, and zpos are used to represent the 3D position. Here's the code for example 01-perspective-1.html:
<!doctype html>

<html>

 <head>

  <meta charset="utf-8">

  <title>Perspective 1</title>

  <link rel="stylesheet" href="style.css">

 </head>

 <body>

  <canvas id="canvas" width="400" height="400"></canvas>
  <script src="utils.js"></script>

  <script src="ball.js"></script>

  <script>

  window.onload = function () {

    var canvas = document.getElementById('canvas'),

        context = canvas.getContext('2d'),

        mouse = utils.captureMouse(canvas),

        ball = new Ball(),

        xpos = 0,

        ypos = 0,

        zpos = 0,

        fl = 250,

        vpX = canvas.width / 2,

        vpY = canvas.height / 2;


    window.addEventListener('keydown', function (event) {

      if (event.keyCode === 38) {         //up

        zpos += 5;

      } else if (event.keyCode === 40) {   //down

        zpos -= 5;

       }

     }, false);


     (function drawFrame () {

       window.requestAnimationFrame(drawFrame, canvas);

       context.clearRect(0, 0, canvas.width, canvas.height);


       var scale = fl / (fl + zpos);

       xpos = mouse.x - vpX;

       ypos = mouse.y - vpY;

       ball.scaleX = ball.scaleY = scale;

       ball.x = vpX + xpos * scale;

       ball.y = vpY + ypos * scale;


       ball.draw(context);

     }());

   };

  </script>

 </body>

</html>
First, you create variables for xpos, ypos, and zpos, as well as fl. Then you create a vanishing point, vpX, vpY. Remember, as objects move off in the distance, they converge on 0, 0. If you don't offset this somehow, everything converges at the top-left corner of the screen, which is not what you want. You use vpX, vpY to make the center of the canvas element the vanishing point.
Next, add a listener for the keydown event that changes the zpos variable. If the up key is pressed, zpos increases, and pressing the down key decreases it. This makes the ball move farther from, or closer to, the viewer.
In the drawFrame animation loop, set xpos and ypos to the mouse position, as offset by the vanishing point. In other words, if the mouse is 200 pixels right of center, xpos is 200. If it's 200 pixels left of center, xpos is −200.
Calculate scale using the perspective formula we just covered, and size and position the ball accordingly. The x and y positions of the ball on the canvas element are calculated from the vanishing point, adding on the xpos and ypos times the scale. Thus, as scale becomes small, the ball converges on the vanishing point.
When this example is run in your browser, at first it looks like you're simply dragging the ball with the mouse. This is because zpos is zero, making scale 1.0. So, no noticeable perspective is applied. As you press the up cursor key, the ball appears to slide into the distance, as shown in Figure 15-4. Now as you move the mouse around, the ball moves with it, but much less, giving you a parallax effect. If you want to set up a scene to use parallax, hard-code the z value for each layer, rather than calculating it dynamically.
Figure 15-4. Perspective in action
You might notice that if you keep pressing the down key, the ball gets very large. This is expected—if you hold a pebble close to your eye, it looks like a boulder. However, if you continue to press the down key, you see that the ball grows to an infinite size and then shrinks down again. (It's actually upside down and reversed, but it's difficult to tell that from a circle.) This is the ball going behind the viewpoint.
Mathematically, what happens is that when zpos is equal to -fl, the formula scale = fl / (fl + zpos) becomes scale = fl / 0. In many languages, dividing by zero gives you an error. In JavaScript, it gives you Infinity. As you decrease zpos even more, you divide fl by a negative number. scale becomes negative, which when applied to the canvas context, has the effect of flipping the image coordinate system, so your ball looks upside down and backward.
A simple way to handle this is to make the ball invisible if it goes past a certain point. If zpos is less than or equal to -fl, you have a problem, so you can test for that condition and handle it. Here's the updated drawFrame function in document 02-perspective-2.html (the rest of the script is the same as the previous example):
(function drawFrame () {

  window.requestAnimationFrame(drawFrame, canvas);

  context.clearRect(0, 0, canvas.width, canvas.height);


  if (zpos > -fl) {

    var scale = fl / (fl + zpos);

    xpos = mouse.x − vpX;

    ypos = mouse.y − vpY;

    ball.scaleX = ball.scaleY = scale;

    ball.x = vpX + xpos * scale;

    ball.y = vpY + ypos * scale;

    ball.visible = true;
  } else {

    ball.visible = false;

  }


  if (ball.visible) {

    ball.draw(context);

  }

}());
If the ball is not in front of us, there's no need to scale and position it. And if the ball isn't visible, there is no need to draw it to the canvas.
Well, there you have it, the bare-bones basics of 3D. Not so painful, is it? Make sure you play around with this example and get a good feel for it. In particular, change the value of fl and see how it affects how the scene is rendered. This is the equivalent of changing the lens on a camera.
The rest of the chapter is devoted to programming the various motion effects covered in previous chapters, but now in 3D.
Velocity and acceleration
Accomplishing velocity and acceleration in 3D is surprisingly easy. For 2D, you have vx and vy variables to represent velocity on two axes. Now you just need to add the vz variable for the third dimension. Similarly, if you have something such as ax and ay for acceleration, you add az.
You can modify the last exercise to make it work sort of like the earlier spaceship examples, but in 3D. It's all keyboard-controlled now, with the cursor keys providing the thrust on the x and y axes, and the Shift and Control keys used for z thrust. Here's the code for document 03-velocity-3d.html:
<!doctype html>

<html>

 <head>

  <meta charset="utf-8">

  <title>Velocity 3D</title>

  <link rel="stylesheet" href="style.css">

  </head>

  <body>

   <canvas id="canvas" width="400" height="400"></canvas>

   <script src="utils.js"></script>

   <script src="ball.js"></script>

   <script>

  window.onload = function () {

    var canvas = document.getElementById('canvas'),

        context = canvas.getContext('2d'),

        ball = new Ball(),

        xpos = 0,

        ypos = 0,

        zpos = 0,

        vx = 0,

        vy = 0,

        vz = 0,
        friction = 0.98,

        fl = 250,

        vpX = canvas.width / 2,

        vpY = canvas.height / 2;


    window.addEventListener('keydown', function (event) {

      switch (event.keyCode) {

      case 38:        //up

        vy -= 1;

        break;

      case 40:        //down

        vy += 1;

        break;

      case 37:        //left

        vx -= 1;

        break;

      case 39:        //right

        vx += 1;

        break;

      case 16:        //shift

        vz += 1;

        break;

      case 17:        //control

        vz -= 1;

        break;

      }

    }, false);


    (function drawFrame () {

      window.requestAnimationFrame(drawFrame, canvas);

      context.clearRect(0, 0, canvas.width, canvas.height);


      xpos += vx;

      ypos += vy;

      zpos += vz;

      vx *= friction;

      vy *= friction;

      vz *= friction;


      if (zpos > -fl) {

        var scale = fl / (fl + zpos);

        ball.scaleX = ball.scaleY = scale;

        ball.x = vpX + xpos * scale;

        ball.y = vpY + ypos * scale;

        ball.visible = true;

      } else {

        ball.visible = false;

      }


      if (ball.visible) {

        ball.draw(context);

      }

    }());
  };

  </script>

 </body>

</html>
All we did here is add variables for velocity on each axis and some friction. When one of the six keys is pressed, it adds or subtracts from the appropriate velocity (remember that acceleration changes velocity). Then it adds the velocity to the position on each axis and computes friction.
Now you have a 3D object moving with acceleration, velocity, and friction. And done quite easily.
Bouncing
For the purposes of this section, we bounce a ball off a flat surface—in other words, one that aligns perfectly with the x, y, or z axis. This is analogous to bouncing off the sides of our canvas element you did in 2D.
Single object bouncing
When bouncing in 3D, again you detect when the object has gone past a boundary, adjust it to touch that boundary, and then reverse its velocity on the appropriate axis. One of the differences with 3D is in how you decide where the boundaries are. In 2D, you generally use the canvas element or some other visible rectangular area. In 3D, things aren't quite so simple because there is no real concept of a visible edge—unless you draw one. You will draw in 3D in the next chapter, so for now, bounce your objects off arbitrarily placed, invisible walls.
The boundaries are set up as before, but now you position them in 3D space, which means that they can be negative as well as positive. And a boundary can be set up on the z-axis. For the next example, our boundaries look like this:
var top = -100,

    bottom = 100,

    left = -100,

    right = 100,

    front = -100,

    back = 100;
After determining the object's new position, check it against all six boundaries. Remember that you take half of the object's width into account when checking for the collision, and that you already stored that value in a property of the Ball class called radius. Here's the full code listing for 3D bouncing (document 04-bounce-3d.html):
<!doctype html>

<html>

 <head>

  <meta charset="utf-8">

  <title>Bounce 3d</title>

  <link rel="stylesheet" href="style.css">

 </head>

 <body>
  <canvas id="canvas" width="400" height="400"></canvas>

  <script src="utils.js"></script>

  <script src="ball.js"></script>

  <script>

  window.onload = function () {

    var canvas = document.getElementById('canvas'),

        context = canvas.getContext('2d'),

        ball = new Ball(),

        xpos = 0,

        ypos = 0,

        zpos = 0,

        vx = Math.random() * 10 − 5,

        vy = Math.random() * 10 − 5,

        vz = Math.random() * 10 − 5,

        fl = 250,

        vpX = canvas.width / 2,

        vpY = canvas.height / 2,

        top = -100,

        bottom = 100,

        left = -100,

        right = 100,

        front = -100,

        back = 100;


    (function drawFrame () {

      window.requestAnimationFrame(drawFrame, canvas);

      context.clearRect(0, 0, canvas.width, canvas.height);


      xpos += vx;

      ypos += vy;

      zpos += vz;


      //check boundaries

      if (xpos + ball.radius > right) {

        xpos = right − ball.radius;

        vx *= -1;

      } else if (xpos - ball.radius < left) {

        xpos = left + ball.radius;

        vx *= -1;

      }

      if (ypos + ball.radius > bottom) {

        ypos = bottom − ball.radius;

        vy *= -1;

      } else if (ypos - ball.radius < top) {

        ypos = top + ball.radius;

        vy *= -1;

      }

      if (zpos + ball.radius > back) {

        zpos = back − ball.radius;

        vz *= -1;

      } else if (zpos - ball.radius < front) {

        zpos = front + ball.radius;

        vz *= -1;
      }


      if (zpos > -fl) {

        var scale = fl / (fl + zpos);

        ball.scaleX = ball.scaleY = scale;

        ball.x = vpX + xpos * scale;

        ball.y = vpY + ypos * scale;

        ball.visible = true;

      } else {

        ball.visible = false;

      }


      if (ball.visible) {

        ball.draw(context);

      }

    }());

   };

  </script>

 </body>

</html>
All of the key-handling code has been removed from the previous example, and the ball has been given a random velocity on each axis. Now you can see the ball is definitely bouncing around, but you can't really tell what it is bouncing against—remember that these are arbitrarily placed invisible boundaries.
Multiple object bouncing
One thing you can do to visualize the walls a little better is to fill up the space with more objects. To do this, we need multiple instances of the Ball class. But then each instance needs its own xpos, ypos, zpos, and velocities on each axis as well. It can get messy keeping track of all of that in the main code, so we'll create a new class, Ball3d, to keep track of the values for us. Save the following script to the file ball3d.js and we'll import it into the next examples:
function Ball3d (radius, color) {

  if (radius === undefined) { radius = 40; }

  if (color === undefined) { color = "#ff0000"; }

  this.x = 0;

  this.y = 0;

  this.xpos = 0;

  this.ypos = 0;

  this.zpos = 0;

  this.vx = 0;

  this.vy = 0;

  this.vz = 0;

  this.radius = radius;

  this.mass = 1;

  this.rotation = 0;

  this.scaleX = 1;

  this.scaleY = 1;

  this.color = utils.parseColor(color);

  this.lineWidth = 1;

  this.visible = true;
  }

  Ball3d.prototype.draw = function (context) {

    context.save();

    context.translate(this.x, this.y);

    context.rotate(this.rotation);

    context.scale(this.scaleX, this.scaleY);

    context.lineWidth = this.lineWidth;

    context.fillStyle = this.color;

    context.beginPath();

    context.arc(0, 0, this.radius, 0, (Math.PI * 2), true);

    context.closePath();

    context.fill();

    if (this.lineWidth > 0) {

      context.stroke();

    }

    context.restore();

};
As you can see, all this does is add properties for position and velocity on each axis to our ball. In 05-multi-bounce-3d.html, we created 50 instances of this new class. Each one now has its own values for xpos, ypos, and zpos, and vx, vy, vz. The drawFrame animation loop now iterates twice over each Ball3d object, passing it to the move and draw functions. This code does the same thing to each ball that the previous example did to just one. Here's the example 05-multi-bounce-3d.html:
<!doctype html>

<html>

 <head>

  <meta charset="utf-8">

  <title<Multi Bounce 3d</title>

  <link rel="stylesheet" href="style.css">

 </head>

 <body>

  <canvas id="canvas" width="400" height="400"></canvas>

  <script src="utils.js"></script>

  <script src="ball3d.js"></script>

  <script>

  window.onload = function () {

    var canvas = document.getElementById('canvas'),

        context = canvas.getContext('2d'),

        balls = [],

        numBalls = 50,

        fl = 250,

        vpX = canvas.width / 2,

        vpY = canvas.height / 2,

        top = -100,

        bottom = 100,

        left = -100,

        right = 100,

        front = -100,

        back = 100;


    for (var ball, i = 0; i < numBalls; i++) {
      ball = new Ball3d(15);

      ball.vx = Math.random() * 10 − 5;

      ball.vy = Math.random() * 10 − 5;

      ball.vz = Math.random() * 10 − 5;

      balls.push(ball);

    }


    function move (ball) {

      ball.xpos += ball.vx;

      ball.ypos += ball.vy;

      ball.zpos += ball.vz;


      //check boundaries

      if (ball.xpos + ball.radius > right) {

        ball.xpos = right − ball.radius;

        ball.vx *= -1;

      } else if (ball.xpos - ball.radius < left) {

        ball.xpos = left + ball.radius;

        ball.vx *= -1;

      }

      if (ball.ypos + ball.radius > bottom) {

        ball.ypos = bottom − ball.radius;

        ball.vy *= -1;

      } else if (ball.ypos - ball.radius < top) {

        ball.ypos = top + ball.radius;

        ball.vy *= -1;

      }

      if (ball.zpos + ball.radius > back) {

        ball.zpos = back − ball.radius;

        ball.vz *= -1;

      } else if (ball.zpos - ball.radius < front) {

        ball.zpos = front + ball.radius;

        ball.vz *= -1;

      }


      if (ball.zpos > -fl) {

        var scale = fl / (fl + ball.zpos);

        ball.scaleX = ball.scaleY = scale;

        ball.x = vpX + ball.xpos * scale;

        ball.y = vpY + ball.ypos * scale;

        ball.visible = true;

      } else {

        ball.visible = false;

      }

    }


    function draw (ball) {

      if (ball.visible) {

        ball.draw(context);

      }

    }


    (function drawFrame () {
      window.requestAnimationFrame(drawFrame, canvas);

      context.clearRect(0, 0, canvas.width, canvas.height);


      balls.forEach(move);

      balls.forEach(draw);

    }());

  };

  </script>

 </body>

</html>
When you run this script, you'll see the balls fill up the space between the six boundaries, as shown in Figure 15-5, and you can get an idea of the shape of this space.
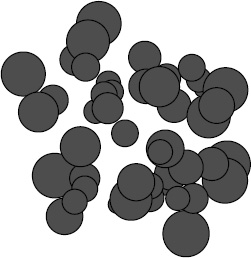
Figure 15-5. Bouncing 3D balls
Z-sorting
Now, this addition of multiple objects brings up an issue lacking in the code you have so far—something called z-sorting. Z-sorting is how objects are sorted on the z-axis, or which one goes in front of another one. If you look closely at the ball outlines, you can see which ball is on top of which. This pretty much ruins the whole 3D effect, because smaller objects are now appearing in front of larger ones. But we can fix the order the balls are drawn to the canvas element by applying z-sorting.
Our code draws the balls in the order they are positioned in the balls array. In the prior example, that order is determined when the balls are first initialized and added to the array. So if we want to draw the balls according to their position on the z-index, we need to reorder them accordingly. To reorder an array in JavaScript, we need to define a function to sort it.
JavaScript arrays have a sort method that is defined as Array.sort([compareFunction]). The method has an optional function parameter that defines the sort order by comparing each element. If this argument omitted, the array is sorted alphabetically by the element names.
The compareFunction parameter is a function that in turn takes two arguments, and these are the array elements that are compared as it iterates over the entire collection. How the array is ordered is determined by the numeric return value of the compareFunction when passed successive elements using the following rules:
Let n = compareFunction(a, b).
- If
nis less than 0, sort elementato a lower index than elementb. - If
nreturns 0, leave elementaand elementbunchanged. - If
nis greater than 0, sort elementbto a lower index than elementa.
For example, to sort an array of numbers in ascending order:
var arr = [3, 5, 1, 4, 2];

arr.sort(function (a, b) { return (a - b); });


console.log(arr); //prints [1, 2, 3, 4, 5]
In terms of 3D depth ordering, index 0 is the bottom, and any objects with a higher number appear in front of objects with a lower number. You want to sort the array of objects from the highest depth (farthest away) to lowest (closest). The following code defines our sort function, and then orders the balls array:
function zSort (a, b) {

  return (b.zpos − a.zpos);

}

balls.sort(zSort);
This sorts the array based on the zpos property of each object, in reverse numerical order—in other words, from high to low. The result is that the ball that is farthest away (highest zpos value) is first in the array and therefore drawn first to the canvas element. The closest ball is the last element in the array and drawn on top of every other ball.
Once you add this function to previous example, you need to call it before you draw the balls:
(function drawFrame () {

  window.requestAnimationFrame(drawFrame, canvas);

  context.clearRect(0, 0, canvas.width, canvas.height);


  balls.forEach(move);

  balls.sort(zSort);

  balls.forEach(draw);

}());
The rest of the code remains the same as the previous exercise. The full listing can be found in document 06-z-sort.html.
Gravity
In this section, we look at simple gravity as seen from the earth's surface, and as described in Chapter 5. In this case, gravity works pretty much the same in 3D as it does in 2D. Choose a number for the force gravity that is exerting on the object, and add that number to the object's y velocity on each animation frame.
Gravity in 3D may be simple, but something simple can create a great looking effect. In this example, we combine gravity with bouncing to give the appearance of dumping a bucket of tiny rubber bouncy balls onto the floor.
You need an object to represent a single rubber bouncy ball, so we again use the Ball3d class, but with a smaller radius. Make each ball a random color, and it also helps to change the background color to black. Here's the code for exercise, 07-bouncy-balls.html:
<!doctype html>

<html>

 <head>

  <meta charset="utf-8">

  <title>Fireworks</title>

  <link rel="stylesheet" href="style.css">

  <style>

  #canvas {

    background-color: #000000;

  }

  </style>

 </head>

 <body>

  <canvas id="canvas" width="400" height="400"></canvas>

  <script src="utils.js"></script>

  <script src="ball3d.js"></script>

  <script>

  window.onload = function () {

    var canvas = document.getElementById('canvas'),

        context = canvas.getContext('2d'),

        balls = [],

        numBalls = 100,

        fl = 250,

        vpX = canvas.width / 2,

        vpY = canvas.height / 2,

        gravity = 0.2,

        floor = 200,

        bounce = -0.6;


    for (var ball, i = 0; i < numBalls; i++) {

      ball = new Ball3d(3, Math.random() * 0xffffff);

      ball.ypos = -100;

      ball.vx = Math.random() * 6 − 3;

      ball.vy = Math.random() * 6 − 3;

      ball.vz = Math.random() * 6 − 3;

      balls.push(ball);

    }
    function move (ball) {

      ball.vy += gravity;

      ball.xpos += ball.vx;

      ball.ypos += ball.vy;

      ball.zpos += ball.vz;


      if (ball.ypos > floor) {

        ball.ypos = floor;

        ball.vy *= bounce;

      }


      if (ball.zpos > -fl) {

        var scale = fl / (fl + ball.zpos);

        ball.scaleX = ball.scaleY = scale;

        ball.x = vpX + ball.xpos * scale;

        ball.y = vpY + ball.ypos * scale;

        ball.visible = true;

      } else {

        ball.visible = false;

      }

    }


    function zSort (a, b) {

      return (b.zpos − a.zpos);

    }


    function draw (ball) {

      if (ball.visible) {

        ball.draw(context);

      }

    }


    (function drawFrame () {

      window.requestAnimationFrame(drawFrame, canvas);

      context.clearRect(0, 0, canvas.width, canvas.height);


      balls.forEach(move);

      balls.sort(zSort);

      balls.forEach(draw);

    }());

  };

  </script>

 </body>

</html>
Here, we add a few properties: gravity, bounce, and floor. The first two you should know by now, and the floor property is just that—the bottom-most y value that the balls can hit before they bounce.
Other than the one line that adds gravity to each ball's vy property, and the bouncing when each one hits the floor, there's not a lot going on here that we haven't covered, but things are starting to look pretty nice.
The result looks something like Figure 15-6.
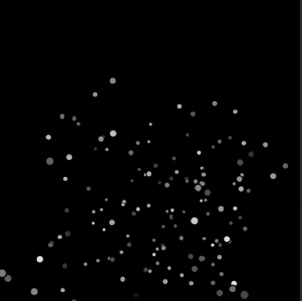
Figure 15-6. A bunch of rubber bouncy balls! (Trust me, it looks much better in motion.)
Wrapping
Recall in Chapter 6, we discussed three possible reactions when an object hits a boundary. We just covered bouncing, and there was also wrapping and regeneration. For 3D, wrapping can be useful, but primarily on the z axis.
In 2D wrapping, you check whether the object went off the screen on the x or y axis. This works pretty well, because when the object goes beyond one of those boundaries, you can't see it anymore, so you can easily reposition it without jarring the viewer's attention. You don't have that luxury in 3D.
In 3D wrapping, there are only two points where it's safe to remove and reposition an object. One is when the object has gone behind the viewpoint. The previous examples test for this and make the object invisible in such a case. The other is when the object is so far in the distance and shrunk to such a small size that it's practically invisible. This means that you can safely wrap on the z axis. When something goes behind you, you toss it way out in front of you, and let it come at you again. Or, if something has gone so far out that you can barely see it, remove it and replace it behind you. If you want, you can try wrapping on the x or y axis as well, but in most cases, you're going to wind up with an unnatural popping in and out of existence effect.
It's worth mentioning, if an object has moved too far out of sight on the x or y axis, you can always reposition it along the z-axis. This is not really screen wrapping, but can be an effective way to reuse objects.
But z-axis wrapping can be useful, especially in 3D racing type games, and we'll create a basic setup here. The idea is to place various 3D objects in front of the viewpoint, then, you move those objects toward the viewpoint. In other words, you give them some negative z velocity. Depending on how you set it up, this can either look like a lot of objects coming toward you, or it can trick the eye to look like you're moving toward the objects. Once an object has gone behind the viewpoint, replace it way out in the distance. That way there is a never-ending supply of objects to move past.
The objects we use in the next example are simple, stylized trees with randomized branch positions. This is the Tree class, which has the 3D position properties and draws a somewhat random stick figure tree. This code will be file tree.js:
function Tree () {

  this.x = 0;

  this.y = 0;

  this.xpos = 0;

  this.ypos = 0;

  this.zpos = 0;

  this.scaleX = 1;

  this.scaleY = 1;

  this.color = "#ffffff";

  this.alpha = 1;

  this.lineWidth = 1;

  this.branch = [];


  //generate some random branch positions

  this.branch[0] = -140 - Math.random() * 20;

  this.branch[1] = -30 - Math.random() * 30;

  this.branch[2] = Math.random() * 80 − 40;

  this.branch[3] = -100 - Math.random() * 40;

  this.branch[4] = -60 - Math.random() * 40;

  this.branch[5] = Math.random() * 60 − 30;

  this.branch[6] = -110 - Math.random() * 20;

}


Tree.prototype.draw = function (context) {

  context.save();

  context.translate(this.x, this.y);

  context.scale(this.scaleX, this.scaleY);

  context.lineWidth = this.lineWidth;

  context.strokeStyle = utils.colorToRGB(this.color, this.alpha);

  context.beginPath();

  context.moveTo(0, 0);

  context.lineTo(0, this.branch[0]);

  context.moveTo(0, this.branch[1]);

  context.lineTo(this.branch[2], this.branch[3]);

  context.moveTo(0, this.branch[4]);

  context.lineTo(this.branch[5], this.branch[6]);

  context.stroke();

  context.restore();

};
Again, for this example, we use a white on a black background color. The script creates several trees, and they are spread out randomly on the x-axis, 1,000 pixels in either direction. They are also spread out on the z-axis, from 0 to 10,000. They all have the same y position though, based on the floor property, which gives the impression of a ground plane.
The following code is for excercise 08-trees-1.html, and you can see what it looks like in Figure 15-7.
<!doctype html>

<html>

 <head>

  <meta charset="utf-8">

  <title>Trees 1</title>

  <link rel="stylesheet" href="style.css">

  <style>

  #canvas {

    background-color: #000000;

  }

  </style>

 </head>

<body>

 <canvas id="canvas" width="400" height="400"></canvas>

 <script src="utils.js"></script>

 <script src="tree.js"></script>

 <script>

 window.onload = function () {

   var canvas = document.getElementById('canvas'),

       context = canvas.getContext('2d'),

       trees = [],

       numTrees = 100,

       fl = 250,

       vpX = canvas.width / 2,

       vpY = canvas.height / 2,

       floor = 200,

       vz = 0,

       friction = 0.98;


   for (var tree, i = 0; i < numTrees; i++) {

     tree = new Tree();

     tree.xpos = Math.random() * 2000 − 1000;

     tree.ypos = floor;

     tree.zpos = Math.random() * 10000;

     trees.push(tree);

   }


   window.addEventListener('keydown', function (event) {

     if (event.keyCode === 38) {         //up

       vz -= 1;

     } else if (event.keyCode === 40) {  //down

       vz += 1;

     }

   }, false);


   function move (tree) {

     tree.zpos += vz;

     if (tree.zpos < -fl) {

       tree.zpos += 10000;

     }

     if (tree.zpos > 10000 - fl) {

       tree.zpos -= 10000;

     }
     var scale = fl / (fl + tree.zpos);

     tree.scaleX = tree.scaleY = scale;

     tree.x = vpX + tree.xpos * scale;

     tree.y = vpY + tree.ypos * scale;

     tree.alpha = scale;

   }


   function zSort (a, b) {

     return (b.zpos − a.zpos);

   }


     function draw (tree) {

       tree.draw(context);

   }


    (function drawFrame () {

      window.requestAnimationFrame(drawFrame, canvas);

      context.clearRect(0, 0, canvas.width, canvas.height);


      trees.forEach(move);

      vz *= friction;

      trees.sort(zSort);

      trees.forEach(draw);

    }());

  };

  </script>

 </body>

</html>
There is only a single variable for z velocity, because the trees won't move on the x or y axis, and all move in unison on the z-axis. We attached a keydown event listener to the document, which increments or decrements vz accordingly. Applying a little friction in the drawFrame function keeps the speed from increasing infinitely, and slows you down if no key is pressed.
The code then loops through each tree, updating its z position with the current z velocity. Then it checks whether a tree has gone behind you. If so, rather than making it invisible, it moves the tree 10,000 pixels into the z axis. Likewise, if it has gone past 10,000 - fl, it moves the tree back 10,000.
You then do the standard perspective actions. Here, we also add another little extra to enhance the illusion of depth:
tree.alpha = scale;
This sets the transparency of the tree in relation to its depth on the z-axis. The farther away it goes, the more it fades out. This is atmospheric perspective, simulating the effect of the atmosphere between the viewer and the object. This is particularly effective when you have objects moving way out in the distance, as in this example. The effect is applied to the canvas context within the tree's draw method:
context.strokeStyle = utils.colorToRGB(this.color, this.alpha);
This specific calculation for transparency gives the effect of a dark, spooky night. You might want to try something like the following:
This gives the trees an opacity of at least 30%—not quite so foggy. There are no right or wrong values for most of this, just different values that create different effects.
We left the z-sorting method in there, though, in this particular case, it doesn't make much of a visual difference because the trees are just simple lines of the same color. If you draw more complex, overlapping objects, it is pretty important.
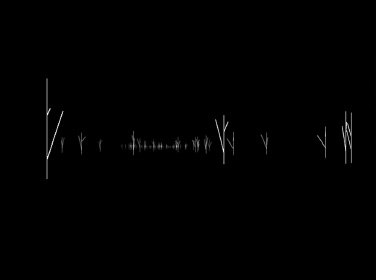
Figure 15-7. Watch out for the trees!
Let's add a few enhancements beyond the scope of screen wrapping, just to give you an idea of where this can go. Here is the result (which can also be found in 09-trees-2.html):
<!doctype html>

<html>

 <head>

  <meta charset="utf-8">

  <title>Trees 2</title>

  <link rel="stylesheet" href="style.css">

  <style>

  #canvas {

    background-color: #000000;

  }

  </style>

 </head>

 <body>

  <canvas id="canvas" width="400" height="400"></canvas>

  <script src="utils.js"></script>

  <script src="tree.js"></script>

  <script>

  window.onload = function () {

    var canvas = document.getElementById('canvas'),

        context = canvas.getContext('2d'),
        trees = [],

        numTrees = 100,

        fl = 250,

        vpX = canvas.width / 2,

        vpY = canvas.height / 2,

        floor = 50,

        ax = 0,

        ay = 0,

        az = 0,

        vx = 0,

        vy = 0,

        vz = 0,

        gravity = 0.3,

        friction = 0.95;


    for (var tree, i = 0; i < numTrees; i++) {

      tree = new Tree();

      tree.xpos = Math.random() * 2000 − 1000;

      tree.ypos = floor;

      tree.zpos = Math.random() * 10000;

      trees.push(tree);

    }


    window.addEventListener('keydown', function (event) {

      switch (event.keyCode) {

      case 38:        //up

        az = -1;

        break;

      case 40:        //down

        az = 1;

        break;

      case 37:        //left

        ax = 1;

        break;

      case 39:        //right

        ax = -1;

        break;

      case 32:        //space

        ay = 1;

        break;

      }

    }, false);


    window.addEventListener('keyup', function (event) {

      switch (event.keyCode) {

      case 38:        //up

      case 40:        //down

        az = 0;

        break;

      case 37:        //left

      case 39:        //right

        ax = 0;

        break;
      case 32:        //space

        ay = 0;

        break;

      }

    }, false);


    function move (tree) {

      tree.xpos += vx;

      tree.ypos += vy;

      tree.zpos += vz;

      if (tree.ypos < floor) {

        tree.ypos = floor;

      }

      if (tree.zpos < -fl) {

        tree.zpos += 10000;

      }

      if (tree.zpos > 10000 - fl) {

        tree.zpos -= 10000;

      }

      var scale = fl / (fl + tree.zpos);

      tree.scaleX = tree.scaleY = scale;

      tree.x = vpX + tree.xpos * scale;

      tree.y = vpY + tree.ypos * scale;

      tree.alpha = scale;

    }


    function zSort (a, b) {

      return (b.zpos − a.zpos);

    }


    function draw (tree) {

      tree.draw(context);

    }


    (function drawFrame () {

      window.requestAnimationFrame(drawFrame, canvas);

      context.clearRect(0, 0, canvas.width, canvas.height);


      vx += ax;

      vy += ay;

      vz += az;

      vy -= gravity;

      trees.forEach(move);

      vx *= friction;

      vy *= friction;

      vz *= friction;

      trees.sort(zSort);

      trees.forEach(draw);

    }());

  };

  </script>

 </body>

</html>
Here, we add velocity for the x and y axis, as well as some gravity. We also do some fancy footwork to detect multiple key presses by attaching a keydown and keyup event listener. When the key is pressed, we set the acceleration on the appropriate axis to 1 or −1;then when that key is released, we set the acceleration back to 0. The acceleration for each axis gets added to the velocity on that axis in the drawFrame animation loop. The left and right cursor keys were obvious choices for the x velocity, and we use the spacebar for y. One interesting point is that we are subtracting gravity from vy. This is because we want it to seem like the viewer is the one who is falling down to where the trees are, as shown in Figure 15-8. Really, the trees are “falling up” to where the viewpoint is, but it winds up looking the same. The y position of the trees is limited to 50, which makes it look like you landed on the ground.
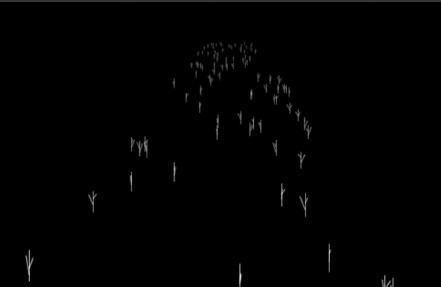
Figure 15-8. Look, I'm flying!
There is nothing to limit movement on the x-axis, which means you can go off to the side of the forest if you want. As an additional exercise, it wouldn't be too hard for you to set up some side boundaries.
Easing and springing
Easing and springing are also not much more complex in 3D than they are in 2D (the subject of Chapter 8). Just add another variable or two for the z-axis, and you're all set.
Easing
There's not a lot to cover on easing. In 2D, you have tx and ty as a target point. You just add tz for the z-axis. On each animation frame, you measure the distance from the object to the target on each axis, and move it a fraction of the way there.
Let's look at a simple example that eases an instance of Ball3d to a random target in 3D space. When the ball arrives at the coordinate, it picks another target and moves there. Here's the code (document 10-easing-3d.html):
<!doctype html>

<html>

 <head>

  <meta charset="utf-8">

  <title>Easing 3d</title>

  <link rel="stylesheet" href="style.css">

 </head>

 <body>

  <canvas id="canvas" width="400" height="400"></canvas>

  <script src="utils.js"></script>

  <script src="ball3d.js"></script>

  <script>

  window.onload = function () {

    var canvas = document.getElementById('canvas'),

        context = canvas.getContext('2d'),

        ball = new Ball3d(),

        tx = Math.random() * 500 − 250,

        ty = Math.random() * 500 − 250,

        tz = Math.random() * 500,

        easing = 0.1,

        fl = 250,

        vpX = canvas.width / 2,

        vpY = canvas.height / 2;


    (function drawFrame () {

      window.requestAnimationFrame(drawFrame, canvas);

      context.clearRect(0, 0, canvas.width, canvas.height);


      var dx = tx − ball.xpos,

          dy = ty − ball.ypos,

          dz = tz − ball.zpos,

          dist = Math.sqrt(dx * dx + dy * dy + dz * dz);


      ball.xpos += dx * easing;

      ball.ypos += dy * easing;

      ball.zpos += dz * easing;


      if (dist < 1) {

        tx = Math.random() * 500 − 250;

        ty = Math.random() * 500 − 250;

        tz = Math.random() * 500;

      }


      if (ball.zpos > -fl) {

        var scale = fl / (fl + ball.zpos);

        ball.scaleX = ball.scaleY = scale;

        ball.x = vpX + ball.xpos * scale;

        ball.y = vpY + ball.ypos * scale;

        ball.visible = true;

      } else {

        ball.visible = false;

      }
      if (ball.visible) {

        ball.draw(context);

      }

    }());

  };

  </script>

 </body>

</html>
The most interesting part of this code is calculating the 3D distance:
var dist = Math.sqrt(dx * dx + dy * dy + dz * dz);
If you remember, in 2D, you measure the distance between two points by the following equation:
var dist = Math.sqrt(dx * dx + dy * dy);
To move into 3D distances, just add the square of the distance on the third axis. It's pretty simple.
Springing
Springing, a close cousin to easing, requires a similar adjustment for 3D. You use the distance to the target to change the velocity, rather than the position. In this example, 11-spring-3d.html, clicking the mouse creates a new random target for the ball to spring to:
<!doctype html>

<html>

 <head>

  <meta charset="utf-8">

  <title>Spring 3d</title>

  <link rel="stylesheet" href="style.css">

 </head>

 <body>

  <canvas id="canvas" width="400" height="400"></canvas>

  <script src="utils.js"></script>

  <script src="ball3d.js"></script>

  <script>

  window.onload = function () {

    var canvas = document.getElementById('canvas'),

        context = canvas.getContext('2d'),

        ball = new Ball3d(),

        tx = Math.random() * 500 − 250,

        ty = Math.random() * 500 − 250,

        tz = Math.random() * 500,

        spring = 0.1,

        friction = 0.94,

        fl = 250,

        vpX = canvas.width / 2,

        vpY = canvas.height / 2;


    window.addEventListener('mousedown', function () {

      tx = Math.random() * 500 − 250;

      ty = Math.random() * 500 − 250;
      tz = Math.random() * 500;

    }, false);


    (function drawFrame () {

       window.requestAnimationFrame(drawFrame, canvas);

       context.clearRect(0, 0, canvas.width, canvas.height);


       var dx = tx − ball.xpos,

           dy = ty − ball.ypos,

           dz = tz − ball.zpos;


       ball.vx += dx * spring;

       ball.vy += dy * spring;

       ball.vz += dz * spring;

       ball.xpos += ball.vx;

       ball.ypos += ball.vy;

       ball.zpos += ball.vz;

       ball.vx *= friction;

       ball.vy *= friction;

       ball.vz *= friction;


       if (ball.zpos > -fl) {

         var scale = fl / (fl + ball.zpos);

         ball.scaleX = ball.scaleY = scale;

         ball.x = vpX + ball.xpos * scale;

         ball.y = vpY + ball.ypos * scale;

         ball.visible = true;

       } else {

         ball.visible = false;

       }


       if (ball.visible) {

         ball.draw(context);

       }

     }());

   };

  </script>

 </body>

</html>
This code uses the basic spring formula from Chapter 8, but with a third axis.
Coordinate rotation
Next up is coordinate rotation in 3D. This gets a bit more complex than 2D, which you saw in Chapters 10 and 11. Not only can you choose between three different axes to rotate on, you can even rotate on more than one of them at once.
In 2D coordinate rotation, the points rotate around the z-axis, as shown in Figure 15-9. Think of a spinning windmill with an axle through the center. The axle is the z-axis. Only the x and y coordinates change.
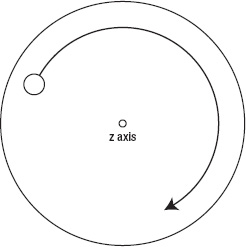
Figure 15-9. Rotation on the z axis
In 3D, you can also rotate on the x or y axis. An x-axis rotation looks like a car tire rolling toward you, as shown in Figure 15-10, with the axle as the x-axis. Points rotate around that and change their y and z positions.
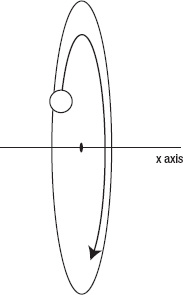
Figure 15-10. Rotation on the x axis
For y-axis rotation, imagine a record player, something like Figure 15-11. The spindle is the y-axis, and the points move on the x and z axes.
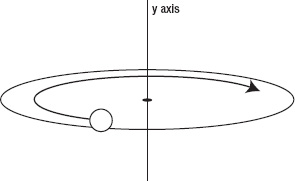
Figure 15-11. Rotation on the y axis
Thus, for 3D, when you rotate an object on one axis, its position changes on the other two axes.
In Chapter 10, we calculated 2D coordinate rotation using the formula:
x1 = x * cos(angle) − y * sin(angle)

y1 = y * cos(angle) + x * sin(angle)
In 3D, you do basically the same thing, but you need to specify which angle you're talking about: x, y, or z. Thus, you get the following three formulas:
x1 = x * cos(angleZ) − y * sin(angleZ)

y1 = y * cos(angleZ) + x * sin(angleZ)


x1 = x * cos(angleY) − z * sin(angleY)

z1 = z * cos(angleY) + x * sin(angleY)


y1 = y * cos(angleX) − z * sin(angleX)

z1 = z * cos(angleX) + y * sin(angleX)
We'll perform a y-axis rotation in the next example, 12-rotate-y.html. It creates 50 instances of Ball3d and randomly positions them. Then, it gets a y angle based on the mouse's x position. The farther right the mouse goes, the higher the number for the angle. This makes the objects seem to follow the mouse in their rotation.
<!doctype html>

<html>

 <head>

  <meta charset="utf-8">

  <title>Rotate Y</title>

  <link rel="stylesheet" href="style.css">

 </head>

 <body>

  <canvas id="canvas" width="400" height="400"></canvas>

  <script src="utils.js"></script>

  <script src="ball3d.js"></script>

  <script>

  window.onload = function () {

    var canvas = document.getElementById('canvas'),

        context = canvas.getContext('2d'),
        mouse = utils.captureMouse(canvas),

        balls = [],

        numBalls = 50,

        fl = 250,

        vpX = canvas.width / 2,

        vpY = canvas.height / 2,

        angleY; //referenced in drawFrame and move


    for (var ball, i = 0; i < numBalls; i++) {

      ball = new Ball3d(15);

      ball.xpos = Math.random() * 200 − 100;

      ball.ypos = Math.random() * 200 − 100;

      ball.zpos = Math.random() * 200 − 100;

      balls.push(ball);

    }


    function rotateY (ball, angle) {

      var cos = Math.cos(angle),

          sin = Math.sin(angle),

          x1 = ball.xpos * cos - ball.zpos * sin,

          z1 = ball.zpos * cos + ball.xpos * sin;


      ball.xpos = x1;

      ball.zpos = z1;


      if (ball.zpos > -fl) {

        var scale = fl / (fl + ball.zpos);

        ball.scaleX = ball.scaleY = scale;

        ball.x = vpX + ball.xpos * scale;

        ball.y = vpY + ball.ypos * scale;

        ball.visible = true;

      } else {

        ball.visible = false;

    }

  }


  function move (ball) {

    rotateY(ball, angleY);

  }


  function zSort (a, b) {

    return (b.zpos − a.zpos);

  }


  function draw (ball) {

    if (ball.visible) {

      ball.draw(context);

    }

  }


  (function drawFrame () {

    window.requestAnimationFrame(drawFrame, canvas);

    context.clearRect(0, 0, canvas.width, canvas.height);
     angleY = (mouse.x - vpX) * 0.001;


     balls.forEach(move);

     balls.sort(zSort);

     balls.forEach(draw);

   }());

  };

  </script>

 </body>

</html>
The important parts are in bold. You get an angle, and pass it and each ball to the rotateY function. Inside this function, you get the sine and cosine of the angle, calculate the rotation, and assign x1 and z1 back to the ball's xpos and zpos properties. After that, it's just standard perspective and z-sorting. Figure 15-12 shows the result.
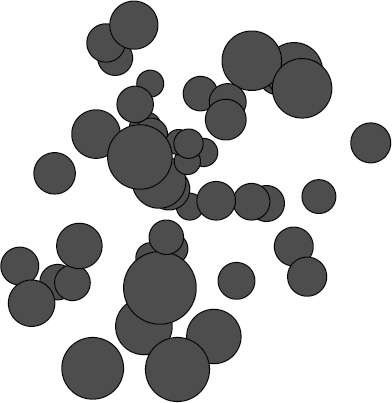
Figure 15-12. Rotation on the y-axis
After you try that, you can switch the example over to an x-axis rotation. Add a new angleX variable to the top of the script, and update the drawFrame and move functions:
function move (ball) {

  rotateX(ball, angleX);

}


(function drawFrame () {
  window.requestAnimationFrame(drawFrame, canvas);

  context.clearRect(0, 0, canvas.width, canvas.height);


  angleX = (mouse.y - vpY) * 0.001;


  balls.forEach(move);

  balls.sort(zSort);

  balls.forEach(draw);

}());
Then, you just need to create the rotateX function to perform the rotation:
function rotateX (ball, angle) {

  var cos = Math.cos(angle),

      sin = Math.sin(angle),

      y1 = ball.ypos * cos - ball.zpos * sin,

      z1 = ball.zpos * cos + ball.ypos * sin;


  ball.ypos = y1;

  ball.zpos = z1;


  if (ball.zpos > -fl) {

    var scale = fl / (fl + ball.zpos);

    ball.scaleX = ball.scaleY = scale;

    ball.x = vpX + ball.xpos * scale;

    ball.y = vpY + ball.ypos * scale;

    ball.visible = true;

  } else {

    ball.visible = false;

  }

}
The angle is based on the mouse's y position. You take the cosine and sine of the angle, and use them to get y1 and z1, which are passed to the ball's ypos and zpos properties.
For the next example, let's combine the two rotations. Here's the code for 13-rotate-xy.html:
<!doctype html>

<html>

 <head>

  <meta charset="utf-8">

  <title>Rotate XY</title>

  <link rel="stylesheet" href="style.css">

 </head>

 <body>

  <canvas id="canvas" width="400" height="400"></canvas>

  <script src="utils.js"></script>

  <script src="ball3d.js"></script>

  <script>

  window.onload = function () {

    var canvas = document.getElementById('canvas'),

        context = canvas.getContext('2d'),

        mouse = utils.captureMouse(canvas),

        balls = [],
        numBalls = 50,

        fl = 250,

        vpX = canvas.width / 2,

        vpY = canvas.height / 2,

        angleX, angleY; //referenced in drawFrame and move


    for (var ball, i = 0; i < numBalls; i++) {

      ball = new Ball3d(15);

      ball.xpos = Math.random() * 200 − 100;

      ball.ypos = Math.random() * 200 − 100;

      ball.zpos = Math.random() * 200 − 100;

      balls.push(ball);

    }


    function rotateX (ball, angle) {

      var cos = Math.cos(angle),

          sin = Math.sin(angle),

          y1 = ball.ypos * cos - ball.zpos * sin,

          z1 = ball.zpos * cos + ball.ypos * sin;


      ball.ypos = y1;

      ball.zpos = z1;

    }


    function rotateY (ball, angle) {

      var cos = Math.cos(angle),

          sin = Math.sin(angle),

          x1 = ball.xpos * cos - ball.zpos * sin,

          z1 = ball.zpos * cos + ball.xpos * sin;


      ball.xpos = x1;

      ball.zpos = z1;

    }


    function setPerspective (ball) {

      if (ball.zpos > -fl) {

        var scale = fl / (fl + ball.zpos);

        ball.scaleX = ball.scaleY = scale;

        ball.x = vpX + ball.xpos * scale;

        ball.y = vpY + ball.ypos * scale;

        ball.visible = true;

      } else {

        ball.visible = false;

      }

    }


    function move (ball) {

      rotateX(ball, angleX);

      rotateY(ball, angleY);

      setPerspective(ball);

    }


    function zSort (a, b) {
    return (b.zpos − a.zpos);

  }


  function draw (ball) {

    if (ball.visible) {

      ball.draw(context);

    }

  }


  (function drawFrame () {

    window.requestAnimationFrame(drawFrame, canvas);

    context.clearRect(0, 0, canvas.width, canvas.height);


    angleX = (mouse.y - vpY) * 0.001;

    angleY = (mouse.x - vpX) * 0.001;


    balls.forEach(move);

    balls.sort(zSort);

    balls.forEach(draw);

  }());

  };

  </script>

 </body>

</html>
Here, you find both angleY and angleX, and call both rotateX and rotateY functions for each ball. The perspective code has been moved out of the rotate functions and into its own function, setPerspective, since it doesn't need to be called twice. You can easily add a rotateZ function based on what you learned and the preceding formulas.
Collision detection
The last thing to cover in this introduction to 3D is collision detection. The only feasible way of calculating collision detection in 3D with the canvas and JavaScript is distance-based. This is not too much different from collision detection in 2D: You find the distance between two objects (using the 3D distance formula), and if that is less than the sum of their radii, you have a hit.
For a 3D collision detection example, we alter one of the earlier 3D bouncing examples, giving it fewer objects and more space. First, we perform the normal 3D motion and perspective, and then do a double iteration to compare the locations of all the balls and check for a collision. If any are less distance apart than twice their radius, it's a hit, and we change the color of both balls to blue. Here's the code for exercise 14-collision-3d.html:
<!doctype html>

<html>

 <head>

  <meta charset="utf-8">

  <title>Collision 3d</title>

  <link rel="stylesheet" href="style.css">

 </head>

 <body>
  <canvas id="canvas" width="400" height="400"></canvas>

  <script src="utils.js"></script>

  <script src="ball3d.js"></script>

  <script>

  window.onload = function () {

    var canvas = document.getElementById('canvas'),

        context = canvas.getContext('2d'),

        balls = [],

        numBalls = 20,

        fl = 250,

        vpX = canvas.width / 2,

        vpY = canvas.height / 2,

        top = -200,

        bottom = 200,

        left = -200,

        right = 200,

        front = -200

        back = 200;


    for (var ball, i = 0; i < numBalls; i++) {

      ball = new Ball3d(15);

      ball.xpos = Math.random() * 400 − 200;

      ball.ypos = Math.random() * 400 − 200;

      ball.zpos = Math.random() * 400 − 200;

      ball.vx = Math.random() * 5 − 1;

      ball.vy = Math.random() * 5 − 1;

      ball.vz = Math.random() * 5 − 1;

      balls.push(ball);

    }


    function move (ball) {

      ball.xpos += ball.vx;

      ball.ypos += ball.vy;

      ball.zpos += ball.vz;


      //check boundaries

      if (ball.xpos + ball.radius > right) {

        ball.xpos = right − ball.radius;

        ball.vx *= -1;

      } else if (ball.xpos - ball.radius < left) {

        ball.xpos = left + ball.radius;

        ball.vx *= -1;

      }

      if (ball.ypos + ball.radius > bottom) {

      ball.ypos = bottom − ball.radius;

      ball.vy *= -1;

    } else if (ball.ypos - ball.radius < top) {

      ball.ypos = top + ball.radius;

      ball.vy *= -1;

    }

    if (ball.zpos + ball.radius > back) {

      ball.zpos = back − ball.radius;

      ball.vz *= -1;

    } else if (ball.zpos - ball.radius < front) {
      ball.zpos = front + ball.radius;

      ball.vz *= -1;

    }


    if (ball.zpos > -fl) {

      var scale = fl / (fl + ball.zpos);

      ball.scaleX = ball.scaleY = scale;

      ball.x = vpX + ball.xpos * scale;

      ball.y = vpY + ball.ypos * scale;

      ball.visible = true;

    } else {

      ball.visible = false;

    }

  }


  function checkCollision (ballA, i) {

    for (var ballB, dx, dy, dz, dist, j = i + 1; j < numBalls; j++) {

     ballB = balls[j];

     dx = ballA.xpos − ballB.xpos;

     dy = ballA.ypos − ballB.ypos;

     dz = ballA.zpos − ballB.zpos;

     dist = Math.sqrt(dx * dx + dy * dy + dz * dz);


     if (dist < ballA.radius + ballB.radius) {

       ballA.color = "#0000ff";

       ballB.color = "#0000ff";

     }

    }

  }


  function zSort (a, b) {

    return (b.zpos − a.zpos);

  }


  function draw (ball) {

    if (ball.visible) {

      ball.draw(context);

    }

  }


  (function drawFrame () {

    window.requestAnimationFrame(drawFrame, canvas);

    context.clearRect(0, 0, canvas.width, canvas.height);


    balls.forEach(move);

    balls.forEach(checkCollision);

    balls.sort(zSort);

    balls.forEach(draw);

  }());

  };

  </script>

 </body>

</html>
The important parts of this code are in bold. The balls start out all red, and as they collide, they change color. Before long, all are blue.
Important formulas in this chapter
The important formulas in this chapter are those for 3D perspective, coordinate rotation, and distance.
Basic perspective
    scale = fl / (fl + zpos);

    object.scaleX = object.scaleY = scale;

    object.alpha = scale; // optional

    object.x = vanishingPointX + xpos * scale;

    object.y = vanishingPointY + ypos * scale;
Z-sorting
    //assumes an array of 3D objects with a zpos property

    function zSort (a, b) {

      return (b.zpos − a.zpos);

    }


    objects.sort(zSort);
Coordinate rotation
    x1 = xpos * cos(angleZ) − ypos * sin(angleZ);

    y1 = ypos * cos(angleZ) + xpos * sin(angleZ);


    x1 = xpos * cos(angleY) − zpos * sin(angleY);

    z1 = zpos * cos(angleY) + xpos * sin(angleY);


    y1 = ypos * cos(angleX) − zpos * sin(angleX);

    z1 = zpos * cos(angleX) + ypos * sin(angleX);
3D distance
dist = Math.sqrt(dx * dx + dy * dy + dz * dz);
Summary
You now have the basics of 3D under your belt, and you've seen most of the basic motion code adapted for 3D. It's surprising how much of it is the same as the 2D animation code, but with an additional z variable. It turns out that much of these examples were rather simple.
You use a lot of what you learned here in the next chapter, where you actually begin to sculpt 3D forms with points and lines.