
C H A P T E R 5
Content Delivery Networks
This chapter covers a topic that you probably won’t be able to recreate by yourself. Or at least you wouldn’t (or shouldn’t) want to. Content delivery networks (CDNs) have become quite prominent in recent years. The way they work is very simple and this hides some of their intrinsic power.
For example, Peter lives in Hong Kong and is blessed with a 100Mbps Internet connection. When he downloads updates from Microsoft or Apple, he can download at around 10Mbps. The reason is because Hong Kong has awesome connectivity. It is quite realistic for an individual to have a 1Gbps fiber optic network connection here. However, while this provides ping times for Quake 3 in the low single digits, all of this stops at Hong Kong’s border. At this point everything gets shuttled back and forth via relatively slow links, and your lightning-fast connection gives you no advantage.
So, how can he download the updates so fast? The answer is really rather straightforward: the files he needs are physically in Hong Kong. But what happens for people outside of Hong Kong? Surely they’ll have the same issue in reverse: if it’s fast for Peter, it’s going to be deathly slow for them. As it happens, this isn’t a problem because the files are in most other countries, too.
Okay, so that doesn’t sound particular awe-inspiring, does it? Big deal, you have the file in more than one place. Not rocket science. True, but what is really cool is that you access all those files—regardless of where they are—with the same address. In other words, if you use the URL in Hong Kong, you download from the Hong Kong mirror, but if you’re in the United States or the United Kingdom, you would get to the local mirrors. In short, you would always connect to the server that’s closest to you and thus get the highest possible speed available.
So, same URL, same file, different locations. Isn’t that cool?
When the World Wide Web took off and it became critical for a web site in the United States to be equally fast and responsive when browsed from Tokyo, it hit a problem. The easiest solution (and one you still see occasionally) is for a company to have servers in more than one place. You go to their main site and then you’ll get redirected to a local mirror. You can usually spot these by the different hostname, such as the following:
http://www.example.com/

http://hk.example.com/

http://uk.example.com/
These addresses point to individual machines, usually in the region they are supposed to serve.
![]() Note Funky hostnames don’t necessarily mean that the server is different. For example, applications like Basecamp from 37Signals use different hostnames to differentiate individual customers. It’s a great example of using the environment to make the application simpler and easier to maintain.
Note Funky hostnames don’t necessarily mean that the server is different. For example, applications like Basecamp from 37Signals use different hostnames to differentiate individual customers. It’s a great example of using the environment to make the application simpler and easier to maintain.
The problem with this system is you have to maintain a server for each region or country. You need to apply updates to all of them individually and make sure the content is always up to date. That said, if you are specifically targeting only two countries, you might want to look into this solution. The rest of us need a solution that’s just going to work, be fast, and make the boss and customers happy. We need a content delivery network.
Building complicated networks that span the world is not a cheap thing to do. In fact, it’s hideously expensive. The interesting thing is that although you need to set up the servers and have good coverage, once the network is in place, it will spend most of its time sitting on its hands waiting for something to do. That’s not a very efficient use of your huge investment.
Content delivery networks get around this little problem. One company builds the network and then shares it with others—for a fee, of course! This has many benefits for people like us, as we merely need to use a small portion of the network’s bandwidth and don’t fancy the high costs of its implementation. We just pay for what we intend to use, nothing more.
Choosing a CDN Provider
So now what you know the details of what a content delivery network really is and what it can do for you, you can start by choosing one for your purposes. There are many commercial content delivery network providers available: Amazon Web Services offers the Amazon CloudFront, which is optimized to work with other Amazon Web Services they offer, such as their Elastic Compute Cloud, or EC2. Another frontrunner in the field of CDN is Limelight Networks, which was founded in 2001 and has an extensive portfolio with well-known customers and a good reputation. Finally, Akamai is another key player; delivering between 15 to 30% of all web traffic and running over 95,000 servers worldwide, it is definitely a market leader.
The CDN provider you’ll be looking at in this chapter is Rackspace. Rackspace offers many services, including their Rackspace Cloud Files service. The Cloud Files service is currently hosted using Akamai’s content delivery network at a very decent price, paid per GB of storage per month. Naturally, it’s eventually up to you to choose which content delivery provider to use, but we’ve been very satisfied with their services and how their API integrates.
Getting Started with Rackspace
Before you can start uploading any data, you first need to register an account using their web site. The process should be pretty straightforward and involves selecting the services to use (in this case, the Rackspace Cloud Files service) and providing them with some basic information, such as your contact details, payment information, and so on. Once done, you will receive an e-mail from them that includes your login details with a link to their web site that you can use to get started. For now, let’s assume that your username is loadbalancer, and your password is LoadBalance01.
Use your browser to navigate to their web site, which will prompt you for your login credentials, as shown in Figure 5-1.

Figure 5-1. Rackspace Cloud login prompt
The first time you log into the account, you’ll be asked to read and accept the terms of conditions and set up password recovery information in case you forget your password. Then you will get to the Rackspace interface. The management interface is quite self-explanatory and offers a number of options to modify your account, request support, view some tutorials, and of course, manage your hosted files. More importantly, you will be shown an overview of your account’s activity per rented service; this includes the total amount of bandwidth used and disk space rented throughout the past month.
Specifically, Bandwidth In tells you the total amount of data transferred into your Rackspace Cloud Files account. Bandwidth Out tells you the total amount of gigabytes transferred to external users via the Web, so this will tell you how active your web site or application has been the last few weeks. Bandwidth CDN informs you about the total amount of data delivered to others using the Akamai content delivery network, which Rackspace employs. Next, Disk Space informs you about the total amount of gigabytes used by all objects on your account. Finally, Operations summarizes the number of actions you’ve performed recently on your account, such as initiating uploads, downloads, creating new storage containers, and so forth. An overview of the default layout can be seen in Figure 5-2.
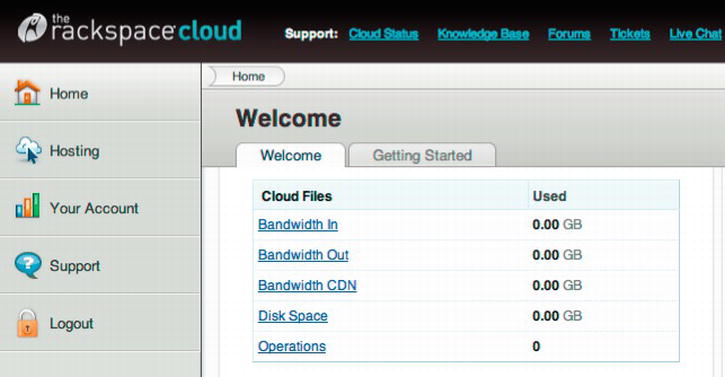
Figure 5-2. Getting started on your fresh Rackspace account
Adding Content to Your CDN Account
Before you can get started on adding your data to the Cloud Files account, you first need to generate an API access key. The API access key will be required for authenticating against the RESTful API before being able to perform any calls (or actions). The RESTful API is discussed later in this chapter, so you don’t need to concern yourselves with the details on how the API and authentication scheme works yet, but you do need to generate this key before you can get started.
To generate the access key, you need to navigate to the Hosting menu and select Cloud Files. Here, you’ll be prompted to generate the API Access Key by clicking Activate Now. Once done, the blank fields will be populated with your API Key and your account’s username. You will require this information later on when you start working with language-specific APIs. For now, you can proceed by clicking on Start Cloud Files.
Initially, no containers will be listed the first time you open the interface, as you can see in Figure 5-3. Containers are used to store the content you wish to serve and are best compared to directories. That said, it is mandatory to create at least one before you can upload any data to the CDM. To do so, select Add Container from the menu, which allows you to specify the name of your container (for example, website or AwesomeApp, depending on what you prefer). Fill in a name for the container and click OK to generate it.

Figure 5-3. The initial view showing no containers or data
Once generated, the container will be listed, and additional options will become available in the CDN & Metadata frame below. Here you can specify whether the container should be publicly available using the Publish to CDN option or if it should remain private. By default, every container is set to private, meaning its contents will only be published to the CDN and made publicly available when configured so using the container’s properties. Additionally, Enable CDN Logs can be enabled to generate log files, keeping track of your visitors. The size of these log files do count to your disk usage, however.
For now, enable the Publish to CDN option as shown in Figure 5-4 and leave it at that. Now you’re ready to upload some content!
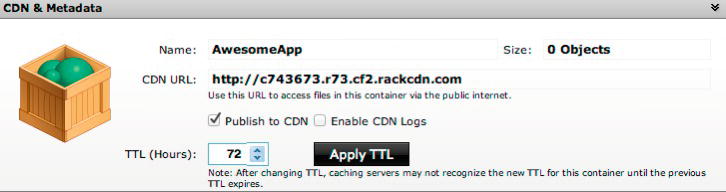
Figure 5-4. Publishing your container to the CDN
Before going any further, note that Rackspace Cloud Files does not currently support nesting containers or creating subdirectories within a container. Instead, it allows you to use pseudo-directories by adding directory marker objects and ensuring the file names are set to match these.
Say you’ve previously created a container named Images. If you want to create a pseudo-directory in it named HongKong, you first need to create a (zero-bytes) file lacking any extension and name it HongKong (this can be done using the create_paths function, shown later on). Now, if you wish to ensure a file is reachable using Images/HongKong/IMG_1234.JPG, you need to rename the file to HongKong/IMG_1234.JPG, where the / would act as a path element separator. Note that the forward slash is a regular character and will be accepted in any filename.
This way, you can also create additional nested directories. Keep in mind that for each nested pseudo-directory a directory marker object needs to be created.
Moving on! You can now proceed to upload data to your container by selecting it and selecting File Upload from the menu. This allows you to browse your local files or the network and select them for uploading. You can upload several files at once (all of which will be listed in a separate window from where they can also be removed if necessary). Now, assume you have built a killer app that’s going to make you very rich and so you wish to publish it to the CDN (in this example, your killer app is called AmazingApp and the file is AmazingApp-1.0.0.tar.gz). So you simply add it to the list of uploads, and select Upload, as shown in Figure 5-5. It’s that simple! The file(s) is now well on its way to a number of servers from where it can be downloaded using the high-speed network that Akamai provides.
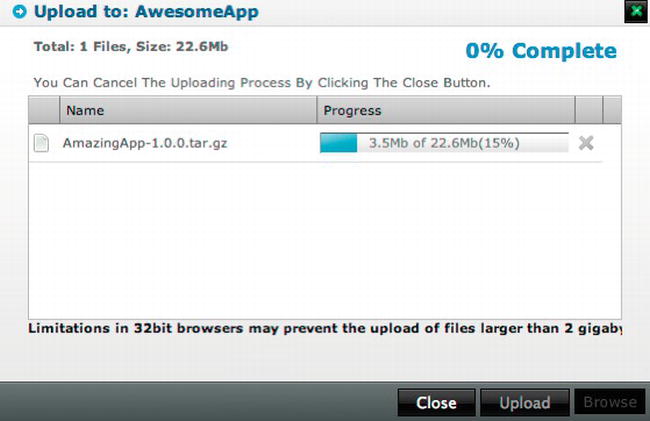
Figure 5-5. Publishing your data to the CDN
Once the upload has finished, the data will be listed under the container previously created, as shown in Figure 5-6. Its size and file type will also be displayed. When highlighting the file, the CDN URL will be presented, which can be used to directly download the file over the high-speed network. This is exactly what’s so cool about a CDN: one URL, different servers, but a guaranteed high-speed connection available from wherever the file will be requested.
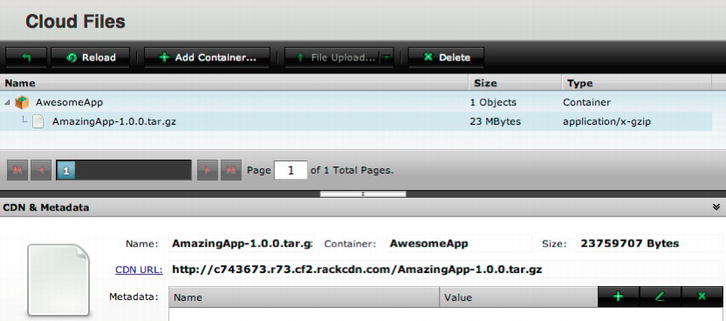
Figure 5-6. An overview of the published file and its details
The Rackspace Cloud Files API
Other than the web interface, Rackspace also offers a number of language-specific application programming interfaces, or APIs. These can be integrated into your own application, allowing you to interact with your CDN containers without requiring the web interface. Using the API, containers can be created, modified, and deleted; files can be listed, uploaded, and removed; and much more. Essentially, it allows you to do exactly the same actions that can be done via the web interface. In fact, the same API, called RESTful, is utilized, and the language-specific APIs simply provide another layer of abstraction on top of the RESTful API, preventing you from work directly with HTTP requests and responses to manage your data.
That said, any requests made and responses received to and from the API are being done using standard HTTP calls. These calls are performed using HTTPS (port 443).
In the remainder of this chapter, you’ll look at the RESTful API for PHP. PHP is a popular programming language on the web, and there’s a fair chance you’ll be using it for developing your own web applications. The current version of the RESTful API requires PHP version 5.x with the following modules enabled:
- cURL
- FileInfo
- mbstring
Throughout the remainder of this section, we will assume you have a solid understanding of the basics of PHP.
![]() Note All the language specific APIs are hosted at and can be obtained from GitHub at
Note All the language specific APIs are hosted at and can be obtained from GitHub at http://github.com/rackspace.
Integrating the API into PHP
Before you can start using the API, you first need to integrate it into your PHP page. By doing so, you load all the API classes available, allowing you to call functions otherwise unknown to the native PHP language. To do so, you first need to download the PHP API from the GitHub repository and extract its contents to the web server, ensuring the source code files are in your PHP include path.
Once extracted, open your PHP file and include or require the cloudfiles.php file in your script, like so:
<?php

  require('cloudfiles.php'),

?>
And that’s it! Simple, isn’t it? Now you’re all set to start using the API. Remember that the examples shown here will solely focus on your API, not on any additional code.
Authenticating with Your API Key
When you first started using your Rackspace account, you were asked to generate an API access key before you could proceed to upload any files to the CDN. That key is the same one you will use to identify yourselves with the RESTful API, allowing you to interact with your data.
To authenticate, you need to call the authenticate() function. However, in order to do this, you are first required to create an authentication instance by invoking the CF_Authentication class.
<?php

  require('cloudfiles.php'),


  # First, create the authentication instance providing our username and API Key

  $auth = new CF_Authentication("loadbalancer", "12345");


  # Perform the authentication request by calling the authenticate() function

  # on our instance previously created

  $auth->authenticate();

?>
Once authenticate() has been called, it will verify the username and API key provided against the RESTful API and will return 1 if successfully authenticated. If the API returns an AuthenticationException, it means the provided credentials (such as the username/API key) are incorrect and must be rechecked.
Optionally, to confirm authentication has succeeded, or if you are still authenticated, the authenticated() function can be called, which will return 1 if successful. The authenticated() function requires no parameters to be specified and also exists within the CF_Authentication class.
<?php

  require('cloudfiles.php'),


  # First, create the authentication instance providing our username and API Key

  $auth = new CF_Authentication("loadbalancer", "12345");


  # Perform the authentication request by calling the authenticate() function

  # on our instance previously created

  $auth->authenticate();


  # Confirm we’ve successfully authenticated

  $status = $auth->authenticated();

  print $status;

?>
The CF_Authentication provides several other functions that allow you to toggle debugging (setDebug), export, and load authentication information from cache (export_credentials, load_cached_credentials) and ssl_use_cabundle, which can be used to leverage the Certificate Authority bundle included in the API. The functions described, however, are the ones most commonly used.
Connecting and Disconnecting
Once authenticated using the CF_Authentication class, you can pass on the validated authentication details, stored in $auth, to a connection instance in order to connect to the storage system. To do this, the CF_Connection class can be used, with $auth as its parameter.
<?php

  require('cloudfiles.php'),


  # First, create the authentication instance providing our username and API Key

  $auth = new CF_Authentication("loadbalancer", "12345");


  # Perform the authentication request by calling the authenticate() function

  # on our instance previously created

  $auth->authenticate();


  # Establish the connection instance

  $conn = new CF_Connection($auth);

?>
In order to close a connection using the API, you can call the close() function also provided by the CF_Authentication class.
<?php

  require('cloudfiles.php'),


  # First, create the authentication instance providing our username and API Key

  $auth = new CF_Authentication("loadbalancer", "12345");


  # Perform the authentication request by calling the authenticate() function

  # on our instance previously created

  $auth->authenticate();


  # Establish the connection instance

  $conn = new CF_Connection($auth);


  # Disconnect from the storage system

  $conn->close();

?>
Working with Containers
As well as establishing connections, the CF_Connection class can also be used to work with containers. For example, you can use the class to create new containers, list the ones you have, delete and modify containers, and retrieve an overview of the files available and their total size, among other things. This section will look at how to perform the actions most commonly used. First, let’s have a look at how you can retrieve a list of containers currently available to your storage system.
Listing the Containers
There are three different methods available for listing your containers. First, there’s the list_containers function. This function can be used to return an array of strings that contains the names of all containers available on your account. The list_containers function takes two parameters: limit, which can be used to restrict the total number of results returned, accepting an integer, and marker, which can be used to return results greater than whatever string has been specified. Let’s look at an example used to list all available containers, using the list_containers and print_r functions, like so:
<?php

  require('cloudfiles.php'),


  $auth = new CF_Authentication("loadbalancer", "12345");

  $auth->authenticate();

  $conn = new CF_Connection($auth);


  # Create an array containing the names of our containers found

  $containers = $conn->list_containers();


  # Print the array using print_r

  print_r($containers);


  $conn->close();

?>
The results will look as follows:
Array

 (

     [0] => "AwesomeApp"

 )
The second function available to request a list of containers is the list_containers_info function. Like the list_containers function, this one also generates and outputs an array containing the names of all available containers. However, other than the names, it will also print out the total number of objects available within the container and its total size in bytes. As with list_containers, list_containers_info also accepts the two parameters: limit and marker.
<?php

  require('cloudfiles.php'),


  $auth = new CF_Authentication("loadbalancer", "12345");

  $auth->authenticate();

  $conn = new CF_Connection($auth);


  # Create an array containing the names of our containers

  # found, including its details (size, total number of items)

  $containers_info = $conn->list_containers_info();


  # Print the array using print_r

  print_r($containers_info);


  $conn->close();

?>
As expected, its results will contain a nested array for each container available.
Array

 (

     ["AwesomeApp"] =>

         Array

         (

             ["bytes"] => 23759707,

             ["count"] => 1

         )

 )
The third function available for listing your containers is the list_public_containers function. This function can be used to return a list of names of all containers ever published on the CDN. That said, it will also include any containers that were previously CDN-enabled, regardless of their current existence. list_public_containers takes one Boolean parameter. If set to true, list_public_containers will only return the currently enabled CDN containers rather than any that ever existed. By default, this option is set to false.
<?php

  require('cloudfiles.php'),


  $auth = new CF_Authentication("loadbalancer", "12345");

  $auth->authenticate();

  $conn = new CF_Connection($auth);


  # Create an array containing the names of our containers

  # that are now, or were previously, made publicly available

  $public_containers = $conn->list_public_containers();


  # Print the array using print_r

  print_r($public_containers);


  $conn->close();

?>
The resulting array would look like the following:
Array

 (

     [0] => "AwesomeApp"

)
Creating and Deleting Containers
Two other methods that the CF_Connection class provides are create_container and delete_container. As their names imply, create_container is used to create a new container on the storage system, whereas delete_container is used to delete an existing, but empty, container.
The create_container function is extremely straightforward to use as it only accepts a single string as its parameter: the container’s name. If the supplied name already exists, a SyntaxException will be reported back, and you would require specifying another name. Let’s look at an example.
<?php

  require('cloudfiles.php'),


  $auth = new CF_Authentication("loadbalancer", "12345");

  $auth->authenticate();

  $conn = new CF_Connection($auth);


  # Create a new container named "Images"

  $conn->create_container("Images");


  $conn->close();

?>
Likewise, delete_container also takes a single string representing the container’s name as its parameter.
![]() Note Containers should be emptied before they are removed. This can be done using the
Note Containers should be emptied before they are removed. This can be done using the delete_object function provided by the CF_Container class.
<?php

  require('cloudfiles.php'),


  $auth = new CF_Authentication("loadbalancer", "12345");

  $auth->authenticate();

  $conn = new CF_Connection($auth);


  # Delete the (empty) container named "Images"

  $result = $conn->delete_container("AwesomeApp");

  print $result;


  $conn->close();

?>
If the delete_container command returns the NonEmptyContainerException, it, quite obviously, implies that the container is not yet empty, and thus can’t be removed. Additionally, if the container’s title wasn’t typed properly, a NoSuchContainerException response can be expected. If all goes well, however, a True will be returned to indicate the container was removed as expected.
Using a Container
Before you can start making modifications to your containers, you first need to know how to use them. Sure, you’ve seen how to list, create, and delete containers, but you haven’t looked at modifying them yet. In order for you to do this, you must first require assigning an instance to the container or containers by using the get_container or get_containers functions respectively, as provided by the CF_Connection class.
The first function you’ll be interested in is the get_container function. As with many functions, this one also takes a single string as a parameter, used to identify the name of the container for which you’re creating the instance.
<?php

  require('cloudfiles.php'),


  $auth = new CF_Authentication("loadbalancer", "12345");

  $auth->authenticate();

  $conn = new CF_Connection($auth);


  # Create an instance for our Images container, named $container

  $container = $conn->get_container("Images");


  $conn->close();

?>
Once the instance ($container) has been specified, you can make modifications to it, such as changing its public visibility, removing it, and so forth. You will learn how to do this later.
You can also create an array of container instances using get_containers. When using this function, an array will be returned that also includes some specifics about the containers it includes, such as the number of objects and the number of bytes stored within each container. The get_containers function accepts two parameters: $limit, and $marker. $limit can be used to restrict the total number of results returned, accepting an integer, and $marker can be used to return results greater than whatever string has been specified. Let’s look at a practical example and its results.
<?php

  require('cloudfiles.php'),


  $auth = new CF_Authentication("loadbalancer", "12345");

  $auth->authenticate();

  $conn = new CF_Connection($auth);


  # Create an array of container instances, named $containers, limit to 2 results

  $containers = $conn->get_containers(2);

  # Print the array's details in a decent way

  foreach ($containers as $contdetails) {

    echo "Container name:" . $contdetails->name . "
";

    echo "Objects:" . $contdetails->count . "
";

    echo "Bytes stored:" . $contdetails->bytes . "
";

  }


  $conn->close();

?>
The resulting output will look similar to this, depending on the number of containers and the contents found, of course:
Container name: AwesomeApp

Objects: 1

Bytes stored: 23759707

Container name: Images

Objects: 0

Bytes stored: 0
Modifying Container Settings
Now that you’ve seen how to make, break, and use containers, let’s have a look at how to modify the permission settings on them. Using the CF_Container class, you can leverage two functions to modify the containers’ privacy settings. The first function, make_private, takes a single string as a parameter used to specify the container’s name and can be used to disable sharing a container on the content delivery network. The function will work for both new and old containers, but be aware that any data already cached in the CDN will remain publicly available from the CDN’s cache until the TTL expires.
Let’s look at a practical example on how to privatize an already existing container using make_private.
<?php

  require('cloudfiles.php'),


  $auth = new CF_Authentication("loadbalancer", "12345");

  $auth->authenticate();

  $conn = new CF_Connection($auth);


  # Create an instance for the Images container, named $container

  $container = $conn->get_container("Images");


  # Privatize this container

  $container->make_private();


  $conn->close();

?>
In a similar fashion, you can also make the container publicly available using the make_public function. When doing so, you will need to specify two parameters: the container’s name and the default TTL specified in seconds. As expected, a CDN-enabled URL will be returned to your browser, which you can print out using the print or echo function PHP provides.
<?php

  require('cloudfiles.php'),


  $auth = new CF_Authentication("loadbalancer", "12345");

  $auth->authenticate();

  $conn = new CF_Connection($auth);


  # Create an instance for the Images container, named $container

  $container = $conn->get_container("Images");
  # Publish this container on the CDN, with a TTL of 30 days (1 day * 30)

  $url = $container->make_public(86400 * 30);


  # Print the public URL

  print $url;


  $conn->close();

?>
Working with Files
Okay! By now you should have a solid understanding of how the API operates, the overall structure of the functions it provides, and how the output is returned. You know how to make adjustments to your container collection and how to retrieve useful information about them. However, you haven’t looked at storing anything in them yet. What good is creating and managing containers via the API if you still require the web interface to stuff it? This section will cover how to list, upload, remove, and download files using the PHP API.
Listing Your Files
The first function you should know about is the list_objects function. Using this function, you can retrieve an array of strings that contains all the items in the selected container. The function takes four optional parameters: $limit, $marker, $prefix and $path. $limit can be used to restrict the total number of results returned, accepting an integer; $marker can be used to define an offset (number of items to skip); $prefix takes a string and is used to list only those filenames starting with what has been specified and which path can be used; $path can be used to only return the items listed under the given pseudo-directory.
Let’s look at some examples to clarify this.
<?php

  require('cloudfiles.php'),


  $auth = new CF_Authentication("loadbalancer", "12345");

  $auth->authenticate();

  $conn = new CF_Connection($auth);

  $container = $conn->get_container("Images");


  # List all the files within the Images container

  $files = $container->list_objects();


  # List only the first 5 files within the Images container

  $files = $container->list_objects(5);


  # List only 10 files within the Images container, but skip the first 10 files found

  $files = $container->list_objects(10,10);


  # List all the files found within the container that start with "IMG_"

  $files = $container->list_objects(0,NULL,"IMG_");
  # List the first 10 files found within the Images container

  # HongKong/Day1 pseudo directory

  $files = $container->list_objects(10,NULL,NULL,"HongKong/Day1");


  # Output the array

  print_r($files);


  $conn->close();

?>
Using Your Files
As is the case with containers, you must first create an instance for a file before you can start working with it. To do this, use the get_object function, which takes a single parameter: the file name you wish to modify or act upon. Keep in mind that you first need to create a container instance. The following is an example:
<?php

  require('cloudfiles.php'),


  $auth = new CF_Authentication("loadbalancer", "12345");

  $auth->authenticate();

  $conn = new CF_Connection($auth);

  $container = $conn->get_container("Images");


  # Create an object instance for one of the files in the Images container:

  $file = $container->get_object("IMG_1234.JPG");


  $conn->close();

?>
Another such command you can use to “select” your files is get_objects. This function allows you to create an instance of a whole number of files, rather than one. The get_objects function takes four optional parameters: $limit, $marker, $prefix and $path. $limit can be used to restrict the total number of results returned, accepting an integer; $marker can be used to define an offset (number of items to skip); $prefix takes a string and is used to list only those filenames starting with what has been specified and the path to be used; and $path can be used to only return the items listed under the given pseudo-directory. Here’s an example:
<?php

  require('cloudfiles.php'),


  $auth = new CF_Authentication("loadbalancer", "12345");

  $auth->authenticate();

  $conn = new CF_Connection($auth);

  $container = $conn->get_container("Images");


  # Create an object instance for all files in the Images container:

  $files = $container->get_objects();
  # Create an object instance for only the first 10 files found in the Images container:

  $files = $container->get_objects(10);


  # Create an object instance for only the first 5 files found, skipping the first 10 items:

  $files = $container->get_objects(5,10);


  # Create an object instance of all files starting with "IMG_"

  $files = $container->get_objects(0,NULL,"IMG_");


  # Create an object instance of the first 8 files found after skipping 16,

  # located in the Images container's HongKong/Day1 pseudo directory

  $files = $container->get_objects(8,16,NULL,"HongKong/Day1");


  $conn->close();

?>
Once the instance has been created, you can start requesting information of your files and make modifications to them!
Getting the Public URI
One of the first functions you should know for working with your files is the public_uri function. As the name implies, it allows you to retrieve the public URI of the instance you are currently working with. When executed, the function will return either the public URI if successful or NULL if no public URI is available. Let’s look at a short, but practical, code example.
<?php

  require('cloudfiles.php'),


  $auth = new CF_Authentication("loadbalancer", "12345");

  $auth->authenticate();

  $conn = new CF_Connection($auth);

  $container = $conn->get_container("Images");

  $file = $container->get_object("IMG_1234.JPG");


  # Retrieve the URI from the file, and display the file in the browser

  $uri = $file->public_uri();

  print "<img src='$uri' />";


  $conn->close();

?>
Uploading and Removing Files
Now let’s look at something more interesting: uploading files. A very simple and effective tool for uploading data to your Rackspace account is the HTML form. They are simple to create, easy to modify, and easy to integrate to pretty much any web-based application. That said, for the following piece of PHP code it is assumed you’ve set up an HTML form containing at least one input field, named name. Not exactly original, we admit, but at least it’s self-explanatory! Now let’s get some work done.
Assuming you’ve created your HTML form that includes type=file input field named name, you can start looking at your PHP script. To upload a file to your Rackspace account, you need to look at two functions not covered yet: create_object and load_from_filename. The create_object function is (not surprisingly) used to create a new object in your current container and works like a placeholder for the file to be uploaded. It takes a single parameter used to identify the file itself. This is where the form’s name field will be inserted, as this represents the name of the file you’ve uploaded.
The second function is load_from_filename. This function is used to upload a file to an instance that is returned by create_object, previously executed. load_from_filename accepts two parameters: filename and verify. Naturally, the first parameter is most relevant to you, as it allows you to specify the location of the file that you wish to upload. This file is, in fact, placed in a temporary location on your web server, and it inserts its location in the $_FILES array. In the example code, this location is represented directly by the $tmp_name variable, which is thus the first parameter you will use. The second parameter, labeled verify, can be used to check if the uploaded file’s MD5 checksum matches that of the original file on the web server. This parameter is Boolean and thus requires a True or False.
Now, let’s have a look at the actual code itself.
<?php

  require('cloudfiles.php'),


  $auth = new CF_Authentication("loadbalancer", "12345");

  $auth->authenticate();

  $conn = new CF_Connection($auth);


  # Store information based on the uploaded data using the form

  $filename = $_FILES['fileupload']['name'];

  $localfile = $_FILES['fileupload']['tmp_name'];


  # Create an instance for the container where we wish to upload the file to

  $container = $conn->get_container("Images");


  # Create a new object with $filename as its name. Return an instance for it ($upload)

  $upload = $container->create_object($filename);


  # Upload the file to the container

  $upload->load_from_filename($localfile)

  $conn->close();

?>
Other than uploading files, there will also be times when you want to remove a file from your Rackspace collection. To do so, you can use the delete_object function provided by the CF_Container class. The function takes either a filename or an instance as its parameter, which will represent the file to be removed. Let’s look at a simple example for both of them. First, let’s look at how to remove a single file by specifying the file name directly.
<?php

  require('cloudfiles.php'),


  $auth = new CF_Authentication("loadbalancer", "12345");

  $auth->authenticate();

  $conn = new CF_Connection($auth);

  $container = $conn->get_container("Images");
  # Delete an object from the Images container

  $container->delete_object("IMG_1234.JPG");


  $conn->close();

?>
Downloading Files
Another useful thing the API lets you do is download files from the cloud. Now, you may think: aren’t we given URLs for that? Well, yes, this is generally true, but not if the container is set to be private, for example. When this is the case, you can choose to download the file and store it locally using save_to_filename, feed its contents to the browser using read, or stream it using stream. So, there are lots of options available. Let’s have a closer look at each one to see when each is best used and what the code would look like.
Before you can download a file, however, you need to create an instance for the file you wish to download. As you might remember from earlier, this is done using the get_object or get_objects function. Here’s a simple example that creates an instance named $file for one of the JPG files found in the Images container:
<?php

  require('cloudfiles.php'),


  $auth = new CF_Authentication("loadbalancer", "12345");

  $auth->authenticate();

  $conn = new CF_Connection($auth);

  $container = $conn->get_container("Images");


  # Create an object instance for one of the files in the Images container:

  $file = $container->get_object("IMG_1234.JPG");


  $conn->close();

?>
If you wish to save this object locally on your web server, you can use the save_to_filename function. save_to_filename is all but complicated: it takes a single parameter used to specify the location where the file is to be stored locally. Here’s an example:
<?php

  require('cloudfiles.php'),


  $auth = new CF_Authentication("loadbalancer", "12345");

  $auth->authenticate();

  $conn = new CF_Connection($auth);

  $container = $conn->get_container("Images");


  # Create an object instance for one of the files in the Images container:

  $file = $container->get_object("IMG_1234.JPG");
  # Save this file locally on the hard drive

  $file->save_to_filename("/var/www/IMG_1234.JPG");


  $conn->close();

?>
If you directly wish to feed the contents of the file to your browser, however, you need to look either read or stream. It is suggested to use read for relatively small files, such as text files, image files, and so forth. read takes a single parameter that can be used to define specific custom HTTP headers to the file, such as Last-Modified, If-Match, and so on. Additionally, you want to use the header function provided by PHP to set the page’s content type to whatever the file’s content type really is, which you can find out using content_type. Let’s look at an example.
<?php

  require('cloudfiles.php'),


  $auth = new CF_Authentication("loadbalancer", "12345");

  $auth->authenticate();

  $conn = new CF_Connection($auth);

  $container = $conn->get_container("Images");


  # Create an object instance for one of the files in the Images container:

  $file = $container->get_object("IMG_1234.JPG");


  # Figure out the content-type using content_type, and use it to set the header of this page

  header("Content-Type: " . $file->content_type);


  # Read the file, and feed its contents to the browser. After that, print it:

  $data = $file->read();

  print $data;


  $conn->close();

?>
When you are dealing with larger files such as video files or a large number of images, you need to look at the stream function instead. stream relies on fopen (provided by PHP) to bind a file to a stream. As with the read function, stream also requires you to set the content type of the page using header to ensure the contents are properly displayed in your browser. Here’s an example:
<?php

  require('cloudfiles.php'),


  $auth = new CF_Authentication("loadbalancer", "12345");

  $auth->authenticate();

  $conn = new CF_Connection($auth);

  $container = $conn->get_container("Images");


  # Create an object instance for one of the files in the Images container:

  $file = $container->get_object("IMG_1234.JPG");
  # Figure out the content-type using content_type, and use it to set the header of this page

  header("Content-Type: " . $file->content_type);


  # Star streaming the output to the browser

  $output = fopen("php://output", "w");

  $file->stream($output);

  fclose($output);


  $conn->close();

?>
Other Useful Functions
There are two more helpful functions that the API provides and they can really make your life easier. The first one is create_paths, which is timesaving when working with pseudo-directories.
As you’ve seen earlier on in the chapter, Rackspace Cloud Files doesn’t allow the creation of subdirectories or subcontainers. Rather, it lets you use pseudo-directories by creating directory marker objects. This way, you can still simulate a hierarchical structure in your containers. Note, however, that you are required to manually create these directory marker objects for each (nested) pseudo-directory you want to have, consisting of a zero- or one-byte file of the content-type application/directory.
Luckily, the API lets you do this automatically using the create_paths function. You can do this by creating an object instance of a file containing the path separator symbol (a forward slash, `/’) in its name, and passing this instance on to create_paths. Here’s a simple example that will clarify:
<?php

  require('cloudfiles.php'),


  $auth = new CF_Authentication("loadbalancer", "12345");

  $auth->authenticate();

  $conn = new CF_Connection($auth);

  $container = $conn->get_container("Images");


  # Create a variable for one of the files in the Images container:

  $file = "Holidays/2011/HongKong/Day1/Resized/Small/IMG_1234.JPG";


  # Use the create_paths function to create pseudo-directories

  $container->create_paths($file);


  $conn->close();

?>
This script will create a total of six directory marker objects:
Holidays

Holidays/2011

Holidays/2011/HongKong

Holidays/2011/HongKong/Day1

Holidays/2011/HongKong/Day1/Resized

Holidays/2011/HongKong/Day1/Resized/Small
If you now wish to upload a specific photo, video, text file, or any other type of file in to any of these directories, you simply need to rename the file so that it is prefixed with the pseudo-directory’s name. For example, to place a video in the Day1 folder, you need to ensure the file name is renamed accordingly, like so:
Holidays/2011/HongKong/Day1/video.mp4
To wrap up this chapter, we would like to mention the get_info function. The get_info function provides you with some relevant information about your Rackspace Cloud Files account. It creates an array that reports the total number of containers available and the number of bytes used in your Rackspace account. This not only gives you a quick overview of your account, but it can also be used to calculate your monthly costs, for example. Here’s a code snippet of how it looks. Note that it doesn’t require any parameters to be specified.
<?php

  include cloudfiles.php;


  $auth = new CF_Authentication("loadbalancer", "12345");

  $auth->authenticate();

  $conn = new CF_Connection($auth);


  # Create an array storing your account's information

  list($containers, $size) = $conn->get_info();


  # Output the results in a pretty way

  print "Containers: " . $containers . "
";

  print "Total bytes: " . $size . "
";


  $conn->close();

?>
Summary
This chapter introduced the concept of content delivery networks. Content delivery networks allows you to distribute your data across the planet while consistently providing top-notch download rates. Without them, your data would be tucked away on a single server, which although very capable locally, would quickly reach its limit when requests came from across the border. Content delivery networks get around this little problem by using a hideously expensive and complicated network that spans many countries to store all the data at each location. Today, you can use this very same service for a small fee without maintaining the servers and paying the fat bills for it.
We’ve also covered the basics on how Rackspace works and how their web interface can be used to create and modify containers, upload files, and retrieve the URL for the uploaded data.
To finish, we’ve covered the majority of functions the Rackspace Cloud PHP API provides. The API is available for several programming languages, and each allows you to perform an extensive amount of actions on your collections and files. Leveraging the API and the CDN’s services, you can provide a solid, simple, and high-speed web application that is guaranteed to run smoothly.