
C H A P T E R 8
Load Balancing Your Web Site
When hearing the word “Apache,” most people will think of three things: a group of Native American tribes, a US military battle helicopter, or the open-source HTTP web server project. Now, assuming you didn't pick up this book to learn about American battle helicopters or the Apachean people, you are probably thinking of the web server.
While it's certainly true that the brand name Apache is mostly known for the web server project, the name Apache on its own has little meaning. Rather, it is the Apache Software Foundation that has developed and released the Apache HTTP Server as one of their projects, among many others. It is this Apache HTTP Server software we'll be discussing in this chapter. You'll learn how to fine-tune it for better performance and how to apply load balancing to it.
You'll also have a look at optimizing and load-balancing nginx (`engine x'), which is another open-source cross-platform package capable of hosting web sites as well as acting as a reverse proxy and an IMAP/POP3 proxy server that can be used for e-mail. Where Apache HTTP is process-based and highly extensible using modules, nginx is well known for being a high-performance, event-driven, and lightweight solution instead; it also has a very small memory footprint, which is exactly what you need to speed up your web site!
Don't worry! While both Apache HTTP Server and nginx have their strengths and weaknesses, there is no need to start deciding which one to pick. Would it be Apache HTTP because you're so comfortable with it, or should you go with the new kid in town, nginx, that quickly earned its stripes due to its efficiency? Why not use them both? Remember, this isn't about choosing teams. Instead, your purpose is to make your web site load faster, so why not reap the benefits of both if you can: nginx running on the foreground for serving static content (HTML files, images, and so forth) as well as the load balancer using its proxy module (which is very simple to set up) and several Apache servers running in the background for the dynamic content (such as PHP pages).
Measuring Web Server Performance
Before you can get started on speeding up your web server, you first need to know its currently capability. How else are you going to tell if the steps you took to speed it up actually worked? There are several tools and packages available to benchmark your web server: some are expensive, others are free. One that has proved to be helpful is the tool called httperf. Optionally, you can use ab, which comes with Apache.
httperf is a very powerful command-line Linux tool that can be used to establish a (high) number of connections to a web server to give you an impression of your server's performance. Not only is it flexible enough to send along specific headers (such as the Accept-Encoding header), there's also a perl wrapper available called autobench, which allows you to increase the number of requested connections per second on each iteration and writes the output to a tab-separated file that can be used to create nice charts to make your results more visual (using the bench2graph tool).
![]() Note httperf can be obtained from Hewlett-Packard's web site free of charge or installed directly using your distribution's software management software, such as apt-get or yum.
Note httperf can be obtained from Hewlett-Packard's web site free of charge or installed directly using your distribution's software management software, such as apt-get or yum.
Here you'll use httperf on a default, out-of-the-box installation of both Apache HTTP and nginx. No changes are made to the configuration files and both web services host the same file: a simple HTML file called index.html that contains 5011 bytes of data. You'll tell httperf to establish as many as 20,000 connections to the web server using the --num-conns parameter. In this example, the httperf package is executed from a local client to the web server Server02's index.html page that resides on the same subnet to prevent network bottlenecks.
$ httperf --server Server02 --uri /index.html --num-conns 20000 --add-header='Accept-Encoding:

gzip,deflate
'
![]() Note In order for httperf to properly handle compressed content, you will need to add additional header information using the
Note In order for httperf to properly handle compressed content, you will need to add additional header information using the --add-header option, as shown in this example.
These are the results for benchmarking the index.html file on an out-of-the-box Apache HTTP Server:
Maximum connect burst length: 1


Total: connections 20000 requests 20000 replies 20000 test-duration 30.041 s


Connection rate: 665.8 conn/s (1.5 ms/conn, <=1 concurrent connections)

Connection time [ms]: min 0.5 avg 1.5 max 25.4 median 1.5 stddev 0.7

Connection time [ms]: connect 0.6

Connection length [replies/conn]: 1.000


Request rate: 665.8 req/s (1.5 ms/req)

Request size [B]: 117.0


Reply rate [replies/s]: min 534.4 avg 665.7 max 794.8 stddev 92.2 (6 samples)

Reply time [ms]: response 0.8 transfer 0.0

Reply size [B]: header 283.0 content 1809.0 footer 0.0 (total 2092.0)

Reply status: 1xx=0 2xx=20000 3xx=0 4xx=0 5xx=0
CPU time [s]: user 2.52 system 27.52 (user 8.4% system 91.6% total 100.0%)

Net I/O: 1436.2 KB/s (11.8*10^6 bps)


Errors: total 0 client-timo 0 socket-timo 0 connrefused 0 connreset 0

Errors: fd-unavail 0 addrunavail 0 ftab-full 0 other 0
Here, the reply rate values are most relevant as they tells you about how many replies the web server is capable of sending back to the client per second. In this example, you can see it's capable of sending a minimum of 534.4 replies per second and a maximum of 794.8. Now, let's compare these values to those of nginx on the same server:
$ httperf --server Server02 --uri /index.html --num-conns 20000 --add-header='Accept-Encoding:

gzip,deflate
'


Maximum connect burst length: 1


Total: connections 20000 requests 20000 replies 20000 test-duration 28.943 s


Connection rate: 691.0 conn/s (1.4 ms/conn, <=1 concurrent connections)

Connection time [ms]: min 0.7 avg 1.4 max 14.5 median 1.5 stddev 0.6

Connection time [ms]: connect 0.7

Connection length [replies/conn]: 1.000


Request rate: 691.0 req/s (1.4 ms/req)

Request size [B]: 117.0


Reply rate [replies/s]: min 612.5 avg 696.0 max 843.2 stddev 89.7 (5 samples)

Reply time [ms]: response 0.7 transfer 0.0

Reply size [B]: header 225.0 content 1925.0 footer 2.0 (total 2152.0)

Reply status: 1xx=0 2xx=20000 3xx=0 4xx=0 5xx=0


CPU time [s]: user 1.83 system 27.10 (user 6.3% system 93.6% total 100.0%)

Net I/O: 1529.8 KB/s (12.5*10^6 bps)


Errors: total 0 client-timo 0 socket-timo 0 connrefused 0 connreset 0

Errors: fd-unavail 0 addrunavail 0 ftab-full 0 other 0
When comparing the results, visible in Figure 8-1, you can see that there is a vast difference between the number of replies between the two web services: Apache's out-of-the-box installation is capable of sending a maximum of 794.8 replies per second but nginx is capable of sending as many as 843.2 replies per second. Indeed, merely switching web servers makes a great difference!
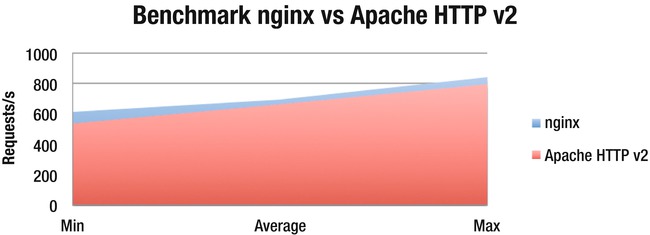
Figure 8-1. A benchmark comparison of nginx vs. Apache HTTP v2
Accelerating Apache HTTP
Now that you know your web server's performance, it's time to speed things up! Before applying techniques such as load balancing, there is actually a great deal of reconfiguration that can be done to speed up your web service. This not only includes changes made to the overall operating system (such as implementing memcached, which was discussed in Chapter 3) but especially to the web service itself.
Disabling Unneeded Modules
Apache HTTP is a modular program, which means the server administrator can choose to extend the program's capabilities by loading additional modules, or DSO (Dynamic Shared Object) modules, by modifying the server's httpd.conf configuration file in version 1.x or adding/removing symlinks in Apache's mods-enabled/ directory in version 2.x. By default, many of these additional modules are either statically compiled into the Apache core or loaded automatically as a DSO. Many of these DSO modules may not be required, however, and are best disabled to reduce the overall memory footprint and thus increase performance.
Each module is loaded using the LoadModule command, and you can easily find an entire list of the ones that are loaded on a default, out-of-the-box installation of Apache HTTP v2 by listing the mods-enabled directory, like so:
LoadModule alias_module /usr/lib/apache2/modules/mod_alias.so

LoadModule auth_basic_module /usr/lib/apache2/modules/mod_auth_basic.so

LoadModule authn_file_module /usr/lib/apache2/modules/mod_authn_file.so

LoadModule authz_default_module /usr/lib/apache2/modules/mod_authz_default.so

LoadModule authz_groupfile_module /usr/lib/apache2/modules/mod_authz_groupfile.so

LoadModule authz_host_module /usr/lib/apache2/modules/mod_authz_host.so

LoadModule authz_user_module /usr/lib/apache2/modules/mod_authz_user.so

LoadModule autoindex_module /usr/lib/apache2/modules/mod_autoindex.so

LoadModule cgi_module /usr/lib/apache2/modules/mod_cgi.so

LoadModule deflate_module /usr/lib/apache2/modules/mod_deflate.so

LoadModule dir_module /usr/lib/apache2/modules/mod_dir.so

LoadModule env_module /usr/lib/apache2/modules/mod_env.so

LoadModule mime_module /usr/lib/apache2/modules/mod_mime.so

LoadModule negotiation_module /usr/lib/apache2/modules/mod_negotiation.so

LoadModule reqtimeout_module /usr/lib/apache2/modules/mod_reqtimeout.so
LoadModule setenvif_module /usr/lib/apache2/modules/mod_setenvif.so

LoadModule status_module /usr/lib/apache2/modules/mod_status.so
Most of these modules are self-explanatory once you get to know Apache HTTP a little better. For example, mod_alias is used for creating a mapping between a URL to certain filesystem paths. mod_auth_basic can be used for providing basic authentication (username/password) on specific folders using a .htaccess file, and the mod_cgi module can be used to execute CGI scripts. Some of these may not be required and are best left as disabled if this is the case. Which one you should or shouldn't disable really depends on your configuration of Apache, however, so check if you can disable them safely before doing so.
Disabling DNS Lookups
Another method to reduce latency time is to ensure that DNS lookups are disabled. DNS lookups are not always done, however, except when you are using the Allow from or Deny from options to restrict access to specific web sites or folders. If you do decide to use these options, it's best to use IP addresses instead of a domain or hostname as the cumulative effect of DNS lookups imposes performance penalties every time your server receives a request from a client. In a similar fashion, DNS lookups are also performed when access logging is enabled in combination with the optional HostnameLookups. By default, however, HostnameLookups is disabled ever since Apache 1.3.
![]() Note If you do wish to log hostnames rather than IP addresses, it is considered best practice to use a post-processing program such as logresolve, which ships with Apache HTTP.
Note If you do wish to log hostnames rather than IP addresses, it is considered best practice to use a post-processing program such as logresolve, which ships with Apache HTTP.
Using Compression
Another good method to speed up your web site's traffic is by using HTTP compression to compress your web site's content before sending it out to the client. In Apache HTTP v2, the mod_deflate module can be used to do this, which replaces the mod_gzip previously available in Apache HTTP v1.3. Using mod_deflate, file types such as HTML, text, PHP, XML, and other MIME types can be compressed to approximately 20 or 30 percent of their original size, thereby saving your server a great deal of traffic.
The best part about this is that the clients receiving this compressed data don't need any specific client software, as today's modern browsers natively know how to handle compressed content. Even when an old browser is used, such as Netscape, the browser will first negotiate with the web server to see if it can receive the content; otherwise, it requests the data be sent uncompressed instead.
![]() Warning Keep in mind that compressing data doesn't come effortlessly: in fact, it causes a slightly higher load on the server as the specified content needs to be compressed. Generally this is compensated by the decrease in the client's connection times, which tends to be the bottleneck. Formal benchmarking is suggested to verify the facts, which differ in each specific situation.
Warning Keep in mind that compressing data doesn't come effortlessly: in fact, it causes a slightly higher load on the server as the specified content needs to be compressed. Generally this is compensated by the decrease in the client's connection times, which tends to be the bottleneck. Formal benchmarking is suggested to verify the facts, which differ in each specific situation.
mod_deflate is enabled by default in Apache HTTP v2, and generally there is little that needs to be done to its configuration file (mod_deflate.conf) as several commonly used MIME types are already set to be compressed (HTML, XML, CSS, JavaScript, RSS, ECMAScript, and plain text files). The configuration can be easily altered, however, to specify which MIME types should or shouldn't be compressed. But be careful with this: some MIME types are already compressed, so you don't want attempt to compress these again with mod_deflate because there is little point in doing so. Examples of such file types are graphic files, music files, ZIP files, video files, and PDF files, to name a few.
![]() Note Be careful when choosing what MIME types to compress. Certain types are already in a compressed state and would only cause additional CPU overhead while making little difference. Generally you only want to compress text-based files (such as HTML, JS, CSS, XML, and so on). When a specific web site contains a high number of small text files in these formats, you should also reconsider enabling compression as the time required to transfer the uncompressed files might be shorter than the time required to compress and transfer the files.
Note Be careful when choosing what MIME types to compress. Certain types are already in a compressed state and would only cause additional CPU overhead while making little difference. Generally you only want to compress text-based files (such as HTML, JS, CSS, XML, and so on). When a specific web site contains a high number of small text files in these formats, you should also reconsider enabling compression as the time required to transfer the uncompressed files might be shorter than the time required to compress and transfer the files.
In order to check if mod_deflate is loaded successfully, apache2ctl can be used, which is included in Apache's installation. To check, open up a console and type
# apache2ctl -t -D DUMP_MODULES
This will show an entire list of modules currently loaded. If you see the deflate module listed there, you'll know it's loaded.
# apache2ctl -t -D DUMP_MODULES

Loaded Modules:

core_module (static)

[..]

deflate_module (shared)

Syntax OK
Note that (static) behind the module name implies the module is statically compiled into the Apache core, where (shared) implies the module can be loaded or unloaded.
If the module isn't listed, you can load the module manually by using the LoadModule function in your web site's configuration file (httpd.conf for the entire web site, or your virtual host's specific configuration file in the sites-available/ directory). To load the module for your entire web site, you can simply create a symlink in the mods-enabled/ folder pointing to the mods-available/deflate* files using the ln command, like so:
# ln -s /etc/apache2/mods-available/deflate.* /etc/apache2/mods-enabled/
When you only wish to load the module for a certain virtual host, use the LoadModule function instead.
LoadModule deflate_module /usr/lib/apache2/modules/mod_deflate.so
FollowSymLinks and SymLinksIfOwnerMatch
The FollowSymLinks option can be used within a <Directory> directive to ensure that symbolic links defined within the web site's configuration file can be accessed from that directory. In a similar fashion, SymLinksIfOwnerMatch can be used to follow such symbolic links only if the target file or directory is owned by the same user as the link itself, thus providing a higher level of security.
However, when the latter is set, Apache will need to verify whether the owner of the link and the target directory are identical using lstat, which requires additional system calls and adds to the overall latency. In contrast, when the FollowSymLinks option is not set, Apache will need to issue some additional system calls when accessing a file because it has to check whether the file is a “real file” or a symbolic link.
![]() Note Apache doesn't cache the results of these
Note Apache doesn't cache the results of these lstat operations; hence they need to occur on every single request, which drastically impacts the system's performance.
For the best performance, don't use the SymLinksIfOwnerMatch option and always enable FollowSymLinks in your Directory directives. The final results of the configuration modifications to Apache HTTP v2 can be seen in Figure 8-2.
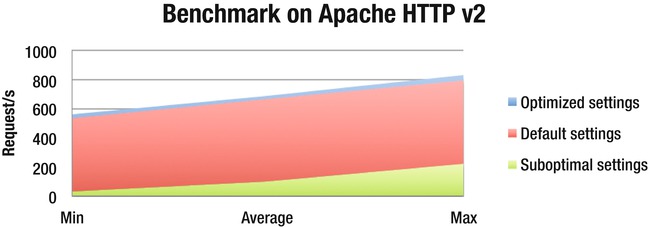
Figure 8-2: Benchmark comparison of different settings on Apache HTTP v2
Accelerating nginx
The out-of-the-box installation of nginx leaves little room for improvement. After all, nginx is designed for high performance, and it does an amazing job with the default settings already. There are a few tricks, however, that have more to do with fine-tuning the installation to match your server's hardware than, say, disabling modules as with Apache HTTP Server.
worker_processes and worker_cpu_affinity
The nginx configuration file (default: /etc/nginx/nginx.conf) lets you specify the worker_processes directive. Using this directive, you can tell nginx how many single-threaded processes can be created by nginx. For example, if nginx is performing CPU-intensive actions (such as compressing, encrypting, or executing code in the background) an additional worker process can be spawned (preferably on another CPU or core), thereby decreasing the web server's overall latency. The worker_processes directive is set to 1 by default.
worker_processes 4;
![]() Note For the best performance, you should set this option equal to the number of CPUs or cores in your server.
Note For the best performance, you should set this option equal to the number of CPUs or cores in your server.
Chances are, however, that your operating system decides to bond the additional worker process on the same CPU/core on which the original process is already running. When needed, you can balance these processes appropriately across the system's cores using the worker_cpu_affinity option, which can be used to bind each worker process to a specific core/CPU.
The worker_cpu_affinity option takes the binary bitmask value from your CPU as an option, where the lowest order bitmask represents your first logical CPU and the highest order bit represents your last logical CPU. For example, if you have four CPUs on your system, you can set the affinity as such:
worker_processes 4;

worker_cpu_affinity 0001 0010 0100 1000;
If you have eight, the following would do the trick:
worker_processes 8;

worker_cpu_affinity 0001 0010 0100 1000 10000 100000 1000000 10000000;
After the changes have been made, you will need to restart nginx. You can use ps in combination with taskset to confirm which CPU each worker process is running on.
# ps ax | grep nginx

18996 ?        Ss     0:00 nginx: master process /usr/sbin/nginx

18997 ?        S      0:00 nginx: worker process

18998 ?        S      0:00 nginx: worker process

18999 ?        S      0:00 nginx: worker process

19000 ?        S      0:00 nginx: worker process


# taskset -p <pid id>

pid 18997's current affinity mask: 1

pid 18998's current affinity mask: 2

pid 18999's current affinity mask: 3

pid 19000's current affinity mask: 4
![]() Note Currently
Note Currently worker_cpu_affinity is only supported on Linux.
Gzip Compression
Just like Apache HTTP, nginx is also capable of compressing the data before sending it out to the visitor. It has two tricks for this: the gzip module and the gzip pre-compression module, both which can be enabled at the same time.
As is the case with Apache HTTP, you won't need to worry about any client-side software: modern browsers have full compatibility for compressed content, and those that don't can be explicitly disabled in the configuration file using the gzip_disable directive, which takes regular expressions for increased flexibility.
The gzip module is compiled by default, unless explicitly disabled during the package's configuration process using --without-http_gzip_module. The on-the-fly compression can be enabled in nginx's configuration file using the gzip directive under the http{} section.
http {

    gzip  on;

}
The compression level can also be specified in the configuration file by using the gzip_comp_level directive. The gzip_comp_level directive takes an integer from a range of 1 to 9, where 1 represents the lowest level of compression (and thus the fastest) and 9 represents the highest level of compression (slower). By default, gzip_comp_level is set to 1.
http {

    gzip  on;

    gzip_comp_level 3;

}
As is the case with Apache HTTP, you will need to find a good balance between the level of compression and what type of files you choose to compress and for which browsers. Keeping in mind that compression will add an additional load to your server, you want to avoid compressing files that have little to compress in the first place, like image, music, PDF files, etc.
By default, file types other than text/HTML aren't compressed. This can be changed, however, using the gzip_types directive where you can add additional MIME-types.
http {

        gzip on;

        gzip_comp_level 3;

        gzip_types application/javascript application/xml;

}
![]() Note Text/HTML MIME types are compressed by default. This doesn't need to be added to the list of
Note Text/HTML MIME types are compressed by default. This doesn't need to be added to the list of gzip_types to compress.
As you've seen by now, the biggest conundrum of using compression is the additional server load created by the compression process. While this can generally be offset against the reduced connection times, the overall process can still be CPU intensive. That said, nginx provides an additional module called gzip_static, which allows nginx to look for an already compressed version of the data it wishes to send, thereby avoiding compressing the same data each time it is requested by a client.
The gzip_static module can be easily enabled using the gzip_static directive in nginx's configuration file under the http{} section.
http {

        gzip_static on

}
Once a request comes in, nginx will look for a .gz file in the same location as the original file and send it out instead. Of course, this does assume the file is there already, so you will need to create the .gz file yourself from the static data using gzip. Using this approach, nginx need only worry about serving the gzipped data itself, rather than compressing the original file each time it is being requested, causing additional load on the server.
Dynamic content stills need to be compressed on the fly, however, which can still be done using the gzip module. It's suggested that you use a lower compression level for this data to ensure your server's performance is not affected too much.
http {

        gzip on;

        gzip_static on;

        gzip_comp_level 2;

        gzip_types application/javascript application/xml;

}
The final results of the modification changes to nginx can be seen in Figure 8-3.
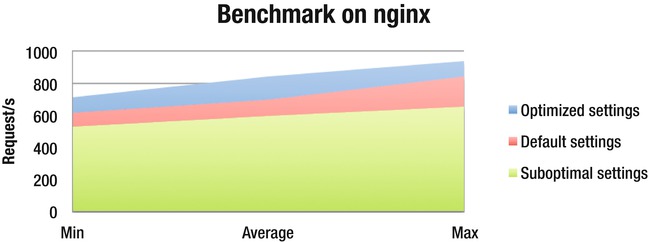
Figure 8-3. Benchmark comparison of different settings on nginx
Load Balancing Your Web Server
Now that you've seen how to improve your web server's overall performance, you can take it one step further and add load balancing to the equation. The idea of load balancing your web service is pretty simple: you distribute all incoming connections to your web site to a number of different web servers by using one or more load balancing servers. By doing so, you don't only reduce the overall load on the web servers, you also have good means of failover in case one of the web servers temporarily breaks down.
So, what do you need to set this up? Well, this depends on your wishes, really! The simplest setup requires at least two web servers and one load-balancing server. The load balancing server would generally require two network adapters with one connected to the Internet and the other connected to the same network segment to which the web servers are connected.
The Setup
In this example, you will assume a relatively simple setup as described earlier: two web servers running an optimized installation of either Apache or nginx on a Linux-based operating system (Ubuntu in this case) and one load balancing server running IPVS. IPVS, short for Internet Protocol Virtual Server, is the utility you'll be using to balance your server loads.
In the foreground, the load balancer (LoadBalancer) will be receiving all incoming connections. This means that if you use port forwarding, the connection needs to be redirected to this server. Likewise, people will be connecting to the external IP of the server LoadBalancer (1.2.3.4 in this case). The load balancer, or the Director, will be distributing the load across the web servers, or worker servers, using a weighted least connections (wlc) schedule.
![]() Note There are several different methods available that IPVS can use for distributing the workload. All of these are described in Chapter 10, which also covers IPVS in greater detail than in this chapter.
Note There are several different methods available that IPVS can use for distributing the workload. All of these are described in Chapter 10, which also covers IPVS in greater detail than in this chapter.
Your load balancing server (LoadBalancer) will be using two network interface cards (or NICs): eth0 with the IP address 1.2.3.4, responsible for the incoming/outgoing traffic to the Internet and eth1 with the IP address 10.0.0.1 connected to a (virtual) network, which is where the workers also connected. Similarly, the workers (Server01 and Server02) will both be connected to the 10.0.0.x subnet, both with one NIC (eth0) with the IP address 10.0.0.2 and 10.0.0.3, respectively. These servers will not require any public IP address. An overview of the layout can be seen in Figure 8-4.
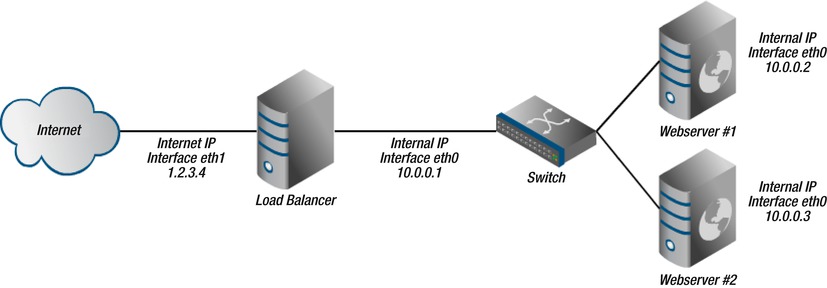
Figure 8-4. An overview of the setup
Preparing the Server
Now you're going to get your hands dirty. You will find that installing IPVS is a piece of cake, as it will be to configure your server and clients. The server might actually be the hardest, and even this is but a seven-step process! First, you'll have to confirm that your network settings are actually correct. On Linux, it is fairly easy to check what IP addresses your network adapters have been set to by using ifconfig.
# ifconfig

eth0      Link encap:Ethernet  HWaddr 02:00:b2:fa:35:e1

          inet addr:1.2.3.4  Bcast:1.2.3.255  Mask:255.255.255.0

          inet6 addr: fe80::b2ff:fefa:35e1/64 Scope:Link

          UP BROADCAST RUNNING MULTICAST  MTU:1500  Metric:1

          RX packets:124098 errors:0 dropped:0 overruns:0 frame:0

          TX packets:12181 errors:0 dropped:0 overruns:0 carrier:0

          collisions:0 txqueuelen:1000

          RX bytes:7818260 (7.8 MB)  TX bytes:4030566 (4.0 MB)


eth1      Link encap:Ethernet  HWaddr 00:1c:23:20:f4:53

          inet addr:10.0.0.1  Bcast:10.255.255.255  Mask:255.0.0.0

          inet6 addr: fe80::21c:23ff:fe20:f453/64 Scope:Link

          UP BROADCAST RUNNING MULTICAST  MTU:1500  Metric:1

          RX packets:8802179 errors:0 dropped:0 overruns:0 frame:0

          TX packets:7543819 errors:0 dropped:0 overruns:0 carrier:0

          collisions:0 txqueuelen:1000

          RX bytes:2613848314 (2.6 GB)  TX bytes:731286814 (731.2 MB)

          Interrupt:17
What you wish to see here is that eth0 is given a public IP address (1.2.3.4) and that eth1 is set to have an internal IP address (10.0.0.1) that can be used to connect to the web servers. You can use ping to confirm a connection can be established in both directions between load balancer and its workers.
# ping -c 1 10.0.0.2

PING 10.0.0.2 (10.0.0.2) 56(84) bytes of data.

64 bytes from 10.0.0.2: icmp_seq=1 ttl=64 time=0.316 ms


--- 10.0.0.2 ping statistics ---

1 packets transmitted, 1 received, 0% packet loss, time 0ms

rtt min/avg/max/mdev = 0.316/0.316/0.316/0.000 ms


# ping -c 1 10.0.0.3

PING 10.0.0.3 (10.0.0.3) 56(84) bytes of data.

64 bytes from 10.0.0.3: icmp_seq=1 ttl=64 time=0.342 ms


--- 10.0.0.3 ping statistics ---

1 packets transmitted, 1 received, 0% packet loss, time 0ms

rtt min/avg/max/mdev = 0.342/0.342/0.342/0.000 ms
![]() Note It's best to manually configure the IP address on the internal subnet as sometimes DHCP servers can change your routing table and change IP addresses of your load balancer and its workers.
Note It's best to manually configure the IP address on the internal subnet as sometimes DHCP servers can change your routing table and change IP addresses of your load balancer and its workers.
Once you've confirmed that the network is working as it should, you're ready for the next step: modifying the load balancer's /etc/sysctl.conf with your favorite text editor (vim, nano, etc.). Using the /etc/sysctl.conf file, you can configure various kinds of networking and system variables. In this example, you will only need to uncomment one single line that, once done, allows you to forward any incoming IP packets (meant for the web servers) to your workers. Locate and uncomment the following line, or add it if it's not already there:
net.ipv4.ip_forward=1
Save the file, and close your text editor. Next, run sysctl -p to load in the modified configuration file, which will confirm the modification has been made.
#sysctl -p

net.ipv4.ip_forward = 1
Next, open and modify the file /proc/sys/net/ipv4/ip_forward so that it contains a 1. Optionally, you can use the echo command for this also.
# echo 1 > /proc/sys/net/ipv4/ip_forward
Once done, you are ready to install IPVS! Depending on your distribution of Linux, you can install IPVS using apt-get (debian/ubuntu), yum (CentOS, RHEL), or compile it yourself when needed. Here are the commands for apt-get and yum:
# apt-get install ipvsadm

# yum install ipvsadm
The installation should go smoothly and will install the required kernel module it needs to operate. For a more detailed guide on its installation and process specifics, please refer to Chapter 10.
Now, you will need to reconfigure IPVS so that it will run on boot up as a master-server and listen on eth0 for incoming connections to route. Don't worry; it sounds a lot harder than it is. You only need to run the following command to configure the package on Debian-flavored distributions:
# dpkg-reconfigure ipvsadm
Once prompted, all you will be required to do is answer the following questions accordingly:
Do you want to automatically load IPVS rules on boot? [Yes]

Daemon method: [master]

Multicast interface for ipvsadm: [eth0]
In order to do achieve the same in Red Hat-flavored distributions, use the ipvsadm command.
# ipvsadm --start-daemon=master --mcast-interface=eth0
Once done, the reconfiguration will close, and you're ready to configure your load balancer! The hardest part has already been done; from here on, it will only get simpler. Even simpler, you say? Yes, indeed. All you need to do next is create a new virtual service using the IPVSADM package. At the moment, the IPVS table is empty, which you can confirm by executing the ipvsadm command:
# ipvsadm

IP Virtual Server version 1.2.1 (size=4096)

Prot LocalAddress:Port Scheduler Flags

  -> RemoteAddress:Port           Forward Weight ActiveConn InActConn

#
Let's add the virtual service. You can do this using the -A parameter, followed by -t to specify that it concerns a TCP service. The syntax is as follows: 1.2.3.4 indicates the public IP address, and :80 is the port number your service should be listening on (usually :80 for web servers).
# ipvsadm -A -t 1.2.3.4:80

#
Once the service is created, you can add your workers to it to ensure any incoming connections on port 80 will be forwarded to the servers listed, regardless how many. Recall that you're using the weighted least connections schedule here, which directs the incoming connection to the worker with the lowest number of connections and the highest weight value. To add your workers, use the -a option, followed again by -t to specify that it concerns a TCP service, followed by the external IP address (identical to the virtual service's IP previously specified), its port number, the -r option to specify the real server's IP address and port number, and finally the -m option to use NAT (network address translation), which you previously enabled.
# ipvsadm -a -t 1.2.3.4:80 -r 10.0.0.2:80 -m

# ipvsadm -a -t 1.2.3.4:80 -r 10.0.0.3:80 -m

#
And that's it from the server side! To see your current IPVS table, just type ipvsadm on your terminal, which will also show you the number of active and inactive connections.
Preparing the Workers
Preparing the workers shouldn't take more than five minutes: it merely involves ensuring the web service (Apache, nginx, or any other web service listening on port 80) is running and modifying the worker's routing table. To be sure of the web server's status, you can simply request its status using the daemon on both servers.
# /etc/init.d/apache2 status

Apache is NOT running.


# /etc/init.d/nginx status

* nginx is running
Be sure that the web service is running on both workers, however, and not just one of them. If so, the web site's performance might be degraded, if only a bit.
Once you got that covered, you can modify the systems' routing tables. The routing tables are a crucial part of the network's operation and allow you to specify how and where any outgoing traffic is sent in order to reach its final destination. For a more in-depth explanation of the routing table, please refer to Chapter 10. You will tell your servers' routing tables that any outgoing traffic coming from port 80 will be redirected to your load balancer or, in this case, your gateway. Note that you will need to specify the internal IP address from the load balancer followed by the NIC's identifier to use.
# route add default gw 10.0.0.1 eth0
To verify the route was added successfully, the route command can be executed once again, which will show you an overview of the known routes to the system.
# route

Kernel IP routing table

Destination     Gateway         Genmask         Flags Metric Ref    Use Iface

10.0.0.0        *               255.0.0.0       U     0      0        0 eth0

default         10.0.0.1        0.0.0.0         UG    0      0        0 eth0
And that's it. Voila, all done!
Testing the Load Balancer
So now that you've set up your load balancer as well as the workers, you can test that the setup works as expected by simply visiting the web site. However, if both web servers are, as intended, hosting the same data, it would be hard to tell what server you're actually visiting at the moment. A simple way to check is to use the ipvsadm command, which if you recall from earlier, shows you the number of active connections on the servers at that time. You can use the watch command to ensure the ipvsadm table is updated each second, so that you'll have a better view on this.
# watch -n 1 ipvsadm

Every 1.0s: ipvsadm


IP Virtual Server version 1.2.1 (size=4096)

Prot LocalAddress:Port Scheduler Flags

  -> RemoteAddress:Port           Forward Weight ActiveConn InActConn

TCP  1.2.3.4:www wlc

  -> 10.0.0.2:www                 Masq    1      0          418

  -> 10.0.0.3:www                 Masq    1      1          418
The ActiveConn field specifies the number of total active connections on each web server. As you can see in this example, the second web server with the IP address 10.0.0.3 currently has one active connection, and both have so far equally handled 418 connections each, as can be seen under the InActConns field (Inactive Connections).
Another more visual way of testing your load balancer is to generate a plain text file on each web server, specifying unique information. As is generally the case with your workers, they would host the same data, but creating one unique file on each would be a simple way of identifying the current worker. For example, you can create one file named id that contains but the hostname of the worker on each directory.
root@Server01# echo "Worker1" > /var/www/id

root@Server02# echo "Worker2" > /var/www/id
Now you can use a simple shell script in combination with lynx (a command-line browser) to print the /id file's output to the terminal itself, ten times in a row, from the web server itself or any other host.
# for i in {1..10}; do lynx -source 1.2.3.4/id; done

Server02

Server01

Server02

Server01

Server02

Server01
Server02

Server01

Server02

Server01
Thanks to the weighted least connection schedule used by IPVS, it should come as no surprise that both servers are now equally loaded with incoming connections.
![]() Note To ensure that the static data available to the web servers are always kept in sync, mirroring utilities such as rsync can be used to copy pieces of files that have changed.
Note To ensure that the static data available to the web servers are always kept in sync, mirroring utilities such as rsync can be used to copy pieces of files that have changed.
Best of Both Worlds
Now that you've seen how load balancing can be applied to your web service using the IPVS package, you can take it another step further and separate dynamic from static content using nginx's reverse-proxy module. Using this, nginx is capable of redirecting any incoming requests for specific MIME types of a web site to another server. By doing so, you can, for example, use nginx on the foreground as the primary server serving the web site's static content such as HTML pages, image files, CSS files, and so on, and redirect any requests for dynamic data (such as PHP-generated content) to your high-end Apache server running at the back end. This way, you can reap the benefits of both: use nginx for handling pre-compressed static data, and use Apache for processing the web site's dynamic data. An overview of this setup can be seen in Figure 8-5.
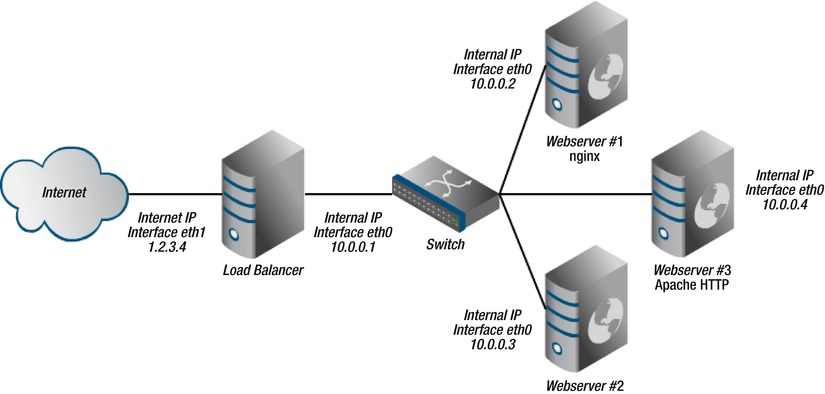
Figure 8-5. Adding an additional Apache HTTP server for dynamic content
The reserve-proxy module is relatively easy to configure. As a simple example, you will tell nginx to handle any requests itself other than the requests made for PHP pages, which generally contain dynamic content. Any request for a PHP document will be forwarded to your Apache HTTP server running on a third web server (Webserver #3 in this example). To do so, make sure Apache is up and running on the web server itself and readily accepting any incoming connections.
![]() Note When using the reserve-proxy module to redirect traffic to a different web server for a specific MIME-type, that specific web server doesn't need to be reachable via a public IP because the outbound traffic will be sent via its front-end (nginx) server.
Note When using the reserve-proxy module to redirect traffic to a different web server for a specific MIME-type, that specific web server doesn't need to be reachable via a public IP because the outbound traffic will be sent via its front-end (nginx) server.
Once Apache HTTP is fully running on your web server and capable of handling PHP documents, you will tell nginx what to forward and to where by modifying the web site's specific configuration file using your favorite text editor. The default file that comes with nginx is called default and can be found under /etc/nginx/sites-enabled/default. In it, you will need to add the following under the server{} directive:
location ~ .php$ {

        proxy_pass http://10.0.0.4;

        proxy_set_header X-Real-IP $remote_addr;

        proxy_set_header X-Forwarded-For $proxy_add_x_forwarded_for;

}
With this code, you are telling nginx to forward any request for any .php file on any location on the web site to the web server listening on the internal IP 10.0.0.4 using the proxy_pass directive. You're also telling nginx to modify some of the request header lines that will be send to the (Apache) web server using the proxy_set_header directive. That's all!
Once done, save the configuration file and reload nginx's settings.
# /etc/init.d/nginx restart

Restarting nginx: the configuration file /etc/nginx/nginx.conf syntax is ok

configuration file /etc/nginx/nginx.conf test is successful

nginx.

#
![]() Warning If you've set up load balancing as previously shown, be sure you apply these changes on both nginx web servers.
Warning If you've set up load balancing as previously shown, be sure you apply these changes on both nginx web servers.
Summary
Implementing load balancing to your web servers is a piece of cake: the installation of the IPVS software merely takes a few minutes. Configuring the load balancer as its worker is equally simple and takes just as long at best. The benefits of implementing load balancing on your web servers is easy to see: not only will the overall number of accepted incoming connections of your web site be increased, but your web site will also have a temporary fail-over in case one of the servers temporarily breaks down for whatever reason.
Several packages are available to perform load balancing, and some web services even offer their own solution, such as nginx with its proxy module, but the flexibility that IPVS has to offer with its vast set of balancing schedules makes it a very good choice indeed. Also, it can be considered an all-in-one load balancing solution, as the same approach can be used to load balance any other hosted service.
Of course, implementing load balancing is a great concept, but in order to make it successful you need to ensure that your web servers are also running in an optimal state. By reconfiguring the software—be it Apache HTTP, nginx, or any other web service application—you can generally speed up the service drastically. This is, therefore, a good place to start.