
Chapter 7
Scrolling with Joy
Continuing with the beginnings of the game from the previous chapter, I now want to turn it into something resembling an actual shoot-’em-up game. The very first thing will be to make the player’s ship controllable. Acceleromater controls don’t make sense in this case; a virtual joypad would be much more appropriate. But instead of reinventing the wheel, we’ll be using a cool source code package called SneakyInput to add a virtual joypad to this cocos2d game.
Moving the player’s ship around is just one thing. We also want the background to scroll, to give the impression of moving into a certain direction. For this to happen, we’ll implement our own solution for parallax scrolling, since CCParallaxNode is too limited in that it does not allow an infinitely scrolling parallax background.
In addition, I’ll illustrate what you’ve learned about texture atlases and sprite batching in the previous chapter. There will be one texture atlas containing all of the game’s graphics since there’s no need to group the images separately when using a texture atlas.
Advanced Parallax Scrolling
I mentioned before that CCParallaxNode is limited in that it doesn’t allow infinite scrolling. For this shooting game, we’ll add a ParallaxBackground node, which will do just that. Moreover, it will use a CCSpriteBatchNode to speed up the rendering of the background images.
Creating the Background As Stripes
First, I would like to illustrate how I created the background stripes that will create the parallaxing effect. This is crucial to understanding how the texture atlas created by TexturePacker can help you save memory and performance, but also save time positioning the individual stripes. Take a look at Figure 7–1; it shows the background layer as a Seashore image composed of individual parallax layers. This image is also in the Assets folder of the ScrollingWithJoy01 project, as background-parallax.xcf.
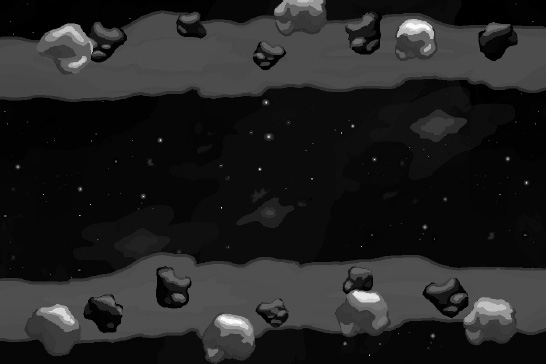
Figure 7–1. The source image for the parallax scrolling background
Each of these stripes is on its own layer in the image-editing program Seashore. In Figure 7–2 you can see the various layers, and if you look in the Assets folder, you’ll notice that there are images named bg0.png through bg6.png, which correspond to the seven individual stripes that make up the background.
There are several reasons for creating the parallax background image in this way. You can create the image as a whole, but you’re able to save each layer to an individual file. All of these files will be 960×640 pixels in size, which may seem wasteful at first. But you’re not adding the individual images to the game; instead, you’ll be adding them to a texture atlas. Since TexturePacker removes the surrounding transparent space of each image, it will shrink the individual stripes down to a bare minimum. You can see this in Figure 7–3.
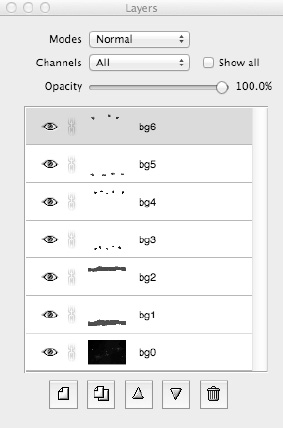
Figure 7–2. Each stripe of the background is on its own layer. This helps in creating the individual images and positioning them in the game.
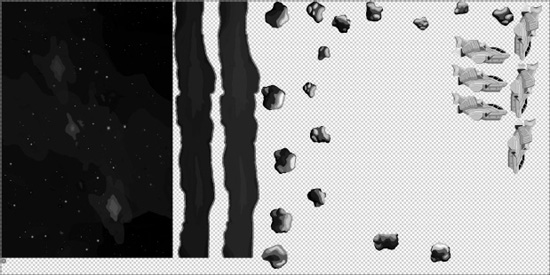
Figure 7–3. The background stripes as they would appear in a texture atlas
Splitting the stripes into individual images is not only going to be helpful for drawing the images at the correct z-order. Strictly speaking, the images bg5.pngandbg6.png can be at the same z-order since they do not overlap, yet I chose to save them into separate files. In Figure 7–3 you can see these two files as the two topmost stripes. You’ll notice how little space they actually use up in the texture atlas, and that’s because TexturePacker was able to remove most of the surrounding transparent parts of these images.
Now suppose I left both these stripes in the same 960×640 image—one would be at the top and the other at the bottom of the image, with a big gaping hole of transparency in between them. TexturePacker is not able to remove the transparent part between these two sprites, so they would have remained as a 960×640 image in the texture atlas, which is a lot more space than they take up as individual images.
Splitting the stripes into individual images also helps maintain a high framerate. The iOS devices are very limited in fill rate (that is, the number of pixels they can draw every frame). Since images can overlap each other, and they frequently do, the iOS device will often have to draw the same pixel several times in every frame. The extreme scenario would be a full-screen image that is on top of another full-screen image. You can see only one of the two images, but the device actually has to draw both. The technical term for that is overdraw. Separating the background into individual stripes with as little overlap as possible reduces the number of pixels drawn.
TIP: By using 16-bit textures (RGB565, RGBA5551, and RGBA4444) or even PVR compressed textures, you can improve the rendering performance of your game. Of course, you lose some image quality, but in many cases it is hardly noticeable on the iPhone screen, even if you do see some artifacts on your computer’s screen. TexturePacker enables you to reduce the color depth of your images while retaining most of the image quality through dithering techniques. And if you experience long load times, saving images in the compressed pvr.czz format is worth a try because this particular image file format loads noticeably faster than other image file formats.
Re-creating the Background in Code
You may be wondering by now how you can put these images back together in the source code without spending a lot of time properly positioning these stripped-down images. The answer is you don’t have to do this. Since all these images were saved as full-screen images, TexturePacker will remember the image offsets. All you really have to do is center each of these images on the screen, and they will be at the correct place.
Let’s take a look at the code for the ParallaxBackground node newly added to the ScrollingWithJoy01 project. The header file is pretty straightforward:
@interface ParallaxBackground : CCNode

{

    CCSpriteBatchNode* spriteBatch;

    int numSprites;

}

@end
I only chose to keep a reference to the CCSpriteBatchNode around because I will be accessing it in the code frequently. Storing a node as a member variable is faster than asking cocos2d for the node via the getNodeByTag method. If you do that every frame, it saves you a few CPU cycles. It is nothing too dramatic, and it is certainly not worth keeping several hundreds of member variables around. It’s a minor optimization that is just very convenient in this case.
In the init method of the ParallaxBackground class, the CCSpriteBatchNode is created, and all seven background images are added from the texture atlas, as shown in Listing 7–1.
Listing 7–1. Loading the Background Images
CGSize screenSize = [[CCDirector sharedDirector] winSize];


// Get the game's texture atlas texture by adding it

CCTexture2D* gameArtTexture = [[CCTextureCache sharedTextureCache]

    addImage:@"game-art.pvr.czz"];


spriteBatch = [CCSpriteBatchNode batchNodeWithTexture:gameArtTexture];

[self addChild:spriteBatch];


numSprites = 7;


// Add the six different layer objects and position them on the screen

for (int i = 0; i < numSprites; i++)

{

    NSString* frameName = [NSString stringWithFormat:@"bg%i.png", i];

    CCSprite* sprite = [CCSprite spriteWithSpriteFrameName:frameName];

    sprite.position = CGPointMake(screenSize.width / 2, screenSize.height / 2);

    [spriteBatch addChild:sprite z:i];

}
You’ll see that first I’m adding the game-art.pvr.czz texture atlas image to CCTextureCache. Actually, the texture atlas has already been added in the GameScene class, so why would I add it a second time here? The reason is simply that I need the CCTexture2D object to create the CCSpriteBatchNode, and adding the same image another time is the only way to retrieve an already cached image from the CCTextureCache. This doesn’t load the texture a second time; the CCTextureCache singleton knows that the texture is already loaded and returns the cached version, which is a fast operation. It’s just a bit unusual that there is no specific getTextureByName method, but that’s the way it is.
With the CCSpriteBatchNode created and set up, the next step is to load the seven individual background images. I deliberately chose to number them from 0 to 6 so that I can use stringWithFormat to create the file names as strings in a very effective way:
NSString* frameName = [NSString stringWithFormat:@"bg%i.png", i];
With that sprite frameName, I create a CCSprite as usual and then position it at the center of the screen:
sprite.position = CGPointMake(screenSize.width / 2, screenSize.height / 2);
Of course, once you create an iPad version of this project, the images won’t fit perfectly anymore since they were designed for a screen of 960×640 resolution. If you want to create an iPad version, you can follow the exact same steps, except make your original image 1024×768 in size. You can then downscale the 960×640 versions from that easily, since there’s only a few extra pixels of overlap.
TIP: It takes surprisingly little effort to re-create the source image in cocos2d, and it’s all thanks to TexturePacker saving the image offsets for you. It’s also a great way to create your game screen layouts. You can have an artist design each screen as separate layers, as many as are needed. Then each layer is exported as an individual full-screen file with transparency. Next you create a texture atlas from these files and end up having the artist-envisioned screen design in cocos2d with no hassle of positioning individual files and no wasted memory either.
Because the ParallaxBackground class is derived from CCNode, I only need to add it to the GameScene layer to add the ParallaxBackground to the game, like this:
ParallaxBackground* background = [ParallaxBackground node];

[self addChild:background z:-1];
This replaces the CCLayerColor and the background CCSprite, which were placeholders from the previous chapter.
Moving the ParallaxBackground
In the ScrollingWithJoy01 project, I also added a quick-and-dirty scrolling of the background stripes. It does show a parallax effect, although the images quickly leave the screen, revealing the blank background behind them. Figure 7–4 isn’t exactly what I had in mind, but I’m getting there.
NOTE: You’ll also notice that Figure 7–4 doesn’t look at all like Figure 7–1 or the game project. Figure 7–4 uses dummy graphics to better illustrate the parallax images “leaving” the screen. You’ll notice this effect much better in motion.
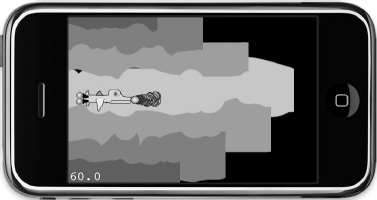
Figure 7–4. The background stripes are moving, but they’re also leaving the screen forever.
Still, Listing 7–2 shows that the code to make the background scroll as a first test is surprisingly simple.
Listing 7–2. Moving the Background Stripes
-(void) update:(ccTime)delta

{

    CCSprite* sprite;

    CCARRAY_FOREACH([spriteBatch children], sprite)

    {

        CGPoint pos = sprite.position;

        pos.x -= (scrollSpeed + sprite.zOrder) * (delta * 20);

        sprite.position = pos;

    }

}
Every background image’s x position gets subtracted a bit every frame to scroll it from right to left. How much an image moves depends on the predefined scrollSpeed plus the sprite’s zOrder. The delta multiplier is used to make the scrolling speed independent of the framerate, which is then multiplied by 20 to make the scrolling reasonably fast. Images that are closer to the screen scroll faster. However, using the zOrder property causes the stripes that should be at the same visual depth to scroll at different speeds.
The position is also multiplied by the delta time to make the scrolling speed independent of the framerate. The delta time itself is just a tiny fraction—it’s the time between two calls to the update method. At exactly 60 frames per second (fps), it’s 1/60 of a second, which is a delta time of 0.167 seconds. For that reason, I multiply delta by 20 just to get a reasonably fast scroll; otherwise, the images would be moving too slowly.
Parallax Speed Factors
Somehow the stripes of the same color need to scroll at the same speed, and the stripes should repeat so that the background doesn’t show up. My solutions to these issues are in the ScrollingWithJoy02 project.
The first change is regarding the scrolling speed. I decided to use a CCArray to store the speed factor with which individual stripes move. There are other solutions, but this allows me to illustrate a key issue of CCArray and in fact all iOS SDK collection classes: they can store only objects, never values such as integers and floating-point numbers.
The way around this is to box numbers into an NSNumber object. The following code is the newly added CCArray* speedFactors, which stores floating-point values. The array is defined in the ParallaxBackground class header:
@interface ParallaxBackground : CCNode

{

    CCSpriteBatchNode* spriteBatch;


    int numStripes;

    CCArray* speedFactors;

    float scrollSpeed;

}

@end
Then it is filled with factors in the init method of the ParallaxBackground class. Notice how NSNumbernumberWithFloat is used to store a float value inside the array:
// Initialize the array that contains the scroll factors for individual stripes

speedFactors = [[CCArray alloc] initWithCapacity:numStripes];

[speedFactors addObject:[NSNumber numberWithFloat:0.3f]];

[speedFactors addObject:[NSNumber numberWithFloat:0.5f]];

[speedFactors addObject:[NSNumber numberWithFloat:0.5f]];

[speedFactors addObject:[NSNumber numberWithFloat:0.8f]];

[speedFactors addObject:[NSNumber numberWithFloat:0.8f]];

[speedFactors addObject:[NSNumber numberWithFloat:1.2f]];

[speedFactors addObject:[NSNumber numberWithFloat:1.2f]];

NSAssert([speedFactors count] == numStripes, @"speedFactors count mismatch!");
The final assert is simply a safety check for human error. Consider that you may be adding or removing stripes from the background for whatever reason but might forget to adjust the number of values you’re adding to the speedFactors array. If you forget to modify the speedFactors initialization, the assert will remind you of it, instead of potentially crashing the game seemingly at random.
In Figure 7–5 you can see which speed factor is applied to which stripe. Stripes with higher speed factors move faster than those with slower speed factors, which creates the parallax effect. Once again, dummy graphics are used to make each individual stripe clearly visible.
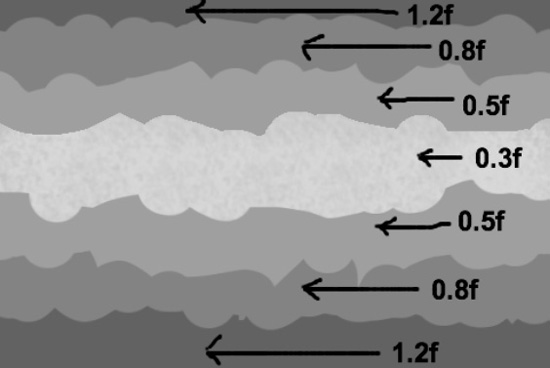
Figure 7–5. The speed factors applied to each background stripe
The speedFactors array is created with alloc, so its memory must also be released, which is done in the newly added dealloc method:
-(void) dealloc

{

    [speedFactors release];

    [super dealloc];

}
To use the newly introduced speed factors, the update method has been changed to this:
-(void) update:(ccTime)delta

{

    CCSprite* sprite;

    CCARRAY_FOREACH([spriteBatch children], sprite)

    {

        NSNumber* factor = [speedFactors objectAtIndex:sprite.zOrder];


        CGPoint pos = sprite.position;

        pos.x -= scrollSpeed * [factor floatValue] * (delta * 50);

        sprite.position = pos;

    }

}
Based on the sprite’s zOrder property, a speed factor NSNumber is obtained from the speedFactors array. This will be multiplied by the scrollSpeed to speed up or slow down the movement of individual stripes. You can’t multiply the NSNumber object directly because it is a class instance storing a primitive data type such as float, int, char, or others. NSNumber has a floatValue method that returns the floating-point value, but it supports a number of different methods. You could also use intValue, even though this NSNumber stores a floating-point value. It is essentially the same as casting a float to an int. Once again, the delta time is also factored in to make the scrolling speed independent of the framerate.
By using the speedFactors array and giving the same-colored stripes the same factor, the background stripes will now move as expected. But there’s still the issue of making endless scrolling.
Scrolling to Infinity and Beyond
Also in ScrollingWithJoy02 is the first step toward endless scrolling. As you can see in Listing 7–3, I simply added seven more background stripes to the CCSpriteBatchNode, although with a slightly different setup.
Listing 7–3. Adding Off-Screen Background Images
// Add seven more stripes, flip them, and position them next to their neighbor stripe

for (int i = 0; i < numStripes; i++)

{

    NSString* frameName = [NSString stringWithFormat:@"bg%i.png", i];

    CCSprite* sprite = [CCSprite spriteWithSpriteFrameName:frameName];


    // Position the new sprite one screen width to the right

    sprite.position = CGPointMake(screenSize.width + screenSize.width / 2,

        screenSize.height / 2);


    // Flip the sprite so that it aligns perfectly with its neighbor

    sprite.flipX = YES;


    // Add the sprite using the same tag offset by numStripes

    [spriteBatch addChild:sprite z:i tag:i + numStripes];

}
The idea is to add one more stripe of the same type each. They are positioned so that they align with the right end of the first stripe’s position. In effect, this doubles the total width of the background stripes, and that will be enough for endless scrolling. But I’ll get to that shortly.
First I need to point out that the new neighboring images’ X coordinates are flipped (mirrored along the y-axis). This is done so that the images match visually where they are aligned, to avoid any sharp edges. The new images also get a different tag number, one that is offset by the number of stripes in use. This way, it will be easy to get to the neighboring stripe by either adding or deducting numStripes from the tag number.
Right now, the background image scrolls just a bit longer before showing the blank canvas behind the images. The project ScrollingWithJoy03 completes the effort and adds totally infinite scrolling. But first the anchorPoint property of the stripes needs to change to make things a little easier. The x position is now simply at 0:
sprite.anchorPoint = CGPointMake(0, 0.5f);

sprite.position = CGPointMake(0, screenSize.height / 2);
The same goes for the secondary, flipped stripes, which now only need to be offset by the screen width:
sprite.anchorPoint = CGPointMake(0, 0.5f);

sprite.position = CGPointMake(screenSize.width, screenSize.height / 2);
The stripes’ anchorPoint is changed from its default (0.5f, 0.5f) to (0, 0.5f). This makes it easier to work with the parallax sprites, since in this particular case you don’t want to have to take into account that that texture’s origin and the sprite’s x position aren’t at the same location. Figure 7–6 shows how this makes it easier to calculate the x position.

Figure 7–6. Anchor point moved to the left for simplicity
You can see in Listing 7–4 how this is helpful in the changed update method, which now gives us endless scrolling.
Listing 7–4. Moving the Image Pairs Seamlessly
-(void) update:(ccTime)delta

{

    CCSprite* sprite;

    CCARRAY_FOREACH([spriteBatch children], sprite)

    {

        NSNumber* factor = [speedFactors objectAtIndex:sprite.zOrder];
        CGPoint pos = sprite.position;

        pos.x -= scrollSpeed * [factor floatValue] * (delta * 50);


        // Reposition stripes when they're out of bounds

        if (pos.x < -screenSize.width)

        {

            pos.x += screenSize.width * 2;

        }


        sprite.position = pos;

    }

}
The stripes’ x position now only needs to be checked if it is less than negative screen width and, if it is it is, multiplied by twice the screen width. Essentially, this moves the sprite that has just left the screen on the left side to the right side, just outside the screen. This repeats forever with the same two sprites, giving the effect of endless scrolling.
TIP: Notice that the background of the screen scrolls, but the ship stays in place. Inexperienced game developers often have the misconception that everything on the screen needs to be scrolling to achieve the effect of game objects passing by the player character as he progresses through the game world. Instead, you can much more easily create the illusion of objects moving on the screen by moving the background layers but keeping the player character fixed in place. Popular examples of games that make use of this visual illusion are Super Turbo Action Pig, Canabalt, Super Blast, Doodle Jump, and Zombieville USA. Typically, the game objects scrolling into view are randomly generated shortly before they appear, and when they leave the screen, they are removed from the game. In Chapter 11, I’ll make use of the same effect where the player character remains in the center of the screen while only the game world underneath the player is actually moving, giving the impression that the player moves around in the world.
Fixing the Flicker
So far, so good. There’s only one issue remaining. If you look closely, you will notice a vertical, flickering line appearing where the two background stripes meet. That’s where they align with each other. This line appears because of rounding errors in their positions in combination with subpixel rendering. From time to time, a 1-pixel-wide gap can appear for just a fraction of a second. It’s still noticeable and is something you should get rid of for a commercial-quality game.
The simplest solution is to overlap the stripes by 1 pixel. In the ScrollingWithJoy04 project I changed the initial positions for the flipped background stripes by subtracting 1 pixel from the x position:
sprite.position = CGPointMake(screenSize.width - 1, screenSize.height / 2);
This also requires updating the stripe-repositioning code in the update method so that the stripe is positioned 2 pixels further to the left than before:
// Reposition stripes when they're out of bounds

if (pos.x < -screenSize.width)

{

    pos.x += (screenSize.width * 2) - 2;

}
Why 2 pixels? Well, since the initial position of the flipped stripes is already moved to the left by 1 pixel, we have to move all of them 2 pixels to the left each time they flip around to maintain the same distance and to keep the overlap of 1 pixel.
An alternative solution would be to update only the position of the currently leftmost sprite and then find the sprite that is aligned to the right of it and offset it by exactly the screen width. This way, you also avoid the rounding errors. Figure 7–7 shows the finished result with the final graphics.
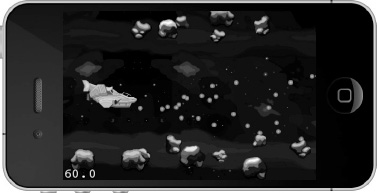
Figure 7–7. The result: an infinitely scrolling parallax background
Repeat, Repeat, Repeat
Another neat trick deserves mention in this chapter. You can set any texture to repeat over a certain rectangular area. If you make this area big enough, you can have this texture repeat nearly endlessly. At least several thousand pixels or dozens of screen areas can be covered with a repeating texture, with no penalty to performance or memory usage.
The trick is to use the GL_REPEAT texture parameter supported by OpenGL. But it only works with square images that are exactly a power of 2, like 32×32 or 128×128 pixels. Listing 7–5 shows the code.
Listing 7–5. Repeating Background with GL_REPEAT
CGRect repeatRect = CGRectMake(-5000, -5000, 5000, 5000);
CCSprite* sprite = [CCSprite spriteWithFile:@”square.png” rect:repeatRect];
ccTexParams params =
{
GL_LINEAR, // texture minifying function
GL_LINEAR, // texture magnification function
GL_REPEAT, // how texture should wrap along X coordinates
GL_REPEAT // how texture should wrap along Y coordinates
};
[sprite.texture setTexParameters:¶ms];
In this case, the sprite must be initialized with a rect that determines the area the sprite will occupy. The ccTexParams struct is initialized with the wrap parameters for the texture coordinates set to GL_REPEAT. Don’t worry if that doesn’t mean anything to you. These OpenGL parameters are then set on the sprite’s texture using the CCTexture2D method setTexParameters.
The result is a tiled area repeating the same square.png image over and over again. If you move the sprite, the whole area covered by the repeatRect is moved. You could use this trick to remove the bottommost background stripe and replace it with a smaller image that simply repeats. I’ll leave that up to you as an exercise.
A Virtual Joypad
Since the iOS devices all use a touchscreen for input and have no buttons, D-pads, or analog joypads like conventional mobile gaming devices, we need something called a virtual joypad. This emulates the behavior of digital or analog thumbsticks by allowing you to touch the screen where the digipad or thumbstick is displayed and move your finger over it to control the action on the screen. Buttons are also designated areas of the touchscreen that you can tap or hold to cause actions on the screen. Figure 7–8 shows a virtual joypad in action.
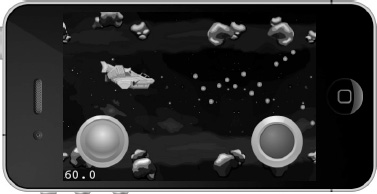
Figure 7–8. A skinned analog thumbstick and fire button created with SneakyInput
CAUTION: Virtual joypads resemble joypad controllers in looks but never in feel. The user is still touching a flat surface with no feedback to the fingers as to how far the virtual analog stick was moved or whether the virtual button has been pressed correctly. A number of players feel uneasy controlling a game with virtual joypads. It has become more or less common wisdom that a virtual joypad should have no more than two or three controller elements, usually a stick/pad (sometimes limited to two directions) and one or two buttons. Add more, and you’re going to make your game exponentially harder to control.
Introducing SneakyInput
Over time, many a developer has faced the problem of implementing a virtual joypad. There are many ways to go about this, and even more ways to fail at it. But why spend time on that if there’s a ready-to-use solution?
This is generally sound advice. Before you program anything that seems reasonably common that others might have worked on before, always check to see whether there is a general-purpose solution available that you can just use instead of having to spend a lot of time creating it yourself. In this case, SneakyInput is just too good to be ignored.
SneakyInput was created by Nick Pannuto, with skinning examples by CJ Hanson. SneakyInput is open source software and free to download, but if you like this product, please consider making a donation to Nick Pannuto at this link:
http://pledgie.com/campaigns/9124.
The SneakyInput source code is hosted on GitHub, a social coding web site, at this link:
http://github.com/sneakyness/SneakyInput.
It may not be immediately obvious what you have to do to download the source code from GitHub. When you browse to the web site and click any of the files, you’ll see the actual source code displayed in your browser. But you want the full source code project, not individual files. What you do is locate the Download Source button in the upper-right corner of the web site. You then choose one of the archive types—it doesn’t really matter which—and save the file to your computer and extract it.
At this point, you might want to open the SneakyInputXcode project and compile it. Since SneakyInput comes together with cocos2d integrated into the project, it’s possible that the cocos2d version used by SneakyInput may not be the most current version. If the project is up and running, you’ll see an analog pad and a button as simple circles. The analog virtual thumbstick moves the “Hello World” label on the screen, while the button changes the label’s colors on touch.
Figure 7–9 shows the SneakyInput sample project running in the iPhone Simulator. The sample project includes a virtual analog thumbstick that controls the “Hello World” label’s position, as well as a button in the lower-right corner that changes the label’s color when touched. The buttons aren’t skinned; they use the ColoredCircleSprite class.

Figure 7–9. The SneakyInput sample project
But of course the sticks and buttons can also be skinned. Skinning, sometimes referred to as texturing, means using images from textures instead of flat colors to display the sticks and buttons, as you saw in Figure 7–8.
Integrating SneakyInput
I already have a project fully set up and functioning—in this case ScrollingWithJoy05. I don’t want to use the project provided by SneakyInput. How do I get it to work with my project?
This is an issue that isn’t limited to SneakyInput but possibly any source code project you can download that comes already bundled with its own version of cocos2d. In most cases, and as long as the programming language of that source code is Objective-C, you only have to figure out which of the project’s files are necessary and add them to your own project. There’s no clear guideline, however, since every project is different.
I can tell you which files you need to add to your project regarding SneakyInput, however. It consists at its core of five classes:
SneakyButtonandSneakyButtonSkinnedBaseSneakyJoystickandSneakyJoystickSkinnedBaseColoredCircleSprite(optional)
The remaining files are not needed but serve as references. Figure 7–10 shows the selection I’ve made in the Add Files To … dialog. My rationale for not including certain classes was by first making an educated guess and then seeing whether I was right by compiling the project after having added the files I believed to be necessary.
The HelloWorldScene class is created by a cocos2d project template and most likely doesn’t contain anything but example code. Of course, I already have an AppDelegate in my project, so I don’t need to be adding SneakyInput’s AppDelegate class—it might be in conflict with the existing AppDelegate. Then there are two classes explicitly suffixed with Example, which indicates that these files are not core classes for SneakyInput but further example code.
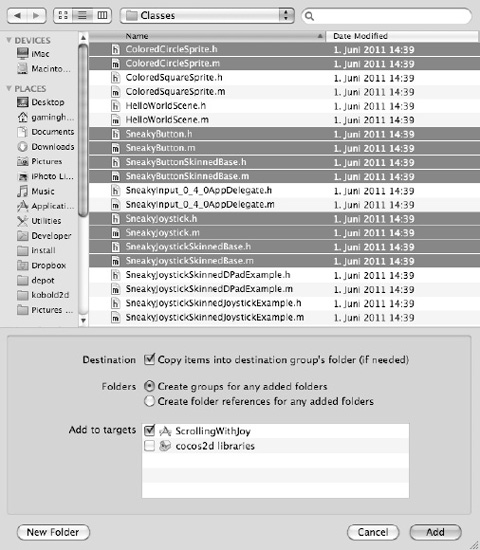
Figure 7–10. These files are needed to get SneakyInput to work in your own project; the other files are used only for example code.
Touch Button to Shoot
Let’s try this. With the SneakyInput source code added to the project ScrollingWithJoy05, the first goal is to add a button that allows the player to shoot bullets from the player’s ship. I’m going to add a separate InputLayer class to the project, which is derived from CCLayer and added to the GameScene class. In Listing 7–6, I updated the scene method to add the new InputLayer to it, and I’m giving both layers a tag just in case I need to identify them later.
Listing 7–6. Adding the InputLayer to the GameScene
+(id) scene

{

    CCScene* scene = [CCScene node];

    GameScene* layer = [GameScene node];

    [scene addChild:layer z:0 tag:GameSceneLayerTagGame];

    InputLayer* inputLayer = [InputLayer node];

    [scene addChild:inputLayer z:1 tag:GameSceneLayerTagInput];

    return scene;

}
The new tags are defined in the GameScene header file as follows:
typedef enum

{

    GameSceneLayerTagGame = 1,

    GameSceneLayerTagInput,

} GameSceneLayerTags;
With the InputLayer in place, the next step is to add the header files for the SneakyInput files we want to use to the InputLayer.h header file. I’m not picky, and we’re probably going to use most of the classes, so I simply added all of the SneakyInput header files:
#import <Foundation/Foundation.h>

#import "cocos2d.h"


// SneakyInput headers

#import "ColoredCircleSprite.h"

#import "SneakyButton.h"

#import "SneakyButtonSkinnedBase.h"

#import "SneakyJoystick.h"

#import "SneakyJoystickSkinnedBase.h"


@interface InputLayer : CCLayer

{

    SneakyButton* fireButton;

}

@end
In addition, I added a SneakyButton member variable for easier access to the button I’m going to create now. This is done in the addFireButton method in Listing 7–7.
Listing 7–7. Creating a SneakyButton
-(void) addFireButton

{

    float buttonRadius = 80;

    CGSize screenSize = [[CCDirector sharedDirector] winSize];


    fireButton = [[[SneakyButton alloc] initWithRect:CGRectZero] autorelease];

    fireButton.radius = buttonRadius;

    fireButton.position = CGPointMake(screenSize.width - buttonRadius, buttonRadius);

    [self addChild:fireButton];

}
The CGRect parameter of the button’s initWithRect method isn’t used by SneakyButton, which is why I’m simply passing CGRectZero. The actual touch code uses the radius property to determine whether the button should react to the touch. The button in this case should be neatly tucked into the lower-right corner. Subtracting the buttonRadius from the screen width and setting its height to buttonRadius places it exactly at the desired location.
TIP: The use of the buttonRadius variable allows you to change the radius of the button in one place. Otherwise, you would have to update several values in several places. This is not only extra work for a value you might want to tweak several times before you get it exactly the way you want, but it can also introduce subtle bugs, because you’re a human and you tend to forget things, such as changing that one value over there. Suddenly the button is offset—or worse, the input doesn’t match the button’s location.
The InputLayer class schedules the update method:
[self scheduleUpdate];
The update method is used to check whether the button is touched:
-(void) update:(ccTime)delta

{

    if (fireButton.active)

    {

        CCLOG(@"FIRE!!!");

    }

}
Instead of shooting a bullet, I wanted to keep things simple for now and simply log a successful button press. If you try the ScrollingWithJoy05 project now, you’ll notice that there isn’t any button drawn. Yet when you touch the screen at the lower-right corner, you’ll see the “FIRE!!!” message appear in the Debugger Console window. So, all is well and right, except that the button can’t be seen—which we’ll need to fix.
Skinning the Button
Eeeww! No, it’s not what you think. Skinning in computer graphics refers to giving an otherwise featureless object a texture or simply a different look. In this case, we want to actually see our button, so we need an image for that.
I also prefer to add cocos2d-style static initializers to external classes using a category, as done in the previous chapter. This helps avoid potentially forgetting to send alloc or autorelease messages to a SneakyButton object. I’ll start with that by adding a SneakyExtensions class to the ScrollingWithJoy06 project and then stripping the header file down to this:
#import <Foundation/Foundation.h>


// SneakyInput headers

#import "ColoredCircleSprite.h"

#import "SneakyButton.h"

#import "SneakyButtonSkinnedBase.h"

#import "SneakyJoystick.h"

#import "SneakyJoystickSkinnedBase.h"
@interface SneakyButton (Extension)

+(id) button;

+(id) buttonWithRect:(CGRect)rect;

@end
Once more, all the SneakyInput headers are added because I plan to make more categories for every SneakyInput class that doesn’t conform to regular cocos2d initializers. In this case, a SneakyButton category named Extension is added, which adds two methods, named button and buttonWithRect. They are implemented as shown in Listing 7–8.
Listing 7–8. A Category with SneakyButtonAutorelease Initializers
#import "SneakyExtensions.h"


@implementation SneakyButton (Extension)

+(id) button

{

    return [[[SneakyButton alloc] initWithRect:CGRectZero] autorelease];

}


+(id) buttonWithRect:(CGRect)rect

{

    return [[[SneakyButton alloc] initWithRect:rect] autorelease];

}

@end
They simply wrap the alloc and autorelease calls. Also, I decided to add a simple, parameterless button initializer because the CGRect parameter isn’t really used anyway. This allows me to initialize the fireButton in a straightforward manner:
fireButton = [SneakyButton button];
It’s just a little extra effort for more convenience and cleaner code. I’ll be adding more convenience methods to SneakyExtensions without discussing them in the book, because the principle is the same.
Now my mind is at peace, and I can start skinning the button. I created four button images that are 100×100 pixels in size—twice the final button radius of 50 that I’m going with. The button images come in four variations: Default, Pressed, Activated, and Disabled. The default state is what the button looks like when it isn’t pressed, which should make it obvious what the Pressed state is. The Activated state comes into play only for toggle buttons, meaning the toggle button is active, or on. The Disabled image is used if the button currently has no function. For example, when the ship’s weapons are overheated and you can’t shoot for a few seconds, you could disable the button, and it would show the Disabled image. For the shoot button, I only needed to use the Default and Pressed images. Listing 7–9 shows the updated addFireButton method.
Listing 7–9. Replacing Listing 7–7 with a Skinned Button
float buttonRadius = 50;

CGSize screenSize = [[CCDirector sharedDirector] winSize];


fireButton = [SneakyButton button];

fireButton.isHoldable = YES;
SneakyButtonSkinnedBase* skinFireButton = [SneakyButtonSkinnedBase skinnedButton];

skinFireButton.position = CGPointMake(screenSize.width - buttonRadius, buttonRadius);

skinFireButton.defaultSprite = [CCSprite spriteWithSpriteFrameName:

    @"fire-button-idle.png"];

skinFireButton.pressSprite = [CCSprite spriteWithSpriteFrameName:

    @"fire-button-pressed.png"];

skinFireButton.button = fireButton;

[self addChild:skinFireButton];
I initialized the fireButton as usual except that I made it holdable, which means you can keep it pressed down for a continuous stream of bullets. It also doesn’t set the radius property anymore, since the images of the SneakyButtonSkinnedBase class determine the radius now. Keep in mind that I added a category to SneakyButtonSkinnedBase in the SneakyExtension source files created earlier. The skinnedButton initializer is in there and wraps the alloc and autorelease messages.
Instead of positioning the fireButton, the skinned button is now used to position the button on the screen; the actual button is updated accordingly by SneakyButtonSkinnedBase.
At this point, it makes sense to also write the firing code; Listing 7–10 shows the update method now sending the fire message to the GameScene class.
Listing 7–10. Shooting Bullets Whenever the Fire Button Is Active
-(void) update:(ccTime)delta

{

    totalTime += delta;


    if (fireButton.active && totalTime > nextShotTime)

    {

        nextShotTime = totalTime + 0.5f;


        GameScene* game = [GameScene sharedGameScene];

        [game shootBulletFromShip:[game defaultShip]];

    }


    // Allow faster shooting by quickly tapping the fire button

    if (fireButton.active == NO)

    {

        nextShotTime = 0;

    }

}
The two ccTime variables, totalTime and nextShotTime, are used to limit the number of bullets the ship will emit to two per second. If the fire button is not active (meaning that it isn’t pressed), the nextShotTime is set to 0 so that the next time you press the button a shot is guaranteed to be fired. Tap the button quickly, and you should be able to shoot more bullets than with continuous fire.
Controlling the Action
You can’t fly a ship without some form of input. This is where SneakyJoystick will give us a helping hand (I mean a helping virtual thumbstick). Behold, ScrollingWithJoy07 is here!
As usual, the first thing I did was add another Extension category to the new classes so I could initialize them like any other CCNode. For the joystick, I’ll go right ahead and create a skinned one in the addJoystick method in Listing 7–11.
Listing 7–11. Adding a Skinned Joystick
-(void) addJoystick

{

    float stickRadius = 50;


    joystick = [SneakyJoystick joystickWithRect:CGRectMake(0, 0, stickRadius,

        stickRadius)];

    joystick.autoCenter = YES;

    joystick.hasDeadzone = YES;

    joystick.deadRadius = 10;


    SneakyJoystickSkinnedBase* skinStick = [SneakyJoystickSkinnedBase

        skinnedJoystick];

    skinStick.position = CGPointMake(stickRadius * 1.5f, stickRadius * 1.5f);

    skinStick.backgroundSprite = [CCSprite spriteWithSpriteFrameName:

        @"joystick-back.png"];

    skinStick.backgroundSprite.color = ccYELLOW;

    skinStick.thumbSprite = [CCSprite spriteWithSpriteFrameName:

        @"joystick-stick.png"];

    skinStick.joystick = joystick;

    [self addChild:skinStick];

}
The SneakyJoystick is initialized with a CGRect, and contrary to the SneakyButton, the CGRect is actually used to determine the joystick’s radius. I set the joystick to autoCenter so that the thumb controller jumps back to the neutral position, like most real-world game controllers. The dead zone is also enabled; this is a small area defined by the deadRadius, in which you can move the thumb controller without any effect. This gives users a certain radius where they can keep the thumb controller centered. Without the dead zone, it would be almost impossible to center the thumb controller manually.
The SneakyJoystickSkinnedBase is positioned a small distance away from the edge of the screen. The button’s position and size may not be ideal for the game, but it allows me to better demonstrate the controls. If you align the thumb controller with the screen edges, it’s too easy to inadvertently move your finger off the touchscreen and thus lose control of the ship.
TIP: Gray areas are useful! I mean gray images like joystick-back.png. By using just grayscale colors, you can colorize the image using the color property of the sprite. You can create red, green, yellow, blue, magenta, and other colored versions of the same image, saving both download size and in-game memory. The only drawback is that it will be a flat color, so instead of shades of gray, your image will be using shades of red. This trick works best with images that are supposed to be shades of a single color.
You want the thumbstick on the screen to be used to control the ship, of course. As usual, the update method processes the input, as shown in Listing 7–12.
Listing 7–12. Moving the Ship Based on Joystick Input
-(void) update:(ccTime)delta

{

    …


    // Moving the ship with the thumbstick

    GameScene* game = [GameScene sharedGameScene];

    Ship* ship = [game defaultShip];


    // Velocity must be scaled up by a factor that feels right

    CGPoint velocity = ccpMult(joystick.velocity, 7000 * delta);

    if (velocity.x != 0 && velocity.y != 0)

    {

        ship.position = CGPointMake(ship.position.x + velocity.x * delta,

            ship.position.y + velocity.y * delta);

    }

}
I have added a defaultShip accessor method to the GameScene class in the meantime so that the InputLayer has access to the ship. The velocity property of the joystick is used to change the ship’s position but not without scaling it up. The velocity values are a tiny fraction of a pixel, so multiplying the velocity using cocos2d’s ccpMult method, which takes a CGPoint and a float factor, is necessary for the joypad velocity to have a noticeable effect. The scale factor is arbitrary; it’s just a value that feels good for this game.
To ensure smooth movement even if the update method is called at uneven intervals, the update method’s delta parameter is factored in as well. The delta parameter is passed by cocos2d and contains the time elapsed since the update method was last called. This isn’t strictly necessary, but it’s good practice. If you don’t do it, you run the risk that the ship will move more slowly whenever the framerate drops below 60 fps. Tiny things like these can be pretty annoying to players, and as game developers, our goal is the exact opposite of annoying players.
At this point, it is still possible to move the ship outside the screen area. I bet you’d like for the ship to stay on the screen as much as I do. And you may be tempted to add this code directly to the InputLayer where the ship’s position is updated. That brings up a question: do you want to prevent the joystick input from moving the ship outside the screen, or do you want to prevent the ship from ever being able to move outside the screen? The latter is the more general solution and preferable in this case. To do so, you only need to override the setPosition method in the Ship class, as shown in Listing 7–13.
Listing 7–13. Overriding the Ship’s setPosition Method
// Override setPosition to keep the ship within bounds

-(void) setPosition:(CGPoint)pos

{

    CGSize screenSize = [[CCDirector sharedDirector] winSize];

    float halfWidth = contentSize_.width * 0.5f;

    float halfHeight = contentSize_.height * 0.5f;


    // Cap the position so the ship's sprite stays on the screen

    if (pos.x < halfWidth)

    {

        pos.x = halfWidth;

    }

    else if (pos.x > (screenSize.width - halfWidth))

    {

        pos.x = screenSize.width - halfWidth;

    }


    if (pos.y < halfHeight)

    {

        pos.y = halfHeight;

    }

    else if (pos.y > (screenSize.height - halfHeight))

    {

        pos.y = screenSize.height - halfHeight;

    }


    // Must call super with the new position

    [super setPosition:pos];

}
Every time the ship’s position is updated, the preceding code performs the check to see whether the ship’s sprite is still inside the screen boundaries. If not, then the X or Y coordinate is set to a distance of half the contentSize away from the respective screen border.
Because position is a property, the setPosition method gets called by this code:
ship.position = CGPointMake(200, 100);
The dot notation is shorthand for getter and setter messages to Objective-C properties, and it can be rewritten:
[ship setPosition:CGPointMake(200, 100)];
You can override other base class methods in this way to change the behavior of your game objects. For example, if an object is allowed to be rotated only between 0 and 180 degrees, you would override the setRotation:(float)rotation method and add the code to limit the rotation to it.
Digital Controls
You can turn the SneakyJoystick class into a digital controller as well, often referred to as a D-pad. The necessary code changes are minimal. You can find them in the ScrollingWithJoy08 project or right here:
joystick = [SneakyJoystick joystickWithRect:CGRectMake(0, 0, stickRadius, stickRadius)];

joystick.autoCenter = YES;


// Now with fewer directions

joystick.isDPad = YES;

joystick.numberOfDirections = 8;
The dead zone properties have been removed—they are not needed for a digital controller. The joystick is set to digital controls by setting the isDPad property to YES. You can also define the number of directions. While D-pads regularly have four directions, in many games you can keep two directions pressed at the same time to have the character move in a diagonal direction. To achieve the same effect, the numberOfDirections property is set to 8. SneakyJoystick automatically ensures that these directions are evenly divided onto the thumbpad controller. Of course, you will get strange results if you set the number of directions to 6, but then again, maybe that’s exactly what you need to travel across a hexagonal tile map.
Summary
In this chapter you learned several tricks to make an effective parallax scrolling background. Not only did you learn to scroll the background infinitely and without flickering edges, but you also learned how to properly separate the parallax layers so that TexturePacker can cut down on any unnecessary transparent areas while keeping the image’s offset so you don’t have to fumble with positioning the parallax layers.
The downside to this approach is that it is specific to a certain screen resolution. If you wanted to create an iPad version, for example, you could use the same process, except you’d have to create the image at a 1024×768 resolution. I’ll leave that up to you as an exercise.
The second half of this chapter introduced you to SneakyInput, an open source project to add virtual thumbsticks and buttons to any cocos2d game. It may not be perfect, but it’s good enough for most games, and it definitely beats writing your own virtual thumbstick code.
The ship is now controllable and stays within the screen’s boundaries, and it’s able to shoot with the press of a button—but the game is still lacking something. A shoot-’em-up isn’t a shoot-’em-up without something to shoot down, is it? The next chapter addresses that lack.