
Chapter 10
Working with Tilemaps
In the next two chapters, I'll introduce you to the world of tile-based games. Whether you've been playing games since the age of classic role-playing games like Ultima or you've just recently joined your Facebook friends in Farmville, I'm sure you've already played a game that uses the tilemap concept for displaying its graphics.
In tilemap games, the graphics consist of a small number of images, called tiles, that align with each other; placing them on a grid allows us to build rather convincing game worlds. The concept is very attractive because it conserves memory as compared to drawing the whole world as individual textures, while still allowing a lot of variety.
This chapter will introduce general tilemap concepts by using the simplest tilemaps of all: orthogonal tilemaps. They are most often built from square, rarely from nonsquare rectangular tiles, and typically display the world in a top-down fashion. I'll discuss the various display styles of tilemaps, and the next chapter will focus on isometric tilemaps, building on the tilemap programming basics that you'll learn in this chapter.
What Is a Tilemap?
Tilemaps are 2D game worlds made of individual tiles. You can create large world maps with just a handful of images that all have the same dimensions. This means tilemaps are very efficient at conserving memory for large maps (game worlds). It's no wonder that they first appeared in the early days of computer games. Many classic role-playing games used square tiles to create fantastic fantasy worlds. These games looked a bit like the tilemap in Figure 10–1, which is also a perfect example of an orthogonal tilemap. It looks like an aerial view, looking straight down. For this reason, orthogonal tilemaps usually look flat.
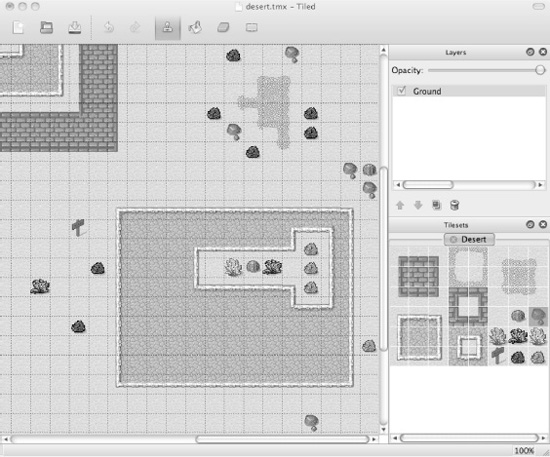
Figure 10–1. An orthogonal tilemap in Tiled (Qt) Map Editor
Tiles in an orthogonal tilemap actually don't need to be square; you can create orthogonal tilemaps from rectangular images as well. Those were most often used by Asian role-playing games, such as Dragon Quest. While still using an orthogonal perspective, it allowed the designers to create objects that are seemingly taller than wide. This enabled the designers to create the illusion of volumes, like houses, by painting them as several tiles and allowing game characters to be partially obstructed by tiles.
That method really came to shine with Ultima 6 and in particular Ultima 7. By skewing the perspective with which tiles were drawn, the effect came close to isometric tilemaps while still being orthogonal tilemaps. Using this method, the designers were able to create the illusion of depth, as you can see in Figure 10–2.
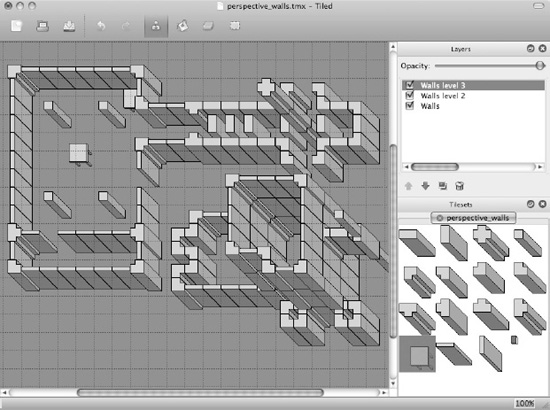
Figure 10–2. An orthogonal tilemap with perspective tiles designed to be created in multiple layers to give the impression of depth. This tilemap style has come to fame by Ultima 7.
Isometric tilemaps take this one step further by not just drawing the tiles in a certain perspective but also by rotating the tiles by 45 degrees. Isometric tilemaps are very effective in tricking our minds into believing that there really is a third dimension in this world, even though all of the images are still essentially flat. Isometric tilemaps achieve this impression of depth by using tile images that are drawn as diamond shapes (rhombuses) and allowing tiles closer to the viewer to draw over the tiles further away from the viewer. See Figure 10–3 for an example of an isometric tilemap, which I'll be discussing in the next chapter in greater detail.
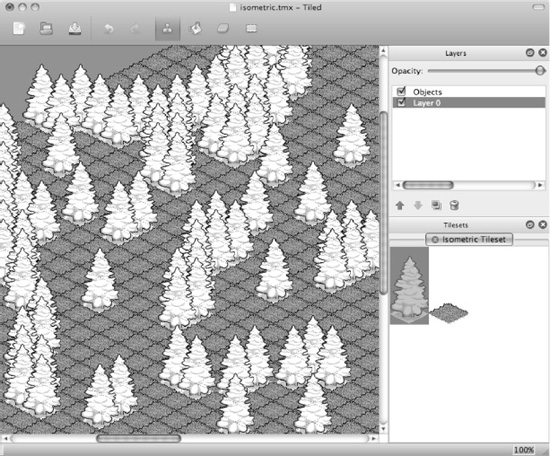
Figure 10–3. An isometric tilemap in Tiled (Qt) Map Editor
The tilemaps in Figures10–2 and 10–3 prove that tilemaps don't need to be flat-looking. The layering or stacking of tiles can also be used with some games that allow players to interact with the game world, as many of the Farmville fan videos show to great effect. Several Farmville users have used nothing but crop fields to build houses and even tall skyscrapers just by stacking tiles. They make use of an optical illusion that's possible with isometric tilemaps.
Editing tilemaps is usually done with an editor, and the one directly supported by cocos2d is called Tiled (Qt) Map Editor. Tiled is free, is open source, and allows you to edit both orthogonal and isometric tilemaps with multiple layers. Tiled also enables you to add trigger areas (Object Layer), which can be used in a game to trigger certain actions when a character enters the area. They also serve as a way to add arbitrary positions to the map so that you can, for example, define spawn locations. By editing tile properties, you can determine what type of tile it is. This can also be used to block characters from entering certain tiles or, for example, to take damage when moving over a lava tile.
NOTE: Qt refers to Nokia's Qt framework, on which Tiled is built. Since there is also a defunct Java version of Tiled, it's important to make this differentiation by writing Tiled (Qt). The Java version is no longer updated but contains a few extra features that may be worth checking out. But in this and the following chapter, I will be using and discussing Tiled (Qt).
Preparing Images with TexturePacker
Before you start working with the Tiled (Qt) Map Editor, you need to prepare the tilemap graphics. The set of tile images for a tilemap is commonly referred to as tileset. Technically it's just a texture atlas containing tile images.
In the Tilemap01 project for this chapter, you'll find a number of square tile images in the Assets/tiles folder. Add all of these tile images to TexturePacker and then uncheck Allow Rotation, set Algorithm to Basic, and set Sort by to Name. These settings ensure that the tiles are ordered and aligned correctly for Tiled. The resulting tileset in TexturePacker should look similar to Figure 10–4.
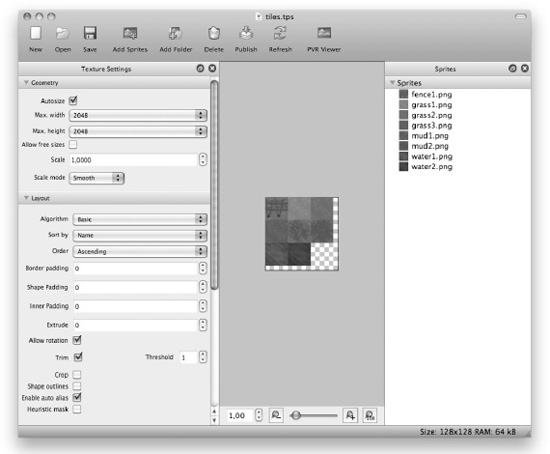
Figure 10–4. Creating a texture atlas of a few square tiles using TexturePacker
For Tiled it is crucial that the tiles stay at the same position—this is why the sorting by name is so important—since Tiled refers to individual tiles in the tileset by position and offset only. That means that if tiles in the texture shift places, the tilemap in Tiled using this tileset texture will look completely different. The tilemap still refers to the same tile positions in the tileset, but instead of a grass tile there could now be a water tile at that position, for example.
NOTE: TexturePacker will get a new algorithm called TileMap—a special mode for creating tilesets for tilemaps, allowing you to manually arrange the tiles within the grid. Please visit www.texturepacker.com for availability and more information regarding this new feature.
Tiled (Qt) Map Editor
The most popular tool to create tilemaps for use with cocos2d is the Tiled (Qt) Map Editor that I've already mentioned in the preceding sections. The TMX files it creates are natively supported by the cocos2d game engine. TMX files are simply XML files that, if need be, you could edit with a text editor.
Tiled is available as a free download, and at the time of this writing, version 0.7 is the most current. You can download Tiled from its home page, at www.mapeditor.org.
If you would like to support the development of Tiled, consider making a donation to the project's developer, Thorbjørn Lindeijer. You can donate to the project here: http://sourceforge.net/donate/index.php?group_id=161281.
Creating a New Tilemap
The first thing after you've downloaded, extracted, installed, and started Tiled is to go to the View menu and check both the Tilesets and Layers items. This will show the list of layers and the current tileset on the right side of the Tiled window. Then choose File ![]()
New to create a new tilemap. This will bring up the New Map dialog pictured in Figure 10–5.
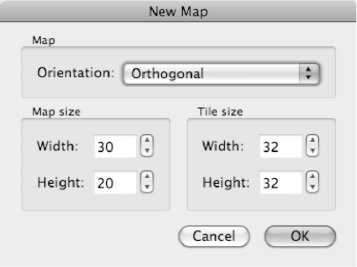
Figure 10–5. Creating a new tilemap in Tiled
Currently, Tiled supports orthogonal (rectangular) tilemaps as well as isometric tilemaps. The map size is given in tiles, not pixels. In this case, the new map will be 30×20 tiles, with the tile images having 32×32-pixel dimensions because that's the size of the tile images. It's crucial that the tile size matches the size of your tile images, or they will not align.
The new map will be completely empty, and there's no tileset loaded that you can draw from. You can add a tileset by selecting Map ![]()
New Tileset from Tiled's menu. This will open the New Tileset dialog (shown in Figure 10–6), where you can browse for the proper tileset image. A tileset is just a name for an image containing multiple tiles with equal spacing, so you could also call it a texture atlas containing only images of the same size.
NOTE: The function Map ![]()
Add External Tileset is used only to import a previously exported tileset to share the same tileset with multiple TMX maps. You can export a tileset by right-clicking the tileset view in the lower-right corner of the Tiled window and then select Export Tileset As.
I will use the dg_grounds32.pngtileset. These tiles were drawn by David E. Gervais and published under the Creative Commons License, meaning you are free to share and remix his work as long as you give credit to him. You can download more of his tilesets from this web site: http://pousse.rapiere.free.fr/tome/index.htm.
In Figure 10–6, I have already added the dg_grounds32.png tileset image by locating it through the Browse button in the Resources folder of the Tilemap01 project. If you check the “Use transparent color” check box, transparent areas will simply be drawn in pink (the default color). You can leave this box unchecked for now since the tiles in use have no transparent areas.
The tile width and height are the dimensions of individual tiles in the tileset. They should match the tile size of 32×32 pixels, which you set when creating the new map. The Margin and Spacing settings determine how many pixels away from the image border the tiles are and how many pixels of space are between them. In the case of the dg_grounds32.png, there is no spacing at all, so I set both values to 0.
If you had your tiles aligned by TexturePacker to create a tileset texture, you must enter the pixel-padding value used by TexturePacker in the Margin and Spacing fields. By default TexturePacker uses a padding of 0 pixels.
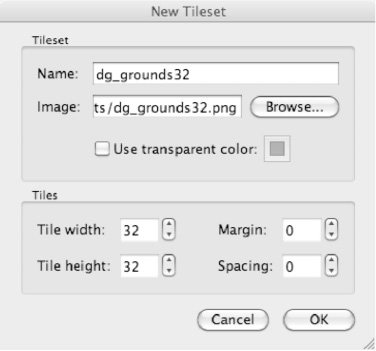
Figure 10–6. Creating a new tileset from an image file
When loading a new tileset image, make sure the tileset image is already located in your project's resource folder. You should then also make sure to save the tilemap TMX file to the same folder where the tileset image used by the tilemap is located. Otherwise, cocos2d might fail to load the tileset image; trying to load the TMX file will then cause a runtime exception. The culprit is that TMX files reference the tileset image relative to the location the TMX file is saved to. If they are not both in the same folder, cocos2d may be unable to find the image because the folder structure is not preserved when the app is installed in the simulator or on the device.
TIP: TMX files are plain XML files, so you might want to peek inside if you're curious. If you see the image file referenced with parts of a path, then cocos2d is unlikely to load the referenced image file. The image reference should list just the image file name without any path components, like so: <image source="tiles.png"/>.
Designing a Tilemap
With the tileset loaded, you'll be faced with a blank map, an invitation for your creativity to come up with great ideas for a tilemap. What's even better is to get rid of the blank tilemap as the very first step. It's very helpful to start the tilemap with a default floor tile. I selected the Bucket Fill tool and picked a bright grass tile so that my tilemap is now a lush meadow—sort of. You can see it in Figure 10–7.

Figure 10–7. An empty map with the dg_grounds32 tileset loaded, waiting for your inspiration
TIP: If you ever notice something missing from Tiled's window, check the View menu. You can hide and unhide the Tilesets, Layers, and History views. This is important to know because it's the only way to bring back these views in case you have clicked the X button on one of these views.
Tiled uses four modes for editing the tilemap, indicated by the four rightmost icons on the toolbar. They are Stamp Brush (hotkey B), which allows you to draw the current selection in the tileset; Bucket Fill (hotkey F), which fills areas of connected, identical tiles; Eraser (hotkey E), which erases tiles; and Rectangular Select (hotkey R), with which you can select a range of tiles and then copy and paste the selection.
You can also zoom the tilemap. If you have a mouse with a mousewheel, simply hold down the Command key and spin the scroll wheel to zoom in and out. Alternatively, you can also zoom in and out by pressingthe Command key with either the plus and minus sign, respectively.
You'll spend most of your time picking a tile from the tileset and drawing it onto the tilemap with the Stamp Brush selected. Placing tile by tile, you'll create your tile-based game world.
You can also edit tiles in multiple layers by adding more layers in the Layers view. From the menu, choose Layer ![]()
Add Tile Layer to create a new layer for tiles. Using multiple tile layers allows you to switch out areas of the tilemap in cocos2d. In the TileMap01 example project, I'm using it to switch parts of the map between winter and summer.
You can also choose Layer ![]()
Add Object Layer to add a layer for adding objects. There are two types of objects; the regular objects are simply rectangles that you can place, and the other type are tile objects that allow you to freely place a tile anywhere on the map, without snapping to the tile grid. You can use the rectangle objects to annotate the map with custom information, such as spawn points, teleport locations, or trigger areas. The tile objects are most commonly used to place smaller things like swords, flowers, candles, and other items directly onto the tile world.
To work with objects, there are additional buttons in the Tiled toolbar: Select Objects (hotkey S), Insert Objects (hotkey O), and Insert Tile Objects (hotkey T). To insert a rectangle object, click the Insert Objects icon and click in the tilemap world to create point objects (rectangles with zero width and height), or click and drag down and to the right to create a rectangle. To insert a tile object, click the Insert Tile Objects icon, select a tile from the tileset, and then click the tilemap world to add a new tile object.
Some functionality in Tiled is hidden in context menus. For example, the rectangle objects I just mentioned can be deleted by right-clicking them in the Tilemap view and selecting Remove Object. Note that you also need to have the object layer highlighted in the Layers list view for the context menu to appear.
You can also edit properties of objects, layers, and tiles by right-clicking them and clicking the corresponding Properties menu item. One use for that is to create an additional tile layer by using Layer ![]()
Add Tile Layer. This will be a layer used to tell the game about certain properties of tiles. I called it GameEventLayer because it will be used to define trigger areas for certain game events.
With GameEventLayer selected, choose Map ![]()
New Tileset and load game-events.png from the same folder as dg_grounds32.png. It contains only three tiles. Right-click one, select Tile Properties, and add the isWater property, as shown in Figure 10–8.
CAUTION: Keep in mind that each tile layer creates some overhead, especially if you set tiles in multiple layers at the same location. This will cause both layers to be drawn and can adversely affect the game's performance. It is recommended to keep the number of tile layers to a minimum. Two to four tile layers should be sufficient for most games. Be sure to take a look at your game's framerate on the device after you have added a new tile layer and drawn on it.
You should also be aware that Tiled allows you to add more than one tileset for a layer. However, cocos2d supports only one tileset per layer.
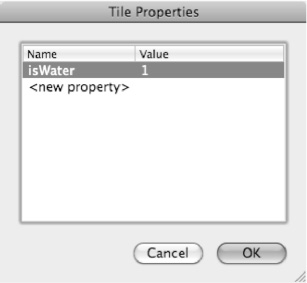
Figure 10–8. Adding a tile property
You can then draw over the tilemap using the tile to whose properties you just added the isWater property. Ideally, draw it over the river. If you want to see the tiles underneath what you're drawing, you can use the Opacity slider for the GameEventLayer in the Layers view. Or, click the layer's check box to hide or unhide everything drawn on this particular layer.
Just be sure to enable all layer check boxes before saving the TMX tilemap. Cocos2d does not load layers that are unchecked in Tiled.
When you're done with this, you should have a tilemap similar to the one in Figure 10–9. Save it in the same TileMap01 Resourcesfolder where the tileset images are.
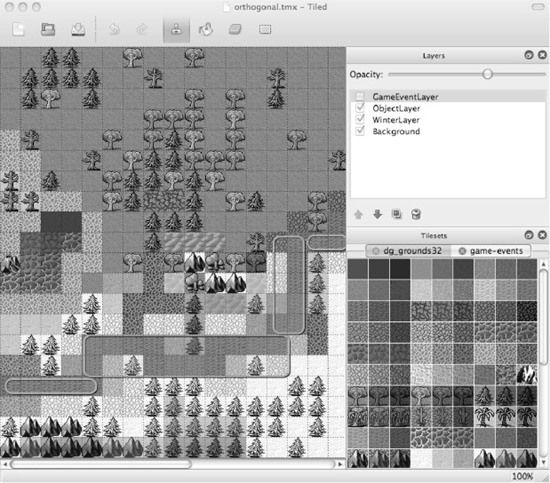
Figure 10–9. A completed tilemap with three tile layers and an object layer
Using Orthogonal Tilemaps with Cocos2d
To use TMX tilemaps with cocos2d, you first have to add the TMX file and the accompanying tileset image files as resources to your Xcode project. In the TileMap01 project, I added orthogonal.tmx along with the tilesets dg_grounds32.png and game-events.png. Loading and displaying the tilemap is very straightforward; the following code is from the init method of the TileMapLayer class:
CCTMXTiledMap* tileMap = [CCTMXTiledMap tiledMapWithTMXFile:@"orthogonal.tmx"];

[self addChild:tileMap z:-1 tag:TileMapNode];


CCTMXLayer* eventLayer = [tileMap layerNamed:@"GameEventLayer"];

eventLayer.visible = NO;
The CCTMXTiledMap class is initialized with the name of the TMX file and then added as a child with a tag so that it can be retrieved later. A member variable would of course work just as well. The next step is to retrieve the CCTMXTiledMap used for game events by using the layerNamed method and providing the name of the layer as it was named in Tiled. Because the game events layer will be used only as hints for code to determine properties of certain tiles, this layer should not be rendered at all. Note that if you uncheck the layer in Tiled, it won't be displayed, but you will also not have access to its tiles and tile properties either.
If you run the project now, you'll see a tilemap just like in Figure 10–10.
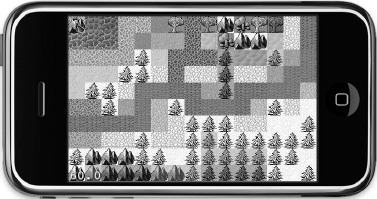
Figure 10–10. The orthogonal tilemap in the iPhone Simulator
Right now you can't do anything with the tilemap, but I'd like to change that. Moving on to the TileMap02 project, I'd like to be able to find the isWater tiles. I've added the ccTouchesBegan method, as shown in Listing 10–1, in order to determine the tile that the player is touching.
Listing 10–1. Determining a Tile's Properties
-(void) ccTouchesBegan:(NSSet *)touches withEvent:(UIEvent *)event

{

    CCNode* node = [self getChildByTag:TileMapNode];

    NSAssert([node isKindOfClass:[CCTMXTiledMap class]], @"not a CCTMXTiledMap");

    CCTMXTiledMap* tileMap = (CCTMXTiledMap*)node;


    // Get the position in tile coordinates from the touch location

    CGPoint touchLocation = [self locationFromTouch:[touches anyObject]];

    CGPoint tilePos = [self tilePosFromLocation:touchLocation tileMap:tileMap];


    // Check if the touch was on water (e.g., tiles with isWater property)

    bool isTouchOnWater = NO;


    CCTMXLayer* eventLayer = [tileMap layerNamed:@"GameEventLayer"];

    int tileGID = [eventLayer tileGIDAt:tilePos];


    if (tileGID != 0)

    {

        NSDictionary* properties = [tileMap propertiesForGID:tileGID];

        if (properties)

        {

            NSString* isWaterProperty = [properties valueForKey:@"isWater"];

            isTouchOnWater = ([isWaterProperty boolValue] == YES);

        }
}
// Decide what to do depending on where the touch was
if (isTouchOnWater)
{
[[SimpleAudioEngine sharedEngine] playEffect:@"alien-sfx.caf"];
}
else
{
// Get the winter layer and toggle its visibility
CCTMXLayer* winterLayer = [tileMap layerNamed:@"WinterLayer"];
winterLayer.visible = !winterLayer.visible;
}
}
The CCTMXTiledMap is retrieved as usual. The location of the touch is first converted into screen coordinates and then used to retrieve the tilePos containing the indices into the tilemap at that specific screen location. I'll get to the tilePosFromLocation method in a minute. For now, just know that it returns the index of the touched tile.
At this point, I'd like to introduce the concept of global identifiers (GIDs) for tiles, which are unique integer numbers assigned to each tile used in a tilemap. The tiles in a map are consecutively numbered, starting with 1. A GID of 0 represents an empty tile. With the tileGIDAt method of the CCTMXLayer, you can determine the GID number of the tile at the given tile coordinates.
Next, the CCTMXLayer named GameEventLayer is obtained from the tilemap. This is the layer where I defined the isWater tile and drew it over the river tiles. The tileGIDAt method returns the unique identifier for this tile. If the identifier happens to be 0, it means there is no tile at this position on this layer—in that case, it's already clear that the touched tile can't be an isWater tile.
The CCTMXTiledMap has a propertiesForGID method, which returns an NSDictionary if there are properties available for the tile with the given identifier (GID). This NSDictionary contains the properties edited in Tiled (see Figure 10–8). The dictionary stores any key/value pairs as NSString objects. If you want to see what's in a particular NSDictionary for debugging purposes, you can use a CCLOG statement like this:
CCLOG(@"NSDictionary 'properties' contains:
%@", properties);
This will print out a line similar to the following in the Debugger Console window:
2010–08-30 19:50:52.344 Tilemap[978:207] NSDictionary 'properties' contains:

{

    isWater = 1;

}
You'll be dealing with a variety of NSDictionary objects while working with tilemaps. Logging its contents allows you to peek inside any NSDictionary, or any iPhone SDK collection class, for that matter. This will come in handy at times.
Each property in an NSDictionary can be retrieved by its name through the NSDictionary method valueForKey, which returns an NSString. To get a bool value from the NSString, you can simply use the NSString's boolValue method. In much the same way, you can retrieve integer and floating-point values using NSString's intValue and floatValue methods, respectively.
At the end of ccTouchesBegan, I check whether the touch was on water, and if so, a sound is played. Otherwise, I retrieve the WinterLayer and toggle its visible property by negating it. Changing seasons has never been this simple! The effect should illustrate how you can use multiple layers in Tiled to achieve changes on a global scale without having to load a completely separate tilemap.
For more local changes to individual tiles, you can make use of the removeTileAt and setTileGID methods to remove or replace tiles of a specific layer during game play:
[winterLayer removeTileAt:tilePos];

[winterLayer setTileGID:tileGID at:tilePos];
Locating Touched Tiles
I mentioned the tilePosFromLocation method earlier, and I'll repeat the two relevant lines here:
// Get the position in tile coordinates from the touch location

CGPoint touchLocation = [self locationFromTouch:[touches anyObject]];

CGPoint tilePos = [self tilePosFromLocation:touchLocation tileMap:tileMap];
First, the position of the touch is mapped to screen coordinates. I've done this before, but since you'll be needing this code a lot, I've provided it in Listing 10–2 for your reference.
Listing 10–2. Determining the Position of a Touch
-(CGPoint) locationFromTouch:(UITouch*)touch

{

    CGPoint touchLocation = [touch locationInView: [touch view]];

    return [[CCDirector sharedDirector] convertToGL:touchLocation];

}
With the touch location converted to screen coordinates, the tilePosFromLocation method is called. It gets both the touch location and a pointer to the tileMap as parameters. The method in Listing 10–3 contains a bit of math, which I'll explain in a second—hold your breath:
Listing 10–3. Converting Location to Tile Coordinates
-(CGPoint) tilePosFromLocation:(CGPoint)location tileMap:(CCTMXTiledMap*)tileMap

{

    // Tilemap position must be offset, in case the tilemap is scrolling

    CGPoint pos = ccpSub(location, tileMap.position);


    // Cast to int makes sure that result is in whole numbers

    pos.x = (int)(pos.x / tileMap.tileSize.width);

    pos.y = (int)((tileMap.mapSize.height * tileMap.tileSize.height - pos.y) /

        tileMap.tileSize.height);


    CCLOG(@"touch at (%.0f, %.0f) is at tileCoord (%i, %i)", location.x, location.y,

        (int)pos.x, (int)pos.y);
NSAssert(pos.x >= 0 && pos.y >= 0 && pos.x < tileMap.mapSize.width &&
pos.y < tileMap.mapSize.height, @"%@: coordinates (%i, %i) out of bounds!",
NSStringFromSelector(_cmd), (int)pos.x, (int)pos.y);
return pos;
}
Still with me? If you've worked with tilemaps before, this bit of code should be familiar, but if not, you may be at a loss. I'll explain. The first thing this method does is subtract the current tileMap.position from the touch location. The upcoming Tilemap03 example project adds tilemap scrolling, so the tilemap's position will most likely not be at 0,0.
To make the viewpoint scroll further up (north) and to the right (east), you actually have to change its position by negative amounts. That is because the tilemap starts at position 0,0, which positions the map's bottom-left corner at the very bottom left of the screen. The tilemap's 0,0 point coincides with the screen's 0,0 point initially. If you were to move the tilemap to position 100,100, it would seem as if the viewpoint were moving toward the left and down. The common mistake is to assume that you're moving the viewpoint, which you are not. The tilemap layer is what's moving, and to scroll further toward the center of the tilemap, you have to offset the tilemap by negative values.
The rest is simple math: to get the proper offset from the tilemap (whose position we know is always negative), we have to subtract the touch location and tileMap.position. The concrete numbers reveal that subtracting a negative number is actually an addition:
location(240, 160) – tileMap.position(-100, -100) = pos(340, 260)
With the tilemap layer moved –100,–100 pixels away from the screen's 0,0 point and the touch being at 240,160 pixels on the screen, the total offset of the touch location from the tilemap's position is 340,260 pixels away from the current tileMap.position.
With the scrolling offset taken into account, we can get the tile coordinates for the tile at this location into the tilemap. At this point, you have to consider that the tile coordinates' 0,0 tile is at the top-left corner of the tilemap. Contrary to screen coordinates, where the 0,0 point (point of origin) is at the lower-left corner, the tilemap coordinates start at the upper-left corner. Figure 10–11 shows the x, y coordinates of a series of tiles. The screenshot was made with the Tiled Java version by enabling View ![]()
Show Coordinates, which is a feature that isn't available yet in the Tiled Qt version.
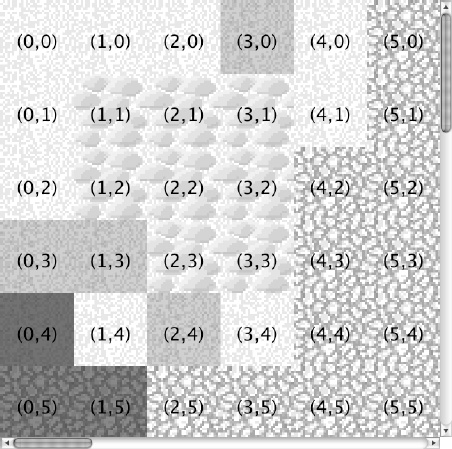
Figure 10–11. The coordinate system of an orthogonal tilemap
So as not to get confused, this is the line of code that calculates the tile coordinate's x position:
pos.x = (int)(pos.x / tileMap.tileSize.width);
The tileMap.tileSize property is the size of the tiles in the tileset, which in this case is 32×32 (see also Figure 10–6). If the touch were at the 340 x position, the calculation would reveal the following:
340 / 32 = 10.625
That can't be right, though. We're looking for a tile's x coordinate, which is never a fractional number! The reason is, of course, that the touch was somewhere inside the tile we're looking for (that is, inside a 32×32 square area). The simple trick of casting the result to an int value will get rid of the fractional part and assign this to pos.x:
pos.x = (int)10.625 // pos.x == 10
Casting to an int will remove the fractional part. You can safely get rid of the fractional part because it's simply not relevant—actually it's harmful. If you didn't cast away the fractional part but used the noninteger coordinate, in this example 10.625, to try to retrieve the tile at a tile coordinate 10.625, you'd receive a runtime error because there is only a tile at x coordinates 10 and 11, not at 10.625.
A slightly more complicated calculation is used to get the tile's y coordinate:
pos.y = (int)((tileMap.mapSize.height * tileMap.tileSize.height - pos.y) /

     tileMap.tileSize.height);
Note that the parentheses are important to make sure that the division is done last. In actual numbers, this calculation may be easier to understand. As shown in Figure 10–5, the tileMap.mapSize is 30×20 tiles, and as I mentioned earlier, tileMap.tileSize is 32×32 pixels. The calculation then looks like this:
pos.y = (int)((20 * 32 – 260) / 32)
Multiplying tileMap.mapSize.height with tileMap.tileSize.height returns the full height of the tilemap in pixels. This is necessary because the tilemap starts counting y coordinates from top to bottom, whereas screen y coordinates count from bottom to top. By calculating the bottommost y coordinate of the tilemap and subtracting the current y position 260 from that, you get the correct y position of the touch into the tilemap, in pixels. And because it is a pixel coordinate, you need to divide by the tileSize.height and then cast down to an int value to get the tile's y coordinate.
The CCLOG and NSAssert lines are helpful for seeing the results of the calculation in the Debugger Console window, as well as ensuring that tile coordinates never take on illegal values. It's both a learning tool and an insurance policy.
An Exercise in Optimization and Readability
Since the tilemap's size never changes, you can optimize the calculation a little to get the y tile coordinate by adding a member variable to the class's @interface, which will be used to store the tilemap's height in pixels:
float tileMapHeightInPixels;
You can then make the calculation to get the tileMapHeightInPixels just once in the init method, right after the tilemap is loaded:
CCTMXTiledMap* tileMap = [CCTMXTiledMap tiledMapWithTMXFile:@"orthogonal.tmx"];

tileMapHeightInPixels = tileMap.mapSize.height * tileMap.tileSize.height;
Then you can rewrite the calculation, saving a multiplication every time you call the tilePosFromLocation method:
pos.y = (int)((tileMapHeightInPixels - pos.y) / tileMap.tileSize.height);
It may not win any awards for best optimization ever—it's only a very tiny improvement in performance. But every bit counts, and it does make the calculation easier to read by taking away complexity and putting a readable variable name in its place.
Working with the Object Layer
Theorthogonal.tmxtilemap I've created as an example tilemap for this chapter also contains an object layer, fittingly named ObjectLayer. You can create object layers in Tiled by choosing Layer ![]()
Add Object Layer. Then you can click inside the tilemap and draw rectangles. I think the name object layer is a bit unfortunate and misleading, because most games will use these rectangles as points of interest and trigger areas, and not as actual objects.
In the Tilemap03 project, I've added a bit more code to the ccTouchesBegan method to interact with the object layer. Listing 10–4 shows the relevant part of the code, which follows directly after the isWater check:
Listing 10–4. Detecting If a Touch Was Inside an ObjectLayer Rectangle
// Check if the touch was within one of the rectangle objects

CCTMXObjectGroup* objectLayer = [tileMap objectGroupNamed:@"ObjectLayer"];


bool isTouchInRectangle = NO;

int numObjects = [objectLayer.objects count];

for (int i = 0; i < numObjects; i++)

{

    NSDictionary* properties = [objectLayer.objects objectAtIndex:i];

    CGRect rect = [self getRectFromObjectProperties:properties tileMap:tileMap];


    if (CGRectContainsPoint(rect, touchLocation))

    {

        isTouchInRectangle = YES;

        break;

    }

}
Because object layers are a different kind of layer, you can't get them via the layerNamed method of the tilemap. The object layer in cocos2d is the class CCTMXObjectGroup, another unfortunate naming mishap, since Tiled refers to it as an object layer, not an object group. In any case, you can get the CCTMXObjectGroup for the object layer named simply ObjectLayer by using the tilemap's objectGroupNamed method and specifying the object layer's name as defined in Tiled.
Next, I iterate over the objectLayer.objectsNSMutableArray, which contains a list of NSDictionary items. Sound familiar? Yes, these are the same NSDictionary properties returned by the tilemap's propertiesForGID method, as shown earlier—except that the contents of these NSDictionary items are given by Tiled and not user editable. They simply contain the coordinates for each rectangle. The method getRectFromObjectProperties returns the rectangle:
-(CGRect) getRectFromObjectProperties:(NSDictionary*)dict tileMap:(CCTMXTiledMap*)tileMap

{

    float x, y, width, height;


    x = [[dict valueForKey:@"x"] floatValue] + tileMap.position.x;

    y = [[dict valueForKey:@"y"] floatValue] + tileMap.position.y;

    width = [[dict valueForKey:@"width"] floatValue];

    height = [[dict valueForKey:@"height"] floatValue];


    return CGRectMake(x, y, width, height);

}
The keys x, y, width, and height are set by Tiled. I simply retrieve them from the NSDictionary via valueForKey and use the floatValue method to convert the values from NSString to actual floating-point numbers. The x and y values need to be offset with the tileMap's position, because the rectangles need to be moving along with the tilemap. At the end, a CGRect is returned by calling the CGRectMake convenience method.
The remaining code in ccTouchesBegan then simply checks whether the touch location is contained in the rect via CGRectContainsPoint. If it is, the isTouchInRectangle flag is set to true, and the for loop is aborted by using the break statement. There's no need to check another rectangle for containing the touch location. At the end of ccTouchesBegan, the isTouchInRectangle flag is then used to decide whether to play a particle effect at the touch location. So, this code is creating an explosion particle effect whenever you touch inside a rectangle:
if (isTouchOnWater)

{

    [[SimpleAudioEngine sharedEngine] playEffect:@"alien-sfx.caf"];

}

else if (isTouchInRectangle)

{

    CCParticleSystem* system = [CCQuadParticleSystem particleWithFile:

        @"fx-explosion.plist"];

    system.autoRemoveOnFinish = YES;

    system.position = touchLocation;

    [self addChild:system z:1];

}
Drawing the Object Layer Rectangles
When you run the Tilemap03 project, you'll notice that the object layer rectangles are drawn over the tilemap, as shown in Figure 10–12. This is not a standard feature of tilemaps or object layers. Instead, the rectangles are drawn using OpenGL ES code. Every CCNode has a –(void) draw method that you can override to add custom OpenGL ES code. I tend to use this a lot to debug my code visually by drawing lines, circles, and rectangles that may be used for collision and distance tests, among other things. In this case, it's very useful to actually see where the object layer areas are. Visualizing such information beats looking up and comparing coordinates in the debugger. Our minds are much better at assessing visual information than at comparing and calculating numbers. Use this to your advantage!
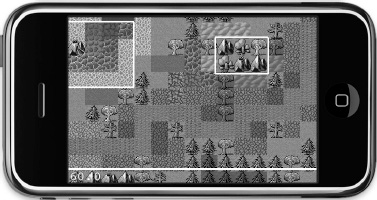
Figure 10–12. The tilemap with object layer rectangles displayed using OpenGL ES code
The –(void) draw method just needs to be in the class, and it will be called automatically every frame. However, you should refrain from using the draw method to modify properties of nodes, because this can interfere with drawing the nodes. Listing 10–5 shows the draw method of the TileMapLayer class.
Listing 10–5. Drawing ObjectLayer Rectangles
-(void) draw

{

    CCNode* node = [self getChildByTag:TileMapNode];

    NSAssert([node isKindOfClass:[CCTMXTiledMap class]], @"not a CCTMXTiledMap");

    CCTMXTiledMap* tileMap = (CCTMXTiledMap*)node;


    // Get the object layer

    CCTMXObjectGroup* objectLayer = [tileMap objectGroupNamed:@"ObjectLayer"];


    // Make the line 3 pixels thick

    glLineWidth(3.0f);

    glColor4f(1, 0, 1, 1);


    int numObjects = [[objectLayer objects] count];

    for (int i = 0; i < numObjects; i++)

    {

        NSDictionary* properties = [[objectLayer objects] objectAtIndex:i];

        CGRect rect = [self getRectFromObjectProperties:properties tileMap:tileMap];

        [self drawRect:rect];

    }


    glLineWidth(1.0f);

    glColor4f(1, 1, 1, 1);

}
First, I get the tilemap by its tag and then the CCTMXObjectGroup by using the objectGroupNamed method. I then set the line width to 3 pixels by using the OpenGL ES method glLineWidth and set the color to purple by using glColor4f. This affects line thickness and color of all subsequent lines drawn with OpenGL ES—not just in the current method but possibly other nodes that use OpenGL ES code for drawing (for example, any of the convenience methods for drawing lines, circles, and polygons defined in cocos2d's CCDrawingPrimitives.h header file). That is why I reset glLineWidth and glColor4f after I'm done drawing. It is good style in OpenGL code to leave its state like you found it; otherwise, it might alter the way other draw code produces its output. OpenGL is a state machine, so every setting you change is remembered and may affect subsequent drawing methods. To avoid this, any OpenGL settings you change should be set back to a safe default after you're done drawing.
NOTE: Code inside the -(void) draw method is always drawn at a z-order of 0. It is also drawn before all other nodes at z-order 0, which means that any OpenGL ES code will be overdrawn by other nodes if they are also at z-order 0. In the case of the object layer draw code, I had to add the tileMap at a z-order of –1 for the rectangles to be drawn over the tilemap.
Just like before, I iterate over all object layer objects and get their properties from NSDictionary to get the CGRect of that object, which is then passed to the drawRect method. Unfortunately, cocos2d omitted this particular convenience method, but it's easy enough to add using ccDrawLine, as Listing 10–6 shows.
Listing 10–6. Drawing a Rectangle
-(void) drawRect:(CGRect)rect

{

    // The rect is drawn using four lines

    CGPoint pos1, pos2, pos3, pos4;

    pos1 = CGPointMake(rect.origin.x, rect.origin.y);

    pos2 = CGPointMake(rect.origin.x, rect.origin.y + rect.size.height);

    pos3 = CGPointMake(rect.origin.x + rect.size.width,

        rect.origin.y + rect.size.height);

    pos4 = CGPointMake(rect.origin.x + rect.size.width, rect.origin.y);


    ccDrawLine(pos1, pos2);

    ccDrawLine(pos2, pos3);

    ccDrawLine(pos3, pos4);

    ccDrawLine(pos4, pos1);

}
For each corner of the rectangle, a CGPoint is created, which is then used in four ccDrawLine methods to draw the lines between the corners of the rectangle. You may want to remember this method and put it in a safe place, because you'll probably need it again.
Note that the draw and drawRect methods are enclosed in #ifdef DEBUG and #endif statements. This means that the object layer rectangles will not be drawn in release builds, because I only need them for debugging and illustration purposes—the end user should never see them.
Scrolling the Tilemap
The best part comes last: scrolling. It's actually straightforward because only the CCTMXTiledMap needs to be moved. In the Tilemap04 project, I've added the call to the centerTileMapOnTileCoord method in ccTouchesBegan right after obtaining the tile coordinates of the touch:
-(void) ccTouchesBegan:(NSSet *)touches withEvent:(UIEvent *)event

{

    ...

    // Get the position in tile coordinates from the touch location

    CGPoint touchLocation = [self locationFromTouches:touches];

    CGPoint tilePos = [self tilePosFromLocation:touchLocation tileMap:tileMap];


    // Move tilemap so that the touched tile is at the center of the screen

    [self centerTileMapOnTileCoord:tilePos tileMap:tileMap];

    ...

}
Listing 10–7 shows the centerTileMapOnTileCoord method, which moves the tilemap so that the touched tile is at the center of the screen. It also stops the tilemap from scrolling further if any tilemap border already aligns with the screen edge.
Listing 10–7. Centering the Tilemap on a Tile Coordinate
-(void) centerTileMapOnTileCoord:(CGPoint)tilePos tileMap:(CCTMXTiledMap*)tileMap

{

    // Center tilemap on the given tile pos

    CGSize screenSize = [[CCDirector sharedDirector] winSize];

    CGPoint screenCenter = CGPointMake(screenSize.width * 0.5f,

        screenSize.height * 0.5f);


    // Tile coordinates are counted from upper-left corner

    tilePos.y = (tileMap.mapSize.height - 1) - tilePos.y;


    // Point is now at lower-left corner of the screen

    CGPoint scrollPosition = CGPointMake(-(tilePos.x * tileMap.tileSize.width),

        -(tilePos.y * tileMap.tileSize.height));


    // Offset point to center of screen and center of tile

    scrollPosition.x += screenCenter.x - tileMap.tileSize.width * 0.5f;

    scrollPosition.y += screenCenter.y - tileMap.tileSize.height * 0.5f;


    // Make sure tilemap scrolling stops at the tilemap borders

    scrollPosition.x = MIN(scrollPosition.x, 0);

    scrollPosition.x = MAX(scrollPosition.x, -screenSize.width);

    scrollPosition.y = MIN(scrollPosition.y, 0);

    scrollPosition.y = MAX(scrollPosition.y, -screenSize.height);


    CCAction* move = [CCMoveTo actionWithDuration:0.2f position: scrollPosition];

    [tileMap stopAllActions];

    [tileMap runAction:move];

}
After obtaining the center position of the screen, I modify the tilePos y coordinate because tilemap coordinates are counted from top to bottom (see Figure 10–11), while screen coordinates increase from bottom up. In effect, I convert the tilePos y coordinate as if it were counted from bottom up. In addition, I subtract 1 from the map's height to account for the fact that tile coordinates are counted from 0. In other words, if the map's height were 10, only the tile coordinates 0 to 9 would be valid.
Next, the scrollPositionCGPoint is created, which will become the position the tilemap will be moved to. The first step is to multiply the tile coordinates with the tilemap's tileSize. You may be wondering why I negate the tilePosInPixels coordinates. It's simply because if I want the tiles to move from top right to bottom left, I have to move the tilemap down and to the left by decreasing the coordinates.
The next big block modifies the coordinates of the scrollPosition to center the tile on the screen's center point. You also need to take into account the center of the tile itself, which is why half the tileSize is deducted from the screenCenter offset.
By using the Objective-C language's MIN and MAX macros, it is ensured that the scrollPosition is kept within the bounds of the tilemap, so as to not reveal anything past the borders of the tilemap. MIN and MAX return the minimum and maximum values of their two parameters, respectively, and are a more compact and readable solution than conditional assignments using if and else statements.
Finally, a CCMoveTo action is used to scroll the tilemap node so that the touched tile is centered on the screen. The result is a tilemap that scrolls to the tile that you tap. You can use the same method to scroll to a tile of interest—for example, the player's position.
TIP: As for the player character itself, you'll find an implementation in the next chapter about isometric tilemaps. You can apply the same principle to orthogonal tilemaps. And this Cocos2D forum thread will get you started with pathfinding on orthogonal tilemaps, source code included: www.cocos2d-iphone.org/forum/topic/19463.
If you're interested in a complete, working, and ready-made solution for a hack-and-slash game on orthogonal tilemaps, including a great tutorial, I recommend looking at Nate Weiss' iPhone Game Kit: www.iphonegamekit.com.
Summary
You should now have a fair understanding of what tilemaps are and how to work with Tiled Map Editor to create a tilemap with multiple layers and properties that can be used by your game.
Loading and displaying a tilemap with cocos2d is a simple task that quickly grows in complexity when it comes to obtaining tile and object layers, modifying them, and reading their properties. You also learned how to determine the tile coordinate of a touch location and how to use tile coordinates to scroll the tilemap so that it centers the touched tile on the screen.
I even got you acquainted with custom drawing and a bit of OpenGL ES code to render the object layer rectangles on the tilemap for debugging purposes.