
Setting Up Your Application for In-App Billing
The Android Developers site can send in-app billing requests and manage in-app billing transactions using the Android Market. It has a sample application that shows the user how to do several in-app billing implementations. It is available now at http://developer.android.com/guide/market/billing/billing_integrate.html#billing-download.
The sample shows you how to handle synchronous responses from the Android Market application, and asynchronous responses (broadcasts intents) from your Android Market application. It also shows you how to use in-app security mechanisms for the integrity of billing responses, and even how to create a UI that allows users to select items for purchase.
This sample includes an application file (Dungeons.java), as well as an Android Interface Definition Language (AIDL) file (IMarketBillingService.aidl). It also includes several classes that demonstrate in-app billing messaging. It is available on the SDK, and you can get it by simply going to the SDK or Eclipse and opening the Android SDK and AVD Manager. You then just need to select Google Market Billing Package, and then Install, as shown in Figure 7-7.
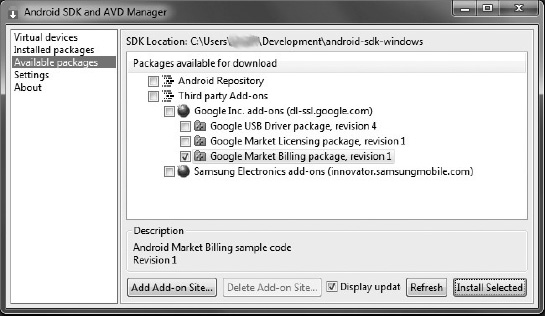
Figure 7-7. Where to find the Google Market billing package in the Android SDK and AVD Manager
The file is located wherever you placed the SDK, in extras/google/market_billing. If you want to see a demonstration, follow the instructions for installing the sample in the next section.
How to Install the Sample
If you want to see a demonstration, then you will need to build and run the sample, configure and build the sample application, update the sample application to the Android Market, set up test accounts, and run the sample application. You also have to add the Android Market public key to the sample application code. Here’s how:
- Log into your Android Market publisher account.
- Click Edit Profile at the upper left of the page.
- Scroll down to the Licensing and In-app Billing panel on the Edit Profile page.
- Copy your public key.
- Open the
src/com/example/dungeons/Security.javafile in your editor.- Add a public key to this following line of code:
String base64EncodedPublicKey = "your public key here";.- Save the file.
- Change the package name of the sample application, since the Android Market does not let you upload applications with package names that contain the text
com.example. Its current name iscom.example.dungeons.- Build the sample application in release mode and sign it.
From there, upload the sample application as a draft to the Android Market publisher site. I discuss the Android Market publisher site in much greater detail in Chapter 9.
You must create a product list for the in-app items available for purchase. To do that, you have to upload the release of the sample application to the Android Market. You don’t want to publish it—just leave it as a published draft application. The purpose of it is for a demonstration; it should not be made publicly available yet. You can see a sample of it in Figure 7-8.
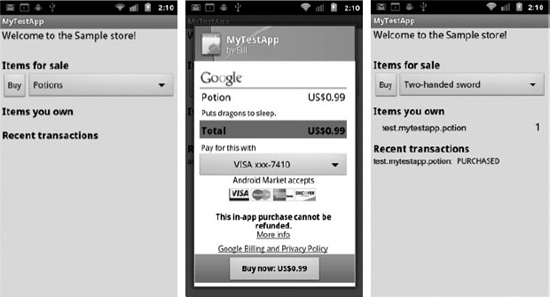
Figure 7-8. A sample of in-app billing
Notice that this application creates a product list of sword_001 and potion_001 (very fitting items from a sample file called Dungeons.java). The Android Developers site recommends setting up the purchase type in two ways so you can see how it works. You have to publish the items in your product list, even though you’re not publishing the sample application.
The sample application can’t be run on the emulator, only on a device. To run it, you have to have at least one test account registered under the Android Market. You will need to verify that the device is running a supported version of the Android Market application or the MyApps application. For example, if your device is running Android 3.0, in-app billing requires version 5.0.12 or higher of the MyApps application; any other version of Android requires version 2.3.4 or higher.
Install the application on the device and make one of your test accounts the primary account on your device. If the primary account isn’t a test account, here’s how to perform a factory reset:
10. Open Settings on your device.
11. Touch Privacy.
12. Touch “Factory data reset.”
13. Touch “Reset phone.”
14. Once the phone resets, sign in with your test accounts.
There’s nothing left to do but purchase one of the products and see if it works. The test account is billed through Google Checkout, and your Google Checkout Merchant account receives a payout. You’ll want to refund purchases made with test accounts, or else these purchases will show up as actual payouts.
Installing In-App Billing Without the Demonstration
The MarketBillingService file has to be added to the project, and the Android build environment creates an interface file (IMarketBillingService.java), and this interface can make billing requests. If you are using Eclipse with its ADT plug-in, just add this file to the src directory, and Eclipse will generate the interface file. It is somewhat easy, and here are the instructions:
- Create the following director in
src:com/android/vending/billing.- Copy the
IMarketBillingService.aidlfile to thesample/src/com/android/vending/billingdirectory.- Build the application.
You should then check the gen folder to see if you can find the generated interface file named IMarketBillingService.
The next steps are updating the application’s manifest and adding the com.android.vending.BILLING permission to the AndroidManifest.xml file. You need to declare the BroadcastReceiver that you will use to receive asynchronous response messages, and declare the service that you will use to bind with the IMarketBillingService and send messages to the Android Market. You also need to declare intent filters for the BroadcastReceiver so the Android system knows how to handle the broadcast intents sent from the Android Market application.
Here is the sample code for the in-app billing service:
 <?xml version="1.0" encoding="utf-8"?>

<manifest xmlns:android="http://schemas.android.com/apk/res/android"

  package="com.example.dungeons"

  android:versionCode="1"

  android:versionName="1.0">


  <uses-permission android:name="com.android.vending.BILLING" />


  <application android:icon="@drawable/icon" android:label="@string/app_name">

    <activity android:name=".Dungeons" android:label="@string/app_name">

      <intent-filter>

        <action android:name="android.intent.action.MAIN" />

        <category android:name="android.intent.category.LAUNCHER" />

      </intent-filter>

    </activity>


    <service android:name="BillingService" />


    <receiver android:name="BillingReceiver">

      <intent-filter>

        <action android:name="com.android.vending.billing.IN_APP_NOTIFY" />

        <action android:name="com.android.vending.billing.RESPONSE_CODE" />

        <action android:name="com.android.vending.billing.PURCHASE_STATE_CHANGED" />

      </intent-filter>
    </receiver>


  </application>

</manifest>
Next it is time to create a local service in order to facilitate messaging between your application and the Android Market. The service must bind to the MarketBillingService so the application can send billing requests and receive billing responses from the Android Market application.
This is the code for how to use the bindService method:
try {

  boolean bindResult = mContext.bindService(

    new Intent("com.android.vending.billing.MarketBillingService.BIND"), this,

    Context.BIND_AUTO_CREATE);

  if (bindResult) {

    Log.i(TAG, "Service bind successful.");

  } else {

    Log.e(TAG, "Could not bind to the MarketBillingService.");

  }

} catch (SecurityException e) {

  Log.e(TAG, "Security exception: " + e);

}
You have to reference to the IMarketBillingService interface for making billing requests via IPC method calls. This is the code with the onServiceConnected() callback method:
/**

  * The Android system calls this when we are connected to the MarketBillingService.

  */

  public void onServiceConnected(ComponentName name, IBinder service) {

    Log.i(TAG, "MarketBillingService connected.");

    mService = IMarketBillingService.Stub.asInterface(service);

  }
Since you can use the mService reference to invoke the sendBillingRequest() method, use that reference to send billing requests to the MarketBillingService. This is done via IPC method calls, and the single public method sendBillingRequest() takes a single Bundle parameter. This is important so the user can handle five types of transactions:
CHECK_BILLING_SUPPORTED: Verifies that the Android Market application supports in-app billingREQUEST_PURCHASE: Sends a purchase request for an in-app itemGET_PURCHASE_INFORMATION: Retrieves transaction information for a purchase or refundCONFIRM_NOTIFICATIONS: Acknowledges that you received the transaction information for a purchase or refundRESTORE_TRANSACTIONS: Retrieves a user’s transaction history for managed purchases
There are details about each one of these at the Android Developers site, at http://developer.android.com/guide/market/billing/billing_integrate.html#billing-service.
Now I will discuss how to create a BroadcastReceiver to handle broadcast intents from the Android Market application. The in-app billing application uses broadcast intents in order to send billing responses to your application, but to receive them you need to create a BroadcastReceiver that can handle the following intents:
com.android.vending.billing.RESPONSE_COD: Sent after an in-app billing requestcom.android.vending.billing.IN_APP_NOTIFY: Indicates a purchase with a changed state, showing a successful, canceled, or refunded purchasecom.android.vending.billing.PURCHASE_STATE_CHANGED: Contains detailed information about one or more transactions
Here is some code to show how to handle the broadcast intents and intent extras within a BroadcastReceiver:
public class BillingReceiver extends BroadcastReceiver {


  private static final String TAG = "BillingReceiver";


  // Intent actions that we receive in the BillingReceiver from Android Market.

  // These are defined by Android Market and cannot be changed.

  // The sample application defines these in the Consts.java file.

  public static final String ACTION_NOTIFY = "com.android.vending.billing.IN_APP_NOTIFY";

  public static final String ACTION_RESPONSE_CODE = "com.android.vending.billing.RESPONSE_CODE";

  public static final String ACTION_PURCHASE_STATE_CHANGED =

    "com.android.vending.billing.PURCHASE_STATE_CHANGED";


  // The intent extras that are passed in an intent from Android Market.

  // These are defined by Android Market and cannot be changed.

  // The sample application defines these in the Consts.java file.

  public static final String NOTIFICATION_ID = "notification_id";

  public static final String INAPP_SIGNED_DATA = "inapp_signed_data";

  public static final String INAPP_SIGNATURE = "inapp_signature";

  public static final String INAPP_REQUEST_ID = "request_id";

  public static final String INAPP_RESPONSE_CODE = "response_code";


  @Override

  public void onReceive(Context context, Intent intent) {

    String action = intent.getAction();

    if (ACTION_PURCHASE_STATE_CHANGED.equals(action)) {

      String signedData = intent.getStringExtra(INAPP_SIGNED_DATA);

      String signature = intent.getStringExtra(INAPP_SIGNATURE);

      // Do something with the signedData and the signature.

    } else if (ACTION_NOTIFY.equals(action)) {

      String notifyId = intent.getStringExtra(NOTIFICATION_ID);

      // Do something with the notifyId.

    } else if (ACTION_RESPONSE_CODE.equals(action)) {

      long requestId = intent.getLongExtra(INAPP_REQUEST_ID, -1);

      int responseCodeIndex = intent.getIntExtra(INAPP_RESPONSE_CODE,

        ResponseCode.RESULT_ERROR.ordinal());
      // Do something with the requestId and the responseCodeIndex.

    } else {

      Log.w(TAG, "unexpected action: " + action);

    }

  }

  // Perform other processing here, such as forwarding intent messages to your local service.

}
The BroadcastReceiver must also be able to handle the information received in the broadcast intents, and the BroadcastReceiver accomplishes this by sending information to a local service. The BillingReceiver.java file in the sample application can show you how to do this.
It is now time to create a security-processing component in order to verify the transaction messages that are sent by the Android Market. The Android Market’s in-app billing service uses two mechanisms for verifying the transaction information: nonces and signatures. A nonce is short for “number used once,” and it is a secure number that the application generates and sends with every GET_PURCHASE_INFORMATION and RESTORE_TRANSACTIONS request. The following is some sample code used to generate, manage, and verify nonces:
private static final SecureRandom RANDOM = new SecureRandom();

  private static HashSet<Long> sKnownNonces = new HashSet<Long>();


  public static long generateNonce() {

    long nonce = RANDOM.nextLong();

    sKnownNonces.add(nonce);

    return nonce;

  }


  public static void removeNonce(long nonce) {

    sKnownNonces.remove(nonce);

  }


  public static boolean isNonceKnown(long nonce) {

    return sKnownNonces.contains(nonce);

  }
As for the application that needs a verification for signatures for every PURCHASE_STATE_CHANGED broadcast intent, the Security.java file shows how to perform this verification. In order to use your Android Market public key to perform the signature verification, here is the procedure:
4. Log into your publisher account.
5. Click “Edit profile” in the upper-left corner of the page, under your name.
6. Scroll down to the Licensing & In-App Billing panel.
7. Copy your public key.
Now, after you are done with that, you can modify the application’s code. This means that you need to write code for a storage mechanism for storing the users’ purchase information, and create a UI that allows users to select items for purchase.
You should take another step to prevent piracy, and Android encourages developers not to bundle their in-app purchase content into the APK file. It is be better to deliver the content through a real-time service with a remote server, and be certain that the content is encrypted for an SD card.
Figure 7-9 illustrates the architecture.
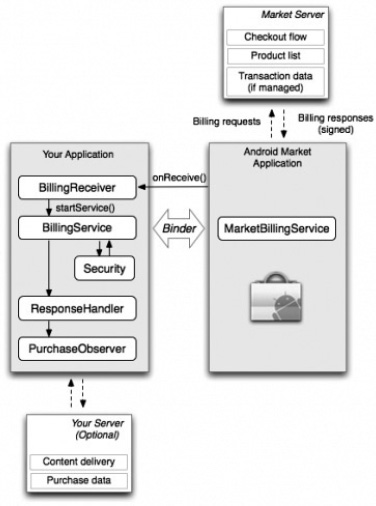
Figure 7-9. The complex architecture of the in-app billing for the Android Market.