![]()
Context and Dependency Injection
The very first version of Java EE (J2EE at the time) introduced the concept of inversion of control (IoC), meaning that the container would take control of your business code and provide technical services (such as transaction or security management). Taking control meant managing the life cycle of the components, bringing dependency injection and configuration to your components. These services were built in to the container and programmers had to wait until later versions of Java EE to have access to them. Component configuration was made possible in early versions with XML deployment descriptors, but we had to wait for Java EE 5 and Java EE 6 to have an easy and robust API to do life-cycle management and dependency injection.
Java EE 6 introduced Context and Dependency Injection to ease some of these concerns but mostly to become a central specification that ties all of these concepts together. Today CDI gives Managed Beans a first-class citizen programming model turning nearly all Java EE components into injectable, interceptable, and manageable beans. CDI is built on the concept of “loose coupling, strong typing,” meaning that beans are loosely coupled but in a strongly typed way. Decoupling goes further by bringing interceptors, decorators, and events to the entire platform. And at the same time CDI brings the web tier and the back end together by homogenizing scopes. Thanks to its event bus CDI is also the standard way to extend Java EE and so becomes the extension platform for Java EE.
This chapter talks about dependency injection, scoping, and loose coupling, thereby covering most of the concepts behind CDI.
Java SE has JavaBeans, Java EE has Enterprise JavaBeans. But Java EE has other sorts of components such as Servlets, SOAP web services, RESTful web services, entities . . . and of course Managed Beans. But let’s not forget our POJOs. POJOs are just Java classes that run inside the Java Virtual Machine (JVM). JavaBeans are just POJOs that follow certain patterns (e.g., a naming convention for accessors/mutators (getters/setters) for a property, a default constructor . . .) and are executed inside the JVM. All the other Java EE components also follow certain patterns (e.g., an Enterprise JavaBean must have metadata, a default constructor can’t be final . . .) and are executed inside a container (e.g., the EJB container) that supplies some services (e.g., transaction, pooling, security . . .). This leaves us with Managed Beans and beans.
Managed Beans are container-managed objects that support only a small set of basic services: resource injection, life-cycle management, and interception. They were introduced in Java EE 6 to offer a lightweight component model aligned with the rest of the Java EE platform. They provide a common foundation for the different kinds of components that exist in the Java EE platform. For example, an Enterprise JavaBean can be seen as a Managed Bean with extra services. A Servlet can also be seen as a Managed Bean with extra services (different from an EJB), and so on.
Beans are CDI objects that are build on this basic Managed Bean model. Beans have an improved life cycle for stateful objects; are bound to well-defined contexts; bring a typesafe approach to dependency injection, interception, and decoration; are specialized with qualifier annotations; and can be used in expression language (EL). In fact, with very few exceptions, potentially every Java class that has a default constructor and runs inside a container is a bean. So JavaBeans and Enterprise JavaBeans can naturally take advantage of these CDI services.
Dependency Injection
Dependency Injection (DI) is a design pattern that decouples dependent components. It is part of inversion of control, where the concern being inverted is the process of obtaining the needed dependency. The term was first coined by Martin Fowler. One way to think about DI in a managed environment such as Java EE is to think of JNDI turned inside out. Instead of an object looking up other objects, the container injects those dependent objects for you. This is the so-called Hollywood Principle, “Don’t call us?” (lookup objects), “we’ll call you” (inject objects).
Java EE was created in the late 1990s and the first version already had EJBs, Servlets, and JMS. These components could use JNDI to look up container-managed resources such as JDBC DataSource, JMS factories or destinations. It allowed component dependencies and let the EJB container deal with the complexities of managing the life cycle of the resource (instantiating, initializing, sequencing, and supplying resource references to clients as required). But let’s get back to talking about the resource injection performed by the container.
Java EE 5 introduced resource injection for developers. It allowed developers to inject container resources such as EJBs, entity managers, data sources, JMS factories, and destinations into a set of defined components (Servlets, JSF backing beans, and EJBs). For this purpose Java EE 5 introduced a new set of annotations (@Resource, @PersistenceContext, @PersistenceUnit, @EJB, and @WebServiceRef).
This first step taken in Java EE 5 wasn’t enough, so Java EE 6 created two brand-new specifications to bring real DI to the platform: Dependency Injection (JSR 330) and Contexts and Dependency Injection (JSR 299). Today, in Java EE 7, DI goes even further to tie specifications together.
The life cycle of a POJO is pretty simple: as a Java developer you create an instance of a class using the new keyword and wait for the Garbage Collector to get rid of it and free some memory. But if you want to run a CDI Bean inside a container, you are not allowed to use the new keyword. Instead, you need to inject the bean and the container does the rest, meaning, the container is the one responsible for managing the life cycle of the bean: it creates the instance; it gets rid of it. So how do you initialize a bean if you can’t call a constructor? Well, the container gives you a handle after constructing an instance and before destroying it.
Figure 2-1 shows the life cycle of a Managed Bean (and therefore, a CDI Bean). When you inject a bean, the container (EJB, Web, or CDI container) is the one responsible for creating the instance (using the new keyword). It then resolves the dependencies and invokes any method annotated with @PostConstruct before the first business method invocation on the bean. Then, the @PreDestroy callback notification signals that the instance is in the process of being removed by the container.
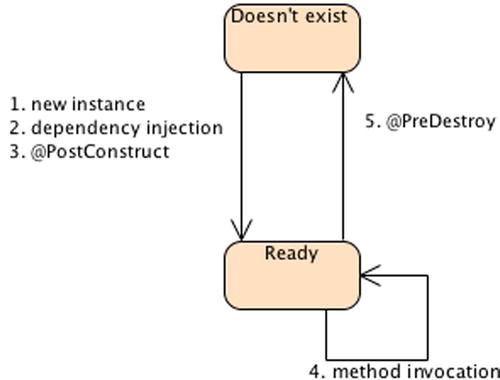
Figure 2-1. Managed Bean life cycle
As you’ll see in the following chapters, most of the Java EE components follow the life cycle described in Figure 2-1.
CDI Beans may be stateful and are contextual, meaning that they live in a well-defined scope (CDI comes with predefined scopes: request, session, application, and conversation scopes). For example, a session context and its beans exist during the lifetime of an HTTP session. During this lifetime, the injected references to the beans are also aware of the context—that is, the entire chain of the bean dependencies is contextual. The container manages all beans inside the scope automatically for you and, at the end of the session, automatically destroys them.
Unlike stateless components (e.g., stateless session beans) or singletons (e.g., Servlets or singletons), different clients of a stateful bean see the bean in different states. When the bean is stateful (session, application and conversation scoped), it matters which bean instance the client has. Clients (e.g., other beans) executing in the same context will see the same instance of the bean. But clients in a different context may see a different instance (depending on the relationship between the contexts). In all cases, the client does not control the life cycle of the instance by explicitly creating and destroying it; the container does it according to the scope.
Interception
Interceptors are used to interpose on business method invocations. In this aspect, it is similar to aspect-oriented programming (AOP). AOP is a programming paradigm that separates cross-cutting concerns (concerns that cut across the application) from your business code. Most applications have common code that is repeated across components. These could be technical concerns (log the entry and exit from each method, log the duration of a method invocation, store statistics of method usage, etc.) or business concerns (perform additional checks if a customer buys more than $10,000 of items, send a refill order when the inventory level is too low, etc.). These concerns can be applied automatically through AOP to your entire application or to a subset of it.
Managed Beans support AOP-like functionality by providing the ability to intercept method invocation through interceptors. Interceptors are automatically triggered by the container when a Managed Bean method is invoked. As shown in Figure 2-2, interceptors can be chained and are called before and/or after the execution of a method.

Figure 2-2. A container intercepting a call and invoking interceptors
Figure 2-2 shows you a number of interceptors that are called between the client and the Managed Bean. You could think of an EJB container as a chain of interceptors itself. When you develop a session bean, you just concentrate on your business code. But behind the scenes, when a client invokes a method on your EJB, the container intercepts the invocation and applies different services (life-cycle management, transaction, security, etc.). With interceptors, you add your own cross-cutting mechanisms and apply them transparently to your business code.
Loose Coupling and Strong Typing
Interceptors are a very powerful way to decouple technical concerns from business logic. Contextual life-cycle management also decouples beans from managing their own life cycles. With injection a bean is not aware of the concrete implementation of any bean it interacts with. But there is more to loose coupling in CDI. Beans can use event notifications to decouple event producers from event consumers or decorators to decouple business concerns. In other words, loose coupling is the DNA on which CDI has been built.
And all these facilities are delivered in a typesafe manner. CDI never relies on String-based identifiers to determine how objects fit together. Instead, CDI uses strongly typed annotations (e.g., qualifiers, stereotypes, and interceptor bindings) to wire beans together. Usage of XML descriptors is minimized to truly deployment-specific information.
Nearly every Java EE specification has an optional XML deployment descriptor. It usually describes how a component, module, or application (such as a web application or enterprise application) should be configured. With CDI, the deployment descriptor is called beans.xml and is mandatory. It can be used to configure certain functionalities (interceptors, decorators, alternatives, etc.), but it is essential to enable CDI. That’s because CDI needs to identify the beans in your class path (this is called bean discovery).
It is during the bean discovery phase that the magic happens: that’s when CDI turns POJOs into CDI Beans. At deployment time, CDI checks all of your application’s jar and war files and each time it finds a beans.xml deployment descriptor it manages all the POJOs, which then become CDI Beans. Without a beans.xml file in the class path (under the META-INF or WEB-INF directory), CDI will not be able to use injection, interception, decoration, and so forth. Without this markup file CDI will not work. If your web application contains several jar files and you want to have CDI enabled across the entire application, each jar will need its own beans.xml to trigger CDI and bean discovery for each jar.
CDI Specifications Overview
Context and Dependency Injection is becoming a common ground for several specifications in Java EE. Some specifications heavily rely on it (Bean Validation, JAX-RS), others inspired it (EJB) and some work hand in hand with it (JSF). CDI 1.1 cuts across several specifications but would be nothing without others: Dependency Injection for Java 1.0 (JSR 330), Managed Bean 1.0 (JSR 342), Common Annotations 1.2 (JSR 250), Expression Language 3.0 (JSR 341), and Interceptors 1.2 (JSR 318).
A Brief History of CDI Specifications
In 2006, inspired from the Seam, Guice and Spring framework, Gavin King (the creator of Seam) became the specification lead of the JSR 299 which was then called Web Beans. Targeted for Java EE 6, Web Beans had to be renamed to Context and Dependency Injection 1.0 and was built on top of the new JSR 330: Dependency Injection for Java 1.0 (a.k.a. @Inject).
These two specifications were complementary and one could not be used without the other in Java EE. Dependency Injection for Java defined a set of annotations (@Inject, @Named, @Qualifier, @Scope, and @Singleton) mainly used for injection. CDI gave semantics to JSR 330 and added many more features such as context management, events, decorators, and enhanced interceptors (the JSR 318). Furthermore, CDI allowed the developer to extend the platform within standard, which was impossible until then. The aim of CDI was to fill all the gaps.
- Give more cohesion to the platform,
- Knit together the web tier and the transactional tier,
- Turn dependency injection into a first-class citizen, and
- Have the ability to add new extensions easily.
Today, with Java EE 7, CDI 1.1 is becoming the foundation of many JSRs and there have been some improvements.
What’s New in CDI 1.1?
CDI 1.1 doesn’t add any major features. Instead, this new version concentrates on integrating CDI with other specifications such as embracing interceptors, adding conversations in Servlet request, or having richer application life-cycle events in Java EE. The following new features can be found in CDI 1.1:
- The new CDI class provides programmatic access to CDI facilities from outside a Managed Bean;
- Interceptors, decorators, and alternatives can be prioritized (@Priority) and ordered for an entire application;
- Any type or package may be prevented from being considered a bean by CDI by adding the @Vetoed annotation on the type or package;
- The @New qualifier is deprecated in CDI 1.1 and applications are now encouraged to inject @Dependent scoped beans instead; and
- The new @WithAnnotations allows an extension to filter which types it sees.
Table 2-1 lists the main packages related to CDI. You will find the CDI annotations and classes in the javax.enterprise.inject and javax.decorator packages. Dependency Injection for Java APIs is in the javax.inject package and interceptors in javax.interceptor.
Table 2-1. Main CDI-Related Packages
| Package | Description |
|---|---|
| javax.inject | Contains the core Dependency Injection for Java APIs (JSR 330) |
| javax.enterprise.inject | Core dependency injection APIs |
| javax.enterprise.context | CDI scopes and contextual APIs |
| javax.enterprise.event | CDI events and observers APIs |
| javax.enterprise.util | CDI utility package |
| javax.interceptor | Contains the Interceptor APIs (JSR 318) |
| javax.decorator | CDI decorator APIs |
The reference implementation of CDI is Weld, an open source project from JBoss. Other implementations exist such as Apache OpenWebBeans or CanDi (from Caucho). It is also important to mention the Apache DeltaSpike project that references a set of CDI portable extensions.
Writing a CDI Bean
A CDI Bean can be any kind of class that contains business logic. It may be called directly from Java code via injection, or it may be invoked via EL from a JSF page. As you can see in Listing 2-1, a bean is a POJO that doesn’t inherit or extend from anything, can inject references to other beans (@Inject), has its life cycle managed by the container (@PostConstruct), and can get its method invocation intercepted (here @Transactional is an interceptor binding—more on that later).
Listing 2-1. A BookService Bean Using Injection, Life-Cycle Management, and Interception
public class BookService {

  @Inject
  private NumberGenerator numberGenerator;
  @Inject
  private EntityManager em;

  private Date instanciationDate;

  @PostConstruct
  private void initDate() {
    instanciationDate = new Date();
  }

  @Transactional
  public Book createBook(String title, Float price, String description) {
    Book book = new Book(title, price, description);
    book.setIsbn(numberGenerator.generateNumber());
    book.setInstanciationDate(instanciationDate);
    em.persist(book);
    return book;
  }
}
Anatomy of a CDI Bean
According to the CDI 1.1 specification, the container treats any class that satisfies the following conditions as a CDI Bean:
- It is not a non-static inner class,
- It is a concrete class, or is annotated @Decorator, and
- It has a default constructor with no parameters, or it declares a constructor annotated @Inject.
Then a bean can have an optional scope, an optional EL name, a set of interceptor bindings, and an optional life-cycle management.
Dependency Injection
Java is an object-oriented programming language, meaning that the real world is represented using objects. A Book class represents a copy of “H2G2,” a Customer represents you, and a PurchaseOrder represents you buying this book. These objects depend on each other: a book can be read by a customer and a purchase order refers to several books. This dependence is one value of object-oriented design.
For example, the process of creating a book (BookService) can be reduced to instantiating a Book object, generating a unique number using another service (NumberGenerator), and persisting the book to a database. The NumberGenerator service can generate an ISBN number made of 13 digits or an older format called ISSN with 8 digits. The BookService would then end up depending on either an IsbnGenerator or an IssnGenerator according to some condition or environment.
Figure 2-3 shows a class diagram of the NumberGenerator interface that has one method (String generateNumber()) and is implemented by IsbnGenerator and IssnGenerator. The BookService depends on the interface to generate a book number.
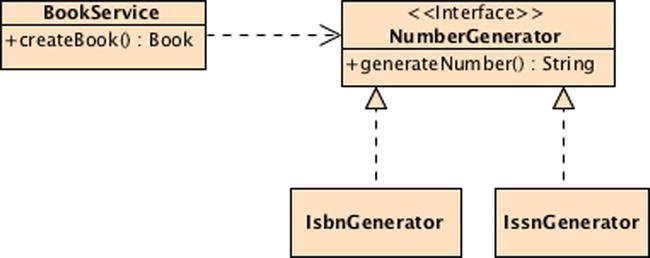
Figure 2-3. Class diagram with the NumberGenerator interface and implementations
How would you connect a BookService to the ISBN implementation of the NumberGenerator interface? One solution is to use the good old new keyword as shown in Listing 2-2.
Listing 2-2. A BookService POJO Creating Dependencies Using the New Keyword
public class BookService {

  private NumberGenerator numberGenerator ;

  public BookService() {
    this.numberGenerator = new IsbnGenerator();
  }

  public Book createBook(String title, Float price, String description) {
    Book book = new Book(title, price, description);
    book.setIsbn( numberGenerator.generateNumber() );
    return book;
  }
}
The code in Listing 2-2 is pretty simple and does the job. In the constructor the BookService creates an instance of IsbnGenerator and affects it to the numberGenerator attribute. Invoking the numberGenerator.generateNumber() method would generate a 13-digit number.
But what if you want to choose between implementations and not just get wired to the IsbnGenerator? One solution is to pass the implementation to the constructor and leave an external class to choose which implementation it wants to use (see Listing 2-3).
Listing 2-3. A BookService POJO Choosing Dependencies Using the Constructor
public class BookService {

  private NumberGenerator numberGenerator ;

  public BookService(NumberGenerator numberGenerator) {
    this.numberGenerator = numberGenerator;
  }

  public Book createBook(String title, Float price, String description) {
    Book book = new Book(title, price, description);
    book.setIsbn(numberGenerator.generateNumber());
    return book;
  }
}
So now an external class could use the BookService with the implementation it needs.
BookService bookService = new BookService( new IsbnGenerator() );
BookService bookService = new BookService( new IssnGenerator() );
This illustrates what inversion of control is: the control of creating the dependency between BookService and NumberGenerator is inverted because it’s given to an external class, not the class itself. Since you end up connecting the dependencies yourself, this technique is referred to as construction by hand. In the preceding code we used the constructor to choose implementation (constructor injection), but another common way is to use setters (setter injection). However, instead of constructing dependencies by hand you can leave it for an injector (i.e., CDI) to do.
@Inject
As Java EE is a managed environment you don’t need to construct dependencies by hand but can leave the container to inject a reference for you. In a nutshell, CDI dependency injection is the ability to inject beans into others in a typesafe way, which means no XML but annotations.
Injection already existed in Java EE 5 with the @Resource, @PersistentUnit or @EJB annotations, for example. But it was limited to certain resources (datasource, EJB . . .) and into certain components (Servlets, EJBs, JSF backing bean . . .). With CDI you can inject nearly anything anywhere thanks to the @Inject annotation. Note that in Java EE 7 you can still use the other injection mechanisms (@Resource . . .) but you should consider using @Inject whenever it is possible (see the “Producers” section later in this chapter).
Listing 2-4 shows how you would inject a reference of the NumberGenerator into the BookService using the CDI @Inject.
Listing 2-4. BookService Using @Inject to Get a Reference of NumberGenerator
public class BookService {

  @Inject
  private NumberGenerator numberGenerator;

  public Book createBook(String title, Float price, String description) {
    Book book = new Book(title, price, description);
    book.setIsbn(numberGenerator.generateNumber());
    return book;
  }
}
As you can see in Listing 2-4, a simple @Inject annotation on the property will inform the container that it has to inject a reference of a NumberGenerator implementation into the numberGenerator property. This is called the injection point (the place where the @Inject annotation is). Listing 2-5 shows the IsbnGenerator implementation. As you can see there are no special annotations and the class implements the NumberGenerator interface.
Listing 2-5. The IsbnGenerator Bean
public class IsbnGenerator implements NumberGenerator {

  public String generateNumber() {
    return "13-84356-" + Math.abs(new Random().nextInt());
  }
}
The @Inject annotation defines an injection point that is injected during bean instantiation. Injection can occur via three different mechanisms: property, setter, or constructor.
Until now, in all the previous code examples, you’ve seen the @Inject annotation on attributes (properties).
@Inject
private NumberGenerator numberGenerator;
Notice that it isn’t necessary to create a getter and a setter method on an attribute to use injection. CDI can access an injected field directly (even if it’s private), which sometimes helps eliminate some wasteful code. But instead of annotating the attributes, you can add the @Inject annotation on a constructor as follows:
@Inject
public BookService (NumberGenerator numberGenerator) {
  this.numberGenerator = numberGenerator;
}
But the rule is that you can only have one constructor injection point. The container is the one doing injection, not you (you can’t invoke a constructor in a managed environment); therefore, there is only one bean constructor allowed so that the container can do its work and inject the right references.
The other choice is to use setter injection, which looks like constructor injection. You just need to annotate the setter with @Inject.
@Inject
public void setNumberGenerator(NumberGenerator numberGenerator) {
  this.numberGenerator = numberGenerator;
}
You may ask, “When should I use a field over a constructor or setter injection?” There is no real technical answer to that question; it’s a matter of your own personal taste. In a managed environment, the container is the one doing all the injection’s work; it just needs the right injection points.
Assume that NumberGenerator only has one implementation (IsbnGenerator). CDI will then be able to inject it simply by using @Inject on its own.
@Inject
private NumberGenerator numberGenerator;
This is termed default injection. Whenever a bean or injection point does not explicitly declare a qualifier, the container assumes the qualifier @javax.enterprise.inject.Default. In fact, the following code is identical to the previous one:
@Inject @Default
private NumberGenerator numberGenerator;
@Default is a built-in qualifier that informs CDI to inject the default bean implementation. If you define a bean with no qualifier, the bean automatically has the qualifier @Default. So code in Listing 2-6 is identical to the one in Listing 2-5.
Listing 2-6. The IsbnGenerator Bean with the @Default Qualifier
@Default
public class IsbnGenerator implements NumberGenerator {

  public String generateNumber() {
    return "13-84356-" + Math.abs(new Random().nextInt());
  }
}
If you only have one implementation of a bean to inject, the default behavior applies and a straightforward @Inject will inject the implementation. The class diagram in Figure 2-4 shows the @Default implementation (IsbnGenerator) as well as the default injection point (@Inject @Default). But sometimes you have to choose between several implementations. That’s when you need to use qualifiers.
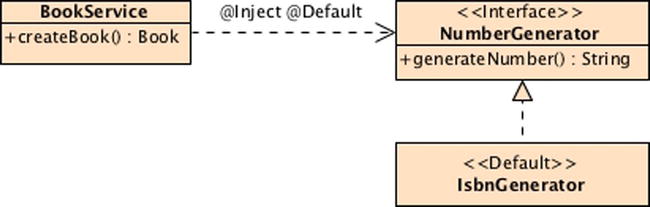
Figure 2-4. Class diagram with @Default injection
Qualifiers
At system initialization time, the container must validate that exactly one bean satisfying each injection point exists. Meaning that if no implementation of NumberGenerator is available, the container would inform you of an unsatisfied dependency and will not deploy the application. If there is only one implementation, injection will work using the @Default qualifier (see the diagram in Figure 2-4). If more than one default implementation were available, the container would inform you of an ambiguous dependency and will not deploy the application. That’s because the typesafe resolution algorithm fails when the container is unable to identify exactly one bean to inject.
So how does a component choose which implementation (IsbnGenerator or IssnGenerator) is to get injected? Most frameworks heavily rely on external XML configuration to declare and inject beans. CDI uses qualifiers, which basically are Java annotations that bring typesafe injection and disambiguate a type without having to fall back on String-based names.
Let’s say we have an application with a BookService that creates books with a 13-digit ISBN number and a LegacyBookService that creates books with an 8-digit ISSN number. As you can see in Figure 2-5, both services inject a reference of the same NumberGenerator interface. The services distinguish between the two implementations by using qualifiers.
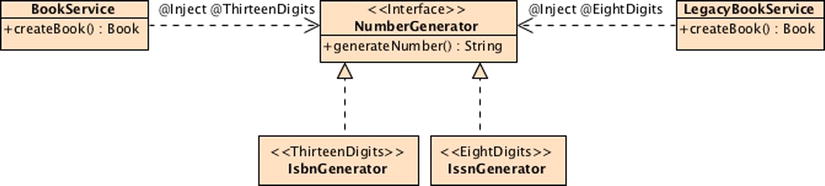
Figure 2-5. Services using qualifiers for non-ambiguous injection
A qualifier represents some semantics associated with a type that is satisfied by some implementation of that type. It is a user-defined annotation, itself annotated with @javax.inject.Qualifer. For example, we could introduce qualifiers to represent 13- and 8-digit number generators both shown in Listing 2-7 and Listing 2-8.
Listing 2-7. The ThirteenDigits Qualifier
@Qualifier
@Retention(RUNTIME)
@Target({FIELD, TYPE, METHOD})
public @interface ThirteenDigits { }
Listing 2-8. The EightDigits Qualifier
@Qualifier
@Retention(RUNTIME)
@Target({FIELD, TYPE, METHOD})
public @interface EightDigits { }
Once you have defined the needed qualifiers, they must be applied on the appropriate implementation. As you can see in both Listing 2-9 and Listing 2-10, the @ThirteenDigits qualifier is applied to the IsbnGenerator bean and @EightDigits to IssnGenerator.
Listing 2-9. The IsbnGenerator Bean with the @ThirteenDigits Qualifier
@ThirteenDigits
public class IsbnGenerator implements NumberGenerator {

  public String generateNumber() {
    return "13-84356-" + Math.abs(new Random().nextInt());
  }
}
Listing 2-10. The IssnGenerator Bean with the @EightDigits Qualifier
@EightDigits
public class IssnGenerator implements NumberGenerator {

  public String generateNumber() {
    return "8-" + Math.abs(new Random().nextInt());
  }
}
These qualifiers are then applied to injection points to distinguish which implementation is required by the client. In Listing 2-11 the BookService explicitly defines the 13-digit implementation by injecting a reference of the @ThirteenDigits number generator and in Listing 2-12 the LegacyBookService injects the 8-digit implementation.
Listing 2-11. BookService Using the @ThirteenDigits NumberGenerator Implementation
public class BookService {

  @Inject @ThirteenDigits
  private NumberGenerator numberGenerator;

  public Book createBook(String title, Float price, String description) {
    Book book = new Book(title, price, description);
    book.setIsbn(numberGenerator.generateNumber());
    return book;
  }
}
Listing 2-12. LegacyBookService Using the @EightDigits NumberGenerator Implementation
public class LegacyBookService {

  @Inject @EightDigits
  private NumberGenerator numberGenerator;

  public Book createBook(String title, Float price, String description) {
    Book book = new Book(title, price, description);
    book.setIsbn(numberGenerator.generateNumber());
    return book;
  }
}
For this to work you don’t need external configuration; that’s why CDI is said to use strong typing. You can rename your implementations to whatever you want, rename your qualifier—the injection point will not change (that’s loose coupling). As you can see, CDI is an elegant way to have typesafe injection. But if you start creating annotations each time you need to inject something, your application will end up being very verbose. That’s when qualifiers with members can help you.
Qualifiers with Members
Each time you need to choose between implementations, you create a qualifier (i.e., an annotation). So if you need an extra two digits and a ten-digit number generator you will create extra annotations (e.g., @TwoDigits, @EightDigits, @TenDigits, @ThirteenDigits). Imagine that the generated numbers can either be odd or even, you would then end up with an large number of annotations: @TwoOddDigits, @TwoEvenDigits, @EightOddDigits, etc. One way to avoid the multiplication of annotations is to use members.
In our example we could replace all these qualifiers by using the single qualifier @NumberOfDigits with an enumeration as a value and a Boolean for the parity (see Listing 2-13).
Listing 2-13. The @NumberOfDigits with a Digits Enum and a Parity Boolean
@Qualifier
@Retention(RUNTIME)
@Target({FIELD, TYPE, METHOD})
public @interface NumberOfDigits {

  Digits value();
  boolean odd();
}

public enum Digits {
  TWO,
  EIGHT,
  TEN,
  THIRTEEN
}
The manner in which you would use this qualifier with members doesn’t change from what you’ve seen so far. The injection point will qualify the needed implementation by setting the annotation members as follows:
@Inject @NumberOfDigits(value = Digits.THIRTEEN, odd = false)
private NumberGenerator numberGenerator;
And the concerned implementation will do the same.
@NumberOfDigits(value = Digits.THIRTEEN, odd = false)
public class IsbnEvenGenerator implements NumberGenerator {...}
Another way of qualifying a bean and an injection point is to specify multiple qualifiers. So instead of having multiple qualifiers for parity (@TwoOddDigits, @TwoEvenDigits . . .) or having a qualifier with members (@NumberOfDigits), we could have used two different set of qualifiers: one set for the parity (@Odd and @Even) and another one for the number of digits. This is how you could qualify a generator of 13 even digits.
@ThirteenDigits @Even
public class IsbnEvenGenerator implements NumberGenerator {...}
The injection point would use the same syntax.
@Inject @ThirteenDigits @Even
private NumberGenerator numberGenerator;
Then only a bean that has both qualifier annotations would be eligible for injection. Qualifiers should be meaningful. Having the right names and granularity of qualifiers is important for an application.
Alternatives
Qualifiers let you choose between multiple implementations of an interface at development time. But sometimes you want to inject an implementation depending on a particular deployment scenario. For example, you may want to use a mock number generator in a testing environment.
Alternatives are beans annotated with the special qualifier javax.enterprise.inject.Alternative. By default alternatives are disabled and need to be enabled in the beans.xml descriptor to make them available for instantiation and injection. Listing 2-14 shows a mock number generator alternative.
Listing 2-14. A Default Mock Generator Alternative
@Alternative
public class MockGenerator implements NumberGenerator {

  public String generateNumber() {
    return "MOCK";
  }
}
As you can see in Listing 2-14, the MockGenerator implements the NumberGenerator interface as usual. It is annotated with @Alternative, meaning that CDI treats it as the default alternative of the NumberGenerator. As in Listing 2-6, this default alternative could have used the @Default built-in qualifier as follows:
@Alternative @Default
public class MockGenerator implements NumberGenerator {...}
Instead of a default alternative, you can specify the alternative by using qualifiers. For example, the following code tells CDI that the alternative of a 13-digit number generator is the mock:
@Alternative @ThirteenDigits
public class MockGenerator implements NumberGenerator {...}
By default, @Alternative beans are disabled and you need to explicitly enable them in the beans.xml descriptor as shown in Listing 2-15.
Listing 2-15. The beans.xml Deployment Descriptor Enabling an Alternative
<beans xmlns=" http://xmlns.jcp.org/xml/ns/javaee "
       xmlns:xsi=" http://www.w3.org/2001/XMLSchema-instance "
       xsi:schemaLocation=" http://xmlns.jcp.org/xml/ns/javaee →
                           http://xmlns.jcp.org/xml/ns/javaee/beans_1_1.xsd "
       version="1.1" bean-discovery-mode="all">

  <alternatives>
    <class>org.agoncal.book.javaee7.chapter02. MockGenerator </class>
  </alternatives>
</beans>
In terms of injection point, nothing changes. So your client code is not impacted. The code that follows injects the default implementation of a number generator. If the alternative is enabled, then the MockGenerator defined in Listing 2-14 will be injected.
@Inject
private NumberGenerator numberGenerator;
You can have several beans.xml files declaring several alternatives depending on your environment (development, production, test . . .).
Producers
I’ve shown you how to inject CDI Beans into other CDI Beans. But you can also inject primitives (e.g., int, long, float . . .), array types and any POJO that is not CDI enabled, thanks to producers. By CDI enabled I mean any class packaged into an archive containing a beans.xml file.
By default, you cannot inject classes such as a java.util.Date or java.lang.String. That’s because all these classes are packaged in the rt.jar file (the Java runtime environment classes) and this archive does not contain a beans.xml deployment descriptor. If an archive does not have a beans.xml under the META-INF directory, CDI will not trigger bean discovery and POJOs will not be able to be treated as beans and, thus, be injectable. The only way to be able to inject POJOs is to use producer fields or producer methods as shown in Listing 2-16.
Listing 2-16. Producer Fields and Methods
public class NumberProducer {

  @Produces @ThirteenDigits
  private String prefix13digits = "13-";

  @Produces @ThirteenDigits
  private int editorNumber = 84356;

  @Produces @Random
  public double random() {
    return Math.abs(new Random().nextInt());
  }
}
The NumberProducer class in Listing 2-16 has several attributes and methods all annotated with javax.enterprise.inject.Produces. This means that all the types and classes produced can now be injected with @Inject using a qualifier (@ThirteenDigits, @EightDigits or @Random).
The producer method (random() in Listing 2-16) is a method that acts as a factory of bean instances. It allows the return value to be injected. We can even specify a qualifier (e.g., @Random), a scope, and an EL name (as you will see later). A producer field (prefix13digits and editorNumber) is a simpler alternative to a producer method and it doesn’t have any business code. It is just a property that becomes injectable.
In Listing 2-9 the IsbnGenerator generates an ISBN number with the formula "13-84356-" + Math.abs(new Random().nextInt()). Using the NumberProducer (Listing 2-16) we can use the produced types to change this formula. In Listing 2-17 the IsbnGenerator now injects both a String and an integer with @Inject @ThirteenDigits representing the prefix ("13-") and the editor identifier (84356) of an ISBN number. The random number is injected with @Inject @Random and returns a double.
Listing 2-17. IsbnGenerator Injecting Produced Types
@ThirteenDigits
public class IsbnGenerator implements NumberGenerator {

  @Inject @ThirteenDigits
  private String prefix;

  @Inject @ThirteenDigits
  private int editorNumber;

  @Inject @Random
  private double postfix;

  public String generateNumber() {
    return prefix + editorNumber + postfix;
  }
}
In Listing 2-17 you can see strong typing in action. Using the same syntax (@Inject @ThirteenDigits), CDI knows that it needs to inject a String, an integer, or an implementation of a NumberGenerator. The advantage of using injected types (Listing 2-17) rather than a fixed formula (Listing 2-9) for generating numbers is that you can use all the CDI features such as alternatives (and have an alternative ISBN number generator algorithm if needed).
InjectionPoint API
In Listing 2-16 the attributes and return value produced by @Produces do not need any information about where they are injected. But there are certain cases where objects need to know something about the injection point into which they are injected. This can be a way of configuring or changing behavior depending on the injection point.
Let’s take for example the creation of a logger. In the JDK, to create a java.util.logging.Logger you need to set the category of the class that owns it. For example, if you want a logger for the BookService you will write:
Logger log = Logger.getLogger(BookService.class.getName());
How would you produce a Logger that needs to know the class name of the injection point? CDI has an InjectionPoint API that provides access to metadata about an injection point (see Table 2-2). Thus you need to create a producer method that uses the InjectionPoint API to configure the right logger. Listing 2-18 shows how the createLogger method gets the injection point class name.
Table 2-2. InjectionPoint API
Listing 2-18. Logging Producer
public class LoggingProducer {

  @Produces
  private Logger createLogger( InjectionPoint injectionPoint ) {
    return Logger.getLogger( injectionPoint .getMember().getDeclaringClass().getName());
  }
}
To use the produced logger in any bean you just inject it and use it. The logger’s category class name will then be automatically set:
@Inject Logger log;
Disposers
In the previous examples (Listing 2-17 and Listing 2-18) we used producers to create datatypes or POJOs so they could be injected. We created them and didn’t have to destroy or close them once used. But some producer methods return objects that require explicit destruction such as a Java Database Connectivity (JDBC) connection, JMS session, or entity manager. For creation, CDI uses producers, and for destruction, disposers. A disposer method allows the application to perform the customized cleanup of an object returned by a producer method.
Listing 2-19 shows a utility class that creates and closes a JDBC connection. The createConnection takes a Derby JDBC driver, creates a connection with a specific URL, deals with the exceptions, and returns an opened JDBC connection. This method is annotated with @Produces. On the other hand, the closeConnection method terminates the JDBC connection. It is annotated with @Disposes.
Listing 2-19. JDBC Connection Producer and Disposer
public class JDBCConnectionProducer {

  @Produces
  private Connection createConnection() {
    Connection conn = null;
    try {
      Class.forName("org.apache.derby.jdbc.EmbeddedDriver").newInstance();
      conn = DriverManager.getConnection("jdbc:derby:memory:chapter02DB", "APP", "APP");

    } catch (InstantiationException | IllegalAccessException | ClassNotFoundException) {
      e.printStackTrace();
    }
    return conn;
  }

  private void closeConnection( @Disposes Connection conn) throws SQLException {
    conn.close();
  }
}
Destruction can be performed by a matching disposer method, defined by the same class as the producer method. Each disposer method, annotated with @Disposes, must have exactly one disposed parameter of the same type (here java.sql.Connection) and qualifiers (@Default) as the corresponding producer method return type (annotated @Produces). The disposer method (closeConnection()) is called automatically when the client context ends (in Listing 2-20 the context is @ApplicationScoped), and the parameter receives the object produced by the producer method.
Listing 2-20. JDBC Connection Producer and Disposer
@ApplicationScoped
public class DerbyPingService {

  @Inject
  private Connection conn;

  public void ping() throws SQLException {
    conn.createStatement().executeQuery("SELECT 1 FROM SYSIBM.SYSDUMMY1");
  }
}
Listing 2-20 shows a bean injecting the created JDBC connection with @Inject and using it to ping a Derby database. As you can see, this client code doesn’t deal with all the technical plumbing of creating and closing the JDBC connection or exception handling. Producers and disposers are a neat way of creating and closing resources.
Scopes
CDI is about Dependency Injection but also Context (the “C” in CDI). Every object managed by CDI has a well-defined scope and life cycle that is bound to a specific context. In Java, the scope of a POJO is pretty simple: you create an instance of a class using the new keyword and you rely on the garbage collection to get rid of it and free some memory. With CDI, a bean is bound to a context and it remains in that context until the bean is destroyed by the container. There is no way to manually remove a bean from a context.
While the web tier has well-defined scopes (application, session, request), there was no such thing for the service tier (see also Chapter 7 for stateless and stateful session beans). That’s because when session beans or POJOs are used within web applications, they are not aware of the contexts of the web applications. CDI brought the web and service tiers together by binding them with meaningful scopes. CDI defines the following built-in scopes and even gives you extension points so you can create your own:
- Application scope (@ApplicationScoped): Spans for the entire duration of an application. The bean is created only once for the duration of the application and is discarded when the application is shut down. This scope is useful for utility or helper classes, or objects that store data shared by the entire application (but you should be careful about concurrency issues when the data have to be accessed by several threads).
- Session scope (@SessionScoped): Spans across several HTTP requests or several method invocations for a single user’s session. The bean is created for the duration of an HTTP session and is discarded when the session ends. This scope is for objects that are needed throughout the session such as user preferences or login credentials.
- Request scope (@RequestScoped): Corresponds to a single HTTP request or a method invocation. The bean is created for the duration of the method invocation and is discarded when the method ends. It is used for service classes or JSF backing beans that are only needed for the duration of an HTTP request.
- Conversation scope (@ConversationScoped): Spans between multiple invocations within the session boundaries with starting and ending points determined by the application. Conversations are used across multiple pages as part of a multistep workflow.
- Dependent pseudo-scope (@Dependent): The life cycle is same as that the client. A dependent bean is created each time it is injected and the reference is removed when the injection target is removed. This is the default scope for CDI.
As you can see, all the scopes have an annotation you can use on your CDI Beans (all these annotations are in the javax.enterprise.context package). The first three scopes are well known. For example, if you have a session scoped shopping cart bean, the bean will be automatically created when the session begins (e.g., the first time a user logs in) and automatically destroyed when the session ends.
@SessionScoped
public class ShoppingCart implements Serializable {...}
An instance of the ShoppingCart bean is bound to a user session and is shared by all requests that execute in the context of that session. If you don’t want the bean to sit in the session indefinitely, consider using another scope with a shorter life span, such as the request or conversation scope. Note that beans with scope @SessionScoped or @ConversationScoped must be serializable, since the container passivates them from time to time.
If a scope is not explicitly specified, then the bean belongs to the dependent pseudo-scope (@Dependent). Beans with this scope are never shared between different clients or different injection points. They are dependent on some other bean, which means their life cycle is bound to the life cycle of that bean. A dependent bean is instantiated when the object it belongs to is created, and destroyed when the object it belongs to is destroyed. The code that follows shows a dependent scoped ISBN generator with a qualifier:
@Dependent @ThirteenDigits
public class IsbnGenerator implements NumberGenerator {...}
Being the default scope, you can omit the @Dependent annotation and write the following:
@ThirteenDigits
public class IsbnGenerator implements NumberGenerator {...}
Scopes can be mixed. A @SessionScoped bean can be injected into a @RequestScoped or @ApplicationScoped bean and vice versa.
Conversation
The conversation scope is slightly different than the application, session, or request scope. It holds state associated with a user, spans multiple requests, and is demarcated programmatically by the application. A @ConversationScoped bean can be used for a long-running process where there is a definite beginning and end such as navigating through a wizard or buying items and checking out of an online store.
Request scoped objects have a very short life span that usually lasts for a single request (HTTP request or method invocation) while session scoped objects last for the entire duration of the user’s session. But there are many cases that fall between these two extremes. There are some presentation tier objects that can be used across more than one page but not across the entire session. For that, CDI has a special conversation scope (@ConversationScoped). Unlike session scoped objects that are automatically timed out by the container, conversation scoped objects have a well-defined life cycle that explicitly starts and ends programmatically using the javax.enterprise.context.Conversation API.
As an example, think of a customer creation wizard web application. The wizard is composed of three steps. In the first step, the customer enters login information (e.g., username and password). In the second step, the customer enters account details such as the first name, last name, address, and e-mail address. The final step of the wizard confirms all the collected information and creates the account. Listing 2-21 shows the conversation scoped bean that implements the customer creator wizard.
Listing 2-21. A Wizard to Create a Customer Using a Conversation
@ConversationScoped
public class CustomerCreatorWizard implements Serializable {

  private Login login;
  private Account account;

  @Inject
  private CustomerService customerService;

  @Inject
  private Conversation conversation ;

  public void saveLogin () {
    conversation.begin();

    login = new Login();
    // Sets login properties
  }

  public void saveAccount() {
    account = new Account();
    // Sets account properties
  }

  public void createCustomer () {
    Customer customer = new Customer();
    customer.setLogin(login);
    customer.setAccount(account);
    customerService.createCustomer(customer);

    conversation.end();
  }
}
The CustomerCreatorWizard in Listing 2-21 is annotated with @ConversationScoped. It then injects a CustomerService, to create the Customer, but more important, it injects a Conversation. This interface allows programmatic control over the life cycle of the conversation scope. Notice that when the saveLogin method is invoked, the conversation starts (conversation.begin()). The conversation is now started and is used for the duration of the wizard. Once the last step of the wizard is invoked, the createCustomer method is invoked and the conversation ends (conversation.end()). Table 2-3 gives you an overview of the Conversation API.
Table 2-3. Conversation API
Beans in Expression Language
One of the key features of CDI is that it knits together the transactional tier (see Chapter 9) and the web tier. But as you’ve seen so far, one of the primary characteristics of CDI is that DI is completely typesafe and does not depend on character-based names. While this is great in Java code, beans would not be resolvable without a character-based name outside Java such as EL in JSF pages for example.
By default, CDI Beans are not assigned any name and are not resolvable via EL binding. To assign a bean a name, it must be annotated with the @javax.inject.Named built-in qualifier as shown in Listing 2-22.
Listing 2-22. A BookService with a Character-Based Name
@Named
public class BookService {

  private String title, description;
  private Float price;
  private Book book;

  @Inject @ThirteenDigits
  private NumberGenerator numberGenerator;

  public String createBook () {
    book = new Book(title, price, description);
    book.setIsbn(numberGenerator.generateNumber());
    return "customer.xhtml";
  }
}
The @Named qualifier allows you to access the BookService bean through its name (which by default is the class name in camel case with the first letter in lowercase). The following code shows a JSF button invoking the createBook method:
<h:commandButton value="Send email" action="#{ bookService.createBook }"/>
You can also override the name of the bean by adding a different name to the qualifier.
@Named("myService")
public class BookService {...}
Then you can use this new name on your JSF page.
<h:commandButton value="Send email" action="#{ myService.createBook }"/>
Interceptors
Interceptors allow you to add cross-cutting concerns to your beans. As shown in Figure 2-2, when a client invokes a method on a Managed Bean (and therefore a CDI Bean, an EJB, a RESTful web service . . .), the container is able to intercept the call and process business logic before the bean’s method is invoked. Interceptors fall into four types.
- Constructor-level interceptors: Interceptor associated with a constructor of the target class (@AroundConstruct),
- Method-level interceptors: Interceptor associated with a specific business method (@AroundInvoke),
- Timeout method interceptors: Interceptor that interposes on timeout methods with @AroundTimeout (only used with EJB timer service, see Chapter 8), and
- Life-cycle callback interceptors: Interceptor that interposes on the target instance life-cycle event callbacks (@PostConstruct and @PreDestroy).
![]() Note Since Java EE 6, interceptors have evolved into a separate specification (they used to be bundled with the EJB specification). They can be applied to Managed Bean, as you’ll see in this section, but also to EJBs, SOAP, and RESTful web services.
Note Since Java EE 6, interceptors have evolved into a separate specification (they used to be bundled with the EJB specification). They can be applied to Managed Bean, as you’ll see in this section, but also to EJBs, SOAP, and RESTful web services.
There are several ways of defining interception. The simplest is to add interceptors (method-level, timeout, or life-cycle interceptors) to the bean itself as shown in Listing 2-23. CustomerService annotates logMethod() with @AroundInvoke. logMethod() is used to log a message when a method is entered and exited. Once this Managed Bean is deployed, any client invocation to createCustomer() or findCustomerById() will be intercepted, and the logMethod() will be applied. Note that the scope of this interceptor is limited to the bean itself (the target class).
Listing 2-23. A CustomerService Using Around-Invoke Interceptor
@Transactional
public class CustomerService {

  @Inject
  private EntityManager em;
  @Inject
  private Logger logger;

  public void createCustomer(Customer customer) {
    em.persist(customer);
  }

  public Customer findCustomerById(Long id) {
    return em.find(Customer.class, id);
  }

  @AroundInvoke
  private Object logMethod( InvocationContext ic ) throws Exception {
    logger.entering( ic .getTarget().toString(), ic .getMethod().getName());
    try {
      return ic.proceed() ;
    } finally {
      logger.exiting( ic .getTarget().toString(), ic .getMethod().getName());
    }
  }
}
Despite being annotated with @AroundInvoke, logMethod() must have the following signature pattern:
@AroundInvoke
Object <METHOD>(InvocationContext ic) throws Exception;
The following rules apply to an around-invoke method (as well constructor, timeout, or life-cycle interceptors):
- The method can have public, private, protected, or package-level access but must not be static or final.
- The method must have a javax.interceptor.InvocationContext parameter and must return Object, which is the result of the invoked target method.
- The method can throw a checked exception.
The InvocationContext object allows interceptors to control the behavior of the invocation chain. If several interceptors are chained, the same InvocationContext instance is passed to each interceptor, which can add contextual data to be processed by other interceptors. Table 2-4 describes the InvocationContext API.
Table 2-4. Definition of the InvocationContext Interface
| Method | Description |
|---|---|
| getContextData | Allows values to be passed between interceptor methods in the same InvocationContext instance using a Map. |
| getConstructor | Returns the constructor of the target class for which the interceptor was invoked. |
| getMethod | Returns the method of the bean class for which the interceptor was invoked. |
| getParameters | Returns the parameters that will be used to invoke the business method. |
| getTarget | Returns the bean instance that the intercepted method belongs to. |
| getTimer | Returns the timer associated with a @Timeout method. |
| proceed | Causes the invocation of the next interceptor method in the chain. It returns the result of the next method invoked. If a method is of type void, proceed returns null. |
| setParameters | Modifies the value of the parameters used for the target class method invocation. The types and the number of parameters must match the bean’s method signature, or IllegalArgumentException is thrown. |
To explain how the code works in Listing 2-23, let’s take a look at the sequence diagram shown in Figure 2-6 to see what happens when a client invokes the createCustomer() method. First of all, the container intercepts the call and, instead of directly processing createCustomer(), first invokes the logMethod() method. logMethod() uses the InvocationContext interface to get the name of the invoked bean (ic.getTarget()) and invoked method (ic.getMethod()) to log an entry message (logger.entering()). Then, the proceed() method is called. Calling InvocationContext.proceed() is extremely important as it tells the container that it should proceed to the next interceptor or call the bean’s business method. Not calling proceed() would stop the interceptors chain and would avoid calling the business method. The createCustomer() is finally invoked, and once it returns, the interceptor finishes its execution by logging an exit message (logger.exiting()). The same sequence would happen if a client invokes the findCustomerById() method.
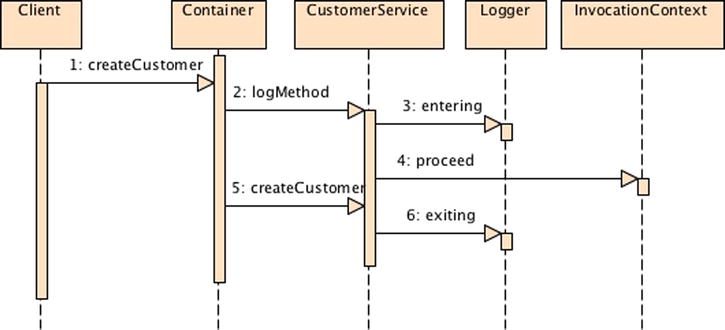
Figure 2-6. A call to a business method being intercepted
![]() Note Listing 2-23 uses the new @javax.transaction.Transactional annotation. It is used to control transaction boundaries on CDI Beans as well as Servlets, JAX-RS, and JAX-WS service endpoints. It provides the semantics of EJB transaction attributes in CDI. @Transactional is implemented via an interceptor. More on transactions in Chapter 9.
Note Listing 2-23 uses the new @javax.transaction.Transactional annotation. It is used to control transaction boundaries on CDI Beans as well as Servlets, JAX-RS, and JAX-WS service endpoints. It provides the semantics of EJB transaction attributes in CDI. @Transactional is implemented via an interceptor. More on transactions in Chapter 9.
Class Interceptors
Listing 2-23 defines an interceptor that is only available for CustomerService. But most of the time you want to isolate cross-cutting concerns into a separate class and tell the container to intercept the calls on several beans. Logging is a typical example of a situation in which you want all the methods of all your beans to log entering and exiting messages. To specify a class interceptor, you need to develop a separate class and instruct the container to apply it on a specific bean or bean’s method.
To share some code among multiple beans, let’s take the logMethod() methods from Listing 2-23 and isolate it in a separate class as shown in Listing 2-24. Notice the init() method which is annotated with @AroundConstruct and will be invoked only when the constructor of the bean is called.
Listing 2-24. An Interceptor Class with Around-Invoke and Around-Construct
public class LoggingInterceptor {

  @Inject
  private Logger logger;

  @AroundConstruct
  private void init( InvocationContext ic ) throws Exception {
    logger.fine("Entering constructor");
    try {
      ic.proceed();
    } finally {
      logger.fine("Exiting constructor");
    }
  }

  @AroundInvoke
  public Object logMethod(InvocationContext ic) throws Exception {
    logger.entering( ic .getTarget().toString(), ic .getMethod().getName());
    try {
      return ic.proceed() ;
    } finally {
      logger.exiting( ic .getTarget().toString(), ic .getMethod().getName());
    }
  }
}
The LoggingInterceptor can now be wrapped transparently by any bean interested in this interceptor. To do this, the bean needs to inform the container with a@javax.interceptor.Interceptors annotation. In Listing 2-25, the annotation is set on the createCustomer() method. This means that any invocation of this method will be intercepted by the container, and the LoggingInterceptor class will be invoked (logging a message on entry and exit of the method).
Listing 2-25. CustomerService Uses an Interceptor on One Method
@Transactional
public class CustomerService {

  @Inject
  private EntityManager em;

  @Interceptors(LoggingInterceptor.class)
  public void createCustomer(Customer customer) {
    em.persist(customer);
  }

  public Customer findCustomerById(Long id) {
    return em.find(Customer.class, id);
  }
}
In Listing 2-25, @Interceptors is only attached to the createCustomer() method. This means that if a client invokes findCustomerById(), the container will not intercept the call. If you want the calls to both methods to be intercepted, you can add the @Interceptors annotation either on both methods or on the bean itself. When you do so, the interceptor is triggered if either method is invoked. And because the interceptor has an @AroundConstruct, the call to the constructor will be also intercepted.
@Transactional
@Interceptors(LoggingInterceptor.class)
public class CustomerService {
  public void createCustomer(Customer customer) {...}
  public Customer findCustomerById(Long id) {...}
}
If your bean has several methods, and you want to apply an interceptor to the entire bean except for a specific method, you can use the javax.interceptor.ExcludeClassInterceptors annotation to exclude a call from being intercepted. In the following code, the call to updateCustomer() will not be intercepted, but all others will:
@Transactional
@Interceptors(LoggingInterceptor.class)
public class CustomerService {
  public void createCustomer(Customer customer) {...}
  public Customer findCustomerById(Long id) {...}
  @ExcludeClassInterceptors
  public Customer updateCustomer(Customer customer) { ... }
}
Life-Cycle Interceptor
At the beginning of this chapter I explained the life cycle of a Managed Bean (Figure 2-2) and callback events. With a callback annotation, you can inform the container to invoke a method at a certain life-cycle phase (@PostConstruct and @PreDestroy). For example, if you want to log an entry each time a bean instance is created, you just need to add a @PostConstruct annotation on one method of your bean and add some logging mechanisms to it. But what if you need to capture life-cycle events across many types of beans? Life-cycle interceptors allow you to isolate some code into a class and invoke it when a life-cycle event is triggered.
Listing 2-26 shows the ProfileInterceptor class with two methods: logMethod(), used for postconstruction (@PostConstruct), and profile(), used for method interception (@AroundInvoke).
Listing 2-26. An Interceptor with Both Life-Cycle and Around-Invoke
public class ProfileInterceptor {

  @Inject
  private Logger logger;

  @PostConstruct
  public void logMethod(InvocationContext ic) throws Exception {
    logger.fine(ic.getTarget().toString());
      try {
      ic.proceed();
    } finally {
      logger.fine(ic.getTarget().toString());
    }
  }

  @AroundInvoke
  public Object profile(InvocationContext ic) throws Exception {
    long initTime = System.currentTimeMillis();
    try {
      return ic.proceed();
    } finally {
      long diffTime = System.currentTimeMillis() - initTime;
      logger.fine(ic.getMethod() + " took " + diffTime + " millis");
    }
  }
}
As you can see in Listing 2-26, life-cycle interceptors take an InvocationContext parameter and return void instead of Object. To apply the interceptor defined in Listing 2-26, the bean CustomerService (Listing 2-27) needs to use the @Interceptors annotation and define the ProfileInterceptor. When the bean is instantiated by the container, the logMethod() will be invoked prior to the init() method. Then, if a client calls createCustomer() or findCustomerById(), the profile() method will be invoked.
Listing 2-27. CustomerService Using an Interceptor and a Callback Annotation
@Transactional
@Interceptors(ProfileInterceptor.class)
public class CustomerService {

  @Inject
  private EntityManager em;

  @PostConstruct
  public void init() {
    // ...
  }

  public void createCustomer(Customer customer) {
    em.persist(customer);
  }

  public Customer findCustomerById(Long id) {
    return em.find(Customer.class, id);
  }
}
Chaining and Excluding Interceptors
You’ve seen how to intercept calls within a single bean (with @AroundInvoke) and across multiple beans (using @Interceptors). Interceptors 1.2 also lets you chain several interceptors.
In fact, the @Interceptors annotation is capable of attaching more than one interceptor, as it takes a comma-separated list of interceptors as a parameter. When multiple interceptors are defined, the order in which they are invoked is determined by the order in which they are specified in the @Interceptors annotation. For example, the code in Listing 2-28 uses @Interceptors at the bean and method level.
Listing 2-28. CustomerService Chaining Serveral Interceptors
@Stateless
@Interceptors({I1.class, I2.class})
public class CustomerService {
  public void createCustomer(Customer customer) {...}
  @Interceptors({I3.class, I4.class})
  public Customer findCustomerById(Long id) {...}
  public void removeCustomer(Customer customer) {...}
  @ExcludeClassInterceptors
  public Customer updateCustomer(Customer customer) {...}
}
When a client calls the updateCustomer() method, no interceptor is invoked because the method is annotated with @ExcludeClassInterceptors. When the createCustomer() method is called, interceptor I1 is executed followed by interceptor I2. When the findCustomerById() method is invoked, interceptors I1, I2, I3, and I4 get executed in this order.
Interceptor Binding
Interceptors are defined in their own specification (JSR 318) and can be used in any Managed Bean (EJBs, Servlets, RESTful web services . . . ). But the CDI specification has extended it by adding interceptor binding, meaning that interceptor binding can only be used if CDI is enabled.
If you look at Listing 2-25 as an example, you can see the way interceptors work; you need to specify the implementation of the interceptor directly on the implementation of the bean (e.g., @Interceptors(LoggingInterceptor.class)). This is typesafe, but not loosely coupled. CDI provides interceptor binding that introduces a level of indirection and loose coupling. An interceptor binding type is a user-defined annotation that is itself annotated @InterceptorBinding which binds the interceptor class to the bean with no direct dependency between the two classes.
Listing 2-29 shows an interceptor binding called Loggable. As you can see, this code is very similar to a qualifier. An interceptor binding is an annotation itself annotated with @InterceptorBinding, which can be empty or have members (such as the ones seen in Listing 2-13).
Listing 2-29. Loggable Interceptor Binding
@InterceptorBinding
@Target({METHOD, TYPE})
@Retention(RUNTIME)
public @interface Loggable { }
Once you have an interceptor binding you need to attach it to the interceptor itself. This is done by annotating the interceptor with both @Interceptor and the interceptor binding (@Loggable in Listing 2-30).
Listing 2-30. Loggable Interceptor
@Interceptor
@Loggable
public class LoggingInterceptor {

  @Inject
  private Logger logger;

  @AroundInvoke
  public Object logMethod(InvocationContext ic) throws Exception {
    logger.entering( ic .getTarget().toString(), ic .getMethod().getName());
    try {
      return ic.proceed() ;
    } finally {
      logger.exiting( ic .getTarget().toString(), ic .getMethod().getName());
    }
  }
}
Now you can apply the interceptor to a bean by annotating the bean class with the same interceptor binding as shown in Listing 2-31. This gives you loose coupling (as the implementation class of the interceptor is not explicitly stated) and a nice level of indirection.
Listing 2-31. CustomerService using the Interceptor Binding
@Transactional
@Loggable
public class CustomerService {

  @Inject
  private EntityManager em;

  public void createCustomer(Customer customer) {
    em.persist(customer);
  }

  public Customer findCustomerById(Long id) {
    return em.find(Customer.class, id);
  }
}
In Listing 2-31 the interceptor binding is on the bean, meaning that every method will be intercepted and logged. But like interceptors, you can apply an interceptor binding to a method instead of an entire bean.
@Transactional
public class CustomerService {
  @Loggable
  public void createCustomer(Customer customer) {...}
  public Customer findCustomerById(Long id) {...}
}
Interceptors are deployment-specific and are disabled by default. Like alternatives, interceptors have to be enabled by using the CDI deployment descriptor beans.xml of the jar or Java EE module as shown in Listing 2-32.
Listing 2-32. The beans.xml Deployment Descriptor Enabling an Interceptor
<beans xmlns=" http://xmlns.jcp.org/xml/ns/javaee "
       xmlns:xsi=" http://www.w3.org/2001/XMLSchema-instance "
       xsi:schemaLocation=" http://xmlns.jcp.org/xml/ns/javaee →
                           http://xmlns.jcp.org/xml/ns/javaee/beans_1_1.xsd "
       version="1.1" bean-discovery-mode="all">

  <interceptors>
    <class>org.agoncal.book.javaee7.chapter02. LoggingInterceptor </class>
  </interceptors>
</beans>
Prioritizing Interceptors Binding
Interceptor binding brings you a level of indirection, but you lose the possibility to order the interceptors as shown in Listing 2-28 (@Interceptors({I1.class, I2.class})). From CDI 1.1 you can prioritize them using the @javax.annotation.Priority annotation (or the XML equivalent in beans.xml) along with a priority value as shown in Listing 2-33.
Listing 2-33. Loggable Interceptor Binding
@Interceptor
@Loggable
@Priority(200)
public class LoggingInterceptor {

  @Inject
  private Logger logger;

  @AroundInvoke
  public Object logMethod(InvocationContext ic) throws Exception {
    logger.entering( ic .getTarget().toString(), ic .getMethod().getName());
    try {
      return ic.proceed() ;
    } finally {
      logger.exiting( ic .getTarget().toString(), ic .getMethod().getName());
    }
  }
}
@Priority takes an integer that can take any value. The rule is that interceptors with smaller priority values are called first. Java EE 7 defines platform-level priorities and you can then have your interceptors called before or after certain events. The javax.interceptor.Interceptor annotation defines the following set of constants:
- PLATFORM_BEFORE = 0: Start of range for early interceptors defined by the Java EE platform,
- LIBRARY_BEFORE = 1000: Start of range for early interceptors defined by extension libraries,
- APPLICATION = 2000: Start of range for interceptors defined by applications,
- LIBRARY_AFTER = 3000: Start of range for late interceptors defined by extension libraries, and
- PLATFORM_AFTER = 4000: Start of range for late interceptors defined by the Java EE platform.
So if you want your interceptor to be executed before any application interceptor, but after any early platform interceptor, you can write the following:
@Interceptor
@Loggable
@Priority(Interceptor.Priority.LIBRARY_BEFORE + 10)
public class LoggingInterceptor {...}
Decorators
Interceptors perform cross-cutting tasks and are perfect for solving technical concerns such as transaction management, security, or logging. By nature interceptors are unaware of the actual semantics of the actions they intercept and therefore are not appropriate for separating business-related concerns. The reverse is true for decorators.
Decorators are a common design pattern from the Gang of Four. The idea is to take a class and wrap another class around it (i.e., decorate it). This way, when you call a decorated class, you always pass through the surrounding decorator before you reach the target class. Decorators are meant to add additional logic to a business method. They are not able to solve technical concerns that cut across many disparate types. Interceptors and decorators, though similar in many ways, are complementary.
Let’s take the example of an ISSN number generator. ISSN is an 8-digit number that has been replaced by ISBN (13-digit number). Instead of having two separate number generators (such as the one in Listing 2-9 and Listing 2-10) you can decorate the ISSN generator to add an extra algorithm that turns an 8-digit number into a 13-digit number. Listing 2-34 implements such an algorithm as a decorator. The FromEightToThirteenDigitsDecorator class is annotated with javax.decorator.Decorator, implements business interfaces (the NumberGenerator defined in Figure 2-3), and overrides the generateNumber method (a decorator can be declared as an abstract class so that it does not have to implement all the business methods of the interfaces if there are many). The generateNumber() method invokes the target bean to generate an ISSN, adds some business logic to transform such a number, and returns an ISBN number.
Listing 2-34. Decorator Transforming an 8-Digit Number to 13
@Decorator
public class FromEightToThirteenDigitsDecorator implements NumberGenerator {

  @Inject @Delegate
  private NumberGenerator numberGenerator;

  public String generateNumber () {
    String issn = numberGenerator.generateNumber() ;
    String isbn = "13-84356" + issn.substring(1);
    return isbn;
  }
}
Decorators must have a delegate injection point (annotated with @Delegate), with the same type as the beans they decorate (here the NumberGenerator interface). It allows the decorator to invoke the delegate object (i.e., the target bean IssnNumberGenerator) and therefore invoke any business method on it (such as numberGenerator.generateNumber() in Listing 2-34).
By default, all decorators are disabled like alternatives and interceptors. You need to enable decorators in the beans.xml as shown in Listing 2-35.
Listing 2-35. The beans.xml Deployment Descriptor Enabling a Decorator
<beans xmlns=" http://xmlns.jcp.org/xml/ns/javaee "
       xmlns:xsi=" http://www.w3.org/2001/XMLSchema-instance "
       xsi:schemaLocation=" http://xmlns.jcp.org/xml/ns/javaee →
                           http://xmlns.jcp.org/xml/ns/javaee/beans_1_1.xsd "
       version="1.1" bean-discovery-mode="all">

  <decorators>
    <class>org.agoncal.book.javaee7.chapter02. FromEightToThirteenDigitsDecorator </class>
  </decorators>
</beans>
If an application has both interceptors and decorators, the interceptors are invoked first.
DI, alternatives, interceptors, and decorators enable loose coupling by allowing additional behavior to vary, either at deployment time or at runtime. Events go one step further, allowing beans to interact with no compile time dependency at all. One bean can define an event, another bean can fire the event, and yet another bean can handle the event. The beans can be in separate packages and even in separate tiers of the application. This basic schema follows the observer/observable design pattern from the Gang of Four.
Event producers fire events using the javax.enterprise.event.Event interface. A producer raises events by calling the fire() method, passes the event object, and is not dependent on the observer. In Listing 2-36 the BookService fires an event (bookAddedEvent) each time a book is created. The code bookAddedEvent.fire(book) fires the event and notifies any observer methods observing this particular event. The content of this event is the Book object itself that will be carried from the producer to the consumer.
Listing 2-36. The BookService Fires an Event Each Time a Book Is Created
public class BookService {

  @Inject
  private NumberGenerator numberGenerator;

  @Inject
  private Event<Book> bookAddedEvent ;

  public Book createBook(String title, Float price, String description) {
    Book book = new Book(title, price, description);
    book.setIsbn(numberGenerator.generateNumber());
    bookAddedEvent.fire(book);
    return book;
  }
}
Events are fired by the event producer and subscribed to by event observers. An observer is a bean with one or more observer methods. Each of these observer methods takes an event of a specific type as a parameter that is annotated with the @Observes annotation and optional qualifiers. The observer method is notified of an event if the event object matches the event type and all the qualifiers. Listing 2-37 shows the inventory service whose job is to keep the inventory of available books by increasing the book stock. It has an addBook method that observes any event typed with Book. The annotated parameter is called the event parameter. So once the event is fired from the BookService bean, the CDI container pauses the execution and passes the event to any registered observer. In our case the addBook method in Listing 2-37 will be invoked and the inventory updated, and the container will then continue the code execution where it paused in the BookService bean. This means that events in CDI are not treated asynchronously.
Listing 2-37. The InventoryService Observes the Book Event
public class InventoryService {

  @Inject
  private Logger logger;
  List<Book> inventory = new ArrayList<>();

  public void addBook( @Observes Book book ) {
    logger.info("Adding book " + book.getTitle() + " to inventory");
    inventory.add(book);
  }
}
Like most of CDI, event production and subscription are typesafe and allow qualifiers to determine which events observers will be observing. An event may be assigned one or more qualifiers (with or without members), which allows observers to distinguish it from other events of the same type. Listing 2-38 revisits the BookService bean by adding an extra event. When a book is created it fires a bookAddedEvent and when a book is removed it fires a bookRemovedEvent, both of type Book. To distinguish both events, each is qualified either by @Added or by @Removed. The code of these qualifiers is identical to the code in Listing 2-7: an annotation with no members and annotated with @Qualifier.
Listing 2-38. The BookService Firing Several Events
public class BookService {

  @Inject
  private NumberGenerator numberGenerator;

  @Inject @Added
  private Event<Book> bookAddedEvent ;

  @Inject @Removed
  private Event<Book> bookRemovedEvent ;

  public Book createBook(String title, Float price, String description) {
    Book book = new Book(title, price, description);
    book.setIsbn(numberGenerator.generateNumber());
    bookAddedEvent.fire(book);
    return book;
  }

  public void deleteBook(Book book) {
    bookRemovedEvent.fire(book);
  }
}
The InventoryService in Listing 2-39 observes both events by declaring two separate methods observing either the book added event (@Observes @Added Book) or the book removed event (@Observes @Removed Book).
Listing 2-39. The InventoryService Observing Several Events
public class InventoryService {

  @Inject
  private Logger logger;
  List<Book> inventory = new ArrayList<>();

  public void addBook( @Observes @Added Book book ) {
    logger.warning("Adding book " + book.getTitle() + " to inventory");
    inventory.add(book);
  }

  public void removeBook( @Observes @Removed Book book ) {
    logger.warning("Removing book " + book.getTitle() + " to inventory");
    inventory.remove(book);
  }
}
Because the event model uses qualifiers, you can benefit from having members on theses qualifiers or aggregating them. The code that follows observes all the added books which have a price greater than 100:
void addBook(@Observes @Added @Price(greaterThan=100) Book book)
Putting It All Together
Now let’s put some of these concepts together, write some beans, producers, use injection, qualifiers, alternatives, and interceptor binding. This example uses the Weld container to run a Main class in Java SE as well as an integration test to check if our injection is correct.
Figure 2-7 shows a class diagram with all the needed classes to run this sample and describes all the injection points.
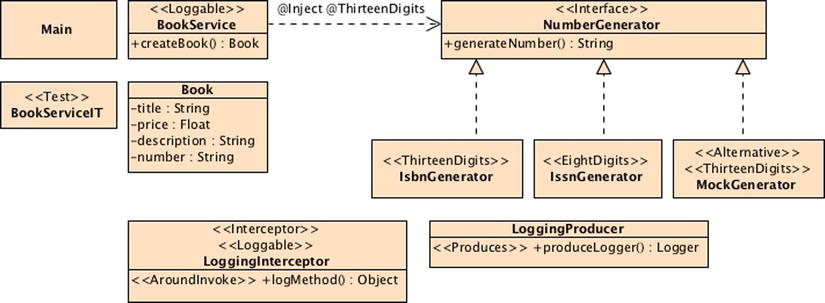
Figure 2-7. Putting It All Together
- The BookService bean has a method to create Book POJOs.
- The interface NumberGenerator has two implementations to generate ISBN and ISSN numbers (IsbnGenerator and IssnGenerator) and one alternative implementation for generating mock numbers for integration tests (MockGenerator).
- The NumberGenerator implementations use two qualifiers to avoid ambiguous dependency injection: @ThirteenDigits and @EightDigits.
- The LoggingProducer has a method-producer to allow Logger injection. The LoggingInterceptor coupled with the Loggable interceptor binding allows CDI Beans to log method entries.
- The Main class uses the BookService to create a Book and generate a number with the IsbnGenerator. The BookServiceIT integration test uses the MockGenerator alternative to generate a mock book number.
The classes described in Figure 2-7 follow the standard Maven directory structure.
- src/main/java: The directory for all the beans, qualifiers, interceptors, and Main class,
- src/main/resources: An empty beans.xml file so we can trigger CDI with no alternative nor interceptors,
- src/test/java: The directory for the integration tests BookServiceIT and the alternative MockGenerator,
- src/test/resources: A beans.xml enabling the MockGenerator alternative and the LoggingInterceptor interceptor, and
- pom.xml: The Maven Project Object Model (POM) describing the project and its dependencies.
Writing the Book and BookService Classes
The CD-BookStore application uses the BookService (Listing 2-41) to create books. The Book POJO (Listing 2-40) has a title, a description, and a price. The number of the book is generated by an external service and can be either an ISBN or an ISSN number.
Listing 2-40. The Book POJO
public class Book {

  private String title;
  private Float price;
  private String description;
  private String number;

  // Constructors, getters, setters
}
The BookService (Listing 2-41) has one method that takes a title, a price, and a description and returns a Book POJO. It uses injection (@Inject) and a qualifier (@ThirteenDigits) to invoke the generateNumber method of the IsbnGenerator to set the book’s ISBN number.
Listing 2-41. The BookService Using Dependency Injection and Interception
@Loggable
public class BookService {

  @Inject  @ThirteenDigits
  private NumberGenerator numberGenerator ;

  public Book createBook(String title, Float price, String description) {
    Book book = new Book(title, price, description);
    book.setNumber( numberGenerator.generateNumber() );
    return book;
  }
}
The BookService in Listing 2-41 is annotated with the interceptor binding @Loggable (Listing 2-50) which logs the method entry and exit if enabled.
Writing the NumberGenerator Classes
The BookService in Listing 2-41 depends on the interface NumberGenerator (Listing 2-42). This interface has one method that generates and returns a book number. This interface is implemented by the IsbnGenerator, IssnGenerator, and MockGenerator classes.
Listing 2-42. The NumberGenerator Interface
public interface NumberGenerator {
    String generateNumber ();
}
The IsbnGenerator (Listing 2-43) is qualified with @ThirteenDigits. This informs CDI that the number generated is made of 13 digits. Notice that the IsbnGenerator class also uses injection to get a java.util.logging.Logger (produced in Listing 2-48) and the interceptor binding @Loggable to log the method entry and exit
Listing 2-43. The IsbnGenerator Generates a 13-Digit Number
@ThirteenDigits
public class IsbnGenerator implements NumberGenerator {

  @Inject
  private Logger logger;

  @Loggable
  public String generateNumber () {
    String isbn = " 13-84356- " + Math.abs(new Random().nextInt());
    logger.info(" Generated ISBN : " + isbn);
    return isbn;
  }
}
The IssnGenerator in Listing 2-44 is the eight-digit implementation of the NumberGenerator.
Listing 2-44. The IssnGenerator Generates an Eight-Digit Number
@EightDigits
public class IssnGenerator implements NumberGenerator {

  @Inject
  private Logger logger;

  @Loggable
  public String generateNumber () {
    String issn =  " 8- " + Math.abs(new Random().nextInt());
    logger.info("Generated ISBN : " + issn);
    return issn;
  }
}
The MockGenerator in Listing 2-45 is an alternative (@Alternative) to the IsbnGenerator (because it is also qualified with @ThirteenDigits). The MockGenerator is only used for integration tests because it is only enabled in the beans.xml of the testing environment (see Listing 2-55).
Listing 2-45. Mock Number Generator as an Alternative to 13 Digits
@Alternative
@ThirteenDigits
public class MockGenerator implements NumberGenerator {

  @Inject
  private Logger logger;

  @Loggable
  public String generateNumber () {
    String mock = " MOCK- " + Math.abs(new Random().nextInt());
    logger.info("Generated Mock : " + mock);
    return mock;
  }
}
Because there are several implementations of the NumberGenerator, CDI needs to qualify each bean and each injection point to avoid ambiguous injection. To do this, it uses the two qualifiers ThirteenDigits (Listing 2-46) and EightDigits (Listing 2-47) which are both annotated with javax.inject.Qualifier and have no members (just empty annotations). @ThirteenDigits is the one used in the IsbnGenerator bean (Listing 2-43) as well as the injection point in BookService (Listing 2-41).
Listing 2-46. The 13-Digits Qualifier
@Qualifier
@Retention(RUNTIME)
@Target({FIELD, TYPE, METHOD})
public @interface ThirteenDigits { }
Listing 2-47. The Eight-Digits Qualifier
@Qualifier
@Retention(RUNTIME)
@Target({FIELD, TYPE, METHOD})
public @interface EightDigits { }
The sample application uses logging in several ways. As you can see in Listings 2-43, 2-44, and 2-45, all the NumberGenerator implementations use injection to get a java.util.logging.Logger and write logs. Because Logger belongs to the JDK, it is not injectable by default (the rt.jar file does not have a beans.xml file) and you then need to produce it. The LoggingProducer class in Listing 2-48 has a producer method (produceLogger) annotated with @Produces that will create and return a Logger parameterized with the injection point class name.
Listing 2-48. Logging Producer
public class LoggingProducer {

  @Produces
  public Logger produceLogger(InjectionPoint injectionPoint) {
    return Logger.getLogger(injectionPoint.getMember().getDeclaringClass().getName());
  }
}
The LoggingInterceptor in Listing 2-49 uses the produced Logger to log the entering and exiting of methods. Because logging can be treated as a cross-cutting concern it is externalized as an interceptor (@AroundInvoke on logMethod). The LoggingInterceptor defines the @Loggable interceptor binding (Listing 2-50) and can then be used in any bean (e.g., BookService in Listing 2-41).
Listing 2-49. Interceptor Logging Methods on Entry and on Exit
@Interceptor
@Loggable
public class LoggingInterceptor {

  @Inject
  private Logger logger ;

  @AroundInvoke
  public Object logMethod(InvocationContext ic) throws Exception {
    logger.entering (ic.getTarget().getClass().getName(), ic.getMethod().getName());
    try {
      return ic.proceed();
    } finally {
      logger.exiting (ic.getTarget().getClass().getName(), ic.getMethod().getName());
    }
  }
}
Listing 2-50. The Loggable Inteceptor Binding
@InterceptorBinding
@Target({METHOD, TYPE})
@Retention(RUNTIME)
public @interface Loggable { }
To run the sample application we need a main class that triggers the CDI container and invokes the BookService.createBook method. CDI 1.1 does not have a standard API to bootstrap the container, so the code in Listing 2-51 is Weld specific. It first initializes the WeldContainer and returns a fully constructed and injected instance of the BookService.class. Invoking the createBook method will then use all the container services: the IsbnGenerator and the Logger will be injected into the BookService and a Book with an ISBN number will be created and displayed.
Listing 2-51. Main Class Using the CDI Container to Invoke the BookService
public class Main {

  public static void main(String[] args) {

    Weld weld = new Weld();
    WeldContainer container = weld.initialize();

    BookService bookService = container.instance(). select(BookService.class) .get();

    Book book = bookService. createBook ("H2G2", 12.5f, "Geeky scifi Book");

    System.out.println(book);

    weld.shutdown();
  }
}
The code in Listing 2-51 is Weld specific and therefore not portable. It will not work in other CDI implementations such as OpenWebBeans (Apache) or CanDI (Caucho). One goal of a future CDI release will be to standardize a bootstrapping API.
Trigger CDI with beans.xml
To trigger CDI and allow this sample to work, we need a beans.xml file in the class path of the application. As you can see in Listing 2-52 the beans.xml file is completely empty, but without it CDI will not be triggered, bean discovery will not happen, and injection will not work.
Listing 2-52. Empty beans.xml File to Trigger CDI
<beans xmlns=" http://xmlns.jcp.org/xml/ns/javaee "
       xmlns:xsi=" http://www.w3.org/2001/XMLSchema-instance "
       xsi:schemaLocation=" http://xmlns.jcp.org/xml/ns/javaee →
                           http://xmlns.jcp.org/xml/ns/javaee/beans_1_1.xsd "
       version="1.1" bean-discovery-mode="all">
</beans>
Compiling and Executing with Maven
All the classes need now to be compiled before running the Main class and the BookServiceIT integration test. The pom.xml in Listing 2-53 declares all the necessary dependencies to compile the code (org.jboss.weld.se:weld-se contains the CDI API and the Weld implementation) and run the test (junit:junit). Setting the version to 1.7 in the maven-compiler-plugin explicitly specifies that you want to use Java SE 7 (<source> 1.7 </source>). Notice that we use the exec-maven-plugin to be able to execute the Main class with Maven.
Listing 2-53. The pom.xml File to Compile, Run, and Test
<?xml version="1.0" encoding="UTF-8"?>
<project xmlns=" http://maven.apache.org/POM/4.0.0 " →
         xmlns:xsi=" http://www.w3.org/2001/XMLSchema-instance " →
         xsi:schemaLocation=" http://maven.apache.org/POM/4.0.0 →
         http://maven.apache.org/xsd/maven-4.0.0.xsd ">
  <modelVersion>4.0.0</modelVersion>

  <parent>
    <groupId>org.agoncal.book.javaee7</groupId>
    <artifactId>chapter02</artifactId>
    <version>1.0</version>
  </parent>

  <groupId>org.agoncal.book.javaee7.chapter02</groupId>
  <artifactId>chapter02-putting-together</artifactId>
  <version>1.0</version>

  <dependencies>
    <dependency>
      <groupId>org.jboss.weld.se</groupId>
      <artifactId> weld-se </artifactId>
      <version>2.0.0</version>
    </dependency>
    <dependency>
      <groupId>junit</groupId>
      <artifactId> junit </artifactId>
      <version>4.11</version>
      <scope>test</scope>
    </dependency>
  </dependencies>

  <build>

    <plugins>
      <plugin>
        <groupId>org.apache.maven.plugins</groupId>
        <artifactId> maven-compiler-plugin </artifactId>
        <version>2.5.1</version>
        <configuration>
          <source> 1.7 </source>
          <target>1.7</target>
        </configuration>
      </plugin>

      <plugin>
        <groupId>org.codehaus.mojo</groupId>
        <artifactId> exec-maven-plugin </artifactId>
        <version>1.2.1</version>
        <executions>
          <execution>
            <goals>
              <goal>java</goal>
            </goals>
            <configuration>
              <mainClass> org.agoncal.book.javaee7.chapter02.Main </mainClass>
            </configuration>
          </execution>
        </executions>
      </plugin>

      <plugin>
        <groupId>org.apache.maven.plugins</groupId>
        <artifactId>maven-failsafe-plugin</artifactId>
        <version>2.12.4</version>
        <executions>
          <execution>
            <id>integration-test</id>
            <goals>
              <goal> integration-test </goal>
              <goal>verify</goal>
            </goals>
          </execution>
        </executions>
      </plugin>
    </plugins>
  </build>
</project>
To compile the classes, open a command line in the root directory containing the pom.xml file and enter the following Maven command:
$ mvn compile
Running the Main Class
Thanks to the exec-maven-plugin configured in the pom.xml in Listing 2-53, we can now very easily execute the Main class defined in Listing 2-51. Open a command line in the root directory containing the pom.xml file and enter the following Maven command:
$ mvn exec:java
This will execute the Main class that uses the BookService to create a Book. Thanks to injection the Logger will display the following output:
Info: Generated ISBN : 13-84356-1864341788
Book{title='H2G2', price=12.5, description='Geeky scifi Book', isbn='13-84356-1864341788'}
Writing the BookServiceIT Class
Listing 2-54 shows the BookServiceIT class testing the BookService bean. It uses the same Weld-specific API to bootstrap CDI as the Main class shown in Listing 2-51. Once the BookService.createBook is invoked, the integration test checks that the generated number starts with "MOCK". That’s because the integration test uses the MockGenerator alternative (instead of the IsbnGenerator).
Listing 2-54. The BookServiceIT Integration Test
public class BookServiceIT {

  @Test
  public void shouldCheckNumberIsMOCK () {

    Weld weld = new Weld();
    WeldContainer container = weld.initialize();

    BookService bookService = container.instance(). select(BookService.class) .get();

    Book book = bookService. createBook ("H2G2", 12.5f, "Geeky scifi Book");

    assertTrue(book.getNumber().startsWith("MOCK"));

    weld.shutdown();
  }
}
Enabling Alternatives and Interceptors in beans.xml for Integration Testing
The BookServiceIT integration test in Listing 2-54 needs the MockGenerator to be enabled. This is done by having a different beans.xml file for testing (Listing 2-55) and enabling alternatives (with the <alternatives> tag). In a testing environment you might want to increase the logs. You can do so by enabling the LoggingInterceptor in the beans.xml.
Listing 2-55. Enabling Alternatives and Interceptors in beans.xml File
<beans xmlns=" http://xmlns.jcp.org/xml/ns/javaee "
       xmlns:xsi=" http://www.w3.org/2001/XMLSchema-instance "
       xsi:schemaLocation=" http://xmlns.jcp.org/xml/ns/javaee →
       http://xmlns.jcp.org/xml/ns/javaee/beans_1_1.xsd "
       version="1.1" bean-discovery-mode="all">
  < alternatives >
    <class>org.agoncal.book.javaee7.chapter02. MockGenerator </class>
  </alternatives>
  < interceptors >
    <class>org.agoncal.book.javaee7.chapter02. LoggingInterceptor </class>
  </interceptors>
</beans>
Running the Integration Test
To execute the integration tests with the Maven Failsafe plugin (defined in the pom.xml in Listing 2-53) enter the following Maven command:
$ mvn integration-test
The BookServiceIT should run one successful integration test. You should also see several logs or methods entering and exiting.
Summary
In this chapter you have learned the difference between a POJO, a Managed Bean, and a CDI Bean and which services apply to which component model. Dependency Injection (JSR 330) and Contexts and Dependency Injection (JSR 299) both bring a standard, portable, and typesafe support for dependency injection to Java EE. CDI adds extra features such as scopes and contexts but also enhanced interceptors, decorators, and events. In fact, CDI natively implements several design patterns like the bridge (with alternatives), the observer/observable (with events), the decorator, the factory (with producers), and of course interception and injection.
Interceptors are the AOP-like mechanism of Java EE, allowing the container to invoke cross-cutting concerns on your application. Interceptors are easy to use, are powerful, and can be chained together or prioritized to apply several concerns to your beans.
CDI, being a vertical specification, is used in other Java EE specifications. In fact, the next chapters of this book will use some of these CDI services in some way.