
![]()
Java Persistence API has two sides. The first is the ability to map objects to a relational database. Configuration by exception allows persistence providers to do most of the work without much code, but the richness of JPA also allows customized mapping from objects to tables using either annotation or XML descriptors. From simple mapping (changing the name of a column) to more complex mapping (inheritance), JPA offers a wide spectrum of customizations. As a result, you can map almost any object model to a legacy database.
The other aspect of JPA is the ability to query these mapped objects. In JPA, the centralized service to manipulate instances of entities is the entity manager. It provides an API to create, find, remove, and synchronize objects with the database. It also allows the execution of different sorts of JPQL queries, such as dynamic, static, or native queries, against entities. Locking mechanisms are also possible with the entity manager.
The database world relies on Structured Query Language. This programming language is designed for managing relational data (retrieval, insertion, updating, and deletion), and its syntax is table oriented. You can select columns from tables made of rows, join tables together, combine the results of two SQL queries through unions, and so on. There are no objects here, only rows, columns, and tables. In the Java world, where we manipulate objects, a language made for tables (SQL) has to be twisted to suit a language made of objects (Java). This is where Java Persistence Query Language comes into play.
JPQL is the language defined in JPA to query entities stored in a relational database. JPQL syntax resembles SQL but operates against entity objects rather than directly with database tables. JPQL does not see the underlying database structure or deal with tables or columns but rather objects and attributes. And, for that, it uses the dot (.) notation that Java developers are familiar with.
In this chapter, you will learn how to manage persistent objects. This means you will learn how to do create, read, update, and delete (CRUD) operations with the entity manager as well as complex queries using JPQL. This chapter also talks about how JPA handles concurrency as well as second-level cache. The chapter ends by explaining the life cycle of an entity and how JPA allows you to hook in your own business logic when certain events occur on the entity.
The entity manager is a central piece of JPA. It manages the state and life cycle of entities as well as querying entities within a persistence context. The entity manager is responsible for creating and removing persistent entity instances and finding entities by their primary key. It can lock entities for protecting against concurrent access by using optimistic or pessimistic locking and can use JPQL queries to retrieve entities following certain criteria.
When an entity manager obtains a reference to an entity, it is said to be “managed.” Until that point, the entity is seen as a regular POJO (i.e., detached). The strength of JPA is that entities can be used as regular objects by different layers of an application and become managed by the entity manager when you need to load or insert data into the database. When an entity is managed, you can carry out persistence operations, and the entity manager will automatically synchronize the state of the entity with the database. When the entity is detached (i.e., not managed), it returns to a simple POJO and can then be used by other layers (e.g., a JavaServer Faces, or JSF, presentation layer) without synchronizing its state with the database.
With regard to persistence, the real work begins with the entity manager. EntityManager is an interface implemented by a persistence provider that will generate and execute SQL statements. The javax.persistence.EntityManager interface provides the API to manipulate entities (subset shown in Listing 6-1).
Listing 6-1. Subset of the EntityManager API
public interface EntityManager {

  // Factory to create an entity manager, close it and check if it’s open
  EntityManagerFactory getEntityManagerFactory();
  void close();
  boolean isOpen();

  // Returns an entity transaction
  EntityTransaction getTransaction();

  // Persists, merges and removes and entity to/from the database
  void persist(Object entity);
  <T> T merge(T entity);
  void remove(Object entity);

  // Finds an entity based on its primary key (with different lock mecanisms)
  <T> T find(Class<T> entityClass, Object primaryKey);
  <T> T find(Class<T> entityClass, Object primaryKey, LockModeType lockMode);
  <T> T getReference(Class<T> entityClass, Object primaryKey);

  // Locks an entity with the specified lock mode type (optimistic, pessimistic...)
  void lock(Object entity, LockModeType lockMode);

  // Synchronizes the persistence context to the underlying database
  void flush();
  void setFlushMode(FlushModeType flushMode);
  FlushModeType getFlushMode();

  // Refreshes the state of the entity from the database, overwriting any changes made
  void refresh(Object entity);
  void refresh(Object entity, LockModeType lockMode);

  // Clears the persistence context and checks if it contains an entity
  void clear();
  void detach(Object entity);
  boolean contains(Object entity);

  // Sets and gets an entity manager property or hint
  void setProperty(String propertyName, Object value);
  Map<String, Object> getProperties();

  // Creates an instance of Query or TypedQuery for executing a JPQL statement
  Query createQuery(String qlString);
  <T> TypedQuery<T> createQuery(CriteriaQuery<T> criteriaQuery);
  <T> TypedQuery<T> createQuery(String qlString, Class<T> resultClass);

  // Creates an instance of Query or TypedQuery for executing a named query
  Query createNamedQuery(String name);
  <T> TypedQuery<T> createNamedQuery(String name, Class<T> resultClass);

  // Creates an instance of Query for executing a native SQL query
  Query createNativeQuery(String sqlString);
  Query createNativeQuery(String sqlString, Class resultClass);
  Query createNativeQuery(String sqlString, String resultSetMapping);

  // Creates a StoredProcedureQuery for executing a stored procedure in the database
  StoredProcedureQuery createStoredProcedureQuery(String procedureName);
  StoredProcedureQuery createNamedStoredProcedureQuery(String name);

  // Metamodel and criteria builder for criteria queries (select, update and delete)
  CriteriaBuilder getCriteriaBuilder();
  Metamodel getMetamodel();
  Query createQuery(CriteriaUpdate updateQuery);
  Query createQuery(CriteriaDelete deleteQuery);

  // Indicates that a JTA transaction is active and joins the persistence context to it
  void joinTransaction();
  boolean isJoinedToTransaction();

  // Return the underlying provider object for the EntityManager
  <T> T unwrap(Class<T> cls);
  Object getDelegate();

  // Returns an entity graph
  <T> EntityGraph<T> createEntityGraph(Class<T> rootType);
  EntityGraph<?> createEntityGraph(String graphName);
  <T> EntityGraph<T> getEntityGraph(String graphName);
  <T> List<EntityGraph<? super T>> getEntityGraphs(Class<T> entityClass);
}
Don’t get scared by the API in Listing 6-1, as this chapter covers most of the methods. In the next section, I explain how to get an instance of an EntityManager.
Obtaining an Entity Manager
The entity manager is the central interface used to interact with entities, but it first has to be obtained by an application. Depending on whether it is a container-managed environment (like you’ll see in Chapter 7 with EJBs) or an application-managed environment, the code can be quite different. For example, in a container-managed environment, the transactions are managed by the container. That means you don’t need to explicitly write the commit or rollback, which you have to do in an application-managed environment.
The term “application managed” means an application is responsible for explicitly obtaining an instance of EntityManager and managing its life cycle (it closes the entity manager when finished, for example). The code in Listing 6-2 demonstrates how a class running in a Java SE environment gets an instance of an entity manager. It uses the Persistence class to bootstrap an EntityManagerFactory associated with a persistence unit (chapter06PU), which is then used to create an entity manager. Notice that in an application-managed environment the developer is responsible for creating and closing the entity manager (i.e., managing its life cycle).
Listing 6-2. A Main Class Creating an EntityManager with an EntityManagerFactory
public class Main {

  public static void main(String[] args) {

    // Creates an instance of book
    Book book = new Book ("H2G2", "The Hitchhiker's Guide to the Galaxy", 12.5F, →
                         "1-84023-742-2", 354, false);

    // Obtains an entity manager and a transaction
    EntityManagerFactory emf = Persistence .createEntityManagerFactory(" chapter06PU ");
    EntityManager em = emf.createEntityManager();

    // Persists the book to the database
    EntityTransaction tx = em.getTransaction();
    tx.begin();
    em.persist(book);
    tx.commit();

    // Closes the entity manager and the factory
    em.close();
    emf.close();
  }
}
Creating an application-managed entity manager is simple enough using a factory, but what differentiates application managed from container managed is how the factory is acquired. A container-managed environment is when the application evolves in a Servlet or an EJB container. In a Java EE environment, the most common way to acquire an entity manager is by the @PersistenceContext annotation, or by JNDI lookup. The component running in a container (Servlet, EJB, web service, etc.) doesn’t need to create or close the entity manager, as its life cycle is managed by the container. Listing 6-3 shows the code of a stateless session bean into which we inject a reference of the chapter06PU persistence unit.
Listing 6-3. A Stateless EJB Injected with a Reference of an Entity Manager
@Stateless
public class BookEJB {

  @PersistenceContext(unitName = "chapter06PU")
  private EntityManager em;

  public void createBook() {

    // Creates an instance of book
    Book book = new Book ("H2G2", "The Hitchhiker's Guide to the Galaxy", 12.5F, →
                         "1-84023-742-2", 354, false);

    // Persists the book to the database
    em.persist(book);
  }
}
Compared with Listing 6-2, the code in Listing 6-3 is much simpler. First, there is no Persistence or EntityManagerFactory as the container injects the entity manager instance. The application is not responsible for managing the life cycle of the EntityManager (creating and closing the EntityManager). Second, because stateless beans manage the transactions, there is no explicit commit or rollback. Chapter 7 demonstrates this style of entity manager.
![]() Note If you refer to the “Producers” section of Chapter 2 (Context and Dependency Injection) you will understand that you can also @Inject an EntityManager if you produce it (using the @Produces annotation).
Note If you refer to the “Producers” section of Chapter 2 (Context and Dependency Injection) you will understand that you can also @Inject an EntityManager if you produce it (using the @Produces annotation).
Persistence Context
Before exploring the EntityManager API in detail, you need to understand a crucial concept: the persistence context. A persistence context is a set of managed entity instances at a given time for a given user’s transaction: only one entity instance with the same persistent identity can exist in a persistence context. For example, if a Book instance with an ID of 12 exists in the persistence context, no other book with this ID can exist within that same persistence context. Only entities that are contained in the persistence context are managed by the entity manager, meaning that changes will be reflected in the database.
The entity manager updates or consults the persistence context whenever a method of the javax.persistence.EntityManager interface is called. For example, when a persist() method is called, the entity passed as an argument will be added to the persistence context if it doesn’t already exist. Similarly, when an entity is found by its primary key, the entity manager first checks whether the requested entity is already present in the persistence context. The persistence context can be seen as a first-level cache. It’s a short, live space where the entity manager stores entities before flushing the content to the database. By default, objects just live in the persistent context for the duration of the transaction.
To summarize, let’s look at Figure 6-1 where two users need to access entities whose data are stored in the database. Each user has his own persistence context that lasts for the duration of his own transaction. User 1 gets the Book entities with IDs equal to 12 and 56 from the database, so both get stored in his persistence context. User 2 gets the entities 12 and 34. As you can see, the entity with ID = 12 is stored in each user’s persistence context. While the transaction runs, the persistence context acts like a first-level cache storing the entities that can be managed by the EntityManager. Once the transaction ends, the persistence context ends and the entities are cleared.
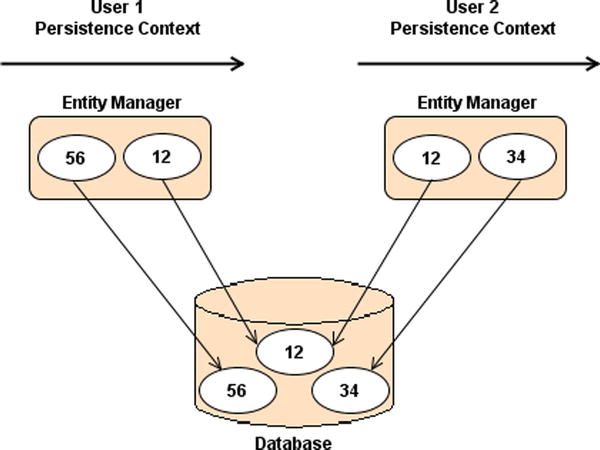
Figure 6-1. Entities living in different users’ persistence context
The configuration for an entity manager is bound to the factory that created it. Whether application or container managed, the factory needs a persistence unit from which to create an entity manager. A persistence unit dictates the settings to connect to the database and the list of entities that can be managed in a persistence context. The persistence.xml file (see Listing 6-4) located in the META-INF directory defines the persistence unit. The persistence unit has a name (chapter06PU) and a set of attributes.
Listing 6-4. A Persistence Unit with a Set of Manageable Entities
<?xml version="1.0" encoding="UTF-8"?>
<persistence xmlns=" http://xmlns.jcp.org/xml/ns/persistence "
             xmlns:xsi=" http://www.w3.org/2001/XMLSchema-instance "
             xsi:schemaLocation=" http://xmlns.jcp.org/xml/ns/persistence →
             http://xmlns.jcp.org/xml/ns/persistence/persistence_2_1.xsd "
             version="2.1">

  <persistence-unit name=" chapter06PU " transaction-type="RESOURCE_LOCAL">
    <provider>org.eclipse.persistence.jpa.PersistenceProvider</provider>
    <class>org.agoncal.book.javaee7.chapter06. Book </class>
    <class>org.agoncal.book.javaee7.chapter06. Customer </class>
    <class>org.agoncal.book.javaee7.chapter06. Address </class>
    <properties>
      <property name="javax.persistence.schema-generation.database.action" →
               value="drop-and-create"/>
      <property name="javax.persistence.jdbc.driver" →
               value="org.apache.derby.jdbc.EmbeddedDriver"/>
      <property name=" javax.persistence.jdbc.url " →
               value="jdbc:derby:memory: chapter06DB ;create=true"/>
      <property name=" eclipselink.logging.level " value="INFO"/>
    </properties>
  </persistence-unit>
</persistence>
The persistence unit is the bridge between the persistence context and the database. On one hand, the <class> tag lists all the entities that could be managed in the persistence context, and, on the other, it gives all the information to physically connect to the database (using properties). This is because you are in an application-managed environment (transaction-type="RESOURCE_LOCAL"). As you’ll see in Chapter 7, in a container-managed environment, the persistence.xml would define a data source instead of the database connection properties and set the transaction type to JTA (transaction-type="JTA").
In JPA 2.1, some properties of the persistence.xml file have been standardized (see Table 6-1). They all start with javax.persistence such as javax.persistence.jdbc.url. JPA providers are required to support these standard properties, but they may provide custom properties of their own, such as the EclipseLink property in the example (e.g., eclipselink.logging.level).
Table 6-1. Standard JPA Properties
Manipulating Entities
Being the central piece of JPA, we use the entity manager for both simple entity manipulation and complex JPQL query execution. When manipulating single entities, the EntityManager interface can be seen as a generic Data Access Object (DAO), which allows CRUD operations on any entity (see Table 6-2).
Table 6-2. EntityManager Interface Methods to Manipulate Entities
| Method | Description |
|---|---|
| void persist(Object entity) | Makes an instance managed and persistent |
| <T> T find(Class<T> entityClass, Object primaryKey) | Searches for an entity of the specified class and primary key |
| <T> T getReference(Class<T> entityClass, Object primaryKey) | Gets an instance, whose state may be lazily fetched |
| void remove(Object entity) | Removes the entity instance from the persistence context and from the underlying database |
| <T> T merge(T entity) | Merges the state of the given entity into the current persistence context |
| void refresh(Object entity) | Refreshes the state of the instance from the database, overwriting changes made to the entity, if any |
| void flush() | Synchronizes the persistence context to the underlying database |
| void clear() | Clears the persistence context, causing all managed entities to become detached |
| void detach(Object entity) | Removes the given entity from the persistence context, causing a managed entity to become detached |
| boolean contains(Object entity) | Checks whether the instance is a managed entity instance belonging to the current persistence context |
To help you gain a better understanding of these methods, I use a simple example of a one-way, one-to-one relationship between a Customer and an Address. Both entities have automatically generated identifiers (thanks to the @GeneratedValue annotation), and Customer (see Listing 6-5) has a lazy fetch to Address (see Listing 6-6).
Listing 6-5. The Customer Entity with a One-Way, One-to-One Address
@Entity
public class Customer {

  @Id @GeneratedValue
  private Long id;
  private String firstName;
  private String lastName;
  private String email;
  @OneToOne (fetch = FetchType.LAZY)
  @JoinColumn(name = "address_fk")
  private Address address;

  // Constructors, getters, setters
}
Listing 6-6. The Address Entity
@Entity
public class Address {

  @Id @GeneratedValue
  private Long id;
  private String street1;
  private String city;
  private String zipcode;
  private String country;

  // Constructors, getters, setters
}
These two entities will get mapped into the database structure shown in Figure 6-2. Note the ADDRESS_FK column is the foreign key to ADDRESS.

Figure 6-2. CUSTOMER and ADDRESS tables
For better readability, the fragments of code used in the upcoming section assume that the em attribute is of type EntityManager and tx of type EntityTransaction.
Persisting an Entity
Persisting an entity means inserting data into the database when the data don’t already exist (otherwise an EntityExistsException is thrown). To do so, it’s necessary to create a new entity instance using the new operator, set the values of the attributes, bind one entity to another when there are associations, and finally call the EntityManager.persist() method as shown in the JUnit test case in Listing 6-7.
Listing 6-7. Persisting a Customer with an Address
Customer customer = new Customer("Antony", "Balla", " [email protected] ");
Address address = new Address("Ritherdon Rd", "London", "8QE", "UK");
customer.setAddress(address);

tx.begin();
em. persist (customer);
em. persist (address);
tx.commit();

assertNotNull(customer.getId());
assertNotNull(address.getId());
In Listing 6-7, customer and address are just two objects that reside in the JVM memory. Both become managed entities when the entity manager (variable em) takes them into account by persisting them (em.persist(customer)). At this time, both objects become eligible to be inserted in the database. When the transaction is committed (tx.commit()), the data are flushed to the database, an address row is inserted into the ADDRESS table, and a customer row is inserted into the CUSTOMER table. As the Customer is the owner of the relationship, its table holds the foreign key to ADDRESS. The assertNotNull expressions check that both entities have received a generated identifier (thanks to the persistence provider and the @Id and @GeneratedValue annotations).
Note the ordering of the persist() methods: a customer is persisted and then an address. If it were the other way round, the result would be the same. Earlier, the entity manager was described as a first-level cache. Until the transaction is committed, the data stay in memory and there is no access to the database. The entity manager caches data and, when ready, flushes the data in the order that the underlying database is expecting (respecting integrity constraints). Because of the foreign key in the CUSTOMER table, the insert statement for ADDRESS will be executed first, followed by that for CUSTOMER.
![]() Note Most of the entities in this chapter do not implement the Serializable interface. That’s because entities don’t have to be in order to get persisted in the database. They are passed by reference from one method to the other, and, when they have to be persisted, the EntityManager.persist() method is invoked. But, if you need to pass entities by value (remote invocation, external EJB container, etc.), they must implement the java.io.Serializable marker (no method) interface. It indicates to the compiler that it must enforce all fields on the entity class to be serializable, so that any instance can be serialized to a byte stream and passed using Remote Method Invocation (RMI).
Note Most of the entities in this chapter do not implement the Serializable interface. That’s because entities don’t have to be in order to get persisted in the database. They are passed by reference from one method to the other, and, when they have to be persisted, the EntityManager.persist() method is invoked. But, if you need to pass entities by value (remote invocation, external EJB container, etc.), they must implement the java.io.Serializable marker (no method) interface. It indicates to the compiler that it must enforce all fields on the entity class to be serializable, so that any instance can be serialized to a byte stream and passed using Remote Method Invocation (RMI).
Finding by ID
To find an entity by its identifier, you can use two different methods. The first is the EntityManager.find() method, which has two parameters: the entity class and the unique identifier (see Listing 6-8). If the entity is found, it is returned; if it is not found, a null value is returned.
Listing 6-8. Finding a Customer by ID
Customer customer = em.find (Customer.class, 1234L)
if (customer!= null) {
  // Process the object
}
The second method is getReference() (see Listing 6-9). It is very similar to the find operation, as it has the same parameters, but it retrieves a reference to an entity (via its primary key) but does not retrieve its data. Think of it as a proxy to an entity, not the entity itself. It is intended for situations where a managed entity instance is needed, but no data, other than potentially the entity’s primary key, being accessed. With getReference(), the state data are fetched lazily, which means that if you don’t access state before the entity is detached, the data might not be there. If the entity is not found, an EntityNotFoundException is thrown.
Listing 6-9. Finding a Customer by Reference
try {
  Customer customer = em.getReference (Customer.class, 1234L)
  // Process the object
} catch(EntityNotFoundException ex) {
  // Entity not found
}
An entity can be removed with the EntityManager.remove() method. Once removed, the entity is deleted from the database, is detached from the entity manager, and cannot be synchronized with the database anymore. In terms of Java objects, the entity is still accessible until it goes out of scope and the garbage collector cleans it up. The code in Listing 6-10 shows how to remove an object after it has been created.
Listing 6-10. Creating and Removing Customer and Address Entities
Customer customer = new Customer("Antony", "Balla", " [email protected] ");
Address address = new Address("Ritherdon Rd", "London", "8QE", "UK");
customer.setAddress(address);

tx.begin();
em.persist(customer);
em.persist(address);
tx.commit();
tx.begin();
em. remove (customer);
tx.commit();

// The data is removed from the database but the object is still accessible
assertNotNull( customer );
The code in Listing 6-10 creates an instance of Customer and Address, links them together (customer.setAddress(address)), and persists them. In the database, the customer row is linked to the address through a foreign key; later on in the code, only the Customer is deleted. Depending on how the cascading is configured (discussed later in this chapter), the Address could be left with no other entity referencing it and the address row becomes an orphan.
For data consistency, orphans are not desirable, as they result in having rows in a database that are not referenced by any other table, without means of access. With JPA, you can inform the persistence provider to automatically remove orphans or cascade a remove operation as you’ll see later. If a target entity (Address) is privately owned by a source (Customer), meaning a target must never be owned by more than one source, and that source is deleted by the application, the provider should also delete the target.
Associations that are specified as one-to-one or one-to-many support the use of the orphan-removal option. To include this option in the example, let’s look at how to add the orphanRemoval=true element to the @OneToOne annotation (see Listing 6-11).
Listing 6-11. The Customer Entity Dealing with Orphan Address Removal
@Entity
public class Customer {

  @Id @GeneratedValue
  private Long id;
  private String firstName;
  private String lastName;
  private String email;
  @OneToOne (fetch = FetchType.LAZY, orphanRemoval=true )
  private Address address;

  // Constructors, getters, setters
}
With this mapping, the code in Listing 6-10 will automatically remove the Address entity when the customer is removed, or when the relationship is broken (by setting the address attribute to null, or by removing the child entity from the collection in a one-to-many case). The remove operation is applied at the time of the flush operation (transaction committed).
Synchronizing with the Database
Until now, the synchronization with the database has been done at commit time. The entity manager is a first-level cache, waiting for the transaction to be committed to flush the data to the database, but what happens when a customer and an address need to be inserted?
tx.begin();
em.persist(customer);
em.persist(address);
tx.commit();
All pending changes require anSQL statement; here two insert statements are produced and made permanent only when the database transaction commits. For most applications, this automatic data synchronization is sufficient. Although it is not known at exactly which point in time the provider actually flushes the changes to the database, you can be sure it happens when the transaction is committed. The database is synchronized with the entities in the persistence context, but data can be explicitly flushed (flush) to the database, or entities refreshed with data from the database (refresh). If the data are flushed to the database at one point, and if later in the code the application calls the rollback() method, the flushed data will be taken out of the database.
With the EntityManager.flush() method, the persistence provider can be explicitly forced to flush the data to the database but does not commit the transaction. This allows a developer to manually trigger the same process used by the entity manager internally to flush the persistence context.
tx.begin();
em.persist(customer);
em. flush ();
em.persist(address);
tx.commit();
Two interesting things happen in the preceding code. The first is that em.flush() will not wait for the transaction to commit and will force the provider to flush the persistence context. An insert statement will be generated and executed at the flush. The second is that this code will not work because ofthe integrity constraint. Without an explicit flush, the entity manager caches all changes and orders and executes them in a coherent way for the database. With an explicit flush, the insert statement to CUSTOMER will be executed, but the integrity constraint on the address foreign key will be violated (the ADDRESS_FK column in CUSTOMER). That will lead the transaction to roll back. Data that have been flushed will also get rolled back Explicit flushes should be carefully used and only when needed.
Refreshing an Entity
The refresh() method is used for data synchronization in the opposite direction of the flush, meaning it overwrites the current state of a managed entity with data as they are present in the database. A typical case is when you use the EntityManager.refresh() method to undo changes that have been made to the entity in memory only. The test case snippet in Listing 6-12 finds a Customer by ID, changes its first name, and undoes this change using the refresh() method.
Listing 6-12. Refreshing the Customer Entity from the Database
Customer customer = em.find(Customer.class, 1234L)
assertEquals(customer.getFirstName(), " Antony ");

customer.setFirstName(" William ");

em.refresh(customer);
assertEquals(customer.getFirstName(), " Antony ");
");
Content of the Persistence Context
The persistence context holds the managed entities. With the EntityManager interface, you can check whether an entity is being managed, detach it, or clear all entities from the persistence context.
Entities are either managed or not by the entity manager. The EntityManager.contains() method returns a Boolean and allows you to check whether or not a particular entity instance is currently managed by the entity manager within the current persistence context. In the test case in Listing 6-13, a Customer is persisted, and you can immediately check whether the entity is managed (em.contains(customer)). The answer is true. Afterward, the remove() method is called, and the entity is removed from the database and from the persistence context (em.contains(customer) returns false).
Listing 6-13. Test Case for Whether the Customer Entity Is in the Persistence Context
Customer customer = new Customer("Antony", "Balla", " [email protected] ");

tx.begin();
em.persist(customer);
tx.commit();

assertTrue ( em.contains(customer) );

tx.begin();
em.remove(customer);
tx.commit();

assertFalse(em.contains(customer) );
Clear and Detach
The clear() method is straightforward: it empties the persistence context, causing all managed entities to become detached. The detach(Object entity) method removes the given entity from the persistence context. Changes made to the entity will not be synchronized to the database after such eviction has taken place. Listing 6-14 creates an entity, checks that it is managed, detaches it from the persistence context, and checks that it is detached.
Listing 6-14. Checking Whether the Customer Entity Is in the Persistence Context
Customer customer = new Customer("Antony", "Balla", " [email protected] ");

tx.begin();
em.persist(customer);
tx.commit();

assertTrue (em.contains(customer));


em.detach(customer);

assertFalse (em.contains(customer));
Merging an Entity
A detached entity is no longer associated with a persistence context. If you want to manage it, you need to reattach it (i.e., merge it). Let’s take the example of an entity that needs to be displayed in a JSF page. The entity is first loaded from the database into the persistent layer (it is managed), it is returned from an invocation of a local EJB (it is detached because the transaction context ends), the presentation layer displays it (it is still detached), and then it returns to be updated to the database. However, at that moment, the entity is detached and needs to be attached again, or merged, to synchronize its state with the database.
Listing 6-15 simulates this case by clearing the persistence context (em.clear()), which detaches the entity.
Listing 6-15. Clearing the Persistence Context and Merging an Entity
Customer customer = new Customer("Antony", "Balla", " [email protected] ");

tx.begin();
em.persist(customer);
tx.commit();

em.clear();

// Sets a new value to a detached entity
customer.setFirstName("William");

tx.begin();
em.merge(customer);
tx.commit();
The code in Listing 6-15 creates and persists a customer. The call to em.clear() forces the detachment of the customer entity, but detached entities continue to live outside the persistence context in which they were, and their state is no longer guaranteed to be synchronized with the database state. That’s what happens with customer.setFirstName("William"); this is executed on a detached entity, and the data are not updated in the database. To replicate this change to the database, you need to reattach the entity (i.e., merge it) with em.merge(customer) inside a transaction.
Updating an Entity
Updating an entity is simple, yet at the same time it can be confusing to understand. As you’ve just seen, you can use EntityManager.merge() to attach an entity and synchronize its state with the database. But, if an entity is currently managed, changes to it will be reflected in the database automatically. If not, you will need to explicitly call merge().
Listing 6-16 demonstrates persisting a customer with a first name set to Antony. When you call the em.persist() method, the entity is managed, so any changes made to the entity will be synchronized with the database. When you call the setFirstName() method, the entity changes its state. The entity manager caches any action starting at tx.begin() and synchronizes it when committed.
Listing 6-16. Updating the Customer’s First Name
Customer customer = new Customer(" Antony ", "Balla", " [email protected] ");

tx.begin();
em. persist (customer);

customer.setFirstName("Williman");

tx.commit();
Cascading Events
By default, every entity manager operation applies only to the entity supplied as an argument to the operation. But sometimes, when an operation is carried out on an entity, you want to propagate it on its associations. This is known as cascading an event. The examples so far have relied on default cascade behavior and not customized behavior. In Listing 6-17, to create a customer, you instantiate a Customer and an Address entity, link them together (customer.setAddress(address)), and then persist the two.
Listing 6-17. Persisting a Customer with an Address
Customer customer = new Customer("Antony", "Balla", " [email protected] ");
Address address = new Address("Ritherdon Rd", "London", "8QE", "UK");
customer.setAddress(address);

tx.begin();
em.persist(customer);
em.persist(address);
tx.commit();
Because there’s a relationship between Customer and Address, you could cascade the persist action from the customer to the address. That would mean that a call to em.persist(customer) would cascade the persist event to the Address entity if it allows this type of event to be propagated. You could then shrink the code and do away with the em.persist(address) as shown in Listing 6-18.
Listing 6-18. Cascading a Persist Event to Address
Customer customer = new Customer("Antony", "Balla", " [email protected] ");
Address address = new Address("Ritherdon Rd", "London", "8QE", "UK");
customer.setAddress(address);

tx.begin();
em.persist(customer);
tx.commit();
Without cascading, the customer would get persisted but not the address. Cascading an event is possible if the mapping of the relationship is changed. The annotations @OneToOne, @OneToMany, @ManyToOne, and @ManyToMany have a cascade attribute that takes an array of events to be cascaded, and a PERSIST event that can be cascaded as well as a REMOVE event (commonly used to perform delete cascades). To allow this, you must change the mapping of the Customer entity (see Listing 6-19) and add a cascade attribute to the @OneToOne annotation on Address.
Listing 6-19. Customer Entity Cascading Persist and Remove Events
@Entity
public class Customer {

  @Id @GeneratedValue
  private Long id;
  private String firstName;
  private String lastName;
  private String email;
  @OneToOne (fetch = FetchType.LAZY, cascade = {CascadeType.PERSIST, CascadeType.REMOVE} )
  @JoinColumn(name = "address_fk")
  private Address address;

  // Constructors, getters, setters
}
You can choose from several events to cascade to a target association (Table 6-3 lists these events) and you can even cascade them all using the CascadeType.ALL type.
Table 6-3. Possible Events to Be Cascaded
| Cascade Type | Description |
|---|---|
| PERSIST | Cascades persist operations to the target of the association |
| REMOVE | Cascades remove operations to the target of the association |
| MERGE | Cascades merge operations to the target of the association |
| REFRESH | Cascades refresh operations to the target of the association |
| DETACH | Cascades detach operations to the target of the association |
| ALL | Declares that all the previous operations should be cascaded |
You just saw how to manipulate entities individually with the EntityManager API. You know how to find an entity by ID, remove it, update its attributes, and so on. But finding an entity by ID is quite limiting, as you only retrieve a single entity using its unique identifier. In practice, you may need to retrieve an entity by criteria other than the ID (by name, ISBN, etc.) or retrieve a set of entities based on different criteria (e.g., all customers living in the United States). This possibility is inherent to relational databases, and JPA has a language that allows this interaction: JPQL.
JPQL is used to define searches against persistent entities independent of the underlying database. JPQL is a query language that takes its roots in the syntax of SQL, which is the standard language for database interrogation. But the main difference is that in SQL the results obtained are in the form of rows and columns (tables), whereas JPQL uses an entity or a collection of entities. JPQL syntax is object oriented and therefore more easily understood by developers whose experience is limited to object-oriented languages. Developers manage their entity domain model, not a table structure, by using the dot notation (e.g., myClass.myAttribute).
Under the hood, JPQL uses the mechanism of mapping to transform a JPQL query into language comprehensible by an SQL database. The query is executed on the underlying database with SQL and JDBC calls, and then entity instances have their attributes set and are returned to the application—all in a very simple and powerful manner using a rich query syntax.
The simplest JPQL query selects all the instances of a single entity.
SELECT b
FROM Book b
If you know SQL, this should look familiar to you. Instead of selecting from a table, JPQL selects entities, here Book. The FROM clause is also used to give an alias to the entity: b is an alias for Book. The SELECT clause of the query indicates that the result type of the query is the b entity (the Book). Executing this statement will result in a list of zero or more Book instances.
To restrict the result, add search criteria; you can use the WHERE clause as follows:
SELECT b
FROM Book b
WHERE b.title = 'H2G2'
The alias is used to navigate across entity attributes through the dot operator. Since the Book entity has a persistent attribute named title of type String, b.title refers to the title attribute of the Book entity. Executing this statement will result in a list of zero or more Book instances that have a title equal to H2G2.
The simplest select query consists of two mandatory parts: the SELECT and the FROM clause. SELECT defines the format of the query results. The FROM clause defines the entity or entities from which the results will be obtained, and the optional WHERE, ORDER BY, GROUP BY, and HAVING clauses can be used to restrict or order the result of a query. Listing 6-20 defines a simplified syntax of a JPQL statement.
Listing 6-20. Simplied JPQL Statement Syntax
SELECT <select clause>
FROM <from clause>
[WHERE <where clause>]
[ORDER BY <order by clause>]
[GROUP BY <group by clause>]
[HAVING <having clause>]
Listing 6-20 defines a SELECT statement, but DELETE and UPDATE statements can also be used to perform delete and update operations across multiple instances of a specific entity class.
Select
The SELECT clause follows the path expressions syntax and results in one of the following forms: an entity, an entity attribute, a constructor expression, an aggregate function, or some sequence of these Path expressions are the building blocks of queries and are used to navigate on entity attributes or across entity relationships (or a collection of entities) via the dot (.) navigation using the following syntax:
SELECT [DISTINCT] <expression> [[AS] <identification variable>]
expression ::= { NEW | TREAT | AVG | MAX | MIN | SUM | COUNT }
A simple SELECT returns an entity. For example, if a Customer entity has an alias called c, SELECT c will return an entity or a list of entities.
SELECT c
FROM Customer c
But a SELECT clause can also return attributes. If the Customer entity has a first name, SELECT c.firstName will return a String or a collection of Strings with the first names.
SELECT c.firstName
FROM Customer c
To retrieve the first name and the last name of a customer, you create a list containing the following two attributes:
SELECT c.firstName, c.lastName
FROM Customer c
Since JPA 2.0, an attribute can be retrieved depending on a condition (using a CASE WHEN ... THEN ... ELSE ... END expression). For example, instead of retrieving the price of a book, a statement can return a computation of the price (e.g., 50% discount) depending on the publisher (e.g., 50% discount on the Apress books, 20% discount for all the other books).
SELECT CASE b.editor WHEN 'Apress'
                     THEN b.price * 0.5
                     ELSE b.price * 0.8
       END
FROM Book b
If a Customer entity has a one-to-one relationship with Address, c.address refers to the address of the customer, and the result of the following query will return not a list of customers but a list of addresses:
SELECT c.address
FROM Customer c
Navigation expressions can be chained together to traverse complex entity graphs. Using this technique, path expressions such as c.address.country.code can be constructed, referring to the country code of the customer’s address.
SELECT c.address.country.code
FROM Customer c
A constructor may be used in the SELECT expression to return an instance of a Java class initialized with the result of the query. The class doesn’t have to be an entity, but the constructor must be fully qualified and match the attributes.
SELECT NEW org.agoncal.javaee7.CustomerDTO(c.firstName, c.lastName, c.address.street1)
FROM Customer c
The result of this query is a list of CustomerDTO objects that have been instantiated with the new operator and initialized with the first name, last name, and street of the customers.
Executing these queries will return either a single value or a collection of zero or more entities (or attributes) including duplicates. To remove the duplicates, the DISTINCT operator must be used.
SELECT DISTINCT c
FROM Customer c

SELECT DISTINCT c.firstName
FROM Customer c
The result of a query may be the result of an aggregate function applied to a path expression. The following aggregate functions can be used in the SELECT clause: AVG, COUNT, MAX, MIN, SUM. The results may be grouped in the GROUP BY clause and filtered using the HAVING clause.
SELECT COUNT (c)
FROM Customer c
Scalar expressions also can be used in the SELECT clause of a query as well as in the WHERE and HAVING clauses. These expressions can be used on numeric (ABS, SQRT, MOD, SIZE, INDEX), String (CONCAT, SUBSTRING, TRIM, LOWER, UPPER, LENGTH, LOCATE), and date-time (CURRENT_DATE, CURRENT_TIME, CURRENT_TIMESTAMP) values.
The FROM clause of a query defines entities by declaring identification variables. An identification variable, or alias, is an identifier that can be used in the other clauses (SELECT, WHERE, etc.). The syntax of the FROM clause consists of an entity and an alias. In the following example, Customer is the entity and c the identification variable:
SELECT c
FROM Customer c
Where
The WHERE clause of a query consists of a conditional expression used to restrict the result of a SELECT, UPDATE, or DELETE statement. The WHERE clause can be a simple expression or a set of conditional expressions used to filter the query.
The simplest way to restrict the result of a query is to use the attribute of an entity. For example, the following query selects all customers named Vincent:
SELECT c
FROM Customer c
WHERE c.firstName = 'Vincent'
You can further restrict queries by using the logical operators AND and OR. The following example uses AND to select all customers named Vincent, living in France:
SELECT c
FROM Customer c
WHERE c.firstName = 'Vincent' AND c.address.country = 'France'
The WHERE clause also uses comparison operators: =, >, >=, <, <=, <>, [NOT] BETWEEN, [NOT] LIKE, [NOT] IN, IS [NOT] NULL, IS [NOT] EMPTY, [NOT] MEMBER [OF]. The following shows an example using two of these operators:
SELECT c
FROM Customer c
WHERE c.age > 18

SELECT c
FROM Customer c
WHERE c.age NOT BETWEEN 40 AND 50

SELECT c
FROM Customer c
WHERE c.address.country IN ('USA', 'Portugal')
The LIKE expression consists of a String and optional escape characters that define the match conditions: the underscore (_) for single-character wildcards and the percent sign (%) for multicharacter wildcards.
SELECT c
FROM Customer c
WHERE c.email LIKE '%mail.com'
Binding Parameters
Until now, the WHERE clauses shown herein have only used fixed values. In an application, queries frequently depend on parameters. JPQL supports two types of parameter-binding syntax, allowing dynamic changes to the restriction clause of a query: positional and named parameters.
Positional parameters are designated by the question mark (?) followed by an integer (e.g., ?1). When the query is executed, the parameter numbers that should be replaced need to be specified.
SELECT c
FROM Customer c
WHERE c.firstName = ?1 AND c.address.country = ?2
Named parameters can also be used and are designated by a String identifier that is prefixed by the colon (:) symbol. When the query is executed, the parameter names that should be replaced need to be specified.
SELECT c
FROM Customer c
WHERE c.firstName = :fname AND c.address.country = :country
In the “Queries” section later in this chapter, you will see how an application binds parameters.
Subqueries
A subquery is a SELECT query that is embedded within a conditional expression of a WHERE or HAVING clause. The results of the subquery are evaluated and interpreted in the conditional expression of the main query. To retrieve the youngest customers from the database, a subquery with a MIN(age) is first executed and its result evaluated in the main query.
SELECT c
FROM Customer c
WHERE c.age = ( SELECT MIN(cust. age) FROM Customer cust )
)
Order By
The ORDER BY clause allows the entities or values that are returned by a SELECT query to be ordered. The ordering applies to the entity attribute specified in this clause followed by the ASC or DESC keyword. The keyword ASC specifies that ascending ordering be used; DESC, the inverse, specifies that descending ordering be used. Ascending is the default and can be omitted.
SELECT c
FROM Customer c
WHERE c.age > 18
ORDER BY c.age DESC
Multiple expressions may also be used to refine the sort order.
SELECT c
FROM Customer c
WHERE c.age > 18
ORDER BY c.age DESC , c.address.country ASC
The GROUP BY construct enables the aggregation of result values according to a set of properties. The entities are divided into groups based on the values of the entity field specified in the GROUP BY clause. To group customers by country and count them, use the following query:
SELECT c.address.country, count(c)
FROM Customer c
GROUP BY c.address.country
The GROUP BY defines the grouping expressions (c.address.country) over which the results will be aggregated and counted (count(c)). Note that expressions that appear in the GROUP BY clause must also appear in the SELECT clause.
The HAVING clause defines an applicable filter after the query results have been grouped, similar to a secondary WHERE clause, filtering the result of the GROUP BY. Using the previous query, by adding a HAVING clause, a result of countries other than the UK can be returned.
SELECT c.address.country, count(c)
FROM Customer c
GROUP BY c.address.country
HAVING c.address.country <> 'UK'
GROUP BY and HAVING can only be used within a SELECT clause (not a DELETE or an UPDATE).
Bulk Delete
You know how to remove an entity with the EntityManager.remove() method and query a database to retrieve a list of entities that correspond to certain criteria. To remove a list of entities, you can execute a query, iterate through it, and remove each entity individually. Although this is a valid algorithm, it is terrible in terms of performance (too many database accesses). There is a better way to do it: bulk deletes.
JPQL performs bulk delete operations across multiple instances of a specific entity class. These are used to delete a large number of entities in a single operation. The DELETE statement looks like the SELECT statement, as it can have a restricting WHERE clause and use parameters. As a result, the number of entity instances affected by the operation is returned. The syntax of the DELETE statement is
DELETE FROM <entity name> [[AS] <identification variable>]
[WHERE <where clause>]
As an example, to delete all customers younger than 18, you can use a bulk removal via a DELETE statement.
DELETE FROM Customer c
WHERE c.age < 18
Bulk updates of entities are accomplished with the UPDATE statement, setting one or more attributes of the entity subject to conditions in the WHERE clause. The UPDATE statement syntax is
UPDATE <entity name> [[AS] <identification variable>]
SET <update statement> {, <update statement>}*
[WHERE <where clause>]
Rather than deleting all the young customers, their first name can be changed to “too young” with the following statement:
UPDATE Customer c
SET c.firstName = 'TOO YOUNG'
WHERE c.age < 18
Queries
You’ve seen the JPQL syntax and how to describe statements using different clauses (SELECT, FROM, WHERE, etc.). But how do you integrate a JPQL statement to your application? The answer: through queries. JPA 2.1 has five different types of queries that can be used in code, each with a different purpose.
- Dynamic queries: This is the simplest form of query, consisting of nothing more than a JPQL query string dynamically specified at runtime.
- Named queries: Named queries are static and unchangeable.
- Criteria API: JPA 2.0 introduced the concept of object-oriented query API.
- Native queries: This type of query is useful to execute a native SQL statement instead of a JPQL statement.
- Stored procedure queries: JPA 2.1 brings a new API to call stored procedures.
The central point for choosing from these five types of queries is the EntityManager interface, which has several factory methods, listed in Table 6-4, returning either a Query, a TypedQuery, or a StoredProcedureQuery interface (both TypedQuery and StoredProcedureQuery extend Query). The Query interface is used in cases when the result type is Object, and TypedQuery is used when a typed result is preferred. StoredProcedureQuery is used to control stored procedure query execution.
Table 6-4. EntityManager Methods for Creating Queries
When you obtain an implementation of the Query, TypedQuery, or StoredProcedureQuery interface through one of the factory methods in the EntityManager interface, a rich API controls it. The Query API, shown in Listing 6-21, is used for static queries (i.e., named queries) and dynamic queries using JPQL, and native queries in SQL. The Query API also supports parameter binding and pagination control.
Listing 6-21. Query API
public interface Query {

  // Executes a query and returns a result
  List getResultList();
  Object getSingleResult();
  int executeUpdate();

  // Sets parameters to the query
  Query setParameter(String name, Object value);
  Query setParameter(String name, Date value, TemporalType temporalType);
  Query setParameter(String name, Calendar value, TemporalType temporalType);
  Query setParameter(int position, Object value);
  Query setParameter(int position, Date value, TemporalType temporalType);
  Query setParameter(int position, Calendar value, TemporalType temporalType);
  <T> Query setParameter(Parameter<T> param, T value);
  Query setParameter(Parameter<Date> param, Date value, TemporalType temporalType);
  Query setParameter(Parameter<Calendar> param, Calendar value, TemporalType temporalType);

  // Gets parameters from the query
  Set<Parameter<?>> getParameters();
  Parameter<?> getParameter(String name);
  Parameter<?> getParameter(int position);
  <T> Parameter<T> getParameter(String name, Class<T> type);
  <T> Parameter<T> getParameter(int position, Class<T> type);
  boolean isBound(Parameter<?> param);
  <T> T getParameterValue(Parameter<T> param);
  Object getParameterValue(String name);
  Object getParameterValue(int position);

  // Constrains the number of results returned by a query
  Query setMaxResults(int maxResult);
  int getMaxResults();
  Query setFirstResult(int startPosition);
  int getFirstResult();

  // Sets and gets query hints
  Query setHint(String hintName, Object value);
  Map<String, Object> getHints();

  // Sets the flush mode type to be used for the query execution
  Query setFlushMode(FlushModeType flushMode);
  FlushModeType getFlushMode();

  // Sets the lock mode type to be used for the query execution
  Query setLockMode(LockModeType lockMode);
  LockModeType getLockMode();

  // Allows access to the provider-specific API
  <T> T unwrap(Class<T> cls);
}
The methods that are mostly used in this API are ones that execute the query itself. To execute a SELECT query, you have to choose between two methods depending on the required result.
- The getResultList() method executes the query and returns a list of results (entities, attributes, expressions, etc.).
- The getSingleResult() method executes the query and returns a single result (throws a NonUniqueResultException if more than one result is found).
To execute an update or a delete, the executeUpdate() method executes the bulk query and returns the number of entities affected by the execution of the query.
As you saw in the “JPQL” section earlier, a query can use parameters that are either named (e.g., :myParam) or positional (e.g., ?1). The Query API defines several setParameter methods to set parameters before executing a query.
When you execute a query, it can return a large number of results. Depending on the application, these can be processed together or in chunks (e.g., a web application only displays ten rows at one time). To control the pagination, the Query interface defines setFirstResult() and setMaxResults() methods to specify the first result to be received (numbered from zero) and the maximum number of results to return relative to that point.
The flush mode indicates to the persistence provider how to handle pending changes and queries. There are two possible flush mode settings: AUTO and COMMIT. AUTO (the default) means that the persistence provider is responsible for ensuring pending changes are visible to the processing of the query. COMMIT is when the effect of updates made to entities does not overlap with changed data in the persistence context.
Queries can be locked using the setLockMode(LockModeType) method. Locks are intended to provide a facility that enables the effect of repeatable read whether optimistically or pessimistically.
The following sections illustrate the five different types of queries using some of the methods just described.
Dynamic Queries
Dynamic queries are defined on the fly as needed by the application. To create a dynamic query, use the EntityManager.createQuery() method, which takes a String as a parameter that represents a JPQL query.
In the following code, the JPQL query selects all the customers from the database. The result of this query is a list, so when you invoke the getResultList() method, it returns a list of Customer entities (List<Customer>). However, if you know that your query only returns a single entity, use the getSingleResult() method. It returns a single entity and avoids the work of retrieving the data as a list.
Query query = em. createQuery ("SELECT c FROM Customer c");
List<Customer> customers = query. getResultList ();
This JPQL query returns a Query object. When you invoke the query.getResultList() method, it returns a list of untyped objects. If you want the same query to return a list of type Customer, you need to use the TypedQuery as follows:
TypedQuery <Customer> query = em.createQuery("SELECT c FROM Customer c", Customer.class );
List<Customer> customers = query.getResultList();
This query string can also be dynamically created by the application, which can then specify a complex query at runtime not known ahead of time. String concatenation is used to construct the query dynamically depending on the criteria.
String jpqlQuery = "SELECT c FROM Customer c";
if (someCriteria)
    jpqlQuery += " WHERE c.firstName = 'Betty'";
query = em.createQuery( jpqlQuery );
List<Customer> customers = query.getResultList();
The previous query retrieves customers named Betty, but you might want to introduce a parameter for the first name. There are two possible choices for passing a parameter: using names or positions. In the following example, I use a named parameter called :fname (note the : symbol) in the query and bound it with the setParameter method:
query = em.createQuery("SELECT c FROM Customer c where c.firstName = :fname ");
query.setParameter(" fname ", "Betty");
List<Customer> customers = query.getResultList();
Note that the parameter name fname does not include the colon used in the query. The code using a position parameter would look like the following:
query = em.createQuery("SELECT c FROM Customer c where c.firstName = ?1 ");
query.setParameter( 1 , "Betty");
List<Customer> customers = query.getResultList();
If you need to use pagination to display the list of customers by chunks of ten, you can use the setMaxResults method as follows:
query = em.createQuery("SELECT c FROM Customer c", Customer.class);
query. setMaxResults (10);
List<Customer> customers = query.getResultList();
An issue to consider with dynamic queries is the cost of translating the JPQL string into an SQL statement at runtime. Because the query is dynamically created and cannot be predicted, the persistence provider has to parse the JPQL string, get the ORM metadata, and generate the equivalent SQL. The performance cost of processing each of these dynamic queries can be an issue. If you have static queries that are unchangeable and want to avoid this overhead, then you can use named queries instead.
Named Queries
Named queries are different from dynamic queries in that they are static and unchangeable. In addition to their static nature, which does not allow the flexibility of a dynamic query, named queries can be more efficient to execute because the persistence provider can translate the JPQL string to SQL once the application starts, rather than every time the query is executed.
Named queries are static queries expressed in metadata inside either a @NamedQuery annotation or the XML equivalent. To define these reusable queries, annotate an entity with the @NamedQuery annotation, which takes two elements: the name of the query and its content. So let’s change the Customer entity and statically define three queries using annotations (see Listing 6-22).
Listing 6-22. The Customer Entity Defining Named Queries
@Entity
@NamedQueries({
  @NamedQuery ( name = " findAll ", query ="select c from Customer c"),
  @NamedQuery(name = "findVincent", →
              query="select c from Customer c where c.firstName = 'Vincent'"),
  @NamedQuery(name = "findWithParam", →
              query="select c from Customer c where c.firstName = :fname")
})
public class Customer {

  @Id @GeneratedValue
  private Long id;
  private String firstName;
  private String lastName;
  private Integer age;
  private String email;
  @OneToOne
  @JoinColumn(name = "address_fk")
  private Address address;

  // Constructors, getters, setters
}
Because the Customer entity defines more than one named query, it uses the @NamedQueries annotation, which takes an array of @NamedQuery. The first query, called findAll, selects all customers from the database with no restriction (no WHERE clause). The findWithParam query uses the parameter :fname to restrict customers by their first name. Listing 6-22 shows an array of @NamedQuery, but, if the Customer only had one query, it would have been defined as follows:
@Entity
@NamedQuery ( name = " findAll ", query ="select c from Customer c")
public class Customer {...}
The way to execute these named queries resembles the way dynamic queries are used. The EntityManager.createNamedQuery() method is invoked and passed to the query name defined by the annotations. This method returns a Query or a TypedQuery that can be used to set parameters, the max results, fetch modes, and so on. To execute the findAll query, write the following code:
Query query = em. createNamedQuery (" findAll ");
Again, if you need to type the query to return a list of Customer objects, you’ll need to use the TypedQuery as follows:
TypedQuery <Customer> query = em.createNamedQuery("findAll", Customer.class );
The following is a fragment of code calling the findWithParam named query, passing the parameter :fname, and setting the maximum result to 3:
Query query = em.createNamedQuery("findWithParam");
query.setParameter("fname", "Vincent");
query. setMaxResults (3);
List<Customer> customers = query.getResultList();
Because most of the methods of the Query API return a Query object, you can use the following elegant shortcut to write queries. You call methods one after the other (setParameter().setMaxResults(), etc.).
Query query = em.createNamedQuery("findWithParam").setParameter("fname", "Vincent") →
                                                  .setMaxResults(3);
Named queries are useful for organizing query definitions and powerful for improving application performance. The organization comes from the fact that the named queries are defined statically on entities and are typically placed on the entity class that directly corresponds to the query result (here the findAll query returns customers, so it should be defined in the Customer entity).
There is a restriction in that the name of the query is scoped to the persistence unit and must be unique within that scope, meaning that only one findAll method can exist. A findAll query for customers and a findAll query for addresses should be named differently. A common practice is to prefix the query name with the entity name. For example, the findAll query for the Customer entity would be named Customer.findAll.
Another problem is that the name of the query, which is a String, is manipulated, and, if you make a typo or refactor your code, you may get some exceptions indicating that the query doesn’t exist. To limit the risks, you can replace the name of a query with a constant. Listing 6-23 shows how to refactor the Customer entity.
Listing 6-23. The Customer Entity Defining a Named Query with a Constant
@Entity
@NamedQuery(name = Customer.FIND_ALL , query="select c from Customer c"),
public class Customer {

  public static final String FIND_ALL = "Customer.findAll";

  // Attributes, constructors, getters, setters
}
The FIND_ALL constant identifies the findAll query nonambiguously by prefixing the name of the query with the name of the entity. The same constant is then used in the @NamedQuery annotation, and you can use this constant to execute the query as follows:
TypedQuery<Customer> query = em.createNamedQuery( Customer.FIND_ALL , Customer.class);
Criteria API (or Object-Oriented Queries)
Until now, I’ve been using Strings to write JPQL (dynamic or named queries) statements. This has the advantage of writing a database query concisely but the inconvenience of being error prone and difficult for an external framework to manipulate: it is a String, you end up concatenating Strings and so many typos can be made. For example, you could have typos on JPQL keywords (SLECT instead of SELECT), class names (Custmer instead of Customer), or attributes (firstname instead of firstName). You can also write a syntactically incorrect statement (SELECT c WHERE c.firstName = 'John' FROM Customer). Any of these mistakes will be discovered at runtime, and it may sometimes be difficult to find where the bug comes from.
JPA 2.0 created a new API, called Criteria API and defined in the package javax.persistence.criteria. It allows you to write any query in an object-oriented and syntactically correct way. Most of the mistakes that a developer could make writing a statement are found at compile time, not at runtime. The idea is that all the JPQL keywords (SELECT, UPDATE, DELETE, WHERE, LIKE, GROUP BY. . .) are defined in this API. In other words, the Criteria API supports everything JPQL can do but with an object-based syntax. Let’s have a first look at a query that retrieves all the customers named “Vincent.” In JPQL, it would look as follows:
SELECT c FROM Customer c WHERE c.firstName = 'Vincent'
This JPQL statement is rewritten in Listing 6-24 in an object-oriented way using the Criteria API.
Listing 6-24. A Criteria Query Selecting All the Customers Named Vincent
CriteriaBuilder builder = em.getCriteriaBuilder();
CriteriaQuery <Customer> criteriaQuery = builder.createQuery(Customer.class);
Root <Customer> c = criteriaQuery . from (Customer.class);
criteriaQuery . select (c). where (builder.equal( c.get("firstName") , "Vincent"));
Query query = em.createQuery( criteriaQuery ).getResultList();
List<Customer> customers = query.getResultList();
Without going into too much detail, you can see that the SELECT, FROM, and WHERE keywords have an API representation through the methods select(), from(), and where(). And this rule applies for every JPQL keyword. Criteria queries are constructed through the CriteriaBuilder interface that is obtained by the EntityManager (the em attribute in Listings 6-24 and 6-25). It contains methods to construct the query definition (this interface defines keywords such as desc(), asc(), avg(), sum(), max(), min(), count(), and(), or(), greaterThan(), lowerThan(). . .). The other role of the CriteriaBuilder is to serve as the main factory of criteria queries (CriteriaQuery) and criteria query elements. This interface defines methods such as select(), from(), where(), orderBy(), groupBy(), and having(), which have the equivalent meaning in JPQL. In Listing 6-24, the way you get the alias c (as in SELECT c FROM Customer) is through the Root interface (Root<Customer> c). Then you just have to use the builder, the query, and the root to write any JPQL statement you want: from the simplest (select all the entities from the database) to the most complex (joins, subqueries, case expressions, functions . . .).
Listing 6-25. A Criteria Query Selecting All the Customers Older Than 40
CriteriaBuilder builder = em.getCriteriaBuilder();
CriteriaQuery<Customer> criteriaQuery = builder.createQuery(Customer.class);
Root<Customer> c = criteriaQuery.from(Customer.class);
criteriaQuery.select(c).where(builder.greaterThan( c.get("age").as(Integer.class) , 40));
Query query = em.createQuery(criteriaQuery).getResultList();
List<Customer> customers = query.getResultList();
Let’s take another example. Listing 6-25 shows a query that retrieves all the customers older than 40. The c.get("age") gets the attribute age from the Customer entity and checks if it’s greater than 40.
I started this section saying that the Criteria API allows you to write error-free statements. But it’s not completely true yet. When you look at Listings 6-24 and 6-25, you can still see some strings ("firstName" and "age") that represent the attributes of the Customer entity. So typos can still be made. In Listing 6-25, we even need to cast the age into an Integer (c.get("age").as(Integer.class)) because there is no other way to discover that the age attribute is of type Integer. To solve these problems, the Criteria API comes with a static metamodel class for each entity, bringing type safety to the API.
Type-Safe Criteria API
Listings 6-24 and 6-25 are almost typesafe: each JPQL keyword can be represented by a method of the CriteriaBuilder and CriteriaQuery interface. The only missing part is the attributes of the entity that are string based: the way to refer to the customer’s firstName attribute is by calling c.get("firstName"). The get method takes a String as a parameter. Type-safe Criteria API solves this by overriding this method with a path expression from the metamodel API classes bringing type safety.
Listing 6-26 shows the Customer entity with several attributes of different type (Long, String, Integer, Address).
Listing 6-26. A Customer Entity with Several Attributes’ Types
@Entity
public class Customer {

  @Id @GeneratedValue
  private Long id;
  private String firstName;
  private String lastName;
  private Integer age;
  private String email;
  private Address address;

  // Constructors, getters, setters
}
To bring type safety, JPA 2.1 can generate a static metamodel class for each entity. The convention is that each entity X will have a metadata class called X_ (with an underscore). So, the Customer entity will have its metamodel representation described in the Customer_ class shown in Listing 6-27.
Listing 6-27. The Customer_ Class Describing the Metamodel of Customer
@Generated("EclipseLink")
@StaticMetamodel(Customer.class)
public class Customer_ {

  public static volatile SingularAttribute<Customer, Long > id;
  public static volatile SingularAttribute<Customer, String > firstName;
  public static volatile SingularAttribute<Customer, String> lastName;
  public static volatile SingularAttribute<Customer, Integer > age;
  public static volatile SingularAttribute<Customer, String> email;
  public static volatile SingularAttribute<Customer, Address > address;
}
In the static metamodel class, each attribute of the Customer entity is defined by a subclass of javax.persistence.metamodel.Attribute (CollectionAttribute, ListAttribute, MapAttribute, SetAttribute, or SingularAttribute). Each of these attributes uses generics and is strongly typed (e.g., SingularAttribute<Customer, Integer>, age). Listing 6-28 shows the exact same code as Listing 6-25 but revisited with the static metamodel class (the c.get("age") is turned into c.get(Customer_.age)). Another advantage of type safety is that the metamodel defines the age attribute as being an Integer, so there is no need to cast the attribute into an Integer using as(Integer.class).
Listing 6-28. A Type-Safe Criteria Query Selecting All the Customers Older Than 40
CriteriaBuilder builder = em.getCriteriaBuilder();
CriteriaQuery<Customer> criteriaQuery = builder.createQuery(Customer.class);
Root<Customer> c = criteriaQuery.from(Customer.class);
criteriaQuery.select(c).where(builder.greaterThan( c.get(Customer_.age) , 40));
Query query = em.createQuery(criteriaQuery).getResultList();
List<Customer> customers = query.getResultList();
Again, these are just examples of what you can do with the Criteria API. It is a very rich API that is completely defined in Chapter 5 (Metamodel API) and Chapter 6 (Criteria API) of the JPA 2.1 specification.
![]() Note The classes used in the static metamodel, such as Attribute or SingularAttribute, are standard and defined in the package javax.persistence.metamodel. But the generation of the static metamodel classes is implementation specific. EclipseLink uses an internal class called CanonicalModelProcessor. This processor can be invoked by your integrated development environment (IDE) while you develop a Java command, an Ant task, or a Maven plug-in.
Note The classes used in the static metamodel, such as Attribute or SingularAttribute, are standard and defined in the package javax.persistence.metamodel. But the generation of the static metamodel classes is implementation specific. EclipseLink uses an internal class called CanonicalModelProcessor. This processor can be invoked by your integrated development environment (IDE) while you develop a Java command, an Ant task, or a Maven plug-in.
JPQL has a very rich syntax that allows you to handle entities in any form and ensures portability across databases. JPA enables you to use specific features of a database by using native queries. Native queries take a native SQL statement (SELECT, UPDATE, or DELETE) as the parameter and return a Query instance for executing that SQL statement. However, native queries are not expected to be portable across databases.
If the code is not portable, why not use JDBC calls? The main reason to use JPA native queries rather than JDBC calls is because the result of the query will be automatically converted back to entities. If you want to retrieve all the customer entities from the database using SQL, you need to use the EntityManager.createNativeQuery() method that has as parameters the SQL query and the entity class that the result should be mapped to.
Query query = em.createNativeQuery (" SELECT * FROM t_customer ", Customer.class);
List<Customer> customers = query.getResultList();
As you can see in the preceding code fragment, the SQL query is a String that can be dynamically created at runtime (just like JPQL dynamic queries). Again, the query could be complex, and, because the persistence provider doesn’t know in advance, it will interpret it each time. Like named queries, native queries can use annotations to define static SQL queries. Named native queries are defined using the @NamedNativeQuery annotation, which must be placed on any entity (see code below). Like JPQL named queries, the name of the query must be unique within the persistence unit.
@Entity
@NamedNativeQuery(name = "findAll", query="select * from t_customer")
@Table(name = "t_customer")
public class Customer {...}
Stored Procedure Queries
So far all the different queries (JPQL or SQL) have the same purpose: send a query from your application to the database that will execute it and send back a result. Stored procedures are different in the sense that they are actually stored in the database itself and executed within this database.
A stored procedure is a subroutine available to applications that access a relational database. Typical usage could be extensive or complex processing that requires execution of several SQL statements or a data-intensive repetitive task. Stored procedures are usually written in a proprietary language close to SQL and therefore not easily portable across database vendors. But storing the code inside the database even in a nonportable way provides many advantages, like
- Better performance due to precompilation of the stored procedure as well as reutilizing its execution plan,
- Keeping statistics on the code to keep it optimized,
- Reducing the amount of data passed over a network by keeping the code on the server,
- Altering the code in a central location without replicating in several different programs,
- Stored procedures, which can be used by multiple programs written in different languages (not just Java),
- Hiding the raw data by allowing only stored procedures to gain access to the data, and
- Enhancing security controls by granting users permission to execute a stored procedure independently of underlying table permissions.
Let’s take a look at a practical example: archiving old books and CDs. After a certain date books and CDs have to be archived in a certain warehouse, meaning they have to be physically transferred from a warehouse to a reseller. Archiving books and CDs can be a time-consuming process as several tables have to be updated (Inventory, Warehouse, Book, CD, Transportation tables, etc.). So we can write a stored procedure to regroup several SQL statements and improve performance. The stored procedure sp_archive_books defined in Listing 6-29 takes an archive date and a warehouse code as parameters and updates the T_Inventory and the T_Transport tables.
Listing 6-29. Abstract of a Stored Procedure Archiving Books
CREATE PROCEDURE sp_archive_books @archiveDate DATE, @warehouseCode VARCHAR AS
  UPDATE T_Inventory
  SET Number_Of_Books_Left - 1
  WHERE Archive_Date < @archiveDate AND Warehouse_Code = @warehouseCode ;

  UPDATE T_Transport
  SET Warehouse_To_Take_Books_From = @warehouseCode ;
END
The stored procedure in Listing 6-29 is compiled into the database and can then be invoked through its name (sp_archive_books). As you can see, a stored procedure accepts data in the form of input or output parameters. Input parameters (@archiveDate and @warehouseCode in our example) are utilized in the execution of the stored procedure which, in turn, can produce some output result. This result is returned to the application through the use of a result set.
In JPA 2.1 the StoredProcedureQuery interface (which extends Query) supports stored procedures. Unlike dynamic, named, or native queries, the API only allows you to invoke a stored procedure that already exists in the database, not define it. You can invoke a stored procedure with annotations (with @NamedStoredProcedureQuery) or dynamically.
Listing 6-30 shows the Book entity that declares the sp_archive_books stored procedure using named query annotations. The NamedStoredProcedureQuery annotation specifies name of the stored procedure to invoke the types of all parameters (Date.class and String.class), their corresponding parameter modes (IN, OUT, INOUT, REF_CURSOR), and how result sets, if any, are to be mapped. A StoredProcedureParameter annotation needs to be provided for each parameter.
Listing 6-30. Entity Declaring a Named Stored Procedure
@Entity
@NamedStoredProcedureQuery (name = "archiveOldBooks", procedureName = " sp_archive_books ",
  parameters = {
    @StoredProcedureParameter (name = " archiveDate ", mode = IN, type = Date.class),
    @StoredProcedureParameter(name = " warehouse ", mode = IN, type = String.class)
  }
)
public class Book {

  @Id @GeneratedValue
  private Long id;
  private String title;
  private Float price;
  private String description;
  private String isbn;
  private String editor;
  private Integer nbOfPage;
  private Boolean illustrations;

  // Constructors, getters, setters
}
To invoke the sp_archive_books stored procedure, you need to use the entity manager and create a named stored procedure query by passing its name (archiveOldBooks). This returns a StoredProcedureQuery on which you can set the parameters and execute it as shown in Listing 6-31.
Listing 6-31. Calling a StoredProcedureQuery
StoredProcedureQuery query = em. createNamedStoredProcedureQuery (" archiveOldBooks ");
query.setParameter("archiveDate", new Date());
query.setParameter("maxBookArchived", 1000);
query.execute();
If the stored procedure is not defined using metadata (@NamedStoredProcedureQuery), you can use the API to dynamically specify a stored procedure query. This means that parameters and result set information must be provided programmatically. This can be done using the registerStoredProcedureParameter method of the StoredProcedureQuery interface as shown in Listing 6-32.
Listing 6-32. Registering and Calling a StoredProcedureQuery
StoredProcedureQuery query = em. createStoredProcedureQuery ("sp_archive_old_books");
query. registerStoredProcedureParameter (" archiveDate ", Date.class, ParameterMode.IN);
query. registerStoredProcedureParameter (" maxBookArchived ", Integer.class, ParameterMode.IN);

query.setParameter("archiveDate", new Date());
query.setParameter("maxBookArchived", 1000);
query.execute();
Most specifications (not just Java EE) focus heavily on functional requirements, leaving nonfunctional ones like performance, scalability, or clustering as implementation details. Implementations have to strictly follow the specification but may also add specific features. A perfect example for JPA would be caching.
Until JPA 2.0, caching wasn’t mentioned in the specification. The entity manager is a first-level cache used to process data comprehensively for the database and to cache short-lived entities. This first-level cache is used on a per-transaction basis to reduce the number of SQL queries within a given transaction. For example, if an object is modified several times within the same transaction, the entity manager will generate only one UPDATE statement at the end of the transaction. A first-level cache is not a performance cache.
Nevertheless, all JPA implementations use a performance cache (a.k.a. a second-level cache) to optimize database access, queries, joins, and so on. As seen in Figure 6-3, the second-level cache sits between the entity manager and the database to reduce database traffic by keeping objects loaded in memory and available to the whole application.
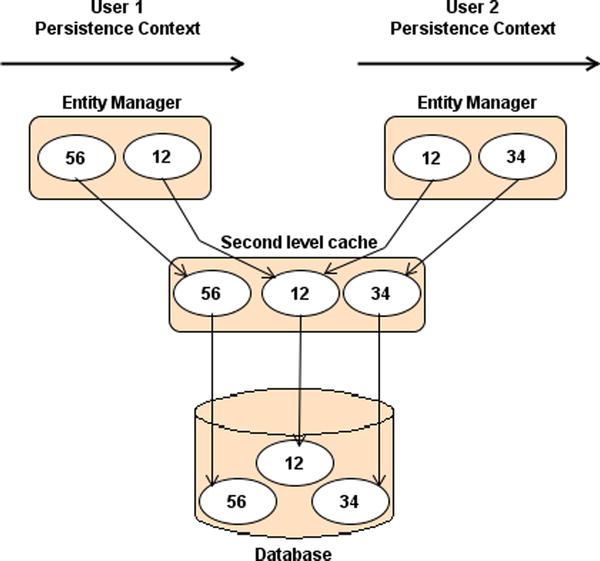
Figure 6-3. Second-level cache
Each implementation has its own way of caching objects, either by developing their own mechanism or by reusing existing ones (open source or commercial). Caching can be distributed across a cluster or not—anything is possible when the specification ignores a topic. JPA 2.0 acknowledged that second-level cache was needed and has added caching operations to the standard API. The API, shown in Listing 6-33, is very minimalist (because the goal of JPA is not to standardize a fully functional cache), but it allows code to query and remove some entities from the second-level cache in a standard manner. Like EntityManager, the javax.persistence.Cache is an interface implemented by the persistence provider caching system.
Listing 6-33. Cache API
public interface Cache {

  // Whether the cache contains the given entity
  public boolean contains(Class cls, Object id);

  // Removes the given entity from the cache
  public void evict(Class cls, Object id);
  // Removes entities of the specified class (and its subclasses) from the cache
  public void evict(Class cls);

  // Clears the cache.
  public void evictAll();

  // Returns the provider-specific cache implementation
  public <T> T unwrap(Class<T> cls);
}
You can use this API to check if a specific entity is in the second-level cache or not, remove it from the cache, or clear the entire cache. Combined with this API, you can explicitly inform the provider that an entity is cacheable or not by using the @Cacheable annotation as shown in Listing 6-34. If the entity has no @Cacheable annotation, it means that the entity and its state must not be cached by the provider.
Listing 6-34. The Customer Entity Is Cacheable
@Entity
@Cacheable(true)
public class Customer {

  @Id @GeneratedValue
  private Long id;
  private String firstName;
  private String lastName;
  private String email;

  // Constructors, getters, setters
}
The @Cacheable annotation takes a Boolean value. Once you’ve decided which entity should be cacheable or not, you need to inform the provider which caching mechanism to use. The way to do this with JPA is to set the shared-cache-mode attribute in the persistence.xml file. Following are the possible values:
- ALL: All entities and entity-related state and data are cached.
- DISABLE_SELECTIVE: Caching is enabled for all entities except those annotated with @Cacheable(false).
- ENABLE_SELECTIVE: Caching is enabled for all entities annotated with @Cacheable(true).
- NONE: Caching is disabled for the persistence unit.
- UNSPECIFIED: Caching behavior is undefined (the provider-specific defaults may apply).
Not setting one of these values leaves it up to the provider to decide which caching mechanism to use. The code in Listing 6-35 shows you how to use this caching mechanism. First, we create a Customer object and persist it. Because Customer is cacheable (see Listing 6-34), it should be in the second-level cache (by using the EntityManagerFactory.getCache().contains() method). Invoking the cache.evict(Customer.class) method removes the entity from the cache.
Listing 6-35. The Customer Entity Is Cacheable
Customer customer = new Customer("Patricia", "Jane", " [email protected] ");

tx.begin();
em.persist(customer);
tx.commit();

// Uses the EntityManagerFactory to get the Cache
Cache cache = emf.getCache();

// Customer should be in the cache
assertTrue( cache.contains (Customer.class, customer.getId()));

// Removes the Customer entity from the cache
cache.evict (Customer.class);

// Customer should not be in the cache anymore
assertFalse( cache.contains (Customer.class, customer.getId()));
JPA can be used to change persistent data, and JPQL can be used to retrieve data following certain criteria. All this can happen within an application running in a cluster with multiple nodes, multiple threads, and one single database, so it is quite common for entities to be accessed concurrently. When this is the case, synchronization must be controlled by the application using a locking mechanism. Whether the application is simple or complex, chances are that you will make use of locking somewhere in your code.
To illustrate the problem of concurrent database access, let’s see an example of an application with two concurrent threads, shown in Figure 6-4. One thread finds a book by its identifier and raises the price of the book by $2. The other does the same thing but raises the price by $5. If you execute these two threads concurrently in separate transactions and manipulate the same book, you can’t predict the final price of the book. In this example, the initial price of the book is $10. Depending on which transaction finishes last, the price can be $12 or $15.
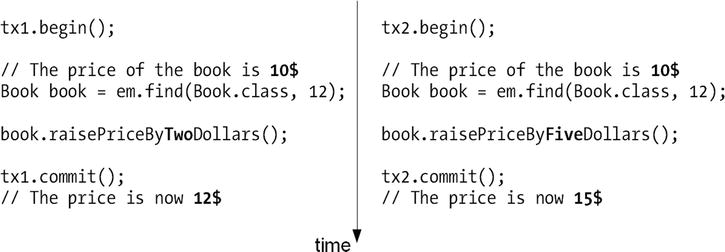
Figure 6-4. Transactions one (tx1) and two (tx2) updating the price of a book concurrently
This problem of concurrency, where the “winner” is the last one to commit, is not specific to JPA. Databases have had to deal with this problem for a long time and have found different solutions to isolate one transaction from others. One common mechanism that databases use is to lock the row on which the SQL statement is being executed.
JPA 2.1 uses two different locking mechanisms (JPA 1.0 only had support for optimistic locking).
- Optimistic locking is based on the assumption that most database transactions don’t conflict with other transactions, allowing concurrency to be as permissive as possible when allowing transactions to execute.
- Pessimistic locking is based on the opposite assumption, so a lock will be obtained on the resource before operating on it.
As an example from everyday life that reinforces these concepts, consider “optimistic and pessimistic street crossing.” In an area with very light traffic, you might be able to cross the street without checking for approaching cars. But not in a busy city center!
JPA uses different locking mechanisms at different levels of the API. Both pessimistic and optimistic locks can be obtained via the EntityManager.find and EntityManager.refresh methods (in addition to the lock method), as well as through JPQL queries, meaning locking can be achieved at the EntityManager level and at the Query level with the methods listed in Tables 6-5 and 6-6.
Table 6-5. EntityManager Methods to Lock Entities
| Method | Description |
|---|---|
| <T> T find(Class<T> entityClass, Object primaryKey,LockModeType lockMode) | Searches for an entity of the specified class and primary key and locks it with respect to the specified lock type |
| void lock(Object entity, LockModeType lockMode) | Locks an entity instance that is contained in the persistence context with the specified lock mode type |
| void refresh(Object entity, LockModeType lockMode) | Refreshes the state of the instance from the database, overwriting changes made to the entity, if any, and locks it with respect to the given lock mode type |
| LockModeType getLockMode(Object entity) | Gets the current lock mode for the entity instance |
Table 6-6. Query Method to Lock JPQL Queries
| Method | Description |
|---|---|
| LockModeType getLockMode() | Gets the current lock mode for the query |
| Query setLockMode(LockModeType lockMode) | Sets the lock mode type to be used for the query execution |
Each of these methods takes a LockModeType as a parameter that can take different values.
- OPTIMISTIC: Uses optimistic locking.
- OPTIMISTIC_FORCE_INCREMENT: Uses optimistic locking and forces an increment to the entity’s version column (see the upcoming “Versioning” section).
- PESSIMISTIC_READ: Uses pessimistic locking without the need to reread the data at the end of the transaction to obtain a lock.
- PESSIMISTIC_WRITE: Uses pessimistic locking and forces serialization among transactions attempting to update the entity.
- PESSIMISTIC_FORCE_INCREMENT: Uses pessimistic locking and forces an increment to the entity’s version column (see the upcoming “Versioning” section).
- NONE: Specifies no locking mechanism should be used.
You can use these parameters in multiple places depending on how you need to specify locks. You can read then lock.
Book book = em.find(Book.class, 12);
// Lock to raise the price
em.lock(book, LockModeType.OPTIMISTIC_FORCE_INCREMENT);
book.raisePriceByTwoDollars();
Or you can read and lock.
Book book = em.find(Book.class, 12, LockModeType.OPTIMISTIC_FORCE_INCREMENT );
// The book is already locked, raise the price
book.raisePriceByTwoDollars();
Concurrency and locking are key motivators for versioning.
Versioning
Java specifications use versioning: Java SE 5.0, Java SE 6.0, EJB 3.1, JAX-RS 1.0, and so on. When a new version of JAX-RS is released, its version number is increased, and you upgrade to JAX-RS 1.1. JPA uses this exact mechanism when you need to version entities. So, when you persist an entity for the first time in the database, it will get the version number 1. Later, if you update an attribute and commit this change to the database, the entity version will get the number 2, and so on. This versioning will evolve each time a change is made to the entity.
In order for this to happen, the entity must have an attribute to store the version number, and it has to be annotated by @Version. This version number is then mapped to a column in the database. The attribute types supported for versioning can be int, Integer, short, Short, long, Long, or Timestamp. Listing 6-36 shows how to add a version attribute to the Book entity.
Listing 6-36. The Book Entity with a @Version Annotation on an Integer
@Entity
public class Book {

  @Id @GeneratedValue
  private Long id;
  @Version
  private Integer version;
  private String title;
  private Float price;
  private String description;
  private String isbn;
  private Integer nbOfPage;
  private Boolean illustrations;

  // Constructors, getters, setters
}
The entity can access the value of its version property but must not modify it. Only the persistence provider is permitted to set or update the value of the version attribute when the object is written or updated to the database. Let’s look at an example to illustrate the behavior of this versioning. In Listing 6-37, a new Book entity is persisted to the database. Once the transaction is committed, the persistence provider sets the version to 1. Later, the price of the book is updated, and, once the data are flushed to the database, the version number is incremented to 2.
Listing 6-37. Transactions tx1 and tx2 Updating the Price of a Book Concurrently
Book book = new Book("H2G2", 21f, "Best IT book", "123-456", 321, false);

tx.begin();
em.persist(book);
tx.commit();
assertEquals( 1, book.getVersion() );

tx.begin();
book.raisePriceByTwoDollars();
tx.commit();
assertEquals( 2, book.getVersion() );
The version attribute is not required but is recommended when the entity can be concurrently modified by more than one process or thread. Versioning is the core of optimistic locking and provides protection for infrequent concurrent entity modification. In fact, an entity is automatically enabled for optimistic locking if it has a property mapped with a @Version annotation.
Optimistic Locking
As its name indicates, optimistic locking is based on the fact that database transactions don’t conflict with each other. In other words, there is a good chance that the transaction updating an entity will be the only one that actually updates the entity during that interval. Therefore, the decision to acquire a lock on the entity is actually made at the end of the transaction. This ensures that updates to an entity are consistent with the current state of the database. Transactions that would cause this constraint to be violated result in an OptimisticLockException being thrown and the transaction marked for rollback.
How would you throw an OptimisticLockException? Either by explicitly locking the entity (with the lock or the find methods that you saw, passing a LockModeType) or by letting the persistence provider check the attribute annotated with @Version. The use of a dedicated @Version annotation on an entity allows the EntityManager to perform optimistic locking simply by comparing the value of the version attribute in the entity instance with the value of the column in the database. Without an attribute annotated with @Version, the entity manager will not be able to do optimistic locking automatically (implicitly).
Let’s look again at the example of increasing the price of a book. Transactions tx1 and tx2 both get an instance of the same Book entity. At that moment, the version of the Book entity is 1. The first transaction raises the price of the book by $2 and commits this change. When the data are flushed to the database, the persistence provider increases the version number and sets it to 2. At that moment, the second transaction raises the price by $5 and commits the change. The entity manager for tx2 realizes that the version number in the database is different from that of the entity. This means the version has been changed by a different transaction, so an OptimisticLockException is thrown, as shown in Figure 6-5.
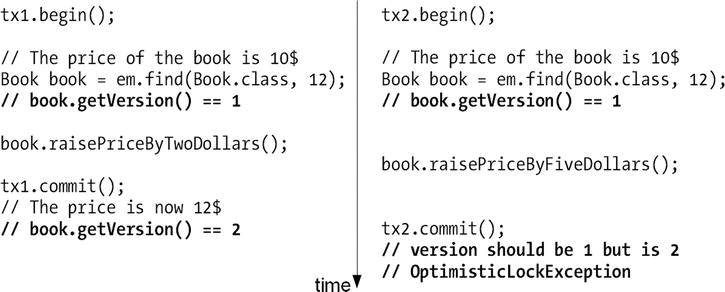
Figure 6-5. OptimisticLockException thrown on transaction tx2
This is the default behavior when the @Version annotation is used: an OptimisticLockException is thrown when the data are flushed (at commit time or by explicitly calling the em.flush() method). You can also control where you want to add the optimistic lock using read then lock or read and lock. The code of read and lock, for example, would look like this:
Book book = em.find(Book.class, 12);
// Lock to raise the price
em.lock(book, LockModeType.OPTIMISTIC);
book.raisePriceByTwoDollars();
With optimistic locking, the LockModeType that you pass as a parameter can take two values: OPTIMISTIC and OPTIMISTIC_FORCE_INCREMENT (or READ and WRITE, respectively, but these values are deprecated). The only difference is that OPTIMISTIC_FORCE_INCREMENT will force an update (increment) to the entity’s version column.
Applications are strongly encouraged to enable optimistic locking for all entities that may be concurrently accessed. Failure to use a locking mechanism may lead to inconsistent entity state, lost updates, and other state irregularities. Optimistic locking is a useful performance optimization that offloads work that would otherwise be required of the database and is an alternative to pessimistic locking, which requires low-level database locking.
Pessimistic locking is based on the opposite assumption to optimistic locking, because a lock is eagerly obtained on the entity before operating on it. This is very resource restrictive and results in significant performance degradation, as a database lock is held using a SELECT ... FOR UPDATE SQL statement to read data.
Databases typically offer a pessimistic locking service that allows the entity manager to lock a row in a table to prevent another thread from updating the same row. This is an effective mechanism to ensure that two clients do not modify the same row at the same time, but it requires expensive, low-level checks inside the database. Transactions that would cause this constraint to be violated result in a PessimisticLockException being thrown and the transaction marked for rollback.
Optimistic locking is appropriate in dealing with moderate contention among concurrent transactions. But in some applications with a higher risk of contentions, pessimistic locking may be more appropriate, as the database lock is immediately obtained as opposed to the often late failure of optimistic transactions. For example, in times of economic crises, stock markets receive huge numbers of selling orders. If 100 million Americans need to sell their stock options at the same time, the system needs to use pessimistic locks to ensure data consistency. Note that at the moment the market is rather pessimistic instead of optimistic, and that has nothing to do with JPA.
Pessimistic locking may be applied to entities that do not contain the annotated @Version attribute.
By now, you know most of the mysteries of entities, so let’s look at their life cycle. When an entity is instantiated (with the new operator), it is just seen as a regular POJO by the JVM (i.e., detached) and can be used as a regular object by the application. Then, when the entity is persisted by the entity manager, it is said to be managed. When an entity is managed, the entity manager will automatically synchronize the value of its attributes with the underlying database (e.g., if you change the value of an attribute by using a set method while the entity is managed, this new value will be automatically synchronized with the database).
To have a better understanding of this process, take a look at Figure 6-6, a UML state diagram showing the transitions between each state of a Customer entity.
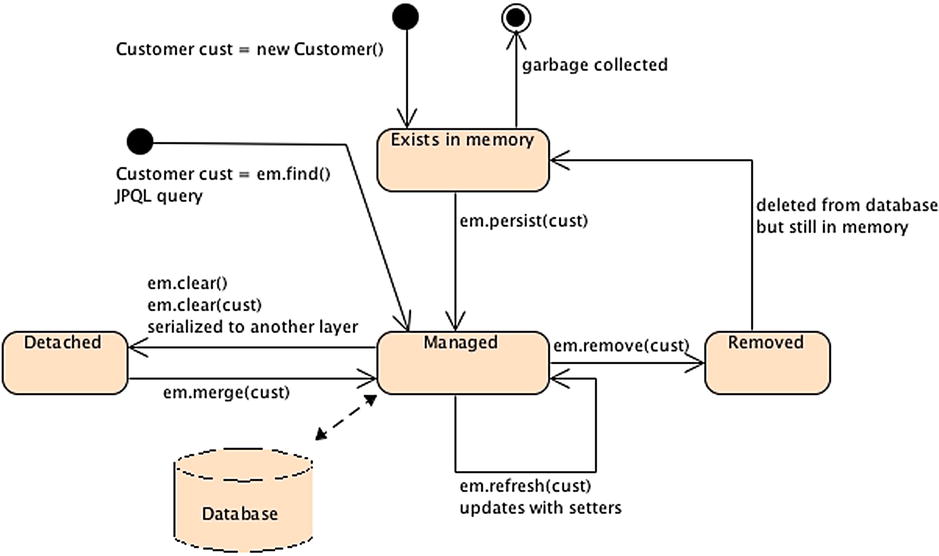
Figure 6-6. Entity life cycle
To create an instance of the Customer entity, you use the new operator. This object exists in memory, although JPA knows nothing about it. If you do nothing with this object, it will go out of scope and will end up being garbage collected, and that will be the end of its life cycle. What you can do next is persist an instance of Customer with the EntityManager.persist() method. At that moment, the entity becomes managed, and its state is synchronized with the database. During this managed state, you can update attributes using the setter methods (e.g., customer.setFirstName()) or refresh the content with anEntityManager.refresh() method. All these changes will be synchronized between the entity and the database. During this state, if you call the EntityManager.contains(customer) method, it will return true because customer is contained in the persistence context (i.e., managed).
Another way for an entity to be managed is when it is loaded from the database. When you use the EntityManager.find() method, or create a JPQL query to retrieve a list of entities, all are automatically managed, and you can start updating or removing their attributes.
In the managed state, you can call the EntityManager.remove() method, and the entity is deleted from the database and not managed anymore. But the Java object continues living in memory, and you can still use it until the garbage collector gets rid of it.
Now let’s look at the detached state. You’ve seen in the previous chapter how explicitly calling the EntityManager.clear() or EntityManager.detach(customer) methods will clear the entity from the persistence context; it becomes detached. But there is also another, more subtle, way to detach an entity: when it’s serialized. In many examples in this book, entities don’t implement anything, but, if they need to cross a network to be invoked remotely or cross layers to be displayed in a presentation tier, they need to implement the java.io.Serializable interface. This is not a JPA restriction but a Java restriction. When a managed entity is serialized, crosses the network, and gets deserialized, it is seen as a detached object. To reattach an entity, you need to call the EntityManager.merge() method. A common-use case is when you use an entity in a JSF page. Let’s say that a Customer entity is displayed in a form on a remote JSF page to be updated. Being remote, the entity needs to be serialized on the server side before being sent to the presentation layer. At that moment, the entity is automatically detached. Once displayed, if any data are changed and need to be updated, the form is submitted and the entity is sent back to the server, deserialized, and needs to be merged to be attached again.
Callback methods and listeners allow you to add your own business logic when certain life-cycle events occur on an entity, or broadly whenever a life-cycle event occurs on any entity.
The life cycle of an entity falls into four categories: persisting, updating, removing, and loading, which correspond to the database operations of inserting, updating, deleting, and selecting, respectively. Each life cycle has a “pre” and “post” event that can be intercepted by the entity manager to invoke a business method. These business methods have to be annotated by one of the annotations described in Table 6-7. These annotations may be applied to methods of an entity class, a mapped superclass, or a callback listener class.
Table 6-7. Life-Cycle Callback Annotations
| Annotation | Description |
|---|---|
| @PrePersist | Marks a method to be invoked before EntityManager.persist() is executed. |
| @PostPersist | Marks a method to be invoked after the entity has been persisted. If the entity autogenerates its primary key (with @GeneratedValue), the value is available in the method. |
| @PreUpdate | Marks a method to be invoked before a database update operation is performed (calling the entity setters or the EntityManager.merge() method). |
| @PostUpdate | Marks a method to be invoked after a database update operation is performed. |
| @PreRemove | Marks a method to be invoked before EntityManager.remove() is executed. |
| @PostRemove | Marks a method to be invoked after the entity has been removed. |
| @PostLoad | Marks a method to be invoked after an entity is loaded (with a JPQL query or an EntityManager.find()) or refreshed from the underlying database. There is no @PreLoad annotation, as it doesn’t make sense to preload data on an entity that is not built yet. |
Adding the callback annotations to the UML state diagram shown previously in Figure 6-6 results in the diagram you see in Figure 6-7.
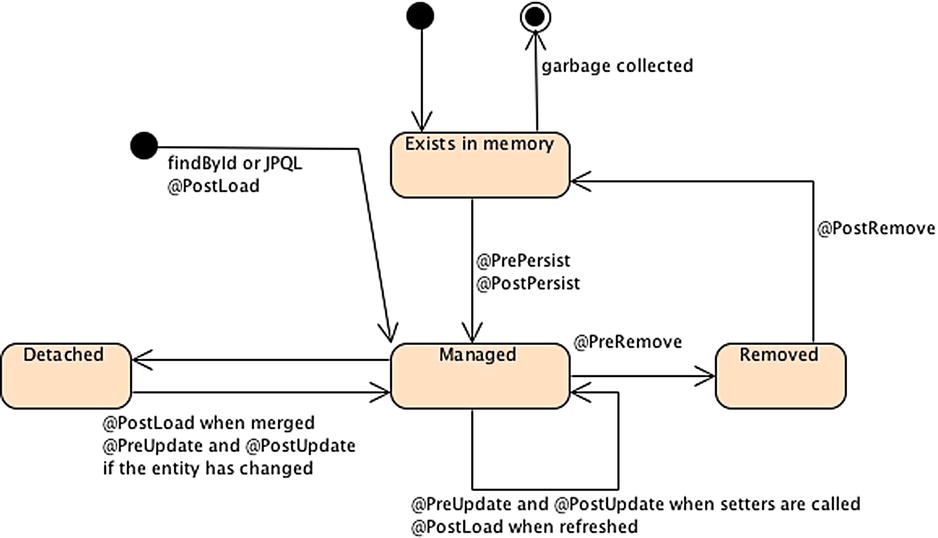
Figure 6-7. Entity life cycle with callback annotations
Before inserting an entity into the database, the entity manager calls the method annotated with @PrePersist. If the insert does not throw an exception, the entity is persisted, its identity is initialized, and the method annotated with @PostPersist is then invoked. This is the same behavior for updates (@PreUpdate, @PostUpdate) and deletes (@PreRemove, @PostRemove). A method annotated with @PostLoad is called when an entity is loaded from the database (via an EntityManager.find() or a JPQL query). When the entity is detached and needs to be merged, the entity manager first has to check whether there are any differences with the database (@PostLoad) and, if so, update the data (@PreUpdate, @PostUpdate).
How does it look in the code? Entities can have not only attributes, constructors, getters, and setters but also business logic used to validate their state or compute some of their attributes. These can consist of normal Java methods that are invoked by other classes or callback annotations (also referred to as callback methods), as shown in Listing 6-38. The entity manager invokes them automatically depending on the event triggered.
Listing 6-38. The Customer Entity with Callback Annotations
@Entity
public class Customer {

  @Id @GeneratedValue
  private Long id;
  private String firstName;
  private String lastName;
  private String email;
  private String phoneNumber;
  @Temporal(TemporalType.DATE)
  private Date dateOfBirth;
  @Transient
  private Integer age;
  @Temporal(TemporalType.TIMESTAMP)
  private Date creationDate;

  @PrePersist
  @PreUpdate
  private void validate() {
    if (firstName == null || "".equals(firstName))
      throw new IllegalArgumentException("Invalid first name");
    if (lastName == null || "".equals(lastName))
      throw new IllegalArgumentException("Invalid last name");
  }

  @PostLoad
  @PostPersist
  @PostUpdate
  public void calculateAge() {
    if (dateOfBirth == null) {
      age = null;
      return;
    }

    Calendar birth = new GregorianCalendar();
    birth.setTime(dateOfBirth);
    Calendar now = new GregorianCalendar();
    now.setTime(new Date());
    int adjust = 0;
    if (now.get(DAY_OF_YEAR) - birth.get(DAY_OF_YEAR) < 0) {
      adjust = -1;
    }
    age = now.get(YEAR) - birth.get(YEAR) + adjust;
  }

  // Constructors, getters, setters
}
In Listing 6-38, the Customer entity has a method to validate its data (checks the firstName and lastName attributes). This method is annotated with @PrePersist and @PreUpdate and will get called before inserting data into or updating data in the database. If the data are not valid, a runtime exception is launched, and the insert or update will roll back to ensure that the data inserted or updated in the database are valid.
The method calculateAge() calculates the age of the customer. The age attribute is transient and doesn’t get mapped into the database. After the entity gets loaded, persisted, or updated, the calculateAge() method takes the date of birth of the customer, calculates the age, and sets the attribute.
The following rules apply to life-cycle callback methods:
- Methods can have public, private, protected, or package-level access but must not be static or final. Notice in Listing 6-38 that the validate() method is private.
- A method may be annotated with multiple life-cycle event annotations (the validateData() method is annotated with @PrePersist and @PreUpdate). However, only one life-cycle annotation of a given type may be present in an entity class (e.g., you can’t have two @PrePersist annotations in the same entity).
- A method can throw unchecked (runtime) exceptions but not checked exceptions. Throwing a runtime exception will roll back the transaction if one exists.
- A method can invoke JNDI, JDBC, JMS, and EJBs but cannot invoke any EntityManager or Query operations.
- With inheritance, if a method is specified on the superclass, it will get invoked before the method on the child class. For example, if in Listing 6-38 Customer was inheriting from a Person entity, the Person @PrePersist method would be invoked before the Customer @PrePersist method.
- If event cascading is used in the relationships, the callback method will also be called in a cascaded way. For example, let’s say a Customer has a collection of addresses, and a cascade remove is set on the relation. When you delete the customer, the Address @PreRemove method would be invoked as well as the Customer @PreRemove method.
Callback methods in an entity work well when you have business logic that is only related to that entity. Entity listeners are used to extract the business logic to a separate class and share it between other entities. An entity listener is just a POJO on which you can define one or more life-cycle callback methods. To register a listener, the entity needs to use the @EntityListeners annotation.
Using the customer example, let’s extract the calculateAge() and validate() methods to separate listener classes, AgeCalculationListener (see Listing 6-39) and DataValidationListener (see Listing 6-40), respectively.
Listing 6-39. A Listener Calculating the Customer’s Age
public class AgeCalculationListener {

  @PostLoad
  @PostPersist
  @PostUpdate
  public void calculateAge( Customer customer ) {
    if (customer.getDateOfBirth() == null) {
      customer.setAge(null);
      return;
    }

    Calendar birth = new GregorianCalendar();
    birth.setTime(customer.getDateOfBirth());
    Calendar now = new GregorianCalendar();
    now.setTime(new Date());
    int adjust = 0;    if (now.get(DAY_OF_YEAR) - birth.get(DAY_OF_YEAR) < 0) {
      adjust = -1;
    }
    customer.setAge(now.get(YEAR) - birth.get(YEAR) + adjust);
  }
}
Listing 6-40. A Listener Validating the Customer’s Attributes
public class DataValidationListener {

  @PrePersist
  @PreUpdate
  private void validate( Customer customer ) {
    if (customer.getFirstName() == null || "".equals(customer.getFirstName()))
      throw new IllegalArgumentException("Invalid first name");
    if (customer.getLastName() == null || "".equals(customer.getLastName()))
      throw new IllegalArgumentException("Invalid last name");
  }
}
Only simple rules apply to a listener class. The first is that the class must have a public no-arg constructor. Second, the signatures of the callback methods are slightly different from the ones in Listing 6-38. When you invoke the callback method on a listener, the method needs to have access to the entity state (e.g., the customer’s first name and last name, which need to be validated). The methods must have a parameter of a type that is compatible with the entity type, as the entity related to the event is being passed into the callback. A callback method defined on an entity has the following signature with no parameter:
void <METHOD>();
Callback methods defined on an entity listener can have two different types of signatures. If the method has to be used on several entities, it must have an Object argument.
void <METHOD>( Object anyEntity)
If it is only for one entity or its subclasses (when there’s inheritance), the parameter can be of the entity type.
void <METHOD>( Customer customerOrSubclasses)
To designate that these two listeners are notified of life-cycle events on the Customer entity, you need to use the @EntityListeners annotation (see Listing 6-41). This annotation can take one entity listener as a parameter or an array of listeners. When several listeners are defined and the life-cycle event occurs, the persistence provider iterates through each listener in the order in which they are listed and will invoke the callback method, passing a reference of the entity to which the event applies. It will then invoke the callback methods on the entity itself (if there are any).
Listing 6-41. The Customer Entity Defining Two Listeners
@EntityListeners({DataValidationListener.class, AgeCalculationListener.class})
@Entity
public class Customer {

  @Id @GeneratedValue
  private Long id;
  private String firstName;
  private String lastName;
  private String email;
  private String phoneNumber;
  @Temporal(TemporalType.DATE)
  private Date dateOfBirth;
  @Transient
  private Integer age;
  @Temporal(TemporalType.TIMESTAMP)
  private Date creationDate;

  // Constructors, getters, setters
}
The result of this code is exactly the same as that of the previous example (shown earlier in Listing 6-38). The Customer entity validates its data before an insert or an update using the DataValidationListener.validate() method and calculates its age with the listener’s AgeCalculationListener.calculateAge() method.
The rules that an entity listener’s methods have to follow are similar to the entity callback methods except for a few details.
- Only unchecked exceptions can be thrown. This causes the remaining listeners and callback methods to not be invoked and the transaction to be roll backed if one exists.
- In an inheritance hierarchy, if multiple entities define listeners, the listeners defined on the superclass are invoked before the listeners defined on the subclasses. If an entity doesn’t want to inherit the superclass listeners, it can explicitly exclude them by using the @ExcludeSuperclassListeners annotation (or its XML equivalent).
Listing 6-41 shows a Customer entity defining two listeners, but a listener can also be defined by more than one entity. This can be useful in cases where the listener provides more general logic that many entities can benefit from. For example, you could create a debug listener that displays the name of some triggered events, as shown in Listing 6-42.
Listing 6-42. A Debug Listener Usable by Any Entity
public class DebugListener {

  @PrePersist
  void prePersist(Object object) {
    System.out.println("prePersist");
  }

  @PreUpdate
  void preUpdate(Object object) {
    System.out.println("preUpdate");
  }

  @PreRemove
  void preRemove(Object object) {
    System.out.println("preRemove");
  }
}
Note that each method takes an Object as a parameter, meaning that any type of entity could use this listener by adding the DebugListener class to its @EntityListeners annotation. To have every single entity of your application use this listener, you would have to go through each one and add it manually to the annotation. For this case, JPA has a notion of default listeners that can cover all entities in a persistence unit. As there is no annotation targeted for the entire scope of the persistence unit, the default listeners can only be declared in an XML mapping file.
In the previous chapter you saw how to use XML mapping files instead of annotations. The same steps have to be followed to define the DebugListener as a default listener. A mapping file with the XML defined in Listing 6-43 needs to be created and deployed with the application.
Listing 6-43. A Debug Listener Defined as the Default Listener
<?xml version="1.0" encoding="UTF-8"?>
<entity-mappings xmlns=" http://xmlns.jcp.org/xml/ns/persistence/orm "
                 xmlns:xsi=" http://www.w3.org/2001/XMLSchema-instance " →
                 xsi:schemaLocation=" http://xmlns.jcp.org/xml/ns/persistence/orm
                 http://xmlns.jcp.org/xml/ns/persistence/orm_2_1.xsd "
                 version="2.1">

   <persistence-unit-metadata>
      <persistence-unit-defaults>
         <entity-listeners>
            <entity-listener class="org.agoncal.book.javaee7.chapter06. DebugListener "/>
         </entity-listeners>
      </persistence-unit-defaults>
   </persistence-unit-metadata>

</entity-mappings>
In this file, the <persistence-unit-metadata> tag defines all the metadata that don’t have any annotation equivalent. The <persistence-unit-defaults> tag defines all the defaults of the persistence unit, and the <entity-listener> tag defines the default listener. This file needs to be referred in the persistence.xml and deployed with the application. The DebugListener will then be automatically invoked for every single entity.
When you declare a list of default entity listeners, each listener gets called in the order in which it is listed in the XML mapping file. Default entity listeners always get invoked before any of the entity listeners listed in the @EntityListeners annotation. If an entity doesn’t want to have the default entity listeners applied to it, it can use the @ExcludeDefaultListeners annotation, as shown in Listing 6-44.
Listing 6-44. The Customer Entity Excluding Default Listeners
@ExcludeDefaultListeners
@Entity
public class Customer {

  @Id @GeneratedValue
  private Long id;
  private String firstName;
  private String lastName;
  private String email;
  private String phoneNumber;
  @Temporal(TemporalType.DATE)
  private Date dateOfBirth;
  @Transient
  private Integer age;
  @Temporal(TemporalType.TIMESTAMP)
  private Date creationDate;

  // Constructors, getters, setters
}
When an event is raised, the listeners are executed in the following order:
- @EntityListeners for a given entity or superclass in the array order,
- Entity listeners for the superclasses (highest first),
- Entity listeners for the entity,
- Callbacks of the superclasses (highest first), and
- Callbacks of the entity.
Summary
In this chapter, you learned how to query entities. The entity manager is central to articulating entities with persistence. It can create, update, find by ID, remove, and synchronize entities with the database with the help of the persistence context, which acts as a level-one cache. JPA also comes with a very powerful query language, JPQL, which is database vendor independent. You can retrieve entities with a rich syntax using WHERE, ORDER BY, or GROUP BY clauses, and when concurrent access occurs to your entities, you know how to use versioning and when to use optimistic or pessimistic locking.
This chapter also described the entity life cycle and how the entity manager catches events to invoke callback methods. Callback methods can be defined on a single entity and annotated by several annotations (@PrePersist, @PostPersist, etc.). The method can also be extracted to listener classes and used by several or all entities (using default entity listeners). With callback methods, you see that entities are not just anemic objects (objects with no business logic, just attributes, getters, and setters); entities can have business logic that can be invoked by other objects in the application, or invoked automatically by the entity manager, depending on the life cycle of the entity.