
![]()
Processing and Navigation
In Chapter 10, I showed you how to create web pages using JSF components. However, drawing pages with graphical components is not enough; these pages need to interact with a back-end system, navigate through other pages, and also validate and convert data. JSF is a rich specification: backing beans allow you to invoke the business tier and to navigate in your application. A set of classes allows you to convert component values to and from a corresponding type or validate them to conform to business rules. Integration with Bean Validation also facilitates validation in JSF 2.2. With the use of annotations, it is now easy to develop backing beans, custom converters, and customer validators.
JSF 2.2 brings simplicity and richness in terms of dynamic user interfaces. It natively supports Ajax calls in a simple manner. The specification comes with a JavaScript library, allowing asynchronous calls to the server and refreshing small portions of the page.
Creating user interfaces, controlling navigation in the entire application, and calling business logic synchronously or asynchronously are possible because JSF is built on the Model-View-Controller (MVC) design pattern. Each part is separate from the other, allowing the user interface to change without impacting the business logic and vice versa. This chapter presents all these concepts, complementing Chapter 10.
The MVC Pattern
JSF, and most web frameworks, encourages separation of concerns by using variations of the MVC design pattern. MVC is an architectural pattern used to isolate business logic from the user interface. Business logic doesn’t mix well with UI code. When the two are mixed, applications are much harder to maintain and less scalable. When MVC is applied, it results in a loosely coupled application; with this type of application, it is easier to modify either the visual appearance of the application or the underlying business rules without one affecting the other.
In MVC, the model represents the data of the application, the view corresponds to the UI, and the controller manages the communication between both (see Figure 11-1).
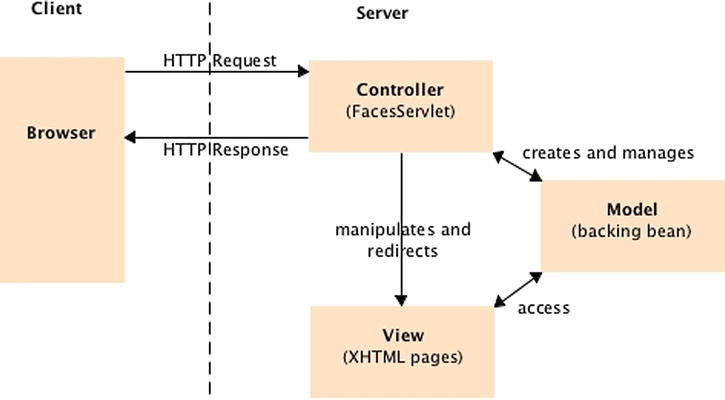
Figure 11-1. The MVC design pattern
The model is represented by the content, which is often stored in a database and displayed in the view. The model is built without concern for its look and feel when presented to the user. In JSF, it can consist of backing beans, EJB calls, JPA entities, and so forth.
The view in JSF is the actual XHTML page when we deal with web interfaces. As explained in Chapter 10, a view provides a graphical representation for a model. A model can also have several views, showing a book as a form or as a list, for example.
When a user manipulates a view, the view informs a controller of the desired changes. The controller then gathers, converts, and validates the data, invokes business logic, and generates the content in XHTML. In JSF, the controller is the FacesServlet.
The FacesServlet is an implementation of javax.servlet.Servlet and acts as the central controller element, through which all user requests pass. As shown in Figure 11-2, when an event occurs (e.g., when the user clicks a button), the event notification is sent via HTTP to the server and is intercepted by the javax.faces.webapp.FacesServlet. It examines the request and calls various actions on the model using backing beans.
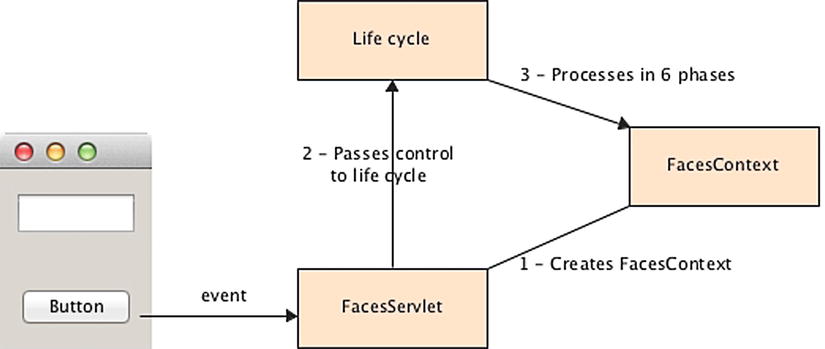
Figure 11-2. The FacesServlet interactions
Behind the scenes, the FacesServlet accepts incoming requests and hands control over to the javax.faces.lifecycle.Lifecycle object. Using a factory, it creates an object of type javax.faces.context.FacesContext, which contains and processes all the per-request state information. The Lifecycle object uses the FacesContext object during the six different phases of the page life cycle (previously described in Chapter 10) before rendering the response.
Out of the box, user requests are processed by the JSF runtime that declares a FacesServlet using common behavior, thanks to configuration by exception. If the defaults do not suit you, you can configure the FacesServlet in a web.xml file. Listing 11-1 shows the web.xml as an example.
Listing 11-1. web.xml Defining the FacesServlet
<?xml version='1.0' encoding='UTF-8'?>
<web-app xmlns=" http://xmlns.jcp.org/xml/ns/javaee "
         xmlns:xsi=" http://www.w3.org/2001/XMLSchema-instance "
         xsi:schemaLocation=" http://xmlns.jcp.org/xml/ns/javaee →
         http://xmlns.jcp.org/xml/ns/javaee/web-app_3_1.xsd "
         version="3.1">

  <servlet>
    <servlet-name>Faces Servlet</servlet-name>
    <servlet-class> javax.faces.webapp.FacesServlet </servlet-class>
    <load-on-startup>1</load-on-startup>
  </servlet>
  <servlet-mapping>
    <servlet-name>Faces Servlet</servlet-name>
    <url-pattern> *.jsf </url-pattern>
  </servlet-mapping>

  <context-param>
    <param-name> javax.faces.PROJECT_STAGE </param-name>
    <param-value>Development</param-value>
  </context-param>
  <context-param>
    <param-name> javax.faces.FACELETS_SKIP_COMMENTS </param-name>
    <param-value>true</param-value>
  </context-param>
</web-app>
This web.xml file defines the javax.faces.webapp.FacesServlet by giving it a name (e.g., Faces Servlet) and a mapping. In this example, all requests that have the .jsf extension are mapped to be managed by the Servlet, and any request such as http://localhost:8080/chapter11-1.0/newBook.jsf will be handled by JSF.
![]() Note The default Servlet mappings for JSF pages are *.faces or /faces/*. In Listing 11-1, this default value has been changed to .jsf but, if .faces suits you, you can omit the Servlet mapping configuration.
Note The default Servlet mappings for JSF pages are *.faces or /faces/*. In Listing 11-1, this default value has been changed to .jsf but, if .faces suits you, you can omit the Servlet mapping configuration.
You can also configure a few JSF-specific parameters in the <context-param> element. Table 11-1 lists some of these parameters.
Table 11-1. Some JSF-Specific Configuration Parameters
| Parameter | Description |
|---|---|
| javax.faces.CONFIG_FILES | Defines a comma-delimited list of context-relative resource paths under which the JSF implementation will look for resources. |
| javax.faces.DEFAULT_SUFFIX | Allows the web application to define a list of alternative suffixes for pages containing JSF content (e.g., .jsf). |
| javax.faces.FACELETS_BUFFER_SIZE | The buffer size to set on the response. By default, the value is −1, which will not assign a buffer size on the response. |
| javax.faces.FACELETS_REFRESH_PERIOD | When a page is requested, the interval in seconds that the compiler should check for changes. A value of −1 disables the compiler check. |
| javax.faces.FACELETS_SKIP_COMMENTS | If set to true, the runtime ensures that XML comments in the Facelets page are not delivered to the client. |
| javax.faces.LIFECYCLE_ID | Identifies the Lifecycle instance to be used when processing JSF requests. |
| javax.faces.STATE_SAVING_METHOD | Defines the location where state is saved. Valid values are server, which is the default (typically saved in HttpSession) and client (saved as a hidden field in the subsequent form submit). |
| javax.faces.PROJECT_STAGE | Describes where this particular JSF application is in the software development life cycle (Development, UnitTest, SystemTest, or Production). This could be used by a JSF implementation to cache resources in order to improve performance in production, for example. |
| javax.faces.DISABLE_FACELET_JSF_VIEWHANDLER | Disables Facelets as the default page declaration language (PDL) if set to true. |
| javax.faces.WEBAPP_RESOURCES_DIRECTORY | If this parameter is set, the JSF runtime interprets its value as a path, relative to the web application root, where resources are to be located. |
| javax.faces.LIBRARIES | Interprets each file found in the semicolon-separated list of paths as a Facelets tag library. |
JSF defines the javax.faces.context.FacesContext abstract class for representing the contextual information associated with processing an incoming request and creating the corresponding response. This is the class that allows interaction with the UI and the rest of the JSF environment.
To gain access, you can either use the implicit facesContext object in your pages (see Chapter 10 for discussion on implicit objects) or obtain a reference in your backing beans using the static method getCurrentInstance(). This will return the FacesContext instance for the current thread, and then you can invoke the methods listed in Table 11-2.
Table 11-2. Some Methods of the FacesContext
| Method | Description |
|---|---|
| addMessage | Appends a message (information, warning, error, or fatal). |
| getApplication | Returns the Application instance associated with this web application. |
| getAttributes | Returns a Map representing the attributes associated with the FacesContext instance. |
| getCurrentInstance | Returns the FacesContext instance for the request that is being processed by the current thread. |
| getELContext | Returns the ELContext instance for the current FacesContext instance. |
| getMaximumSeverity | Returns the maximum severity level recorded on any FacesMessage that has been queued. |
| getMessages | Returns a collection of FacesMessage. |
| getPartialViewContext | Returns the PartialViewContext object for this request. It is used to inject logic into the processing/rendering loop control (such as Ajax processing). |
| getViewRoot | Returns the root component that is associated with the request. |
| release | Releases any resources associated with this FacesContext instance. |
| renderResponse | Signals the JSF implementation that, as soon as the current phase of the request-processing life cycle has been completed, control should be passed to the Render response phase, bypassing any phases that have not been executed yet. |
| responseComplete | Signals the JSF implementation that the HTTP response for this request has already been generated (such as an HTTP redirect), and that the request-processing life cycle should be terminated as soon as the current phase is completed. |
The FacesServlet is internal to JSF implementations, and, though you don’t have access to its code; you do require metadata to configure it or some properties in the web.xml as seen in Listing 11.1. By now, you may be accustomed to the two possible choices of metadata in Java EE 7: annotations and XML deployment descriptors (/WEB-INF/faces-config.xml).
Before JSF 2.0, the only choice was to use XML; today, backing beans, converters, event listeners, renderers, and validators can have annotations, and so using XML configuration files has become optional. Even most of the navigation between pages can be orchestrated with either XML or Java code. Listing 11-2 shows an extract of what a faces-config.xml file looks like. In this example it defines a default locale (fr), a message bundle for internationalization, and some navigation rules. Soon you will see how to navigate with and without faces-config.xml.
Listing 11-2. Snippet of a faces-config.xml File
<?xml version='1.0' encoding='UTF-8'?>
<faces-config xmlns=" http://xmlns.jcp.org/xml/ns/javaee "
              xmlns:xsi=" http://www.w3.org/2001/XMLSchema-instance "
              xsi:schemaLocation=" http://xmlns.jcp.org/xml/ns/javaee →
              http://xmlns.jcp.org/xml/ns/javaee/web-facesconfig_2_2.xsd "
              version="2.2">

  <application>
    <locale-config>
      < default-locale >fr</default-locale>
    </locale-config>
    < resource-bundle >
      <base-name>messages</base-name>
      <var>msg</var>
    </resource-bundle>
  </application>

  < navigation-rule >
    <from-view-id>*</from-view-id>
    <navigation-case>
      <from-outcome>doCreateBook-success</from-outcome>
      <to-view-id>/listBooks.htm</to-view-id>
    </navigation-case>
  </navigation-rule>

</faces-config>
Writing Backing Beans
As noted earlier in this chapter, the MVC pattern encourages separation between the model, the view, and the controller: JSF pages form the view and the FacesServlet the controller. Backing beans are the gateway to the model.
Backing beans are annotated Java classes and are central to web applications. They can perform business logic (or delegate to EJBs, for example), handle navigation between pages, and hold data. A typical JSF application includes one or more backing beans that can be shared by several pages. The data are held within attributes of the backing bean and actions in a page trigger a method of the bean. To bind components to a backing bean, you need to use expression language (e.g., #{bookController.book.title}).
![]() Note I prefer to use the term “Backing Bean” rather than “Managed Bean” but they both historically mean the same thing in JSF. “Managed Bean” refers to the more general Java EE component model I introduced in Chapter 2 with CDI. In Java EE any POJO that is managed by a container or provider is called a Managed Bean. So a backing bean is actually a Managed Bean, but for JSF.
Note I prefer to use the term “Backing Bean” rather than “Managed Bean” but they both historically mean the same thing in JSF. “Managed Bean” refers to the more general Java EE component model I introduced in Chapter 2 with CDI. In Java EE any POJO that is managed by a container or provider is called a Managed Bean. So a backing bean is actually a Managed Bean, but for JSF.
Writing a backing bean is as easy as writing an EJB or a JPA entity; it’s simply a Java class annotated with the CDI @Named annotation (see Listing 11-3) and a CDI scope (in this case it’s a @RequestScoped). There are no faces-config.xml entries, no helper classes, and no inheritance. JSF 2.2 also uses the configuration-by-exception mechanism, whereby, with only two annotations, you can use all defaults and deploy your web application with such a backing bean.
Listing 11-3. A Simple BookController Backing Bean
@Named
@RequestScoped
public class BookController {

  private Book book = new Book();

  public String doCreateBook () {
    createBook(book);
    return " newBook.xhtml ";
  }

  // Constructors, getters, setters
}
Listing 11-3 shows the programming model of a backing bean: it holds state (the book attribute) for a certain duration (a scope), defines action methods (doCreateBook()), and handles navigation (return "newBook.xhtml"). With expression language a component can then bind its value to a property (e.g., <h:outputText value="#{bookController.book.isbn}"/>) or invoke a method (<h:commandLink action="#{bookController.doCreateBook}">).
Anatomy of a Backing Bean
Backing beans are Java classes that are managed by the FacesServlet. The UI components are bound to the backing bean’s properties and can invoke action methods. A backing bean needs to follow these requirements:
- The class must be annotated with @javax.inject.Named or the XML equivalent in the faces-config.xml deployment descriptor.
- It must have a scope (e.g., @RequestScoped).
- The class must be defined as public; it must not be final or abstract.
- The class must have a public no-arg constructor that the container will use to create instances.
- The class must not define the finalize() method.
- Attributes must have public getters and setters to be bound to a component.
Following the ease-of-use model of Java EE 7, a backing bean can simply be an annotated POJO, eliminating most of the configuration. Remember that in Chapter 2 I introduced CDI stereotypes. The @javax.enterprise.inject.Modelis the perfect stereotype to use on backing beans as it is @Named and @RequestScoped (as shown in Listing 11-4). So you can rewrite the BookController showed in Listing 11-3, replace the annotations with @Model (Listing 11-5), and get the same behavior.
Listing 11-4. The Built-in CDI @Model Stereotype
@Named
@RequestScoped
@Documented
@Stereotype
@Target({ TYPE, METHOD, FIELD })
@Retention(RUNTIME)
public @interface Model {
}
Listing 11-5. The BookController Using the @Model Stereotype
@Model
public class BookController {

  private Book book = new Book();

  public String doCreateBook() {
    createBook(book);
    return "listBooks.xhtml";
  }

  // Constructors, getters, setters
}
The presence of the @javax.inject.Named annotation on a class allows expression language to use it in a page. @Named can also specify a different name for the backing bean (which by default is the name of the class starting with a lowercase letter). UI components are bound to backing bean properties; changing the default name has an impact on how you invoke a property or a method. The code in Listing 11-6 renames the backing bean to myBean.
Listing 11-6. A Renamed Backing Bean
@Named(" myBean ")
@RequestScoped
public class BookController06 {

  private Book book = new Book();

  public String doCreateBook() {
    createBook(book);
    return "listBooks.xhtml";
  }

  // Constructors, getters, setters
}
To invoke attributes or methods of this backing bean in your pages, you must use the overridden name as follows:
<h:outputText value="#{ myBean .book.isbn}"/>
<h:form>
  <h:commandLink action="#{ myBean .doCreateBook}">Create a new book</h:commandLink>
</h:form>
![]() Note Before JSF 2.2 you had to annotate a backing bean with @javax.faces.bean.ManagedBean. First of all this was confusing because it was using the name “Managed Bean,” which defines a more general Java EE component model which is part of the JSR-250 Common Annotations (@javax.annotation.ManagedBean). But more important, in JSF 2.2 the integration with CDI got stronger and it is now recommended to use CDI @Named as well as CDI scopes. The javax.faces.bean package will get deprecated in the next version of JSF.
Note Before JSF 2.2 you had to annotate a backing bean with @javax.faces.bean.ManagedBean. First of all this was confusing because it was using the name “Managed Bean,” which defines a more general Java EE component model which is part of the JSR-250 Common Annotations (@javax.annotation.ManagedBean). But more important, in JSF 2.2 the integration with CDI got stronger and it is now recommended to use CDI @Named as well as CDI scopes. The javax.faces.bean package will get deprecated in the next version of JSF.
Scopes
Objects that are created as part of a backing bean have a certain lifetime and may or may not be accessible to UI components or objects in the web application. The lifetime and accessibility of an object are known as scope. In a web application (backing beans and pages), you can specify the scope of an object using different durations:
- Application: This is the least restrictive duration (use the @ApplicationScoped annotation in your backing bean), with the longest life span. Objects that are created are available in all request/response cycles for all clients using the web application, for as long as the application is active. These objects can be called concurrently and need to be thread-safe (using the synchronized keyword). Objects with this scope can use other objects with no scope or application scope.
- Session: Objects are available for any request/response cycles that belong to the client’s session (@SessionScoped). These objects have their state persisted between requests and last until the session is invalidated. Objects with this scope can use other objects with no scope, session scope, or application scope.
- View: Objects are available within a given view until the view is changed and have their state persisted until the user navigates to a new view, at which point they will be cleared out. Objects with this scope can use other objects with no scope, view scope, session scope, or application scope. Backing beans can be annotated with @ViewScoped.
- Request: State is available from the beginning of a request until the response has been sent to the client (@RequestScoped annotation). A client can execute several requests but stay on the same view. That’s why the @ViewScoped duration lasts longer than that of @RequestScoped. Objects with this scope can use other objects with no scope, request scope, view scope, session scope, or application scope.
- Flash: Introduced in JSF 2.0, the new flash scope provides a short-lived conversation. It is a way to pass temporary objects that are propagated across a single-view transition and cleaned up before moving on to another view. The flash scope can only be used programmatically as there is no annotation.
- Flow: Objects in this scope are created when the user enters into the specified flow and deallocated when the user exits the flow (using the @FlowScoped annotation).
![]() Note All the scoped annotations used in JSF 2.2 are now CDI scopes (i.e., they are all annotated with @javax.enterprise.context.NormalScope). But they come from different specifications: @ApplicationScoped, @RequestScoped, and @SessionScoped are part of CDI and @ViewScoped and @FlowScoped are defined in the JSF specification.
Note All the scoped annotations used in JSF 2.2 are now CDI scopes (i.e., they are all annotated with @javax.enterprise.context.NormalScope). But they come from different specifications: @ApplicationScoped, @RequestScoped, and @SessionScoped are part of CDI and @ViewScoped and @FlowScoped are defined in the JSF specification.
You need to be careful when you choose a scope for your backing beans. You should give them only as much scope as needed. Excessively scoped beans (e.g., @ApplicationScoped) will increase memory usage, and the potential need to persist them could cause increased disk and network usage. It makes no sense to give application scope to an object that is used only within a single component. Likewise, an object with too much restriction will be unavailable to different parts of your application. You should also be concerned with concurrent access. Multiple sessions accessing the same application scoped bean might create thread-safety issues.
The code in Listing 11-7 defines a backing bean with application scope. It initializes the defaultBook attribute as soon as it’s constructed (@PostConstruct).
Listing 11-7. A Backing Bean with an Application Scope
@Named
@ApplicationScoped
public class InitController {

  private Book defaultBook;

  @PostConstruct
  private void init() {
    defaultBook = new Book("default title", 0F, "default description");
  }

  // Constructors, getters, setters
}
Life Cycle and Callback Annotations
Chapter 10 explained the life cycle of a page (with six phases from receiving the request to rendering the response). Backing beans also have a life cycle (see Figure 11-3), which is completely different from that of the page. In fact, backing beans have a similar life cycle to Managed Beans, except that if they do exist, it is for the lifetime of the defined scope.
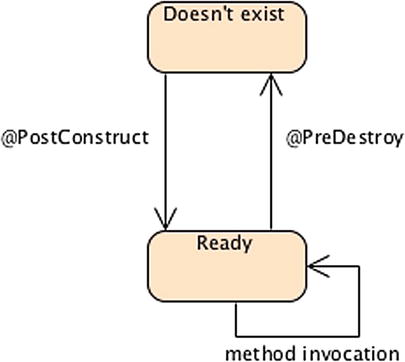
Figure 11-3. The backing bean life cycle
Backing beans running in a Servlet container can use the @PostConstruct and @PreDestroy annotations. After the container creates an instance of a backing bean, it calls the @PostConstruct callback method, if any. After this stage, the backing bean is bound to a scope and responds to any user’s request. Before removing the backing bean, the container calls the @PreDestroy method. These methods can be used to initialize attributes or to create and release any external resource (see Listing 11-7).
Handling Exceptions and Messages
Backing beans process business logic, call EJBs, persist and retrieve data from databases, and so on, and sometimes things can go wrong. In this case, the user has to be informed through a message to take action. Messages can be split into two categories: application errors (involving business logic, database, or network connection) and user input errors (invalid ISBN or empty fields). Application errors can generate a completely different page asking the user to retry in a few moments, for example, or call a hotline service. Input errors can be displayed on the same page, with text describing the error, and messages can be informational, such as one indicating that a book was successfully added to the database.
In Chapter 10, you saw tags that are used to display messages on pages (<h:message> and <h:messages>). To produce these messages, JSF allows you to queue messages by calling the facesContext.addMessage() method in your backing beans. The signature of the method is as follows:
void addMessage(String clientId , FacesMessage message)
This method appends a FacesMessage to the set of messages to be displayed. The first parameter of this method specifies a client identifier. This parameter refers to the Document Object Model (DOM) location of the UI component that the message is registered to (e.g., bookForm:isbn refers to the UI component that has the isbn identifier within the bookForm form). If clientId is null, the message doesn’t refer to any special component and is said to be global to the whole page. A message consists of a summary text, a detailed text, and a severity level (fatal, error, warning, and info). Messages can also be internationalized using message bundles.
FacesMessage (Severity severity, String summary, String detail)
The code in Listing 11-8 is a snippet of a backing bean that creates a book. If the creation succeeds, a global informational message is queued (the FacesMessage with a SEVERITY_INFO). If an exception is caught, an error message is added to the messages queue to be displayed. Note that both messages are global because the clientId is null. On the other hand, when we validate the ISBN and book title entered by the user, we want to display the warning messages (SEVERITY_WARN) related to the UI component (e.g., bookForm:title is the DOM identifier of the text field title located under the bookForm form).
Listing 11-8. Adding Different Severity Messages
@Named
@RequestScoped
public class BookController {

  @Inject
  private BookEJB bookEJB;
  private Book book = new Book();

  public String doCreateBook() {
    FacesContext ctx = FacesContext.getCurrentInstance();

    if (book.getIsbn() == null || "".equals(book.getIsbn())) {
      ctx. addMessage ( "bookForm:isbn" , new FacesMessage (FacesMessage. SEVERITY_WARN , →
              "Wrong isbn", "You should enter an ISBN number"));
    }
    if (book.getTitle() == null || "".equals(book.getTitle())) {
      ctx. addMessage ( "bookForm:title" , new FacesMessage(FacesMessage.SEVERITY_WARN, →
              "Wrong title", "You should enter a title for the book"));
    }

    if ( ctx.getMessageList().size() != 0)
      return null;

    try {
      book = bookEJB.createBook(book);
      ctx.addMessage( null , new FacesMessage(FacesMessage. SEVERITY_INFO , "Book created", →
              "The book" + book.getTitle() + " has been created with id=" + book.getId()));

    } catch (Exception e) {
      ctx.addMessage(null, new FacesMessage(FacesMessage. SEVERITY_ERROR , →
              "Book hasn't been created", e.getMessage()));
    }
    return null;
  }

  // Constructors, getters, setters
}
The FacesContext is available in the page and so is the FacesMessage. The page can then display the global messages (with clientId equals to null) using a single <h:messages> tag. When we want to display a message at a specific place on the page for a specific component (as is usually the case with validation or conversion errors), we use <h:message>. Figure 11-4 shows a page with messages specifically aimed at the ISBN and title input fields.
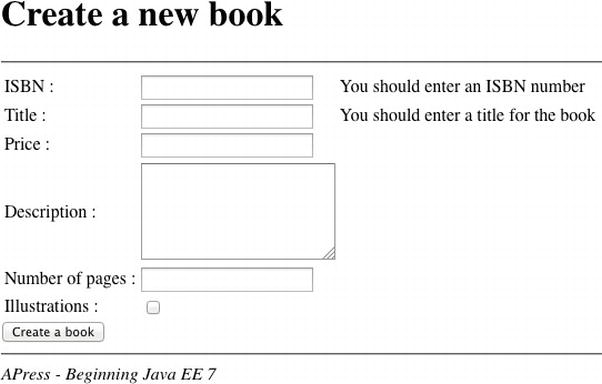
Figure 11-4. A page displaying a message per UI component
The page will have an input text field with an identifier (id="isbn"), and the <h:message> tag will refer to that component (for="isbn"). The result will be that this specific message will only be displayed for this component.
<h: messages infoStyle="color:blue" warnStyle="color:orange" errorStyle="color:red"/>
<h:form id=" bookForm ">
  <h:inputText id="isbn" value="#{bookController.book.isbn}"/>
  <h:message for="isbn" />
</h:form>
If the ISBN field has not been filled, a warning message appears next to the ISBN input text field. JSF uses this messaging mechanism for converters, validators, and Bean Validation. Note that the <h:messages> tag can have different styles per severity (here errors are red and warnings orange).
Bringing JSF and EJBs Together
Until now all the binding and business invocation has been made through backing beans. As you’ll soon see, backing beans also deal with navigation. So when you want to do some processing and then take the user to a different page, having a backing bean makes sense. But sometimes you just need to access an EJB to get a list of books to fill a datatable, for example. You could still go through a backing bean, but it would mostly delegate the call to the EJB. So why not directly call the EJB from the page?
One goal of CDI is to bring JSF and EJBs together. What do you need to do? Not much, just add a @Named annotation to your EJB and you can invoke it using expression language. Listing 11-9 shows a stateless EJB that uses JPA to get the list of all of the books from the database. It has a CDI @Named annotation and therefore can be invoked in a JSF page.
Listing 11-9. A Stateless EJB with a CDI @Named Annotation
@Named
@Stateless
public class BookEJB {

  @Inject
  private EntityManager em;

  public List<Book> findAllBooks() {
    return em.createNamedQuery("findAllBooks", Book.class).getResultList();
  }
}
The findAllBooks() method in Listing 11-9 returns a list of books. To fill a datatable with this list, there is no need to use a backing bean. The page can directly invoke the bookEJB.findAllBooks() in the <h:dataTable> component using EL.
<h:dataTable value=" #{bookEJB.findAllBooks()} " var="book">
  <h:column>
    <h:outputText value="#{book.title}"/>
  </h:column>
</h:dataTable>
Web applications are made of multiple pages that you need to navigate through. Depending on the application, you can have various levels of navigation with page flows that are more or less sophisticated. You can think of wizards, where you can go back to the previous or initial page, business cases where you go to a particular page depending on a certain rule, and so on. JSF has multiple options for navigation and allows you to control the flow, based on single pages or globally for the entire application.
In JSF you can easily navigate to a page if you know its name. You just need to explicitly set the page’s name either in a backing bean returned parameter method or in a JSF page. The FacesServlet, acting as a controller, will do the rest: intercept the call, get the page by its name, bind the values to the components, and render the page to the user. With explicit navigation you can choose between navigating straight to a page and doing some processing before navigating.
When you just want to go from page to page by clicking a link or a button without doing any processing, you can use the UI components <h:button>, <h:link> and <h:outputLink>.
<h:link value="Back to creating a new book" outcome="newBook.xhtml" />
But sometimes this is not enough because you need to access a business tier or a database to retrieve or process data. In this case, you would use <h:commandButton> and <h:commandLink> with their action attribute that allows you to target backing bean methods, as opposed to targeting a page with <h:link> or <h:button>.
<h:commandButton value="Create a book" action="#{bookController.doCreateBook} ">
Imagine there is a first page (newBook.xhtml) displaying a form to create a book. Once you click the Create a book button, a method on the backing bean is invoked, the book is created, and the user navigates to the listBooks.xhtml page, which lists all the books. Once the page is loaded into the browser, the Back to creating a new book link at the bottom of the page allows you to go straight to the previous page without doing any processing (as shown in Figure 11-5).
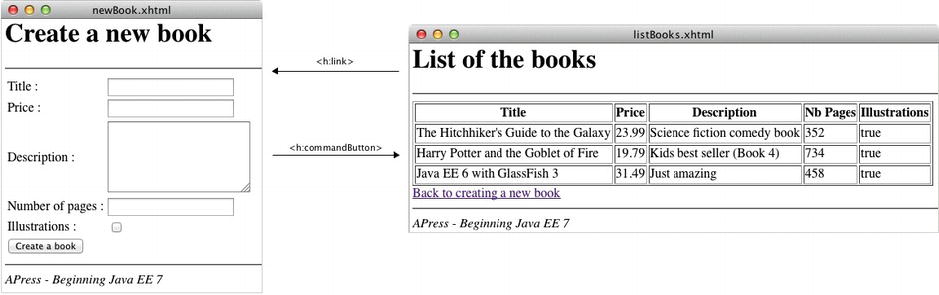
Figure 11-5. Navigating between newBook.xhtml and listBooks.xhtml
The page flow is simple but it still needs a backing bean (BookController) to do some business logic and navigation. Both pages use buttons and link components for navigating and interacting with the backing bean. The newBook.xhtml page uses a button to call the doCreateBook() method of the backing bean (<h:commandButton action="#{bookController.doCreateBook}"/>). The doCreateBook() method will then invoke an EJB to persist a Book entity in the database and return a String: the name of the following page. Then, the listBooks.xhtml page uses a normal link just to go back to the newBook.xhtml page without doing any processing (<h:link outcome="newBook.xhtml"/>).
The <h:commandButton> does not directly call the page it needs to go to. It invokes a method on the backing bean that is responsible for navigation and decides which page to load next. The navigation operates on a set of rules that define all the application’s possible navigation paths. The code of the backing bean in Listing 11-10 uses the simplest form of navigation rules: it just returns the page it needs to go to.
Listing 11-10. A Backing Bean Explicitly Defining Navigation
@Named
@RequestScoped
public class BookController {

  @Inject
  private BookEJB bookEJB;
  private Book book = new Book();
  private List<Book> bookList = new ArrayList<>();

  public String doCreateBook () {
    book = bookEJB.createBook(book);
    bookList = bookEJB.findBooks();
    return " listBooks.xhtml ";
  }

  // Constructors, getters, setters
}
When a backing bean method returns a String, this String can take several forms. In Listing 11-10 you can see the simplest: it returns the page name. By default, the page file extension is .xhtml but you can change it if you configure the FacesServlet in the web.xml as seen previously.
With JSF, the page flow navigation can be defined externally via faces-config.xml. In faces-config.xml, navigation is specified in <navigation-rule> elements. A <navigation-rule> element identifies the start page, a condition, and the target page to navigate to when the condition occurs. The condition is based on a logical name rather than the name of the page. The code of the backing bean in Listing 11-10 could have used the logical name success as shown in Listing 11-11.
Listing 11-11. Snippet of the Backing Bean Using Logical Names
@Named
@RequestScoped
public class BookController {
  // ...

  public String doCreateBook () {
    book = bookEJB.createBook(book);
    bookList = bookEJB.findBooks();
    return " success ";
  }

  // Constructors, getters, setters
}
Listing 11-12 shows the structure of the faces-config.xml file. The <from-view-id> tag defines the page where you initially make the action request. In this case, you start on newBook.xhtml before making the call to the backing bean. If the returned logical name is success (<from-outcome>), the FacesServlet will forward the call to the listBooks.xhtml page (<to-view-id>).
Listing 11-12. A faces-config.xml File Defining Navigation
<?xml version='1.0' encoding='UTF-8'?>
<faces-config xmlns=" http://xmlns.jcp.org/xml/ns/javaee "
              xmlns:xsi=" http://www.w3.org/2001/XMLSchema-instance "
              xsi:schemaLocation=" http://xmlns.jcp.org/xml/ns/javaee →
              http://xmlns.jcp.org/xml/ns/javaee/web-facesconfig_2_2.xsd "
              version="2.2">

  <navigation-rule>
    <from-view-id> newBook.xhtml </from-view-id>
    <navigation-case>
      <from-outcome> success </from-outcome>
      <to-view-id> listBooks.xhtml </to-view-id>
    </navigation-case>
  </navigation-rule>

</faces-config>
Navigation can be done directly in the backing beans or by faces-config.xml, but when should you use one over the other? The first reason to directly return the page name in backing beans is simplicity; the Java code is explicit, and there is no external XML file to work with. If the web application has an extensive page flow, you might want to keep it in a single place, so that any changes can be made in a central location instead of across several pages; and again, using a mix of both can result in having part of your navigation in your beans and another in the faces-config.xml file.
There is one case where using XML configuration is very useful; when there are global links on several pages (e.g., login or logout that can be done in an entire application), as you do not want to define them for every single page. Global navigation rules can be used in XML (but the same feature is not possible within backing beans).
<navigation-rule>
  <from-view-id> * </from-view-id>
  <navigation-case>
    <from-outcome> logout </from-outcome>
    <to-view-id> logout.xhtml </to-view-id>
  </navigation-case>
</navigation-rule>
If you have an action that applies to every page in the application, you can use a navigation-rule element without a <from-view-id> or you can use a wildcard (*). The preceding code indicates that, for any page the user is on, if the method of the backing bean returns the logical name logout, forward the user to the logout.xhtml page.
The previous examples showed simple navigation where one page has only one navigation rule and only one page to go to. This is not often the case, and, depending on certain rules or exceptions, users can be redirected to different pages. This is possible to achieve with either backing beans or the faces-config.xml file. The following code shows a switch case that redirects to different pages. Note that when the null value is returned, the user goes back to the page he is already on.
public String doCreateBook() {
  book = bookEJB.createBook(book);
  bookList = bookEJB.findBooks();
  switch (value) {
    case 1: return " page1.xhtml "; break;
    case 2: return " page2.xhtml "; break;
    default: return null ; break;
  }
}
An enhancement made since JSF 2.0 is the addition of conditional navigation cases. It allows navigation cases to specify a precondition that must be met in order for the navigation case to be accepted. This precondition is specified as an EL expression using the new <if> configuration element. In the example that follows, if the user is in the admin role, the logout is specific and redirects the user to the logout_admin.xhtml page:
<navigation-rule>
    <from-view-id>*</from-view-id>
    <navigation-case>
        <from-outcome>logout</from-outcome>
        <to-view-id>logout_admin.xhtml</to-view-id>
        <if>#{userController.isAdmin}</if>
    </navigation-case>
</navigation-rule>
Prior to JSF 2.0, every client server interaction was an HTTP POST (<h:commandButton> and <h:commandLink>). While this was fine in many situations, it did not work well when it came to bookmarking pages in a web application. JSF 2.0 introduced bookmarking capability mainly with the use of two new tags—<h:button>, <h:link>—and also a ViewParam tag. This provided support for HTTP GET requests. But still the model wasn’t polished enough and so we had to use the preRenderView phase in order to do the job. JSF 2.2 introduced the ViewAction to enable smoother bookmarkability.
ViewParam and ViewAction provide a mechanism to process GET requests and bind the parameters passed in the HTTP request to properties in the model using EL. A page including a <f:viewParam> tag can pull the parameters from the GET request into bound properties. The following code allows access to the viewBook.xhtml page with an id parameter in the request (such as viewBook.xhtml?id=123) and binds it to the bookController.book.id attribute:
<f:metadata>
  <f: viewParam name="id" value="#{bookController.book.id}"/>
</f:metadata>
Once the id of the book is extracted from the HTTP request and bound to a property, you need to invoke an action on a backing bean. JSF 2.2 defines the new tag <f:viewAction> that specifies an application-specific action. To retrieve the book from the database based on the id you need to invoke the doFindBookById method as follows:
<f:metadata>
  <f:viewParam name="id" value="#{bookController.book.id}"/>
  <f: viewAction action="#{bookController.doFindBookById}"/>
</f:metadata>
This technique allows you to directly change the URL (uniform resource locator) in your browser to point at the desired book (e.g., viewBook.xhtml?id=123 or viewBook.xhtml?id=456) and bookmark the page.
Conversion and Validation
You’ve seen how to handle messages to inform the end user about actions to be taken. One possible action is to correct an invalid input value (e.g., invalid ISBN). JSF provides a standard conversion and validation mechanism that can process user inputs to ensure data integrity. In this way, when you invoke business methods to process, you can safely rely on valid data. Conversion and validation allow the developer to focus on business logic rather than checking whether the input data are not null, fit a range of values, and so on.
Conversion takes place when data input by the end user has to be converted from a String to an object and vice versa. It ensures that data are of the right type—for example, in converting a String to a java.util.Date, a String to an Integer, or a price in dollars to euros. As for validation, it ensures data contain the expected content (a date following the dd/MM/yyyy format, a float between 3.14 and 3.15, etc.).
Conversion and validation occur during different phases of the page life cycle (which you saw in the previous chapter) as shown in Figure 11-6.
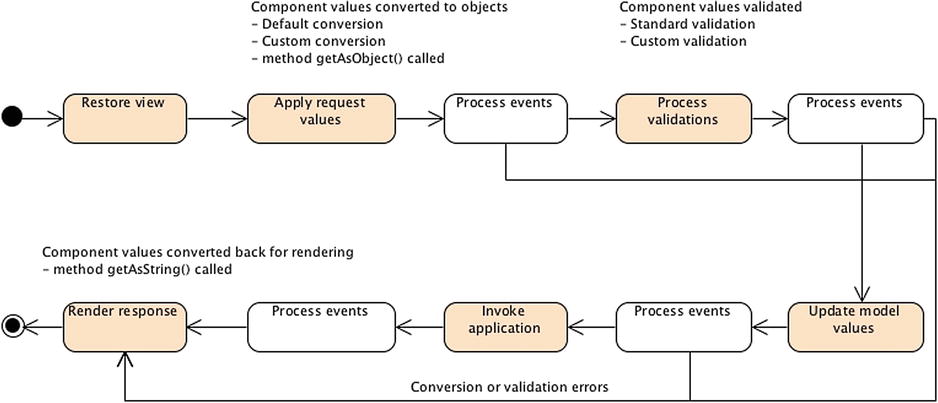
Figure 11-6. Conversion and validation during page life cycle
During the Apply request values phase in Figure 11-6, the UI component value is converted to the targeted object (e.g., from a String to a date) and then validated during the Process validation phase. It makes sense that conversion and validation occur before component data are bound to the backing bean (which happens during the Update model values phase). If any error is found, it will result in adding error messages and shortening the life cycle, so it goes straight to Render response (and messages will be displayed on the user interface with <h:messages/>). During this phase, the backing bean properties are converted back to a String to be displayed.
JSF has a set of standard converters and validators and allows you to easily create your own.
When a form is displayed on a browser, the end user fills the input fields and hits a button, resulting in transporting the data to the server in an HTTP request using String formats. Before updating the model on the backing bean, these data have to be converted from Strings to the target objects (Float, Integer, BigDecimal, etc.). The reverse action will take place when the data have to be sent back to the client in the response and be rendered in the browser.
JSF ships with converters for common types like dates and numbers. In cases where the backing bean property is a primitive type (Integer, int, Float, float, etc.), JSF will automatically convert the UI component value to the correct type and back. When the property is some other datatype, you need to provide your own converter. Table 11-3 lists all the standard converters that are in the javax.faces.convert package.
Table 11-3. Standard Converters
| Converter | Description |
|---|---|
| BigDecimalConverter | Converts a String to a java.math.BigDecimal and vice versa. |
| BigIntegerConverter | Converts a String to a java.math.BigInteger and vice versa. |
| BooleanConverter | Converts a String to a Boolean (and boolean primitive) and vice versa. |
| ByteConverter | Converts a String to a Byte (and byte primitive) and vice versa. |
| CharacterConverter | Converts a String to a Character (and char primitive) and vice versa. |
| DateTimeConverter | Converts a String to a java.util.Date and vice versa. |
| DoubleConverter | Converts a String to a Double (and double primitive) and vice versa. |
| EnumConverter | Converts a String to an Enum (and enum primitive) and vice versa. |
| FloatConverter | Converts a String to a Float (and float primitive) and vice versa. |
| IntegerConverter | Converts a String to an Integer (and int primitive) and vice versa. |
| LongConverter | Converts a String to a Long (and long primitive) and vice versa. |
| NumberConverter | Converts a String to an abstract java.lang.Number class and vice versa. |
| ShortConverter | Converts a String to a Short (and short primitive) and vice versa. |
JSF will automatically convert input values to numbers when the backing bean property is some primitive numeric type and to date or time when the property is some date type. If automatic conversion doesn’t suit you, you can explicitly control it through the standard convertNumber and convertDateTime tags. To use these tags, you need to nest the converter inside any of the input or output tags. The converter will be called by JSF during the life cycle.
The convertNumber tag has attributes that allow conversion of the input value to a number (default), a currency, or a percentage. You can specify a currency symbol or a number of decimal digits, as well as a formatting pattern, determining how the number should be formatted and parsed.
<h:inputText value="#{bookController.book.price}">
  <f: convertNumber currencySymbol="$" type="currency"/>
</h:inputText>
The convertDateTime tag can convert dates in various formats (date, time, or both). It has several attributes that control the date conversion and time zones. A pattern attribute allows identification of the pattern of the date String that will be converted.
<h:inputText value="#{bookController.book.publishedDate}">
    <f: convertDateTime pattern="MM/dd/yy"/>
</h:inputText>
Sometimes converting numbers, dates, enums, and so on is insufficient, and you may require custom conversion. It is easy to develop your own converters and use them in pages with JSF. You simply have to write a class that implements the javax.faces.convert.Converter interface and register it with metadata. This interface has two methods.
Object getAsObject (FacesContext ctx, UIComponent component, String value)
String getAsString (FacesContext ctx, UIComponent component, Object value)
The getAsObject() method converts the String value of a UI component into the corresponding supported type and returns the new instance. This method throws a ConverterException if the conversion fails. Conversely, the getAsString() method converts the provided type to a String, to be rendered in markup language (such as XHTML).
Once you develop the custom converter, it must be registered to allow it to be used in the web application. One method is by declaring the converter in the faces-config.xml file; the other is to use the @FacesConverter annotation.
Listing 11-13 shows how to write a custom converter that converts a price from dollars to euros. It starts by associating this converter with the name euroConverter using the @FacesConverter("euroConverter") annotation, and implements the Converter interface. This example only overrides the getAsString() method, which returns a String representation of a given price in euros.
Listing 11-13. A Euro Converter
@FacesConverter("euroConverter")
public class EuroConverter implements Converter {

  @Override
  public Object getAsObject (FacesContext context, UIComponent component, String value) {
    return value;
  }

  @Override
  public String getAsString (FacesContext ctx, UIComponent component, Object value ) {
    float amountInDollars = Float.parseFloat( value .toString());
    double ammountInEuros = amountInDollars * 0.8;
    DecimalFormat df = new DecimalFormat("###,##0.##");
    return df.format(ammountInEuros);
  }
}
To use this converter, use either the converter attribute of the <h:outputText> tag or the <f:converter> tag. In both cases, you must pass the name of the custom converter defined in the @FacesConverter annotation (euroConverter). The following code displays two output texts, one representing the price in dollars and the other converting this price to euros:
<h:outputText value="#{book.price}"/> // in dollar
<h:outputText value="#{book.price}">  // converted in euro
  < f:converter converterId=" euroConverter "/>
</h:outputText>
Or you can use the converter attribute of the outputText tag.
<h:outputText value="#{book.price}" converter="euroConverter" />
When working with web applications, the accuracy of user-entered data must be ensured. Accurate data entry can be enforced on the client side using JavaScript or on the server side using validators and Bean Validation. JSF simplifies data validation through the use of standard and custom server-side validators. Validators act as a first level of control by validating the value of UI components before being processed by the backing bean.
UI components generally handle simple validation, such as whether or not a value is required. For example, the following tag would require that a value in the text field be entered:
<h:inputText value="#{bookController.book.title}" required="true" />
If you do not enter a value, JSF returns the page with a message indicating that a value should be entered (the page must have a <h:messages> tag). This uses the same message mechanism that I described before. But JSF comes with a set of richer validators that can be used (described in Table 11-4), which are defined in the javax.faces.validator package.
Table 11-4. Standard Validators
| Converter | Description |
|---|---|
| DoubleRangeValidator | Checks the value of the corresponding component against specified minimum and maximum double values. |
| LengthValidator | Checks the number of characters in the String value of the associated component. |
| LongRangeValidator | Checks the value of the corresponding component against specified minimum and maximum long values. |
| MethodExpressionValidator | Performs validation by executing a method on an object. |
| RequiredValidator | Equivalent to setting the required attribute on the input component to true. |
| RegexValidator | Checks the value of the corresponding component against a regular expression. |
These validators are useful for generic cases like the length of a field or a number range and can be easily associated within a component, in the same way as converters are (both can be used on the same component). The following code ensures the book’s title is between 2 and 20 characters in length and its price is from $1 to $500:
<h:inputText value="#{bookController.book.title}" required="true">
  <f: validateLength minimum="2" maximum="20"/>
</h:inputText>
<h:inputText value="#{bookController.book.price}">
  <f: validateLongRange minimum="1" maximum="500"/>
</h:inputText>
Perhaps the standard JSF validators might not suit your needs; you may have data that have to follow certain business formats such as a ZIP code, a state, or an e-mail address. You must create your own custom validator to address these cases. Like converters, a validator is a class that needs to implement an interface and override some method. In the case of a validator, the interface is javax.faces.validator.Validator, which has a single validate() method:
void validate (FacesContext context, UIComponent component, Object value)
In this method, the value argument is the one that has to be checked, based on some business logic. If it passes the validation check, you can simply return from the method, and the life cycle of the page will continue. If not, you can throw a ValidatorException and include a FacesMessage with a summary and a detail message describing the validation error. You must register the validator either in the faces-config.xml or by using the @FacesValidator annotation.
As an example, create an ISBN validator that ensures the ISBN entered by the user for the book follows a certain format (using a regular expression). Listing 11-14 shows the code for the IsbnValidator.
Listing 11-14. An ISBN Validator
@FacesValidator("isbnValidator")
public class IsbnValidator implements Validator {

  private Pattern pattern;
  private Matcher matcher;

  @Override
  public void validate (FacesContext context, UIComponent component, →
                       Object value) throws ValidatorException {

    String componentValue = value.toString();

    pattern = Pattern.compile("(?=[-0-9xX]{13}$)");
    matcher = pattern.matcher(componentValue);

    if (!matcher.find()) {
      String message = MessageFormat.format("{0} not a valid isbn format", componentValue);
      FacesMessage facesMessage = new FacesMessage(FacesMessage.SEVERITY_ERROR, msg, msg);
      throw new ValidatorException (facesMessage);
    }
  }
}
The code in Listing 11-14 starts by associating the validator with the name isbnValidator, to allow it to be used in a page. It implements the Validator interface and adds the validation logic in the validate() method. It checks, with a regular expression, that the ISBN has the right format. If not, it adds a message to the context and throws an exception. JSF will automatically resume the life cycle of the page, recall the page, and display the error message. You can employ this custom validator in your pages using the validator attribute or embedding a <f:validator> tag.
<h:inputText value="#{bookController.book.isbn}" validator ="isbnValidator"/>
// or
<h:inputText value="#{bookController.book.isbn}">
  <f: validator validatorId="isbnValidator" />
</h:inputText>
Integration with Bean Validation
Since JSF 2.0, the support for Bean Validation has been made mandatory (i.e., a JSF implementation must support it). The way it works is pretty simple. If a JSF page has several text fields and each text field is bound to a backing bean property that has at least one Bean Validation constraint annotation, the javax.validation.Validator.validate() method is called during the validation phase. Bean Validation is therefore invoked automatically without the developer doing anything on the JSF page or calling any Bean Validation method in the backing bean. The JSF runtime also ensures that every ConstraintViolation that resulted in attempting to validate the model data is wrapped in a FacesMessage and added to the FacesContext as is normal with every other kind of validator. So a simple <h:messages> in a page will display the list of messages of the violated ConstraintViolation.
In Chapter 3, I presented validation groups. If in your page you need to validate certain components for a certain group, you can use the <f:validateBean> tag. The code that follows validates the title and the price of a book for the Delivery group only:
<f:validateBean validationGroups ="org.agoncal.book.javaee7.Delivery">
  <h:inputText value="#{bookController.book.title}"/>
  <h:inputText value="#{bookController.book.price}"/>
</f:validateBean>
Ajax
The HTTP protocol is based on a request/response mechanism: a client needs something, sends a request, and receives a response from the server, usually an entire web page. The communication follows this direction: a client requests something from the server, and not the other way around. However, web applications must provide rich and responsive interfaces and must react to server events, update parts of the page, aggregate widgets, and so on. In a normal request/response situation, the server would have to send the entire web page back even if only a small portion had to change. If the page has a significant size, you’ll overload the bandwidth and have poor responsiveness as the browser would need to load the entire page. If you want to increase the browser’s responsiveness and improve the user’s browsing experience, you need to update only small portions of the page. And this can be done with Ajax.
Ajax (Asynchronous JavaScript and XML) is a set of web development techniques used to create interactive web applications. Ajax allows web applications to retrieve portions of data from the server asynchronously without interfering with the display and behavior of the existing page. Once the browser receives the data, it only needs the portions requiring updating using the DOM of the page and JavaScript.
General Concepts
The term “Ajax” was coined in 2005 as a set of alternative techniques for loading asynchronous data into web pages. Back in 1999, Microsoft created the XMLHttpRequest object as an ActiveX control in Internet Explorer 5. In 2006, the World Wide Web Consortium (W3C) released the first specification draft for the XMLHttpRequest object, which is now supported by most browsers. At the same time, several companies brainstormed about how to ensure that Ajax could be the industry standard for a rich application platform based on open technologies. The result of this work was the creation of the OpenAjax Alliance, which consists of vendors, open source projects, and companies using Ajax-based technologies.
As shown in Figure 11-7, in traditional web applications, the browser has to ask for the full HTML documents from the server. The user clicks a button to send or get the information, waits for the server to respond, and then receives the entire page that the browser loads. Ajax, on the other hand, uses asynchronous data transfer (HTTP requests) between the browser and the server, allowing web pages to request small bits of information (JSON or XML data) from the server instead of whole pages. The user stays on the same page while a piece of JavaScript requests or sends data to a server asynchronously, and only portions of the page are actually updated, making web application faster and more user friendly.
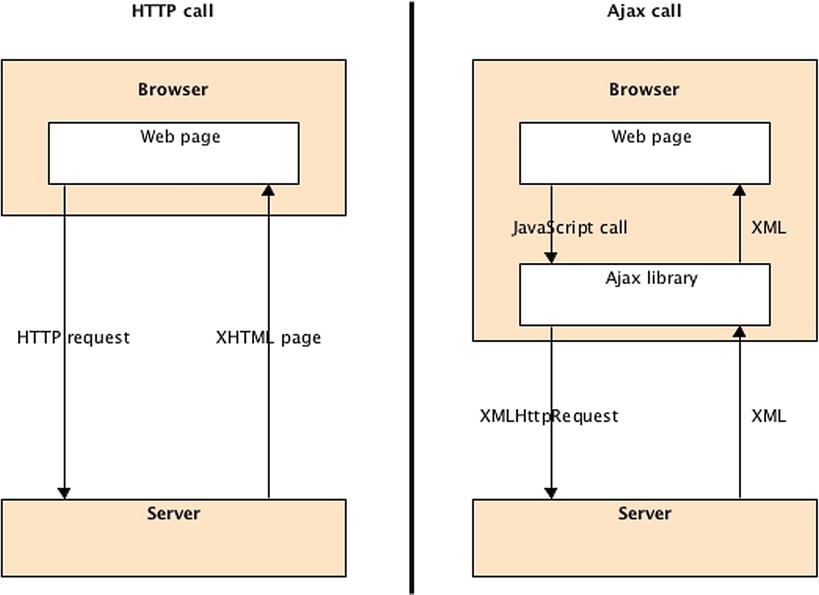
Figure 11-7. Plain HTTP calls vs. Ajax HTTP calls
In principle, Ajax is based on the following:
- XHTML and CSS for presentation.
- DOM for dynamic display and interaction with data.
- XML and XSLT for the interchange, manipulation, and display of XML data.
- The XMLHttpRequest object for asynchronous communication.
- JavaScript to bring these technologies together on the browser.
XMLHttpRequest is an important part of Ajax, as it’s a DOM API used by JavaScript to transfer XML from the browser to the server. The data returned have to be fetched on the client side to update portions of the page dynamically with JavaScript. The data can have several formats such as XHTML, JSON, or even plain text.
Since JSF 2.0, Ajax is supported natively, so you don’t have to develop JavaScript to handle the XMLHttpRequest, but you do need to use a JavaScript library that has been specified and shipped with JSF implementations.
Previous versions of JSF offered no native Ajax solution, so third-party libraries had to be used to fill the gap. Sometimes this increased the complexity of the code at the expense of performance. Since JSF 2.0, things are much easier, as Ajax support has been specified and is built into any JSF implementation.
First of all, there is a specified JavaScript library (jsf.js) for performing Ajax interaction, which means you don’t have to develop your own scripts or manipulate the XMLHttpRequest objects directly. Without developing any JavaScript, you can use a set of standardized functions to send asynchronous requests and receive data. In order to use this library in your pages, you need to add the jsf.js resource with the following line of code:
<h:outputScript name=" jsf.js " library=" javax.faces " target="head"/>
The <h:outputScript> tag renders a <script> markup element referring to the jsf.js JavaScript file in the javax.faces library (which follows the new resource management of JSF, meaning that the jsf.js file is under the META-INF/resources/javax/faces directory). Note that the top-level javax namespace is registered within the OpenAjax Alliance. This JavaScript API is used to initiate client-side interactions with JSF including partial tree traversal and partial page update. The function that we will be directly using in our pages is the request function, as it is responsible for sending an Ajax request to the server. Its signature is as follows:
jsf.ajax.request(ELEMENT, |event|, { |OPTIONS| });
ELEMENT is any JSF component or XHTML element from which you trigger the event. Typically, for submitting a form, the element would be a button. EVENT is any JavaScript event supported by that element, such as onmousedown, onclick, onblur, and so forth. The OPTIONS argument is an array that may contain the following name/value pairs:
- execute:'<space-separated list of UI component IDs>': Sends the list of component IDs to the server in order to be processed during the execute phase of the request.
- render:'<space-separated list of UI component IDs>': Renders the list of component IDs that have been processed during the render phase of the request.
As an example, the following code shows a button that calls asynchronously the doCreateBook method passing all the parameters of a book form. The button calls the jsf.ajax.request function when the user clicks it (onclick event). The this argument refers to the element itself (the button), and the options refer to components IDs (isbn, title, price . . .):
<h:commandButton value="Create a book" onclick =" jsf.ajax.request ( this , event,
         { execute :'isbn title price description nbOfPage illustrations',
          render :'booklist'}); return false;"
         actionListener="#{bookController.doCreateBook}" />
When the client makes an Ajax request, the page life cycle on the server side stays the same (it goes through the same six phases). The key benefit is that the response is simply the return of a small chunk of data rather than a large HTML page to the browser. The Apply request phase determines whether the current request is a “partial request” or not, and the PartialViewContext object is used throughout the page’s life cycle. It contains methods and properties that pertain to partial request processing and partial response rendering. At the end of the life cycle, the Ajax response (or, strictly speaking, the partial response) is sent to the client during the Render response phase. It usually consists of XHTML, XML, or JSON that the client-side JavaScript will parse.
JSF 2 also includes a declarative approach that is intended to be more convenient and easier to use. This approach leverages the new <f:ajax> tag. Instead of manually coding the JavaScript for the Ajax request call, you can declaratively specify the same behavior without requiring any JavaScript code.
<h:commandButton value="Create a book" action="#{bookController.doCreateBook}">
    <f:ajax execute="@form" render=":booklist"/>
</h:commandButton>
In this example, render points to the component id we want to render back (the booklist component). The execute attribute refers to all the components that belong to the form. Table 11-5 shows all the possible values that the render and execute attribute can take.
Table 11-5. Possible Values of the Render and Execute Attribute
| Value | Description |
|---|---|
| @all | Renders or executes all components in view. |
| @none | Renders or executes no components in view (this is the default value if render or execute is not specified). |
| @this | Renders or executes only this component (the component that triggered the Ajax request). |
| @form | Renders or executes all components within this form (from which Ajax request was fired). |
| Space separated list of IDs | One or more IDs of components to be rendered or executed. |
| Expression language | Expression which resolves to Collection of Strings. |
Putting It All Together
Now let’s put all these concepts together and write a web application allowing the user to create a new book, list all the books from the database, and visualize the details of a book. This web application consists of two web pages:
- newBook.xhtml displays a form at the top, letting you create a book, and lists all the books at the bottom. When you create a book and press the Create a book button, only the list at the bottom is updated using Ajax. When you click a book’s title link at the bottom, the user navigates to a different page and visualizes the book’s details.
- viewBook.xhtml displays the book’s details (title, price, description, etc.). Thanks to bookmarkability you can display the content of any book by simply changing the URL (e.g., viewBook.xhtml?id=123 or viewBook.xhtml?id=456).
These two pages share the same template displaying a link at the top (to go back to the newBook.xhtml page) and a label at the bottom. Figure 11-8 shows these two pages and the different navigations (either with <h:link> or <h:commandButton>).
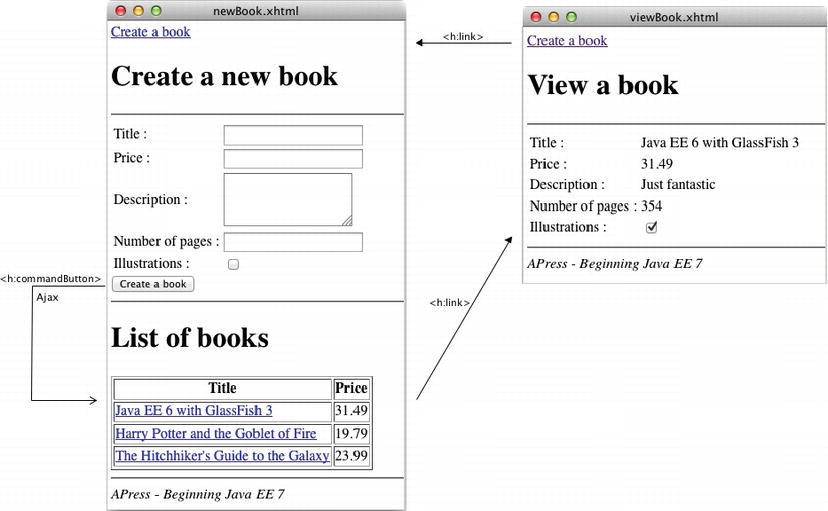
Figure 11-8. Navigating between newBook.xhtml and viewBook.xhtml
These two pages use the BookController backing bean to store the necessary properties and for navigation. Using persistence with JPA and business logic with EJB, everything can be plugged together (JSF, EJB, JPA, Bean Validation, and CDI). The backing bean delegates all the business logic to the BookEJB, which contains three methods: one to persist a book into a database (createBook()), one to retrieve all the books (findAllBooks()), and another one to get a book by its identifier (findBookById()). This stateless session bean uses the EntityManager API to manipulate a Book entity (which uses some Bean Validation annotations).
Figure 11-9 shows the interacting components in this web application. They are packaged in a war file and deployed in a running instance of GlassFish and an in-memory Derby database.
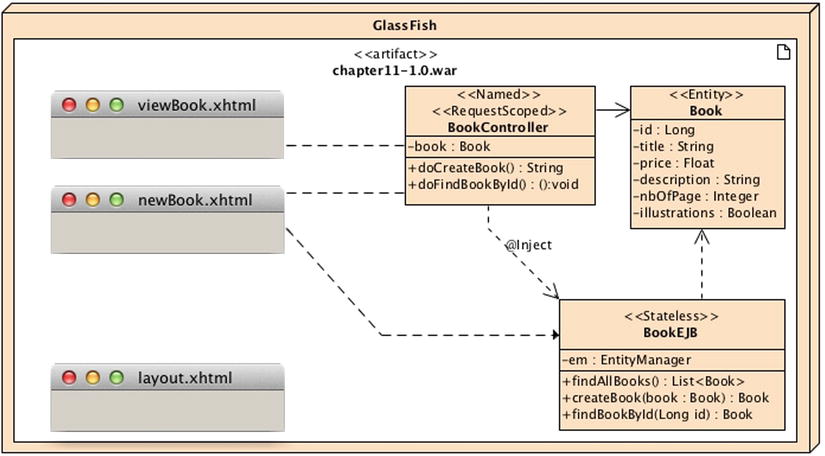
Figure 11-9. Pages and classes involved in the web application
This web application follows the Maven directory structure, so classes, files, and web pages have to be placed in the following directories:
- src/main/java: Contains the Book entity, the BookEJB, and the BookController backing bean.
- src/main/resources: Contains the META-INF/persistence.xml file used to map the entity in the database.
- src/main/webapp: Contains the two web pages newBook.xhtml and viewBook.xhtml.
- src/main/webapp/WEB-INF: Contains the faces-config.xml and beans.xml files used to trigger JSF and CDI.
- pom.xml: Represents the Maven Project Object Model (POM) describing the project, its dependencies, and plug-ins.
Writing the Book Entity
I will not go into too much detail about Listing 11-15, as you should by now understand the code of the Book entity. Despite the JPA mapping and Bean Validation annotations, notice the named query, findAllBooks, that retrieves books from the database ordered by title.
Listing 11-15. A Book Entity with a Named Query and Bean Validation Annotations
@Entity
@NamedQuery (name = " findAllBooks ", query = "SELECT b FROM Book b ORDER BY b.title DESC")
public class Book {

  @Id @GeneratedValue
  private Long id;
  @NotNull @Size(min = 4, max = 50)
  @Column(nullable = false)
  private String title;
  private Float price;
  @Column(length = 2000)
  private String description;
  private Integer nbOfPage;
  private Boolean illustrations;

  // Constructors, getters, setters
}
As you know, this entity also has to be packaged with a persistence.xml file, but in the interests of simplicity I won’t show it here (refer to Chapter 4).
Writing the BookEJB
Listing 11-16 represents a stateless session bean that exposes a no-interface view. This means that the client (i.e., the backing bean) doesn’t need an interface (local or remote) and can directly invoke the EJB. This EJB gets injected with a reference to an entity manager using @Inject. For that it needs a CDI DatabaseProducer similar to Listing 8-13 (not shown here, refer to Chapter 8). With this EntityManager it persists a Book entity (createBook() method), retrieves all the books from the database (using the findAllBooks named query), and finds a book by its identifier. Notice that the EJB is @Named, so it can be invoked from a JSF page (more on that later) and it defines a Datasource with the @DataSourceDefinition annotation. This EJB doesn’t need any deployment descriptor.
Listing 11-16. A Stateless EJB That Creates and Retrieves Books
@Named
@Stateless
@DataSourceDefinition (name = "java:global/jdbc/lab11DS",
        className = "org.apache.derby.jdbc.EmbeddedDriver",
        url = "jdbc:derby:memory:lab11DB;create=true;user=app;password=app"
)
public class BookEJB {

  @Inject
  private EntityManager em;

  public Book createBook (Book book) {
    em.persist(book);
    return book;
  }

  public List<Book> findAllBooks () {
    return em.createNamedQuery("findAllBooks", Book.class).getResultList();
  }

  public Book findBookById (Long id) {
    return em.find(Book.class, id);
  }
}
Writing the BookController Backing Bean
One of the roles of a backing bean is to interact with other layers of the application (e.g., the EJB layer) or perform validation. The BookController in Listing 11-17 is annotated with @Named; therefore it can be used in the JSF pages. The second annotation, @RequestScoped, defines the life duration of the bean; it lasts for the duration of the request. This backing bean contains one attribute book that will be used by the pages. book is the object that will get mapped to the form (newBook.xhtml page), displayed in viewBook.xhtml and persisted to the database.
Listing 11-17. The BookController Backing Bean Invoking the EJB
@Named
@RequestScoped
public class BookController {

  @Inject
  private BookEJB bookEJB;
  private Book book = new Book();

  public String doCreateBook () {
    bookEJB .createBook( book );

    FacesContext.getCurrentInstance().addMessage(null, ➥
            new FacesMessage(FacesMessage.SEVERITY_INFO, "Book created", ➥
            "The book" + book.getTitle() + " has been created with id=" + book.getId()));

    return " newBook.xhtml ";
  }

  public void doFindBookById () {
    book = bookEJB .findBookById(book.getId());
  }

  // Getters, setters
}
All the business processing (creating and retrieving books) is done through the BookEJB. The backing bean is injected with a reference to the EJB using the @Inject annotation and has two methods that will be invoked by the pages.
- doCreateBook(): This method allows book creation by invoking the stateless EJB and passing the book attribute. If the persist succeeds, an INFO message is displayed on the page. Then the method returns the name of the page it needs to navigate to.
- doFindBookById(): This method is used by the viewBook.xhtml page to retrieve a book by its identifier using the stateless EJB.
Listing 11-17 shows the BookController backing bean. All the getters and setters in this snippet of code have been omitted for better readability but are required for the attribute book.
Writing the layout.xhtml Template
Both pages newBook.xhtml and viewBook.xhtml use the same template (layout.xhtml defined in Listing 11-18). As you can see in Figure 11-8 the template has a title, a header with a <h:link> Create a book to navigate to the newBook.xhtml, and a <h:messages> tag to display error and informational messages, as well as a footer.
Listing 11-18. The layout.xhtml Template Used by Both Pages
<!DOCTYPE html PUBLIC "-//W3C//DTD XHTML 1.0 Transitional//EN"
        " http://www.w3.org/TR/xhtml1/DTD/xhtml1-transitional.dtd ">
<html xmlns=" http://www.w3.org/1999/xhtml "
      xmlns:ui=" http://xmlns.jcp.org/jsf/facelets "
      xmlns:h=" http://xmlns.jcp.org/jsf/html ">

<h:head>
  <title> <ui:insert name="title"> Default title</ui:insert></title>
</h:head>
<h:body>
  <h:link value="Create a book" outcome="newBook.xhtml"/>

  <h1> <ui:insert name="title"> Default title</ui:insert></h1>
  <hr/>

  < h:messages id=" errors " infoStyle="color:blue" warnStyle="color:orange" →
                                                 errorStyle="color:red"/>

  <ui:insert name="content"> Default content</ui:insert>

  <hr/>
  <h:outputText value="APress - Beginning Java EE 7" style="font-style: italic"/>
</h:body>
</html>
Writing the newBook.xhtml Page
The newBook.xhtml page is a single page that has a form at the top to enter the book data (title, price, description, number of pages, and illustrations), and a list of books at the bottom (see Figure 11-8). Each time a new book is created by clicking the button, the list is refreshed, showing the newly created book. Once the form is submitted, only the list portion of the page needs to be refreshed. For that we use Ajax.
The code in Listing 11-19 shows the top part of the page that represents the form. The bookController variable refers to the BookController backing bean responsible for all the business logic (see Listing 11-17). Book is the entity, and its attributes are accessed using expression language (#{bookController.book.title} binds to the title).
Listing 11-19. The Top Part of the newBook.xhtml Page
<!DOCTYPE html PUBLIC "-//W3C//DTD XHTML 1.0 Transitional//EN"
        " http://www.w3.org/TR/xhtml1/DTD/xhtml1-transitional.dtd ">
<html xmlns=" http://www.w3.org/1999/xhtml "
      xmlns:h=" http://xmlns.jcp.org/jsf/html "
      xmlns:ui=" http://xmlns.jcp.org/jsf/facelets "
      xmlns:f=" http://xmlns.jcp.org/jsf/core ">

<ui:composition template="layout.xhtml" >

  <ui:define name="title"> Create a new book</ui:define>

  <ui:define name="content">

    <h:form id="bookForm">

      <h:panelGrid columns="2">
        <h:outputLabel value="Title : "/>
        <h:inputText value=" #{bookController.book.title} "/>

        <h:outputLabel value="Price : "/>
        <h:inputText value="#{bookController.book.price}"/>

        <h:outputLabel value="Description : "/>
        <h:inputTextarea value="#{bookController.book.description}" cols="16" rows="3"/>

        <h:outputLabel value="Number of pages : "/>
        <h:inputText value="#{bookController.book.nbOfPage}"/>

        <h:outputLabel value="Illustrations : "/>
        <h:selectBooleanCheckbox value="#{bookController.book.illustrations}"/>
      </h:panelGrid>

      < h:commandButton value="Create a book" action=" #{bookController.doCreateBook} ">
        <f:ajax execute="@form" render=":booklist :errors"/>
      </h:commandButton>

    </h:form>
    ...
The <h:commandButton> tag represents the button where the Ajax call is made. When the user clicks, the <f:ajax> tag passes all the form parameters using the @form shortcut (instead, it could have passed a list of all the components identifiers). The values of all the UI components that make up the form are then posted to the server. The doCreateBook() method of the backing bean is invoked, the new book is persisted, and the list of books is retrieved. If no exception is thrown, the name of the page to navigate to is returned: newBook.xhtml so the user stays on the same page. The rendering of this list on the client side is made asynchronously thanks to Ajax. The render element refers to the booklist ID as the identifier of the data table displaying all the books (see Listing 11-20) but also the errors ID which is defined in the layout.xhtml page (see Listing 11-18) in case a message needs to be displayed.
Listing 11-20. The Bottom Part of the newBook.xhtml Page
    ...
    <hr/>
    <h1>List of books</h1>

    <h:dataTable id=" booklist " value=" #{bookEJB.findAllBooks()} " var="bk" border="1">

      <h:column>
        <f:facet name="header">
          <h:outputText value="Title"/>
        </f:facet>
        <h:link outcome="viewBook.xhtml?id=#{bk.id}" value="#{bk.title}"/>
      </h:column>

      <h:column>
        <f:facet name="header">
          <h:outputText value="Price"/>
        </f:facet>
        <h:outputText value="#{bk.price}"/>
      </h:column>

    </h:dataTable>
  </ui:define>

</ui:composition>
</html>
Listing 11-20 shows the bottom part of the page. To display the list of all books, the page uses a <h:dataTable> whose values come straight from the BookEJB (instead of the BookController) thanks to the @Named annotation (see Listing11-16). The <h:dataTable> tag binds to the bookEJB.findAllBooks() method that returns a List<Book> and declares the variable bk to iterate through the list. Then, inside the <h:dataTable> tag, you can use expressions such as #{bk.price} to get the price attribute of a book and display. The <h:link> tag creates an HTML link that, when clicked, navigates to the viewBook.xhtml passing the identifier of the book (viewBook.xhtml?id=#{bk.id}).
Writing the viewBook.xhtml Page
The viewBook.xhtml page allows you to view the details of a book (title, price, description, number of pages, and illustrations). It uses the bookmarkability functionality of JSF 2, meaning that you can access any book detail just by changing the URL with an HTTP GET, thanks to ViewAction.
You can see in Listing 11-21 that the page binds the id parameter (e.g., viewBook.xhtml?id=123) to the #{bookController.book.id} attribute. Once the identifier is bound, the action #{bookController.doFindBookById} is invoked. The BookController.doFindBookById method (Listing 11-17) calls the EJB and gets the book from the database, and then the page can bind the book attributes (e.g., #{bookController.book.title}) to output text components.
Listing 11-21. The viewBook.xhtml Page
<!DOCTYPE html PUBLIC "-//W3C//DTD XHTML 1.0 Transitional//EN"
        " http://www.w3.org/TR/xhtml1/DTD/xhtml1-transitional.dtd ">
<html xmlns=" http://www.w3.org/1999/xhtml "
      xmlns:h=" http://xmlns.jcp.org/jsf/html "
      xmlns:ui=" http://xmlns.jcp.org/jsf/facelets "
      xmlns:f=" http://xmlns.jcp.org/jsf/core ">

<ui:composition template="layout.xhtml" >

  <f:metadata>
    <f:viewParam name="id" value="#{bookController.book.id}"/>
    <f:viewAction action="#{bookController.doFindBookById}"/>
  </f:metadata>

  <ui:define name="title"> View a book</ui:define>

  <ui:define name="content">

    <h:panelGrid columns="2">
      <h:outputLabel value="Title : "/>
      <h:outputText value=" #{bookController.book.title} "/>

      <h:outputLabel value="Price : "/>
      <h:outputText value="#{bookController.book.price}"/>

      <h:outputLabel value="Description : "/>
      <h:outputText value="#{bookController.book.description}" cols="16" rows="3"/>

      <h:outputLabel value="Number of pages : "/>
      <h:outputText value="#{bookController.book.nbOfPage}"/>

      <h:outputLabel value="Illustrations : "/>
      <h:selectBooleanCheckbox value="#{bookController.book.illustrations}"/>
    </h:panelGrid>

  </ui:define>

</ui:composition>
</html>
Compiling and Packaging with Maven
The web application needs to be compiled and packaged in a war file (<packaging>war</packaging>). The pom.xml shown in Listing 11-22 declares all the dependencies necessary for compiling code (glassfish-embedded-all) and uses version 1.7 of the JDK.
Listing 11-22. Maven pom.xml File for Compiling and Packaging the Web Application
<?xml version="1.0" encoding="UTF-8"?>
<project xmlns=" http://maven.apache.org/POM/4.0.0 " →
         xmlns:xsi=" http://www.w3.org/2001/XMLSchema-instance " →
         xsi:schemaLocation=" http://maven.apache.org/POM/4.0.0 →
         http://maven.apache.org/xsd/maven-4.0.0.xsd ">
  <modelVersion>4.0.0</modelVersion>

  <parent>
    <artifactId>chapter11</artifactId>
    <groupId>org.agoncal.book.javaee7</groupId>
    <version>1.0</version>
  </parent>

  <groupId>org.agoncal.book.javaee7.chapter11</groupId>
  <artifactId>chapter11</artifactId>
  <version>1.0</version>
  <packaging>war</packaging>

  <dependencies>
    <dependency>
      <groupId>org.glassfish.main.extras</groupId>
      <artifactId> glassfish-embedded-all </artifactId>
      <version>4.0</version>
      <scope>provided</scope>
    </dependency>
  </dependencies>

  <build>
    <plugins>
      <plugin>
        <artifactId>maven-compiler-plugin</artifactId>
        <version>2.5.1</version>
        <configuration>
          <source> 1.7 </source>
          <target>1.7</target>
        </configuration>
      </plugin>
      <plugin>
        <artifactId>maven-war-plugin</artifactId>
        <version>2.2</version>
        <configuration>
          <failOnMissingWebXml>false</failOnMissingWebXml>
        </configuration>
      </plugin>
    </plugins>
  </build>
</project>
To compile and package the classes, open a command-line interpreter in the directory that contains the pom.xml file and enter the following Maven command:
$ mvn package
Go to the target directory to find the chapter11-1.0.war file. Open it, and you will see that it contains the Book entity, the BookEJB, the BookController backing bean, the three deployment descriptors (persistence.xml, faces-config.xml, and beans.xml), and the two web pages (newBook.xhtml and viewBook.xhtml).
Deploying on GlassFish
Once you have packaged the web application, it needs to be deployed into GlassFish. Ensure GlassFish is up and running. Open a command line, go to the target directory where the chapter11-1.0.war file is located, and enter the following:
$ asadmin deploy chapter11-1.0.war
If the deployment is successful, the following command should return the name of the deployed application and its type. There are two types: web, because it’s a web application, and ejb, because the application contains an EJB.
$ asadmin list-components
chapter11-1.0 <ejb, web>
Running the Example
Now that the application is deployed, open your browser and go to the following URL:
http://localhost:8080/chapter11-1.0/newBook.faces
The browser is pointing to newBook.faces, not newBook.xhtml, because of the default mapping of the FacesServlet. With the .faces extension, JSF knows it has to process the page before rendering it. Once the newBook page shows up, enter some data, and click the submit button. The book is persisted in the database and appears in the list at the bottom of the page.
If you take a web developer tool to check what happens on the network between the browser and GlassFish, you’ll see Ajax in action. The rendering is a partial XML response instead of the entire HTML page. The partial response from the server contains the XHTML portion of the page to be updated. The JavaScript looks for the errors and booklist elements of the page and applies the changes needed (updating the DOM). The partial response on Listing 11-23 is self-explanatory; it specifies that an update has to be made to the components identified by errors and booklist (<update id="booklist">). The body of the <update> element is the fragment of XHTML that has to override the actual data table. Of course, this XML is handled automatically by the JSF Ajax handlers—the developer doesn’t need to do anything with it manually.
Listing 11-23. The Partial Response Received by the Browser
<?xml version='1.0' encoding='UTF-8'?>
<partial-response>
  <changes>
    <update id="errors">
      <![CDATA[
      <ul id="errors"><li style="color:blue">Book created</li></ul>
      ]]>
    </update>
    <update id="booklist">
      <![CDATA[
      <table id="booklist" border="1">
        <thead>
          <tr>
            <th scope="col">Title</th>
            <th scope="col">Price</th>
          </tr>
        </thead>
        <tbody>
          <tr>
            <td><a href="/chapter11-1.0/viewBook.faces?id=54">Java EE 6</a></td>
            <td>31.49</td>
          </tr>
          <tr>
            <td><a href="/chapter11-1.0/viewBook.faces?id=1">Harry Potter </a></td>
            <td>19.79</td>
          </tr>
          <tr>
            <td><a href="/chapter11-1.0/viewBook.faces?id=51">H2G2</a></td>
            <td>23.99</td>
          </tr>
        </tbody>
      </table>
      ]]>
    </update>
  </changes>
</partial-response>
Summary
Chapter 10 examined the graphical aspect of JSF, and this chapter focused on its dynamic side. JSF follows the MVC design pattern, and its specification ranges from creating user interfaces with components to processing data with backing beans.
Backing beans are at the heart of JSF as they are used to process business logic, call EJBs, databases, and so on, as well as navigating between pages. They have a scope and a life cycle (resembling stateless session beans), and they declare methods and properties that are bound to UI components using expression language. Annotations and configuration by exception have greatly simplified JSF 2.2, as most of the XML configuration is now optional.
This chapter then showed how conversion and validation are handled on any input component. JSF defines a set of converters and validators for most common cases, but it also allows you to easily create and register custom ones. Integration with Bean Validation is natural and you don’t need any plumbing code to integrate it with JSF.
While the Ajax technique has been around for some years, JSF brings standard support, allowing web pages to invoke backing beans asynchronously. It defines a standard JavaScript library, and the developer doesn’t need to write scripts but instead uses functions to refresh portions of pages.
The next four chapters will focus on how to interoperate with systems through messaging, SOAP web services, and RESTful web services using XML or JSon.