![]()
Configuring Your Environment for PowerShell
We are now ready to get our hands dirty, and start playing with PowerShell. Throughout the following pages, you will learn the fundamentals of how you should be configuring your environment to allow you to leverage the full power of PowerShell. At the end of it, you should be able to understand how to set up and configure your own environment to allow you to create, test, and execute your own scripts.
In this chapter, you will be writing and deploying your scripts locally on the SharePoint server. However, I am well aware that this scenario does not reflect the normal Lifecycle Management of PowerShell scripts that enterprises will normally follow. This chapter will provide guidance on how you can set up your scripting environment to be on a separate client operating system. It will act as a foundation to all other topics covered in the other chapters of this book. You should make sure to read all of the details carefully, and ensure that you have a stable environment to help guide you through the rest of the material covered.
In the pre–Windows Server 2008 world, you had to go on Microsoft’s site and download installer files in order to have PowerShell installed on your server. With the release of Windows Server 2008, Microsoft has included the technology directly into the product, but you still have to go and activate it as a server feature in the Server Manager Console. Starting with Windows 2008 R2, PowerShell comes preinstalled with the server’s operating system, which gives us a good indication of how more and more important the tool has become over the years.
After completing this chapter, you will be able to:
- Understand how to prepare your environment to use PowerShell
- Manage scripts permissions
- Setup your scripting environment
Getting Started with the Integrated Scripting Environment (ISE)
Realistically, all you need to write a PowerShell script is a text editor such as Notepad, but since version 2.0 of its PowerShell technology, Microsoft has introduced its own integrated scripting environment (ISE) to help simplify scripts development.
Windows Server 2008 R2
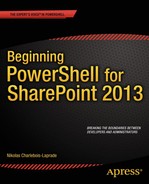
By default, the Scripting Environment doesn’t come preinstalled, even though the core bits of the PowerShell technology are all there from the start. You will need to go in the Server Manager’s console, and manually add it as a feature of your environment (see Figure 3-1). The Server Manager console can be launched by running the command ServerManager.exe from the command prompt.
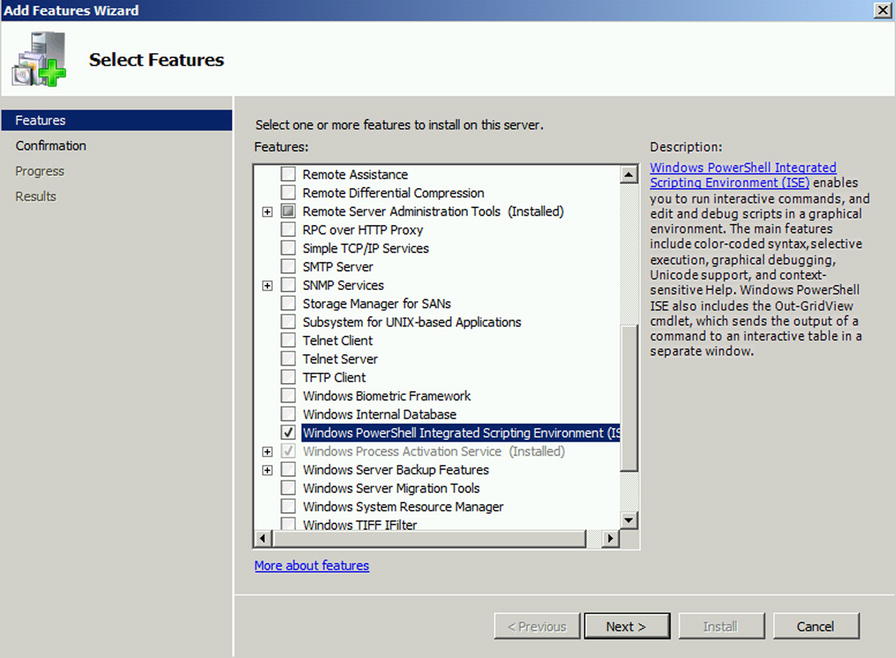
Figure 3-1. Adding the PowerShell ISE feature in Windows Server 2008 R2
The feature should only take a few seconds to install. Once the installation is completed, you will be able to launch the Windows PowerShell Integrated Scripting Environment (ISE) program from the Windows Run box by typing in powershell_ise (see Figure 3-2).
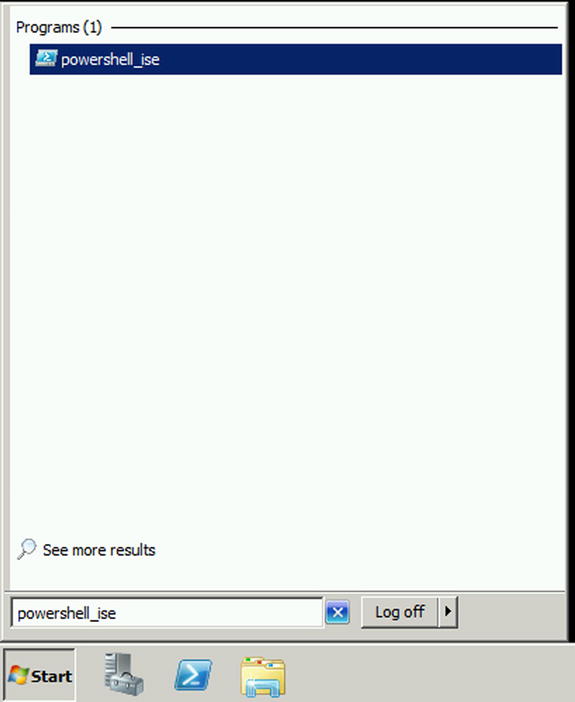
Figure 3-2. Launching the PowerShell ISE v2 from Windows Server 2008 R2
It is very important to note that doing this will actually install version 2.0 of the PowerShell ISE, because, by default, Windows Server 2008 R2 has PowerShell 2.0 preinstalled. In order for you to get the v3.0 bits, you will need to go to Microsoft’s site and download the Windows Management Framework 3.0 installer (www.microsoft.com/en-us/download/details.aspx?34595 ). There is nothing preventing you from writing your scripts for SharePoint 2013 using the v2.0 ISE; your scripts will always execute against the version of PowerShell installed on the server on which it is run, unless otherwise specified. Installing SharePoint 2013 on your Windows Server 2008 R2 environment will automatically install the Windows Management Framework 3.0. So if you are writing your scripts directly on your SharePoint box, you’ll automatically get the latest version of the ISE. The latest version of the ISE is actually called Windows PowerShell ISE, so make sure that you search for that term when trying to launch the program from the Run box. It is my recommendation that you always write your scripts against the v3.0 Framework as it offers more flexibility and robustness than its predecessors.
Windows Server 2012
Good news! If you’re running Windows Server 2012, the Management Framework 3.0 is already installed on your server, and so is the Windows PowerShell Integrated Scripting Environment. You will be able to launch it from the modern UI screen by searching for “Windows PowerShell ISE” (see Figure 3-3).
Figure 3-3. Launching the Windows PowerShell ISE from Windows Server 2012
Windows PowerShell ISE Essential Features
Microsoft really outdid themselves for this release of their PowerShell ISE. Tons of new features have been introduced, and many have been improved compared to its predecessors. This section will give you an overview of some of the essential features offered in the tool.
This is something that all developers use on a daily basis. IntelliSense offers you suggestions as you type, and gives you intuitive descriptions of what the various methods (cmdlets) are expecting as parameters (see Figure 3-4). This is something that was missed by many in the earlier version of the product. Many third-party vendors added this as part of their offering in order to attract more customers. Now, however, this is built in and is an out-of-the-box feature.
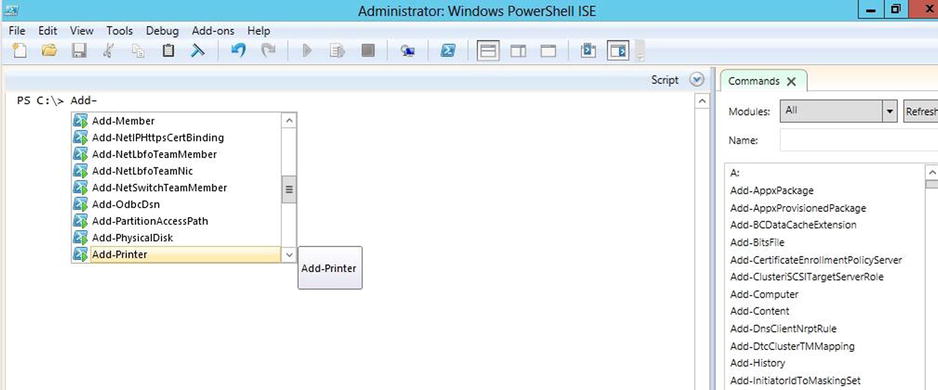
Figure 3-4. IntelliSense in Windows PowerShell ISE
Think of snippets as being reusable patterns of code that are likely to be used more than once in your scripts. Snippets allow you to easily add a reusable pattern of code to your script with a single click—for example, a try-catch or a try-finally clause that prevents your script from crashing in case of errors, and that allows you to handle the exceptions in a managed way. This is something that I encourage every PowerShell developer to use. In order to add this to your code, simply right-click anywhere in the console pane, and pick Start Snippets (Ctrl+J also does the trick). You will then be presented with a list of all available snippets that you can add to your code. Simply double-click on one of them to have it inserted where your cursor is positioned (see Figure 3-5).
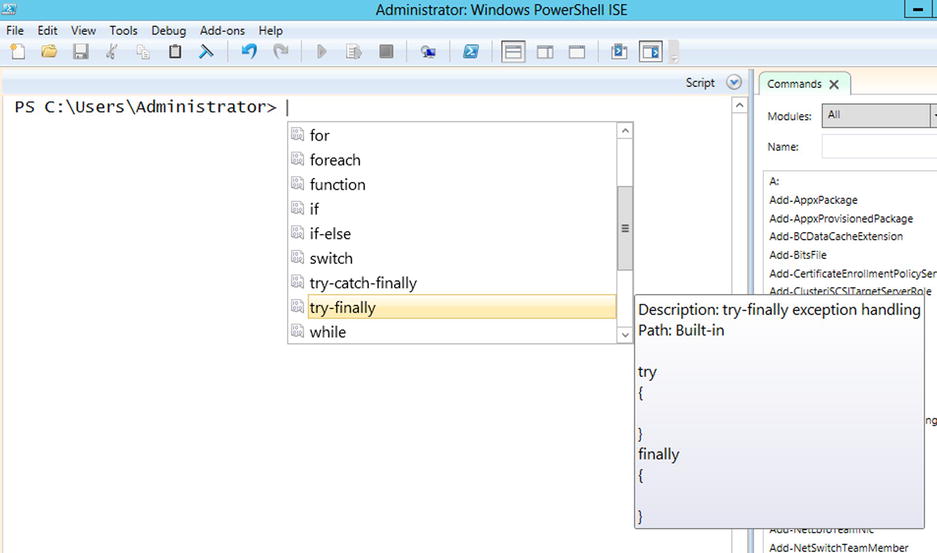
Figure 3-5. Snippets in Windows PowerShell ISE
New snippets can be added to the Windows PowerShell ISE by using the New-ISESnippet cmdlet from within the ISE. In the following example, I’ve created a new snippet that simply prints out a dashed line to the console. I’ve created the new snippet by using the following line of code. In order for this to execute properly, you will need to set the execution policy to Unrestricted (see “Execution Policy”):
New-IseESnippet –Title "Print Dashed Line" –Description "Prints a line on screen" –Author "Nik" –Text "write-host '------------------------'"
Once created, your new snippet will be accessible in the snippet gallery for you to use, as shown in Figure 3-6.
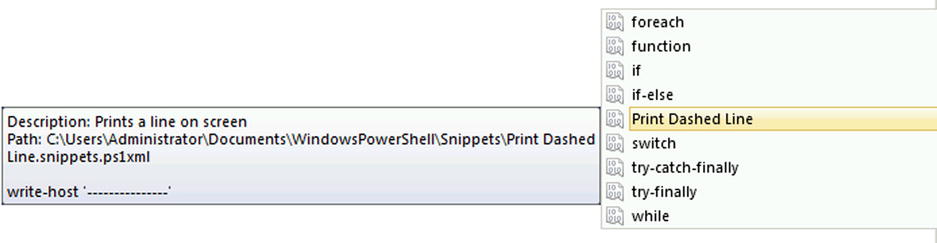
Figure 3-6. My custom Print Dashed Line Snippet
Another great addition to the Integrated Scripting Environment is the Commands Explorer panel on the right-hand side of the interface, which allows you to quickly browse through all the cmdlets that are available in the current session. By default, the SharePoint cmdlets are not listed. In order for them to show up, you need to add the SharePoint snap-in to the current session. Type in the following line in the console pane, and run (press Enter) your code. This will automatically import all SharePoint related operations in your current PowerShell session.
Add-PSSnapin Microsoft.SharePoint.PowerShell
Once added, simply click on the Refresh button at the top of the Commands Explorer panel to have all the SharePoint related cmdlets appear in the list (see Figure 3-7).
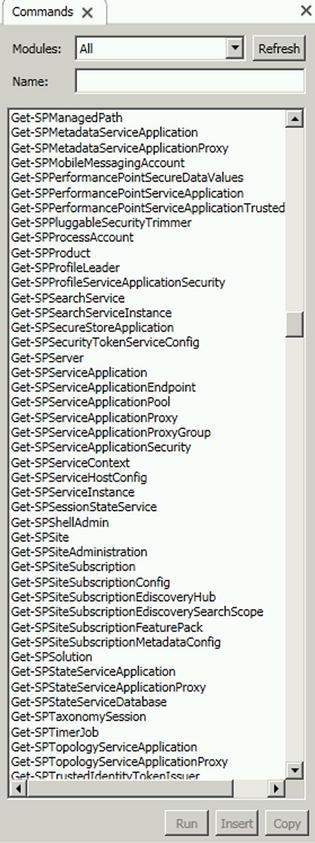
Figure 3-7. Commands Explorer in Windows PowerShell ISE
![]() Did you know? The PowerShell executables and libraries are all stored in the c:WindowsSystem32WindowsPowerShellv1.0 folder, even in version 3.0.
Did you know? The PowerShell executables and libraries are all stored in the c:WindowsSystem32WindowsPowerShellv1.0 folder, even in version 3.0.
PowerShell has its own set of mechanisms to prevent any harm from being done to the server without proper approval from the server’s administrator. One of these mechanisms is what we refer to as execution policies, which determine what types of PowerShell scripts are allowed to be run on the server. There are a few execution policy levels. Here is a description of the four main types that you will encounter and that you can use to specify what type of scripts you want to allow to run on the server:
- AllSigned. This policy only allows scripts that have been signed by a trusted publisher to be run.
- RemoteSigned. This policy forces all scripts downloaded from the internet to be signed by a trusted publisher before being run.
- Restricted. This policy means that no scripts can be run. Administrators can only use PowerShell in interactive mode (typing in commands one at a time in the console).
- Unrestricted. This policy allows all scripts to be run without description.
Execution policies can be set on the server by running the Set-ExecutionPolicy cmdlet. What this does in the backend is update a registry key to contain the name of the effective policy (HKEY_LOCAL_MACHINESOFTWAREMicrosoftPowerShell1ShelldsMicrosoft.PowerShell). On running the cmdlet, as in the following line, you will be asked to confirm the change:
Set-ExecutionPolicy AllSigned
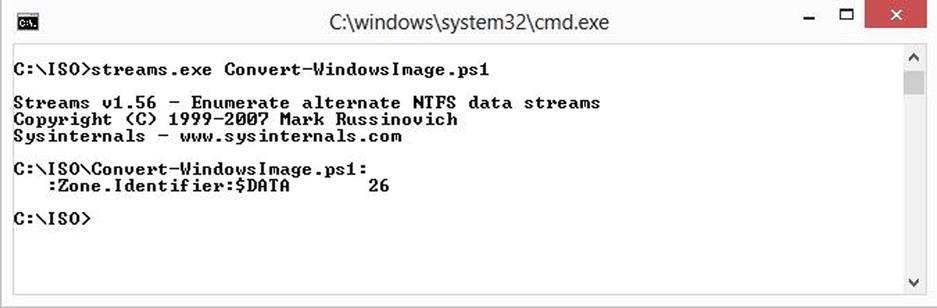
![]() Did you know? PowerShell looks at a script’s property to determine if it was downloaded from an external source or not. It checks the file’s ZoneId property. If its value is greater than or equal to 3, it will automatically treat it as being a remote script. You can view the value of this property by using the Streams tool (http://technet.microsoft.com/en-ca/sysinternals/bb897440.aspx).
Did you know? PowerShell looks at a script’s property to determine if it was downloaded from an external source or not. It checks the file’s ZoneId property. If its value is greater than or equal to 3, it will automatically treat it as being a remote script. You can view the value of this property by using the Streams tool (http://technet.microsoft.com/en-ca/sysinternals/bb897440.aspx).
PowerShell Web Access (PWA)
This PWA feature requires you to have Windows Server 2012 installed as the server operating system for your SharePoint farm. It acts as a gateway to provide you with a web-based interface representing Windows PowerShell console. That’s right, as you’ve probably figured it out by now, this allows users to run PowerShell scripts remotely on servers. You can probably already imagine all of the red flags that this will trigger with your security folks. Don’t you worry, though; Microsoft thought of this, too, and they introduced many mechanisms to allow you and your team to control the access to this feature.
In order for you to be able to run PowerShell Web Access, you need to ensure that the following components are installed and configured on your destination server:
- IIS Web Server
- .NET Framework 4.5 or greater
- Windows Management Framework 3.0 or greater
- Windows Server 2012 or Windows Server 2012 R2
PowerShell Web Access is considered a server feature in Windows Server 2012; therefore, you can either activate it by going in the Server Manager Console, and adding it as a feature, or by using the following PowerShell cmdlets:
Install-WindowsFeature –Name WindowsPowerShellWebAccess –ComputerName <computer_name>
-IncludeManagementTools –Restart
On executing these cmdlets, you should see a teal-colored bar appear in your PowerShell console, and the status of your installation should be displayed. The installation should take about a minute to complete, and PowerShell should display the installation results in a tabular format such as the one illustrated in Figure 3-8. Once the installation is completed, your machine will automatically be restarted.
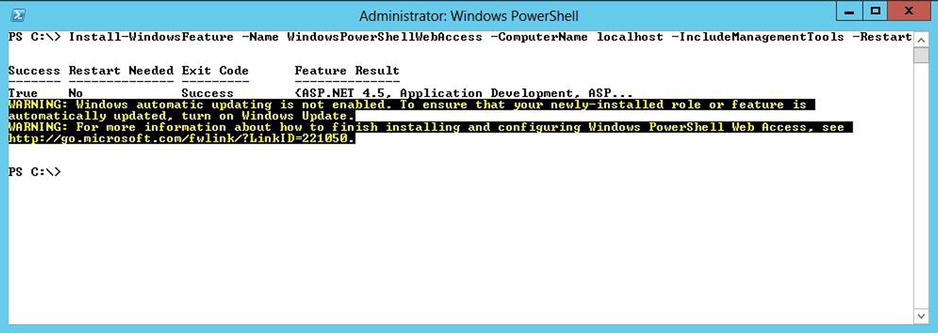
Figure 3-8. Output of the PowerShell Web Access installation
Configuring the Gateway
I am no expert when it comes to network configuration, and I’ve never tried to pretend otherwise. Luckily for me, Microsoft made it as simple as possible to configure the PowerShell Web Access Gateway. All you have to do is to run the following cmdlet. For advanced users, there is a way for you to specify a genuine signed SSL certificate, but in this case, I will simply have PowerShell generate a test certificate by using the –useTestCertificate switch:
Install-PSWAWebApplication -UseTestCertificate
When you run this cmdlet, what PowerShell actually does is create a new web application and its associated Application Pool entity in IIS. The physical path of the newly created web application is located at C:WindowsWebPowerShellWebAccesswwwroot. By default, PowerShell names the web application pswa, but you are allowed to name it whatever you see fit by using the –WebApplicationName parameter and specifying your own name. I used the default web application name. Open the Internet Information Service Manager console, and ensure that the Default Web site is started. If it is not, click on it and choose Start from the right-hand Actions panel:
Install-PSWAWebApplication –UseTestCertificate –WebApplicationName "MyCustomPSWAName"
Once you have PowerShell Web Access configured, you are ready to hit the road and try out the Web console. You can navigate to it by typing in https://<server name>/<Web application name>. I am accessing it at https://spps.contoso.com/pswa/. Once you have accessed the web application, you’ll be presented with a login screen. By default, nobody is allowed access to the PowerShell Web Access Gateway. You will need to manually grant users access using PowerShell, by creating what we refer to as an authorization rule. An authorization rule allows specific users to access a computer on the network, granting them access to a special PowerShell session that is configured to include the list of cmdlets that they normally use. New authorization rules can be created by using:
Add-PSWAAuthorizationRule –username domainusername –ComputerName computerName
–ConfigurationName Admins
The next step is to register a new session configuration with the environment. The session configuration is where we will specify which cmdlets and modules should be loaded by default in the PowerShell Web Access session when a specific user connects. New session configurations are created by calling the following cmdlet:
Register-pssessionconfiguration –Name Admins –RunAsCredential domainusername
Next, you will be prompted to enter the credentials for the account specified. Enter the requested password and click OK. The system will then ask you to confirm a series of operations, involving restarting certain services. You’ll need to input “Y” for yes to each of these questions and press Enter. At one point, the system will ask you to confirm the specified accounts rights on the remote PowerShell service. Simply keep the default options recommended by the system, such as those shown in Figure 3-9, and click OK.
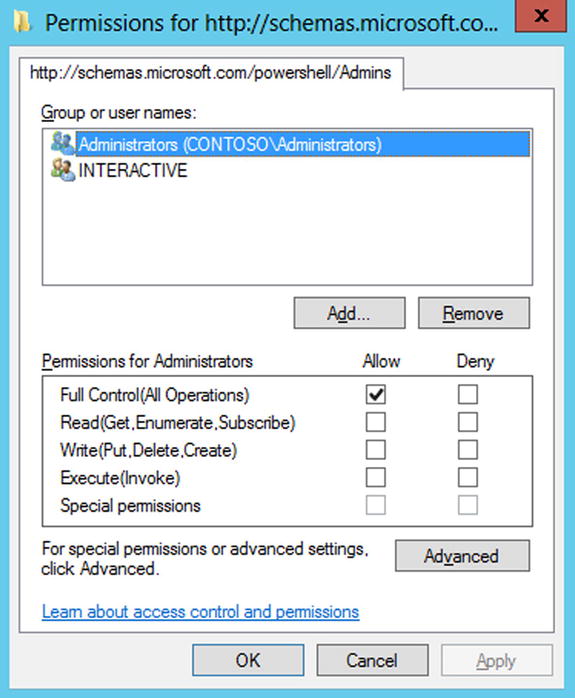
Figure 3-9. Setting default permissions for the remote PowerShell Service
The session configuration object that we created will include all basic cmdlets that a PowerShell session will have the first time you initialize it after installing the operating system. Adding additional cmdlets and modules to session configuration objects is outside the scope of this book. We are now ready to connect to the Web interface:
- Navigate to your PowerShell Web Access Gateway page in a new Internet Explorer window. The login screen should look similar to the one in Figure 3-10.
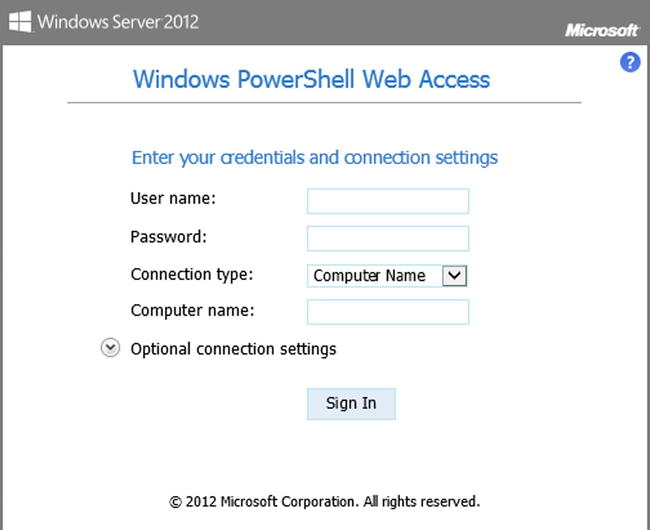
Figure 3-10. PowerShell Web Access Login Screen
- Fill in all required information, and expand the optional connection settings panel.
- In the Configuration Name box, simply enter Admins as this is how we called our new configuration object.
- Click Sign In.
After a few seconds, you should see what looks similar to a desktop PowerShell session inside your web browser. We are now connected to the Windows PowerShell Web Access application and can use it to run commands just like we would within a normal desktop PowerShell session. In order to prove that it is working, you could run the following command to change the date and see it reflected live on the machine. Please note that changing the date of a system is not something that you should try on a production server, as it may have unexpected results on your applications. In the session console, type in the following:
Set-data –date '08/09/1985'
Press Enter to submit your command to the console, and pay close attention to the date at the bottom right of your screen to see it flash.
Summary
In this chapter, you have learned how to configure your environment to be able to leverage PowerShell to its full potential. What you’ve accomplished throughout the previous sections will act as a building block for the chapters to come. If you are using a virtual machine to follow along, it might be a good idea for you to create a snapshot of your machine at this point. This will allow you to go back to a clean installation of your environment, and it could be used as a template for building additional servers in the future.