![]()
Installing & Deploying SharePoint with PowerShell
I am now ready to start digging into what PowerShell has to offer to us, SharePoint people. In this chapter I will go over the basic commands you can use in PowerShell to help you automate the build of your SharePoint environment. Through a set of different demos, you’ll learn how you can write your own custom scripts, and reuse them to create new SharePoint machines on demand. I will be covering the installation automation of the following aspects of a new SharePoint farm:
- Installation and configuration of the Server Operating System’s Roles and Features
- Installation and configuration of SQL Server
- Installation of the SharePoint prerequisites
- Installation of the SharePoint core components
- Configuration of your new SharePoint Farm
The SharePoint Farm environment that will have been created and configured at the end of this chapter will act as the foundation for all other chapters to come. The environment will be “self-contained,” meaning that all required components will be installed on a single box. In real-life scenarios, you’ll always want to offload the domai controller role to a separate server as well as have your SQL Server installation hosted elsewhere. SharePoint 2013 also gives us more flexibility than its predecessors, by allowing us to offload more service applications components than in the 2010 version of the product.
Components like the workflow engine, the machine translation, and search services would normally be installed on external application servers in order to keep the SharePoint Web front-end servers as lightweight as possible. It is important to note that the end-goal architecture will be achieving in this chapter is for learning purposes only, and should not be something you aim to replicate in a production environment. The following sections assume that your test environment has a fresh baseline copy of Windows Server 2012 Standard (x64) edition installed.
Requirements
In the following section, I will be covering both the hardware and the software requirements you will need in order to re-create the same development environment that was created in this chapter. Pay specific attention to the various drives that are required along with their respective installation media, as the script produced at the end of the chapter will not work otherwise.
For you to be able to get through the rest of this book and experience all of the examples that follow in a reasonable fashion, you will need to create your new SharePoint farm on a machine that meets the following list of minimum requirements. These requirements are in line with Microsoft’s recommendations:
- 8 Gb of RAM available
- 80 Gb of disk space
- 64-bit, 4 cores
- Windows Server 2012 as the operating system
- 3 DVD drives assigned to your machine (D:, E:, and F:)
The scripts and examples given in this chapter will require you to have a copy of the installation files for the following software:
- SQL Server 2012 Standard Edition with Service Pack 1 (x64)
- SharePoint Server 2013 (x64)
In addition, all of these scripts assume that you have the media shown in Table 5-1 available to automate the installation.
Table 5-1. Required media and associated drives
|
Drive |
Media |
|---|---|
D: |
SQL Server 2012 with SP1 |
E: |
Windows Server 2012 |
F: |
SharePoint Server 2013 |
Figure 5-1 shows the various drives that are required and their associated installation media in Windows Explorer.
Figure 5-1. Overview of the required instalaltion media
Another requirement is to have the PowerShell execution policy set to be unrestricted. Please refer to Chapter 4 to learn how this can be achieved. Without this set properly, the scripts produced in this chapter will not execute properly, because PowerShell will block their execution.
Roles and Features
This section will help you automate the configuration of all Windows Server 2012 roles and features required by SQL Server 2012 and SharePoint 2013. I will go into the details of what roles and which PowerShell commands are required to have them enabled on your server.
![]() Caution Please note that the intent of this book is to help you understand the internals of how PowerShell works and how it can be used. Some of the scripts that you’ll encounter in the following chapters may contain passwords that are exposed in plain text. This is not considered to be best practice, and you should always be careful how you expose sensitive information in your scripts.
Caution Please note that the intent of this book is to help you understand the internals of how PowerShell works and how it can be used. Some of the scripts that you’ll encounter in the following chapters may contain passwords that are exposed in plain text. This is not considered to be best practice, and you should always be careful how you expose sensitive information in your scripts.
This component will require you to have the Windows Server 2012 installation media available. Some resources contained in the media are required to install the .NET Framework 3.5 bits. The following script assumes that the Windows Server 2012 installation files are loaded on drive E:. The script will automatically enable the feature on the server. Figures 5-2 and 5-3 show the installation while in process and once completed.
Install-WindowsFeature –name NET-Framework-Core –Source E:Sourcessxs
Figure 5-2. Installing the .NET Framework

Figure 5-3. Results of completing the .NET Framework installation
This role is probably the most important one of them all. Remember that your SharePoint machine will be self-contained; therefore, it needs to host its own domain. The good old days when you could simply call dcpromo in command prompt are long gone in Windows Server 2012. Trying to do so will result in getting an error similar to the one shown in Figure 5-4.
Figure 5-4. DCPromo warning when running from command prompt
PowerShell in Windows Server 2012 provides us with a set of various cmdlets that allow us to directly interact with the various Active Directory components. The following script excerpt will configure the domain controller role on the server environment (Figure 5-5 shows the script running):
$domainName = "contoso.com "
$safeModeAdminPassword = ConvertTo-SecureString "pass@word1" -asPlainText -force

Add-Windowsfeature AD-Domain-Services -IncludeManagementTools

Install-ADDSForest -DomainName $domainName -SafeModeAdministratorPassword $safeModeAdminPassword -Confirm:$false
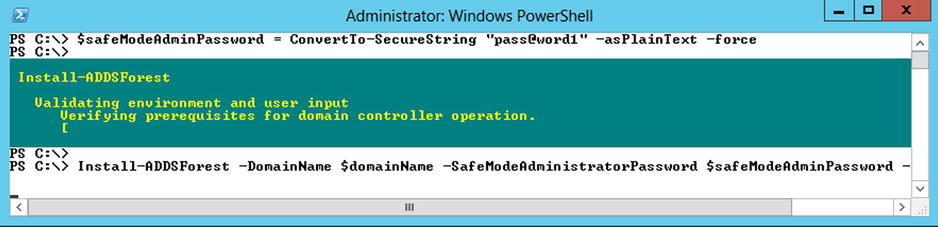
Figure 5-5. Installing the Domain Controller role with PowerShell
Running this script will declare a new domain, called contoso.com, and will automatically promote it. After running this script, the machine will automatically reboot after a few seconds to ensure that the new configuration is taken into effect. After the machine reboots, you should see your new domain name appended in front of your user name on the login screen (see Figure 5-6).
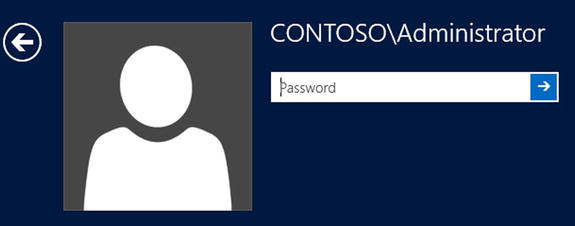
Figure 5-6. Login screen with domain information
The next step will be to create a few test users and groups in your new Active Directory structure. I will try to mimic a real-world scenario with environment, in which I will have fictive users spread out across different business units in the Contoso organization. I will use PowerShell to create the following Active Directory groups to represent the following functional business units:
- Administration
- Finance
- Human Resources
- Directors
- Tech Support
The following lines of script will take care of automatically creating these groups.
New-ADGroup -DisplayName "Administration" -GroupScope DomainLocal -Name "Administration"
New-ADGroup -DisplayName "Finance" -GroupScope DomainLocal -Name "Finance"
New-ADGroup -DisplayName "Human Resources" -GroupScope DomainLocal -Name "Human Resources"
New-ADGroup -DisplayName "Directors" -GroupScope DomainLocal -Name "Directors"
New-ADGroup -DisplayName "Tech Support" -GroupScope DomainLocal -Name "Tech Support"
I will now create a user for each security group that I have just created using the following script. The default password for each of these users will be defaulted to “pass@word1”. This will prove useful in future example, when you will need to log into SharePoint as various users to test permissions. Figure 5-7 shows the created users.
$usersPassword = ConvertTo-SecureString "pass@word1!11" -asPlainText -force

New-ADUser -Name "JSmith" -GivenName "John" -Surname "Smith" -AccountPassword $usersPassword
-UserPrincipalName "[email protected] " -DisplayName "John Smith"
Enable-ADAccount -Identity "JSmith"
Add-ADGroupMember -Identity "Administration" -Member "JSmith"

New-ADUser -Name "BMoores" -GivenName "Bob" -Surname "Moores" -AccountPassword $usersPassword
-UserPrincipalName "[email protected] " -DisplayName "Bob Moores"
Enable-ADAccount -Identity "BMoores"
Add-ADGroupMember -Identity "Finance" -Member "BMoores"

New-ADUser -Name "PHarris" -GivenName "Peter" -Surname "Harris" -AccountPassword $usersPassword
-UserPrincipalName "[email protected] " -DisplayName "Peter Harris"
Enable-ADAccount -Identity "PHarris"
Add-ADGroupMember -Identity "Human Resources" -Member "PHarris"

New-ADUser -Name "KButtler" -GivenName "Kyle" -Surname "Buttler" -AccountPassword $usersPassword
-UserPrincipalName "[email protected] " -DisplayName "Kyle Buttler"
Enable-ADAccount -Identity "KButtler"
Add-ADGroupMember -Identity "Directors" -Member "KButtler"

New-ADUser -Name "MRanger" -GivenName "Mike" -Surname "Ranger" -AccountPassword $usersPassword
-UserPrincipalName "[email protected] " -DisplayName "Mike Ranger"
Enable-ADAccount -Identity "MRanger"
Add-ADGroupMember -Identity "Tech Support" -Member "MRanger"
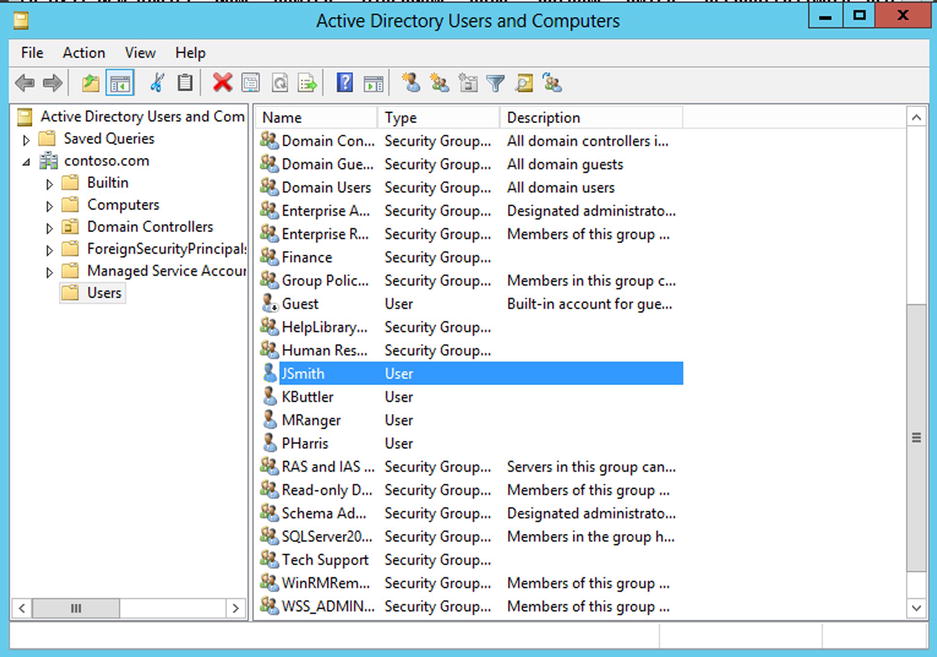
Figure 5-7. List of users and groups
SharePoint requires your server to have the Application Server role enabled to leverage many.NET features such as the Windows Communication Foundation for web service calls. On top of activating this role, there are several specific features that also need to be turned on in order for SharePoint to install properly. The list in Table 5-2 identifies all features required.
Table 5-2. All of the features required for your Application Server role
Application-Server AS-Net-Framework AS-WAS-Support Server-Media-Foundation WAS-NET-Environment Web-Asp-Net Web-Default-Doc Web-Dyn-Compression Web-Http-Errors Web-ISAPI-Ext Web-Log-Libraries Web-Mgmt-Console Web-Performance Web-Server Web-WebServer Xps-Viewer |
AS-HTTP-Activation AS-TCP-Activation AS-Web-Support WAS WAS-Process-Model Web-Basic-Auth Web-Digest-Auth Web-Filtering Web-Http-Logging Web-ISAPI-Filter Web-Metabase Web-Mgmt-Tools Web-Request-Monitor Web-Stat-Compression Web-Windows-Auth |
AS-Named-Pipes AS-TCP-Port-Sharing Net-Framework-Features WAS-Config-APIs Web-App-Dev Web-Common-Http Web-Dir-Browsing Web-Health Web-Http-Tracing Web-Lgcy-Scripting Web-Mgmt-Compat Web-Net-Ext Web-Security Web-Static-Content Windows-Identity-Foundation |
If you make the count, that’s over 45 different features required. You could go and manually add each of them using the Server Manager console, but because this is a PowerShell book after all, just run a one-line command to have it all done automatically for you. The following line of script will take care of it all. Please give it a few minutes to complete.
Add-WindowsFeature Application-Server, AS-HTTP-Activation, AS-Named-Pipes, AS-Net-Framework, AS-TCP-Activation, AS-TCP-Port-Sharing, AS-WAS-Support, AS-Web-Support, Net-Framework-Features, Server-Media-Foundation, WAS, WAS-Config-APIs, WAS-NET-Environment, WAS-Process-Model, Web-App-Dev, Web-Asp-Net, Web-Basic-Auth, Web-Common-Http, Web-Default-Doc, Web-Digest-Auth, Web-Dir-Browsing, Web-Dyn-Compression, Web-Filtering, Web-Health, Web-Http-Errors, Web-Http-Logging, Web-Http-Tracing, Web-ISAPI-Ext, Web-ISAPI-Filter, Web-Lgcy-Scripting, Web-Log-Libraries, Web-Metabase, Web-Mgmt-Compat, Web-Mgmt-Console, Web-Mgmt-Tools, Web-Net-Ext, Web-Performance, Web-Request-Monitor, Web-Security, Web-Server, Web-Stat-Compression, Web-Static-Content, Web-WebServer, Web-Windows-Auth, Windows-Identity-Foundation, Xps-Viewer

Figure 5-8. Features being installed
After you are done running this command, you will need to restart the server. Figure 5-9 shows the features being configured on restarting the server. You can simply run:
Restart-Computer

Figure 5-9. Applying the prerequisite features on restarting
Installing the Software Components
You are now ready to start installing the various components that make up a SharePoint farm. As mentioned earlier in this chapter, the environment that you are building in this chapter is self-contained. I will therefore cover how you can automate the installation of the SQL Server bits, the SharePoint 20103 prerequisites, and the SharePoint 2013 core components using PowerShell. In the next section, you will learn how to configure these components to make the most of your environment.
In order for you to be able to properly install the required components of SQL Server 2012, the following roles will need to be enabled on the server. The scripts that are detailed in the current section all assume that you have the SQL installation bits loaded on a drive mapped to D:. You will be doing a minimal installation of a default SQL standalone instance, installing only the Database Engine Services core bits. The following script will perform an unattended installation of SQL Server:
$sqlSAPassword = "pass@word1"

$sqlProcess = new-object System.Diagnostics.Process
$sqlProcess.StartInfo.Filename = "D:setup.exe"
$sqlProcess.StartInfo.Arguments = "/QS /ACTION=install /IACCEPTSQLSERVERLICENSETERMS=1 /FEATURES=SQL,Tools /INSTANCENAME=MSSQLSERVER /INSTANCEID=MSSQLSERVER /SQLSYSADMINACCOUNTS=contosoAdministrator /SECURITYMODE=SQL /SAPWD=$sqlSAPassword /INDICATEPROGRESS /AGTSVCSTARTUPTYPE=Automatic /TCPENABLED=1"
$sqlProcess.Start()
$sqlProcess.WaitForExit()
During the installation process, you will see several installation windows appear (see Figure 5-10). You do not have to interact with any of them. The parameters passed to the setup executable will automatically fill in the appropriate information required for you installation. The installation process will take about 10 minutes to complete, so now may be a good time for you to go grab a cup of coffee.
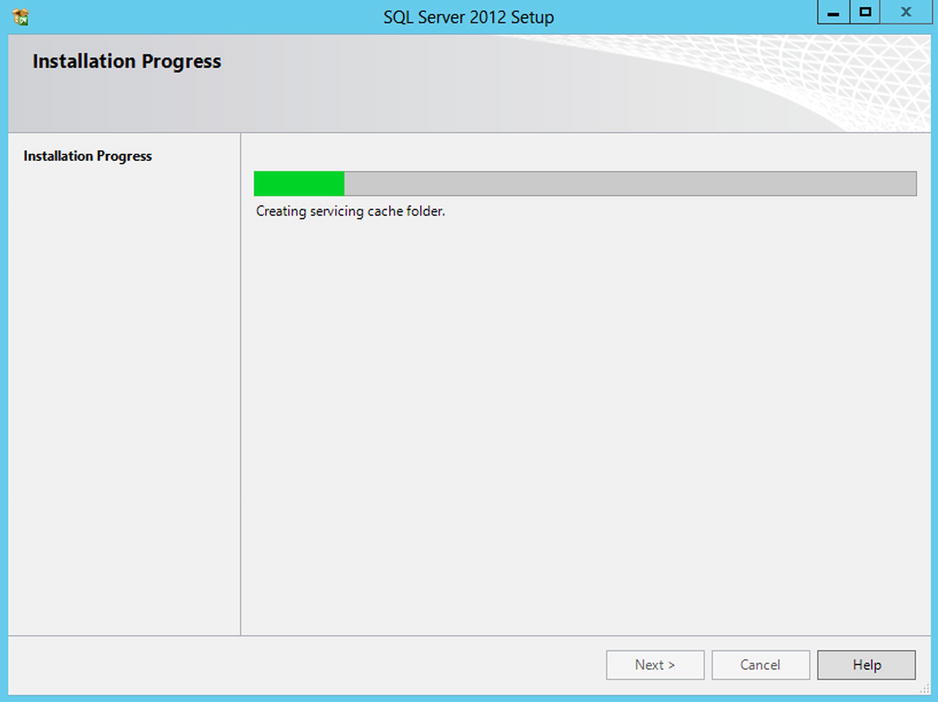
Figure 5-10. Unattended SQL Server 2012 installation
Installing SharePoint Prerequisites
Finally! You are now ready to install the SharePoint bits onto our server. The first step to installing SharePoint will be to download and install all of its prerequisites. You will be creating an automated PowerShell script that will automatically download each of them locally, and install them one at a time. The following list contains all the prerequisites that are required in order for the SharePoint Core installer to work:
- Microsoft SQL Server 2008 R2 SP1 Native Client
- Microsoft Sync Framework Runtime v1.0 SP1 (x64)
- Windows Server AppFabric
- Cumulative Update Package 1 for Microsoft AppFabric 1.1 for Windows Server (KB2671763)
- Windows Identity Foundation (KB974405)
- Microsoft Identity Extensions
- Microsoft Information Protection and Control Client
- Microsoft WCF Data Services 5.0
To download each of the required files, simply use the Invoke-WebRequest PowerShell cmdlet. The method takes two input parameters, one being the URL of the source file to download, and the second one being the local path of where to save the file. This method can be called in the following fashion:
$webClient = New-Object "System.Net.WebClient"
$webClient.DownloadFile("http://<source file URL>","c:<local path><filename> ")
The automated script that you will create will have a list of all of the prerequisites’ files URLs stored in an array. It will loop through each of them and download them locally. Once all of the files have been downloaded locally, the script will call the SharePoint 2013 Products Preparation Tool, passing it the list of prerequisite files as an argument. The installer tool will then take care of installing and properly configuring each of them (see Figure 5-11).
$localPath = "C:SP2013Prereqs"

New-Item -ItemType Directory -Force -Path $localPath

# Array with all urls...a bit messy
$files = @("http://download.microsoft.com/download/9/1/3/9138773A-505D-43E2-AC08-9A77E1E0490B/1033/x64/sqlncli.msi ", "http://download.microsoft.com/download/E/0/0/E0060D8F-2354-4871-9596-DC78538799CC/Synchronization.msi ", "http://download.microsoft.com/download/A/6/7/A678AB47-496B-4907-B3D4-0A2D280A13C0/WindowsServerAppFabricSetup_x64.exe ", "http://download.microsoft.com/download/7/B/5/7B51D8D1-20FD-4BF0-87C7-4714F5A1C313/AppFabric1.1-RTM-KB2671763-x64-ENU.exe ", "http://download.microsoft.com/download/D/7/2/D72FD747-69B6-40B7-875B-C2B40A6B2BDD/Windows6.1-KB974405-x64.msu ", "http://download.microsoft.com/download/0/1/D/01D06854-CA0C-46F1-ADBA-EBF86010DCC6/rtm/MicrosoftIdentityExtensions-64.msi ", "http://download.microsoft.com/download/9/1/D/91DA8796-BE1D-46AF-8489-663AB7811517/setup_msipc_x64.msi ", "http://download.microsoft.com/download/8/F/9/8F93DBBD-896B-4760-AC81-646F61363A6D/WcfDataServices.exe ")

$fileName = ""
$pathParts

foreach($file in $files)
{
    $pathParts = $file.Split("/")
    $fileName = $pathParts[$pathParts.Length -1]
    $fullName = "$localPath$fileName"
    Invoke-WebRequest $file -OutFile $fullName
}

$prereqProcess = new-object System.Diagnostics.Process
$prereqProcess.StartInfo.Filename = "F:prerequisiteinstaller.exe"
$prereqProcess.StartInfo.Arguments = "/SQLNCli:$localPath"+"sqlncli.msi /IDFX:$localPath" + "Windows6.1-KB974405-x64.msu /IDFX11:$localPath" + "MicrosoftIdentityExtensions-64.msi /Sync:$localPath" + "Synchronization.msi /AppFabric:$localPath" + "WindowsServerAppFabricSetup_x64.exe /KB2671763:$localPath" + "AppFabric1.1-RTM-KB2671763-x64-ENU.exe /MSIPCClient:$localPath" + "setup_msipc_x64.msi /WCFDataServices:$localPath" + "WcfDataServices.exe /unattended"
$prereqProcess.Start()
$prereqProcess.WaitForExit()
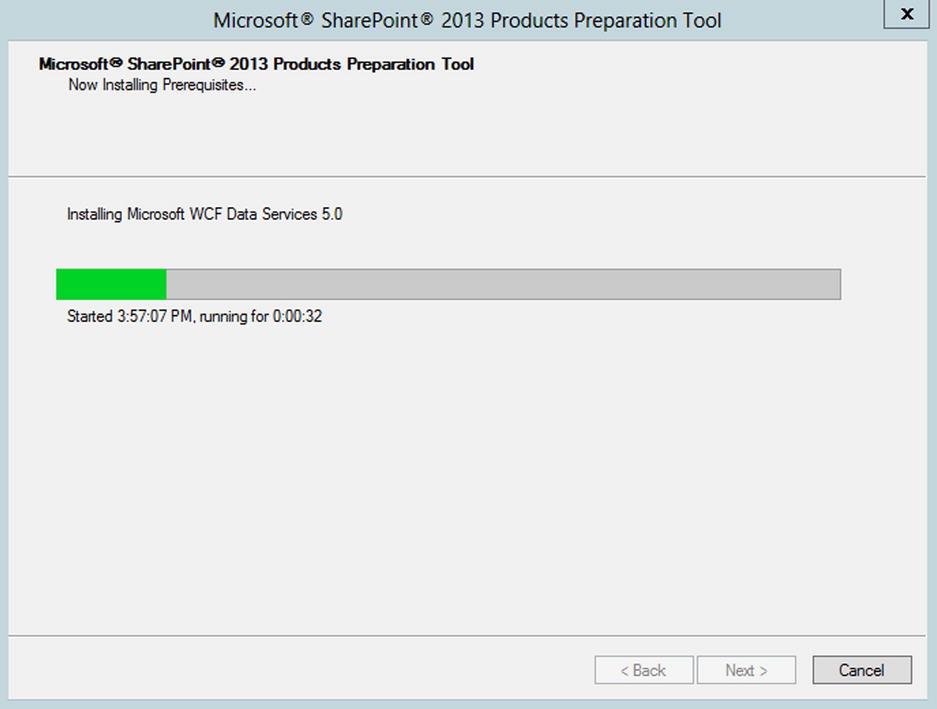
Figure 5-11. Unattended Sharepoint 2013 prerequisites installation
Allow this script about 5 to 10 minutes to finish its execution. Once completed, you will need to reboot the machine. After your machine has finished restarting, it will be properly configured and all ready to receive the SharePoint installation bits.
Last but not least are the SharePoint core bits. The SharePoint installation media already contains a few different predefined configuration files to help us do an unattended installation of the product. Unfortunately, each of them requires you to manually specify your product key in order to be able to complete. The configuration files are nothing more than short XML files located under the /files/ folder at the root of the media.
In order to get your unattended installation working, you will need to copy the setupfarmsilent configuration file locally on drive C:, modify it to include your product key, and then execute the installation process by referencing the newly modified configuration file.
$productKey = "XXXXX-XXXXX-XXXXX-XXXXX-XXXXX" # Replace by your own

$spLocalPath = "C:SP2013"
$spConfigFile = $spLocalPath + "config.xml"

New-Item -ItemType Directory -Force -Path $spLocalPath
Copy-Item F:filessetupfarmsilentconfig.xml $spLocalPath
$configContent =[io.file]::ReadAllText($spConfigFile)

Get-ChildItem $spConfigFile -Recurse |
    Where-Object {$_.GetType().ToString() -eq "System.IO.FileInfo"} |
    Set-ItemProperty -Name IsReadOnly -Value $false

$configContent = $configContent -Replace "<!--", ""
$configContent = $configContent -Replace "-->", ""
$configContent = $configContent -Replace "Enter Product Key Here", $productKey
$configContent = $configContent -Replace """none""", """basic"""

$configContent | Out-File $spConfigFile
This script takes care of copying the configuration file locally by creating a folder on your C: drive, and creating a copy of the XML configuration file used by SharePoint to install all of its components. Open the newly copied file, and modify its content to include our own product key for SharePoint 2013. As the script indicates, please replace the generic product key provided with the one provided on your installation media or MSDN subscription. Next, initiate a new process that will execute the SharePoint 2013 installation wizard in silent mode (no graphical interfaces) by referencing the XML configuration file that you have just created locally with the previous script. Figure 5-12 shows the installation in process.
$spProcess = new-object System.Diagnostics.Process
$spProcess.StartInfo.Filename = "F:setup.exe"
$spProcess.StartInfo.Arguments = "/config C:SP2013config.xml"
$spProcess.Start()
$spProcess.WaitForExit()
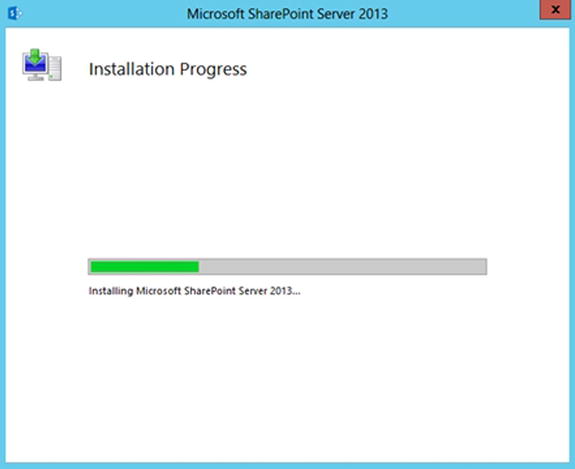
Figure 5-12. SharePoint 2013 unattended installation
Configuring Your SharePoint Farm
Now that all parts of our SharePoint environment have been installed, you need to configure the farm. Once again for this task we will be using PowerShell to create the various databases and service instances required by SharePoint to run properly. At the end of this section, your environment will be fully usable and will be ready for you to start playing with it.
Unless you’ve been living under a rock for the past few years, you’ve come to learn that since SharePoint 2010, the SharePoint Products Configuration Wizard, which is the default graphical tool to configure your SharePoint farm, adds a bunch of random numbers at the end of each database it creates. These numbers are referred to as a GUID, and are used by SharePoint to ensure your databases are uniquely named because the tool doesn’t trust you to pick one yourself. If you are like me, I just hate it when software assumes that I don’t know what I’m doing and makes decision on our behalf. Fear not my friends; with the help of some PowerShell goodness, there is a way to specify how you want these databases to be named.
In the SharePoint world, there are three main types of database that every farm should have: the Central Administration content database (referred to as the admin database), the configuration database (referred to as the config database), and the content database. The admin database is where the information about the central administration site collection is stored. There will always only be a single instance of this database per SharePoint farm. The second one, the config database, stores information about all other SharePoint databases in the farm. It also keeps track of all custom solutions, webparts, web applications, site templates, and all other farm setting. The content database, by contrast, can have multiple instances. It stores all information about a site collection in it. There could be more than one site collection stored in each content database.
Throughout the next few sections, I will describe how to automatically create each of these databases using PowerShell. With the core SharePoint bits now installed onto your machine, you now have access to use the Microsoft.SharePoint.PowerShell cmdlets, which will make your job easier.
The first database that you’ll need to create is the config database. Because it is the main database keeping track of everything going on in our SharePoint farm, it makes sense to have created first. With the SharePoint cmdlets now available to you, you can call the New-SPConfigurationDatabase cmdlet to do the work. Calling this cmdlet will also automatically create an empty admin database that will act as a placeholder for the eventual Central Administration site collection that will be created in the next section.
$spConfigDBName = "SPConfig" # Config DB name, replace by your own;
$spAdminDBName = "SPAdmin" # Admin DB name, replace by your own;
$spPassphrase = "pass@word1" # Recommendation is to change this to something else;
$spFarmAdminPassword = "pass@word1" # replace by your admin account password;

# Convert the provided Passphrase to a secure string
$securePassphrase = ConvertTo-SecureString $spPassphrase -asPlainText -force

# Convert the provided Admin account's password to secure string and create a new PowerShell Credentials object to represent the Administrator's account;
$secureAdminPassword = ConvertTo-SecureString $spFarmAdminPassword -asPlainText -force
$spFarmAdmin = new-object -typename System.Management.Automation.PSCredential -argumentlist "contosoadministrator", $secureAdminPassword

# Load the SharePoint PowerShell cmdlets
Add-PSSnapin Microsoft.SharePoint.PowerShell

New-SPConfigurationDatabase -DatabaseServer $env:COMPUTERNAME -DatabaseName $spConfigDBName
-AdministrationContentDatabaseName $spAdminDBName -Passphrase $securePassphrase -FarmCredentials $spFarmAdmin
The operation should take about four to five minutes to complete. Once completed, you should be able to see that your two databases have been properly created on your server by using the SQL Server Management Studio tool (see Figure 5-13).
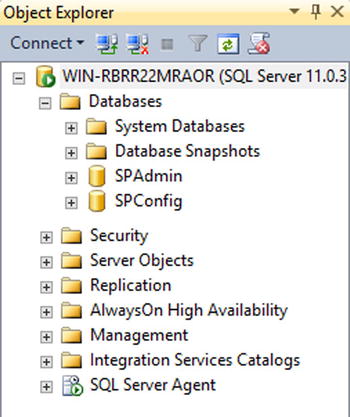
Figure 5-13. SharePoint 2013 databases in SQL Server Management Studio 2012
Configuring Central Administration
Now that your empty place holder for Central Administration has been created (config database), go ahead and populate it with information about its site collection. It is normally a good practice to have your Central Administration site deploy on a nonstandard port that is higher than 999. The following script lets you specify what port number you’d like to use. My personal preference is to always use port 7777 for development farms. Examples that will follow in the next few chapters will all assume that you have it deployed to this port, so unless you have a good reason to wanting to change it, I suggest that you leave it untouched. The execution of the PowerShell command should take about two minutes to execute.
$centralAdminPort = 7777
New-SPCentralAdministration -Port $centralAdminPort -WindowsAuthProvider "NTLM"
Once the process has completed, your Central Administration site will be all ready for you to use. Open a new browser window on your machine, and navigate to http://localhost:7777/. You should be able to view and navigate throughout the various administrative sections of the site (see Figure 5-14).
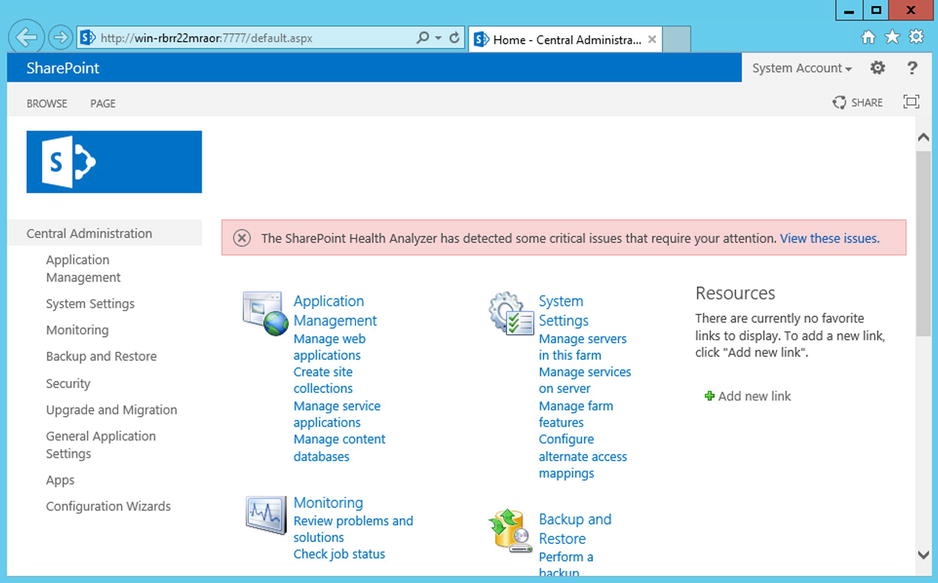
Figure 5-14. Sharepoint 2013 Central Administration
Creating Your First Web Application
The title of this section is not 100 percent true; you already have a web application created in your farm, the Central Administration one. In order for you to start leveraging the collaborative side of SharePoint, you need to create another web application that will contain the site collections that you want to expose to the end users. My recommendation is to have your new web application created on port 80. It just makes it easier to access, and prevents you from having to remember what port it’s on. Again, examples that are to follow in this book all assume that you have it configured on port 80. Feel free, however, to change it to whatever port you would like.
New web applications in PowerShell are created by calling the New-SPWebApplication cmdlet. This requires you to specify its name as well as the name of the Internet Information Services (IIS) application pool that will be associated with it. Each web application in SharePoint gets its own IIS application pool to manage its resources.
In this example, even if it is not required, you will also provide the cmdlet with the port number on which to create your web application. You will also provide the account to use to run the application pool, in this case the administrator account. In SharePoint 2013, the classic mode authentication has been deprecated, so you will need to define a new authentication provider so that your web application can use claims-based authentication. The script to have it created is the following:
$webAppPort = 80

$authProvider = New-SPAuthenticationProvider
$adminManagedAccount = Get-SPManagedAccount "contosoAdministrator"

New-SPWebApplication -Name "Demo Gateway" -ApplicationPool "DemoGatewayPool"
-ApplicationPoolAccount $adminManagedAccount -Port $webAppPort -AuthenticationProvider $authProvider

Install-SPFeature -AllExistingFeatures -Force # Active all required Farm Features
Creating Your Root Site Collection
You are almost there! All that is left is to create is a root site collection in the SharePoint Web Application that you have created in the previous section. SharePoint exposes several templates for creating new site collections out-of-the-box. For the purpose of simplicity, use the Blank Site template, which will create a new site with the minimum set of features activated by default.
$blankSiteTemplate = Get-SPWebTemplate STS#1
New-SPSite -Url "http://localhost/ " -Name "Home" -Template $blankSiteTemplate -OwnerAlias "contosoadministrator"
This script should only take a few seconds to execute. Once finished, open a new Internet Explorer window and navigate to http://localhost/ to ensure that your new site collection was properly created.
Explorer Enhanced Security Configuration
Internet Explorer Enhanced Security Configuration (IE ESC) is a security mechanism put in place by Microsoft on its server operating systems to ensure that administrators do not browse the web on a server machine using their administrative accounts. As best practices would dictate, they should only browse it from a remote machine using a limited account to reduce risks of attacks on the server by an external website. Without going into too much detail about what IE ESC does exactly, you need to understand that it limits most functionalities available within Microsoft’s web browser. For example, it will prevent the execution of scripts, which is essential for SharePoint to work correctly. Although you should normally never be browsing your SharePoint directly on the server, for demonstration purposes, I will be breaking this rule and disabling this security mechanism. If you don’t disable this feature, you will get a page with an error at the top asking you to enable scripts and to reload the page (see Figure 5-15).
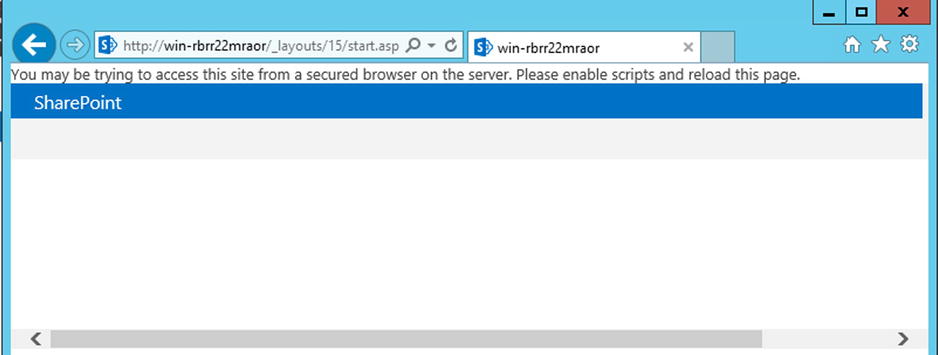
Figure 5-15. Accessing your SharePoint 2013 site with Internet Explorer Enhanced Security Configuration enabled
There are two levels of Enhanced Security Configuration you can set: one for administrator users and one for regular users. In this case, you will be disabling both levels using PowerShell. Internet Explorer Enhanced Security Configuration is disabled through the registry. The keys that control its state are listed in Table 5-3.
Table 5-3. Ehanced Security Configuration levels and registery keys
|
Level |
Registry Key |
|---|---|
Admin |
HKLM:SOFTWAREMicrosoftActive SetupInstalled Components{A509B1A7-37EF-4b3f-8CFC-4F3A74704073} |
User |
HKLM:SOFTWAREMicrosoftActive SetupInstalled Components{A509B1A8-37EF-4b3f-8CFC-4F3A74704073} |
You will need to set the IsInstalled property of both of these keys to ‘0’. The following lines of PowerShell will help automate this process:
$AdminKey = "HKLM:SOFTWAREMicrosoftActive SetupInstalled Components{A509B1A7-37EF-4b3f-8CFC-4F3A74704073}"

$UserKey = "HKLM:SOFTWAREMicrosoftActive SetupInstalled Components{A509B1A8-37EF-4b3f-8CFC-4F3A74704073}"

Set-ItemProperty -Path $AdminKey -Name "IsInstalled" -Value 0
Set-ItemProperty -Path $UserKey -Name "IsInstalled" -Value 0
Once executed, if you open your SharePoint site again, you should see that the error that you were previously getting is gone and that you are now able to use SharePoint to its full potential (see Figure 5-16). The most important thing to remember, however, is that in a real-world production environment, you do not want to disable these features, as they could easily expose it to real threats and cause irreparable damage to your environment.
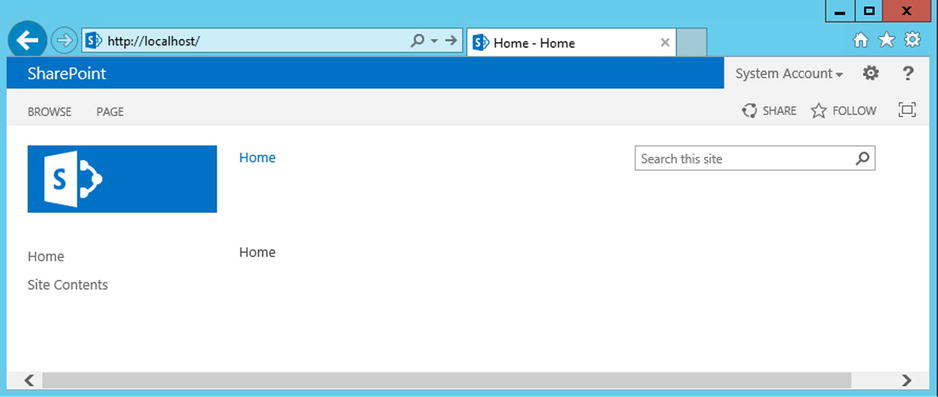
Figure 5-16. Accessing your SharePoint 2013 site with Internet Explorer Enhanced Security Configuration disabled
Remember how you created five users and five security groups at the beginning of this chapter? Well, now is the time to set their permissions in our newly created SharePoint environment. You will be granting permissions to the Active Directory groups instead of granting permissions to the users directly. The permission list will look like Table 5-4.
Table 5-4. Your Active Directory groups and permissions
|
Group Name |
Permission |
|---|---|
Administration |
Design |
Finance |
Contribute |
Human Resources |
Contribute |
Directors |
Read |
Tech Support |
Full Control |
For a full description of what each role does and what privileges are granted with each one, I recommend that you read the following Microsoft article http://technet.microsoft.com/en-us/library/cc288074(v=office.14).aspx.
The following lines of PowerShell will automatically add the security groups you created earlier and will take care of granting the appropriate permission level to our site. In SharePoint, before being able to grant permission on a site to a user, you need to ensure that this user is registered against that site first. The SPWeb.EnsureUser() method ensures that a user is registered against a specific site and returns a reference to the user object.
$web = Get-SPWeb http://localhost
$user = $web.EnsureUser("ContosoAdministration")
Set-SPUser -Identity $user -web $web -AddPermissionLevel "Design"

$user = $web.EnsureUser("ContosoFinance")
Set-SPUser -Identity $user -web $web -AddPermissionLevel "Contribute"

$user = $web.EnsureUser("ContosoHuman Resources")
Set-SPUser -Identity $user -web $web -AddPermissionLevel "Contribute"

$user = $web.EnsureUser("ContosoDirectors")
Set-SPUser -Identity $user -web $web -AddPermissionLevel "Read"

$user = $web.EnsureUser("ContosoTech Support")
Set-SPUser -Identity $user -web $web -AddPermissionLevel "Full Control"
Figure 5-17 shows the different SharePoint groups that have been created.

Figure 5-17. List of users and groups and their associated permissions in SharePoint
Putting It All Together
Throughout the previous sections of this chapter, you have learned how to configure different aspects of your SharePoint farm environment using PowerShell. Wouldn’t it be awesome if you could now put it all together and simply start your script on a fresh installation of the operating system and let it run automatically, without requiring interaction at all? Simply putting all the lines of code together in a single PowerShell script file is not going to cut it. The installation requires the machine to reboot several times, so how do you ensure that PowerShell knows to restart its execution where it left off before the reboot? Also, because your machine will be joining a domain, how do you have the machine logon automatically after rebooting? You don’t want to have to monitor the installation all the time and have to input your credentials to logon every time the machine starts.
Luckily, there is an old Windows trick that you can use that will ensure that you can create a fully unattended installation script. You can use PowerShell to write reboot instructions to the registry, and Windows will automatically read from these entries on rebooting.
PowerShell provides a very simple way of creating and modifying properties of registry keys in Windows. The Set-ItemProperty cmdlet takes as parameters the registry path of the key to add/modify, the name of the property, and its value.
Set-ItemProperty -Path <KeyPath> -Name "<PropertyName>" -Value "<PropertyValue>"
As you’ve probably figured it out by now, the cmdlet to remove a key’s property is Remove-ItemProperty, which only takes the key’s path and its name.
RemoveItemProperty -Path <KeyPath> -Name "<KeyName>"
The first registry key that you will need is the WinLogon key, which allows you to specify credentials for Windows to use to automatically logon when the machine boots. This key is found at the following location in the registry:
HKLM:SOFTWAREMicrosoftWindows NTCurrentVersionWinLogon
Remember that while this key is set, the computer will always attempt to login as the specified user. If you want to get the default login screen prompting you for your credentials, you will need to clear this key’s properties first, or you can limit the number of times the automatic logon will happen by specifying the AutoLogonCount property. There are several properties, shown in Table 5-5, that you will need to set for the automatic logon to work properly.
Table 5-5. Properties needed for automatic logon
|
Property’s Name |
Description |
|---|---|
DefaultUserName |
User name to use to automatically logon |
DefaultPassword |
Password for the associated user account |
AutoAdminLogon |
0 - Disabled 1 - Enabled |
AutoLogonCount |
Number of times to automatically logon. Upon login on automatically, the counter will be decreased by 1. |
DefaultDomainName |
Domain name for the user account to use. |
To achieve a fully unattended installation of SharePoint, encapsulate the code that sets the automatic logon key in a method for reusability purpose. Each time you will need the installation to reboot, you will make a call to this method to have the credentials set automatically on reboot. The method that you will use will look like the following:
Function AutoLogonAfterReboot
{
    $WinLogonKey = "HKLM:SOFTWAREMicrosoftWindows NTCurrentVersionWinLogon"

    set-itemproperty $WinLogonKey "DefaultUserName" "Administrator"
    set-itemproperty $WinLogonKey "DefaultPassword" "pass@word1"
    set-itemproperty $WinLogonKey "AutoAdminLogon" "1"
    set-itemproperty $WinLogonKey "AutoLogonCount" "1"
    set-itemproperty $WinLogonKey "DefaultDomainName" "Contoso"
}
A piece of software or code that is used to determine what other piece of code to execute next is what we refer to as an orchestrator. In our case, an orchestrator will need to be developed to allow our installation to decide what to execute next on restarting. Our code will need to set a registry key containing instructions on what to execute next after rebooting. On rebooting, Windows will look at this registry key to determine if it needs to execute a command or not. The registry key to tell Windows what command to execute next on rebooting is the following:
HKLM:SOFTWAREMicrosoftWindowsCurrentVersionRun
The orchestrator will break your installation down into several logical execution steps (configure domain controller, install SQL Server, install the SharePoint prerequisites, etc.). It will allow users to specify, through a parameter, what step of execution they would like to call next, and it will execute the appropriate piece of code based on this parameter.
Each execution step that requires the machine to reboot after completion will need to call your orchestrator to set the registry key, passing it the name of the next execution step. After the reboot is completed, PowerShell will automatically launch, call your installation script, and pass it the name of the next logical execution step to execute. The orchestrator’s logical flow is summarized in Figure 5-18.
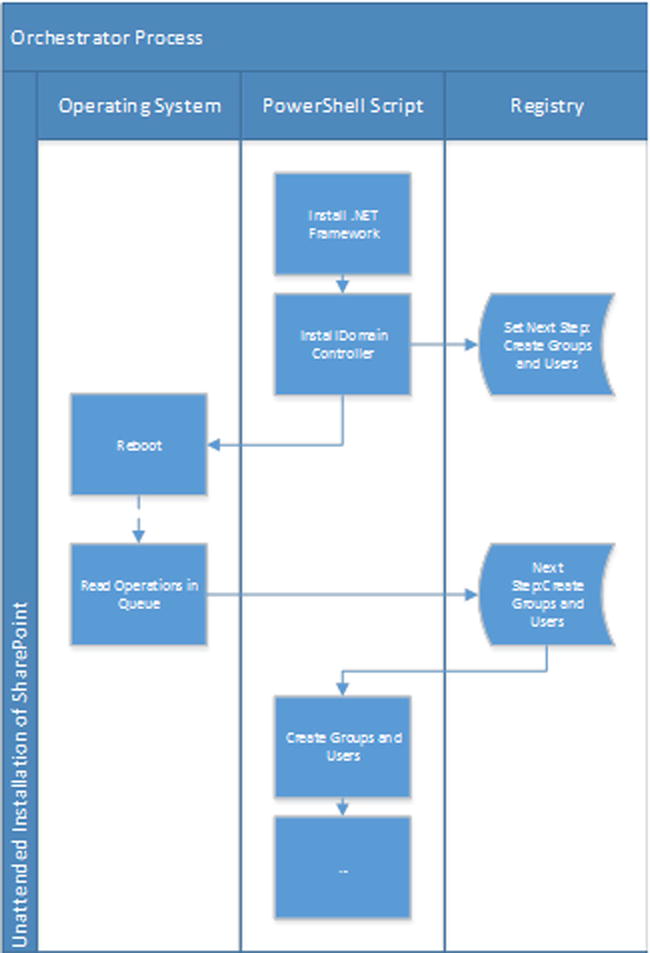
Figure 5-18. Orchestrator flow of logic
The orchestrator’s code will need to have two main methods defined. One method will verify whether an execution step is the one that you should execute next, and one will store the value of the next command to execute in the registry.
# Receives the name of a step and determines if it's the next logical step to execute;
Function IsCurrentStep($nextStep)
{
    if ($global:startingStep -eq $nextStep -or $global:isStarted) {
        $global:started = $TRUE
    }
    return $global:started}

# Set the next command to execute upon rebooting in the registry key.
Function SetNextStep($script, $step)
{
    Set-ItemProperty $runKey $global:restartKey "$global:powershell $script -Step $step"
    Restart-Computer
    exit
}
The SetNextStep method will store the path to the PowerShell executable as the next command to execute, and will pass it the path for your script as well as the name of the next logical execution step to run as parameters (see Figure 5-19).
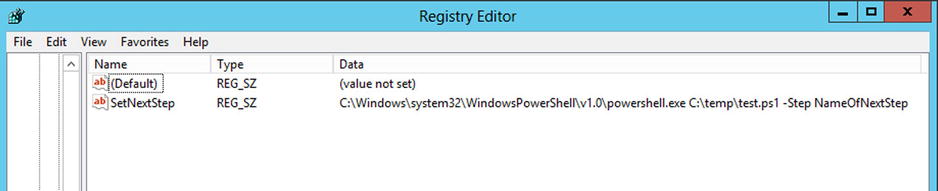
Figure 5-19. Registry key used by the orchestrator
With the orchestrator in place, all that is left to do is to wrap each execution step in our PowerShell script in if statements, and to call the IsNextStep method on them to decide whether or not to execute them.
if (IsCurrentStep "ASP.NET")
{
    ...
}

if (IsCurrentStep "DomainController")
{
    SetNextStep $script "GroupsAndUsers" # Computer will reboot after this line;
}

if (IsCurrentStep "GroupsAndUsers")
{
    ... # Execution will restart here after reboot;
    SetNextStep $script "NextStepName" # Computer will reboot after this line;
}
...
You should consult the electronic resources offered with this book to get your hands on the full script. The script will ask you to fill in certain details regarding your environment, such as what port to install the SharePoint Central Administration on, your administrator’s account password, and so on. It will then start its execution and configure everything as expected. The script takes about an hour to execute. Once finished, it will automatically open a new Internet Explorer window and navigate to your new SharePoint 2013 homepage.
Summary
In this chapter, you have learned how you can automate the configuration of your SharePoint environment using PowerShell. You have had the chance, throughout the various demos, to familiarize yourself with the SharePoint 2013 PowerShell cmdlets, as well as how to use them to interact with the SharePoint 2013 object model. In the next chapter, I will build on this newly acquired knowledge and will dig into the various aspects of SharePoint that you can control using PowerShell. The environment built in the current chapter is the environment that will be used in all examples to come in this book.