![]()
Managing Apps and Solutions Using PowerShell
Those of you that are SharePoint administrators are probably starting to feel dirty doing all these examples and going through all of these scripts that are normally the job of developers and end users. Now’s the time go take a shower and to start back fresh. What you will learn in this chapter is what SharePoint administrators would normally do in their daily jobs. This chapter builds on the concepts learned in the previous chapters and will allow you to understand how certain configuration changes made to a SharePoint farm can affect artifacts that business users use daily.
In this chapter, you will learn how to deploy and manage custom code solutions developed by developers in your organization or by external companies. You will also be introduced to a new development model in SharePoint 2013 known as the app model and will learn how, as an administrator, you can leverage PowerShell to manage these custom solutions. At the end of this chapter, you will have a complete understanding of the differences between what a farm solution and a SharePoint app are and will have all the tools to help you manage them in your day-to-day work.
Solutions
In this section, we will learn how, as a SharePoint administrator, you can use PowerShell to manage solutions in your SharePoint environment. SharePoint solutions are contained a Windows SharePoint (.wsp) file, and contain pieces of functional logic that will get installed in your environment. Solutions can contain different SharePoint features, list definitions and instances, documents, and so on.
In SharePoint 2013, there are three types of solutions that are officially supported by Microsoft: farm solutions: sandboxed solutions, and SharePoint apps. Table 7-1 details the differences between each type of solution.
Table 7-1. Types of solutions in SharePoint 2013
|
Solution Type |
Description |
|---|---|
Farm Solutions |
When installed, these can interact with the entire farm. Their contents can be used across various site collections. |
Sandboxed Solutions |
These are limited to the site collection in which they have been uploaded to. That’s right, sandboxed solutions can be uploaded, meaning anyone that has the site collection administration role in a site collection can build their own sandbox solutions and deploy them themselves. However, their contents can’t affect other site collections. When Office 365 originally launched back in July 2011, sandbox solutions were the only way of deploying reusable customization to your cloud environment. I will cover the topic of Office 365 in Chapter 9. In SharePoint 2013, sandbox solutions are said to be deprecated. What this means is that they will continue to work the way they did in SharePoint 2010, but that most likely, the next version of SharePoint won’t be supporting them, or at least not in the way it is currently supported. Microsoft released an official statement saying that sandbox solutions containing user code components are in fact deprecated, but that the ones containing only declarative content (design packages, list definition, templates, files, etc.) will still be supported in the future. Proof of this is the new design manager feature of SharePoint 2013 that allows you to create packaged themes, called design packages. When you export a design package you built, it always generates a sandbox solution file for you to reuse. |
SharePoint Apps |
This is a new type of solution that was introduced in SharePoint 2013. These can be executed outside of the SharePoint environment and are allowed to interact with its artifacts using calls to the various SharePoint 2013 web services and REST APIs. I will be covering these in more details later on in this chapter. |
My word of advice when it comes to building new solutions in SharePoint is the following: If the solution that you are trying to build serves solely an administrative function, use farm solutions. If all you need to do is to package a set of SharePoint artifacts that you would like to make reusable, then see if sandbox solutions are appropriate depending on what’s the scope of accessibility you want. For example, if you need your artifacts to be accessible across an entire SharePoint farm with over 50 site collections, a sandboxed solution may not be the best fit because it would require you to activate its features on every site collection manually. Remember that sandboxed solutions cannot include code in them. If your solution needs to be accessed throughout the farm, in every site collection, then go with farm solutions. For anything else, you should consider building an app.
Because of the uncertain future of sandbox solutions, the focus of this section will remain on farm solutions. We will learn how you can use PowerShell to deploy, install, uninstall, remove, and upgrade farm solutions in your SharePoint environment. One thing to note is that the process of adding or removing a farm solution in SharePoint automatically recycles the application pools associated with your SharePoint environment in the Internet Information Service manager, causing interruption for the end users. This is not the case when deploying sandbox solutions.
Adding a New Farm Solution
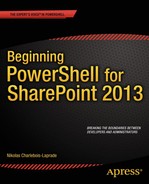
Before you can actually install a SharePoint farm solution in your environment, you need to add it to the solutions store by calling the Add-SPSolution PowerShell cmdlet and by passing it the full path to the solution file you’re trying to add (see Figure 7-1). Doing so will automatically add an entry to the list of available farm solutions under Central Administration ![]() System Settings
System Settings ![]() Manage farm solutions (see Figure 7-2).
Manage farm solutions (see Figure 7-2).
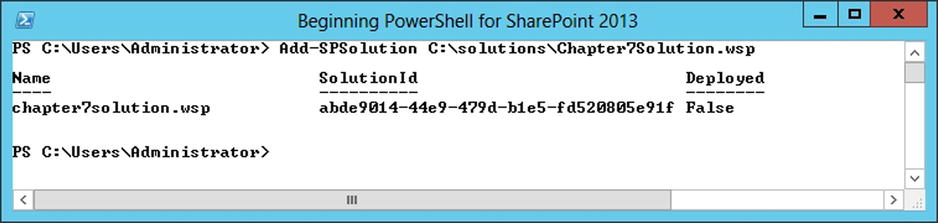
Figure 7-1. Adding a new SharePoint Farm solution
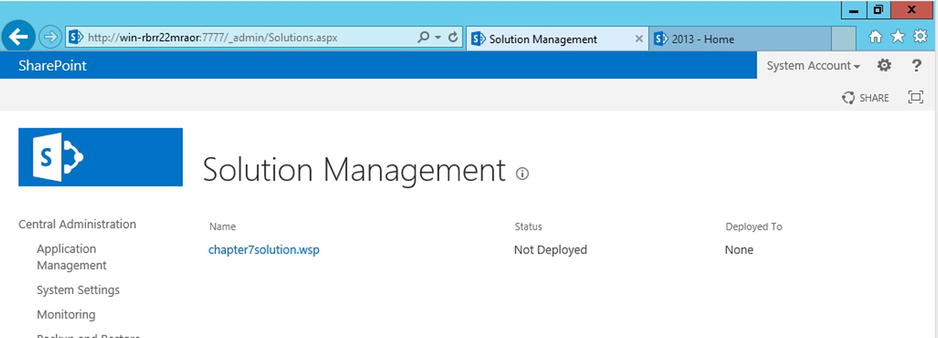
Figure 7-2. New Farm solution viewed from the Central Administration interface
Installing a Farm Solution
At this point, the solution has been added to your farm. In reality, all that you’ve done so far is upload the .wsp file as a blob in your SQL database. You can find information about the solutions that have been added to SharePoint in the configuration database in the Objects table.
Figure 7-3. Farm solution file in the SQL Server configuration database
In order to be able to use the content of your solution, you need to have it installed on your farm. The PowerShell cmdlet to use to install a specific farm solution in our SharePoint environment is Install-SPSolution. Most solutions that you will encounter as an administrator will require you to deploy assemblies in the .NET Global Assembly Cache (GAC). Assemblies deployed in the GAC are made available to the entire farm by default. If you would like to prevent solutions from having to be deployed to it, you’ll need to ask your developers to package their solution using the WebApplication assembly target instead of the default GlobalAssemblyCache value in Visual Studio (see Figure 7-4).
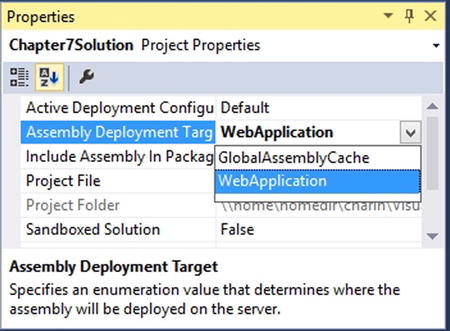
Figure 7-4. Changing the Assembly Deployment Target Type of a SharePoint solution in Visual Studio
If the Assembly Deployment Target is set to WebApplication (as shown in Figure 7-4), then you will need to provide the URL of the destination web application to which you wish to deploy your solution (see Figure 7-5). Please note, however, that deployments to web applications’ bin folder (local folder containing assemblies for a web application) that are not using the Global Assembly Cache are considered deprecated since the 2010 version of SharePoint. Microsoft’s recommendation is that you deploy it globally, using the GACDeploy parameter. If you do, however, need for some reason to deploy your solution in the bin folder, you will need to add the FullTrustBinDeploment parameter to your method call.

Figure 7-5. Deploying a farm solution to the web application's full trust bin directory
When you install a solution, the changes take effect immediately. You have, however, the option of specifying a schedule for the deployments to occur using the -Time parameter. For example, the following line of PowerShell code will create a deployment schedule for our custom solution at 6PM on the 27th of October 2013. A timer job will be scheduled to execute at that time, and will take care of installing the solution.
Install-SPSolution Chapter7Solution.wsp -GACDeploy -Time "2013-10-27 18:00:00"
To verify that a scheduled job has correctly been created for your solution to deploy, you can open the SharePoint Central Administration interface and go to Monitoring ![]() Check job status. In the top left menu, click on Scheduled job to view a complete list of all scheduled instances of timer jobs. You should see an instance of your scheduled job in there if everything worked as expected (see Figure 7-6).
Check job status. In the top left menu, click on Scheduled job to view a complete list of all scheduled instances of timer jobs. You should see an instance of your scheduled job in there if everything worked as expected (see Figure 7-6).

Figure 7-6. Deployment scheduled job entry for a custom farm solution
Once the job executes, you’ll be able to validate the status of your solution’s deployment by going back to the Solution Management page. You should now see a mention that your solution was globally deployed (see Figure 7-7).
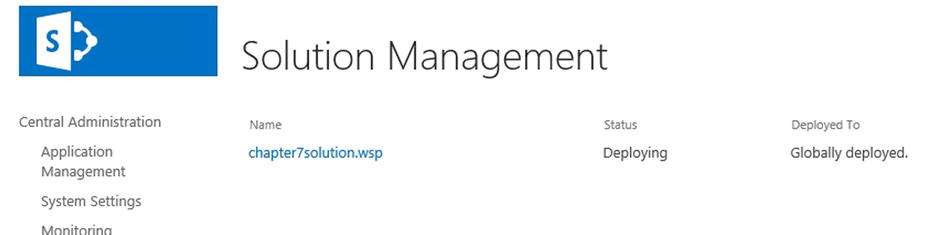
Figure 7-7. Deployed farm solution viewed in Central Administration
Uninstalling a Farm Solution
Uninstalling a farm solution is the process of unbinding its logical components from the farm. It doesn’t remove the solution file from the database; it simply deactivates it. To uninstall a solution from the farm, you’ll need to use the Uninstall-SPSolution PowerShell cmdlet and pass it the name of the solution to uninstall. You can use the -Confirm parameter to prevent PowerShell from prompting you to confirm before doing the uninstallation process of your farm solution.
Uninstall-SPSolution Chapter7Solution.wsp -Confirm:$false
Removing a Farm Solution
Removing a farm solution from your SharePoint environment deletes the solution from the Config database. The PowerShell cmdlet that allows you to remove a solution from your SharePoint farm is the Remove-SPSolution cmdlet. If you no longer need a farm solution in your environment, the recommendation is to uninstall and then remove it from your farm using the PowerShell cmdlets. Once again, you can use the -Confirm parameter to prevent PowerShell from prompting you to confirm your changes before committing them to your environment.
Remove-SPSolution Chapter7Solution.wsp -Confirm:$false
Updating a Farm Solution
You can update an existing farm solution only if the set of files and features contained in the new version of the solution is the same as the one contained in the old one. Otherwise, you will need to uninstall/remove the existing solution and reinstall the new version.
Update-SPSolution Chapter7Solution.wsp -LiteralPath "C:SolutionsChapter7Solutionv2.wsp"
-GACDeploy
If the new version of the solution has the same GUID as the previous one, then the latter gets removed completely from the Config database.
Apps
In SharePoint 2013, a new development model, the app model, was introduced. In the new SharePoint lingo, everything except for webs are apps: custom lists, picture libraries, contacts, everything is an app in SharePoint 2013. The idea behind this new model was to allow developers to build components and have them run outside of SharePoint. This new paradigm was introduced to help minimize problems introduced in SharePoint environments by poorly designed custom farm solutions that did not properly make use of the resources and caused several performance issues. At the same time, this new model also helped Microsoft build their new Office Store component that allows users to “shop” online for preexisting SharePoint solutions meeting their needs. Apps are packaged as .app files and, just like solutions, they can be deployed and installed on the SharePoint farm. In this section you will learn how to use PowerShell to interact with these new apps inside SharePoint. All the content covered in this section is new for SharePoint 2013 and does not apply to SharePoint 2010 and earlier.
Configuring your Environment to Support Apps
Before I begin playing with SharePoint apps, I need to get the environment configured. In order to be able to install apps within your farm, you’ll need to create an instance of two essential components: the App Management Service and Microsoft SharePoint Foundation Subscription Settings Service applications.
App Management Service Application
The App Management Service application is responsible for storing information about app licenses and permissions. It acts as the police between the server that serves the app and the end users to determine if they are authorized or not to use the app in question. It is accessed every time an app is requested in your SharePoint environment. It is this component that allows you to purchase apps straight from the SharePoint store.
To create a new instance of this component using PowerShell, I recommend that you start by creating a new application pool in IIS that will be dedicated to serving requests to the service application. To create a new IIS application pool, you can use the following lines of PowerShell. This will create a new IIS application pool named “AppMgmtServiceAppPool” that will use the identity of our administrator’s account to run (see Figure 7-8).
$adminAcc = Get-SPManagedAccount "contosoadministrator"
$appMgmtPool = New-SPServiceApplicationPool -Name AppMgmtServiceAppPool -Account $adminAcc

Figure 7-8. Creating a new IIS application pool using PowerShell
Once your new application pool has been created, you can create a new instance of our App Management Service application by calling the following cmdlet. This will create a new instance of the service application named “AppManagementServiceApp” and will also create an associated database named “AppManagementDB”.
$appMgmtSvc = New-SPAppManagementServiceApplication –ApplicationPool $appMgmtPool –Name AppManagementServiceApp –DatabaseName AppManagementDB
To verify that the creation was successful, open Central Administration and browse to the list of service applications on the server (under the Application Management section). You should see an entry for the instance that you just created, as shown in Figure 7-9.
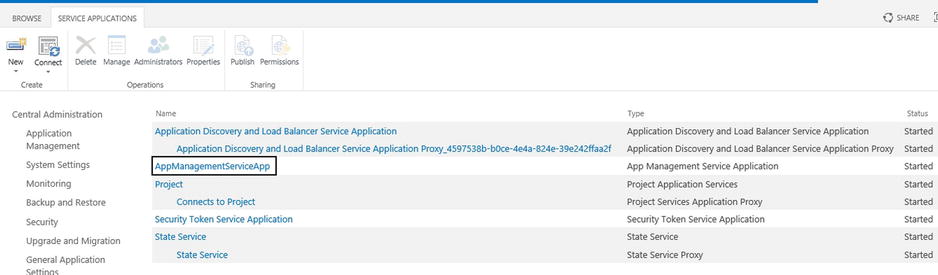
Figure 7-9. New App Management Service Application in Central Administration
You’re almost done! The next step is to create the associated proxy for the instance of the service application we just created. This will allow your Web application to communicate with the instance itself.
$appMgmtProxy = New-SPAppManagementServiceApplicationProxy -ServiceApplication $appMgmtSvc
-Name AppManagementProxy
Once executed, you should see a new entry under the previously created AppManagementServiceApp instance, as shown in Figure 7-10.
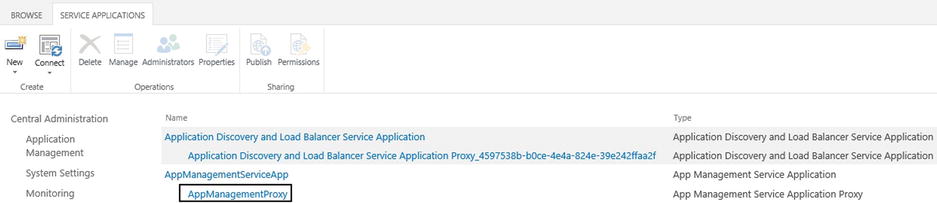
Figure 7-10. New App Management Service Application Proxy in Central Administration
You now have the service application instance and its associated proxy created, but that is not enough for the App Management Service to be enabled on the farm. You need to turn the App Management Service on. To do so, you could navigate to Central Administration and then choose Manage services on server under the System Settings header and then activate the service manually, but you’re a wannabe PowerShell expert, aren’t you? To begin, you need to get a reference to the instance of the App Management Service. This service’s instance can be obtained by using the Get-SPServiceInstance cmdlet. This cmdlet doesn’t take any parameters by default. Calling it directly will simply return a list of all available services on the current server. To get your reference to our specific service (see Figure 7-11), you’ll need to query the returned dataset containing all the services by specifying the type name of the service instance you’re trying to get.
$service = Get-SPServiceInstance | Where{$_.TypeName -eq "App Management Service"}

Figure 7-11. Obtaining a reference to the App Management Service on a SharePoint 2013 server using PowerShell
You can clearly see from the figure that the status of the service instance is set to Disabled, meaning that it is not activated on the server. To start the service instance, you have two choices: you can either manually set the Status property of our service instance to Online, or you can use the Start-SPServiceInstance PowerShell cmdlet and pass it the reference to your service instance. Both would work in this situation.
Option A:
$service.Status = [Microsoft.SharePoint.Administration.SPObjectStatus]::Online
$service.Update()
Option B:
Start-SPServiceInstance $service
To confirm that the App Management Service has been properly started, navigate to the Services on Server page in Central Administration and verify that the service is set to Started (see Figure 7-12).
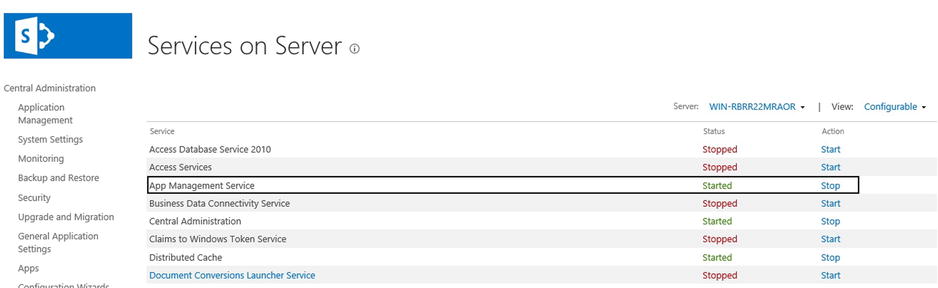
Figure 7-12. The App Management Service entry marked as started through the Central Administration interface
You now have the App Management component of your SharePoint farm up and running. Sadly, this is not enough to allow your users to use the app model and install apps in the environment. There is still another service application that needs to be installed before that. At this point, if users try to go an install an app from the SharePoint Store, they’ll get a notice like the one in Figure 7-13 that apps are turned off in their environment, and that they should contact their administrator.
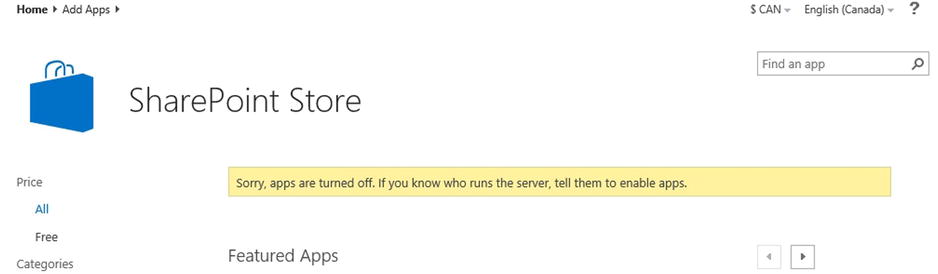
Figure 7-13. Notification that the apps are turned off in the SharePoint Store
Microsoft SharePoint Foundation Subscription Settings Service Application
The second SharePoint service application that is required to enable the use of apps in your environment is called the Microsoft SharePoint Foundation Subscription Settings Service application. This service application is used to manage subdomains for your apps. Basically, every app that you install in your farm, with the exception of the default apps such as lists and documents library, will each have its own subdomain. By default, apps’ URLs will take the following structure:
http://[app prefix]-[app id].[domain name]
where the app prefix is a value you specify in your farm’s configuration (I’ll get to this soon), and the app id is a random unique identifier for your app. One very interesting fact with this service application is that, compared to other service applications in the farm, this one is not available to create through the Central Administration interface. You must use PowerShell if you wish to create an instance of it, how’s that! Figure 7-14 shows you the available service applications from the interface. The Subscription Settings Service is not one of them.
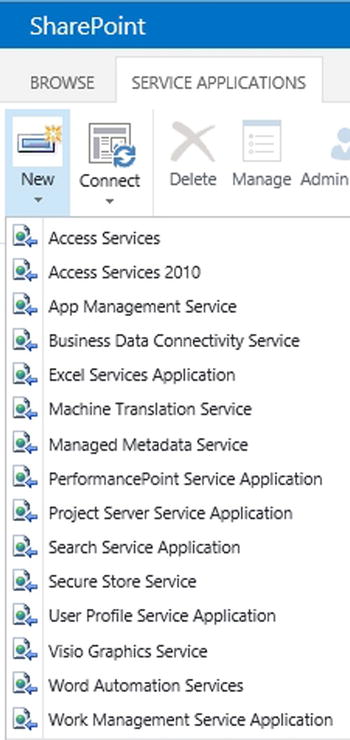
Figure 7-14. List of available service applications in the Central Administration interface
Just like for the App Management Service application, PowerShell provides us with a pre-built cmdlet for creating an instance of the Subscription Settings Service application. The cmdlet in question is New-SPSubscriptionSettingsServiceApplication. (Is it just me or do these keep getting longer and longer?) This cmdlet, just like the one for the App Management Service, take three parameters: a name, a database name, and an application pool to use.
$adminAcc = Get-SPManagedAccount "contosoadministrator"
$subSettingsPool = New-SPServiceApplicationPool -Name SubSettingsServiceAppPool -Account $adminAcc

$subSettingsService = New-SPSubscriptionSettingsServiceApplication -Name SubSettingsService
-DatabaseName SubSettingsDB -ApplicationPool $subSettingsPool
As with the previous application service, you need to create an associated proxy instance. Just when you thought cmdlets’ names couldn’t get any longer, along comes New-SPSubscriptionSettingsServiceApplicationProxy! If you can place this on a Scrabble board, victory is yours for sure. This cmdlet takes a reference to your service application and a name as parameters.
$subSettingsProxy = New-SPSubscriptionSettingsServiceApplicationProxy -ServiceApplication $subSettingsService
Again, to verify that both your service application and its associated proxy got created properly, open Central Administration and navigate to the Service Applications page. You should see the two entries shown in Figure 7-15.

Figure 7-15. Microsoft SharePoint Foundation Subscription Settings Service pplication and its proxy viewed in Central Administration
As explained in the previous section, it is not enough to just create the service application and proxy instances. You also need to enable the associated service on the server. The name of the associated service is Microsoft SharePoint Foundation Subscription Settings Service. You will use the piping method learned in Chapter 4 to obtain a reference to the instance of the service, and to turn it on.
$subSettingsSvc = Get-SPServiceInstance | Where{$_.TypeName -eq "Microsoft SharePoint Foundation Subscription Settings Service"}

Start-SPServiceInstance $subSettingsSvc
You are now down to the last step of configuring SharePoint apps for your environment. As mentioned earlier in this section, apps in the context of SharePoint 2013 are accessed using a very specific URL. The first part of that URL is the app prefix, which can be any identifier you want to specify. By default, I tend to simply use the word “Apps” as a prefix. It helps me quickly identify if what I’m looking at is an app or a SharePoint page by simply looking at the URL in the browser.
Before proceeding to configuring the app prefix using PowerShell, let’s have a look at how one would normally do it using the web interface. Notice that when you open Central Administration in SharePoint 2013, the interface looks very similar to what you were accustomed to in the 2010 version of the product. However, one big difference jumps at us right from the start: the introduction of a totally new section called Apps, and that is represented by two white octagons on a blue background. This is a brand new management section that Microsoft introduced in 2013 to allow administrators to easily manage settings related to the configuration and the licensing of apps. To configure the app’s prefix through the interface, navigate to the Apps section by clicking on the header, and then choose Configure App URLs. This will bring a page up that will allow you to specify the app domain to use, as well as the app prefix.
I will now do it the PowerShell way. I’ll start by configuring the app domain using the Set-SPAppDomain cmdlet. This cmdlet takes a single parameter, the appdomain parameter that lets you mention the DNS of the domain your SharePoint farm is on. In our case, I will use the following line of PowerShell to get it configured properly within my environment:
Set-SPAppDomain -AppDomain "app.contoso.com "
The next step is to configure the app prefix. The cmdlet’s name for this is less intuitive; it is the Set-SPAppSiteSubscriptionName cmdlet that takes a single parameter called Name that represents the app prefix that you wish to use across your farm. The following line of PowerShell will configure our farm to use the prefix “apps” for all of its SharePoint apps’ URLs.
Set-SPAppSiteSubscriptionName -Name "apps" -Confirm:$false
o verify that everything has been configured properly, you can navigate to the Configure App URLs page in Central Administration. You should now see both the app domain and app prefix values specified in the text boxes, as shown in Figure 7-16.
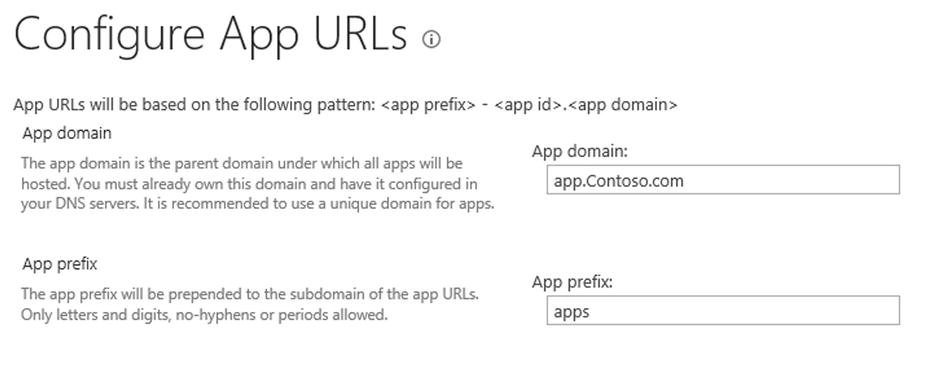
Figure 7-16. App domain and prefix viewed through the Central Administration interface
At this point, you are now ready to deploy and install apps within your SharePoint 2013 environment. If you navigate back to the SharePoint Store page, you should see that the yellow notification banner is now gone, indicating that apps are configured properly. In the next section, you will learn how to use PowerShell to interact with app instances and have them automatically deployed within your environment.
Only one problem remains; the app URLs are not being resolved by our DNS service. In order to allow your DNS service to resolve them, you need to create a new subdomain on your main contoso.com domain. Before PowerShell version 3, interacting with DNS entry using PowerShell required you to do all sorts of gymnastics using obscure Windows Management namespaces. Starting with version 3, you now have a full set of extremely useful PowerShell cmdlets that allow you to interact directly with DNS entries. You need to create a new alias for the apps prefix in your DNS server. The following line of PowerShell will take care of it for you:
Add-DnsServerResourceRecordCName -Name "*.app" -HostNameAlias "contoso.com " -ZoneName "contoso.com "
To verify that the entry was properly created, run the DNS manager console, by typing dnsmgmt.msc in the run console of windows (Windows key + R). When the console opens, expands the node representing your server, expand the Forward Lookup Zone folder, and click on the contoso.com node. You should see the entry shown in Figure 7-17.
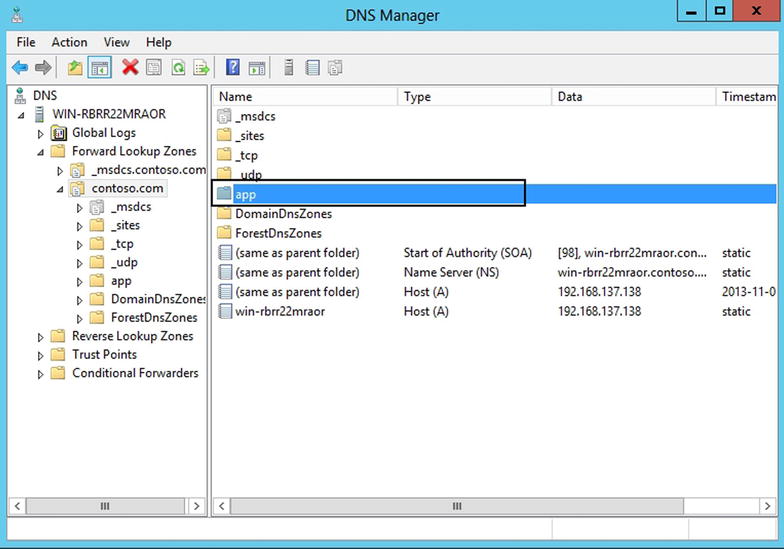
Figure 7-17. New entry in the DNS manager console for app management
Importing an App Package
Before being able to deploy and install a SharePoint app in your environment, you’ll need to import an instance of it in your farm. The PowerShell cmdlet that lets you import an instance of an app is Import-SPAppPackage. To use this command, you’ll need to pass it the local path to your .app package, and also specify the URL of the site collection in which it is to be imported. You also need to specify the source of the app package to import. To use this command, you need to pass it the local path to your .app package and specify the URL of the site collection into which it will be imported. (The user who is calling the cmdlet must be a member of the site owners’ group for this site collection.) You also need to specify the source of the app package to import. Table 7-2 enumerates the possible values that can be passed for an app package’s source. Note there is a sixth value—InvalidSource—that indicates an error and can be seen only as a return value.
Table 7-2. Valid Value Options for an App Package Source
|
Value |
Description |
|---|---|
Marketplace |
Indicates that the app is taken from the Office Marketplace |
CorporateCatalog |
Indicates that the app is taken from the Corporate Catalog. This means that the application has been made available to all employees by the farm administrator |
DeveloperSite |
Indicates that the app is taken from a developer’s site. Normally developers will push their development apps onto a special type of site called a Developers’ site |
ObjectModel |
Indicates that the app has been compiled onto a local package and that it is that local app package that we are trying to import |
RemoteObjectModel |
Indicates that the app that you’re trying to import was uploaded using the Client Object Model |
The following example will import a custom local SharePoint app, as shown in Figure 7-18, into our root site collection:
$app = Import-SPAppPackage -Path C:AppsChapter7App.app -Site http://localhost/
-Source ([Microsoft.SharePoint.Administration.SPAppSource]::ObjectModel)

Figure 7-18. Importing a SharePoint 2013 app package using PowerShell
As mentioned earlier, Microsoft made a big push with the 2013 release of SharePoint to help developers make their apps available to the largest amount of users by enabling the Office Store. I expect that most organizations will mainly start their SharePoint 2013 app journey by browsing the Office Store and by installing from that source.
The Microsoft Office SharePoint Store can be accessed at http://office.microsoft.com/en-us/store/apps-for-sharepoint-FX102804987.aspx. When accessed, that URL allows you to search for various apps that have been made available by freelance developers and by larger development companies. Some apps are free, and some require that you purchase a license before being able to download them. Because of the order of operations, installing apps from the SharePoint Store will be discussed in the “Installing an App Package” section later in this chapter.
Exporting App Packages
It is important here to note the difference between an app package and an app instance. The term package represents the actual .app file that is produced once SharePoint code is compiled. An instance, by contrast, represents an installed entity of a specific app. An instance is associated with a particular web onto which it has been deployed. Assuming that for some reason you have lost the original .app package of a custom app in your organization, if there is still an instance of that app existing in your SharePoint environment, PowerShell provides you with a mechanism to extract the .app package that is associated with your instance. The Export-SPAppPackage cmdlet expects two parameters: an app instance, and a path that specified where to store the extracted app package.
The following example describes how you can get an app package from the SharePoint store. The app used in this example is the Yammer app provided by Microsoft. First you have to install it manually in your farm, and then retrieve its related information using the Get-SPAppInstance cmdlet. I won’t be covering the details of how you can install an app from the SharePoint Store using the web interface. This is a very straightforward process that I’m sure you’ll be able to figure out easily. Calling the cmdlet will give you an app instance object. To retrieve its associated package, you need to look at its App property (see Figure 7-19). One important point to note is that an administrator account is not allowed to install apps on a SharePoint web. In order for you to be able to install an app using the environment that you built in Chapter 5, you will need to log on with one of the custom user accounts we created (e.g., ContosoJSmith).
$app = Get-SPAppInstance -Web http://localhost | Where {$_.Title -like "Yammer*"}
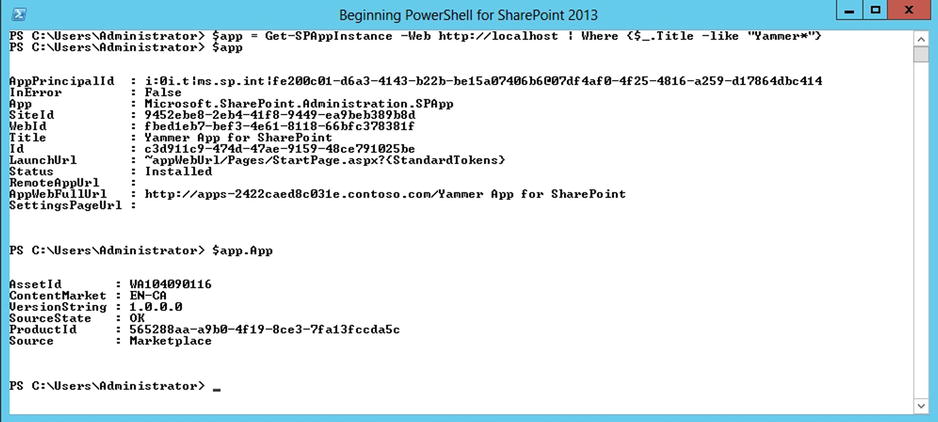
Figure 7-19. Obtaining a reference to a SharePoint App instance and to its associated app package using PowerShell
With this information in hands, you can now call the Export method, specifying the app package object, as well as a local path to extract the app package to:
Export-SPAppPackage -App $app.App -Path "C: empYammer.app"
Navigate to the specified path, and verify that the local .app package has been created as expected. You are now ready to move forward and install an app package within our SharePoint environment.
Installing an App Package
In the two preceding sections of this chapter, you’ve learned how to import a local app package within your environment and how to produce a local package from an already installed app instance. Now let’s have a look at how you can take those local app packages and install them within your SharePoint environment for everyone in the organization to use and consume. The cmdlet that you need to use to install an app package is Install-SPApp. You need to pass it the URL of the web onto which you wish to install it, as well as a reference to the imported app package.
One thing to watch out for here is that for security reasons the administrator account is never allowed to install apps in a SharePoint farm. Therefore, you will need to launch PowerShell as a separate user before running the scripts below. This user will need to be granted special permissions against the content databases associated with the web where you’re trying to install the app package. In order to grant these permissions, you can run the Add-SPShellAdmin cmdlet and specify the user name and the GUID of the content database in question. The following code example will grant permissions to execute PowerShell commands to user John Smith against the content database that hosts the root site collection of your SharePoint 2013 environment:
$contentDB = Get-SPContentDatabase -WebApplication http://localhost
Add-SPShellAdmin -UserName ContosoJSmith -Database $db
This code example assumes that there is only one database returned for the web application; otherwise, the variable db will represent an array of content databases and you will need to specify the one to which you wish to grant permissions.
The following example will import and install the Yammer app that you extracted locally in the previous section (see Figure 7-20). Note that because this app package was taken from the online store, it requires you to specify two additional parameters when importing it: the AssetId, and the ContentMarket, both of which you obtained in the preceding section of this chapter.
$yammerApp = Import-SPAppPackage -Path "C:	empYammer.app" -Site http://localhost
-Source ([Microsoft.SharePoint.Administration.SPAppSource]::Marketplace)
-AssetId WA104090116 -ContentMarket EN-CA

Install-SPApp -Web http://localhost -Identity $yammerApp
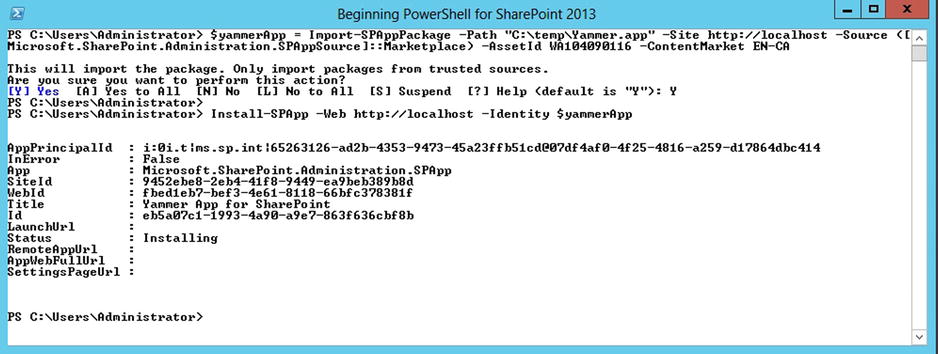
Figure 7-20. Installing a SharePoint app package on a web using PowerShell
Once executed, an installation process for the specified app will be initiated. As you can see in Figure 7-20, the app instance status is set to installing. Give it a few seconds and navigate to the All Site Contents page of your root web (http://localhost). If everything went as expected, you should see your Yammer app installed in the list of available SharePoint apps, as shown in Figure 7-21.
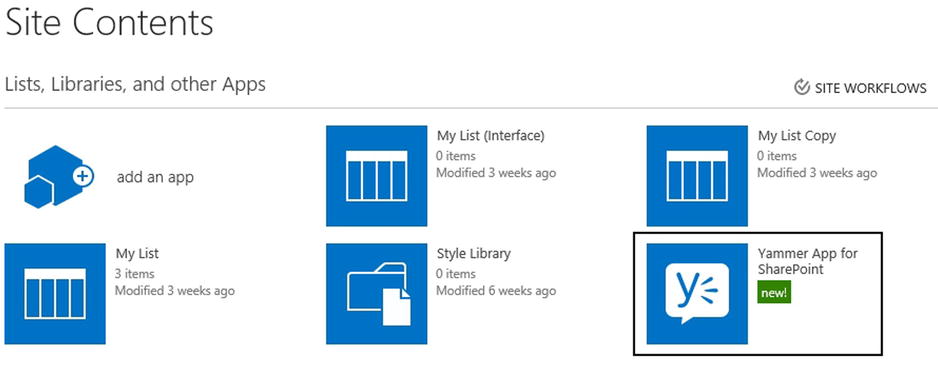
Figure 7-21. Yammer SharePoint 2013 app installed on a web
Uninstalling a SharePoint App
To uninstall an app instance, the cmdlet to use is Uninstall-SPAppInstance, and as a parameter, it simply takes a reference to the app instance to uninstall. You need to understand that what you are actually doing here is simply removing a specific instance of an app on a particular web. You are not removing the app entirely from our farm. Just like it was the case for installing an app, the default administrator account is prohibited from uninstalling apps. You will have to run PowerShell using another administrator account. The following example will show you how to uninstall the instance of the Yammer app we’ve just installed at the root of our main site collection (see Figure 7-22):
$yammerApp = Get-SPAppInstance -Web http://localhost | Where{$_.Title -like "Yammer*"}
Uninstall-SPAppInstance -Identity $yammerApp

Figure 7-22. Uninstalling a Sharepoint 2013 app from a web using PowerShell
One very important piece information you’ll probably want to obtain as an administrator is a list of webs on which a specific app is installed on. You could easily create a short PowerShell script using everything that you’ve learned so far and get the result printed out on screen. Our script would need to begin by obtaining a reference to the Web Application instance in which you want to check for instances of your apps. You would then loop through each site collections and each webs to determine if the specified app is installed or not. The following lines of PowerShell would allow you to create such a useful script:
# Prompt the user to enter the name of the app to check for instances of
$appTitle = Read-Host "What is the name of your app?"

# Get a reference to the Web Application on port 80
$webApp = Get-SPWebApplication http://localhost

# Loop through all site collections in the Web Aplication
foreach($site in $webApp.Sites)
{
    # Loop through each Web in the current site collection
    foreach($web in $site.AllWebs)
    {
        # Query the current site for an instance of our app
        $appInstance = Get-SPAppInstance -Web $web.Url |
            Where {$_.Title -like "*$appTitle*"}

        # If the appInstance variable is not null, then an instance was found
        if($appInstance -ne $null)
        {
            Write-Host $web.Url -BackgroundColor "green"
        }

        $web.Dispose()
    }
    $site.Dispose()
}
This example assumes that a custom SharePoint 2013 app named “Timer Clock” has been installed on two webs across your farm. Executing the script will loop through each web in our Web Application, and print out the URLs of the webs where the app has been installed, as shown in Figure 7-23.

Figure 7-23. Checking for an instance of a SharePoint 2013 app on all webs using PowerShell
The App Catalog
SharePoint 2013 introduced a brand new site collection template called the App Catalog. An app catalog is a site that makes custom built apps available to your organization. It lets administrators control apps for Office and for SharePoint, and it also allows users to request apps from the Office Store. App requests can then be approved or rejected by the administrator. An app catalog is an essential piece to any SharePoint 2013 farm in which apps are enabled to end users.
Creating an App Catalog
By default, the new App Catalog template is not made available via the New Site Collection page. If you wish to create an app catalog through the web interface, you will need to go in Central Administration and navigate to the Apps ![]() Manage App Catalog page using the option shown in Figure 7-24. This page will let you create a new app catalog and specify the primary and secondary administrators, as if you were just creating a normal site collection.
Manage App Catalog page using the option shown in Figure 7-24. This page will let you create a new app catalog and specify the primary and secondary administrators, as if you were just creating a normal site collection.
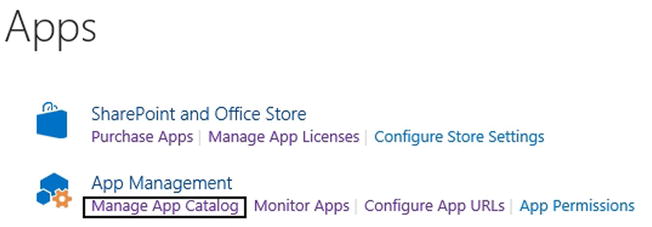
Figure 7-24. The Manage App Catalog link in Central Administration
Using PowerShell, things are almost as easy. We simply call the New-SPSite cmdlet as if we were creating a new site collection, and we specify the custom "APPCATALOG#0" template name. The following line of PowerShell shows you how to create a new app catalog for our environment (shown in Figure 7-25). The app catalog will be created at http://localhost/sites/appcatalog:
$catalogSite = New-SPSite -Url http://localhost/sites/appcatalog -OwnerAlias "contosoadministrator" -Name "App Catalog" -Template "APPCATALOG#0"
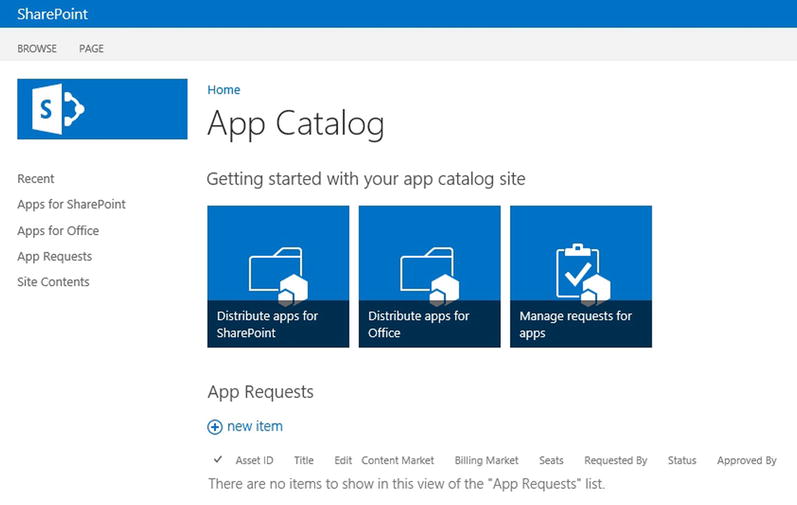
Figure 7-25. Main page of an App Catalog site collection in SharePoint 2013
At this point, your app catalog site collection has been properly created, but it is not yet associated with your current Web application. Even if you were to add new applications in it at this point, they would not be discoverable by users on other sites. What you need to do now is associate it with your current web application. Each web application in a SharePoint environment can have an instance of an app catalog associated with them. You cannot have more than one catalog per web application, however. To associate your catalog, you need to execute the following line of PowerShell:
Update-SPAppCatalogConfiguration -Site http://localhost/sites/appcatalog
To verify that the app catalog has been properly associated with your web application, you can navigate back to the Manage App Catalog page in central administration, and ensure that the site collection is configured properly.
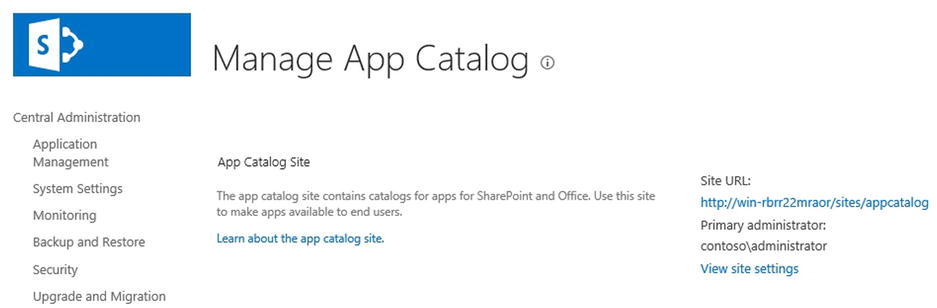
Figure 7-26. Manage App Catalog screen in Central Administration
Adding an App to the Catalog
Once your app catalog is up and running, one of the first things you’ll probably want to do is add authorized apps for your end users to start consuming. Although it is very easy for you to upload custom app packages through the catalog’s web interface, there might be scenarios in which you will want to use PowerShell to achieve this instead. In fact, in many organizations the process of adding apps to the corporate catalog is controlled by the administration team, which uses PowerShell scripts to add, remove, and modify app packages from the catalog. Unfortunately for us, there are no “shortcut” cmdlets that will let us do this in an easy way. You need to treat the app catalog site as if it was just any other site, and upload our local .app package in the appropriate document library.
Each app catalog site has three main document libraries that are made available to SharePoint administrators: Apps for SharePoint, Apps for Office, and App Requests. The first one is the one that I am interested in. It contains a list of all apps that have been made available by the administrators to users in the organization. The following lines of PowerShell will allow you to get a reference to it and to upload a custom .app file in it. Assume this app file (Chapter7RestrictedApp.app) was provided to us by developers within our organization:
$web = Get-SPWeb http://localhost/sites/appcatalog

#Gets a reference to the AppCatalog library
$appCatalog = $web.GetFolder("AppCatalog")
$appFiles = $appCatalog.Files

$myAppPackage = Get-ChildItem C:AppsChapter7RestrictedApp.App
$appFiles.Add("AppCatalog/Chapter7RestrictedApp.App", $myAppPackage.OpenRead(), $false);
Executing these lines of PowerShell will automatically make the uploaded app package available to everyone in the organization. To confirm that the upload process worked as expected, simply navigate to the Apps for SharePoint library of your app catalog. You should now see an entry in there for your new app package, as shown in Figure 7-27.
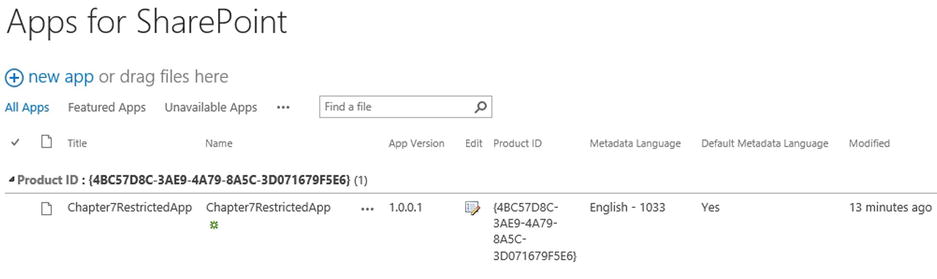
Figure 7-27. A SharePoint 2013 app uploaded in the app catalog
With this package deployed, users who try to add a new app to their sites will now see the newly added app as an available choice (see Figure 7-28).
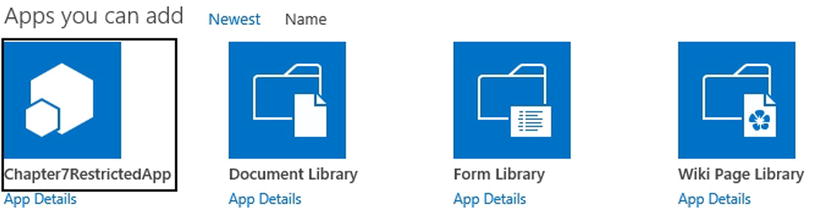
Figure 7-28. Available apps on a SharePoint 2013 web
Managing App Permissions
As a SharePoint administrator, you may decide to prevent users from installing apps on certain sites in your environment. PowerShell provides you with various cmdlets that will give you better control on how you want apps to be automatically deployed throughout your organization. However, with PowerShell there are no ways for us to specify granular permissions for end users on specific apps. To clarify what I mean by this, you need to start by defining how permissions work within the context of SharePoint 2013 apps.
In SharePoint 2013, every app package contains an XML declaration file known as the manifest. An app manifest file contains information about its associated resources such as its app’s title, product Id, and version. It also contains very important information about the set of permissions it needs in order to be installed. When installing an app, the installation process looks at the permissions of the user who’s trying to install the app to determine whether or not the minimum set of permissions required is attained. A user trying to install an app needs to be able to meet every single permission requirement for the app in order for him to be granted rights to install it. Once the app is installed, every user trying to use the app will also need to meet the minimum permission requirement. Because the minimal installation permissions are set in the app package directly, there are no ways with PowerShell to block specific users from installing apps. If you need to prevent a certain group of users from being able to install and use a specific app using PowerShell, you will need to lower their permissions, making sure they don’t meet the minimum required set of permissions to use the app.
To illustrate this, let’s take a look at the Chapter7RestrictedApp app. When developed by developers in Visual Studio, the app had the permissions shown in Figure 7-29 applied to it.

Figure 7-29. SharePoint 2013 custom app permissions viewed in Visual Studio
This basically means that in order for a user to be able to install and use this app, they’ll need to be granted permissions to manage the web on which the app is to be installed, and be an administrator of its site collection. Now, let’s assume a new user named Bob Houle has Full Control role on the web on which he wants to install your app, but he is not a site collection administrator, which is a requirement for the app to install. The user does not have any access whatsoever on the app catalog site on which your custom app has been deployed. When the user goes to the Add an App page and looks at the apps that are available to him, he won’t see the Chapter7RestrictedApp listed (see Figure 7-30).
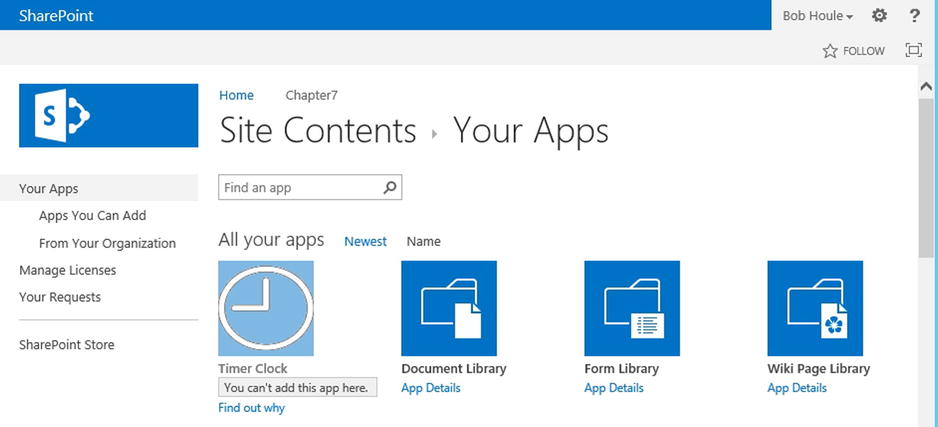
Figure 7-30. Custom app not listed on available apps page
In order for him to even be made aware that this app is available to his organization, he needs to be granted at least Read access to the app catalog site. We can use what we’ve learned in Chapter 6 and grant the user read access to the site using PowerShell. Once the access has been granted, the user will see the app appear on the From Your Organization page but won’t be given the option to install it. Clicking on the app details will give the message shown in Figure 7-31 to the user.
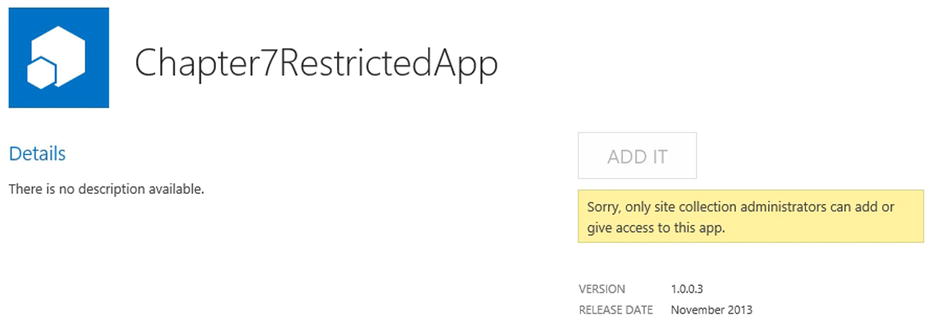
Figure 7-31. Denied permission to install a custom app
In order for you to allow the user to install your custom app, you’ll need to make him a site collection administrator. Doing so will automatically allow the user to install and trust the application for the current site (see Figure 7-32).
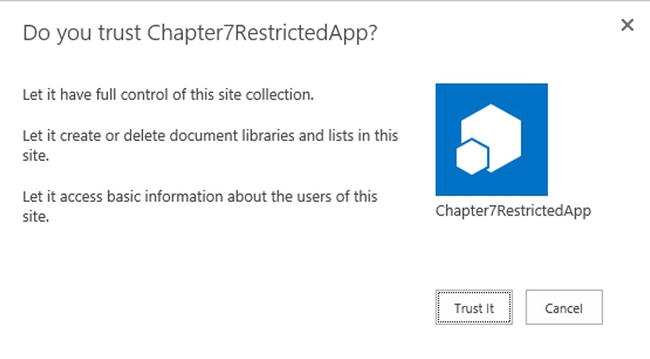
Figure 7-32. Trust a custom SharePoint 2013 app dialog
Updating an Existing App
The new app model allows for several different versions of a same app to run across various webs. For example, the Finance division in our organization could have deployed version 1.0.0.4 of our Chapter7RestrictedApp, while the Human Resources division can have the 1.0.0.5 version deployed. As a SharePoint administrator, this is something you need to be aware of and is something you should pay close attention to. From an app catalog perspective, a different version of an app is simply another version of an app package you need to upload to your Apps for SharePoint library.
Notice in Figure 7-33 that there are different versions of the app version in the version history. Remember, an app package uploaded to the app catalog is just a file like any other document you upload to SharePoint. You can take a look at its history to determine the list of changes that occurred on it. You can clearly see from the figure that the app is now up to version 1.0.0.4. As discussed earlier, in your example the finance division has version 1.0.0.3 deployed, even if the latest version is 1.0.0.4. If a user of the Finance division navigates to the list of apps on the site, and looks at the About page for your app by clicking on the “…” link and choosing About, they see a notification saying that there’s a newer version of their app available and asking them if they would like to upgrade (see Figure 7-34).
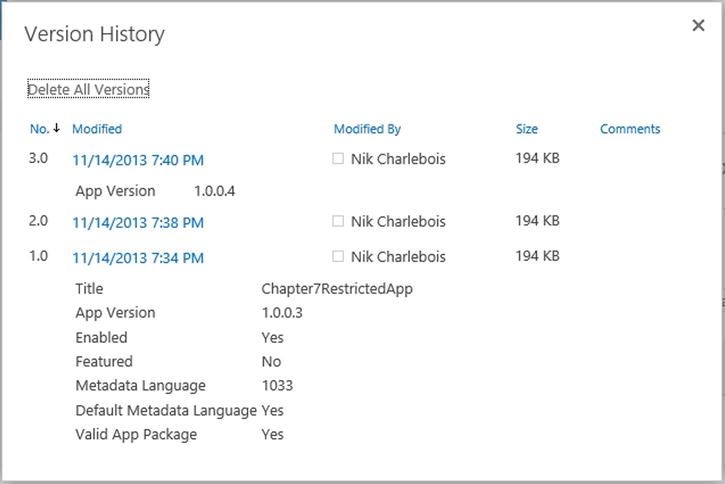
Figure 7-33. App version history in the app catalog
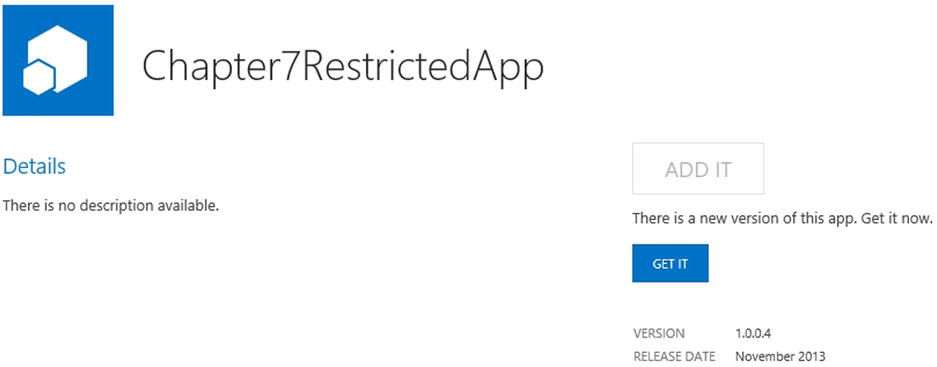
Figure 7-34. New app version notification screen
You may argue that running several versions of the same app is somehow good for your organization because it offers backward compatibility, but personally I smell nothing but trouble coming out of this. As a SharePoint administrator, you’ll probably want to be able to tell, when deploying a new version of an app, what sites are using the previous version of your app. This would allow you to figure out who the client for the site is, and try to see if there’s a way for them to upgrade to the latest version. Out-of-the-box, this is not something that is easily feasible, but with PowerShell, the sky is the limit! Every app package object in SharePoint exposes a property called VersionString that contains the version of the current app package that is installed on a specific web. Given our example, the Figure 7-35 shows the result of obtaining our app instance on both the Finance and Human Resource sites.

Figure 7-35. Displaying two versions of the same app on different sites using PowerShell
All right, so you now know that the finance site needs some upgrading of their Chapter7RestrictedApp app. The question now is how do you make sure that you upgrade to the latest version of our app using PowerShell? Fear not my friends; Update-SPAppInstance is coming to your rescue. This cmdlet takes two parameters: App, a reference to the newest version of the app package; and Identity, a reference to the app instance to upgrade. Normally, you would get a reference to the newest app package using the .app file on disk. Assume the newest package of your app is located on disk at C: empChapter7RestrictedApp-1.0.0.4.app. You should get a reference to this package using Get-SPAppInstance:
$financeAppInstance = Get-SPAppInstance -Web http://localhost/sites/Finance |
Where {$_.Title -eq "Chapter7RestrictedApp"}

$newestPackage = Import-SPAppPackage -Path C:TempChapter7RestrictedApp-1.0.0.4.app
-Site http://localhost/sites/Finance
-Source ([Microsoft.SharePoint.Administration.SPAppSource]::CorporateCatalog)

Update-SPAppInstance -Identity $financeAppInstance -App $newestPackage
To recap, in order to update an app to its latest version, you need to begin by importing the newest version of the app package onto the web where the outdated app is located. Then once the package has been imported, you can simply get a reference to the outdated app instance, and then call the Update-SPAppInstance cmdlet passing both values as parameters.
Summary
In this chapter, you’ve learned how, as a SharePoint administrator, to control custom solutions and apps produced by your developers using PowerShell. I’ve also gone through the process of creating new service application instances using scripts. In the next chapter, I will continue to build on this topic and will explain how to use PowerShell to automate the creation of other service applications in SharePoint 2013. You will also learn how to use PowerShell to validate the health of your SharePoint farm as well as manage and execute maintenance jobs known as Timer jobs.