![]()
Administering and Monitoring SharePoint with PowerShell
This chapter is where most of you will get the biggest bang for your buck. It is full of IT Pro goodness and will really get into the guts of SharePoint administration. As mentioned earlier in this book, there used to be a time when SharePoint administrative tasks all had to be done using a command line tool called STSAdm. This legacy tool came from the time when the SharePoint product as we came to know it today was called SharePoint Team Sites (therefore the STS prefix in the tool’s name). This tool was good, but it was extremely slow to execute heavy operations against the server, and it was difficult for administrators to really know what its methods were really doing in the background.
The story has changed dramatically with the appearance of PowerShell. Now administrators can easily automate long-lasting operations against their SharePoint farms, and have full control over what steps are being executed as part of it. In this chapter, I will be covering various aspects of SharePoint administration using PowerShell. I will be covering several real-life examples, and will provide multiple code samples that could be reused in your respective organizations to help assist you in your day-to-day jobs. Topics covered will include the automation of backups and restores, the monitoring of timer jobs, and the management of services, as well as monitoring the overall SharePoint 2013 farm’s well-being using the Health Analyzer.
Most of the things I will cover in the present chapter are things that can be achieved manually by using the SharePoint Central Administration web interface. However, if you add PowerShell to the mix, you can create new reusable and repeatable scripts that can improve performance, and save you from a lot of headaches. By the end of this chapter, you will have learned the basics of everything a SharePoint farm administrator has to do in order to be successful in his role.
Features
In this section, you will learn how to use PowerShell to interact with SharePoint 2013 features. More specifically, you will learn how to enable and disable features on site collections and webs. A feature, in the context of SharePoint, represents a self-contained set of elements that can be made available at various levels of a SharePoint environment. A SharePoint solution (.wsp package) can contain one ore many features, each associated to a different deployment scope (farm, web application, site collection or web).
When creating custom SharePoint solutions, developers are given the option to choose against which scope they wish to associate their features. For example, assume that you have a custom farm solution that contains a webpart that you wish to deploy to your environment. The web part will be associated with a feature and this feature is scoped at the site collection level. The simple fact of deploying your farm solution will not automatically make that web part available to end users to use in all site collections. In order for the web part to become available, the feature will need to be activated for every site collection on which you wish to use the web part. The process of activating a feature against a specific scope is called “Feature Stapling.”
Getting a Reference to an Existing Feature
The Get-SPFeature PowerShell cmdlet lets you get a reference to the list of all features deployed in your local SharePoint environment, no matter the scope. Each feature is given a unique identifier, a name, and an associated scope. Figure 8-1 shows how to get a list of all existing features in your SharePoint environment using PowerShell. It also shows how you can get a reference to a specific feature using only its name, in your case, the ExcelServer farm feature:
$excelServer = Get-SPFeature | Where{$_.DisplayName -eq "ExcelServer"}
$Get-SPFeature

Figure 8-1. Getting a reference to SharePoint features using PowerShell
Activating a Feature
To activate a SharePoint feature using PowerShell, you need to use the Enable-SPFeature cmdlet and pass it a reference to the feature that you wish to activate. Note that you cannot decide against what scope you wish to activate a specific feature. Each feature is already preassociated with a specific scope, and this cannot be changed using PowerShell. Figure 8-2 shows how to activate the web-scoped GroupWork feature against your root web.
$groupWork = Get-SPFeature | Where{$_.DisplayName -eq "GroupWork"}
Enable-SPFeature -URL http://localhost -Identity $groupWork

Figure 8-2. Enabling a SharePoint feature using PowerShell
Disabling a Feature
If you wish to use PowerShell to disable a SharePoint feature that has previously been activated, you will need to use the Disable-SPFeature cmdlet. This method requires you to pass a reference to the feature that you wish to disable. Figure 8-3 shows you how to use PowerShell to disable the GroupWork feature we activated in the previous section.
$groupWork = Get-SPFeature | Where{$_.DisplayName -eq "GroupWork"}
Disable-SPFeature -URL http://localhost -Identity $groupWork -Confirm:$false

Figure 8-3. Disabling a SharePoint feature using PowerShell
Backups
In the SharePoint world, there are several types of backups available. When backing up entities, SharePoint creates .bak files. These files are essential when trying to restore a SharePoint instance to a previous state. It is important to note that you can also use the built-in SharePoint backup mechanism to assist in transferring site collections or web applications from one SharePoint farm over to another, as long as the destination server has the exact same product version as the source server.
You can back up any SharePoint entities from any level of the hierarchy (farm, web application, and site collection). By default, PowerShell provides us with four main cmdlets to interact with SharePoint 2013 backups: one for backing up the configuration database, one for backing up the enterprise search index, another one for backing up the entire farm or specific content databases, and, finally, one for backing up site collections. In this section, you will learn how to use PowerShell to automate backups of different architectural components of a SharePoint farm (content databases, web applications, site collections, etc.) using PowerShell. Content related to backing up the enterprise search content of SharePoint 2013 is outside the scope of the present book.
Automating a Farm Backup
There are two types of farm backups you can do in the SharePoint world: a full backup and a differential one. A full backup creates a backup of all content along with all of its history, whereas a differential backup simply saves what changed since the last full backup was completed.
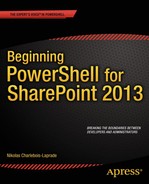
A farm backup represents the operation of creating a full-trust, offline copy of an existing SharePoint 2013 farm, and storing it elsewhere on a shared location. Farm backups can be automated with PowerShell using the Backup-SPFarm cmdlet. As mentioned previously, you can choose what level of SharePoint artifacts you wish to back up. In order to determine the different artifacts you can back up, you can call this cmdlet passing it the -ShowTree switch. This will automatically display all available items for backup on the screen (see Figure 8-4).
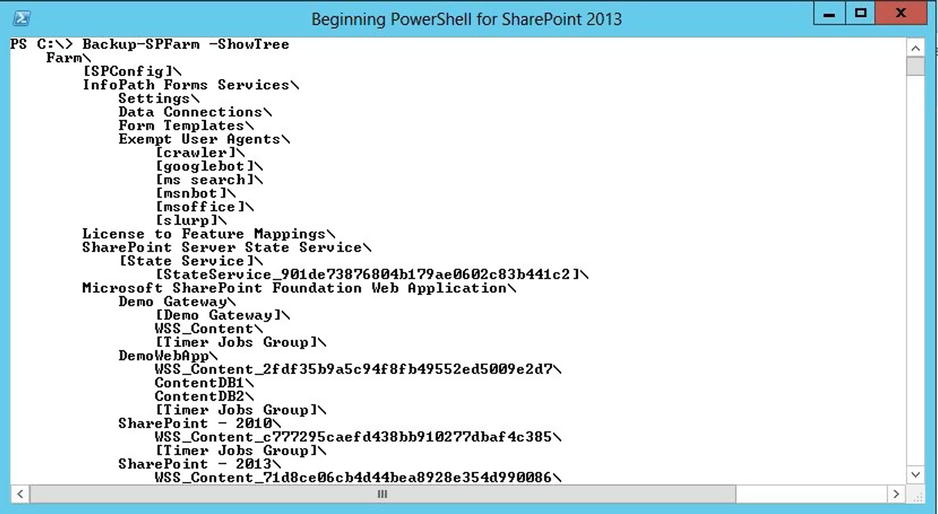
Figure 8-4. Listing all available SharePoint 2013 artifacts available for backup using PowerShell
Once you’ve determine the type of backup (full or differential), and the artifacts you wish to back up, you can proceed with the backup process. The following code will initiate a full farm backup. The backup files will be stored in a local share you’ve created at c:Backups. To perform a differential backup, you simply replace Full with Differential.
Backup-SPFarm -Directory \localhostBackups -BackupMethod Full
Executing this code can take several minute depending on the size of your farm. When executing this code, PowerShell will initiate a backup process and wait for the process to finish before returning the results to screen. Don’t get fooled; you might think that nothing is happening while the execution goes in, but, in reality, timer jobs related to the backup process are busy at work. Figure 8-5 shows the result of navigating to the Backup and Restore Job Status screen in the SharePoint Central Administration. This page will give you a live overview of what is actively going on with the backup process.
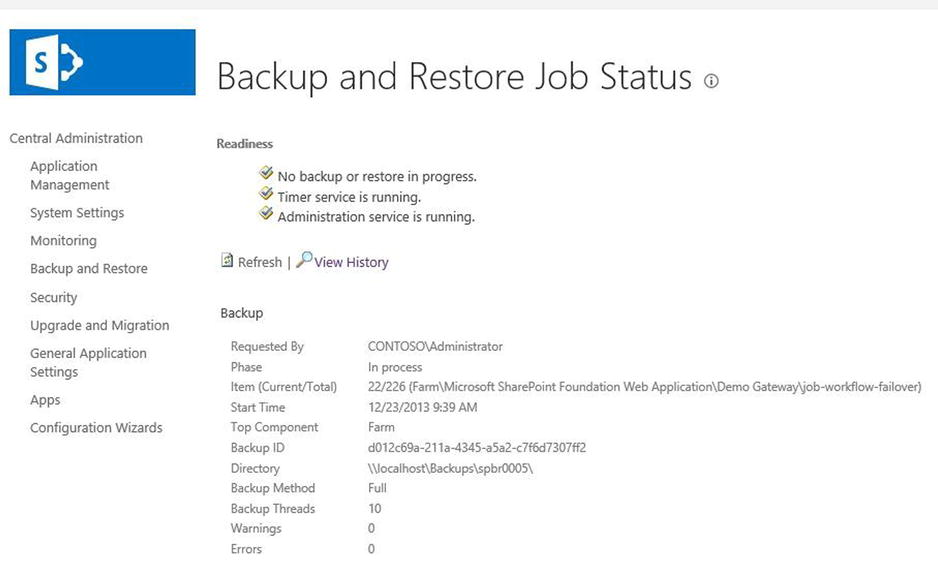
Figure 8-5. Viewing an ongoing backup status through Central Administration
Viewing Backup History
Once a SharePoint backup process is completed, it is inserted to the history list of its associated backup folder. A history list is nothing more than an XML file on disk that contains a record of all backup processes that have been sent to the folder. If you navigate to any backup folder, you should see a file named spbrtoc.xml. This is the file that keeps track of all backups. Using PowerShell, you can get a list of all completed backups for a specific folder using the Get-SPBackupHistory cmdlet. Figure 8-6 shows the execution of this cmdlet against a backup folder in which multiple backup processes were initiated. You pipe the resulting output into the generic PowerShell Format-List method in order to get more details out of the operation.
Get-SPBackupHistory -Directory \localhostBackups | Format-List
Figure 8-6. Retrieving a list of all backups for a specific shared folder using PowerShell
Automating a Site Collection Backup
The second flavor of backups we can do in SharePoint is what we call a site collection backup. As you’ve probably guessed by the name, this type of backup is aimed at a single specific site collection. The result of such an operation will be a single .bak file containing all information related to that site collection. Note that compared to a farm backup, site collection backups don’t keep a history list of all completed processes. The PowerShell cmdlet for backing up SharePoint site collections is Backup-SPSite. All this method takes is a parameter that specifies into which shared folder to put the resulting .bak file.
The following code will initiate a site collection backup of the root site collection of your default Web Application. You specify to PowerShell that the name of the resulting .bak file should be RootSite.bak:
Backup-SPSite -Identity http://localhost -Path \localhostBackupsRootSite.bak
Restores
In the SharePoint context, a restore operation is the action of bringing back the content of backup files to life, either on the same server from which the backups are coming, or on a different, separate SharePoint environment. Just as with the backup operations, there are two types of SharePoint restores: a farm restore and a site collection restore. Both can be easily automated using PowerShell.
Restoring a Farm Backup
When restoring from a farm backup, you have the option to restore the content as a new environment, or to overwrite the existing one; these are called the restore methods. To initiate the restore process, you’ll need to use the Restore-SPFarm PowerShell cmdlet. This cmdlet will expect you to pass it the location of the shared folder where the backup files are located, the restore method (new or overwrite), as well as the farm credentials.
The following PowerShell code will initiate a farm restore using the latest full backup files from our environment, and overwriting the current files and configuration. Note that this script will prompt you to enter the password for the farm account:
$farmAccount = Get-Credential ContosoAdministrator
Restore-SPFarm -Directory \localhostBackups -RestoreMethod Overwrite -FarmCredentials $farmAccount
If you had wanted to restore the content to a new location, you would have needed to specify the value New to the -RestoreMethod parameter. Doing so will initiate PowerShell to prompt you to specify additional parameters such as a URL for the new web application and a new name for each of the databases (content, administration, and configuration). Figure 8-7 shows an example of trying to restore a farm backup to a new location.
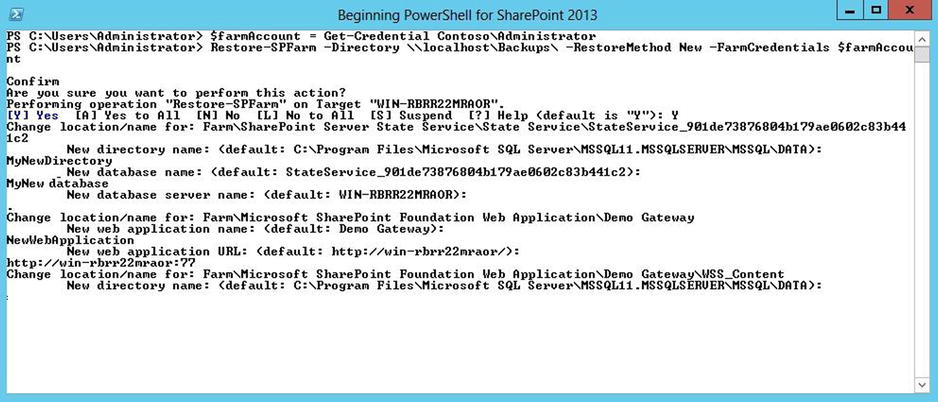
Figure 8-7. Restoring a SharePoint farm backup to a new location using PowerShell
Restoring a Site Collection Backup
The process of restoring content from a site collection backup file using PowerShell is very similar to the process of restoring a farm backup. The cmdlet used in this case is Restore-SPSite, and it requires you to specify the URL where you wish to restore the site collection’s content to, as well as the path to the .bak file that contains the content. If you want to restore a site collection’s backup to an existing location (e.g., overwrite a site collection), you’ll need to pass the -Force parameter to the cmdlet.
The following PowerShell code example shows you how to restore the site collection backup file created earlier and overwrite its current location. This will replace the content that has changed since the moment we took the backup, and will revert it back to what it was. For those familiar with the concept of Virtual Machine snapshots in Hyper-V, this process is similar to rolling back a Virtual Machine’s snapshot back to an earlier instance:
Restore-SPSite http://localhost -Path \localhostBackupsRootSite.bak -Force
Timer Jobs
Timer jobs in SharePoint are comparable to scheduled tasks in the context of the Windows operating system. They are, more often than not, repeatable activities set to execute at a specific time. The SharePoint object model allows for the development of custom timer jobs, which can help expand the set of default jobs we have to help maintain our SharePoint farm. Timer jobs are associated with schedules that determine the time lapse between two executions of its related activities. Schedules can be of any of the following types: Minutes, Hourly, Daily, Weekly, and Monthly.
The SharePoint timer jobs are responsible for activities such as the installation of SharePoint apps, the creation of variation pages in the context of publishing, the removal of deleted site collections, and so on. These are essentials to the well-being of your SharePoint environment. Using PowerShell, there are several ways for users to interact with these. We can use PowerShell to disable timer jobs completely, to enable them, set their schedule, or to force their immediate execution.
Getting a Reference to an Existing Timer Job
There are various reasons why you may want to get a reference to an existing timer job using PowerShell. To get a list of all the existing timer jobs in your SharePoint environment, you can use the Get-SPTimerJob cmdlet. The example shown in Figure 8-8 shows the result of obtaining a list of all timer jobs that have a schedule set to daily.
$dailyJobs = Get-SPTimerJob | Where{$_.Schedule -like "daily*"}
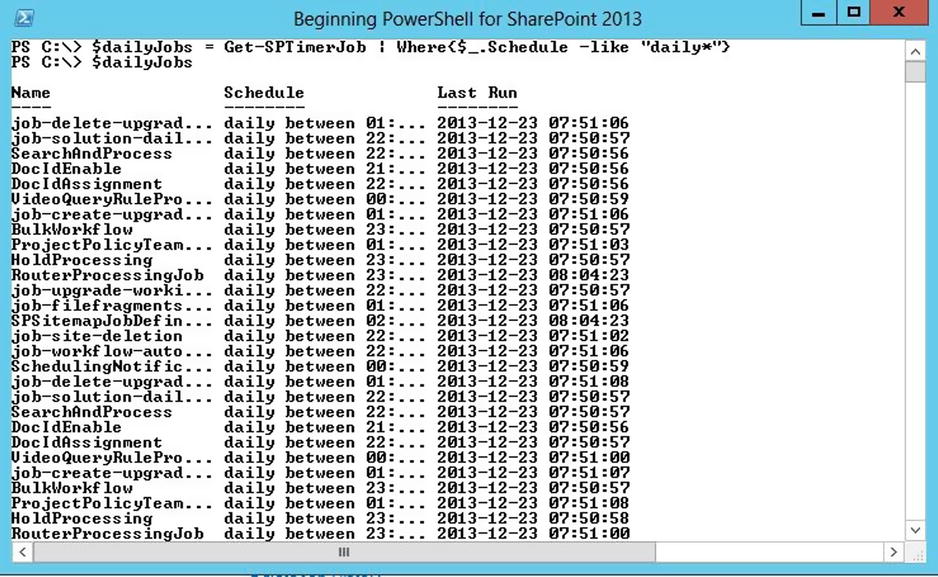
Figure 8-8. Listing all timer jobs with a daily schedule using PowerShell
Disabling a Timer Job
There might be some cases in which you wish to completely prevent a SharePoint timer job from running, for example, if you wish to prevent the app diagnostics timer job from running and gathering information because it can somehow affect the performance of your server. Using PowerShell, you can disable a timer job by calling the Disable-SPTimerJob cmdlet. This method expects to receive a reference to the timer job you wish to disable. The following PowerShell script will get a reference to a specific timer job (apps diagnostics), and disable its execution:
$appDiagnosticsJob = Get-SPTimerJob | Where{$_.DisplayName -eq "Diagnostic Data Provider: App Usage"}
Disable-SPTimerJob $appDiagnosticsJob
If you navigate to the Jobs Definition page in SharePoint Central Administration on the server, you should now see that the instance of the timer job specified in this script is now marked as disabled (see Figure 8-9).
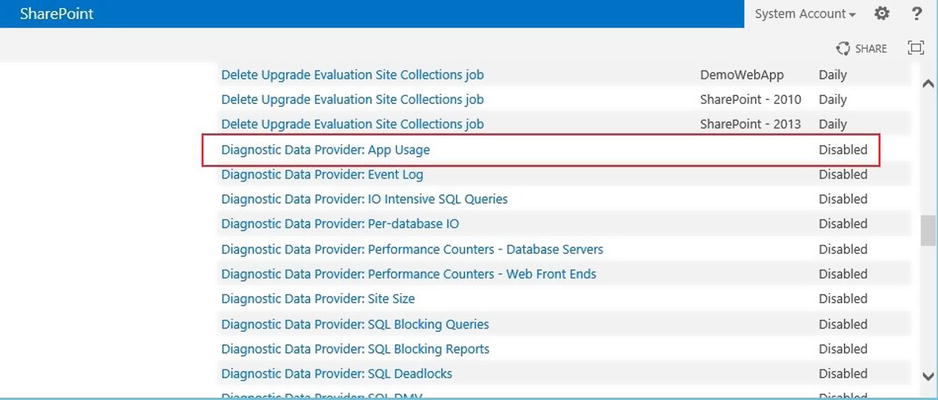
Figure 8-9. Viewing a disabled timer job in Central Adminsitration
Enabling a Timer Job
To enable a timer job in SharePoint using PowerShell, you’ll need to use the Enable-SPTimerjob cmdlet. Just like the method for disabling a timer job, this method expects you to pass it a reference to the timer job object you wish to enable. The PowerShell code below will reenable the timer job you’ve disabled in the previous section:
$appDiagnosticsJob = Get-SPTimerJob | Where{$_.DisplayName -eq "Diagnostic Data Provider: App Usage"}
Enable-SPTimerJob $appDiagnosticsJob
Changing a Timer Job’s Schedule
Another very common operation you may want to do is to change the schedule for your timer jobs. A very common scenario is to change the frequency of the timer job that automatically creates upgrade evaluation site collections for testing upgrades from SharePoint 2010 to SharePoint 2013 (more on this topic in Chapter 10). By default, this timer job is set to run once every day. During a migration project, you may want to bring this down to be an hourly process to allow your users to test their upgrades more rapidly. The PowerShell cmdlet to use to modify a timer job’s schedule is the Set-SPTimerJob method. This cmdlet expects you to pass it the identity of the timer job to modify as well as its new schedule in the form of free text. The schedule parameter can be a little tricky to figure out. Table 8-1 gives you a list of all possible types of schedules as well as an example for each.
Table 8-1. List of timer job schedules and descriptions of their uses
|
Schedule Type |
Example |
Description |
|---|---|---|
Minutes |
Every 2 minutes between 0 and 59 |
Will execute every 2 minutes in the hour |
Hourly |
Hourly between 5 and 10 |
Will execute once every hour between the 5th and the 10th minute of the hour. |
Daily |
Daily at 23:00:00 |
Will execute every evening at 11 PM |
Weekly |
Weekly between Wed 07:00:00 and Fri 06:30:00 |
Will execute every week, any time between Wednesday 7 AM and Friday 6:30 AM |
Monthly |
Monthly at 17 20:00:00 |
Will execute at 20:00:00 the 17th of every month. Need to watch out to make sure the date exists in the month, otherwise the execution will be skipped (e.g., the 31st only exists for every 2 months) |
Yearly |
Yearly at Jan 17 12:30:00 |
Will execute once every year on January 17th at 12:30:00. Again, watch out for leap years |
The following PowerShell code will change the schedule for the creation of upgrade evaluation site collection as discussed earlier. You will be using an hourly schedule to have the job execute every hour between the 5th and the 10th minutes of the hour. One thing to watch out here is that if you have multiple web applications created in your farm, the first line of script that gets a reference to the timer job instance will actually return one instance per web application. You need to make sure that you are modifying the instance that is associated with the web application you want to impact. Figure 8-10 shows the result of viewing the modified timer job’s schedule through the SharePoint Central Administration web interface.
$upEvalCreation = Get-SPTimerJob | Where{$_.DisplayName -eq "Create Upgrade Evaluation Site Collections job"}

Set-SPTimerJob -Identity $upEvalCreation[0] -Schedule "Hourly between 5 and 10"
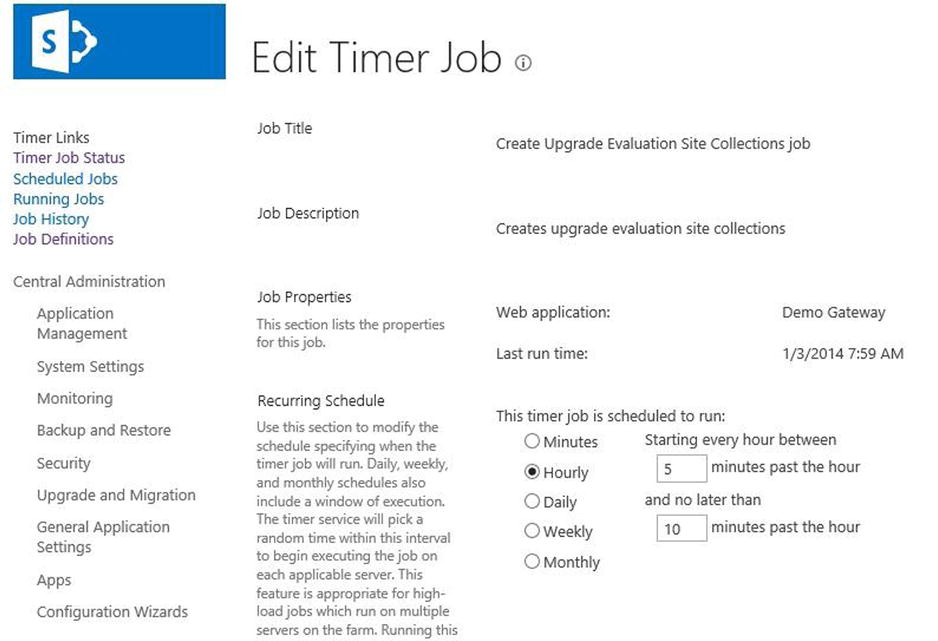
Figure 8-10. Viewing a modified timer job's schedule through the SharePoint 2013 Central Administration web interface
Starting a Timer Job
The last operation left for timer jobs that PowerShell lets you automate is the initiation of a timer job’s execution. This lets you bypass a timer job’s schedule and execute its associated actions right away. This is basically the equivalent of clicking on the “Run Now” button on the Edit Timer Job screen in Central Administration. The PowerShell cmdlet that lets you achieve this is Start-SPTimerJob. All this method expects is the identity of the timer job that you wish to execute.
To illustrate the use of this method, we will use PowerShell to trigger the immediate execution of a SharePoint timer job, called “Delete Job History,” which is set to execute on a weekly basis. The following code will automate this process. Figure 8-11 shows that the timer job executed properly.
$DeleteJobHistory = Get-SPTimerJob | Where{$_.DisplayName -eq "Delete Job History"}
Start-SPTimerJob -Identity $DeleteJobHistory

Figure 8-11. Central Administration showing the execution of a timer job triggered by PowerShell
Managing Services
In the SharePoint world there are over 30 associated services that run in parallel with the environment. These services control things like the search, the user profile synchronization, the sandboxed solutions, and so on. They can either run directly on one of the SharePoint web front-end servers or on a separate application server that is attached to the farm.
Many SharePoint service applications require that these services be started in the farm in order to execute properly. As an example, in order for you to be able to configure the user profile synchronization on your farm, the service application requires you to have both the User Profile Service as well as the User Profile Synchronization Service started in your farm. Using PowerShell, there are several operations you can automate that will interact with these SharePoint services. In this section, you will learn how you can automate operations to obtain references to these services, and how to start and stop them.
Getting a Reference to a Service Instance
A service instance represents the actual SharePoint service that you wish to interact with. Although there is only one entry for each service type in a farm (e.g., only one User Profile Service entry), there can exist various instances, running on different servers. For example, if you have three servers in your farm, say servers A, B, and C, you can have both server B and C run the Distributed Cache Service. There is, however, a maximum of one instance of a specific service running on each server at any given point. It is just that multiple servers can be used to run a service in a SharePoint farm.
To get a reference to a specific instance using PowerShell, we can use the Get-SPServiceInstance cmdlet. You will need to either pass it a GUID for your instance, or the name of the server you wish to retrieve the instances from. In the latter case, you will be getting a list of all services on a specific server. The following code example will show you how you can use PowerShell to retrieve a list of all services instances that have been started in your SharePoint farm, no matter the server on which they are running. Figure 8-12 shows the results of running this line of code in the PowerShell Console, in a tabular format to make sure we view all information on the screen.
Get-SPServiceInstance | Where{$_.Status -eq "Online"} | Format-Table

Figure 8-12. Listing all enabled timer jobs in the SharePoint farm using PowerShell
Starting a SharePoint Service Instance
Once you’ve obtained a reference to a service instance using PowerShell, there are really only two main operations that you can perform on them. You can either enable them, or disable them on a specific server. The PowerShell cmdlet used to enable a service instance on a SharePoint server is Start-SPServiceInstance. All this cmdlet expects as parameter is the identity of the instance to start. Remember that a service instance is unique to a server, meaning that the instance reference you obtain using the Get-SPServiceInstance already contains information about what server in the farm it’s associated with. This means that there are no ways for you to specify to the Start-SPServiceInstance cmdlet what server to start a service on.
The following lines of PowerShell code will get a reference to the Visio Graphics Service on our main SharePoint Web Front-End (WIN-RBRR22MRAOR) and will start its instance. Figure 8-13 shows that the service instance has been properly started via the SharePoint 2013 Central Administration web interface.
$visioServiceInstance = Get-SPServiceInstance -Server "WIN-RBRR22MRAOR" |Where{$_.TypeName -Eq "Visio Graphics Service"}

Start-SPServiceInstance $visioServiceInstance
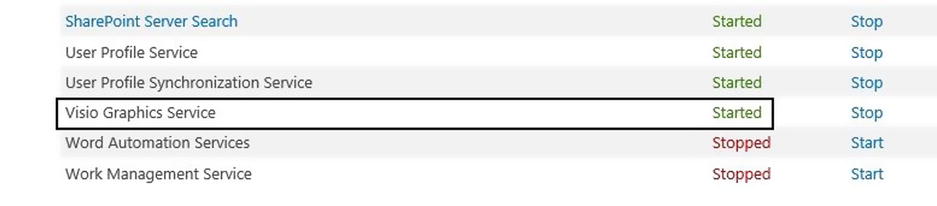
Figure 8-13. Viewing the status of the Visio Graphics Services in Central Administration
Stopping a SharePoint Service Instance
The opposite process, the one in which you want to stop a service instance from running on a specific server, is in all fashions similar to the process of starting it. The only different is that you need to call the Stop-SPServiceInstance cmdlet instead.
The following code will stop the Visio Graphics Service instance you’ve started in the previous section. Figure 8-14 shows, through Central Administration, that the service instance is in the process of going back to its original stopped state after executing these PowerShell lines of code:
$visioServiceInstance = Get-SPServiceInstance -Server "WIN-RBRR22MRAOR" |
Where{$_.TypeName -Eq "Visio Graphics Service"}

Stop-SPServiceInstance $visioServiceInstance

Figure 8-14. Viewing a service instance in the process of being stopped
SharePoint Health Analyzer
The 2010 version of SharePoint has the concept of a health analyzer built into it. What this component does is run frequent checks on the farm’s components to detect common issues that can impact the performance and the overall well-being of a SharePoint environment. These checks are called Health Analyzer rules, and they contain information about what to check in the SharePoint farm to detect anomalies and can even contain information about what corrective measures to automatically take if issues are detected. By default, SharePoint 2013 comes with 65 predefined Health Analyzer rules and they are all enabled. You can define your own custom rules if you wish, but this topic is outside the scope of this book.
Health Analyzer rules, just like timer jobs, have an associated schedule. For example, the rule that checks to see if the databases indexes’ statistics are out of date runs on a daily basis. SharePoint 2013 has about twenty different timer jobs that are dedicated to executing and running the health checks specified in these rules. Depending on the type of schedule a Health Analyzer rule is given, it will get executed by a specific timer job. Figure 8-15 shows a list of all timer jobs that are dedicated to the Health Analyzer engine of SharePoint. In this section, you will learn how to use PowerShell to interact with the SharePoint 2013 Health Analyzer component.
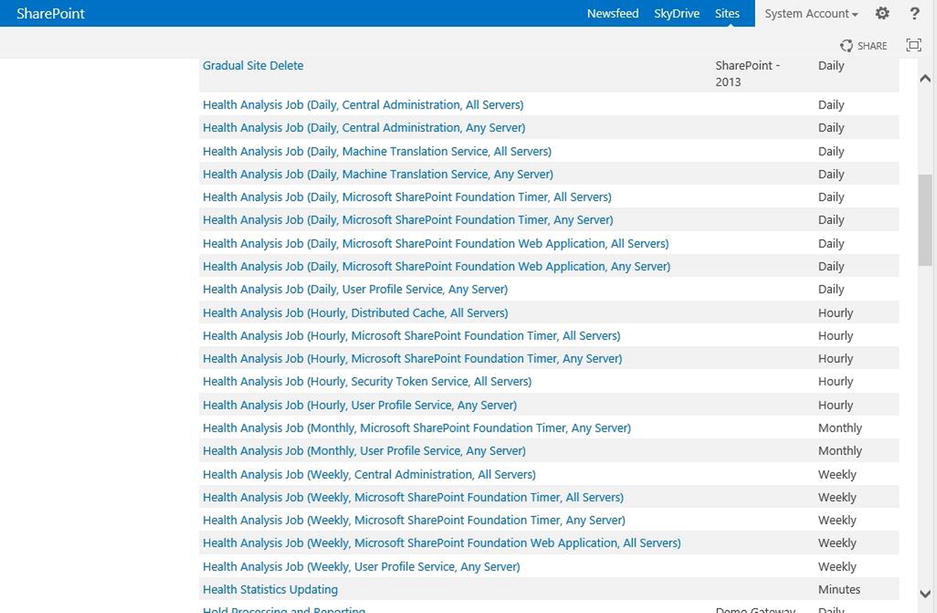
Figure 8-15. A list of all Health Analyzer related timer jobs viewed in Central Administration
Getting References to Health Analyzer Rules
You’re probably starting to see a pattern here. The first topic I will cover in this section is how to get a reference to a Health Analyzer rule object so that you can extract information out of it. The PowerShell cmdlet you need to use to get such a reference is the Get-SPHealthAnalysisRule method. This cmdlet returns a list of all existing rules in your SharePoint farm.
The following PowerShell line of code will get that list and display the rule’s name and its description in a tabular format on screen. Figure 8-16 shows a portion of the resulting table.
Get-SPHealthAnalysisRule | Format-Table -Property Name, Summary
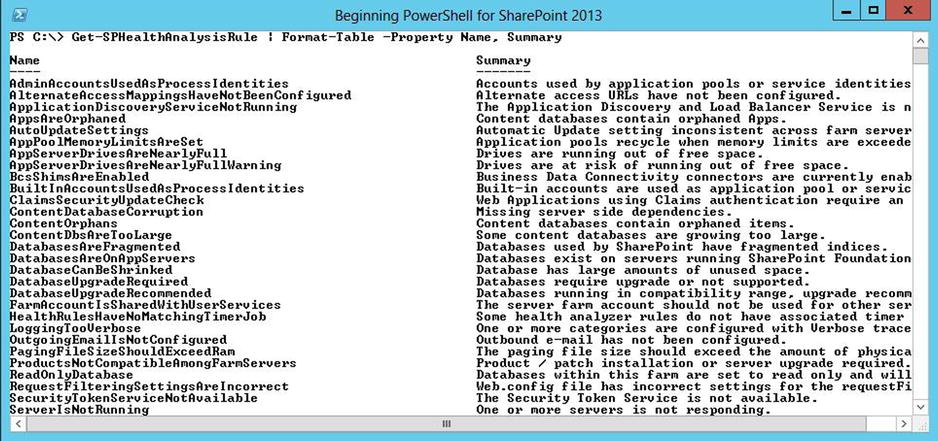
Figure 8-16. A list of all SharePoint Health Analysis rules returned by PowerShell
Disabling a SharePoint Health Analyzer Rule
To disable a Health Analyzer rule using PowerShell, you need to use the Disable-SPHealthAnalysisRule cmdlet. This method simply requires you to pass it a reference to the rule you wish to disable. Figure 8-17 shows the results of disabling the “Missing server side dependencies” rule.
# The code below uses the name of the rule, instead of the display name.
# These very often vary from one another.
$rule = Get-SPHealthAnalysisRule | Where{$_.Name -eq "ContentDatabaseCorruption"}

Disable-SPHealthAnalysisRule $rule
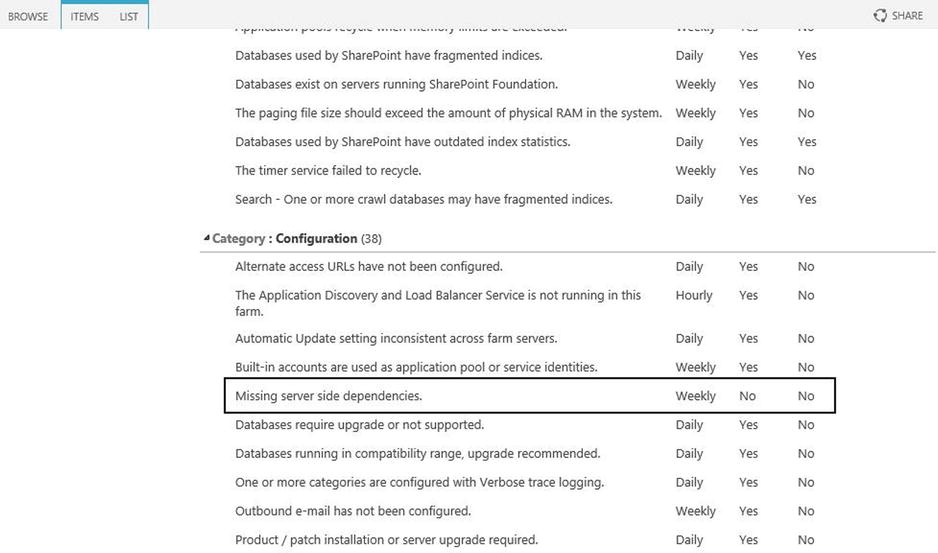
Figure 8-17. Viewing a disabled Health Analyzer rule in Central Administration
Enabling a SharePoint Health Analyzer Rule
The opposite operation to enable a disabled rule is simple enough: use the Enable-SPHealthAnalysisRule PowerShell cmdlet and pass it a reference to the rule object as a parameter. The following code will reenable the “Missing server side dependencies” rule that you’ve disabled in the previous section:
$rule = Get-SPHealthAnalysisRule | Where{$_.Name -eq "ContentDatabaseCorruption"}
Enable-SPHealthAnalysisRule $rule
Summary
In this chapter, you have learned to interact with the administrative components of a SharePoint 2013 farm using PowerShell. You have learned how to use the scripting language to monitor certain aspects of your environment, and have learned how to perform backups of your content and configurations. You have now covered all aspects of on-premises SharePoint management using PowerShell. In the next chapter, you will learn how you can apply everything you’ve learned so far in this book to the cloud, by introducing new mechanisms that you can use to manage an Office 365 SharePoint Online environment hosted with Microsoft.