![]()
Upgrading from SharePoint 2010 to 2013 Using PowerShell
In this last chapter of the book, I will take a step back and look at the scenario in which your organization already has a SharePoint 2010 environment deployed and is looking at upgrading it to SharePoint 2013. The upgrade story has been a changing one between versions of SharePoint for the last decade. If you take a look back at SharePoint Portal Server 2003, you had three options when it came to upgrading to SharePoint 2007. The first option was to do an in-place upgrade, which simply required you to put in the installation media, start the upgrade wizard, and pray for the best. Unfortunately, this didn’t work well for customized SharePoint environments. The second option, called the gradual update, allowed you to run both SharePoint 2003 and 2007 side by side. The third and last option was to do what Microsoft calls a database attach. This basically involved you to start by creating a new SharePoint farm running the desired version of SharePoint, in this case 2007, and to attach copies of your previous environment’s content databases. In many cases, the third option was the preferred one. People often decided that while upgrading the software that they might as well upgrade the hardware as well. From SharePoint 2007 to 2010, Microsoft dropped the option to do gradual upgrades, and decided to only stick with database attach, and in-place upgrades. With SharePoint 2013, the only option left to upgrade from a previous version is to attach a database to a new SharePoint 2013 server and upgrade it from their using PowerShell.
Of course, there is no way for you to automate the upgrade process from beginning to end using PowerShell; however, you can use several cmdlets provided to us by SharePoint to help us achieve your goal. This chapter is intended to be used as a quick reference guide for automating portions of your upgrade’s process. With the use of PowerShell, you will learn how to detect missing features in the new SharePoint 2013 farm, convert content databases to SharePoint 2013, create evaluation site collections to preview what the upgrade will look like, and, finally, upgrade a site collection.
At the end of this chapter you will have learned how to create a PowerShell script to automate as much as possible the upgrade process of a SharePoint 2010 farm to SharePoint 2013.
Throughout this chapter I will use a demo environment that you will build especially for demonstrating the upgrade process of a highly customized SharePoint farm.
Overview of the Source Environment
For demonstration purposes, the SharePoint 2010 environment you used had a lot of customized solutions. The 2010 farm contains two content databases and only has Search service applications instantiated within it. In almost any real-life scenario, your source 2010 environment will have various types of service applications.
You should note that only six types of service applications in SharePoint 2010 have an upgrade option for 2013. Those are:
- Business Data Connectivity service application
- Managed Metadata service application
- PerformancePoint Services service application
- Secure Store service application
- User Profile service application
- Search service application
To get more information on how to upgrade existing service applications to SharePoint 2013, please refer to the following TechNet article: http://technet.microsoft.com/en-us/library/jj839719.aspx.
The Database Detach/Attach Process
The simplest way for you to attach a content database from an existing SharePoint 2010 environment to a new one is to detach the database from the 2010 environment, to copy its associated .mdf file over to the new server, and then reattach it. In this section, I will give you a high-level view of how you can detach your SharePoint 2010 content databases and reattach them over to your new SharePoint 2013 environment.
Detaching and Copying a Database
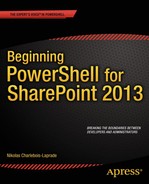
Again, let’s start with detaching your existing SharePoint 2010 content databases from the database server. The reason that you have to detach the content database is that you will get an error if you try to copy an attached SQL Server database. Figure 10-1 shows the error you will see if you try to copy a database to another location without first detaching it from its current SQL Server instance.
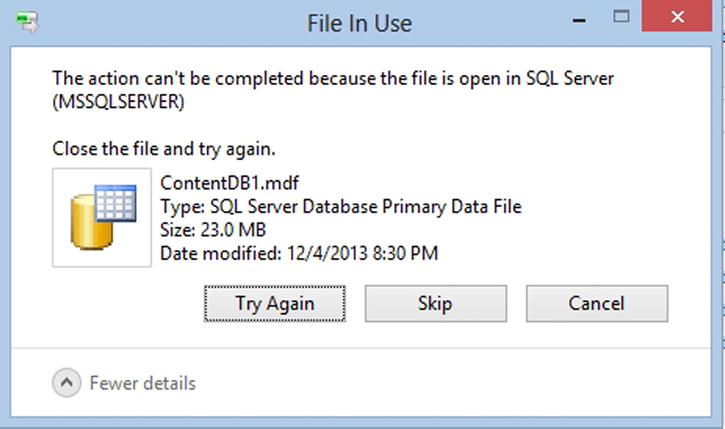
Figure 10-1. Error from trying to copy a SQL Server database that is still attached
There are several options available to you to detach a SQL database. The most common way of doing it is probably to open SQL Server Management Studio (SSMS), to navigate to your database, to right-click the instance, and to choose Tasks ![]() Detach (see Figure 10-2).
Detach (see Figure 10-2).
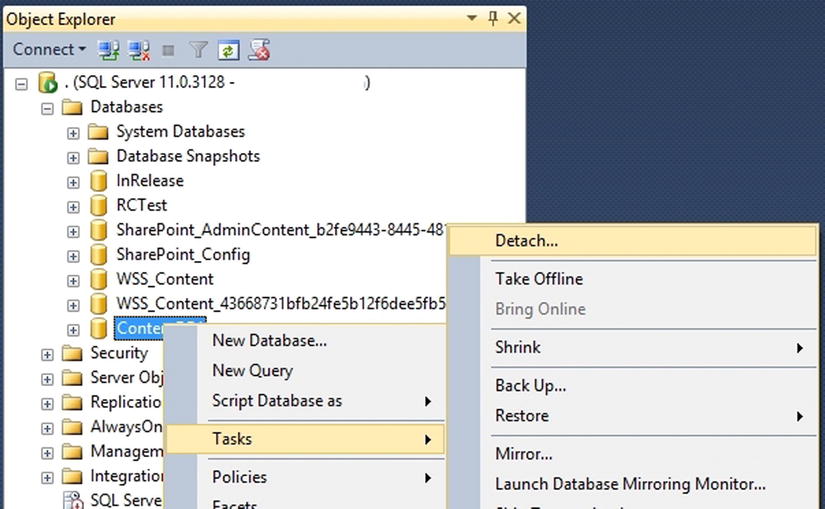
Figure 10-2. Detach a SQL Server database using SQL Server Management Studio (SSMS)
However, now that you’re a PowerShell superhero, you’ll want to spice up things a bit and automate the detach process via a script. To add to the fun, Microsoft has now made available a built-in SQL Server PowerShell module that allows you to directly interact with SQL Server using the PowerShell console. The SQLPS module can be imported into your PowerShell session by calling the Import-Module SQLPS cmdlet. It is important for you to note that this module is only available in SQL Server 2012. With this module imported onto your PowerShell session, you now have access to the extremely useful Invoke-SQLCmd PowerShell cmdlet that lets you execute SQL commands against our local SQL Server and databases.
In order for you to be able to detach the database, you need to first close all existing connections to it. In the Transact-SQL world, the SQL query to execute to achieve this is the following:
ALTER DATABASE <Database Name> SET SINGLE_USER WITH ROLLBACK IMMEDIATE
Once called, this query will tell your SQL database to close all existing clients’ connection. The way is now open for you to detach the database using PowerShell. The SQL query to use to detach a database is:
EXEC sp_detach_db '<Database Name>', 'true'
This query executed the sp_detach_db stored procedure that is responsible for detaching SQL databases. Putting it all together, your PowerShell script to detach your ContentDB1 database will look like the following. Figure 10-3 shows the execution of this script on your SQL Server hosting the SharePoint 2010 databases.
Import-Module SQLPS
Invoke-SQLCmd "ALTER DATABASE ContentDB1 SET SINGLE_USER WITH ROLLBACK IMMEDIATE"
Invoke-SQLCmd "EXEC sp_detach_db 'ContentDB1', 'true'"

Figure 10-3. Detaching a SQL Server database using PowerShell
Detaching a database simply means that it is no longer associated with any SQL Server, and that its .mdf file, which contains all the actual data, is no longer used by any process. The next step is to copy the .mdf file for our ContentDB1, along with its associated log file (.ldf), over to your new SharePoint 2013 SQL server. To keep things simple, we will do this manually. The database files are by default located under the installation directory of SQL Server. In my case, the files were located in C:Program FilesMicrosoft SQL ServerMSSQL11.MSSQLSERVERMSSQLDATA. For the purpose of this demo, copy the database files under folder C:Chapter10 on the destination SQL Server.
Attaching a Database to the New SharePoint Farm
Now that both files have been copied over, you are now ready to do the opposite process of what you just did, which is to attach the copied database onto your new SQL Server. The process to attach SQL databases is in every way similar to the one that you used to detach them. Import the SQLPS module in your PowerShell session, and then directly call the Invoke-SQLCmd cmdlet, passing it the following SQL query:
Invoke-SQLCmd "EXEC sp_attach_db @dbname = N'ContentDB1',
@filename1 = N'C:Chapter10ContentDB1.mdf',
@filename2 = N'C:Chapter10ContentDB1_log.ldf';"
This SQL query will execute the sp_attach_db stored procedure, telling it to name your newly attached database “ContentDB1”, and passing it the physical path to both the .mdf and the .ldf files. Figure 10-4 shows the execution of your PowerShell script that automates the attach process of your ContentDB1 database.

Figure 10-4. Attach a SQL Server database using PowerShell
Now that you’ve learned how to detach a database from one server to another one, you are ready to proceed and mount your SharePoint 2010 databases onto your new SharePoint 2013 environment. In this case, before proceeding with the next section, you will have to repeat the steps learned in the current section for your ContentDB2 database.
Mounting and Testing Content Databases
In this section, you will learn how you can validate that a content database is ready to be upgraded to SharePoint 2013. Assume that the SharePoint 2010 content databases have been already attached to a newly built SharePoint 2013 farm. As mentioned in the previous example, you had a SharePoint 2010 farm that contained two content databases. The first database, ContentDB1, contained three site collections, and the second one, ContentDB2, contained a single one. Figure 10-5 represents the two content databases and the site collections that they each contain.
Figure 10-5. SharePoint 2010 content databases and their associated site collections
The SharePoint environment in your example contains several custom solutions developed by developers in your organization. These solutions contain various features that are activated at different levels in the site collections. Each solution has been globally deployed in your farm, meaning that it has been made available to all web applications. Figure 10-6 lists the different custom applications that have been globally deployed in our SharePoint 2010 source farm.
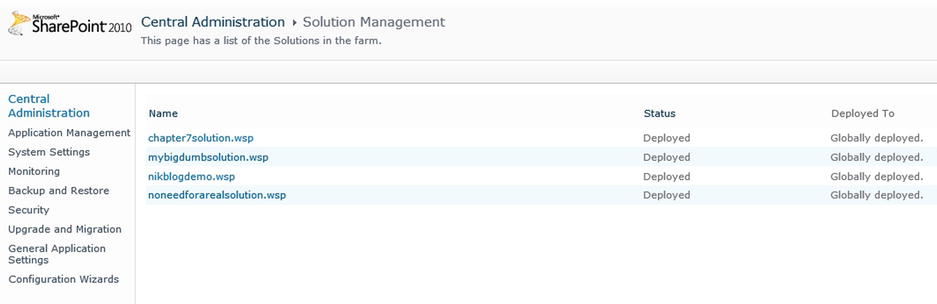
Figure 10-6. Globally deployed solutions in our farm
Pretend that you’ve completed the database detach process, and that the two content databases (ContentDB1 & ContentDB2) have both been copied over and attached to the new SharePoint 2013 farm. You now need to tell your new SharePoint 2013 about the fact that these two new databases are actually SharePoint content databases. To do so, call the Mount-SPContentDatabase PowerShell cmdlet. This cmdlet requires you to pass in the URL of a web application to link the content databases. For the purpose of the demonstration, create a new SharePoint web application on port 8333 (port number chosen randomly) using PowerShell, and attach the content databases to it. The following PowerShell script will automate this process:
$ap = New-SPAuthenticationProvider
$admin = Get-SPManagedAccount contosoadministrator

$webApp = New-SPWebApplication -Name "DemoWebApp" -URL "http://localhost:8333 " -ApplicationPool"DemoAppPool" -ApplicationPoolAccount $admin –AuthenticationProvider $ap

Mount-SPContentDatabase "ContentDB1" -ebApplication "http://localhost:8333 "
Mount-SPContentDatabase "ContentDB2" -ebApplication "http://localhost:8333 "
The process of mounting a database can take several minutes. During the process, PowerShell will update the percentage completed for the mount operation. Now, remember that our SharePoint 2010 farm had these four custom solutions deployed onto it; but what about the 2013 environment? If you execute this code before you’ve correctly deployed these four solutions in your new environment, you may get errors on databases that contain site collections on which these features have been enabled. Figure 10-7 shows the errors thrown by PowerShell when trying to upgrade ContentDB1.
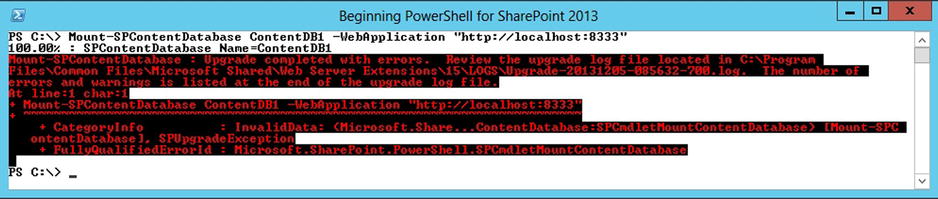
Figure 10-7. Errors mounting a SharePoint 2010 Content Database in a SharePoint 2013 farm
As indicated in the error message, to obtain more information related to what the actual error really is, you can have a look at the log file generated in the 15 hive. Another option is to use the Test-SPContentDatabase PowerShell cmdlet that will take a look at your partially mounted database and write the associated upgrade errors on screen. Figure 10-8 shows some of the errors that are being generated by calling this cmdlet on your ContentDB1 database.
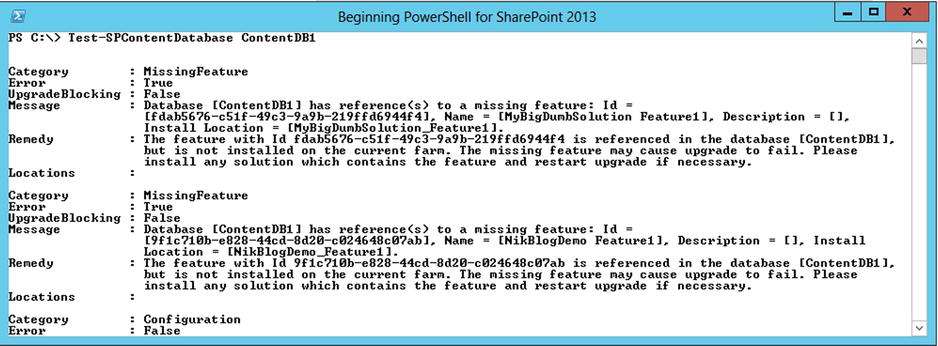
Figure 10-8. Upgrade errors using the Test-SPContentDatabae PowerShell cmdlet
You can clearly identify that your ContentDB1 database contains at least one site collection that requires the “MyBigDumbSolution” solution deployed, as well as another site collection requiring the “NikBlogDemo” solution. In a real-world scenario, when you upgrade a SharePoint 2010 environment to a new SharePoint 2013 one, you’ll want to make sure that all of the solutions deployed on the source farm are also deployed on the destination one. This will ensure that you don’t get any errors about missing features. However, if you are unsure if some solutions on the source farm are still being used or not, then it may be a good idea to do a brute force approach and only deploy the features reported as missing on the destination farm. You may as well do a cleanup while you are upgrading. In my case, I’ll go ahead and deploy all of the four SharePoint 2010 custom solutions identified in Figure 10-6. Using the techniques that you learned in Chapter 7, deploy the custom SharePoint 2010 features over to your new SharePoint 2013 environment. Figure 10-9 shows that the same four solutions that you identified earlier have been successfully deployed onto your new SharePoint 2013 farm.
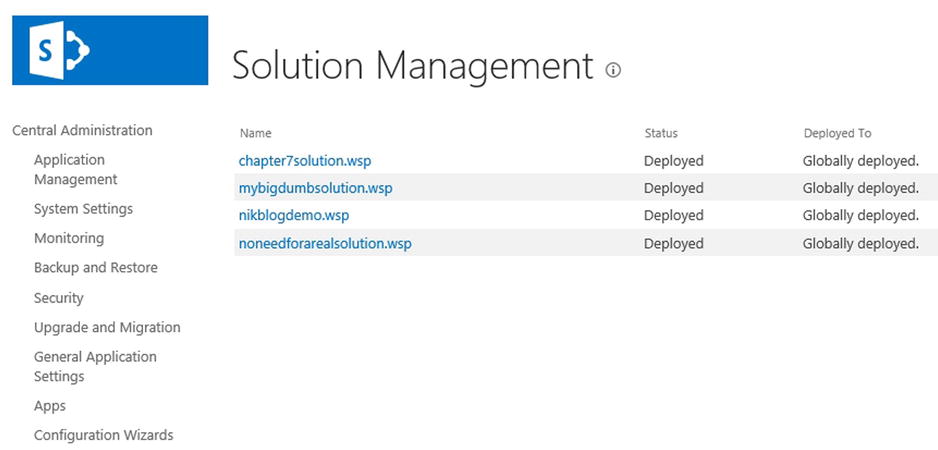
Figure 10-9. Our four custom SharePoint 2010 solutions deployed onto the new SharePoint 2013 environment
With all the custom solutions brought over, you are now ready to analyze your content database for errors. Before you move forward, however, take a look at what would have happened if you had tried mounting the content databases after the four custom solutions had been properly deployed onto your environment. To test this out, you will need to undo the mounting process that you have already done on your content databases. This process is called dismounting a content database from a SharePoint farm. Using PowerShell, you can call the Dismount-SPContentDatabase cmdlet passing it the name of the database to detach. Figure 10-10 shows the execution of the following script to detach both your ContentDB1 and ContentDB2 databases from your SharePoint 2013 environment:
Dismount-SPContentDatabase ContentDB1 -Confirm:$false
Dismount-SPContentDatabase ContentDB2 -Confirm:$false

Figure 10-10. Dismounting SharePoint content databases from a farm using PowerShell
Note that you are only doing this for the purpose of explaining to you how the process would have worked from beginning to end, assuming no upgrade errors were encountered along the way. You don’t normally have to dismount the databases after the missing features have been added to the farm. If you now try to remount the two content databases, no errors will be thrown in the PowerShell console. There may be warnings in the background, but these won’t be shown on screen, unless you rerun the Test-SPContentDatabase cmdlet. Figure 10-11 shows the results of mounting your two content databases in a scenario in which no errors were encountered.
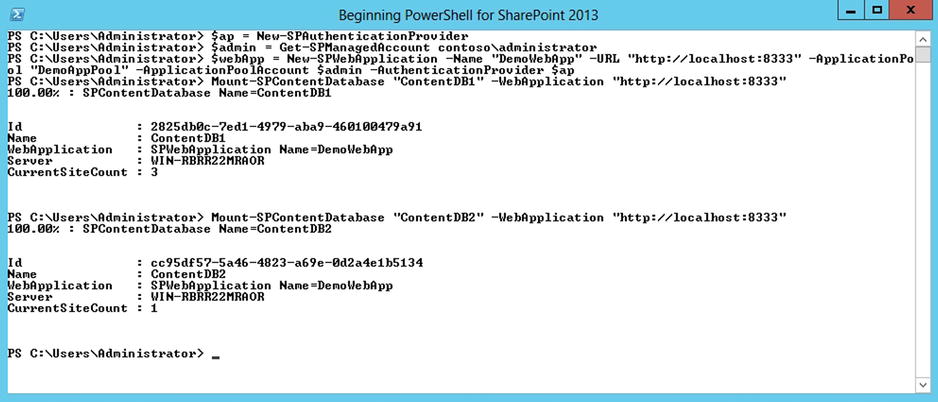
Figure 10-11. Mounting SharePoint databases with no errors using PowerShell
SharePoint 2010 Compatibility Mode
You are now done with your migration—at least, almost done. Now that your two content databases have been attached to the SharePoint 2013 farm, SharePoint will recognize the site collections they contain and make them its own. If you look in Central Administration, you will see that the four content databases (three contained in ContentDB1, and one contained in ContentDB2) are not shown under the web application that you created on port 8333 earlier. Figure 10-12 shows the listing of site collections for your web application in Central Administration.

Figure 10-12. Site collections from the imported SharePoint 2010 content databases view in Central Administration
This means that the site collections listed here are registered with SharePoint and accessible via the browser. If you try to navigate to any of them, you should see something that looks exactly like SharePoint 2010 site collections, with the only difference that they will have a notification bar at the top. This notification bar is only there to notify the administrators that the site that they are viewing is running in a SharePoint 2010 compatibility mode, and that they should probably think about upgrading it to SharePoint 2013. Even in “compatibility mode,” nearly all of the SharePoint 2010 features are still made available to the users. Figure 10-13 shows your site collection 1A access through the browser.
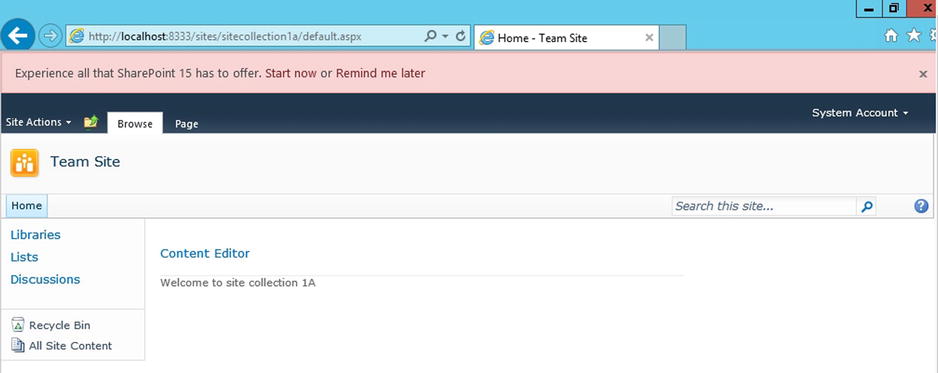
Figure 10-13. Site collection 1A viewed in SharePoint 2010 compatibility mode
Upgrade Evaluation Site Collection
One of the nicest new additions to the SharePoint 2013 upgrade story is the introduction of this new concept of creating an evaluation site collection that lets users preview their existing site collection that are in compatibility mode as if they had been permanently upgraded to SharePoint 2013. An evaluation site collection is a temporary, exact copy of a site collection that lets users test out how certain features or portion of their sites will react to the new 2013 components. Evaluation site collections are created under the same parent URL, but an -eval is appended to the site collections’ names.
Evaluation site collections are created by a timer job that runs on a daily basis by default. When requesting a new evaluation site collection, users are simply putting the request in a queue, and this request is later picked up by the timer job that then processes the request and creates the new site collection. Using PowerShell, it is possible for an administrator to put such a request in the timer job’s queue by calling the Request-SPUpgradeEvaluationSite. Remember that this simply puts the request in the waiting list; it doesn’t automatically create the evaluation site. If you wish to accelerate the process, you can simply force the “Create Upgrade Evaluation Site Collections job” to run now. The following PowerShell lines will automate and initiate the creation of the upgrade evaluation site collection for your SiteCollection1A site collection.
Request-SPUpgradeEvaluationSite http://localhost:8333/sites/sitecollection1a

$webApp = Get-SPWebApplication http://localhost:8333

$evalJob = Get-SPTimerJob | ?{$_.Title -match "Create Upgrade Evaluation Site Collections job"} | ?{$_.Parent -eq $webApp}

Start-SPTimerJob $evalJob
Once executed, you should be able to navigate to your upgrade evaluation site collection by adding -eval to the URL. In this case, the upgrade evaluation site collection for the SiteCollection1A site collection has been created at http://localhost:8333/sites/sitecollection1a-eval. It is important to note that the upgrade process can take several minutes to complete. Don’t worry if the first time you try to access your evaluation site is still looks like 2010, or worst, like a mix of both 2010 to 2013. Once the upgrade process has completed, you should be able to view and interact with your site collection in its temporary 2013 shape. Figure 10-14 shows the upgrade evaluation site collection for site collection 1A.
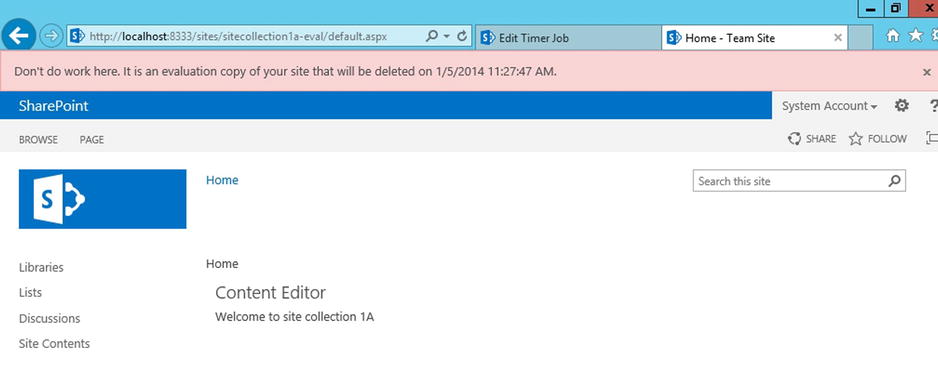
Figure 10-14. Upgrade Evaluation site collection for SiteCollection1A
![]() Note Running the Request-SPUpgradeEvaluationSite PowerShell cmdlet against the root site collection creates the upgrade evaluation site collection under: /sites/root-eval and it is not assigned any expiry date.
Note Running the Request-SPUpgradeEvaluationSite PowerShell cmdlet against the root site collection creates the upgrade evaluation site collection under: /sites/root-eval and it is not assigned any expiry date.
Note that this upgrade evaluation site collection is only temporary and that it will be automatically deleted after a period of time. By default, SharePoint 2013 sets the expiry date of such site collections to 30 days after their creation. You can modify this date using the ExpirationDate property of the site collection. For example, in this case, you can change the expiration date of your evaluation site collection to tomorrow, using the following lines of PowerShell. Figure 10-15 shows the notification bar of your upgrade evaluation site collection after updating the expiration date to tomorrow.
$now = ([System.DateTime])::Now
$tomorrow = $now.AddDays(1)
$evalSite = Get-SPSite http://localhost:8333/sites/sitecollection1a-eval
$evalSite.ExpirationDate = $tomorrow

Figure 10-15. New expiration date set by PowerShell
Upgrading Site Collections
After you are done testing your upgrade using the upgrade evaluation site collection, you can initiate the official upgrade process for your site collections. Using PowerShell, you can initiate the upgrade process by calling the Upgrade-SPSite cmdlet passing it the URL of the site we wish to upgrade. In this example, the following lines of PowerShell will call the upgrade process on your SiteCollection1A site collection:
Upgrade-SPSite http://localhost:8333/sites/sitecollection1a -VersionUpgrade
Unlike the process of creating the upgrade evaluation site collection, the official upgrade process is instantaneous. Just as with the mounting operation, PowerShell will initiate the upgrade sequence and display the percentage completed on screen. Remember that upgrading a site collection does not automatically remove its associated upgrade evaluation site collection. You’ll either need to remove it manually or wait for it to fade out and be picked up by the deletion timer job after its expiration date is passed.
Summary
This is it: you are now qualified to upgrade your organization’s SharePoint 2010 environment to a brand new shiny SharePoint 2013 one. You are now a PowerShell rock star! In this chapter, you learned how the new upgrade evaluation site collection process works in SharePoint 2013, and you have automated its creation using PowerShell. It is important to remember that by using these, your users testing the upgraded environment should not put any business critical information in them. When the official upgrade process will be initiated, only data contained in the original site collection will be brought over.