
![]()
Using Sessions and OAuth to Authorize and Authenticate Users in Node.js Apps
Security is an important aspect of any real-world web application. This is especially true nowadays, because our apps don’t function in silos anymore. We, as developers, can and should leverage numerous third-party services (e.g., Twitter, GitHub) or become service providers ourselves (e.g., provide a public API).
We can makes our apps and communications secure with the usage of various approaches, such as token-based authentication and/or OAuth (http://oauth.net). Therefore, in this practical guide, I dedicate the whole chapter to matters of authorization, authentication, OAuth, and best practices. We’ll look at the following topics:
- Authorization with Express.js middleware
- Token-based authentication
- Session-based authentication
- Project: adding e-mail and password login to Blog
- Node.js OAuth
- Project: Adding Twitter OAuth 1.0 sign-in to Blog with Everyauth (https://github.com/bnoguchi/everyauth)
Authorization with Express.js Middleware
Authorization in web apps usually means restricting certain functions to privileged clients. These functions can either be methods, pages, or REST API end points.
Express.js middleware allows us to apply certain rules seamlessly to all routes, groups of routes (namespacing), or individual routes.
- All routes: app.get('*', auth)
- Groups of routes: app.get('/api/*', auth)
- Individual routes: app.get('/admin/users', auth)
For example, if we want to protect all /api/ endpoints, we execute the following:
app.all('/api/*', auth);
app.get('/api/users', users.list);
app.post('/api/users', users.create);
...
Another way of doing the same thing is to execute:
app.get('/api/users', auth, users.list);
app.post('/api/users', auth, users.create);
...
In the previous examples, auth() is a function with three parameters: req, res, and next—for example,
var auth = function(req, res, next) {
  //authorize user
  //if auth failed, then exit is next(new Error('Not authorized'));
  //or res.send(401);
   return next();
}
The next() part is important, because this is how Express.js proceeds to execute subsequent request handlers and routes (if there’s a match in a URL pattern).
For applications to know which privileges a specific client has (e.g., admin), we must add an authentication step. In the previous example, this step goes inside the auth() function.
The most common authentication is a cookie & session–based authentication, and the next section deals with this topic. However, in some cases, more REST-fulness is required, or cookies/sessions are not supported well (e.g., mobile). In this case, it’s beneficial to authenticate each request with a token (probably using the OAuth2.0 (http://tools.ietf.org/html/rfc6749) scheme). The token can be passed in a query string or in HTTP request headers. Alternatively, we can send some other authentication combination of information, such as e-mail/username and password, or API key, or API password instead of a token.
So, in our example of token-based authentication, each request can submit a token in a query string (accessed via req.query.token). And, if we have the correct value stored somewhere in our app (database, or in this example just a constant SECRET_TOKEN), we can check the incoming token against it. If the token matches our records, we call next() to proceed with the request executions, if not then we call next(error) which triggers Express.js error handlers execution (see the note below):
var auth = function(req, res, next) {
  if (req.query.token && token === SECRET_TOKEN) {
  // Client is fine, proceed to the next route
    return next();
  } else {
    return  next(new Error('Not authorized'));
     // or res.send(401);
  }
};
In a more realistic example, we use API keys and secrets to generate HMAC-SHA1 (hash-based message authentication code-secure hash algorithm strings, then compare them with the value in req.query.token.
![]() Note Calling next() with an error argument is analogous to throwing in the towel (i.e., to give up). The Express.js app enters the error mode and proceeds to the error handlers.
Note Calling next() with an error argument is analogous to throwing in the towel (i.e., to give up). The Express.js app enters the error mode and proceeds to the error handlers.
We just covered token-based authentication, which is often used in REST APIs. However, the user-facing web apps (i.e., browser-enabled users & consumers) come with cookies. We can use cookies to store and send session IDs with each request. Cookies are similar to tokens, but require less work for us, the developers!. This approach is the cornerstone of session-based authentication. The session-based method is the recommended way for basic web apps, because browsers already know what to do with session headers. In addition, in most platforms and frameworks, the session mechanism is built into the core. So, let’s jump straight into session-based authentication with Node.js.
Session-Based Authentication
Session-based authentication is done via the session object in the request object req. A web session in general is a secure way to store information about a client so that subsequent requests from that same client can be identified.
In the Express.js 4.x (versions 4.1.2 and 4.2.0 as of this writing), we’ll need to import (require()) these modules manually, because Express.js 4.x separated these and some other middleware out of its package. For example, to include and use cookie-parser and express-session:
var cookieParser = require('cookie-parser'),
var session = require('express-session'),
...
app.use(cookieParser());
app.use(session());
Needless to say, cookie-parser and express-session must be installed via NPM into the project’s node_modules folder.
To use the session in a typical Express.js 3.x app, two pieces of middleware need to be added to the configuration:
- express.cookieParser(): allows for parsing of the client/request cookies.
- express.session(): exposes the res.session object in each request handler, and stores data in the app memory or some other persistent store like MongoDB or Redis.
In later examples don’t mention Express.js version, assume that it works for both 3.x and 4.x.
The rest is trivial; we can store any data in req.session and it appears automagically on each request from the same client (assuming their browser supports cookies). Hence, the authentication consists of a route that stores some flag (true/false) in the session and of an authorization function in which we check for that flag (if true, then proceed; otherwise, exit). For example,
app.post('/login', function(req, res, next) {
  // This function checks for credentials
  // passed in the request's payload
  if (checkForCredentials(req)) {
    req.session.auth = true;
    res.redirect('/dashboard'),  // Private resource
  } else {
    res.send(401); // Not authorized
  }
});
![]() Warning Avoid storing any sensitive information in cookies. The best practice is not to store any info in cookies manually—except session ID, which Express.js middleware stores for us automatically—because cookies are not secure. Also, cookies have a size limitation (depending on the browser, with Internet Explore being the stringiest) that is very easy to reach.
Warning Avoid storing any sensitive information in cookies. The best practice is not to store any info in cookies manually—except session ID, which Express.js middleware stores for us automatically—because cookies are not secure. Also, cookies have a size limitation (depending on the browser, with Internet Explore being the stringiest) that is very easy to reach.
By default, Express.js uses in-memory session storage. This means that every time an app is restarted or crashes, the sessions are wiped out. To make sessions persistent and available across multiple servers, we can use Redis or MongoDB as session restore.
Project: Adding E-mail and Password Login to Blog
To enable session-based authentication in Blog, we need to do the following:
- Import and add the session middleware to the configuration part of app.js.
- Implement the authorization middleware authorize with a session-based authorization so we can re-use the same code for many routes.
- Add the middleware from #2 (step above) to protected pages and routes in app.js routes, e.g., app.get('/api/, authorize, api.index).
- Implement an authentication route POST /login, and a logout route, GET /logout in user.js.
Session Middleware
Let’s add the automatic cookie parsing and support for session middleware in these two lines by putting them in the middle of configurations in app.js:
// Other middleware
app.use(cookieParser('3CCC4ACD-6ED1-4844-9217-82131BDCB239'));
app.use(session({secret: '2C44774A-D649-4D44-9535-46E296EF984F'}));
// Routes
For Express.js 3.x:
// Other middleware
app.use(express.cookieParser('3CCC4ACD-6ED1-4844-9217-82131BDCB239'));
app.use(express.session({secret: '2C44774A-D649-4D44-9535-46E296EF984F'}));
// Routes
![]() Warning You should replace randomly generated values with your own ones.
Warning You should replace randomly generated values with your own ones.
session() must be preceded by cookieParser() because session depend on cookies to work properly. For more information about these and other Express.js/Connect middleware, refer to Pro Express.js 4 [Apress, 2014].
cookie-session (express.cookieSession() in Express.js 3.x) can be used in some cases, such as var cookieSession = require('cookie-session'), app.use(cookieSession({secret: process.env.SESSION_SECRET}));. The difference is that express-session uses secure in-memory or Redis storage—and cookies store only for the session ID, i.e., sid—whereas cookie-session uses browser cookies to store session information. In other words, the entire session is serialized into cookie-based storage, not just the session key. This approach should be avoided because of cookie size limitations and security concerns.
It’s useful to pass information to the templates regardless of whether the request is authenticated. We can do so by adding middleware that checks the req.session.admin value for truthyness and adds an appropriate property to res.locals:
app.use(function(req, res, next) {
  if (req.session && req.session.admin)
    res.locals.admin = true;
  next();
});
Authorization in Blog
Authorization is also done via middleware, but we won’t set it up right away with app.use like we did in the snippet for res.locals. Instead, we define a function that checks for req.session.admin to be true, and proceeds if it is. Otherwise, the 401 Not Authorized error is thrown and the response is ended.
// Authorization
var authorize = function(req, res, next) {
  if (req.session && req.session.admin)
    return next();
  else
    return res.send(401);
};
Now we can add this middleware to certain protected end points:
...
app.get('/admin', authorize, routes.article.admin);
app.get('/post', authorize, routes.article.post);
app.post('/post', authorize, routes.article.postArticle);
We add the authorize middleware to API routes as well:
app.all('/api', authorize);
app.get('/api/articles', routes.article.list)
app.post('/api/articles', routes.article.add);
app.put('/api/articles/:id', routes.article.edit);
app.del('/api/articles/:id', routes.article.del);
The app.all('/api', authorize); is a more compact alternative to adding authorize to all /api/... routes.
The full source code of the app.js file after adding session support and authorization middleware is as follows (under the ch6/password folder):
var express = require('express'),
  routes = require('./routes'),
  http = require('http'),
  path = require('path'),
  mongoskin = require('mongoskin'),
  dbUrl = process.env.MONGOHQ_URL ||
    'mongodb://@localhost:27017/blog',
  db = mongoskin.db(dbUrl, {safe: true}),
  collections = {
    articles: db.collection('articles'),
    users: db.collection('users')
  };

// Express.js Middleware
var session = require('express-session'),
  logger = require('morgan'),
  errorHandler = require('errorhandler'),
  cookieParser = require('cookie-parser'),
  bodyParser = require('body-parser'),
  methodOverride = require('method-override'),

var app = express();
app.locals.appTitle = 'blog-express';

// Expose collections to request handlers
app.use(function(req, res, next) {
  if (!collections.articles || ! collections.users)
    return next(new Error('No collections.'));
  req.collections = collections;
  return next();
});

// Express.js configurations
app.set('port', process.env.PORT || 3000);
app.set('views', path.join(__dirname, 'views'));
app.set('view engine', 'jade'),

// Express.js middleware configuration
app.use(logger('dev'));
app.use(bodyParser.json());
app.use(bodyParser.urlencoded());
app.use(cookieParser('3CCC4ACD-6ED1-4844-9217-82131BDCB239'));
app.use(session({secret: '2C44774A-D649-4D44-9535-46E296EF984F'}));
app.use(methodOverride());
app.use(require('stylus').middleware(__dirname + '/public'));
app.use(express.static(path.join(__dirname, 'public')));

// Authentication middleware
app.use(function(req, res, next) {
  if (req.session && req.session.admin)
    res.locals.admin = true;
  next();
});

// Authorization Middleware
var authorize = function(req, res, next) {
  if (req.session && req.session.admin)
    return next();
  else
    return res.send(401);
};

if ('development' == app.get('env')) {
  app.use(errorHandler());
}

// Pages & routes
app.get('/', routes.index);
app.get('/login', routes.user.login);
app.post('/login', routes.user.authenticate);
app.get('/logout', routes.user.logout);
app.get('/admin', authorize, routes.article.admin);
app.get('/post', authorize, routes.article.post);
app.post('/post', authorize, routes.article.postArticle);
app.get('/articles/:slug', routes.article.show);

// REST API routes
app.all('/api', authorize);
app.get('/api/articles', routes.article.list);
app.post('/api/articles', routes.article.add);
app.put('/api/articles/:id', routes.article.edit);
app.del('/api/articles/:id', routes.article.del);

app.all('*', function(req, res) {
  res.send(404);
})

var server = http.createServer(app);
var boot = function () {
  server.listen(app.get('port'), function(){
    console.info('Express server listening on port ' +
      app.get('port'));
  });
}
var shutdown = function() {
  server.close();
}
if (require.main === module) {
  boot();
}
else {
  console.info('Running app as a module')
  exports.boot = boot;
  exports.shutdown = shutdown;
  exports.port = app.get('port'),
}
Authentication in Blog
The last step in session-based authorization is to allow users and clients to turn the req.session.admin switch on and off. We do this by having a login form and processing the POST request from that form.
For authenticating users as admins we set the appropriate flag (admin=true), in the routes.user.authenticate in the user.js file. This is done in the POST /login route which we defined in the app.js— a line that has this statement: app.post('/login', routes.user.authenticate);.
In user.js, expose the method to the importer, i.e., the file that imports this user.js module:
exports.authenticate = function(req, res, next) {
The form on the login page submits data to this route. In general, a sanity check for the input values is always a good idea. If values are falsy (including empty values), we’ll render the login page again with the message error. The return keyword ensures the rest of the code in this method isn’t executed. If the values are non-empty (or otherwise truthy), then the request handler will not terminate yet and proceed to the next statements:
if (!req.body.email || !req.body.password)
   return res.render('login',{
      error: 'Please enter your email and password.'
    });
Thanks to the database middleware in app.js, we can access database collections in req.collections. In our app’s architecture, e-mail is a unique identifier (there are no two accounts with the same e-mail), so we use the findOne function to find a match of the e-mail and password combination (logical AND):
req.collections.users.findOne({
  email: req.body.email,
  password: req.body.password
}, function(error, user){
  ...
![]() Warning In virtually all cases, we don’t want to store passwords as a plain text; we should store salts and password hashes instead. In this way, if the database gets compromised, passwords are not seen. For salting, use the core Node.js module crypto.
Warning In virtually all cases, we don’t want to store passwords as a plain text; we should store salts and password hashes instead. In this way, if the database gets compromised, passwords are not seen. For salting, use the core Node.js module crypto.
findOne returns an error object and the user result object. However, we should still do error processing manually:
    if (error) return next(error);
    if (!user) return res.render('login', {error: 'Incorrect email&password combination.'});
If the program has made it thus far (avoided a lot of return statements previously), we can authenticate the user as administrator thus enabling the authentication and the auth (authorization) method:
    req.session.user = user;
    req.session.admin = user.admin;
    res.redirect('/admin'),
  })
};
The logout route is trivial. We clear the session by calling destroy() on req.session:
exports.logout = function(req, res, next) {
  req.session.destroy();
  res.redirect('/'),
};
The full source code of user.js for your reference is as follows:
exports.list = function(req, res){
  res.send('respond with a resource'),
};
exports.login = function(req, res, next) {
  res.render('login'),
};
exports.logout = function(req, res, next) {
  req.session.destroy();
  res.redirect('/'),
};
exports.authenticate = function(req, res, next) {
  if (!req.body.email || !req.body.password)
    return res.render('login', {
      error: 'Please enter your email and password.'
    });
  req.collections.users.findOne({
    email: req.body.email,
    password: req.body.password
  }, function(error, user){
    if (error) return next(error);
    if (!user) return res.render('login', {
      error: 'Incorrect email&password combination.'
    });
    req.session.user = user;
    req.session.admin = user.admin;
    res.redirect('/admin'),
  })
};
Running the App
Now everything should be set up properly to run Blog. Contrary to the example in Chapter 5, we see protected pages only when we’re logged in. These protected pages enable us to create new posts, and to publish and unpublish them. But as soon as we click “Logout” in the menu, we no longer can access the administrator page.
The executable code is under the ch6/password folder of the practicalnode repository: https://github.com/azat-co/practicalnode.
OAuth—which can be located on NPM (https://www.npmjs.org/package/oauth) and GitHub (https://github.com/ciaranj/node-oauth)—is the powerhouse of OAuth 1.0/2.0 schemes for Node.js. It’s a module that generates signatures, encryptions, and HTTP headers, and makes requests. We still need to initiate the OAuth dances (i.e., requests back and forth between consumer, provider and our system), write the callback routes, and store information in sessions or databases. Refer to the service provider’s (e.g., Facebook, Twitter, Google) documentation for end points, methods, and parameter names.
It is recommended that node-auth be used when complex integration is needed or when only certain pieces of OAuth are needed (e.g., header signatures are generated by node-auth, but the request is made by the superagent library).
To add OAuth version 0.9.11 (the latest as of this writing) to your project, simply run:
$ npm install [email protected]
Twitter OAuth 2.0 Example with Node.js OAuth
OAuth 2.0 is less complicated and, some might argue, less secure than OAuth 1.0. The reasons for this are numerous and better understood when written by Eran Hammer, the person who participated in OAuth2.0 creation: OAuth 2.0 and the Road to Hell.
In essence, OAuth 2.0 is similar to the token-based authorization we examined earlier, for which we have a single token, called a bearer, that we pass along with each request. To get that token, all we need to do is exchange our app’s token and secret for the bearer.
Usually, this bearer can be stored for a longer time than OAuth 1.x tokens (depends on the rules set by a specific service-provider), and can be used as a single key/password to open protected resources. This bearer acts as our token in the token-based auth.
Here’s an ordinary example from Node.js OAuth docs (https://github.com/ciaranj/node-oauth#oauth20). First, we create an oauth2 object that has a Twitter consumer key and secret (replace the values with yours):
var OAuth = require('OAuth'),
var OAuth2 = OAuth.OAuth2;
var twitterConsumerKey = 'your key';
var twitterConsumerSecret = 'your secret';
var oauth2 = new OAuth2(server.config.keys.twitter.consumerKey,
  twitterConsumerSecret,
  'https://api.twitter.com/',
  null,
  'oauth2/token',
  null
);
Then, we request access to the token/bearer from the service provider:
oauth2.getOAuthAccessToken(
  '',
  {'grant_type': 'client_credentials'},
  function (e, access_token, refresh_token, results){
    console.log('bearer: ', access_token);
    // Store bearer
    // Make OAuth2 requests using this bearer to protected endpoints
  }
);
Now we can store the bearer for future use and make requests to protected end points with it.
![]() Note Twitter uses OAuth2.0 for the so called app-only authorizations which are requests to protected resources. Those requests are made on behalf of the applications only (not on behalf of users by the apps). Twitter uses OAuth 1.0 for normal auths, i.e., requests made on behalf of the users by the app). Not all endpoints are available via app-only auth, and quotas/limitations are different. Please refer to the official documentation at http://dev.twitter.com.
Note Twitter uses OAuth2.0 for the so called app-only authorizations which are requests to protected resources. Those requests are made on behalf of the applications only (not on behalf of users by the apps). Twitter uses OAuth 1.0 for normal auths, i.e., requests made on behalf of the users by the app). Not all endpoints are available via app-only auth, and quotas/limitations are different. Please refer to the official documentation at http://dev.twitter.com.
Everyauth
The Everyauth module allows for multiple OAuth strategies to be implemented and added to any Express.js app in just a few lines of code. Everyauth comes with strategies for most of the service providers, so there’s no need to search and implement service provider-specific end points, parameters names, and so forth. Also, Everyauth stores user objects in a session, and database storage can be enabled in a findOrCreate callback using a promise pattern.
![]() Tip Everyauth has an e-mail and password strategy that can be used instead of the custom-built auth. More information about it can be found in Everyauth documentation at the GitHub repository (https://github.com/bnoguchi/everyauth#password-authentication).
Tip Everyauth has an e-mail and password strategy that can be used instead of the custom-built auth. More information about it can be found in Everyauth documentation at the GitHub repository (https://github.com/bnoguchi/everyauth#password-authentication).
Everyauth submodules that enable service provider-specific authorization strategies (as of this writing, take from its GitHub repo (https://github.com/bnoguchi/everyauth/blob/master/README.md)) are as follows:
- Password
- Google Hybrid
- Dropbox
- Tumblr
- Evernote
- GitHub
- Foursquare
- Yahoo!
- Justin.tv
- Vimeo
- 37signals (Basecamp, Highrise, Backpack, Campfire)
- Readability
- AngelList
- Dwolla
- OpenStreetMap
- VKontakte (Russian Social Network)
- Mail.ru (Russian Social Network)
- Skyrock
- Gowalla
- TripIt
- 500px
- SoundCloud
- mixi
- Mailchimp
- Mendeley
- Stripe
- Datahero
- Salesforce
- Box.net
- OpenId
- LDAP (experimental; not production tested)
- Windows Azure Access Control Service
Project: Adding Twitter OAuth 1.0 Sign-in to Blog with Everyauth
A typical OAuth 1.0 flow consists of these three steps (simplified):
- Users go to a page/route to initiate the OAuth dance. There, our app requests a token via GET/POST requests using the signed app’s consumer key and secret. For example, /auth/twitter is added automatically by Everyauth.
- The app uses the token extracted in step 1 and redirects users to the service-provider (Twitter) and waits for the callback.
- The service provider redirects users back to the app which catches the redirect in the callback route (e.g., /auth/twitter/callback). Then, the app extracts the access token, the access token secret, and the user information from the Twitter incoming request body / payload.
However, because we’re using Everyauth, we don’t need to implement requests for the initiate and the callback routes!
Let’s add a Sign in with Twitter button to our project. We need the button itself (image or a link), app key, and secret (obtainable at dev.twitter.com), and then we must augment our authorization route to allow for specific Twitter handlers to be administrated on Blog.
Adding a Sign-in with a Twitter Link
By default, Everyauth uses the /auth/:service_provider_name pattern to initiate the three-legged OAuth 1.0 strategy. This, of course, can be customized, but to keep it short and simple (KISS), we can just add this link to menu.jade:
li(class=(menu === 'login') ? 'active' : '')
  a(href='/auth/twitter') Sign in with Twitter
The whole menu.jade looks like this:
.menu
  ul.nav.nav-pills
    li(class=(menu === 'index') ? 'active' : '')
      a(href='/') Home
    if (admin)
      li(class=(menu === 'post') ? 'active' : '')
        a(href="/post") Post
      li(class=(menu === 'admin') ? 'active' : '')
        a(href="/admin") Admin
      li
        a(href="/logout") Log out
    else
      li(class=(menu === 'login')? 'active' : '')
        a(href='/login') Log in
      li
        a(href='/auth/twitter') Sign in with Twitter
Configuring the Everyauth Twitter Strategy
To add the Everyauth module (everyauth) to Blog, type the following in the terminal:
$ npm install [email protected] --save
The configuration of the Everyauth Twitter strategy is implemented in app.js, but in larger apps it’s a good idea to abstract these types of strategies into separate files. The most important thing to remember is that Everyauth middleware needs to precede the app.route call.
To procure the Twitter app consumer key and secret, we harness environmental variables via process.env:
var TWITTER_CONSUMER_KEY = process.env.TWITTER_CONSUMER_KEY
var TWITTER_CONSUMER_SECRET = process.env.TWITTER_CONSUMER_SECRET
To pass these variables we can use Makefile. In the Makefile, add these lines, substituting ABC and XYZ with your values:
start:
    TWITTER_CONSUMER_KEY=ABCABC
    TWITTER_CONSUMER_SECRET=XYZXYZXYZ
    node app
Also, add the start command to .PHONY:
.PHONY: test db start
As another option, we can create a Bash file start.sh:
TWITTER_CONSUMER_KEY=ABCABC
TWITTER_CONSUMER_SECRET=XYZXYZXYZ
node app
Now we go back to the app.js file, in which we need to import the Everyauth module:
everyauth = require('everyauth'),
It’s a good practice to run the module in debug mode the first few times:
everyauth.debug = true;
Each submodule is enabled using chained commands and promises. To define the previously mentioned key and secret, execute the following:
everyauth.twitter
  .consumerKey(TWITTER_CONSUMER_KEY)
  .consumerSecret(TWITTER_CONSUMER_SECRET)
Then, to tell the module what to do when Twitter sends back the authorized user object twitterUserMetadata, type
.findOrCreateUser( function (session, accessToken, accessTokenSecret, twitterUserMetadata) {
We can return the user object right away, but to emulate async writing to a database, let’s create a promise
var promise = this.Promise();
and use the process.nextTick call, which is analogous to setTimeout(callback, 0);, and acts in an asynchronous manner. In a real-world app, you might want to find or save the data to the database:
process.nextTick(function(){
Change Azat’s username to yours:
if (twitterUserMetadata.screen_name === 'azat_co') {
Store the user object in the in-memory session, just like we did in the /login route:
session.user = twitterUserMetadata;
The most important, set admin flag to true:
session.admin = true;
}
Everyauth expects us to fulfill the promise when it’s ready:
        promise.fulfill(twitterUserMetadata);
    })
    return promise;
    // return twitterUserMetadata
  })
After all the steps are done, instruct Everyauth where to redirect the user:
.redirectPath('/admin'),
Everyauth is so smart that it automatically adds a /logout route, this means our route (app.get('/logout', routes.user.logout);) won’t be used. So we need to add some extra logic to the default Everyauth strategy. Otherwise, the session will always keep admin = true. In the handleLogout step, we clear our session by calling the exact same method from user.js:
everyauth.everymodule.handleLogout(routes.user.logout);
The next line tells Everyauth how to find a user object based on the user argument, but because we stored the whole user object in the session and we don’t store user info in findOrCreate, we can just return back the same object:
everyauth.everymodule.findUserById( function (user, callback) {
  callback(user);
});
Last but not least, the line that follows, enable Everyauth routes and it must go after cookie and session middleware but must come before normal routes (e.g., app.get(), app.post()):
app.use(everyauth.middleware());
The full source code of the app.js file after adding the Everyauth Twitter OAuth1.0 strategy is as follows:
var TWITTER_CONSUMER_KEY = process.env.TWITTER_CONSUMER_KEY;
var TWITTER_CONSUMER_SECRET = process.env.TWITTER_CONSUMER_SECRET;

var express = require('express'),
  routes = require('./routes'),
  http = require('http'),
  path = require('path'),
  mongoskin = require('mongoskin'),
  dbUrl = process.env.MONGOHQ_URL ||
    'mongodb://@localhost:27017/blog',
  db = mongoskin.db(dbUrl, {safe: true}),
  collections = {
    articles: db.collection('articles'),
    users: db.collection('users')
  }
  everyauth = require('everyauth'),

// Express.js Middleware
var session = require('express-session'),
  logger = require('morgan'),
  errorHandler = require('errorhandler'),
  cookieParser = require('cookie-parser'),
  bodyParser = require('body-parser'),
  methodOverride = require('method-override'),

everyauth.debug = true;
everyauth.twitter
  .consumerKey(TWITTER_CONSUMER_KEY)
  .consumerSecret(TWITTER_CONSUMER_SECRET)
  .findOrCreateUser(function(
    session,
    accessToken,
    accessTokenSecret,
    twitterUserMetadata) {
      var promise = this.Promise();
      process.nextTick(function(){
        if (twitterUserMetadata.screen_name === 'azat_co') {
          session.user = twitterUserMetadata;
          session.admin = true;
        }
        promise.fulfill(twitterUserMetadata);
      })
      return promise;
    }
  )
  .redirectPath('/admin'),

everyauth.everymodule.handleLogout(routes.user.logout);
everyauth.everymodule.findUserById(function (user, callback) {
  callback(user);
});

var app = express();
app.locals.appTitle = 'blog-express';

app.use(function(req, res, next) {
  if (!collections.articles || ! collections.users)
      return next(new Error('No collections.'));
  req.collections = collections;
  return next();
});

// Express.js configurations
app.set('port', process.env.PORT || 3000);
app.set('views', path.join(__dirname, 'views'));
app.set('view engine', 'jade'),

// Express.js middleware configuration
app.use(logger('dev'));
app.use(bodyParser.json());
app.use(bodyParser.urlencoded());
app.use(cookieParser('3CCC4ACD-6ED1-4844-9217-82131BDCB239'));
app.use(session({secret: '2C44774A-D649-4D44-9535-46E296EF984F'}));
app.use(everyauth.middleware());
app.use(methodOverride());
app.use(require('stylus').middleware(__dirname + '/public'));
app.use(express.static(path.join(__dirname, 'public')));

// Authentication middleware
app.use(function(req, res, next) {
  if (req.session && req.session.admin)
    res.locals.admin = true;
  next();
});

// Authorization
var authorize = function(req, res, next) {
  if (req.session && req.session.admin)
    return next();
  else
    return res.send(401);
};

// Development only
if ('development' == app.get('env')) {
  app.use(errorHandler());
}

// Pages and routes
app.get('/', routes.index);
app.get('/login', routes.user.login);
app.post('/login', routes.user.authenticate);
app.get('/logout', routes.user.logout);
app.get('/admin', authorize, routes.article.admin);
app.get('/post', authorize, routes.article.post);
app.post('/post', authorize, routes.article.postArticle);
app.get('/articles/:slug', routes.article.show);

// REST API routes
app.all('/api', authorize);
app.get('/api/articles', routes.article.list);
app.post('/api/articles', routes.article.add);
app.put('/api/articles/:id', routes.article.edit);
app.del('/api/articles/:id', routes.article.del);

app.all('*', function(req, res) {
  res.send(404);
})

var server = http.createServer(app);
var boot = function () {
  server.listen(app.get('port'), function(){
    console.info('Express server listening on port ' +
      app.get('port'));
    }
  );
}
var shutdown = function() {
  server.close();
}
if (require.main === module) {
  boot();
} else {
  console.info('Running app as a module'),
  exports.boot = boot;
  exports.shutdown = shutdown;
  exports.port = app.get('port'),
}
To run the app, execute $ make start, and don’t forget to replace the Twitter username, consumer key, and secret with yours. Then when you click on “Sign in with Twitter”, you’ll be redirected to Twitter to authorize this application. Then you’ll be redirected back to the localhost app and should see the admin page menu. We have been authorized by a third-party service provider! Also, the user information is available to your app so it can be stored in the database for future usage. If you already gave permissions, the redirect to and from Twitter might happen very fast. The terminal output is shown in Figure 6-1 shows each step of Everyauth process such as getting tokens and sending responses. Each step can be customized to your app’s needs.
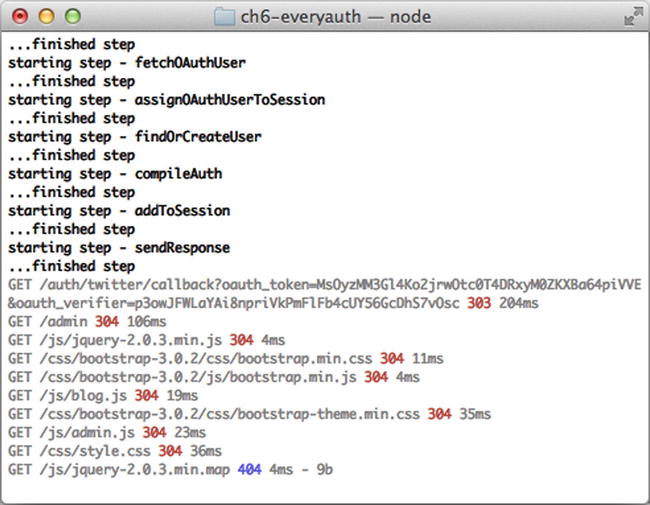
Figure 6-1. Everyauth Twitter strategy with debug mode in action
Summary
In this chapter, we learned how to implement a standard e-mail and password authentication, and used Express.js middleware to protect sensitive pages and end points in Blog. Then, we covered OAuth 1.0 and OAuth 2.0 with Everyauth and OAuth modules, respectively.
Now we have a few security options for Blog. In the next chapter we’ll explore Mongoose (http://mongoosejs.com) object-relational mapping (ORM (http://en.wikipedia.org/wiki/Object-relational_mapping)) Node.js library for MongoDB. This library is a good choice for complex systems with a lot of interdependent business logic between entities, because it completely abstracts the database and provides developers with tools to operate with data only via Mongoose objects. The chapter will touch on the main Mongoose classes and methods, explain some of the more advanced concepts, and re-factor persistence in Blog.