![]()
Boosting Your Node.js Data with the Mongoose ORM Library
Mongoose is a fully developed object relational mapping (ORM) library for Node.js and MongoDB. The advantages of using ORM are many and go far beyond code organization or the ease of development. Typical ORM is a crucial piece of modern software engineering.
Mongoose abstracts everything from the database, and the application code interacts only with objects and their methods. ORM also allows specifying relationships between different types of objects and putting business logic (related to those objects) in the classes.
In addition, Mongoose has built-in validation and type casting that can be extended and customized according to needs. When used together with Express.js, Mongoose makes the stack truly adherent to the MVC concept.
Mongoose uses a similar interface to those of Mongo shell, native MongoDB driver, and Mongoskin. For this reason, main functions such as find, update, insert, save, remove, and so on, look and act the same, which helps us to get started with Mongoose faster. In this chapter we look at the following:
- Mongoose installation
- Connection establishment in a standalone Mongoose script
- Mongoose schemas
- Hooks for keeping code organized
- Custom static and instance methods
- Mongoose models
- Relationships and joins with population
- Nested documents
- Virtual fields
- Schema type behavior amendment
- Express.js + Mongoose = true MVC
The source code for this chapter is in the ch7/blog-express directory of the practical node GitHub repository (https://github.com/azat-co/practicalnode).
Mongoose Installation
First, we should install Mongoose with NPM. Among many variations, this is one of the ways we can install Mongoose 3.8.4 into an empty folder:
$ mkdir node_modules
$ npm install [email protected]
Connection Establishment in a Standalone Mongoose Script
Mongoose can be used as a standalone MongoDB library. To illustrate this, here’s a banal script that establishes a connection, creates a Mongoose model definition, instantiates the practicalNodeBook object, and then saves it to the database.
To have access to the library, we need to include the mongoose module in our program:
var mongoose = require('mongoose'),
Unlike the Node.js native MongoDB driver, which requires us to write a few lines of code, Mongoose can connect to the database server in one line. Mongoose requests are buffered, so we don’t have to wait for the established connection (vs. native driver, which usually requires a callback). To do this, just call mongoose.connect(uri(s), [options], [callback]). The uniform resource identifier (URI) or connection string is the only required parameter, and it follows a standard format of type://username:password@host:port/database_name. In our simple example, the host is localhost, the port is 27017 (default), and the database name is test:
mongoose.connect('mongodb://localhost/test'),
For situations that are more advanced, options and callbacks can be passed to connect. The options object supports all properties of the native MongoDB driver (http://mongodb.github.io/node-mongodb-native/driver-articles/mongoclient.html#mongoclient-connect-options).
![]() Note It’s a common practice in Node.js apps (and Mongoose) to open a database connection once, when the program starts, and then to keep it open until termination. This applies to web apps and servers as well.
Note It’s a common practice in Node.js apps (and Mongoose) to open a database connection once, when the program starts, and then to keep it open until termination. This applies to web apps and servers as well.
This is easy so far, right? The next step is an important distinction that Mongoose introduces compared with Mongoskin and other lightweight MongoDB libraries. The step creates a model with the model() function by passing a string and a schema (more on schemas later). The model is usually stored in a capitalized literal:
var Book = mongoose.model('Book', { name: String });
Now the configuration phase is over and we can create a document that represents a particular instance of the model Book:
var practicalNodeBook = new Book({ name: 'Practical Node.js' });
Mongoose documents come with very convenient built-in methods (http://mongoosejs.com/docs/api.html#document-js) such as validate, isNew, update, and so on. Just keep in mind that these methods apply to this particular document, not the entire collection or model. The difference between documents and models is that a document is an instance of a model; a model is something abstract. It’s like your real MongoDB collection, but it is supported by a schema and is presented as a Node.js class with extra methods and attributes. Collections in Mongoose closely resemble collections in Mongoskin or native driver. Strictly speaking, models, collections, and documents are different Mongoose classes.
Usually we don’t use Mongoose collections directly, and we manipulate data via models only. Some of the main model methods look strikingly familiar to the ones from Mongoskin or native MongoDB driver, such as find, insert(), save, and so forth.
To finish our small script and make it write a document to the database, let’s use one of the document methods—document.save():
practicalNodeBook.save(function (err, results) {
  if (err) {
    console.error(e);
    process.exit(1);
  } else {
    console.log('Saved: ', results);
    process.exit(0);
  }
});
Here is the full source code for the mongoose.js file:
var mongoose = require('mongoose'),
mongoose.connect('mongodb://localhost/test'),

var Book = mongoose.model('Book', { name: String });

var practicalNodeBook = new Book({ name: 'Practical Node.js' });
practicalNodeBook.save(function (err, results) {
  if (err) {
    console.error(e);
    process.exit(1);
  } else {
    console.log('Saved: ', results);
    process.exit(0);
  }
});
To run this snippet, execute the $ node mongoose.js command (MongoDB server must be running in parallel). The results of the script should output the newly created object, as seen in Figure 7-1.
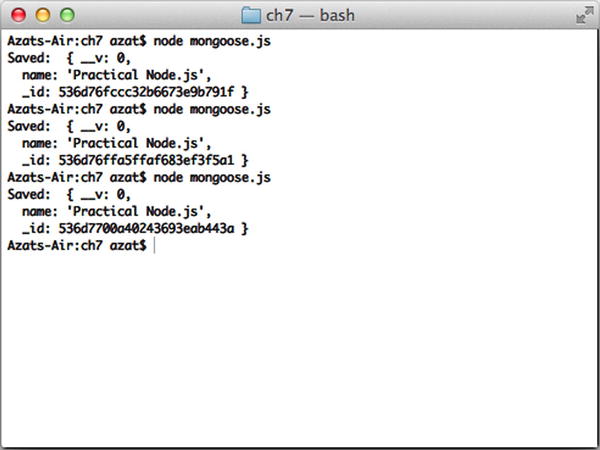
Figure 7-1. Running a standalone Mongoose script that creates objects
Mongoose Schemas
Schema is a JSON-ish class that has information about properties/field types of a document. It also can store information about validation and default values, and whether a particular property is required. Schemas can contain business logic and other important information. In other words, schemas serve as blueprints for documents. They are needed for model creation (i.e., schemas are compiled into models). So, before we can use models properly, we need to define their schemas, e.g., the book schema with the name property of string type:
var bookSchema = mongoose.Schema({
    name: String
})
![]() Warning Mongoose ignores those properties that aren’t defined in the model’s schema.
Warning Mongoose ignores those properties that aren’t defined in the model’s schema.
Mongoose Schema supports these data types:
- String: a standard JavaScript/Node.js string (a sequence of characters) type
- Number: a standard JavaScript/Node number type up to 253 (64-bit); larger numbers with mongoose-long (https://www.npmjs.org/package/mongoose-long) (Git (https://github.com/aheckmann/mongoose-long))
- Boolean: a standard JavaScript/Node Boolean type—true or false
- Buffer: a Node.js binary type (images, PDFs, archives, and so on)
- Date: an ISODate formatted date type, such as 2014-12-31T12:56:26.009Z
- Array: a standard JavaScript/Node array type
- Schema.Types.ObjectId a typical, MongoDB 24-character hex string of a 12-byte binary number (e.g., 52dafa354bd71b30fa12c441)
- Schema.Types.Mixed: any type of data (i.e., flexible free type)
![]() Warning Mongoose does not listen to mixed-type object changes, so call markModified() before saving the object to make sure changes in the mixed-type field are persistent.
Warning Mongoose does not listen to mixed-type object changes, so call markModified() before saving the object to make sure changes in the mixed-type field are persistent.
ObjectId is added automatically as a primary _id key if omitted in the insert or save methods; _id key can be used to sort documents chronologically (http://docs.mongodb.org/manual/reference/object-id/). They are available through Schema.Types or mongoose.Schema.Types (e.g., Schema.Types.Mixed).
We have a great deal of flexibility in defining our document schemas—for example,
var ObjectId = mongoose.Schema.Types.ObjectId,
  Mixed = mongoose.Schema.Types.Mixed;
var bookSchema = mongoose.Schema({
    name: String,
    created_at: Date,
    updated_at: {type: Date, default: Date.now},
    published: Boolean,
    authorId : { type: ObjectId, required: true },
     description: { type: String, default: null },
     active: {type: Boolean, default: false},
     keywords: { type: [ String ], default: [] }
     description: {
       body: String,
       image: Buffer
    },
    version: {type: Number, default: function() {return 1;}},
    notes: Mixed,
    contributors: [ObjectId]
})
It’s possible to create and use custom types (e.g., there’s a module mongoose-types, https://github.com/bnoguchi/mongoose-types) that already have the rules for the ubiquitous e-mail and URL types.
Mongoose schemas are pluggable, which means, by creating a plugin, certain functionality can be extended across all schemas of the application.
For better code organization and code re-use, in the schema, we can set up static and instance methods, apply plugins, and define hooks.
![]() Tip For validation in Node.js, consider using the validatior.js and express-validator modules.
Tip For validation in Node.js, consider using the validatior.js and express-validator modules.
Hooks for Keeping Code Organized
In a complex application with a lot of interrelated objects, we might want to execute certain logic before saving an object. Hooks are a good place to store such logic. For example, we might want to upload a PDF to the web site before saving a book document:
bookSchema.pre('save', function(next) {
    //prepare for saving
    //upload PDF
    return next();
});
On the other hand, before removing, we need to make sure there are no pending purchase orders for this book:
bookSchema.pre('remove', function(next) {
  //prepare for removing
  return next(e);
});
Custom Static and Instance Methods
In addition to dozens of built-in Mongoose model methods, we can add custom ones. For example, to initiate a purchase, we can call the buy method on the document practicalNodeBook after we implement the custom instance method buy():
bookSchema.method({
  buy: function(quantity, customer, callback) {
    var bookToPurchase = this;
    //create a purchase order and invoice customer
    return callback(results);
  },
  refund: function(customer, callback) {
    //process the refund
    return callback(results);
  }
});
Static methods are useful when we either don’t have a particular document object or we don’t need it:
bookSchema.static({
  getZeroInventoryReport: function(callback) {
    //run a query on all books and get the ones with zero inventory
    return callback(books);
  },
  getCountOfBooksById: function(bookId, callback){
    //run a query and get the number of books left for a given book
    return callback(count);
  }
})
![]() Note Hooks and methods must be added to the schemas before compiling them to models—in other words, before calling the mongoose.model() method.
Note Hooks and methods must be added to the schemas before compiling them to models—in other words, before calling the mongoose.model() method.
Mongoose Models
As in many other ORMs, in Mongoose, the cornerstone object is a model. To compile a schema into a model, use mongoose.model(name, schema)—for example,
var Book = mongoose.model('Book', bookSchema)
The first parameter is just a string, which we can use later to pull the instance of this model. Usually, this string is the same as the object literal for the model (e.g., Book).
Models are used to create documents (actual data). To do so, call new ModelName(data)—for example,
var practicalNodeBook = new Book({ name: 'Practical Node.js' });
var javascriptTheGoodPartsBook = new Book({ name: "JavaScript The Good Parts"});
It’s better to assign the initial value through the constructor versus using the document.set() method, because Mongoose has to process less function calls and our code remains more compact and better organized. Of course, this is possible only if we know the values when we create the instances.
Don’t confuse static with instance model methods. If we call a method on practicalNodeBook, it’s an instance method; if we call it on the Book object, it’s a static class method.
Models have static built-in methods that are very similar to Mongoskin and native MongoDB methods, such as find(), create(), and update().
A list of the static Mongoose model methods (invoked on a capitalized object, e.g., Book) along with their meaning follows:
- Model.create(data, [callback (error, doc)]): creates a new Mongoose document and saves it to the database
- Model.remove(query, [callback(error)]): removes documents from the collection that match the query; when finished, calls callback with error
- Model.find(query, [fields], [options], [callback(error, docs)]): finds documents that match the query (as a JSON object); possible to select fields (http://mongoosejs.com/docs/api.html#query_Query-select) and use options (http://mongodb.github.io/node-mongodb-native/api-generated/collection.html#find)
- Model.update(query, update, [options], [callback(error, affectedCount, raw)]): updates documents, similar to native update
- Model.populate(docs, options, [callback(error, doc)]): populates documents using references to other collections; an alternative to another approach described in the next section
- Model.findOne(query, [fields], [options], [callback(error, doc)]): finds the first document that matches the query
- Model.findById(id, [fields], [options], [callback(error, doc)]): finds the first element for which _id equals the id argument (cast based on the schema)
- Model.findOneAndUpdate([query], [update], [options], [callback(error, doc)]): finds the first document that matches the query (if present) and updates it, returning the document; uses findAndModify (http://mongodb.github.io/node-mongodb-native/api-generated/collection.html#findandmodify)
- Model.findOneAndRemove(query, [options], [callback(error, doc)]): finds the first document that matches the query and removes it when returning the document
- Model.findByIdAndUpdate(id, [update], [options], [callback(error, doc)]): similar to findOneAndUpdate using only the ID
- Model.findByIdAndRemove(id, [options], [callback(error, doc)]): similar to findOneAndRemove using only the ID
![]() Warning Not all the Mongoose model methods trigger hooks. Some of them are executed directly. For example, calling Model.remove() does not trigger the remove hook, because no Mongoose documents are involved (instances of Model that use lowercase literals, e.g., practicalNodeBook).
Warning Not all the Mongoose model methods trigger hooks. Some of them are executed directly. For example, calling Model.remove() does not trigger the remove hook, because no Mongoose documents are involved (instances of Model that use lowercase literals, e.g., practicalNodeBook).
The complete list of the methods is extensive; therefore, refer to the official Mongoose API documentation (http://mongoosejs.com/docs/api.html#model-js). The most used instance methods are as follows:
- doc.model(name): returns another Mongoose model
- doc.remove([callback(error, doc)]): removes this document
- doc.save([callback(error, doc, affectedCount)]): saves this document
- doc.update(doc, [options], [callback(error, affectedCount, raw)]): updates the document with doc properties, and options parameters, and then upon completion fires a callback with error, number of affectedCount and the database output
- doc.toJSON([option]): converts a Mongoose document to JSON (options are listed later)
- doc.toObject([option]): converts a Mongoose document to a plain JavaScript object (options are listed later)
- isModified([path]): true/false, respectively, if some parts (or the specific path) of the document are or are not modified
- markModified(path): marks a path manually as modified which is useful for mixed (Schema.Types.Mixed) data types because they don’t trigger the modified flag automatically
- doc.isNew: true/false, respectively, whether the document is new or not new
- doc.id: returns the document ID
- doc.set(path, value, [type], [options]): sets value at a path
- doc.validate(callback(error)): checks validation manually (triggered automatically before save())
Options for toObject() and toJSON() are as follows:
- getters: true/false, calls all getters including path and virtual types
- virtuals: true/false, includes virtual getters and can override the getters option
- minimize: true/false, removes empty properties/objects (defaults to true)
- transform: transforms the function called right before returning the object
For more methods, visit the Mongoose document API (http://mongoosejs.com/docs/api.html#document-js).
Relationships and Joins with Population
Although, there are no relationships stored in a NoSQL database such as MongoDB, we can do so in the application layer. Mongoose provides a feature called population. It allows us to fill certain parts of the document from a different collection. Let’s say we have posts and users collections. We can reference posts in the user schema:
var mongoose = require('mongoose'),
  Schema = mongoose.Schema

var userSchema = Schema({
  _id     : Number,
  name: String,
  posts: [{ type: Schema.Types.ObjectId, ref: 'Post' }]
});

var postSchema = Schema({
  _creator: { type: Number, ref: 'User' },
  title: String,
  text: String
});

var Post  = mongoose.model('Post', postSchema);
var User = mongoose.model('User', userSchema);
User.findOne({ name: /azat/i })
  .populate('posts')
  .exec(function (err, user) {
    if (err) return handleError(err);
    console.log('The user has % post(s)', user.posts.length);
  })
![]() Note ObjectId, Number, String, and Buffer are valid data types to use as references.
Note ObjectId, Number, String, and Buffer are valid data types to use as references.
In the previous query, we used a regular expression (RegExp), this feature is not exclusive to Mongoose. In fact, the native driver and its other wrappers, along with the mongo console all support RegExps. The syntax is the same as in normal JavaScript/Node.js RegExp patterns. Therefore, in a way, we perform a join query on our Post and User models.
It’s possible to return only a portion of populated results. For example, we can limit the number of posts to the first 10 only:
.populate({
  path: 'posts',
  options: { limit: 10, sort: 'title' }
})
Sometimes it’s more practical to return only certain fields instead of the full document. This can be done with select:
.populate({
   path: 'posts',
   select: 'title',
   options: { limit: 10, sort: 'title' }
 })
In addition, Mongoose can filter the populated results by a query! For example, we can apply RegExp for “node.js” to the text (a match query property):
.populate({
   path: 'posts',
   select: '_id title text',
   match: {text: /node.js/i},
   options: { limit: 10, sort: '_id' }
 })
Here, it takes selected properties (select and then the field names of _id, title, text) and can be as customized as you want it to be. The best practice is to populate only the required fields because this avoids potential leakage of sensitive information and reduces overhead on the system.
The populate method also works on multiple document queries. For example, we can use find instead of findOne:
User.find({}, {limit: 10, sort:{ _id: -1}})
  .populate('posts')
  .exec(function (err, user) {
    if (err) return handleError(err);
    console.log('The user has % post(s)', user.posts.length);
  })
![]() Tip For custom sorting, we can add properties using name: -1 or name: 1 patterns and can pass the resulting object to the sort option. Again, this is a standard MongoDB interface and is not exclusive to Mongoose.
Tip For custom sorting, we can add properties using name: -1 or name: 1 patterns and can pass the resulting object to the sort option. Again, this is a standard MongoDB interface and is not exclusive to Mongoose.
Nested Documents
The document storage model in NoSQL databases is well-suited to use nested documents. For example, instead of having two collections—posts and users—we can have a single collection (users), with each item of that collection having posts.
The decision of whether to use separate collections or nested documents is more of an architectural question, and its answer depends on usage. For example, if posts are used only in the context of users (their authors)—say, on the users’ profile pages—then it’s best to use nested documents. However, if the blog features multiple users’ posts that need to be queried independently of their user context, then separate collections fit better.
To implement nested documents, we can use the type Schema.Types.Mixed in Mongoose schemas (Schema, e.g., bookSchema or postSchema) or we can create a new schema for the nested document. An example of the former approach is as follows:
var userSchema = new mongoose.Schema({
  name: String,
  posts: [mongoose.Schema.Types.Mixed]
});
//attach methods, hooks, etc.
var User = mongoose.model('User', userSchema);
However, the latter approach of using a distinct new subschema is more flexible and powerful:
var postSchema = new mongoose.Schema({
  title: String,
  text: String
});
//attach methods, hooks, etc., to post schema
var userSchema = new mongoose.Schema({
  name: String,
  posts: [postSchema]
});
//attach methods, hooks, etc., to user schema
var User = mongoose.model('User', userSchema);
To create a new user document or to save a post to an existing user when working with a nested posts document, treat the posts property as an array and just use the push method from the JavaScript/Node.js API, or use the MongoDB $push operand (http://docs.mongodb.org/manual/reference/operator/update/push/). For example, we can add a post (newPost) to a user object, which is found by a matching ID (_id is userId):
User.update(
  {_id: userId},
  {$push: {posts: newPost}},
  function(error, results) {
    //handle error and check results
  });
Virtual Fields
Virtuals are fields that don’t exist in the database but act just like normal fields in a Mongoose document. To oversimplify, virtual fields are mock or fake fields that pretend to act and be normal ones.
Virtual fields are awesome for creating aggregate fields. For example, if our system requires to have first name, last name and the full name (which is just a concatenation of the first two names)—there’s no need to store the full name values in addition to the first and last name values! All we need to do is concatenate the first and last name in a full name virtual.
Another use case is to make the database backward compatible. For example, we might have thousands of user items in a MongoDB collection and we want to start collecting their locations. We have two options: run a migration script to add the default location (“none”) to the thousands of old user documents or use a virtual field and apply defaults at runtime!
To define a virtual we need to
- Call the virtual(name) method to create a virtual type (Mongoose API, http://mongoosejs.com/docs/api.html#schema_Schema-virtual)
- Apply a getter function with get(fn) (Mongoose API, http://mongoosejs.com/docs/api.html#virtualtype_VirtualType-get)
Gravatar (http://en.gravatar.com/) for example, is a service that hosts profile images. The URL is always an md5 hash (http://en.gravatar.com/site/implement/hash/) of the user’s e-mail. Therefore, we can get the virtual value (gravatarUrl) on the fly by hashing instead of storing the value (less overhead!). In this example, we intentionally made the input email mixed cased and with a trailing space, and then applied crypto:
Identity.virtual('gravatarUrl')
  .get(function() {
    if (!this.email) return null;
    var crypto = require('crypto'),
      email = "[email protected] ";
    email = email.trim();
    email = email.toLowerCase();
    var hash = crypto
      .createHash('md5')
      .update(email)
      .digest('hex')
    var gravatarBaseUrl = 'https://secure.gravatar.com/avatar/';
    return gravatarBaseUrl + hash;
  });
Or, the case mentioned earlier—getting a full name out of first and last—is as follows:
userSchema.virtual('fullName')
 .get(function(){
    return this.firstName + ' ' + this.lastName;
  })
Another scenario is when only a subset of the full document is exposed. For example, if the user model has tokens and passwords, we omit these sensitive fields by whitelisting only the fields we want to expose:
userSchema.virtual('info')
  .get(function() {
    return {
      service: this.service,
      username: this.username,
      name: this.name,
      date: this.date,
      url: this.url,
      avatar: this.avatar
    };
  });
Schema Type Behavior Amendment
Mongoose allows us to define/write getters (get), setters (set), and defaults (default) right in the Schema! Same goes for validate and some other useful methods.
Here’s an examples of defining set (transform to lower case when the value is assigned), get (when the number is extracted the “thousands” commas are added to it), default (brand new ObjectID is generated), and validate (checks for e-mail patterns and is triggered upon save()) all right in a JSON-like structure of the Schema:
postSchema = new mongoose.Schema({
  slug: {
    type: String,
    set: function(slug) {
      return slug.toLowerCase();
    }
  },
  numberOfLikes: {
    type: Number,
    get: function(value) {
      return value.toString().replace(/B(?=(d{3})+(?!d))/g, ",");
    }
  },
  posted_at: {
    type: String,
    get: function(value) {
      if (!value) return null;
      return value.toUTCString();
    }
  },
  authorId: {
    type: ObjectId,
    default: function() {
      return new mongoose.Types.ObjectId()
    }
  },
  email: {
    type: String,
    unique: true,
    validate: [
      function(email) {
        return (email.match(/[a-z0-9!#$%&'*+/=?^_`{|}~-]+(?:.[a-z0-9!#$%&'*+/=?^_`{|}~-]+)*@(?:[a-z0-9](?:[a-z0-9-]*[a-z0-9])?.)+[a-z0-9](?:[a-z0-9-]*[a-z0-9])?/i) != null)},
      'Invalid email'
    ]
  }
});
If defining custom methods in the Schema definition is not an option for some reason (maybe our system requires us to do it dynamically), there’s another approach to amending Schema behavior—to use chained methods:
- Use Schema.path(name) to get SchemaType (official docs, http://mongoosejs.com/docs/api.html#schema_Schema-path).
- Use SchemaType.get(fn) to set the getter method (official docs, http://mongoosejs.com/docs/api.html#schematype_SchemaType-get).
For example,
userSchema.path('numberOfPosts')
  .get(function(value) {
    if (value) return value;
    return this.posts.length;
  });
Path is just a fancy name for the nested field name and its parent objects, for example if we have ZIP code (zip) as a child of contact.address such as user.contact.address.zip, the contact.address.zip is a path.
Express.js + Mongoose = True MVC
To avoid rebuilding all other components unrelated to ORM, such as templates, routes, and so forth, we can factor the existing Blog from the previous chapter by making it use Mongoose instead of Mongoskin. This requires minimal effort but produces an abstraction layer between MongoDB and the request handlers. As always, the fully functional code is available on GitHub, in the ch7 folder (https://github.com/azat-co/practicalnode/tree/master/ch7).
The process of refactoring starts with the creation of a new branch: mongoose. You can use the final solution in the GitHub repository (https://github.com/azat-co/blog-express/tree/mongoose). First, we need to remove Mongoskin and install Mongoose:
$ npm uninstall mongoskin –save
$ npm install [email protected] --save
package.json is amended to something like this:
{
  "name": "blog-express",
  "version": "0.0.1",
  "private": true,
  "scripts": {
    "start": "node app.js",
    "test": "mocha test"
  },
  "dependencies": {
    "express": "4.1.2",
    "jade": "1.3.1",
    "stylus": "0.44.0",
    "everyauth": "0.4.5",
    "mongoose": "3.8.4",
    "cookie-parser": "1.0.1",
    "body-parser": "1.0.2",
    "method-override": "1.0.0",
    "serve-favicon": "2.0.0",
    "express-session": "1.0.4",
    "morgan": "1.0.1",
    "errorhandler": "1.0.1"
  },
  "devDependencies": {
    "mocha": "1.16.2",
    "superagent": "0.15.7",
    "expect.js": "0.2.0"
  }
}
Now, in the app.js file, we can remove the Mongoskin inclusion (mongoskin = require('mongoskin'),) and add a new one for Mongoose:
...
mongoose = require('mongoose'),
Let’s create a folder models ($ mkdir models) and include it:
models = require('./models'),
Substitute the connection, and articles and users collections statements:
db = mongoskin.db(dbUrl, {safe: true}),
 collections = {
   articles: db.collection('articles'),
   users: db.collection('users')
  }
With just the connection statement leaving out the collections:
db = mongoose.connect(dbUrl, {safe: true}),
In the collection middleware, we remove collections:
if (!collections.articles || ! collections.users) return next(new Error('No collections.'))
  req.collections = collections;
Then, add the models:
if (!models.Article || ! models.User) return next(new Error('No models.'))
  req.models = models;
That’s it! The upgrade from Mongoskin to Mongoose is complete. ;-) Just for your reference, here’s the full code of the resulting app.js:
var TWITTER_CONSUMER_KEY = process.env.TWITTER_CONSUMER_KEY ||
'MY_TWITTER_CONSUMER_KEY_ABC'
var TWITTER_CONSUMER_SECRET = process.env.TWITTER_CONSUMER_SECRET ||
'MY_TWITTER_CONSUMER_SECRET_XYZXYZ'

var express = require('express'),
  routes = require('./routes'),
  http = require('http'),
  path = require('path'),
  mongoose = require('mongoose'),
  models = require('./models'),
  dbUrl = process.env.MONGOHQ_URL || 'mongodb://@localhost:27017/blog',
  db = mongoose.connect(dbUrl, {safe: true}),
  everyauth = require('everyauth'),

var session = require('express-session'),
  logger = require('morgan'),
  errorHandler = require('errorhandler'),
  cookieParser = require('cookie-parser'),
  bodyParser = require('body-parser'),
  methodOverride = require('method-override'),

everyauth.debug = true;
everyauth.twitter
  .consumerKey(TWITTER_CONSUMER_KEY)
  .consumerSecret(TWITTER_CONSUMER_SECRET)
  .findOrCreateUser( function (session, accessToken, accessTokenSecret, twitterUserMetadata) {
    var promise = this.Promise();
    process.nextTick(function(){
      // replace with your Twitter username
      if (twitterUserMetadata.screen_name === 'azat_co') {
        session.user = twitterUserMetadata;
        session.admin = true;
      }
      promise.fulfill(twitterUserMetadata);
    })
    return promise;
})
  .redirectPath('/admin'),

//we need it because otherwise the session will be kept alive
everyauth.everymodule.handleLogout(routes.user.logout);

everyauth.everymodule.findUserById( function (user, callback) {
  callback(user);
});

var app = express();
app.locals.appTitle = 'blog-express';

app.use(function(req, res, next) {
  if (!models.Article || ! models.User)
    return next(new Error('No models.'));
  req.models = models;
  return next();
});

app.set('port', process.env.PORT || 3000);
app.set('views', path.join(__dirname, 'views'));
app.set('view engine', 'jade'),

app.use(logger('dev'));
app.use(bodyParser.json());
app.use(cookieParser('3CCC4ACD-6ED1-4844-9217-82131BDCB239'));
app.use(session({secret: '2C44774A-D649-4D44-9535-46E296EF984F'}));
app.use(everyauth.middleware());
app.use(bodyParser.urlencoded());
app.use(methodOverride());
app.use(require('stylus').middleware(__dirname + '/public'));
app.use(express.static(path.join(__dirname, 'public')));

app.use(function(req, res, next) {
  if (req.session && req.session.admin) {
    res.locals.admin = true;
  }
  next();
});

var authorize = function(req, res, next) {
  if (req.session && req.session.admin)
    return next();
  else
    return res.send(401);
};

if ('development' === app.get('env')) {
  app.use(errorHandler());
}

app.get('/', routes.index);
app.get('/login', routes.user.login);
app.post('/login', routes.user.authenticate);
app.get('/logout', routes.user.logout);
app.get('/admin', authorize, routes.article.admin);
app.get('/post', authorize, routes.article.post);
app.post('/post', authorize, routes.article.postArticle);
app.get('/articles/:slug', routes.article.show);

app.all('/api', authorize);
app.get('/api/articles', routes.article.list);
app.post('/api/articles', routes.article.add);
app.put('/api/articles/:id', routes.article.edit);
app.del('/api/articles/:id', routes.article.del);

app.all('*', function(req, res) {
  res.send(404);
})

var server = http.createServer(app);
var boot = function () {
  server.listen(app.get('port'), function(){
    console.info('Express server listening on port ' + app.get('port'));
  });
}
var shutdown = function() {
  server.close();
}
if (require.main === module) {
  boot();
}
else {
  console.info('Running app as a module')
  exports.boot = boot;
  exports.shutdown = shutdown;
  exports.port = app.get('port'),
}
There are three files in the models folder:
- index.js: exposes models to app.js
- article.js: includes article schemas, methods, and models
- user.js: includes the user schema and its model
The index.js file is as follows:
exports.Article = require('./article'),
exports.User = require('./user'),
The article.js file starts with the inclusion:
var mongoose = require('mongoose'),
Then, the schema itself is:
var articleSchema = new mongoose.Schema({
  title: {
    type: String,
    required: true,
    validate: [
      function(value) {
        return value.length<=120
      },
     'Title is too long (120 max)'
    ],
    default: 'New Post'
  },
  text: String,
  published: {
    type: Boolean,
    default: false
  },
  slug: {
    type: String,
    set: function(value) {
      return value.toLowerCase().replace(' ', '-')
    }
  }
});
In the schema above, title is required and it’s limited to 120 characters with validate. The published defaults to false if not specified upon object creation. The slug should never have spaces due to the set method.
To illustrate code reuse, we abstract the find method from the routes (routes/article.js) into the model (models/article.js). This can be done with all database methods:
articleSchema.static({
  list: function(callback){
    this.find({}, null, {sort: {_id:-1}}, callback);
  }
})
The, we compile the schema and methods into a model:
module.exports = mongoose.model('Article', articleSchema);
The full source code of article.js is as follows:
var mongoose = require('mongoose'),

var articleSchema = new mongoose.Schema({
  title: {
    type: String,
    required: true,
    validate: [
      function(value) {
        return value.length<=120
      },
      'Title is too long (120 max)'
    ],
    default: 'New Post'
  },
  text: String,
  published: {
    type: Boolean,
    default: false
  },
  slug: {
    type: String,
    set: function(value){
      return value.toLowerCase().replace(' ', '-')
    }
  }
});

articleSchema.static({
  list: function(callback){
    this.find({}, null, {sort: {_id:-1}}, callback);
  }
})
module.exports = mongoose.model('Article', articleSchema);
The models/user.js file also begins with an inclusion and a schema:
var mongoose = require('mongoose'),

var userSchema = new mongoose.Schema({
  email: {
    type: String,
    required: true,
    set: function(value) {return value.trim().toLowerCase()},
    validate: [
      function(email) {
        return (email.match(/[a-z0-9!#$%&'*+/=?^_`{|}~-]+(?:.[a-z0-9!#$%&'*+/=?^_`{|}~-]+)*@(?:[a-z0-9](?:[a-z0-9-]*[a-z0-9])?.)+[a-z0-9](?:[a-z0-9-]*[a-z0-9])?/i) != null)},
      'Invalid email'
    ]
  },
  password: String,
  admin: {
    type: Boolean,
    default: false
  }
});

module.exports = mongoose.model('User', userSchema);
The e-mail field is validated with RegExp, then is trimmed and forced to lowercase when it’s set.
The routes/article.js file now needs to switch to Mongoose models instead of Mongoskin collections. So, in the show method, this line goes away:
req.collections.articles.findOne({slug: req.params.slug}, function(error, article) {
Then, this line comes in:
req.models.Article.findOne({slug: req.params.slug}, function(error, article) {
In the list method, remove:
req.collections.articles.find({}).toArray(function(error, articles) {
and replace it with:
req.models.Article.list(function(error, articles) {
In the exports.add method,
req.collections.articles.insert(
  article,
  function(error, articleResponse) {
is replaced with:
req.models.Article.create(article, function(error, articleResponse) {
The exports.edit method is trickier, and there are a few possible solutions:
- Find a Mongoose document (e.g., findById) and use document methods (e.g., update)
- Use the static model method findByIdAndUpdate
In both cases, this Mongoskin piece of code goes away:
req.collections.articles.updateById(
  req.params.id,
  {$set: req.body.article},
  function(error, count) {
We’ll use the former two-step approach (i.e., find then update), because it’s more versatile. So the above snippet is replaced by this code:
req.models.Article.findById(
  req.params.id,
  function(error, article) {
    if (error) return next(error);
    article.update({$set: req.body.article}, function(error, count, raw) {
     if (error) return next(error);
     res.send({affectedCount: count});
   })
 });
Just to show you a more elegant one-step approach (the latter from the new exports.edit implementation list above):
req.models.Article.findByIdAndUpdate(
  req.params.id,
  {$set: req.body.article},
  function(error, doc) {
    if (error) return next(error);
    res.send(doc);
  }
);
Similarly, with the exports.del request handler:
exports.del = function(req, res, next) {
  if (!req.params.id) return next(new Error('No article ID.'));
  req.models.Article.findById(req.params.id, function(error, article) {
    if (error) return next(error);
    if (!article) return next(new Error('article not found'));
    article.remove(function(error, doc){
      if (error) return next(error);
      res.send(doc);
    });
  });
};
The exports.postArticle and exports.admin functions look like these (the functions’ bodies are the same):
req.models.Article.create(article, function(error, articleResponse) {
...
req.models.Article.list(function(error, articles) {
...
Again, that’s all we have to do to switch to Mongoose for this route. However, to make sure there’s nothing missing, here’s the full code of the routes/article.js file:
exports.show = function(req, res, next) {
  if (!req.params.slug) return next(new Error('No article slug.'));
  req.models.Article.findOne({slug: req.params.slug}, function(error, article) {
    if (error) return next(error);
    if (!article.published && !req.session.admin) return res.send(401);
    res.render('article', article);
  });
};

exports.list = function(req, res, next) {
  req.models.Article.list(function(error, articles) {
    if (error) return next(error);
    res.send({articles: articles});
  });
};

exports.add = function(req, res, next) {
  if (!req.body.article) return next(new Error('No article payload.'));
  var article = req.body.article;
  article.published = false;
  req.models.Article.create(article, function(error, articleResponse) {
    if (error) return next(error);
    res.send(articleResponse);
  });
};

exports.edit = function(req, res, next) {
  if (!req.params.id) return next(new Error('No article ID.'));
  req.models.Article.findById(req.params.id, function(error, article) {
    if (error) return next(error);
    article.update({$set: req.body.article}, function(error, count, raw){
      if (error) return next(error);
      res.send({affectedCount: count});
    })
  });
};

exports.del = function(req, res, next) {
  if (!req.params.id) return next(new Error('No article ID.'));
  req.models.Article.findById(req.params.id, function(error, article) {
    if (error) return next(error);
    if (!article) return next(new Error('article not found'));
    article.remove(function(error, doc){
      if (error) return next(error);
      res.send(doc);
    });
  });
};

exports.post = function(req, res, next) {
  if (!req.body.title)
  res.render('post'),
};

exports.postArticle = function(req, res, next) {
  if (!req.body.title || !req.body.slug || !req.body.text ) {
    return res.render('post', {error: 'Fill title, slug and text.'});
  }
  var article = {
    title: req.body.title,
    slug: req.body.slug,
    text: req.body.text,
    published: false
  };
  req.models.Article.create(article, function(error, articleResponse) {
    if (error) return next(error);
    res.render('post', {error: 'Article was added. Publish it on Admin page.'});
  });
};

exports.admin = function(req, res, next) {
  req.models.Article.list(function(error, articles) {
    if (error) return next(error);
    res.render('admin',{articles:articles});
  });

}
The routes/index.js file, which serves the home page, is as follows:
exports.article = require('./article'),
exports.user = require('./user'),

exports.index = function(req, res, next){
  req.models.Article.find({published: true}, null, {sort: {_id:-1}}, function(error, articles){
    if (error) return next(error);
    res.render('index', { articles: articles});
  })
};
Lastly, routes/user.js has a single line to change. Instead of:
req.collections.articles.find({}).toArray(function(error, articles) {
Now, we have:
...
req.models.User.findOne({
...
To check if everything went well, simply run Blog as usual with $ node app and navigate the pages on http://localhost:3000/. In addition, we can run Mocha tests with $ mocha test.
Summary
In this chapter, we learned what Mongoose is, how to install it, how to establish a connection to the database, and how to create Mongoose schemas while keeping the code organized with hooks and methods. We also compiled schemas into models and populated references automatically, and used virtual fields and custom schema type properties. Last, we refactored Blog to use Mongoose and made our app gain a true MVC architecture.
Next, we’ll cover how to build REST APIs with the two Node.js frameworks: Express.js and Hapi. This is an important topic, because more and more web developments shift towards heavy front-end logic and thin back-end. Some systems even go as far as building/using free-JSON APIs or back-as-a-service services. This tendency allows teams to focus on what is the most important for end-users: user interface, features, as well as what is vital for businesses: reduced iteration cycles, lower costs of maintenance and development.
Another essential piece in this puzzle is test-driven practice. To explore it, we’ll cover Mocha, which is a widely used Node.js testing framework. To REST APIs and TDD onward.