![]()
Deploying Node.js Apps
As we approach the end of the book, there’s a vital step we have to explore: the deployment itself. To help you navigate between PaaS and IaaS options, and have some scripts you can use on your servers, we cover the following topics:
- Deploying to Heroku (PaaS)
- Deploying to Amazon Web Services (AWS)
- Keeping Node.js apps alive with forever, Upstart, and init.d
- Serving static resources properly with Nginx
- Caching with Varnish
Deploying to Heroku
Heroku (http://www.heroku.com) is a polyglot Agile application deployment Platform as a Service (PaaS). The benefits of using PaaS over other cloud solutions include the following:
- It’s easy to deploy, i.e., just one Git command to deploy $ git push heroku master.
- It’s easy to scale, e.g., log in to Heroku.com and click a few options.
- It’s easy to secure and maintain, e.g., no need to set up startup scripts manually.
Heroku works similarly to Windows Azure (http://azure.microsoft.com/en-us), Nodejitsu (https://www.nodejitsu.com), and many others in the sense that you can use Git to deploy applications. In other words, Heroku uses ubiquitous Git as its deployment mechanism. This means that after becoming familiar with Heroku and comfortable with Git, and after creating accounts with Windows Azure, Nodejitsu, and other PaaSs, it’s fairly easy to deploy Node.js apps to them as well.
To get started with the process, we need to follow these steps:
- Install Heroku Toolbelt (https://toolbelt.heroku.com)—a bundle that includes Git and other tools.
- Log in to Heroku, which should upload a public SSH key file (e.g., id_rsa.pub) to the cloud (i.e., heroku.com).
To set up Heroku, follow these steps:
- Sign up at http://heroku.com. Currently, they have a free account. To use it, select all options as minimum (0) and the database as shared.
- Download Heroku Toolbelt at https://toolbelt.heroku.com. Toolbelt is a package of tools, i.e., libraries, that consists of Heroku, Git, and Foreman (https://github.com/ddollar/foreman). For users of older Macs, get this client (http://assets.heroku.com/heroku-client/heroku-client.tgz) directly. If you use another OS, browse Heroku Client GitHub (https://github.com/heroku/heroku).
- After the installation is done, you should have access to the heroku command. To check it and log in to Heroku, type:
$ heroku loginThe system asks you for Heroku credentials (username and password), and if you’ve already created the SSH key, it uploads it automatically to the Heroku web site, as shown in Figure 11-1.
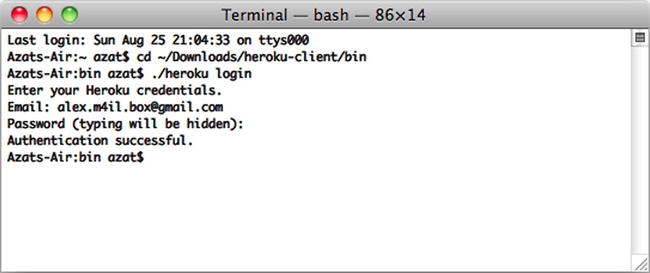
Figure 11-1. The response to a successful $ heroku login command
- If everything went well, to create a Heroku application inside your specific project folder, you should be able to run:
$ heroku create
Official instructions are available at Heroku: Quickstart (https://devcenter.heroku.com/articles/quickstart) and Heroku: Node.js (https://devcenter.heroku.com/articles/getting-started-with-nodejs).
Then, for each app we need to deploy, perform the following setup steps:
- Create the local Git repository.
- Initialize the Heroku app with $ heroku create (adds a Git remote destination to Heroku cloud).
Last, initial deployment as well as each change is deployed by (1) staging the commit with $ git add, (2) committing the changes to the local repository with $ git commit, and (3) pushing the changes to the Heroku remote $ git push heroku master.
On deployment, Heroku determines which stack to use (Node.js, in our case). For this reason, we need to provide the mandatory files package.json, which tells Heroku what dependencies to install; Procfile, which tells Heroku what process to start; and Node.js app files (e.g., server.js). The content of Procfile can be as minimalistic as web: node server.js.
Here is a step-by-step breakdown using Git to deploy to Heroku:
- Create a local Git repository and .git folder if you haven’t done so already:
$ git init - Add files:
$ git add - Commit files and changes:
$ git commit -m "my first commit" - Create the Heroku Cedar stack application (Cedar stack is a special technology that Heroku uses to create and run its apps) and add the Git remote destination with this command:
$ heroku createIf everything went well, the system should tell you that the remote has been added and the app has been created, and it should give you the app name.
- To look up the remote type and execute (optional), do the following :
$ git remote show - Deploy the code to Heroku with:
$ git push heroku masterTerminal logs should tell you whether the deployment went smoothly (i.e., succeeded). If you have a different branch you’d like to use, you can use $ git push heroku branch_name, just like you would do with any other Git destination (e.g., GitHub).
- To open the app in your default browser, type:
$ heroku openor just go to the URL of your app and type something like:
- To look at the Heroku logs for this app, type:
$ heroku logs
To update the app with the new code, type the following only:
$ git add –A
$ git commit -m "commit for deploy to heroku"
$ git push heroku master
![]() Note You’ll be assigned a new application URL each time you create a new Heroku app with the command $ heroku create.
Note You’ll be assigned a new application URL each time you create a new Heroku app with the command $ heroku create.
To propagate environment variables to the Heroku cloud, use the heroku config set of commands:
- $ heroku config: list of environment variables
- $ heroku config:get NAME: value of NAME environment variable
- $ heroku config:set NAME=VALUE: setting the value of NAME to VALUE
- $ heroku config:unset NAME: removal of the environment variable
![]() Note Configuration variable data are limited to 16KB for each app.
Note Configuration variable data are limited to 16KB for each app.
To use the same environment variables locally, you can store them in the .env file in the root of your project. The format is NAME=VALUE. For example:
DB_PASSWORD=F2C9C45
API_KEY=7C311DA3126F
![]() Warning There shouldn’t be any spaces between the name, equal sign, and the value.
Warning There shouldn’t be any spaces between the name, equal sign, and the value.
After the data are in .env, just use Foreman (part of Heroku Toolbelt):
$ foreman start
![]() Tip Don’t forget to add your .env to .gitignore to avoid sharing it in the version control system.
Tip Don’t forget to add your .env to .gitignore to avoid sharing it in the version control system.
As an alternative to Foreman and the .env file, it’s possible just to set environment variables before starting an app:
$ DB_PASSWORD=F2C9C45 API_KEY=7C311DA3126F node server
or in your profile file (e.g., ~/.bashrc):
export DB_PASSWORD=F2C9C45
export API_KEY=7C311DA3126F
Needless to say, if you have more than one app and/or API key, then you can use names such as APPNAME_API_KEY.
To sync your local .env seamlessly with cloud variables, use the heroku-config plugin (https://github.com/ddollar/heroku-config). To install it, run:
$ heroku plugins:install git://github.com/ddollar/heroku-config.git
To get variables from the cloud to the local file, type:
$ heroku config:pull
To overwrite cloud data with local variables, type:
$ heroku config:push
For official information on setting up environment variables in Heroku, see Configuration and Config Vars (https://devcenter.heroku.com/articles/config-vars). The article might require Heroku login.
There are a multitude of add-ons for Heroku (https://addons.heroku.com). Each add-on is like a mini service associated with a particular Heroku app. For example, MongoHQ (https://addons.heroku.com/mongohq) provides MongoDB database, while the Postgres add-on (https://addons.heroku.com/heroku-postgresql) does the same for the PostgreSQL database, and SendGrid (https://addons.heroku.com/sendgrid) allows sending transactional e-mails. In Figure 11-2, you can see the beginning of the long list of Heroku add-ons:
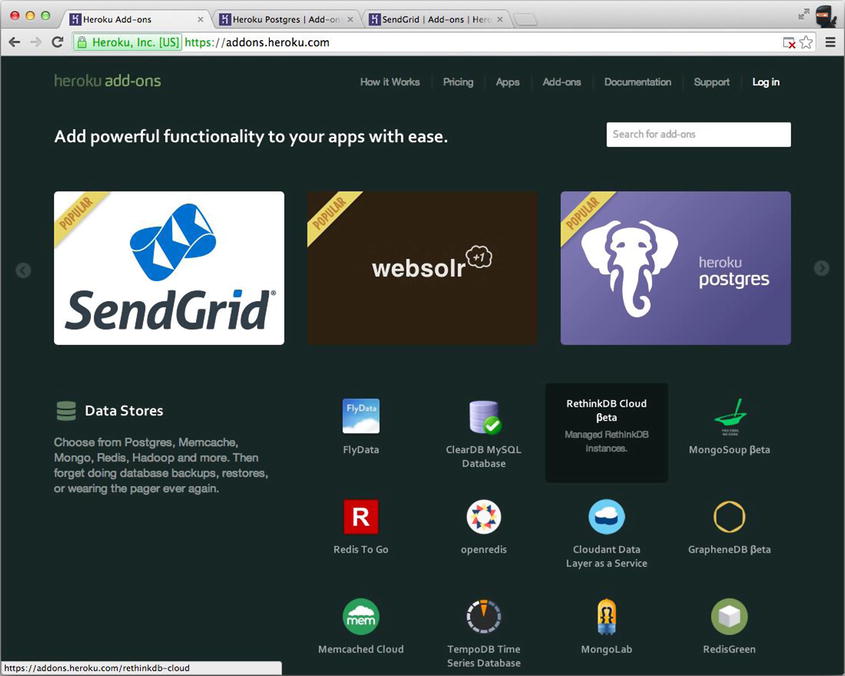
Figure 11-2. There are a multitude of add-ons for Heroku applications
Most of the add-ons pass information to the Node.js app (and others such as Rails) via environment variables. For example, the MongoHQ URI is provided in
process.env.MONGOHQ_URL
To make our Node.js apps work locally and remotely, all we need to do is to specify the local URI to which to fall back (when the environment variable is not set):
var databaseUrl = process.env.MONGOHQ_URL || "mongodb://@127.0.0.1:27017/practicalnode";
The same thing goes for the server port number:
var port = process.env.PORT || 5000;
app.listen(port);
![]() Note It’s possible to copy a database connection string (and other data) from the Heroku web interface. However, it’s not recommended that you do so.
Note It’s possible to copy a database connection string (and other data) from the Heroku web interface. However, it’s not recommended that you do so.
Some useful Git and Heroku commands are as follows:
- git remote -v: list defined remote destinations
- git remote add NAME URL: add a new remote destination with NAME and URL (usually SSH or HTTPS protocols)
- heroku start: start the app in the cloud
- heroku info: pull the app’s info
Deploying to Amazon Web Services
Cloud is eating the world of computing. There are private and public clouds. AWS, probably the most popular choice among the public cloud offerings, falls under the IaaS category. The advantages of using an IaaS such as AWS over PaaS-like Heroku are as follows:
- It’s more configurable (any services, packages, or operation systems).
- It’s more controllable. There are no restrictions or limitations.
- It’s cheaper to maintain. PaaS can quickly cost a fortune for high-performance resources.
In this tutorial, we use 64-bit Amazon Linux AMI (http://aws.amazon.com/amazon-linux-ami) with CentOS. It might be easier to use the Extra Packages for Enterprise Linux (EPEL) package manager to install Node.js and NPM. If you don’t have EPEL, skip to the manual C++ build instructions.
Assuming you have your Elastic Compute Cloud (EC2) instance up and running, make an SSH connection into it and see if you have yum with EPEL (https://fedoraproject.org/wiki/EPEL). To do so, just see if this command says epel:
yum repolist
If there are no mentions of epel, run:
rpm -Uvh http://download-i2.fedoraproject.org/pub/epel/6/i386/epel-release-6-8.noarch.rpm
Then, to install both Node.js and NPM, simply run this command:
sudo yum install nodejs npm --enablerepo=epel
This might take a while. Answer with y as the process goes. In the end, you should see something like this (your results may vary):
Installed:
  nodejs.i686 0:0.10.26-1.el6              npm.noarch 0:1.3.6-4.el6
Dependency Installed:
...
Dependency Updated:
...
Complete!
You probably know this, but just in case, to check installations, type the following:
$ node –V
$ npm –v
For more information on using yum, see Managing Software with yum (https://www.centos.org/docs/5/html/yum) and Tips on securing your EC2 instance (http://aws.amazon.com/articles/1233).
So, if the previous EPEL option didn’t work for you, follow these build steps. On your EC2 instance, install all system updates with yum:
sudo yum update
Then, install the C++ compiler (again with yum):
sudo yum install gcc-c++ make
Do the same with openssl:
sudo yum install openssl-devel
Then install Git, which is needed for delivering source files to the remote machine. When Git is unavailable, rsync (http://ss64.com/bash/rsync.html) can be used:
sudo yum install git
Last, clone the Node repository straight from GitHub:
git clone git://github.com/joyent/node.git
cd node
git checkout v0.10.12
./configure
make
sudo make install
![]() Note For a different version of Node.js, you can list them all with $ git tag -l and check out the one you need.
Note For a different version of Node.js, you can list them all with $ git tag -l and check out the one you need.
To install NPM, run:
git clone https://github.com/isaacs/npm.git
cd npm
sudo make install
Relax and enjoy the build. The next step is to configure AWS ports / firewall settings. Here’s a short example of server.js, which outputs “Hello readers” and looks like this:
var http = require('http')
http.createServer(function(req, res) {
  res.writeHead(200, {'Content-Type': 'text/plain'});
  console.log ('responding'),
  res.end('Hello readers!'
    + 'If you see this, then your Node.js server '
    + 'is running on AWS EC2!'),
}).listen(80);
console.log ('server is up'),
On the EC2 instance, either configure the firewall to redirect connections (e.g., port to Node.js 3000, but this is too advanced for our example) or disable the firewall (okay for our quick demonstration and development purposes):
$ service iptables save
$ service iptables stop
$ chkconfig iptables off
In the AWS console, find your EC2 instance and apply a proper rule to allow for inbound traffic, as shown in Figure 11-3. For example,
Type: HTTP
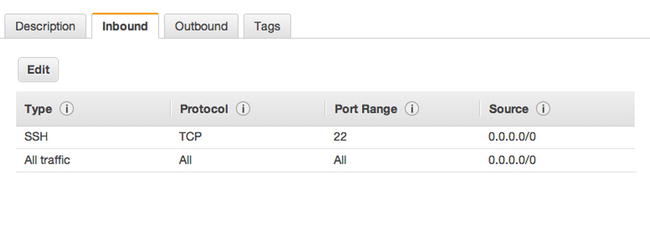
Figure 11-3. Allowing inbound HTTP traffic on port 80
The other fields fill automatically:
Protocol: TCP
Port Range: 80
Source: 0.0.0.0/0
Or we can just allow all traffic (again, for development purposes only), as shown in Figure 11-4.
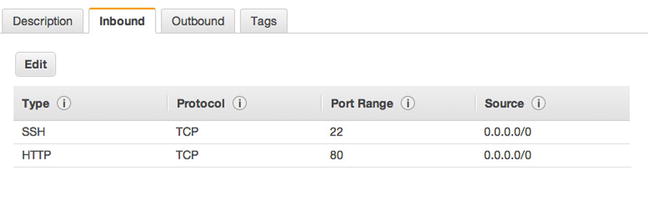
Figure 11-4. Allowing all traffic for development mode only
Now, while the Node.js app is running, executing $ netstat -apn | grep 80, the remote machine should show the process. For example,
tcp 0 0 0.0.0.0:80 0.0.0.0:* LISTEN 1064/node
And from your local machine, i.e., your development computer, you can either use the public IP or the public DNS (the Domain Name System) domain, which is found and copied from the AWS console under that instance’s description. For example,
$ curl XXX.XXX.XXX.XXX –v
Or, just open the browser using the public DNS.
For the proper iptables setup, please consult experienced development operations engineers and manuals, because this is an important security aspect and it is out of the scope of this book. However, here are some commands to redirect traffic to, say, port 3001:
sudo iptables -A PREROUTING -t nat -i eth0 -p tcp --dport 80 -j REDIRECT --to-port 8080
sudo iptables -t nat -A INPUT -p tcp --dport 80 -j     REDIRECT --to-ports 3001
sudo iptables -t nat -A OUTPUT -p tcp --dport 80 -j     REDIRECT --to-ports 3001
You can also use commands such as the following:
$ service iptables save
$ service iptables start
$ service iptables restart
$ chkconfig iptables on
It’s worth mentioning that AWS supports many other operating systems via its AWS Marketplace (https://aws.amazon.com/marketplace). Although AWS EC2 is a very popular and affordable choice, some companies opt for special Node.js tools available in the SmartOS (http://smartos.org), e.g., DTrace (http://dtrace.org/blogs), built on top of Solaris by Joyent (http://www.joyent.com), the company that maintains Node.js.
Keeping Node.js Apps Alive with forever, Upstart, and init.d
This section relates only to IaaS deployment—another advantage to PaaS deployments. The reason why we need this step is to bring the application back to life in case it crashes. Even if we have a master–child system, something needs to keep an eye on the master itself. You also need a way to stop and start processes for maintenance, upgrades, and so forth.
Luckily, there’s no shortage of solutions to monitor and restart our Node.js apps:
- forever (https://github.com/nodejitsu/forever): probably the easiest method. The forever module is installed via NPM and works on almost any Unix OS. Unfortunately, if the server itself fails (not our Node.js server, but the big Unix server), then nothing resumes forever.
- Upstart (http://upstart.ubuntu.com): the most recommended option. It solves the problem of starting daemons on startups, but it requires writing an Upstart script and having the latest Unix OS version support for it. We’ll show you an Upstart script example for CentOS.
- init.d (http://www.unix.com/man-page/opensolaris/4/init.d): an outdated analog of Upstart. init.d contains the last startup script options for systems that don’t have Upstart capabilities.
forever is a module that allows us to start Node.js apps/servers as daemons and keeps them running forever. Yes, that’s right. If the node process dies for some reason, it brings it right back up!
forever is a very neat utility because it’s an NPM module (very easy to install almost anywhere) and it’s very easy to use without any extra language. A simple use case is as follows:
$ sudo npm install forever –g
$ forever server.js
If you’re starting from another location, prefix the file name with the absolute path, e.g., $ forever /var/. A more complex forever example looks like this:
$ forever start -l forever.log -o output.log -e error.log server.js
To stop the process, type:
$ forever stop server.js
To look up all the programs run by forever, type:
$ forever list
To list all available forever commands, type:
$ forever --help
![]() Warning The app won’t start on server reboots without extra setup/utilities.
Warning The app won’t start on server reboots without extra setup/utilities.
Upstart Scripts
“Upstart is an event-based replacement for the /sbin/init daemon that handles starting of tasks and services during boot...”—the Upstart web site (http://upstart.ubuntu.com). The latest CentOS (6.2+), as well as Ubuntu and Debian OSs, come with Upstart. If Upstart is missing, try typing sudo yum install upstart to install it on CentOS, and try sudo app-get install upstart for Ubuntu.
A very basic Upstart script—to illustrate its structure—starts with metadata:
author      "Azat"
description "practicalnode"
setuid      "nodeuser"
We then start the application on startup after the file system and network:
start on (local-filesystems and net-device-up IFACE=eth0)
We stop the app on server shutdown:
stop on shutdown
We instruct Upstart to restart the program when it crashes:
respawn
We log events to /var/log/upstart/webapp.log:
console log
We include environment variables:
env NODE_ENV=production
Command and file to execute:
exec /usr/bin/node /var/practicalnode/webapp.js
A more useful example from a file webapp.conf in /etc/init follows:
cd /etc/init
sudo vi webapp.conf
The simplistic content of an Upstart script is as follows:
#!upstart
description "webapp.js"
author      "Azat"
env PROGRAM_NAME="node"
env FULL_PATH="/home/httpd/buto-middleman/public"
env FILE_NAME="forever.js"
env NODE_PATH="/usr/local/bin/node"
env USERNAME="springloops"

start on runlevel [2345]
stop on shutdown
respawn
This part of the script is responsible for launching the application webapp.js (similar to our local $ node webapp.js command, only with absolute paths). The output is recorded into the webapp.log file:
script
    export HOME="/root"

echo $$ > /var/run/webapp.pid
exec /usr/local/bin/node /root/webapp.js >> /var/log/webapp.log 2>&1

end script
The following piece is not as important, but it provides us with the date in the log file:
pre-
start script
    # Date format same as (new Date()).toISOString() for consistency
    echo "[`date -u +%Y-%m-%dT%T.%3NZ`] (sys) Starting" >> /var/log/webapp.log
end script
The following tells us what to do when we’re stopping the process:
pre-stop script
    rm /var/run/webapp.pid
    echo "[`date -u +%Y-%m-%dT%T.%3NZ`] (sys) Stopping" >> /var/log/webapp.log
end script
To start/stop the app, use:
/sbin/start myapp
/sbin/stop myapp
To determine the app’s status, type:
/sbin/status myapp
![]() Tip With Upstart, the Node.js app restarts on an app crash and on server reboots.
Tip With Upstart, the Node.js app restarts on an app crash and on server reboots.
The previous example was inspired by Deploy Nodejs app in Centos 6.2 (http://bit.ly/1qwIeTJ). For more information on Upstart, see How to Write CentOS Initialization Scripts with Upstart (http://bit.ly/1pNFlxT) and Upstart Cookbook (http://upstart.ubuntu.com/cookbook/upstart_cookbook.pdf).
init.d
If Upstart is unavailable, you can create an init.d script. init.d, which is a technology available on most Linux OSs. Usually, development operations engineers resort to init.d when Upstart is not available and when they need something more robust than forever. Without going into too much detail, Upstart is a newer alternative to init.d scripts. We put init.d scripts into the /etc/ folder.
For example, the following init.d script for CentOS starts, stops, and restarts the node process / file home/nodejs/sample/app.js:
#!/bin/sh

#
# chkconfig: 35 99 99
# description: Node.js /home/nodejs/sample/app.js
#

. /etc/rc.d/init.d/functions

USER="nodejs"

DAEMON="/home/nodejs/.nvm/v0.4.10/bin/node"
ROOT_DIR="/home/nodejs/sample"

SERVER="$ROOT_DIR/app.js"
LOG_FILE="$ROOT_DIR/app.js.log"

LOCK_FILE="/var/lock/subsys/node-server"

do_start()
{
        if [ ! -f "$LOCK_FILE" ] ; then
                echo -n $"Starting $SERVER: "
                runuser -l "$USER" -c "$DAEMON $SERVER >> $LOG_FILE &" && echo_success || echo_failure
                RETVAL=$?
                echo
                [ $RETVAL -eq 0 ] && touch $LOCK_FILE
        else
                echo "$SERVER is locked."
                RETVAL=1
        fi
}
do_stop()
{
        echo -n $"Stopping $SERVER: "
        pid=`ps -aefw | grep "$DAEMON $SERVER" | grep -v " grep " | awk '{print $2}'`
        kill -9 $pid > /dev/null 2>&1 && echo_success || echo_failure
        RETVAL=$?
        echo
        [ $RETVAL -eq 0 ] && rm -f $LOCK_FILE
}

case "$1" in
        start)
                do_start
                ;;
        stop)
                do_stop
                ;;
        restart)
                do_stop
                do_start
                ;;
        *)
                echo "Usage: $0 {start|stop|restart}"
                RETVAL=1
esac

exit $RETVAL
The init.d script above was borrowed from this GitHub gist (https://gist.github.com/nariyu/1211413). For more info on init.d, see this detailed tutorial (http://bit.ly/1lDkRGi).
Serving Static Resources Properly with Nginx
Although, it’s fairly easy to serve static files from Node.js applications, and we can use sendFile or Express.js static middleware, it’s a big no-no for systems that require high performance. In other words, this step is optional but recommended.
The best option is to use Nginx (http://nginx.org), Amazon S3 (http://aws.amazon.com/s3) or CDNs, e.g., Akamai (http://www.akamai.com) or CloudFlare (https://www.cloudflare.com), for the purpose for which they were specifically designed, i.e., serving static content, and let Node.js apps handle interactive and networking tasks only. This tactic decreases the load on Node.js processes and improves the efficiency of your system.
Nginx is a popular choice among development operations engineers. It’s an HTTP and reverse-proxy server. To install Nginx on a CentOS system (v6.4+), type:
sudo yum install nginx
As a side note, for Ubuntu, you can use the apt packaging tool: sudo apt-get install nginx. For more information about apt, refer to the docs (https://help.ubuntu.com/12.04/serverguide/apt-get.html).
But, let’s continue with our CentOS example. We need to open the /etc/nginx/conf.d/virtual.conf file for editing, e.g., using a VIM (Vi Improved) editor:
sudo vim /etc/nginx/conf.d/virtual.conf
Then, we must add this configuration:
server {
    location / {
        proxy_pass http://localhost:3000;
    }

    location /static/ {
        root /var/www/webapplog/public;
    }
}
The first location block acts as a proxy server and redirects all requests that are not /static/* to the Node.js app, which listens on port 3000. Static files are served from the /var/www/webapplog/public folder.
If your project uses Express.js or a framework that’s built on top of it, don’t forget to set the trust proxy to true by adding the following line to your server configuration:
app.set('trust proxy', true);
This little configuration enables Express.js to display true client IPs provided by proxy instead of proxy IPs. The IP address is taken from the X-Forwarded-For HTTP header of requests (see next code snippet).
A more complex example with HTTP headers in the proxy-server directive, and file extensions for static resources, follows:
server {
    listen 0.0.0.0:80;
    server_name webapplog.com;
    access_log /var/log/nginx/webapp.log;

   location ~* ^.+.(jpg|jpeg|gif|png|ico|css|zip|tgz|gz|rar|bz2|pdf|txt|tar|wav|bmp|rtf|js|flv|swf|html|htm)$ {
        root   /var/www/webapplog/public;
    }

    location / {
        proxy_set_header X-Real-IP $remote_addr;
        proxy_set_header HOST $http_host;
        proxy_set_header X-NginX-Proxy true;

        proxy_pass http://127.0.0.1:3000;
        proxy_redirect off;
    }
![]() Note Replace 3000 with the Node.js app’s port number, webapplog.com with our domain name, and webapp.log with your log’s file name.
Note Replace 3000 with the Node.js app’s port number, webapplog.com with our domain name, and webapp.log with your log’s file name.
Alternatively, we can use upstream try_files (http://wiki.nginx.org/httpCoreModule#try_files). Then, start Nginx as a service:
sudo service nginx start
After Nginx is up and running, launch your node app with forever or Upstart on the port number you specified in the proxy-server configurations.
To stop and restart Nginx, use:
sudo service nginx stop
sudo service nginx start
So far, we’ve used Nginx to serve static content while redirecting nonstatic requests to Node.js apps. We can take it a step further and let Nginx serve error pages and use multiple Node.js processes. For example, if we want to serve the 404 page from the 404.html file, which is located in the /var/www/webapplog/public folder, we can add the following line inside the server directive:
error_page 404 /404.html;
location  /404.html {
    internal;
    root /var/www/webapplog/public;
}
If there is a need to run multiple Node.js processes behind Nginx, we can set up location rules inside the server in exactly the same way we used location for dividing static and nonstatic content. However, in this case, both destinations are handled by Node.js apps. For example, we have a Node.js web app that is running on 3000, serving some HTML pages, and its URL path is /, whereas the Node.js API app is running on 3001, serving JSON responses, and its URL path is /api:
server {
  listen 8080;
  server_name webapplog.com;
  location / {
    proxy_pass http://localhost:3000 ;
    proxy_set_header Host $host;
  }
  location /api {
    proxy_pass http://localhost:3001;
    rewrite ^/api(.*) /$1 break;
    proxy_set_header Host $host;
  }
}
In this way, we have the following trafficking:
- The / requests go to http://localhost:3000.
- The /api requests go to http://localhost:3001.
Caching with Varnish
The last piece of the production deployment puzzle is setting up caching using Varnish Cache (https://www.varnish-cache.org). This step is optional for Node.js deploys, but, like a Nginx setup, it’s also recommended, especially for systems that expect to handle large loads with the minimum resources consumed.
The idea is that Varnish allows us to cache requests and serve them later from the cache without hitting Nginx and/or Node.js servers. This avoids the overhead of processing the same requests over and over again. In other words, the more identical requests the server has coming, the better Varnish’s optimization.
Here’s a nice Varnish Cache video (http://youtu.be/x7t2Sp174eI). It does a good job at summarizing the tool in just less than three minutes.
Let’s use yum again, this time to install Varnish dependencies on CentOS:
$ yum install -y gcc make automake autoconf libtool ncurses-devel libxslt groff pcre-devel pckgconfig libedit libedit-devel
Download the latest stable release (as of May 2014):
$ wgethttp://repo.varnish-cache.org/source/varnish-3.0.5.tar.gz
and build Varnish Cache with the following:
$ tar -xvpzf varnish-3.0.5.tar.gz
$ cd varnish-3.0.5
$ ./autogen.sh
$ ./configure
$ make
$ make check
$ make install
For this example, let’s make only minimal configuration adjustments. In the file /etc/sysconfig/varnish, type:
VARNISH_LISTEN_PORT=80
VARNISH_ADMIN_LISTEN_ADDRESS=127.0.0.1
Then, in /etc/varnish/default.vcl, type
backend default {
 .host = "127.0.0.1";
 .port = "8080";
}
Restart the services with:
$ /etc/init.d/varnish restart
$ /etc/init.d/nginx restart
Everything should be working by now. To test it, CURL from your local (or another remote) machine:
$ curl -I www.varnish-cache.org
If you see “Server: Varnish” this means that requests go through Varnish Cache first, just as we intended.
Summary
In this chapter, we covered deployment using the Git and Heroku command-line interfaces to deploy to PaaS. Then, we worked through examples of installing and building a Node.js environment on AWS EC2, running Node.js apps on AWS with CentOS. After that, we explored examples of forever, Upstart, and init.d to keep our apps running. Last, we installed and configured Nginx to serve static content, including error pages, and split traffic between multiple Node.js processes. Then, we added Varnish Cache to lighten the Node.js apps’ loads even more.