
![]()
The HL7 Accelerator in Action
In the previous chapter, you learned about the HL7 Accelerator architecture, including all the components of the HL7 Accelerator. In this chapter, you will learn implementation of various scenarios using the HL7 Accelerator's components. We will discuss the following scenarios:
- Message exchange
- Simple message routing with default configurations
- Turning off message body validation
- Accepting messages with customized fields
- Customized acknowledgment behavior
- Message transformation
- Sending a HL7 message via the MLLP adapter
- Batching
Message Exchange
In an HL7 message exchange, there are always two entities, the initiating and responding system. Each system is both a sender and receiver of messages. The initiator system first sends then receives, and the responding system first receives and then sends, as shown in Figure 4-1.

Figure 4-1. Basic message exchange scenario
The following are the steps for any message exchange between the initiating and responding systems.
- The message initiator sends the message to the responding system.
- The responding system receives the message and processes it.
- The responding system sends the acknowledgment message.
- The initiator receives the response message and process it.
Message processing on the responding system side depends on the acknowledgment mode used. How the processing differs is detailed in upcoming subsections.
Message Processing—Original Mode
The responding system processing in original mode is shown in Figure 4-2.
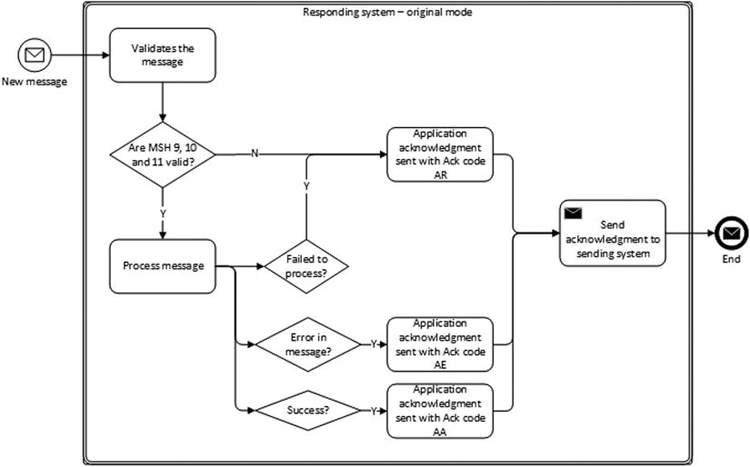
Figure 4-2. Responding system—original mode
The responding system after receiving the message does at least the following validation in original mode.
- The value in MSH9 (message type) is one that is acceptable to the receiver.
- The value in MSH12 (version) is one that is acceptable for receiver.
- The value is MSH11 (processing ID) is appropriate for the application process handling the message.
If any of the above validation fails, then the responding system returns an acknowledgment with acknowledgment code AR to the sending system; in other words, it will reject the message.
If the above validation fails, then it moves to the following steps.
- It processes the message successfully, generating the acknowledgment with acknowledgment code AA in MSA1.
- In case of an error, it sends the acknowledgment with acknowledgment code AE with details of the error in ERR segment.
- It fails to process the message due to internal system issues like the system is down or an internal error, it rejects the message, and it sends the acknowledgment with acknowledgment code AR. In such a situation, the sending application should be able to resubmit the message when the receiving system issue is resolved.
The acknowledgment with the appropriate code is returned to the sending system. Then the sending system processes the response.
Message Processing—Enhanced Mode
In enhanced mode, the message processing by the responding system is shown in Figure 4-3. As you know, the message is committed to safe storage for further processing. The responding system determines, based on following factors, whether message is good to commit to safe storage:
- Availability of safe storage
- The syntactical correctness of the message, if the design of the receiving application includes such validation at this stage
- The validation of MSH9, MSH11, and MSH12, if the design of the receiving application includes such validation at this stage
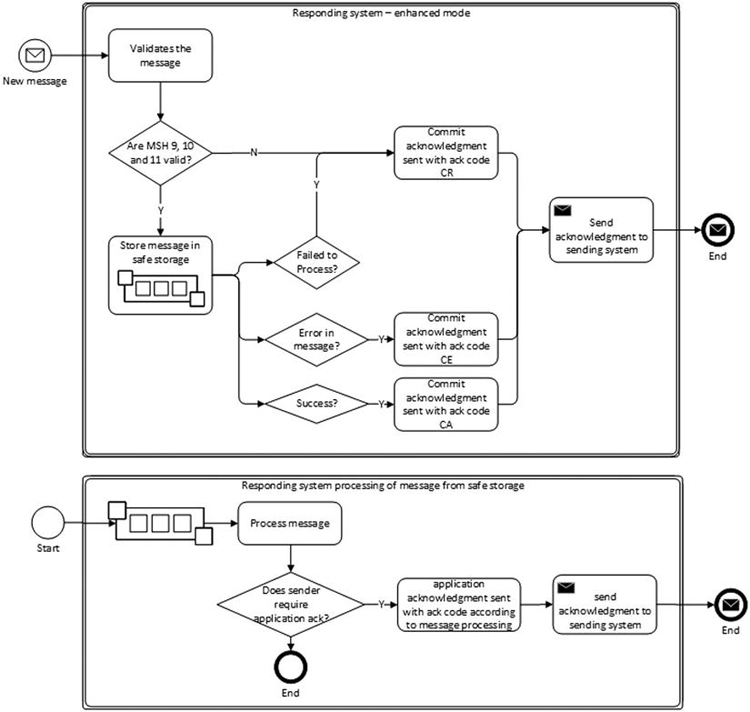
Figure 4-3. Responding system—enhanced mode
It then checks for MSH15 in the received message and sees if the initiating system requires an Accept Acknowledgment; if it does, then a general acknowledgment is sent to the sending system with one of following acknowledgment codes:
- CA - If the message can be accepted for processing
- CR - If one of the values in MSH9, MSH11, and MSH12 is not acceptable to the receiving application
- CE - If the message cannot be accepted due to any other reason
After message processing, the receiving application checks MSH16 in the received message to see if the sending application requires application acknowledgment. If it does, then the receiving application sends an application acknowledgment. In such a case, the receiving application becomes the initiator and the sending application becomes the receiving application, and the whole process of sending an application acknowledgment become any other message exchange between two systems except that in application acknowledgment message cannot have MSH16.
![]() Note The original acknowledgment protocol is equivalent to the enhanced acknowledgment protocol with MSH-15-accept acknowledgment type = NE and MSH-16-application acknowledgment type = AL, and with the application acknowledgment message defined so that it never requires an accept acknowledgment (MSH-15-accept acknowledgment type = NE).
Note The original acknowledgment protocol is equivalent to the enhanced acknowledgment protocol with MSH-15-accept acknowledgment type = NE and MSH-16-application acknowledgment type = AL, and with the application acknowledgment message defined so that it never requires an accept acknowledgment (MSH-15-accept acknowledgment type = NE).
In this scenario, you will learn how to use the various HL7 Accelerator components together to build a simple message routing application. As shown in Figure 4-1, you will implement a responding system using the BizTalk HL7 Accelerator and see how two different acknowledgment modes can be achieved.
![]() Note In order to implement this scenario, you will use HL7 version v2.5.1 ADT message type, with triggering event A01.
Note In order to implement this scenario, you will use HL7 version v2.5.1 ADT message type, with triggering event A01.
The implementation of simple message routing is same, irrespective of the acknowledgment mode you want to use. You will see how to switch from one acknowledgment mode to another using configuration.
Building the Solution
The following are the steps you will take to create the BizTalk solution for this scenario.
- Create a Visual Studio Blank Solution named HL7.Common.
- Create a new BTAHL7V2XCommon project in the solution with the name HL7.Common.Schemas, as shown in Figure 4-4.

Figure 4-4. Common project template
The project in Solution Explorer will look like Figure 4-5.
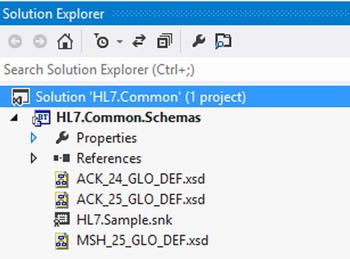
Figure 4-5. Common project in Solution Explorer
- Change the BizTalk Deployment properties to deploy this project to BizTalk under the HL7.Common BizTalk application.
- Sign the project using a strong name key and deploy it.
![]() Note Message header (MSH_25_GLO_DEF.xsd) and acknowledgment (ACK_24_GLO_DEF and ACK_25_GLO_DEF) message schemas can only be deployed once in BizTalk Group for all applications.
Note Message header (MSH_25_GLO_DEF.xsd) and acknowledgment (ACK_24_GLO_DEF and ACK_25_GLO_DEF) message schemas can only be deployed once in BizTalk Group for all applications.
Build HL7 Version Schemas Project
You will learn the steps to add specific HL7 message schemas to a BizTalk project. For this scenario, you will be adding version 2.5.1 ADT message type with triggering event A01.
- Create a new Visual Studio blank solution with the name HL7.Chapter4.Scenarios.
- Create a BTAHL7V251Common project for the solution, as shown in Figure 4-6.
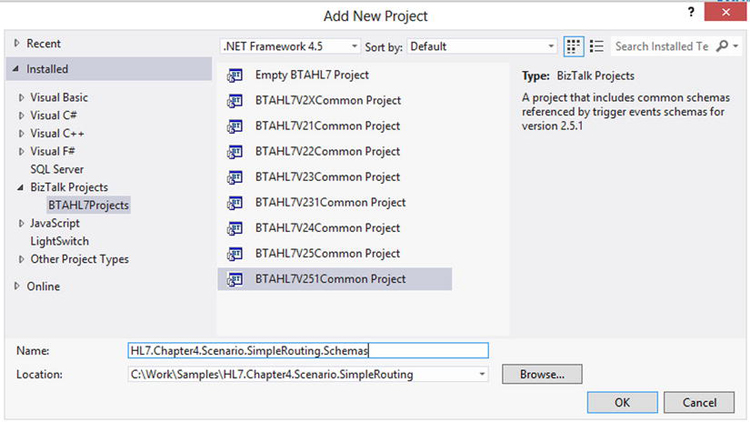
Figure 4-6. Segments, DataTypes, TableValues Project Template
- The above step will add datatypes_251, tablevalues_251, and segments_251 schemas. Now add a new item to the project via Ctrl+Shift+A and select BTAHL7 Schemas as shown in Figure 4-7.
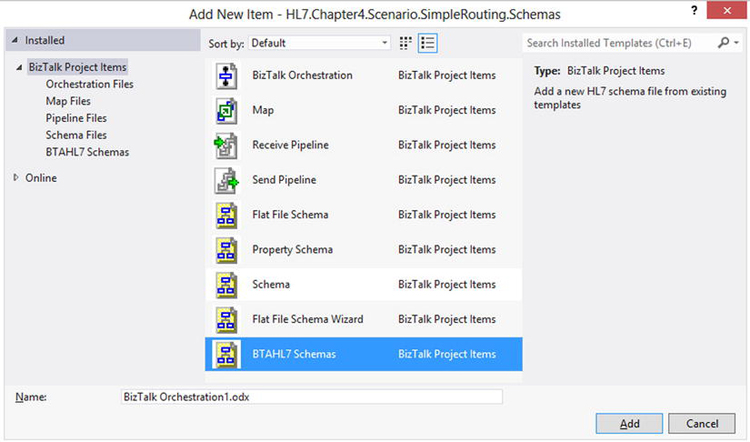
Figure 4-7. Message Type Schema Template
- Click Add, and don't worry about naming the file as next step overrides anything you select here. Once you click Add, you get a new screen called HL7 Schema Selector where you select the message type, triggering event, and version.
- Select the message class, version, message type, and trigger event as shown in Figure 4-8. Once you click Create, it adds a schema named ADT_A01_251_GLO_DEF.xsd
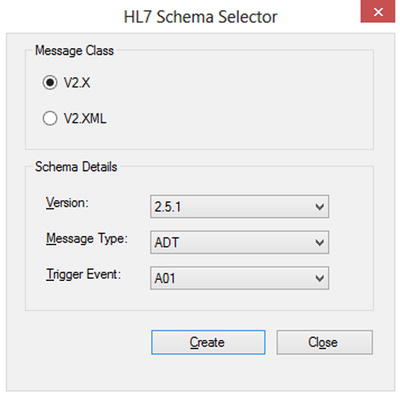
Figure 4-8. HL7 Schema Type Selector
- By default, the message schema is expected to be added to a separate project because it refers to segments_251 xsd from an assembly reference, as shown:
<xs:import schemaLocation="BTAHL7Schemas.segments_251"
namespace="http://microsoft.com/HealthCare/HL7/2X/2.5.1/Segments" /> - Since you added the schema to same project as segments_251 schema, change the schema location to the following:
<xs:import schemaLocation="segments_251.xsd"
namespace="http://microsoft.com/HealthCare/HL7/2X/2.5.1/Segments" /> - The project in Solution Explorer will look like Figure 4-9.

Figure 4-9. Message Schema Project in Solution Explorer
- Sign, build, and deploy the project to BizTalk application HL7.Chapter4.Scenarios
This is all that is required to receive an ADT message and route it somewhere else. In this case, you will route it to a folder.
Configurations
Let's create the required receive and send ports to configure the deployed application using the following steps.
- Add a reference to BizTalk Application 1 application in the BizTalk admin console.
- Create a two-way MLLP receive port with the following configurations:
Property
Value
Adapter Type
MLLP
Receive Handler
A 32-bit host
Receive Pipeline
BTAHL72XReceivePipeline
Receive Pipeline->Enable Trailing Delimiter
True
Send Pipeline
BTAHL72XSendPipeline
MLLP->Use Direct Synchronous HL7 ACK
True
MLLP->Connection Name
Same as your receive location name
MLLP->Host
127.0.0.1
MLLP->Persistent Connection
True
MLLP->Port
11001 (could be any available port)
MLLP->Receive Time Out
0
- Create one send port for successfully parsed messages to send them to a FILE folder using following properties:
Property
Value
Filter->BTAHL7Schemas.ParseError
False
Filter->BTS.MessageType
Send Pipeline
BTAHL72XSendPipeline
Send Handler
A 32-bit host
This port will send all successfully parsed ADT messages.
- Create one send port for failed messages with following filters:
Property
Value
Filter->BTAHL7Schemas.ParseError
True
Send Pipeline
Passthrough
Send Handler
Any host, 32-bit or 64-bit
This port will send messages that failed parsing by the HL7 Disassembler.
- Start the application and the host instances.
Test the Scenario
For testing the scenario, you will use a sample ADT^A01 message (provided below for reference).
MSH|^~&|ADTSource|MCM|ADTDestination|MCM|198808181126|SECURITY|ADT^A01|MSG00002|P|2.5.1|||AL|NE
EVN|A01|198808181123
PID|||PATID1234^5^M11||FN^LN^A^III||19610615|A||2106-3|Address line1^^City^State^Zip|GL|000-000-0000|000-000-0000~000-000-0000||S||PATID12345001^2^M10|123456789|9-87654^NC
NK1|1|FN^LN^K|SPO|||||20011105
NK1|1|FN^LN^A|FTH
PV1|1|I|2000^2012^01||||004777^LEBAUER^SIDNEY^J.|||SUR||-||1|A0
AL1|1||^PENICILLIN||PRODUCES HIVES~RASH
AL1|2||^CAT DANDER
DG1|001|I9|1550|MAL NEO LIVER, PRIMARY|19880501103005|F||
PR1|2234|M11|111^CODE151|COMMON PROCEDURES|198809081123
ROL|45^RECORDER^ROLE MASTER LIST|AD|CP|FN^LN^ELLEN|199505011201
GT1|1122|1519|BILL^GATES^A
IN1|001|A357|1234|BCMD|||||132987
IN2|ID1551001|SSN12345678
ROL|45^RECORDER^ROLE MASTER LIST|AD|CP|KATE^ELLEN|199505011201
There are a couple of ways to send this message to your receive location in BizTalk. The MLLPSend utility provided by the HL7 Accelerator discussed in Chapter 3 can be used as follows:
C:Program Files (x86)Microsoft BizTalk 2013 Accelerator for HL7SDKMLLP Utilities>mllpsend
/IP 127.0.0.1 /P 11001 /TWOWAY /SB 11 /EB 28 /CR 13 /F C:WorkTestFilesdemo1.hl7
With this method, the message acknowledgment returned by the BizTalk connection will be saved in the demo1.hl7.RESPONSE file in the C:WorkTestFiles folder and the acknowledgment will look as follows:
MSH|^~&|ADTDestination|MCM|ADTSource|MCM|20140318063809||ACK^A01^ACK|20000GSM|P|2.5.1
MSA|CA|MSG00002
If everything is set up correctly, you should get the above acknowledgment and the message should route to the successfully parsed send port. If you stop your send port and notice the context properties of the suspended message, there will be number context properties promoted by the HL7 Disassembler, which can also be used for routing. These properties are defined in the HL7PropertySchema in BizTalk Application 1.
The second method to send HL7 messages to your receive location is a third-party tool referred to as 7Edit. This is a very useful GUI tool as it provides easy mapping of a HL7 message to their segment and fields. You can download a free trial from www.7edit.com/home/index.php.
Key Observations
Some of the key observations we want to highlight while creating and testing these scenarios are as follows:
- There is no need to define a party to accept and parse the message successfully.
- The context properties promoted by the HL7 Disassembler, such as MSH3_1, MSH5_1, and ParseError, are useful for routing.
- The MSA.1 code CA in the acknowledgment message indicates enhanced mode acknowledgment as requested using MSH15. If you change MSH15 to NE and MSH16 to AL, then you will receive an original acknowledgment mode acknowledgment with code AA. You can try changing the values of MSH15 and MSH16 in the message to see different behavior. In some cases like where MSH15 = AL and MSH16 = AL, you will get a suspended message in BizTalk because it will now generate two acknowledgments, one with code AA and another with CA.
- Change the message to make it invalid; for example, change PID8 value to A1 and resend the message. You will see message routing to Failed Message send port with parse error = true. PID8 field has a predefined list of values which you can use, and A1 is not part of that list, so the Disassembler fails in parsing the message. If in your message MSH15 = AL and MSH16 = NE, then the acknowledgment returned will have no error details; however, if you change MSH15 = NE and MSH16 = AL, then the error is returned as part of the acknowledgment.
- Change the message type MSH9 of the message to ADT^A02 and resend the message. You will see that an error is returned that the message schema for ADT A02 is not found and the message is routed to the failed message send port.
![]() Note In this scenario, the HL7 Accelerator is using default configuration (message body validation, acknowledgment mode).
Note In this scenario, the HL7 Accelerator is using default configuration (message body validation, acknowledgment mode).
Turning Off Message Body Validation
In many cases, the message you receive contains a lot of local customized data which does not conform to the HL7 messaging standard, and the requirement is to still accept the message and route it to the destination as required. In such cases, you need to turn off the message body validation.
Build the Solution
As part of implementation, you are going to use exact same Visual Studio solution you used in previous scenarios and expand it as required.
Configuration
In order to turn off message validation, you will perform following steps.
- Identify the MSH3 value in the message. In your sample ADT message, it is ADTSource. Typically, this is an identifier of the message source.
- Create a party called ADTSource from the BizTalk Admin Console, as shown in Figures 4-10 and 4-11.

Figure 4-10. New party creation option
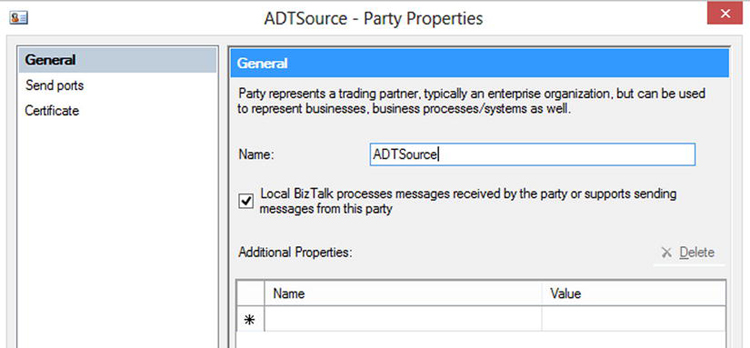
Figure 4-11. Party creation
When creating the party, only give it a name and save it; no other configuration is required.
- Go to BTAHL7 Configuration Explorer, which is installed along with HL7 Accelerator. As you open it, you should see the party ADTSource in left list box along with any other parties available, as shown in Figure 4-12.
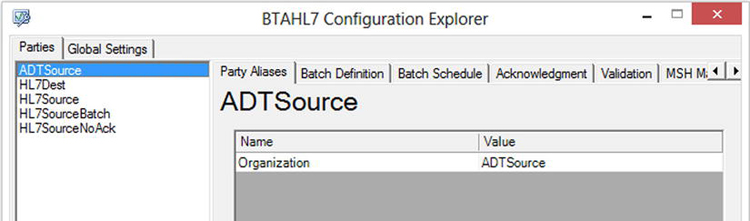
Figure 4-12. BTAHL7 Configuration Explorer
- Go to the Validation tab and uncheck “Validate body segments” and check “Allow trailing delimiters (separators)” as shown in Figure 4-13 and save the party.
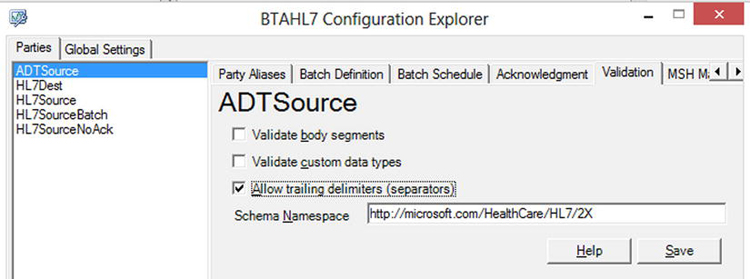
Figure 4-13. BTAHL7 Configuration Explorer Validation tab
Note that the “Validate body segments” option is checked by default as shown below:
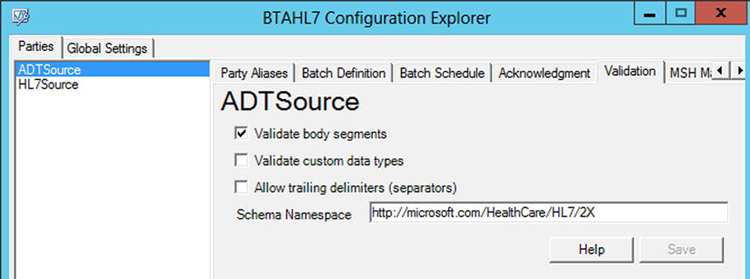
Figure 4-14. BTAHL7 Configuration Explorer Validation tab default values
- Restart the host on which you have configured your receive location.
Test the Scenario
If you now test the following sample message which has a body validation error in PID 8 (highlighted bold), you will see that no error is raised by the HL7 Disassembler and the message is parsed successfully:
MSH|^~&|ADTSource|MCM|ADTDestination|MCM|198808181126|SECURITY|ADT^A01|MSG00002|P|2.5.1|||NE|AL
EVN|A01|198808181123
PID|||PATID1234^5^M11||FN^LN^A^III||19610615|A1||2106-3|Address line1^^City^State^Zip|GL|000-000-0000|000-000-0000~000-000-0000||S||PATID12345001^2^M10|123456789|9-87654^NC
NK1|1|FN^LN^K|SPO|||||20011105
NK1|1|FN^LN^A|FTH
PV1|1|I|2000^2012^01||||004777^LEBAUER^SIDNEY^J.|||SUR||-||1|A0
AL1|1||^PENICILLIN||PRODUCES HIVES~RASH
AL1|2||^CAT DANDER
DG1|001|I9|1550|MAL NEO LIVER, PRIMARY|19880501103005|F||
PR1|2234|M11|111^CODE151|COMMON PROCEDURES|198809081123
ROL|45^RECORDER^ROLE MASTER LIST|AD|CP|FN^LN^ELLEN|199505011201
GT1|1122|1519|BILL^GATES^A
IN1|001|A357|1234|BCMD|||||132987
IN2|ID1551001|SSN12345678
ROL|45^RECORDER^ROLE MASTER LIST|AD|CP|KATE^ELLEN|199505011201
Key Observations
- There is no development effort for switching off message body validation.
- If you receive a message from a different source (a different MSH3), you need a new party to be created to turn off the message validation for each of them. This can become a maintenance problem if the number of message sources is too many. You can avoid this by doing further customization using pipeline components, which we will discuss later in this chapter.
- The host instance restart is always required after making any change to a party configuration.
- Notice the behavior after turning on the validation again and you will see the same error returned in acknowledgment.
![]() Note You have seen property called Allow Trailing Delimiter and you specifically checked it in the party configuration and receive pipeline properties. This property means you can accept messages that have a trailing delimiter in the message segment; in above sample, the DG1 segment has trailing delimiter. Notice the behavior if you uncheck it in the party configuration; you will get the acknowledgment with an error on the DG1 segment.
Note You have seen property called Allow Trailing Delimiter and you specifically checked it in the party configuration and receive pipeline properties. This property means you can accept messages that have a trailing delimiter in the message segment; in above sample, the DG1 segment has trailing delimiter. Notice the behavior if you uncheck it in the party configuration; you will get the acknowledgment with an error on the DG1 segment.
Accept Messages with Customized Fields
There are a couple of scenarios where you need to accept messages with customized fields and as a result you need to modify message schema. These scenarios are listed in the following sections
Z Segment
The HL7 standard allows customization for a message using Z segments. Using these segments you can add fields as per specific system requirements. These Z segments by default are parsed by the HL7 Disassembler as string data type as follows and as shown in Figure 4-15:
ZIN|1|SP|MCR WPS AB|Y|20130420|HX KPI8483||N|||||MCRABWPS
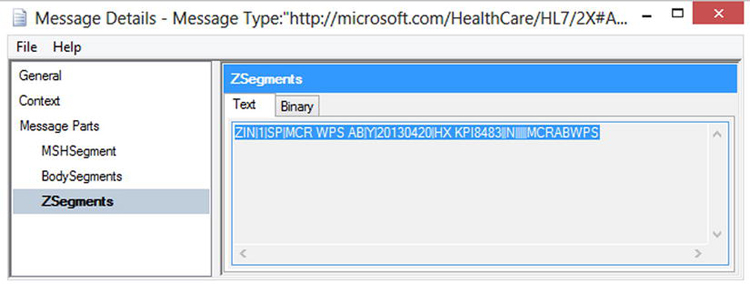
Figure 4-15. Z Segments data in message
If you add the above ZIN segment to your ADT sample and send the message, observer the Z Segments of parsed message on a suspended message instance by stopping the send port.
In many cases, these ZSegments are required to be part of BodySegments so that they can be used in BizTalk maps for transformation. In such cases, you need to change your ADT schema to include Z segment definition.
Standard Segment Field Customization
In addition to the Z segment addition to a schema, many times the source system generates extra segment fields in the message. These extra segment fields, which are not defined in HL7 standard schemas, cause the HL7 Disassembler to fail parsing even if body validation is turned off. This is a very common problem when parsing HL7 messages in BizTalk. One example of such message is the following:
MSH|^~&|ADTSource|MCM|ADTDestination|MCM|198808181126|SECURITY|ADT^A01|MSG00002|P|2.5.1|||NE|AL
EVN|A01|198808181123
PID|||PATID1234^5^M11||FN^LN^A^III||19610615|A||2106-3|Address line1^^City^State^Zip|GL|000-000-0000|000-000-0000~000-000-0000||S||PATID12345001^2^M10|123456789|9-87654^NC
NK1|1|FN^LN^K|SPO|||||20011105
NK1|1|FN^LN^A|FTH
PV1|1|I|2000^2012^01||||004777^LEBAUER^SIDNEY^J.|||SUR||-||1|A0
AL1|1||^PENICILLIN||PRODUCES HIVES~RASH
AL1|2||^CAT DANDER
DG1|001|I9|1550|MAL NEO LIVER, PRIMARY|19880501103005|F||
PR1|2234|M11|111^CODE151|COMMON PROCEDURES|198809081123
ROL|45^RECORDER^ROLE MASTER LIST|AD|CP|FN^LN^ELLEN|199505011201
GT1|1122|1519|BILL^GATES^A
IN1|001|A357|1234|BCMD||||12345^11123|132987
IN2|ID1551001|SSN12345678
ROL|45^RECORDER^ROLE MASTER LIST|AD|CP|KATE^ELLEN|199505011201
ZIN|1|SP|MCR WPS AB|Y|20130420|HX KPI8483||N|||||MCRABWPS
In this example, IN1.8 field highlighted in bold causes parsing to fail with the following error:
MSH|^~&|ADTDestination|MCM|ADTSource|MCM|20140320202627||ACK^A01^ACK|0000GSM2|P|2.5.1|||NE
MSA|AE|MSG00002
ERR||IN1^1^8|102^Data type error^HL79999|E||||||||^^^^^^^^^^^
The error exactly indicates which field of the segment has the issue. Such errors cannot be resolved even by turning off body validation. The recommended approach to solve such an issue is to ask the message source system to fix this; however, this is not always possible. In cases where you need to accept the message with extra fields, you need to modify the message schema, as you will see shortly.
Build the Solution
In order to implement both scenarios, you will modify ADT message schema using following steps.
- Add a new BTAHL7V251Common Project to your previous scenario solution and name it HL7.Chapter4.Scenarios.CustomizedSchemas.
- Add the ADT A01 schema to the project as you did in the previous scenario.
- In order to customize the schemas, you need to change the default target namespace of all the schemas you added. The quickest way is to find http://microsoft.com/HealthCare/HL7/2X and replace it with a new namespace like http://hl7.chapter4.scenario.customization/schemas/hl7/2x.
- After the change, you should be able to open the ADT schema without any error.
- Now that you can modify your schemas as necessary, let's look for IN1 segment in segments_251.xsd and go to field IN1_8_GroupNumber. Note that this is a simple type accepting strings. To change it as per your sample message, you need to add a new complex type in the datatypes_251.xsd schema.
<xs:element name="CustomIN1_8" type="CustomIN1_8" />
<xs:complexType name="CustomIN1_8"><xs:sequence><xs:element name="GroupNumber" type="ST" />
<xs:element name="GroupNumber_1" type="ST" /></xs:sequence></xs:complexType> - Let’s go back to segments_251.xsd to change IN1_8_GroupNumber. Since this field is a simple type, you need to delete it and replace it with a Record type and change its data structure type to ns0:CustomIN1_8.
- Now let’s add a ZIN segment to segments_251.xsd as follows:
<xs:element name="ZIN" type="ZIN" />
<xs:complexType name="ZIN">
    <xs:sequence>
      <xs:element name="Field1" type="ns0:ST" />
      <xs:element name="Field2" type="ns0:ST" />
      <xs:element name="Field3" type="ns0:ST" />
      <xs:element name="Field4" type="ns0:ST" />
      <xs:element name="Field5" type="ns0:ST" />
      <xs:element name="Field6" type="ns0:ST" />
      <xs:element name="Field7" type="ns0:ST" />
      <xs:element name="Field8" type="ns0:ST" />
      <xs:element name="Field9" type="ns0:ST" />
      <xs:element name="Field10" type="ns0:ST" />
      <xs:element name="Field11" type="ns0:ST" />
      <xs:element name="Field12" type="ns0:ST" />
      <xs:element name="Field13" type="ns0:ST" />
      <xs:element name="Field14" type="ns0:ST" />
    </xs:sequence>
</xs:complexType> - Now add the newly defined ZIN segment to the ADT A01 schemas by adding a child record of data structure type ns0:ZIN.
- Your modifications to the schemas are complete. Now deploy the application to the HL7.Chapter4.Scenarios.CustomizedSchemas BizTalk application.
![]() Note Changing the default target namespace of the schemas allows you to deploy both your original message and modified schemas. Remember, you cannot modify the namespace for MSH and ACK message types.
Note Changing the default target namespace of the schemas allows you to deploy both your original message and modified schemas. Remember, you cannot modify the namespace for MSH and ACK message types.
Configuration
Receive and Send Ports
You will use your first scenario's receive and send port configurations to test this scenario, except one additional send port is required to receive your modified schema. You will create this send port in application HL7.Chapter4.Scenarios itself to keep all send ports together. The send port properties are as follows:
Property |
Value |
|---|---|
Filter->BTAHL7Schemas.ParseError |
False |
Filter->BTS.MessageType |
http://hl7.chapter4.scenario.customization/schemas/hl7/2x#ADT_A01_251_GLO_DEF |
Send Pipeline |
BTAHL72XSendPipeline |
Send Handler |
A 32-bit host |
Party
You will now create a new party named ADTSource_A. On the validation tab, make the following changes:
- Change the schema namespace to http://hl7.chapter4.scenario.customization/schemas/hl7/2x.
- Uncheck body validation.
- Allow trailing delimiters.
The party configuration should look like Figure 4-16.
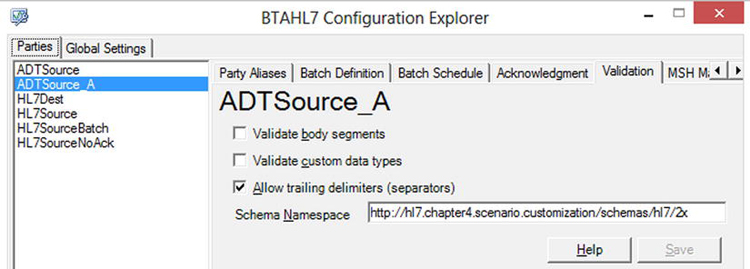
Figure 4-16. Validation tab: BTAHL7 Configuration Explorer
Save the party and restart the host instances.
![]() Note The only reason you created a new party is to keep both scenarios working and to showcase the difference between the two. You can always modify your existing party to change the namespace.
Note The only reason you created a new party is to keep both scenarios working and to showcase the difference between the two. You can always modify your existing party to change the namespace.
Test the Scenario
In your sample message, change MSH3 to ADTSource_A to match the party name and test the message. Note now that the message has been parsed successfully with the body having a ZIN segment and IN1_8 having two fields.
Key Observations
- Both message types with original schemas and modified schemas can coexist by changing the target namespace.
- The same receive port can accept both messages using different MSH3 (if you change MSH3 to ADTSource, the message default schema will be used by the Disassembler; if it is ADTSource_A, then a customized schema will be used).
Customized Acknowledgment Behavior
As of now, you have used the default behavior of the HL7 Accelerator for acknowledgment, which means the acknowledgment is generated based on the MSH15 and MSH16 value in the message. In many cases, the HL7 message does not have both MSH15 and MSH16 values defined, and the sending application still wants an acknowledgment to be returned. In such cases, with the default behavior on the two-way receive port, no acknowledgment is generated by the HL7 Accelerator, and the two-way receive port instance is kept waiting for the acknowledgment.
Ideally, the sending application should be sending MSH15 and MSH16, requesting acknowledgment; however at times messages don't have these field values. The HL7 Accelerator allows you to configure an acknowledgment mode in such cases to generate the acknowledgment when MSH15 and MSH16 are not supplied in message.
Build the Solution
There is no change to the solution you have built so far.
Configurations
All you need to do to make this work is change the acknowledgment mode in the party configuration from "None" to one of the modes you want, as shown in Figure 4-17.

Figure 4-17. Acknowledgment tab: BTAHL7 Configuration Explorer
If you use EnhancedMode, you can also override MSH15 and MSH16 depending on the requirement. You can also override other MSH segment fields in the generated acknowledgment for modes other than StaticMode.
![]() Note All different acknowledgment modes defined on acknowledgment tab are only used when MSH15 and MSH16 values are not present in message—except for StaticMode.
Note All different acknowledgment modes defined on acknowledgment tab are only used when MSH15 and MSH16 values are not present in message—except for StaticMode.
Test the Scenario
If you remove the MSH15 and MSH16 values from the sample message and test it, you will see the exact behavior configured on the party configurator.
Key Observations
- Use a different acknowledgment mode and notice the generated acknowledgment. The acknowledgment is generated as per the configuration.
- Notice the behavior when MSH15 and MSH16 are also provided in the message and the party configuration has an acknowledgment mode defined. In this case, the acknowledgment mode provided within the party configuration is ignored unless the acknowledgment is static.
Message Transformation
Message transformation is one of the key features of BizTalk. Message transformation for a HL7 message is same as any other xml message transformation except that transformation requires an orchestration to be created because a HL7 message is disassembled into a multipart message. This is a limitation of all multipart messages because a map cannot be created and used without orchestration for such messages. In this scenario, you will learn how to consume a HL7 multipart message in orchestration and use a map to transform it.
For this scenario, you will transform the incoming message ADT^A01 on message type http://microsoft.com/HealthCare/HL7/2X#ADT_A01_251_GLO_DEF to ADT^A01 message of message type http://hl7.chapter4.scenario.customization/schemas/hl7/2x#ADT_A01_251_GLO_DEF.
Build the Solution
You will use the same solution you have been using for other scenarios to build the maps and orchestration using following steps.
- Add a new project called HL7.Chapter4.Scenarios.Orchestrations to the solution you built and add a reference to the HL7.Common.Schemas assembly created in the first scenario.
- Add another reference to the schema project that contains the ADT^A01 message. You also need to add a reference to the HL7 Accelerator property schema assembly called Microsoft.Solutions.BTAHL7.HL7Schemas to add filters on the receive shape.
- Add a new multipart message type named HL7MessageType from the orchestration view with three parts to it as follows:
Message Parts
Body Part
Type
Part 1-> MSHSegment
False
MSH_25_GLO_DEF, schema type referenced from HL7.Common.Schemas assembly.
Part2->BodySegments
True
ADT_A01_251_GLO_DEF, schema type referenced from HL7.Chapter4.Scenarios.Schemas project
Part3->Z Segments
False
System.String
- Add another multipart message type named HL7MessageOutType from the orchestration view with three parts to it as follows:
Message Parts
Body Part
Type
Part 1-> MSHSegment
False
MSH_25_GLO_DEF, schema type referenced from HL7.Common.Schemas assembly.
Part2->BodySegments
True
ADT_A01_251_GLO_DEF, schema type referenced from HL7.Chapter4.Scenarios.CustomizedSchemas project
Part3->Z Segments
False
System.String
- Now create the input message variable named hl7MesageIn of a multipart message type and use this message to receive an ADT message from the message box with a filter on following filters:
BTS.MessageType = "http://microsoft.com/HealthCare/HL7/2X#ADT_A01_251_GLO_DEF" And
BTAHL7Schemas.ParseError = false - Create another message variable for output hl7MessageOut of the second multipart message type HL7MessageOutType.
- In order to create the transformation, you also need to create two message variables of your source and destination body schema types (HL7.Chapter4.Scenarios.Schemas.ADT_A01_251_GLO_DEF and HL7.Chapter4.Scenarios.CustomizedSchemas.ADT_A01_251_GLO_DEF).
- Create the transformation using the two message variables you created in step 7 and use the mass copy function to map everything from source to destination, as shown in Figure 4-18.

Figure 4-18. Map
- In the construct shape, use the transformation to map the body and use the message assignment shape to assign the other message parts.
First assignment shape:
bodySegmentIn = hl7MessageIn.BodySegments;

Second assignment shape:

hl7MessageOut.BodySegments = bodySegmentOut;
hl7MessageOut.Z Segments = hl7MessageIn.Z Segments;
hl7MessageOut.MSHSegment = hl7MessageIn.MSHSegment;
hl7MessageOut(*) = hl7MessageIn(*); - Send the output message, and name the logical send port operation to SendTransformedMessage.
- The orchestration will look like Figure 4-19.
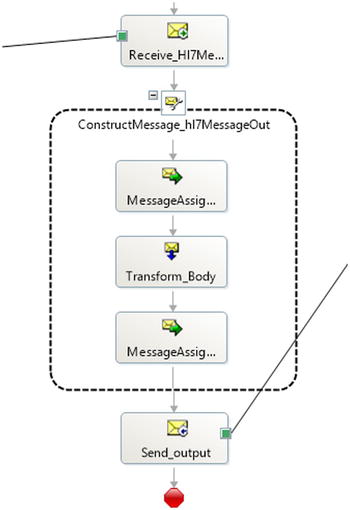
Figure 4-19. Orchestration sample
- Build and deploy the solution to the HL7.Chapter4.Scenarios application.
Configurations
The configuration will be same for other scenarios except you will add another send port called Send_OrchestrationOutput to subscribe to the message output of orchestration using the BTS.Operation == SendTransformedMessage filter.
Test the scenario
You will be using the sample ADT message that you have been using for all scenarios with MSH3=ADTSource. For quick reference, the message is provided below:
MSH|^~&|ADTSource|MCM|ADTDestination|MCM|198808181126|SECURITY|ADT^A01|MSG00002|P|2.5.1|||AL|NE
EVN|A01|198808181123
PID|||PATID1234^5^M11||FN^LN^A^III||19610615|A||2106-3|Address line1^^City^State^Zip|GL|000-000-0000|000-000-0000~000-000-0000||S||PATID12345001^2^M10|123456789|9-87654^NC
NK1|1|FN^LN^K|SPO|||||20011105
NK1|1|FN^LN^A|FTH
PV1|1|I|2000^2012^01||||004777^LEBAUER^SIDNEY^J.|||SUR||-||1|A0
AL1|1||^PENICILLIN||PRODUCES HIVES~RASH
AL1|2||^CAT DANDER
DG1|001|I9|1550|MAL NEO LIVER, PRIMARY|19880501103005|F||
PR1|2234|M11|111^CODE151|COMMON PROCEDURES|198809081123
ROL|45^RECORDER^ROLE MASTER LIST|AD|CP|FN^LN^ELLEN|199505011201
GT1|1122|1519|BILL^GATES^A
IN1|001|A357|1234|BCMD||||12345|132987
IN2|ID1551001|SSN12345678
ROL|45^RECORDER^ROLE MASTER LIST|AD|CP|KATE^ELLEN|199505011201
ZIN|1|SP|MCR WPS AB|Y|20130420|HX KPI8483||N|||||MCRABWPS
In testing, you will see now that the message is sent to two send ports: the original message output and the transformed message output. You can cross-check the output by stopping your send ports and checking the suspended send ports message types.
Key Observations
- Implementation of orchestration and transformation of the HL7 multipart message is simple, except the transformation can be complex due to the number of fields in the message and depending on the requirements.
- It's not possible to use maps on the receive or send ports directly; this limitation is due to the multipart message and requires orchestration to be built.
Send an HL7 Message via a MLLP Adapter
So far in all the scenarios, you have been using the FILE send adapter to send messages; however, in a real scenario, you will mostly be using the MLLP adapter to send HL7 messages. In this scenario, you will learn how to configure both one- and two-way MLLP send adapters.
Build the Solution
You will use your existing scenario solution. No change is required.
Configuration
You will configure two send ports to configure the following two options:
- Create a one-way send port and receive acknowledgment on different receive locations.
Property
Value
Adapter Type
MLLP
Send Handler
A 32-bit host
Send Pipeline
BTAHL72XSendPipeline
Send Pipeline->Enable Trailing Delimiter
True
MLLP->Acceptable Ack Codes
All
MLLP->Connection Name
Same as your send port name (could be any string identifying the connection in performance counter)
MLLP->Host
127.0.0.1
MLLP->Persistent Connection
True
MLLP->Port
21110 (could be any available port)
MLLP->Send Time Out
0
MLLP->Solicit Response Enabled
Yes
MLLP->Submit Receive Location URI for ACK
127.0.0.1:65535 (This receive location is created in BizTalk Application 1 after the HL7 Accelerator installation. You can create any other one-way receive location on a different port to receive the ack; the key thing is that the host must be same for both send port and receive location.)
Filters
BTAHL7Schemas.ParseError == false And
BTS.MessageType == http://microsoft.com/HealthCare/HL7/2X#ADT_A01_251_GLO_DEF
All other configurations should be left default.
- Create one two-way send port to receive the acknowledgment.
Property
Value
Adapter Type
MLLP
Send Handler
A 32-bit host
Send Pipeline
BTAHL72XSendPipeline
Send Pipeline->Enable Trailing Delimiter
True
Receive Pipeline
BTAHL72XReceivePipeline
Receive Pipeline->Enable Trailing Delimiter
True
MLLP->Acceptable Ack Codes
All
MLLP->Connection Name
Same as your send port name (could be any string identifying the connection in performance counter)
MLLP->Host
127.0.0.1
MLLP->Persistent Connection
True
MLLP->Port
21111 (could be any available port)
MLLP->Send Time Out
0
Filters
BTAHL7Schemas.ParseError == false And
BTS.MessageType == http://microsoft.com/HealthCare/HL7/2X#ADT_A01_251_GLO_DEF
All other configurations should be left default.
- Now create a listener on port 21111 and 21110 to receive the message and send the acknowledgment. Listeners can be created either using the MLLPReceive utility provided by the HL7 Accelerator or using the 7-Edit tool. Let's create it using MLLPReceive using following command on the command prompt:
mllpreceive /I 127.0.0.1 /P 21110 /SB 11 /EB 28 /CR 13 /HL7ACK C:WorkTestFilesAcks
ack.txt /D C:WorkTestFilesMLLPReceivedFiles21110

and

mllpreceive /I 127.0.0.1 /P 21110 /SB 11 /EB 28 /CR 13 /HL7ACK C:WorkTestFilesAcks
ack.txt /D C:WorkTestFilesMLLPReceivedFiles21111

The following is the acknowledgment message sent to BizTalk:

MSH|^~&|TEST2|MCM|TEST|MCM|20131226132358||ACK|10000GSM|P|2.5.1|||NEMSA|AE|MSG00001ERR||
PID^1^5|102^Data type error^HL79999|E||||||||^^^^^^^^^^^ ERR||NK1^1^2|102^Data type error
^HL79999|E||||||||^^^^^^^^^^^ - You also need to create one send port to subscribe to the acknowledgment sent by MLLReceive to BizTalk. The send port you create is a FILE adapter with a filter on BTS.MessageType == http://microsoft.com/HealthCare/HL7/2X#ACK_25_GLO_DEF
Test the Scenario
Test the scenario using your sample ADT^A01 message. You will see that two messages are stored in each directory, C:WorkTestFilesMLLPReceivedFiles21110 and C:WorkTestFilesMLLPReceivedFiles21111. Also, BizTalk receives the acknowledgment and sends it to send port you created in your last step.
Key Observations
- Notice the use of a separate receive location in the send port to receive the acknowledgment one way send port.
- Notice how even the acknowledgment with the error reached the acknowledgment send port. If you change Accept Acknowledgment codes to AA or CA, then BizTalk will suspend the original message if negative acknowledgment is received. You can test this behavior by making a change to the send port configurations.
Batching
In this scenario, you will learn how to batch HL7 messages before sending them. Let's say you want to batch all of messages you use to test these scenarios before sending them out. You'll configure a batch size of five message counts (when five messages are received, a batch message will be created and sent out).
Build the Solution
There is no change required to your solution to implement batching.
Configurations
You need the following configurations to implement batching.
- So far in your scenarios, you have not configured party for destination application (in other words, based upon a MSH5 value, batching requires you to set this up). In your message, you have been using ADTDestination as MSH5, so create a party called ADTDestination, and on the Batch Schedule tab, select Message count as 5 under the Repeat Batch After section, and click the Start Schedule button. The batch schedule should look like Figure 4-20.
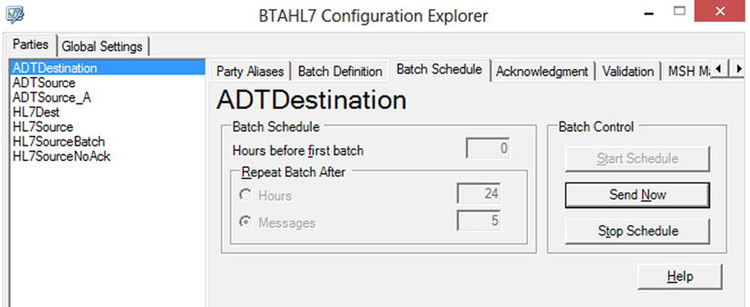
Figure 4-20. Batch schedule: BTAHL7 Configuration Explorer
- Make sure you have enabled the BatchControlLocation receive location and started batch orchestration in BizTalk Application 1. The receive location and orchestration is created by the HL7 Accelerator installation. After the start schedule, you should have your Batch orchestration activated and ready to receive the messages you want to batch.
- On the Batch Definition tab of the ADTDestination party, select the ADT message schema type, as shown in Figure 4-21.
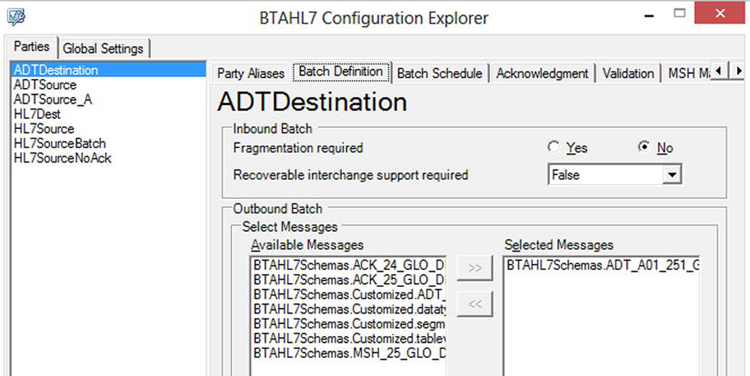
Figure 4-21. Batch definition: BTAHL7 Configuration Explorer
- On the Validation tab, also uncheck the Validate body segment box and check the Allow Trailing Delimiter box.
- Create a send port to subscribe the batched message using filter BTAHL7Schemas.BTAHL7MessageType == OutboundBatch.
- Unlist all the other send ports and orchestration you have created in your scenarios so far.
- Restart the hosts.
Test the Scenario
For testing you will use same message you have been using and you will submit the same message five times. In order to track each of them, you can change the MSH10 message control id every time you send the message. Once you have sent the five messages, one batched message will be sent out to your send port. The output folder will have a batched message containing all five messages. The message output will have FHS, BHS headers and BTS, FTS trailer segments as required by HL7 specifications.
Key Observations
- In order to implement batching, you were not required to change your solution for this simple scenario. You achieved batching with configurations only.
- Batching configuration was done only on the destination party (the MSH5 value).
Summary
In this chapter, you implemented basic scenarios to showcase BizTalk implementations using the HL7 Accelerator. These scenarios allow you to understand more about the HL7 Accelerator and are key to implementing any real-world scenarios, as you will see in Chapter 5.