![]()
Form Management
In Chapter 2, we built a dynamic, personal portfolio site. In the process, you saw how to encode URL variables with <a> elements and how to access such URL variables using the $_GET superglobal. Passing data is what separates dynamic web pages from static ones. By customizing an experience based on the user’s choices, you’re able to add an entirely new level of value to a web site.
Now that you have seen a little PHP and written a basic dynamic site, you’re ready to go deeper into URL variables. HTML <form> elements are commonly used to create interfaces that allow users to interact with your dynamic site. You have to learn how to deal with such HTML forms. In this chapter, you’ll learn the following:
- What HTML forms are and how to create them
- What superglobal arrays are and how to use them
- How to encode URL variables with HTML forms using the GET method
- How to encode URL variables with HTML forms using the POST method
- How to write a dynamic PHP quiz
- When to use if-else conditional statements
- What a named function is and how to write one
- What an American western film can teach you about clean code
- Why code really is poetry
What Are Forms?
HTML forms allow visitors to interact with a site. Figure 3-1 shows Google’s search form. When a user visits www.google.com, types a search term in to the text input field, and clicks Google Search, Google performs the search.

Figure 3-1. Search form from www.google.com
Another kind of form you must have come across is a login form, through which registered users can log in and enter a restricted area. You may have seen such forms when you log in to your Facebook account, your bank account, or your Gmail account. The login in Figure 3-2 is from Facebook.

Figure 3-2. Login form from www.facebook.com
A final familiar example could be the star rating system. You may have come across a star rating system if you have bought a book from an online bookstore. Figure 3-3 shows the star rating form from Amazon.
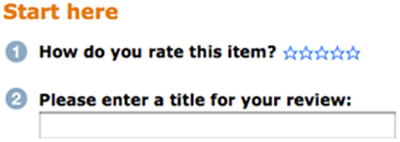
Figure 3-3. Star rating form from www.amazon.com
If you are going to work with web development or web design, you will surely get to work with developing and designing usable, functional forms. Because web forms are the interface between a system and its users, developing and designing web forms is extremely important.
Setting Up a New PHP Project
Learning requires repetition, so let’s repeat some of the lessons learned in the previous chapter. Create a new project folder, called ch3, in the XAMPP/htdocs folder. Inside ch3, you’ll need copies of the templates and classes folders, and the PHP scripts inside, from the previous project. Create an empty folder called views. Open Komodo Edit and create a new index.php file in ch3. Make sure to set Format to All Files when you save the file. Figure 3-4 illustrates how.
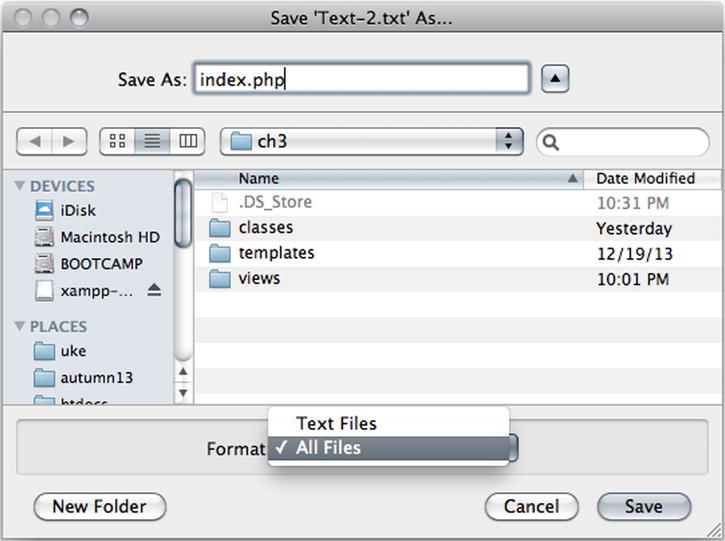
Figure 3-4. Save a new file as index.php with Komodo Edit
You need some PHP inside index.php for anything much to happen. You can begin by outputting a simple HTML page. Notice that you should reuse classes/Page_Data.class.php and templates/page.php, without changing a single line of code inside either scripts. When you know PHP, you don’t have to solve the same task several times. Just solve it once and code it to be reused, as in the following:
<?php
//code listing for index.php
error_reporting( E_ALL );
ini_set( "display_errors", 1 );
include_once "classes/Page_Data.class.php";
$pageData = new Page_Data();
$pageData->title = "Building and processing HTML forms with PHP";
$pageData->content = "<nav>will soon show a navigation...</nav>";
$pageData->content .= "<div>...and a form here</div>";
$page = include_once "templates/page.php";
echo $page;
Seeing for Yourself
To check if you typed everything correctly, you can save index.php and navigate your browser to http://localhost/ch3/index.php. You will probably see the expected output:
will soon show a navigation...
...and a form here
There is no Zen master to prod you with a stick, but I have some questions for you. Your answers will indicate what you have learned so far. If you’re in doubt, you can consult Chapter 2 for explanations.
- What does include_once do?
- How can $pageData->title change the <title> of the generated HTML page?
- What does .=mean? What is the technical name for it?
- What happens when we echo $page?
Creating a Dynamic Navigation
You will create two different forms. You will require a site navigation to navigate between those forms. Create a new file ch3/views/navigation.php, as follows:
<?php
//code listing for views/navigation.php
return "
<nav>
    <a href='index.php?page=search'>Search on bing</a>
    <a href='index.php?page=quiz'>Dynamic quiz</a>
</nav>
";
Just as in Chapter 2, you create a PHP script that simply returns a small snippet of HTML. In index.php, you will use some PHP to stitch a selection of small HTML snippets together, to generate a well-formed, dynamic HTML page. Following, index.php is updated to display the navigation:
<?php
//code listing for index.php
error_reporting( E_ALL );
ini_set( "display_errors", 1 );
include_once "classes/Page_Data.class.php";
$pageData = new Page_Data();
$pageData->title = "Building and processing HTML forms with PHP";
//change this one line below only
$pageData->content = include_once "views/navigation.php";
$pageData->content .= "<div>...and a form here</div>";
$page = include_once "templates/page.php";
echo $page;
Creating Page Views for the Form
You can follow the naming convention for page views from Chapter 2, because it seems to provide a solid code architecture for dynamic web sites. This way of organizing and naming page views can give you a mental framework for building dynamic sites. When you have the framework internalized, you’ll know which files you need to develop the site you want to develop. You don’t have to reinvent a good dynamic code architecture every time you make a new site.
The navigation described in the preceding section has links to pages called search and quiz. So, we will have to create two new PHP files in the views folder.
href |
url variable |
view file |
|---|---|---|
| index.php?page = search | page = search | views/search.php |
| index.php?page = quiz | page= quiz | views/quiz.php |
Create the two new files with Komodo Edit, as follows:
<?php
//code listing for views/search.php
return "will soon show the search form";

<?php
//code listing for views/quiz.php
return "quiz will go here";
Displaying Page Views on index.php
To get index.php to display those page views when they are requested, you have to write a few extra lines of code almost identical to those you wrote in the index.php for the previous project, as follows:
<?php
//code listing for ch3/index.php
error_reporting( E_ALL );
ini_set( "display_errors", 1 );
include_once "classes/Page_Data.class.php";
$pageData = new Page_Data();
$pageData->title = "Building and processing HTML forms with PHP";
$pageData->content = include_once "views/navigation.php";
//changes begin here
//$pageData->content .= "<div>...and a form here</div>";
$navigationIsClicked = isset($_GET['page']);
if ( $navigationIsClicked ) {
    $fileToLoad = $_GET['page'];
} else {
    $fileToLoad = "search";
}
$pageData->content .=include_once "views/$fileToLoad.php";
//no changes below
$page = include_once "templates/page.php";
echo $page;
The code essentially tells PHP to load any view requested by a site visitor. If no navigation item is clicked, we will display views/search.php. You can test that your code works by loading http://localhost/ch3/index.php in your browser.
Spending Your Time Wisely: Conventions and Reuse
You have surely noticed that this dynamic site works very much like the dynamic site from Chapter 2. We have reused a few files, such as the Page_Data class and the page template. We couldn’t reuse index.php or navigation.php exactly as they were in Chapter 2, but this project is built with the same conventions.
Reusing code is a good idea, because this allows you to develop solutions much faster. If you have scripts that work in one project, you can pretty much trust them to do the same in other projects. Hence, code reuse decreases debugging time.
There will always be parts you can’t easily reuse, such as the navigation. But if you get into the habit of creating dynamic navigations in much the same way across different projects, you’ll be able to develop new dynamic navigations quickly and painlessly. So, when you can’t reuse code as is, perhaps you can reuse the principles underpinning the code you know works.
A Super-Simple Search Form
HTML forms are created with <form> elements. There are a number of other HTML elements that are made specifically for forms. Perhaps the most essential one is the <input> element. Let’s create an example in views/search.php, as follows:
<?php
return "
<form method='get' action='http://www.bing.com/search'>
    <input type='text' name='q' />
    <input type='submit' value='search on bing' />
</form>
";
Trying Your Search Form
Save your work and point your browser to http://localhost/ch3/index.php to see the form. You should expect to see something like Figure 3-5.
Figure 3-5. A simple search form completely unstyled
You can type some search term in the text field and click the button. Your browser will load bing.com, and Bing will perform a search for whatever you typed in. I typed cats. When you have performed your search, take a look in your browser’s address bar. You will find something like http://www.bing.com/search?q=cats.
![]() Tip A <form> is like an <a> element; action is like the href attribute.
Tip A <form> is like an <a> element; action is like the href attribute.
When you click the Submit button, your browser requests a new URL. This is just like clicking an <a> element. When you click an <a> element, your browser will request the resource indicated by its href attribute. When you submit a form, your browser will request the resource indicated by the <form> element’s action attribute.
Forms Encode URL Variables
The <form> element’s action attribute is http://www.bing.com/search, but when you submitted the form, your browser requested http://www.bing.com/search?q=cats. Somehow, the form encoded a URL variable named q into the requested URL and set its value to cats. This is what forms can do: They can encode URL variables in HTTP requests.
As you saw in the previous chapter, URL variables can be accessed with PHP. URL variables are essential to dynamic web sites. Evidently, www.bing.com will perform a search, if a URL variable named q is set. Bing will search for whatever value q holds.
A Name Attribute Declares the Name of a URL Variable
It is important to understand how the URL variable q was declared. Understand that, and you understand the essence of forms!
The URL variable q got its name because the <form> has an <input> element with a name attribute set to q. You can deduct that <input> elements with a name attribute will declare a URL variable if the <input> element is nested inside a <form>. This rule also applies to a small subset of other HTML elements commonly used with forms. You will see more such form-related elements in action throughout this book.
The <input> Element and Some Common Types
Did you notice that <input type='text' />displays as a single-line text field and that <input type='submit'/> displays as a Submit button? There are many possible values for the input type attribute. In this book, you will see a small handful of input types. Once you can work with those, you should have no problems learning how to use the remaining input types.
![]() Note HTML5 introduces quite a few new <input> types, not all of which are implemented in all major browsers yet. Many of these new types are immensely useful. See which browsers implement which features at http://caniuse.com/#search=input.
Note HTML5 introduces quite a few new <input> types, not all of which are implemented in all major browsers yet. Many of these new types are immensely useful. See which browsers implement which features at http://caniuse.com/#search=input.
Understanding the Method Attribute
So far, you have only seen URL variables that could be seen in the URL, in the browser’s address bar. This kind of URL variable is encoded using the HTTP method GET. You have used such variables to create a dynamic navigation and a form that can perform a search at www.bing.com.
Any URL variable encoded with GET is limited to relatively few characters. The exact number varies from browser to browser, but the effective maximum seems to be about 2,000 characters. Because GET variables are evident from the URL, pages can be bookmarked and linked to. Therefore, GET variables are perfectly suited for site navigation.
Named PHP Functions
Perhaps one the most powerful features of PHP is the ability to define and execute functions from within your code. A function is a named block of code you declare within your scripts that you can call at a later time. You will soon write a dynamic quiz using functions, but let’s first look into the basics of named functions in PHP:
function functionName () {
    //function body
}
The Basic Syntax for Functions
The basic format of a function requires that you first declare the function using the function keyword in front of the function’s name. Function names can contain any alphanumeric characters and underscores, but they must not start with a number. The function name must be followed with a set of parentheses and a code block delimited by curly braces. Create a new PHP file with Komodo Edit in ch3. Call it test-functions.php. Declare a named function, as follows:
<?php
function p(){
    echo "<p>This paragraph came from a function</p>";
}
If you load http://localhost/ch3/test-functions.php, you will see no output. Many beginners would expect to see an output from the preceding code. But functions don’t always behave as beginners assume. The code inside the function body will not be executed until the function name is explicitly called. You can add a function call in test-functions.php to execute the code, as follows:
<?php
//function declaration
function p(){
    echo "<p>This paragraph came from a function</p>";
}
//function call
p();
Run the code again, and you will see the expected output in your browser. A really interesting feature of functions is that they can be reused very easily. Simply call a function twice, and it runs twice. Let’s do it.
<?php
//function declaration
function p(){
    echo "<p>This paragraph came from a function</p>";
}
//function calls
p();
p();
You can probably correctly guess that the code will output two <p> elements, each with the same text: This paragraph came from a function. What is more important is that you can see the difference between function declarations and function calls. The example has two distinct function calls. Because the function is called two times, it will run two times.
But this is a hideously ugly example. The function is very inflexible. It can only do one thing, i.e., output that one string. Let’s make it a little smarter.
<?php
//function declaration
function p(){
    return "<p>This paragraph came from a function</p>";
}
//function calls
$output = p();
$output .= "<h1>Just some heading</h1>";
$output .=p();
echo $output;
Now this is much, much better! The significant change is that the function no longer has an echo. Instead, it returns a generated <p>. That has a consequence. In order to have the <p> echoed, you have to write that echo somewhere else. In the example, the echo now appears at the very end.
You may ask why that is any smarter? That’s easy! Now that the function doesn’t echo, you can manipulate the output further before you echo it, if you need to do that.
Actually, this is a good rule of thumb: don’t echo directly from a function. It is much better to use a return statement. It is much better to have a single echo statement in one place in your code instead of having echo statements scattered all over the place.
Using Function Arguments for Increased Flexibility
You might think that it is a little silly to have a function that always return a <p> with exactly the same content. You are quite right, of course; it is not very flexible. So, let’s improve the function p() with a function argument.
<?php
//function declaration
function p( $content ){
    return "<p>$content</p>";
}
//function calls
$output = p( "I want this text in my first paragraph" );
$output .=p( "...and this in my second" );
echo $output;
Notice that I declare a variable called $content inside the parentheses in the function declaration. That is a function argument. The $content is used to store the content to be used in the returned <p> element. But how does $content ever get a value? That happens every time the function is called. Whatever argument is used when function p() is called will be stored temporarily in $content. Function arguments are extremely cool, because they allow you to write one function that can be reused with many different values. You will get to see many more examples of functions with parameters later in the book.
Did you consider the function name p()? I like my function names to be meaningful, and as this function always returns a <p> element, I thought p() would be a great name for it. You might consider using another name, such as returnPTag(). Good function names should be accurate and meaningful. Anyway, that was a little detour to explore some of the things you can do with PHP functions. Next, Let’s write a dynamic quiz using functions.
Create a new PHP file, called quiz-form.php, in the views folder.
<?php
//complete code for views/quiz-form.php
return "<form method='post' action='index.php?page=quiz'>
        <p>Is it hard fun to learn PHP?</p>
        <select name='answer'>
            <option value='yes'>Yes, it is</option>
            <option value='no'>No, not really</option>
        </select>
        <input type='submit' name='quiz-submitted' value='post' />
    </form>";
To show the quiz form, you have to update the code in views/quiz.php, as follows:
<?php
$output = include_once "views/quiz-form.php";
return $output;
Save both files and point your browser to http://localhost/ch3/index.php?page=quiz, to see what you have created.
Using <select> and <option>
The preceding form uses two HTML elements that may be unfamiliar to you. A <select> element is a good element to use when you want a user to choose between several predefined options. Options are displayed by nesting <option> elements. The structure is very similar to regular HTML lists such as <ul> and the corresponding <li>.
When a user selects an option, a new URL variable will be encoded into the request sent when the form is submitted. Notice that the name of the URL variable will be defined by the name attribute of the <select> element, and its value by the value attribute of the selected <option> element.
The POST Method
Your first form used the GET method, but it is not the only possible HTTP method. There is another method called POST. The POST method has no defined maximum of characters—in fact, the POST method is not even limited to text. When using the HTTP POST method, it is possible to upload files through a form.
Also, HTTP POST variables are not directly visible in the URL. They are sent hidden from view. This makes HTTP POST the perfect candidate for forms that have to deal with larger amounts of content and forms with sensitive information. Because HTTP POST variables are not an integrated part of the URL, users cannot bookmark page views dependent on HTTP POST variables.
Using the $_POST Superglobal
PHP has a native superglobal called $_POST. It can be used to access URL variables encoded with the POST method. You can use it to process the form when it is submitted. Update views/quiz.php, as follows:
<?php
//add a new variable and an if statement
$quizIsSubmitted = isset( $_POST['quiz-submitted'] );
if ( $quizIsSubmitted ){
    $answer = $_POST['answer'];
    $output = showQuizResponse( $answer );
} else {
    $output = include_once "views/quiz-form.php";
}
//keep the return statement as it was
return $output;
//declare a new function
function showQuizResponse( $answer ){
    $response = "<p>You clicked $answer</p>";
    $response .= "<p>
        <a href='index.php?page=quiz'>Try quiz again?</a>
    </p>";
    return $response;
}
You can load http://localhost/ch3/index.php?page=quiz in your browser, to see what the code does. It first checks to see if the form was submitted. Remember how the form had a Submit button?
<input type='submit' name='quiz-submitted' value='post' />
Well, if PHP can find a URL variable encoded with the POST method under the name quiz-submitted, you know that the form was submitted. If the form was submitted, you can get the selected answer using the superglobal $_POST. The answer is then passed as an argument to a new function, showQuizResponse(), which will simply return a string to indicate a user’s answer and show an <a> element to restart the quiz.
The first form you made had the action attribute pointing to www.bing.com. The quiz form should reload the quiz page when the form is submitted. The URL to load the quiz is index.php?page=quiz, so the action attribute of the <form> references exactly that resource.
$_POST Is an Array
You have read that $_GET is a superglobal array. $_POST is another superglobal array. But what is an array really? Basically, an array is a data type that can hold multiple items. Each item is stored under an index. I’d like to share an example. If you want, you can create a new PHP file and code the example, but it is not really necessary. I keep the following code in a file I called test-assoc-array.php:
<?php
//complete code for ch3/test-assoc-array.php
$my['name'] = "Thomas";
$my['year-of-birth'] = 1972;
$my['height'] = "193cm";

$out = "My name is " . $my['name'];
echo $out;
If you were to run http://localhost/ch3/test-assoc-array.php in your browser, you would see an output of “My name is Thomas.” In the preceding example, $my is an array. You can see that it holds a collection of data stored in the same one variable. In order to get data from an array, you must use the right index. In the preceding example, “Thomas” is stored under the index ['name']. Arrays that store items under named indices are called associative arrays.
It can often be handy to inspect all items in an array. PHP has a function to do just that. It is called print_r(). Here’s one way to use it:
<?php
//complete code for ch3/test-assoc-array.php
$my['name'] = "Thomas";
$my['year-of-birth'] = 1972;
$my['height'] = "193cm";

$out = "<pre>";
$out .=print_r($my, true);
$out .= "</pre>";
echo $out;
If you run this code, you can see every index of $my and its corresponding value. You will see something such as the following:
Array
(
    [name] => Thomas
    [year-of-birth] => 1972
    [height] => 193cm
)
You are looking at an the array as PHP sees it. You see one array with three named indices and their values. Arrays can be very helpful in your code, because they allow you to group items together. The $_GET and $_POST arrays are provided by PHP to give you access to all data encoded with the http methods GET or POST. The quiz example uses POST. I’d like you to inspect $_POST, so you can see for yourself what the form does when it is submitted. Update some code in the if-else statement in views/quiz.php, as follows:
<?php
//complete code for views/quiz.php
$quizIsSubmitted = isset( $_POST['quiz-submitted'] );
if ( $quizIsSubmitted ){
    $answer = $_POST['answer'];
    $output = showQuizResponse( $answer );
    //inspect the $_POST superglobal array
    $output .= "<pre>";
    $output .= print_r($_POST, true);
    $output .= "</pre>";
} else {
    $output = include_once "views/quiz-form.php";
}

return $output;

function showQuizResponse( $answer ){
    $response = "<p>You clicked $answer</p>";
    $response .= "<p>
        <a href='index.php?page=quiz'>Try quiz again?</a>
    </p>";
    return $response;
}
Save your work and point your browser to http://localhost/ch3/index.php?page=quiz. If you submit the quiz form, you can see all items in the $_POST array:
Array
(
    [answer] => yes
    [quiz-submitted] => post
)
You can see from the output that I selected yes before I submitted the form, and you can also see that the index quiz-submitted holds a value of post. What I’d really like you to see is that every form-related HTML element with a name attribute encodes a named index in $_POST when the form is submitted. Take a look in views/quiz-form.php. See how the Submit button encodes the index quiz-submitted, because it has a name attribute with a value of quiz-submitted. The <select> element encodes answer index, because it has a name attribute with a value of answer. PHP provides access to all encoded quiz form data through the $_POST superglobal array.
You will learn to use print_r() to debug your PHP code. This example was just an appetizer. Usually you don’t want to show users the data passed to PHP in the background. You only inspect $_POST to see what PHP sees. Now that you have seen it, you can comment out the part of the code that inspects $_POST:
//partial code for views/quiz.php
//$output .= "<pre>";
//$output .=print_r($_POST, true);
//$output .= "</pre>";
If and Else Explained
The quiz relies on form data encoded with $_POST. It also relies on if-else statements. You have already seen if-else statements used a few times. It is about time you get a more detailed explanation about such conditional statements. All conditional statements follow a certain pattern.
if ( Boolean expression ) {
    //code block
}
Inside the parentheses of any conditional statement, you must write an expression that evaluates to either TRUE or FALSE, 0 or 1. In computer science, such an expression is called a Boolean expression. If the expression evaluates to TRUE, the code block will run. If the expression evaluates to FALSE, the code block will not run.
Often, it comes in handy to do one thing if the expression is TRUE and something else if the expression is FALSE. That can easily be achieved with an else code block. The general form looks like the following:
if ( boolean expression ) {
    code block
} else {
    another code block
}
The first code block will run if the expression is TRUE. The second code block will run if it is FALSE. You can see it working in the quiz example. PHP can check if a user has submitted the form. If that happens, the PHP code will get the answer supplied by the user and generate a response. If not, PHP will simply return the HTML for displaying the quiz.
Evaluating the Quiz Response
The quiz response right now provides no more feedback than what a parrot might supply. It simply repeats whichever answer the user selected. With PHP, you can do better. Open views/quiz.php in your editor and update showQuizResponse(), as follows:
function showQuizResponse( $answer ){
    //changes begin here
    $response = "<p>You clicked $answer";
    if ( $answer === "yes" ){
        $response .= " - I know exactly how you feel!";
    }
    $response .= "</p>";
    //end of changes
    $response .= "<p>
                  <a href='index.php?page=quiz'>Try quiz again?</a>
            </p>";
    return $response;
}
The Identical Comparison Operator
You hadn’t seen any === before the preceding code example. The triple equal signs make up PHP’s identical comparison operator. It compares whether two values are identical. The identical comparison operator is commonly used to formulate a condition for an if statement. The condition used in the example in the preceding section really means “if the user’s answer is identical to ‘yes.’”
![]() Note If you find PHP code examples elsewhere, you will often see ==. The double equal signs represent PHP’s equality comparison operator. It is almost identical to the identical comparison operator. In most cases, you can use the two interchangeably. Learn more at http://php.net/manual/en/language.operators.comparison.php.
Note If you find PHP code examples elsewhere, you will often see ==. The double equal signs represent PHP’s equality comparison operator. It is almost identical to the identical comparison operator. In most cases, you can use the two interchangeably. Learn more at http://php.net/manual/en/language.operators.comparison.php.
Curly’s Law: Do One Thing
Did you ever see the 1991 movie City Slickers? Yes, that feel-good western comedy featuring Billy Crystal. Jack Palance played Curly, a rugged, old cowboy who knew the secret of life and reluctantly shared it with Crystal’s character, Mitch:
- Curly: Do you know what the secret of life is?
- (holds up one finger)
- Curly: This!
- Mitch: Your finger?
- Curly: One thing. Just one thing. You stick to that, and the rest don’t mean shit.
- Mitch: But what is the “one thing”?
- Curly: (smiles) That’s what you have to find out.
We can probably rest assured that Curly wasn’t talking about principles of clean code. But, incidentally, he formulated a principle we can use to write clean functions. Every function should do one thing. Just one thing.
![]() Note Jeff Atwood wrote a funny and interesting blog entry about applying Curly’s law to clean code. Read it at http://blog.codinghorror.com/curlys-law-do-one-thing/.
Note Jeff Atwood wrote a funny and interesting blog entry about applying Curly’s law to clean code. Read it at http://blog.codinghorror.com/curlys-law-do-one-thing/.
Clean code is code that is nice to work with. If your functions do just one thing, they will be short. Short code is normally easier to read and understand than long code. If you can read and understand your code, it becomes much easier to find errors—and you will be making errors. Don’t be surprised if you spend 50% of your development time chasing errors in your code.
In the earlier quiz example, you can see two clean functions, each doing just one thing. One function shows the quiz; the other function shows a response.
Meaningful Names
Function and variable names are arbitrary. You can call them just about anything. In the quiz, we have the following:
if ( $quizIsSubmitted ){
    $answer = $_POST['answer'];
    $output = showQuizResponse( $answer );
} else {
    $output = include_once "views/quiz-form.php";
}
We could rename files, functions, and variables, without losing any functionality at all. We could have, for example:
if ( $a ){
    $c = d( $_POST['answer'] );
} else {
    $c = include_once "views/e.php";
}
The preceding code is bad, because the names are not expressive at all. The code would work, but it would be hard to read and understand. Reading such code requires a very attentive reader. But it is possible to write even worse code. You can use names that are misleading. The following code is still the quiz example, and it still works, but it has become really hard to read:
if ( $itIsLate ){
    $output = goToSleep( $_POST['answer'] );
} else {
    $output = include_once "views/coffee.php";
}
Code Is Poetry
Strive for expressive, beautiful code. Strive for code that is easy-to-read. When you develop new solutions with code, you will spend a very significant part of your time reading your own code. Code is like poetry. You write it once, but read it many times. So write your code as if you were writing poetry: choose your words carefully.
Function names and variable names should be descriptive, accurate, and not excessively long. They should make your code easier to read and understand—not harder. Often, you will find that a function or a variable cannot be described accurately with a single word. I often use compound variable or function names, such as $quizIsSubmitted. I like to write such names using camel case: every new word is capitalized. Camel case is a quite common naming convention. I like it, because I find $quizIsSubmitted much easier to read than $quizissubmitted.
Styling Forms
The first time you try to style a form, you may easily be a bit confused by the unfamiliar element names. But you can style forms and most related elements just as you would any other HTML elements. Usually, you can completely avoid using id and class attributes as CSS hooks. Your forms and their various attributes will give you plenty of opportunity to select just the element you’re after, with CSS attribute selectors. Here’s an example to get you started:
/*this selector will target the quiz form only*/
form[action='index.php?page=quiz']{
    position:relative;
    margin: 30px 10px;
}
/*select only <p> and <select> inside the quiz form*/
form[action='index.php?page=quiz'] p,
form[action='index.php?page=quiz'] select{
    display:inline-block;
}
Exercises
Exercising what you learn is a good way to actually learn. Following are a few uncomplicated exercises that could help you internalize some of the PHP you have encountered. Some of these exercises might seem simple. You have written code to solve more complex tasks already. But copying code examples from a book is one thing. Writing your own code from scratch is something entirely different.
Take this opportunity to challenge yourself. You will probably find that you learn a lot from writing your own code to solve simple problems—perhaps at least as much as from working through the examples in this book.
First of all, you could try to create an external style sheet and link the index.php page to that style sheet. If you have forgotten how, consult Chapter 2 for hints.
You could also try to refine the dynamic quiz a little. How about changing views/quiz.php and have it output a meaningful response whenever a user selects the no option?
You could also write another HTML form that can calculate a person’s body mass index (BMI), based on the person’s height and weight. The formulae for calculating BMI follows. Your task is to create a form, on which users can input height and weight, and to write some PHP code to calculate BMI based on the input.
//metric
bmi = kg/ (2 * m)
//for UK and US readers
bmi = ( lb/(2 * in) ) * 703
Last but not least, you could try to write a form that converts money from one currency to another. If you want it to be really advanced, you could have a <select> element with a list of possible currencies to convert to.
Summary
We covered a lot of ground in this chapter. You have learned how to write HTML forms. HTML forms encode URL variables when they are submitted. URL variables are passed from the browser to the web server with an HTTP request. You have learned how to process HTTP requests with URL variables encoded, using either GET or POST methods. And you have learned to organize your code with named functions. But most important, you have learned about Curly’s law and how to apply it to enhance the beauty of your code.