![]()
Building the Entry Manager
At this point, you know enough to start building your personal blogging system. The rest of this book covers developing and improving a personal blog. This chapter walks you through how to build the backbone of your blogging application: the blog entry manager. The pieces you’ll build include the following:
- A view, which is an HTML form to accept entry input
- A controller, to handle input from the form
- A model, to save and retrieve the entry in the database
By the end of this chapter, you will have a basic entry manager for your personal blog system. In the process of building the entry manager, you will get to revisit previously covered topics, such as basic database design, SQL, organizing your PHP with MVC, and connecting to a database.
Creating the blog_entry Database Table
One of the most important steps with any new application is the planning of the tables that will hold data. This has a huge impact on the ease of scaling the application later. Scaling is the expansion of an application to handle more information and/or users, and it can be a tremendous pain, if you don’t look ahead when starting a new project. At first, your blog needs to store several types of entry information to function, including the following:
- Unique ID
- Entry title
- Entry text
- Date created
Using a unique ID for each entry in the entry table enables you to access the information contained with just a number. This is extremely helpful for data access, especially if the data set changes in the future (if you add an “imageURL” column to the table, for example).
The first step is to determine the fields you will require for the entries table. Your table must define what type of information is stored in each column, so let’s take a quick look at the information each column has to store.
- entry_id: A unique number identifying the entry. This will be a positive integer, and it makes sense for this number to increment automatically, because that ensures the number is unique. Because each entry has a unique entry_id, you can use the number to identify one entry. The entry_id will be the primary key for the table.
- title: An alphanumeric string that should be relatively short. You’ll limit the string to 150 characters.
- entry_text: An alphanumeric string of indeterminate length. You won’t limit the length of this field (within reason).
- date_created: The timestamp generated automatically at the original creation date of the entry. You’ll use this to sort your entries chronologically, as well as for letting your users know when an entry was posted originally.
Now it’s time to create the database. Open your XAMPP control panel to start MySQL and Apache. Point your browser to http://localhost/phpmyadmin/ and select the SQL tab to create a database called simple_blog. Here’s the SQL to do it:
CREATE DATABASE simple_blog CHARSET utf8
The next step is to write the code that creates your entries table. Make sure to select the simple_blog database from the menu at the left side of the phpMyAdmin control panel. Next, bring up the SQL tab and enter the following SQL statement:
CREATE TABLE blog_entry (
    entry_id INT NOT NULL AUTO_INCREMENT,
    title VARCHAR( 150 ),
    entry_text TEXT,
    date_created TIMESTAMP DEFAULT CURRENT_TIMESTAMP,
    PRIMARY KEY ( entry_id )
)
You can see that the statement to create the blog_entry table is similar to the CREATE statement you used to create the poll table. You can also see there are some differences.
The title attribute has a new data type: VARCHAR(150). As a consequence, any title must contain CHARacters of VARiable length. Blog entry titles can be a string of characters between 0 and 150 characters long. If you were to insert a title that was 151 characters long, only the first 150 characters would be saved in the blog_entry table. That’s what VARCHAR(150) does.
The date_created attribute is also declared with a new data type: TIMESTAMP. A TIMESTAMP holds rather precise information about a moment in time. It stores year, month, day, hour, minute, and second as YYYY-MM-DD HH:MM:SS
You have already seen how MySQL table attributes can be created with a default value. Here it is again for the date_created attribute. When a new entry is inserted for the first time, MySQL will automatically store the current TIMESTAMP based on the server’s clock.
Planning the PHP Scripts
You have created a database for your blog. A logical next step would be to create a blog entry editor with PHP, so that you can create new blog entries. The blog entry editor is only meant for you as blog author. Ordinary site visitors should not be able to create new entries. Normal site visitors should simply see your blog entries, without being able to edit existing entries or create new ones.
One approach to such a task is to create two main site entrances: index.php for regular visitors and admin.php for your eyes only. In MVC terminology, index.php and admin.php will both be front controllers. Later in this book, I show you how to restrict access to admin.php, with a login.
The admin page should be able to list all blog entries, and it should give you access to an entry editor, so that you can create new entries and edit or delete existing entries. You will require separate views: one for listing all entries and one for showing the editor.
The script admin.php should output an HTML5 page. It will be your front controller, and it will decide whether to show the editor or list all entries. Figure 7-1 uses the MVC idea to develop a schematic overview of the blog administration module.
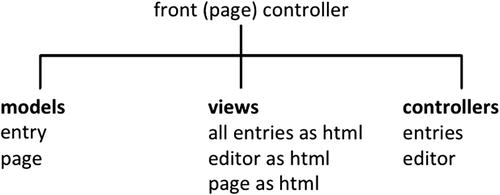
Figure 7-1. Distribution of responsibilities
Note how every view has a corresponding controller. Note, too, that the entry model is used by entries to display all entries and reused by the editor to save a new entry. Let’s just go over the separation of concerns proposed by the MVC approach (see Figure 7-2). A view is something that can be seen by users. A model holds content. The controller is responsible for hooking up the right view with the right model and returning the resulting output to users. The controller is also responsible for responding to user input; often this means updating the model.
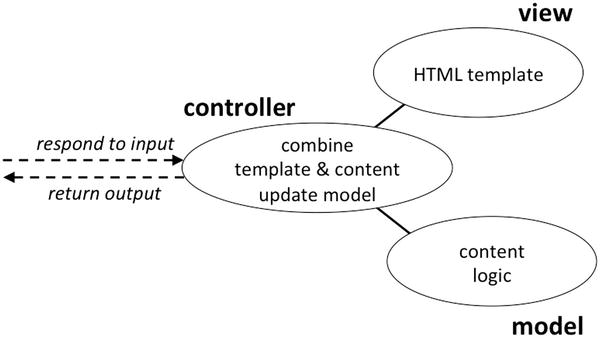
Figure 7-2. Model-view-controller
Creating the Blog Site
Create a new folder in XAMPP/htdocs. Call the new folder blog. Inside the blog folder, you can create four other folders: models, views, controllers, and css.
You can copy the ch4/templates/page.php file from the gallery project. Save a copy of page.php in blog/views/page.php. Likewise, copy ch4/classes/Page_Data.class.php from the gallery project and save a copy in blog/models/Page_Data.class.php. Create a blank style sheet in css/blog.css.
Now it is time to create blog/admin.php and write a little code to check that everything is working nicely together so far:
<?php
//complete code for blog/admin.php
error_reporting( E_ALL );
ini_set( "display_errors", 1 );

include_once "models/Page_Data.class.php";
$pageData = new Page_Data();
$pageData->title = "PHP/MySQL blog demo";
$pageData->addCSS("css/blog.css");
$pageData->content = "<h1>YES!</h1>";

$page = include_once "views/page.php";
echo $page;
Save your files and load http://localhost/blog/admin.php in your browser. If everything works as expected, you should get a well-formed HTML5 with a <title> of PHP/MySQL blog demo and an <h1> element happily exclaiming YES! Seeing YES in the browser is visual confirmation that your project is set up correctly.
Creating the Entry Manager Navigation
Your entry manager should have two base views: one to list all entries and one to show an entry editor. Let’s make a navigation for the entry manager. You can expect this project to contain many PHP files before you’re done. I recommend you create some folders to keep scripts related to the administration module grouped together. Create a folder called admin in the existing views folder. Create a new file in views/admin/admin-navigation.php:
<?php
//complete code for views/admin/admin-navigation.php

return "
<nav id='admin-navigation'>
    <a href='admin.php?page=entries'>All entries</a>
    <a href='admin.php?page=editor'>Editor</a>
</nav>";
You can see that the entry manager navigation is very similar to the navigation you made for the dynamic gallery in Chapters 4 and 5, or for the dynamic portfolio site from Chapter 2, for that matter. You should make a mental note about the URL variable page that gets encoded whenever a user clicks a navigation item.
The admin navigation is a static view, meaning there is no dynamic or database-driven information in the script. You don’t need a model for the navigation, because all content is hard-coded into the view as it is. You do need a controller to load the navigation whenever it should be loaded. It will be quite simple, because the navigation should be loaded and displayed all the time. You can control that from admin.php:
//partial code listing for admin.php
$pageData->addCSS("css/blog.css");
//code changes below here
//comment out or delete the YES
//$pageData->content = "<h1>YES!</h1>";
//load navigation
$pageData->content = include_once "views/admin/admin-navigation.php";
//no changes below
$page = include_once "views/page.php";
echo $page;
Save your work and reload http://localhost/blog/admin.php in your browser. You should see the navigation displayed in the top of your browser window. Clicking a navigation item will not have any immediately visible effect; the navigation is just a view. Clicking any navigation item will encode a URL variable named page. You can see it if you look in the browser’s address bar. You’ll want to create controller code to respond to user interactions, such as a click.
Loading Admin Module Controllers
You can use admin.php to control what to do when a navigation item is clicked. That is the main concern for a front controller. The front controller should load any controller(s) associated with the navigation item a user clicked. There are two links in your navigation, so you will need two controllers.
To see any visible changes in the browser when you click a navigation item, you have to create two preliminary controllers. Create a new folder called admin in the controllers folder and create a new file for controlling the entry editor view, as follows:
<?php
//complete source code for controllers/admin/editor.php
return "<h1>editor controller loaded!</h1>";
As you can see, the editor controller will not be doing a whole lot to begin with. Initially, you just want to check that you hook up the right files. With that in place, you can develop code of greater complexity. Create another file for controlling the view that will eventually list all entries, as follows:
<?php
//complete source code for controllers/admin/entries.php

return "<h1>entries controller loaded!</h1>";
You can load these controllers from admin.php. You have to check whether a navigation item was clicked. If it was, you should load the corresponding controller. Insert these lines of code after the $pageData object is created and before the echo:
<?php
//complete code for blog/admin.php
error_reporting( E_ALL );
ini_set( "display_errors", 1 );

include_once "models/Page_Data.class.php";
$pageData = new Page_Data();
$pageData->title = "PHP/MySQL blog demo";
$pageData->addCSS("css/blog.css");
$pageData->content = include_once "views/admin/admin-navigation.php";

//new code begins here
$navigationIsClicked = isset( $_GET['page'] );
if ( $navigationIsClicked ) {
    //prepare to load corresponding controller
    $contrl = $_GET['page'];
} else {
    //prepare to load default controller
    $contrl = "entries";
}
//load the controller
$pageData->content .=include_once "controllers/admin/$contrl.php";
//end of new code

$page = include_once "views/page.php";
echo $page;
Remember the file names entries.php and editor.php. These names are essential. They must be matched with corresponding values of the URL variable page declared when a user clicks a navigation item. Let’s take a closer look at the href values used in the navigation:
<a href='admin.php?page=entries'>All entries</a>
<a href='admin.php?page=editor'>Editor</a>
When a user clicks the All entries item, the URL variable page gets a value of entries. In admin.php, the URL variable page is fetched using $_GET. The string value entries is stored inside a variable called $contrl and subsequently used to include controllers/admin/$contrl.php, which will really translate to including controllers/admin/entries.php, because the variable $contrl holds the value entries.
If the Editor item is clicked, controllers/admin/editor.php will be included.
There should be no surprises for you in the preceding code. Still, a sanity check is advisable. Save your files and reload http://localhost/blog/admin.php in your browser. By default, you should see the message returned from the entries controller. If you click the navigation item for the editor, you should see the returned message from the editor controller.
Creating the Entry Input Form
Now that you have a dynamic navigation, you might as well use it for something meaningful. You could show an HTML form for the editor. Eventually, it should be possible to use the editor to create new blog entries. So, the editor form should have fields for creating an entry title and an entry article. There should also be a button for saving a new entry. While you’re at it, you might as well create a button for deleting an entry. Create a new file views/admin/editor-html.php, as follows:
<?php
//complete source code for views/admin/editor-html.php
return "
<form method='post' action='admin.php?page=editor' id='editor'>
    <fieldset>
        <legend>New Entry Submission</legend>
        <label>Title</label>
        <input type='text' name='title' maxlength='150' />

        <label>Entry</label>
        <textarea name='entry'></textarea>

        <fieldset id='editor-buttons'>
            <input type='submit' name='action' value='save' />
            <input type='submit' name='action' value='delete' />
        </fieldset>
    </fieldset>
</form>
";
Most of the preceding code should be familiar ground, even if you see a few elements you might not have come across before. You can see two <fieldset> elements. They are used to group related form fields together. The main <fieldset> has a <legend> element. A <legend> is like a heading for a <fieldset> element.
The <input> element for the entry title has a maxlength attribute set to 150. You can probably guess that the displayed text field will only accept 150 characters. That’s perfect, because your entry table in the database accepts a maximum of 150 characters for new title attributes.
The maxlength attribute enhances form usability, in that it becomes harder for users to create an invalid title through the form. The maxlength attribute performs client-side validation and will only allow submission of valid titles. One thing to keep in mind is the fact that client-side validation is great for enhancing usability. It does not improve security, because you should expect a malicious user to be able to override client-side validation.
With a new editor view created, you have to update the controller so it shows the view. The controller for the editor can be found in controller/admin/editor.php. Change the code so it is like the following:
<?php
//complete source code for controllers/admin/editor.php
$editorOutput = include_once "views/admin/editor-html.php";
return $editorOutput;
These few lines of code should hook up the view and display it when the controller is loaded from admin.php. You can see it for yourself by reloading http://localhost/blog/admin.php?page=editor in your browser. You should expect to see the form.
Styling the Editor
You’ll probably agree that the unstyled entry editor form is hideous to look at. A little CSS can take you a long way toward improved aesthetics. You will most likely want to work more on the visual design of the editor. Here’s a little CSS to get you started:
/* code listing for blog/css/blog.css */
form#editor{
    width: 300px;
    margin:0px;
    padding:0px;
}

form#editor label, form#editor input[type='text']{
    display:block;
}

form#editor #editor-buttons{
    border:none;
    text-align:right;
}

form#editor textarea, form#editor input[type='text']{
    width:90%;
    margin-bottom:2em;
}

form#editor textarea{
    height:10em;
}
As you may or may not recall, my code in admin.php expects to find an external style sheet in css/blog.css. If your admin.php is like mine, you’ll want to have your style sheet in that location. Obviously, you could create your style sheet in a different folder, under a different name. Remember to update admin.php, so that it points to your style sheet. You can see the resulting editor design in Figure 7-3.
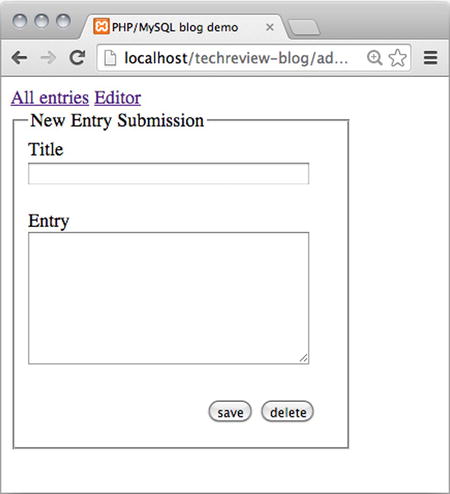
Figure 7-3. The editor displayed in Google Chrome
I like to keep my HTML clean and free of id and class attributes, and I like to hand-code my CSS. I need to be able to hook up style rules with the right HTML elements. I’ve found that I can often get by, using contextual selectors combined with attribute selectors.
If you prefer to use a CSS framework, you will probably take a completely opposite approach. You will write very little CSS by hand and make extensive use of the class and id attributes used by your favorite CSS framework. Do as you see fit!
Connecting to the Database
You’ve completed the basic editor view. Soon, you should be able to insert new blog entries into your blog_entry database table through the editor form. To do that, you will need a database connection from your PHP application to your MySQL database.
You can take the same approach you used for the poll: use PDO for making a connection and make a connection in the front controller to share it with subsequently loaded controllers.
You can create a PDO object in admin.php and share it with all controllers you’ll be loading. You should write the following code in admin.php somewhere after you create $pageData and before the echo:
//partial code listing for admin.php

//new code starts here
$dbInfo = "mysql:host=localhost;dbname=simple_blog";
$dbUser = "root";
$dbPassword = "";
$db = new PDO( $dbInfo, $dbUser, $dbPassword );
$db->setAttribute( PDO::ATTR_ERRMODE, PDO::ERRMODE_EXCEPTION );
//end of new code – no changes below

$navigationIsClicked = isset( $_GET['page'] );
if ($navigationIsClicked ) {
    $contrl = $_GET['page'];
} else {
    $contrl = "entries";
}
$pageData->content .=include_once "controllers/admin/$contrl.php";
$page = include_once "views/page.php";
echo $page;
Be careful to enter correct database credentials and to indicate that you want to connect to the simple_blog database. You can test if the connection works by reloading your browser. If the connection fails, you should see an error message. Consequently, if you see no error message, it means you have successfully connected to a database.
Using Design Patterns
A design pattern is a general, best-practice solution to a common task. Some design patterns are defined rather comprehensively. As your experience grows, you’ll come across more design patterns. As an absolute beginner, you don’t need a comprehensive treatment of design patterns—that would likely be more confusing than helpful.
This book uses simple implementations of a few design patterns. You’ve already seen a simple implementation of the front controller design pattern and an equally simple implementation of MVC. You can see it is possible to combine several design patterns in the same project.
![]() Note You can read about design patterns at http://en.wikipedia.org/wiki/Software_design_pattern.
Note You can read about design patterns at http://en.wikipedia.org/wiki/Software_design_pattern.
Many design patterns tend to be quite tricky for beginners to understand. But there are design patterns for many, common coding problems. This book uses a few design patterns in simple implementations. You should know which design patterns you’re using in your code and that there are other possibilities. You can consider such knowledge a road map for future development.
![]() Note I can highly recommend Matt Zandstra’s book PHP Objects, Patterns, and Practice, Fourth Edition (Apress, 2013). Find it at www.apress.com/9781430260318. It is not really a book for beginners, but you can keep it in mind for future reference.
Note I can highly recommend Matt Zandstra’s book PHP Objects, Patterns, and Practice, Fourth Edition (Apress, 2013). Find it at www.apress.com/9781430260318. It is not really a book for beginners, but you can keep it in mind for future reference.
The Table Data Gateway Design Pattern
Your code will have to communicate extensively with database tables. There are a number of approaches to managing such communication consistently. One approach is to implement a table data gateway design pattern.
The table data gateway design pattern is not the most commonly seen approach to dealing with database access in larger MVC frameworks. Many popular PHP MVC frameworks use an active record pattern. I propose that you use a table data gateway, because it is a relatively simple design pattern to understand. The table data gateway pattern specifies that you create one (PHP) class for every one table in your database. The idea is that all communication between your system and that one table happens through one such object. The table data gateway encapsulates data communication between your system and the specific database table.
That means that all SQL statements needed for this communication will be declared in the table data gateway class definition. This has a couple of advantages: One is that you know where to write your SQL statements. Consequently, you also know where to find your SQL statements related to the particular database table.
Database design and development is a profession in and of itself. If you as a PHP developer keep all your SQL encapsulated in relatively few class definitions, then any database expert on your team would only have to work with these few classes. That is a huge advantage over having your SQL statements scattered all through your code base.
Writing the Entry_Table Class
Initially, you’ll need to be able to insert new blog entries received from the editor form. You can create a new class definition for a table data gateway for the blog_entry table. It will be used to communicate with your database.
The new class will need a PDO object to communicate with the database. You can use the idea you already saw in the previous chapter. Create a class with a constructor method and pass a PDO object as an argument. Take a pause to reflect on the class you’re about to write. Should it be a model, a view, or a controller? The answer should be obvious: a script responsible for communicating with your database should be a model!
Create a new class definition in the models folder, in a new file called Blog_Entry_Table.class.php. Here’s the code for it:
<?php
//complete code listing for models/Blog_Entry_Table.class.php

class Blog_Entry_Table {

    private $db;

    //notice there are two underscore characters in __construct
    public function __construct ( $db ) {
        $this->db = $db;
    }

    public function saveEntry ( $title, $entry ) {
        $entrySQL = "INSERT INTO blog_entry ( title, entry_text )
                     VALUES ( '$title', '$entry' )";
        $entryStatement = $this->db->prepare( $entrySQL );

        try{
            $entryStatement->execute();
        } catch (Exception $e){
            $msg = "<p>You tried to run this sql: $entrySQL<p>
                    <p>Exception: $e</p>";
            trigger_error($msg);
        }
    }
}
The Blog_Entry_Table will not do anything until it is used from another script. I’d like to take a look at this code before using it. As you can see, the Blog_Entry_Table has one property db and two methods: the constructor and saveEntry(). This constructor takes a PDO object as argument. The received PDO object will be stored in the db property. This way, all methods of Blog_Entry_Table will have access to the PDO object and, through that, access to the simple_blog database.
In object-oriented terminology, Blog_Entry_Table and PDO are now associated through a has-a relationship. The Blog_Entry_Table has-a PDO object.
At this early stage of development, you’ll only be saving new entries. So, the Blog_Entry_Table class has just one method besides the constructor. The saveEntry() method takes two arguments: the title and the blog_entry to save in the database.
The variable $entrySQL holds an SQL string to insert a new blog_entry using the received title and blog_entry. The $entryStatement is a PDOStatement object, which you can then try() to execute() to actually insert a new blog_entry.
If this operation fails, it will throw an Exception object, which your code catches. In case an exception occurs, your code will trigger an error showing the SQL string that caused the exception and a more detailed look at the exception.
Processing Form Input and Saving the Entry
With the Blog_Entry_Table class created, you can continue development. A logical next step could be to process input received from the editor form and use a Blog_Entry_Table object to save a new blog entry in the database. Which is responsible for dealing with user interactions? Models, views, or controllers? The MVC design pattern specifies that user interactions should be dealt with in the relevant controller. In this case, the relevant controller would be controllers/admin/editor.php:
<?php
//complete code for controllers/admin/editor.php

//include class definition and create an object
include_once "models/Blog_Entry_Table.class.php";
$entryTable = new Blog_Entry_Table( $db );

//was editor form submitted?
$editorSubmitted = isset( $_POST['action'] );
if ( $editorSubmitted ) {
    $buttonClicked = $_POST['action'];
    //was "save" button clicked
    $insertNewEntry = ( $buttonClicked === 'save' );

    if ( $insertNewEntry ) {
        //get title and entry data from editor form
        $title = $_POST['title'];
        $entry = $_POST['entry'];
        //save the new entry
        $entryTable->saveEntry( $title, $entry );
    }
}

//load relevant view
$editorOutput = include_once "views/admin/editor-html.php";
return $editorOutput;
Save and test your editor. It should be able to insert new blog entries. Try to create a few new blog entries through your editor form. Once you have done that, you can browse the content of your blog_entry table using the phpMyAdmin control panel. You can find the created blog entries in your blog_entry table. Your entry editor works!
Which Button Was Clicked?
There are two buttons in the entry editor form. Eventually, you’ll want your script to respond differently, depending on which button was clicked. So, your code must know which button was clicked. Let’s take a look at the HTML that produces the buttons:
//partial source code for views/admin/editor-html.php
<fieldset id='editor-buttons'>
    <input type='submit' name='action' value='save' />
    <input type='submit' name='action' value='delete' />
</fieldset>
See how the two different buttons have the same name attribute. The only difference between buttons are their value attributes. You can use that knowledge to identify which button was clicked. Actually, you already did it in controllers/admin/editor.php:
//one line of code from controllers/admin/editor.php
//don't make any changes
$buttonClicked = $_POST['action'];
The variable $buttonClicked will hold the value of the clicked button. So, if a user clicked the button to save, $buttonClicked will hold the corresponding value 'save'. If $buttonClicked has a value of save, you know the user is trying to insert a new entry. Take a look at the following line. What will the variable $insertNewEntry hold?
//one line of code from controllers/admin/editor.php
//don't make any changes
$insertNewEntry = ( $buttonClicked === 'save' );
Inside the parentheses, the variable $buttonClicked is compared to the string 'save'. If $buttonClicked is identical to 'save', $insertNewEntry will have a value of true. If not, it will have a value of false. In the subsequent code, you can see that a new blog_entry is inserted if $insertNewEntry is true. So much of your code will only run if a user clicked the Save button.
Security Alert: SQL Injection Attacks
The saveEntry() method illustrates a nifty coding practice. It uses form input data to generate an SQL string dynamically. It’s a wonderful trick to know, because it’s the key to insert input received from a user into a database table. But it’s also a gaping security hole. SQL injection attacks are possibly the single most common attack on database-driven web applications. Your entry editor is wide open for such attacks now.
![]() Note Learn more about SQL injections at http://en.wikipedia.org/wiki/SQL_injection.
Note Learn more about SQL injections at http://en.wikipedia.org/wiki/SQL_injection.
Basically, SQL injection attacks exploit the fact that text entered through a form is used to generate SQL statements dynamically. Anything a user enters through the form will be used in SQL:
//the code that makes you vulnerable
$entrySQL = "INSERT INTO blog_entry ( title, entry_text )
             VALUES ( '$title', '$entry' )";
Look at the preceding code. The variables $title and $entry are simple placeholders for text received from a form. Whatever was entered through the form will become part of the SQL string. So, a malicious user with a solid understanding of SQL can enter evil SQL through the form and thus gain direct access to your database tables. Any data you keep in your database may be exposed. An attacker might submit the form with a string somewhat like the following entered into the entry field:
attack'), DROP TABLE blog_entry;--
With that input, $entrySQL would become
$entrySQL = "INSERT INTO blog_entry ( title, entry_text )
             VALUES ( '$title', ' attack'), DROP TABLE blog_entry;--' )";
You can see that the $entrySQL now holds two SQL statements: one to insert a blog_entry and another one that will drop the entire blog_entry table. It should be obvious that you don’t want users to be able to drop tables in your system! You should know that the particular attack described previously will not actually work. I don’t want to teach you how to perform SQL injection attacks, but I would like you to know about the vulnerability.
Usability Alert: Blog Entries with Quote Characters
The entry editor also has a major usability flaw. (As if it weren’t enough that your editor is vulnerable for the most common type of hacker attack!) You can see the problem for yourself, if you enter the following text through the editor’s entry field:
Brennan's child said: "I want some breakfast!"
PDO throws an exception. The culprit is the single-quote character:
//the code that makes your form submission break
$entrySQL = "INSERT INTO blog_entry ( title, entry_text )
             VALUES ( '$title', '$entry' )";
Because the variables $title and $entry are wrapped in single-quote characters, your entry editor form cannot deal with any content that contains single-quote characters. So, the sentence you typed causes an exception.
With a minor change in code, you could wrap $title and $entry in double quotes instead, but then your entry editor wouldn’t be able to handle any entry with a double-quote character. So, the sentence would still cause an exception.
Solution: Prepared Statements
It should be evident that the code where the SQL string is generated dynamically gives you a lot of grief. It leaves you vulnerable to SQL injection attacks, and because of it, your blog entries must be written without single- or double-quote characters. Graciously, PDO supports a feature that will fix both problems at once. PDO supports prepared statements.
![]() Note Here’s a good tutorial for further information about PDO and prepared statements:
Note Here’s a good tutorial for further information about PDO and prepared statements:
http://net.tutsplus.com/tutorials/php/why-you-should-be-using-phps-pdo-for-database-access.
A prepared statement is an SQL statement prepared for dynamic content. Instead of dropping your PHP variables directly in the SQL statement, you can declare placeholders in the SQL and subsequently replace those placeholders with actual values. If you use PDO prepared statements, you will be safe from SQL injection attacks and from any trouble with special characters such as single and double quotes. Here’s how to do it in models/Blog_Entry_Table.class.php:
//partial code for models/Blog_Entry_Table.class.php
//edit existing method
public function saveEntry ( $title, $entry ) {
    //notice placeholders in SQL string. ? is a placeholder
    //notice the order of attributes: first title, next entry_text
    $entrySQL = "INSERT INTO blog_entry ( title, entry_text )
                 VALUES ( ?, ?)";
    $entryStatement = $this->db->prepare( $entrySQL );
    //create an array with dynamic data
    //Order is important: $title must come first, $entry second
    $formData = array( $title, $entry );
    try{
        //pass $formData as argument to execute
        $entryStatement->execute( $formData );
    } catch (Exception $e){
        $msg = "<p>You tried to run this sql: $entrySQL<p>
                <p>Exception: $e</p>";
        trigger_error($msg);
    }
}
There are three equally important changes, as follows:
- characters are used as placeholders in the SQL string.
- An array is created with the dynamic data. The order of items must match the order used in the SQL string.
- Pass the array with dynamic data as an argument to the execute() method.
You can test for yourself. Insert an entry with single and double quotes. It will be harder for you to verify that your editor is no longer vulnerable to SQL injection attacks. You would have to be able to perform an SQL attack to be able to verify that the editor is now safe. I guess you’ll have to take my word for it.
Summary
This was a relatively short chapter, and there were only a few new coding principles demonstrated. But you’ve taken the first steps toward a personal blogging system and developed a supercool entry editor.
In the process, you have had an opportunity to become more familiar with almost everything you have learned in the previous chapters. You have
- Created a MySQL database with a table
- Inserted data into a table through a web form
- Created an MVC web application structure
- Used the front controller design pattern
- Used the table data gateway design pattern
On top of all that, you’ve learned about SQL injection attacks and learned how to protect your PHP projects using PDO’s prepared statements.