![]()
Deleting and Updating Entries
This is how it will be: one chapter will improve the public face of your blog in some way, and the next chapter will focus on improving the secret blog administration module, and they will keep alternating like that. This chapter focuses on improving the secret blog administration module.
Let’s continue down the model-view-controller (MVC) path with objects and classes. This second iteration of the administration module will show you how to update and delete existing entries, through the entry editor. In the process of improving the entry manager, you will learn about writing small, informal code tests. The tests are meant to emphasize the experimental process of developing a blog, rather than just showing you the finished code for a blog. If you integrate testing into your development process, you will improve your overall code quality and decrease debugging time.
In this chapter, you will also learn how you can create HTML forms that can communicate changes to users. In addition, you will get to revisit the idea of progressive enhancement with JavaScript. Working through this chapter may change your perspective a little: you will no longer just focus on how your code works. You will begin to focus on how to use code to design a system that works for your users.
Creating a Model for Administrative Links
Take a look at your existing editor at http://localhost/blog/admin.php?page=editor. You can clearly see that there are already buttons that can be used for saving or deleting existing entries. You can also see that something is missing. Where would you click to load an existing entry into the entry editor, so that you could edit or delete it?
I am sure you can think of many clever ways to go about this task. I propose an approach that will be quite similar to what you just did with the blog: I propose that you display a list of all entries to administrators. Clicking one entry should load it into the entry editor. My main motivation for taking this approach is its similarity to what you’ve already done for blog entries. Doing it again will present a nice little learning loop for you. In my experience as a teacher, repetition is essential—especially for beginners.
Another advantage is that you already have a getAllEntries() method in the Blog_Entry_Table class. You can reuse the existing method. So, you have already dealt with the model. Just to be certain that you can get access to entry data from the controller, you can write a little code to test the assumption. Open controllers/admin/entries.php in your code editor and rewrite it completely, as follows:
<?php
//complete code for controller/admin/entries.php
include_once "models/Blog_Entry_Table.class.php";
$entryTable = new Blog_Entry_Table( $db );
//get a PDOStatement object to get access to all entries
$allEntries = $entryTable->getAllEntries();
//test that you can get the first row as a StdClass object
$oneEntry = $allEntries->fetchObject();
//prepare test output
$testOutput = print_r( $oneEntry, true );
//return test output to front controller, to admin.php
return "<pre>$testOutput</pre>";
If everything works as intended, you should see a StdClass representation of one entry printed when you load http://localhost/blog/admin.php?page=entries in your browser. The output should be something like the following:
stdClass Object (
     [entry_id] => 1
     [title] => Testing title
     [intro] => bla bla
)
This little test confirms that the entries controller does get access to entry data. You can see the content for the first entry printed in the browser.
You can learn a few things from the preceding output. You can see that your $testOutput variable holds an object of the type StdClass. You can see that it has three properties, called entry_id, title, and intro. You can even see the values of those three properties.
You must learn to understand PHP behavior. It is particularly important that you understand the PHP code you use when you build your own web application. Here’s a good opportunity. You can take a look at the PHP code that produced this output. See if you can work your way through the code and understand every little process involved in creating the preceding output. Here are three questions that may guide you:
- How does the output get from controllers/admin/entries.php to admin.php, where your browser sees it?
- Why are there three properties? Why not one or four or some other number?
- What does the fetchObject() method do?
Take your time and work through the questions to arrive at your own answers. Once you truly understand the answers to those questions, you will be much better equipped to start developing your own PHP/MySQL projects.
Displaying Administrative Links
With the model tried, tested, and understood, you can start working on a view. What you’re after is a list of clickable blog entry titles. That means you will have to iterate through all entries found in the database.
You can take an approach very similar to that you’ve taken with the blog. You can use a while loop to iterate through database records by way of a PDOStatement object. Every row of data from the database table will be represented by a separate <li> element.
You can wrap the individual blog titles in <a> elements to create a clickable list of entries. Create a new file in views/admin/entries-html.php, as follows:
<?php
//complete code for views/admin/entries-html.php
if( isset( $allEntries ) === false ) {
trigger_error('views/admin/entries-html.php needs $allEntries'),
}
$entriesAsHTML = "<ul>";
while ( $entry = $allEntries->fetchObject() ) {
//notice two URL variables are encoded in the href
$href = "admin.php?page=editor&id=$entry->entry_id";
$entriesAsHTML .= "<li><a href='$href'>$entry->title</a></li>";
}
$entriesAsHTML .= "</ul>";
return $entriesAsHTML;
Take a closer look at the href values generated. Clicking an entry will request a URL like admin.php?page=editor&id=2. This way, the editor controller will have access to the entry_id of the clicked entry.
You can see that this code is very similar to that in views/list-entries-html.php. Actually, it is perhaps too similar. If you were to refactor the blog code, this would be a candidate for refactoring. One might argue that you’re not breaking Curly’s law, but you are certainly entering a gray zone. You could refactor the code and use the same view file for listing all entries in slightly different ways. On the other hand, such a solution would lead to greater complexity in the code. I prefer to keep my views as simple as possible. So, I propose you keep this code as it is, because it works, and it’s not overly complicated.
I would like you to see that there are no right or wrong solutions to organizing your code. You can write a solution to a task in many different ways. How you decide to organize your code depends on how you think about your code. In the preceding case, I had to choose between short, abstract code or duplicate, simple code. I prefer shorter code over longer code, but I also prefer simple code over abstract code. In the example, I decided to favor simple code over short code.
To have the new view displayed, you must update the entries controller, so that it loads the view. Right now, your code in controllers/admin/entries.php outputs a StdClass object. You did this to test whether the relevant model code works as intended. You can delete the test code in your entries controller entirely, so that it returns your newly created view. Update the code in controllers/admin/entries.php, as follows:
<?php
//complete code for controller/admin/entries.php
include_once "models/Blog_Entry_Table.class.php";
$entryTable = new Blog_Entry_Table( $db );
$allEntries = $entryTable->getAllEntries();

$entriesAsHTML = include_once "views/admin/entries-html.php";
return $entriesAsHTML;
You can test your code now. Load http://localhost/blog/admin.php?page=entries in your browser, and you should see a well-formed list of clickable blog entry titles. If you click a title, the empty entry editor will be displayed. You can change this, so that the entry editor will be loaded with the contents of the clicked blog entry displayed inside the editor.
Populating Your Form with the Entry to Be Edited
Sometimes, the entry editor form should be displayed with blank fields, so that you can create new entries. At other times, the editor should display an existing entry, so that it can be edited. A user should click a blog title to load it into the editor.
Clicking such a blog title will encode the entry’s entry_id into the HTTP request as a URL variable. It follows that if an entry’s entry_id is available as a URL variable, you should load the corresponding entry into the editor. If no such URL variable is found, you should display a blank editor.
You can achieve that by adding a few placeholders in the editor view. If the view finds data for an entry, it should display it; otherwise, it should display empty editor fields. Here’s the updated views/admin/editor-html.php:
<?php
//complete code for views/admin/editor-html.php

//new code added here
//check if required data is available
$entryDataFound = isset( $entryData );
if( $entryDataFound === false ){
    //default values for an empty editor
    $entryData = new StdClass();
    $entryData->entry_id = 0;
    $entryData->title = "";
    $entryData->entry_text = "";
}

//changes in existing code below
//notice object properties used in <input> and <textarea>
return "
<form method='post' action='admin.php?page=editor' id='editor'>
    <input type='hidden' name='id' value='$entryData->entry_id' />
    <fieldset>
        <legend>New Entry Submission</legend>
        <label>Title</label>
        <input type='text' name='title' maxlength='150'
               value='$entryData->title' />

        <label>Entry</label>
        <textarea name='entry'>$entryData->entry_text</textarea>
        <fieldset id='editor-buttons'>
            <input type='submit' name='action' value='save' />
            <input type='submit' name='action' value='delete' />
        </fieldset>
    </fieldset>
</form>";
The main principle to notice here is the use of object properties as content placeholders. For example: Whatever data PHP finds inside $entryData->entry_text will be displayed inside the <teaxtarea> element. If $entryData->entry_text is an empty string, the <textarea> will be empty. On the other hand, if $entryData->entry_text holds data from the database, the <textarea> will display content from the database.
You can see a new <input> type used in the editor view. There is a hidden input. A hidden input will not be visible to users. You can use it to store values you require to process submitted form input correctly. This hidden input will store the currently displayed entry’s entry_id, or 0, if the editor fields are blank.
The last step to populating the otherwise empty editor with an existing entry is to get the content for the clicked entry. You already have a getEntry() method declared in your Blog_Entry_Table class. You can use that from your editor controller. Update the code in controllers/admin/editor.php, as follows:
//partial code for controllers/admin/editor.php
//add this code near the end of the script
//in my example this is line 21
//introduce a new variable: get entry id from URL
$entryRequested = isset( $_GET['id'] );
//create a new if-statement
if ( $entryRequested ) {
    $id = $_GET['id'];
    //load model of existing entry
    $entryData = $entryTable->getEntry( $id );
    $entryData->entry_id = $id;
}
//no new code below

$editorOutput = include_once "views/admin/editor-html.php";
return $editorOutput;
You can get the entry data from your database, because you have its entry_id available as a URL variable. Because you have an entry_id, you can get all content for that particular blog entry. See it for yourself. Save your work and point your browser to http://localhost/blog/admin.php?page=entries. Click a title to see your editor populated with the title and entry_text of the clicked entry.
The editor isn’t quite perfect yet. You can see any existing entry in the editor, but you cannot save any changes. If you click the Save button, you can see that a new entry will be inserted, even if you tried to edit an existing entry. Your editor cannot edit existing entries yet, nor can it delete existing entries. Deleting is very easy, so let’s implement that first.
Handling Entry Deletion
Obviously, it should be possible to delete entries. It is a wonderfully uncomplicated operation and a good place to start. You will need some changes to the editor’s model and controller.
The model should have some code to actually delete entry data from the database. The view already has a Delete button, so no changes are necessary here. The controller must be updated so it reacts when a user clicks Delete.
Deleting Entries from the Database
To delete a row of data from the blog_entry table in the database, you will need SQL. You will also need PDO to prepare a PDOStatement with your SQL. Executing the PDOStatement should delete the identified entry. Take a minute to reflect. Where would you write the code to delete an entry?
To delete an entry, you want PHP to manipulate the blog_entry database table. You already have a table data gateway object, your Blog_Entry_Table object. The purpose of a table data gateway is to provide a single point of access to a given table. Whenever you want access to that table, you should use the relevant table data gateway object. So, the PHP code to delete an entry in the blog_entry table belongs in your Blog_Entry_Table. You can implement it by declaring a new method in models/Blog_Entry_Table.class.php, as follows:
//partial code for models/Blog_Entry_Table.class.php

//declare a new method inside the Blog_Entry_Table class
public function deleteEntry ( $id ) {
    $sql = "DELETE FROM blog_entry WHERE entry_id = ?";
    $data = array( $id );
    $statement = $this->makeStatement( $sql, $data );
}
Deleting data from a database is a final action; there is no undo! It is important that you never accidentally delete something you shouldn’t have. Luckily, your database table is properly designed: every record has a primary key. That means every single record can be uniquely identified, if you have the primary key of an entry. It follows that you can safely delete a blog_entry by its entry_id, because you can trust the right entry to be deleted. There will be no accidental loss of data here!
Responding to Delete Requests
With the editor model ready to delete entries, it is time to update the controller with code, to determine if the Delete button was clicked. If the Delete button was clicked, the controller should call the model, to have the relevant entry deleted. How can you know if the Delete button was clicked? Take a look at the HTML for the editor form:
//partial code for views/admin/editor-html.php
//two buttons, one name, different values
<fieldset id='editor-buttons'>
    <input type='submit' name='action' value='save' />
    <input type='submit' name='action' value='delete' />
</fieldset>
Clicking any of the submit buttons in the editor form will encode a URL variable named action. The action will have a value of save, if you clicked the Save button, and a value of delete, if you clicked the Delete button. The value of the URL variable action can tell you which button a user clicked. Update the code in controllers/admin/editor.php, as follows:
<?php
//complete code for controllers/admin/editor.php
include_once "models/Blog_Entry_Table.class.php";
$entryTable = new Blog_Entry_Table( $db );

$editorSubmitted = isset( $_POST['action'] );
if ( $editorSubmitted ) {
    $buttonClicked = $_POST['action'];
    $insertNewEntry = ( $buttonClicked === 'save' );
    // new code: was "delete" button clicked
    $deleteEntry = ( $buttonClicked === 'delete' );
    //new code: get the entry id from the hidden input in editor form
    $id = $_POST['id'];

    if ( $insertNewEntry ) {
        $title = $_POST['title'];
        $entry = $_POST['entry'];
        $entryTable->saveEntry( $title, $entry );
        //new code here
    } else if ( $deleteEntry ) {
        $entryTable->deleteEntry( $id );
    }
    //end of new code. No changes below
}
$entryRequested = isset( $_GET['id'] );
if ( $entryRequested ) {
    $id = $_GET['id'];
    $entryData = $entryTable->getEntry( $id );
    $entryData->entry_id = $id;
}

$editorOutput = include_once "views/admin/editor-html.php";
return $editorOutput;
Test your work! Load http://localhost/blog/admin.php?page=entries in your browser; click an entry to load it into the editor; and delete the entry. Clicking the Delete button should delete the entry and reload the empty editor. Confirm that the selected entry was, in fact, deleted.
There is a little detail I would like to bring to your attention. The entry_id can be found in two different places. In one part of the code, you look for the entry_id in $_POST['id']; in another part of your code, you look in $_GET['id']. It is a little peculiar that they hold identical values but serve different purposes. Perhaps it is helpful to consider where these URL variables were encoded.
The $_GET['id'] gets encoded every time a user clicks a blog title listed on http://localhost/blog/admin.php?page=entries. So, $_GET['id'] represents the entry_id of a blog entry a user would like to see in the entry editor.
The $_POST['id'] gets encoded every time an entry has been loaded into the entry editor. It represents the entry_id of the entry the user has just seen in the editor. So, $_GET['id'] represents the entry to be loaded, whereas $_POST['id'] represents the already loaded entry.
Preparing a Model to Update Entries in the Database
You have an editor that can create new entries and delete existing ones. The next step is to update your editor code, so that you can update existing entries. Updating an existing entry in the database is definitely a job for a model. You can add an updateEntry() method to your Blog_Entry_Table class, as follows:
//Partial code for models/Blog_Entry_Table.class.php

//declare new method
public function updateEntry ( $id, $title, $entry) {
    $sql = "UPDATE blog_entry
            SET title = ?,
            entry_text = ?
            WHERE entry_id = ?";
    $data = array( $title, $entry, $id );
    $statement = $this->makeStatement( $sql, $data) ;
    return $statement;
}
Remember SQL update statements from the poll? Here they are again! There should be no surprises in the preceding code. The next task is to call the new method at the right time, i.e., call updateEntry() when a user clicks Save while an existing entry is loaded into the entry editor.
Controller: Should I Insert or Update?
When a user clicks Save, the displayed entry should either be inserted or updated in the database. Which action to take depends on which entry was displayed in the entry editor form. Remember the hidden input from the editor view? It stores the currently displayed entry’s entry_id, or 0, if the editor fields are blank. You can use that to check whether the admin user is trying to insert a new row in the blog_entry table or update an existing row.
When the Save button is clicked, you can get the value from the hidden input. If the editor was empty, the hidden input holds a value of 0. That means the admin user has just created a new entry. Your code should insert a new row into blog_entry. If it holds any other integer, you should update the blog_entry with the corresponding entry_id. The code to deal with user interaction belongs in the controller. It is time to change some code in an if statement in controllers/admin/editor.php, as follows:
//partial code for controllers/admin/editor.php
//this is line 6 in my script
$editorSubmitted = isset( $_POST['action'] );
if ( $editorSubmitted ) {
    $buttonClicked = $_POST['action'];

    //new code begins here
    $save = ( $buttonClicked === 'save' );
    $id = $_POST['id'];
    //id id = 0 the editor was empty
    //so user tries to save a new entry
    $insertNewEntry  = ( $save and $id === '0' );
    //comment out or delete the line below
    //$insertNewEntry = ( $buttonClicked === 'save' );
    $deleteEntry = ($buttonClicked === 'delete'),
    //if $insertNewEntry is false you know that entry_id was NOT 0
    //That happens when an existing entry was displayed in editor
    //in other words: user tries to save an existing entry
    $updateEntry = ( $save and $insertNewEntry === false );
    //get title and entry data from editor form
    $title = $_POST['title'];
    $entry = $_POST['entry'];

    if ( $insertNewEntry ) {
        $entryTable->saveEntry( $title, $entry );
        //new code below
    } else if ( $updateEntry ){
        $entryTable->updateEntry( $id, $title, $entry );
        //end of code changes
    } else if ( $deleteEntry ) {
        $entryTable->deleteEntry( $id );
    }
}
Keep in mind that the user might click the Save button in two of the following different scenarios:
- The user wants to save a new entry.
- The user wants to save some changes in an existing entry.
Your code must be able to differentiate between these two user actions. This is where it is really good to know that when the empty editor is displayed, the hidden input named entry_id will have a value of 0. So, when the user clicks the Save button, and entry_id is 0, the user is really trying to insert a new entry. Take a look in the preceding code and note how that is expressed in code. Read the following code slowly, and let the meaning sink in. Don’t rush this step of your learning process:
//code fragments from controllers/admin/editor.php – make no changes

//$save becomes TRUE if the button with the value of 'save' was clicked
$save = ( $buttonClicked === 'save' );

//and later in the same script...
//$insertNewEntry becomes TRUE only if $save is TRUE and $id is 0. Both conditions must be TRUE
$insertNewEntry  = ( $save and $id === '0' );
It is also good to keep in mind that if an existing entry was displayed in the editor, the hidden entry_id will have a value different from 0. So, if the user clicks Save and entry_id is not 0, the user is really trying to update an existing entry. It is a small task to call either saveEntry() or updateEntry(), once your code has determined which action a user has requested. You can see it expressed in code in the if-else if statement. Test the progress of your work. You should be able to load an existing entry into the editor and change it. You should also be able to create a new entry.
Communicating Changes
The entry editor make any changes “silently”—it does not inform the user if an entry was saved or not. You can improve the editor, so that it provides feedback to users. There are, as you can imagine, many possible approaches. I propose you show a message Entry was saved whenever a new or existing entry has been saved. You can change the code, so that changes are communicated clearly to users, and continue to show the saved entry in the editor. These improvements will require code changes in model, view, and controller.
Step 1: Update Model
PHP cannot really continue to show a saved entry, because the entire entry editor is generated from scratch with every new HTTP request. It is impossible to change only a small part of a PHP-generated HTML page. PHP will change all or nothing at all.
![]() Note Well, perhaps not exactly impossible. You can do it, if you combine PHP and JavaScript with AJAX, but that is a topic beyond the scope of this book.
Note Well, perhaps not exactly impossible. You can do it, if you combine PHP and JavaScript with AJAX, but that is a topic beyond the scope of this book.
But there is always another way. You can give users the impression that an entry continues to be loaded in the editor. You can simply reload it immediately. To be able to reload the saved entry in the editor, you need its entry_id. You already know the entry_id of any updated entry, but you don’t know the entry_id of a new entry only just inserted into the database. Update the saveEntry() method in models/Blog_Entry_Table.class.php, so that it returns the saved entry’s entry_id, as follows:
//partial code for models/Blog_Entry_Table.class.php
//edit existing method
public function saveEntry ( $title, $entry ) {
    $entrySQL = "INSERT INTO blog_entry ( title, entry_text )
                               VALUES ( ?, ?)";
    $formData = array($title, $entry);
    $entryStatement = $this->makeStatement( $entrySQL, $formData );
    //new code below
    //return the entry_id of the saved entry
    return $this->db->lastInsertId();
}
Note the lastInsertId() method. It is a standard PDO method that can often be very handy. It does what you would expect: it returns the id of the most recently inserted row. All it requires is that the table in question be created with an auto-incrementing primary key.
Step 2: Update Controller
Now that the saveEntry() method returns an entry_id, you also have to change some code in the controller, to remember the returned entry_id. It can be done with a tiny change in controllers/admin/editor.php. You simply have to declare a variable that stores the returned value, as follows:
//partial code for controllers/admin/editor.php

//this is line 16 in my script
//update existing if-statement
if ( $insertNewEntry ) {

    //introduce a variable to hold the id of a saved entry
    $savedEntryId = $entryTable->saveEntry( $title, $entry );
} else if ( $updateEntry ){
    $entryTable->updateEntry( $id, $title, $entry );

    //in case an entry was updated
    //overwrite the variable with the id of the updated entry
    $savedEntryId = $id;
} else if ( $deleteEntry ) {
    $entryTable->deleteEntry( $id );
}
![]() Note This project is quickly becoming more complex, and scripts are growing longer. It is probably getting harder for you to know exactly where to implement code changes. If you get stuck, you can always download the complete source code for a particular chapter from the book’s companion site at www.apress.com.
Note This project is quickly becoming more complex, and scripts are growing longer. It is probably getting harder for you to know exactly where to implement code changes. If you get stuck, you can always download the complete source code for a particular chapter from the book’s companion site at www.apress.com.
With the preceding code changes implemented, the editor controller now knows the entry_id of the entry that was just submitted through the entry editor form. If PHP can find a variable called $savedEntryID, you know that an entry was just saved or updated.
If PHP finds $savedEntryID, you should show a message telling users that Entry was saved. You want the editor to display the created or updated entry. So, you have to get a StdClass object, with entry data to have it rendered. But not only that: you want to display a confirmation message, indicating whether an entry was saved or updated. You can do that in the controller, in controllers/admin/editor.php just before the view is loaded.
//partial code for controllers/admin/editor.php

//update existing if-statement
$entryRequested = isset( $_GET['id'] );
if ( $entryRequested ) {
    $id = $_GET['id'];
    $entryData = $entryTable->getEntry( $id );
    $entryData->entry_id = $id;
    //new code: show no message when entry is loaded initially
    $entryData->message = "";
}

//new code below: an entry was saved or updated
$entrySaved = isset( $savedEntryId );
if ( $entrySaved ) {
    $entryData = $entryTable->getEntry( $savedEntryId );
    //display a confirmation message
    $entryData->message = "Entry was saved";
}
//end of new code

$editorOutput = include_once "views/admin/editor-html.php";
return $editorOutput;
At this point, your entry editor should reload a saved or updated blog entry. You can test it quite easily. Load http://localhost/blog/admin.php?page=entries in your browser. Click an entry title, to load the entry into the entry editor form. Change the entry a little and click Save. You should see that the form is reloaded and continues to show the entry.
It is an improvement, compared to before, when clicking Save would have resulted in an empty entry editor form. Try to imagine yourself as a normal user. From that perspective, you will probably agree that it is nicer to have clear feedback from the system, indicating that the entry has really been saved. Wait a second. What about the feedback message? I don’t see it! You nearly have it. A feedback message lives in PHP memory, as $entryData->message. It will be a small task to update the view and show the feedback message.
Step 3: Update View
At this point, you get a new or updated entry’s entry_id from the model. Your controller determines whether an entry has just been saved or updated and adds an appropriate confirmation message. The final step is to update the view, so that the confirmation message is displayed along with the entry. Update the code in views/admin/editor-html.php, as follows:
<?php
//complete code for views/admin/editor-html.php

$entryDataFound = isset( $entryData );
if( $entryDataFound === false ){
    //default values for an empty editor
    $entryData = new StdClass();
    $entryData->entry_id = 0;
    $entryData->title = "";
    $entryData->entry_text = "";
    //notice $entryData->message is blank when the editor is empty
    $entryData->message = "";
}

//notice new code below: $entryData->message is embedded
return "
<form method='post' action='admin.php?page=editor' id='editor'>
 <input type='hidden' name='id' value='$entryData->entry_id'/>
    <fieldset>
        <legend>New Entry Submission</legend>
        <label>Title</label>
        <input type='text' name='title' maxlength='150'  value='$entryData->title' />

        <label>Entry</label>
        <textarea name='entry'>$entryData->entry_text</textarea>

        <fieldset id='editor-buttons'>
            <input type='submit' name='action' value='save' />
            <input type='submit' name='action' value='delete' />
            <p id='editor-message'>$entryData->message</p>
        </fieldset>

    </fieldset>
</form>";
Test your work by loading the editor in your browser. If you create a new entry and save it, you should see the editor message Entry was saved. This is great! Your editor provides clear feedback, and you know that your new entry has been saved. You can also try to load an existing entry to make some editorial changes and save. Again, you should see that Entry was saved.
From a user’s perspective, your entry editor is now greatly improved. Communicating changes is almost as vital as actually making changes.
Insisting on a Title
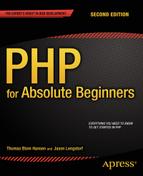
We’re slowly starting to focus on usability as much as functionality. Now that you are working on the entry editor anyway, I’d like to point out a usability flaw. It is possible to create a new blog entry without specifying a title for it! I have done it here, for demonstration purposes (see Figure 9-1). The problem is that you use blog entry titles to list all entries in the administration module.
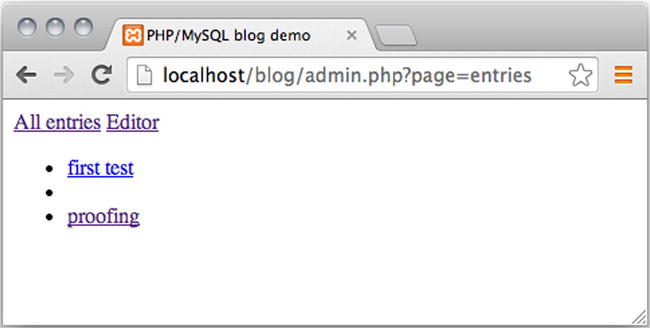
Figure 9-1. A title-less blog entry listed in the admin module
The problem is that a blog entry without a title cannot be clicked, and consequently, such an entry is not loaded into the entry editor form. That’s a little unfortunate, but perhaps not a huge problem, because the created blog entry will be displayed to ordinary users visiting index.php.
If you really wanted to edit the blog entry, you could go through phpMyAdmin. You might say that this is a usability problem, rather than a functional problem. Functionally speaking, it is possible to edit the entry, but it would be much more convenient, and much easier for users, if all blog entries could be edited through the entry editor.
One solution is to change your entry editor, so it insists that a title must be declared for blog entries. You can simply add a required attribute on the <input> element for the title. Do that, and it will be impossible to submit the entry editor form if no title is declared. Update one line of code in views/admin/editor-html.php, as follows:
//partial code for views/admin/editor-html.php

//notice the added required attribute
<input type='text' name='title' maxlength='150' value='$entryData->title'required/>
Implement that small change in your code and try to save a new entry without a title. As you try to save, you will see that the form is not submitted. All you get is a little warning, as shown in Figure 9-2.
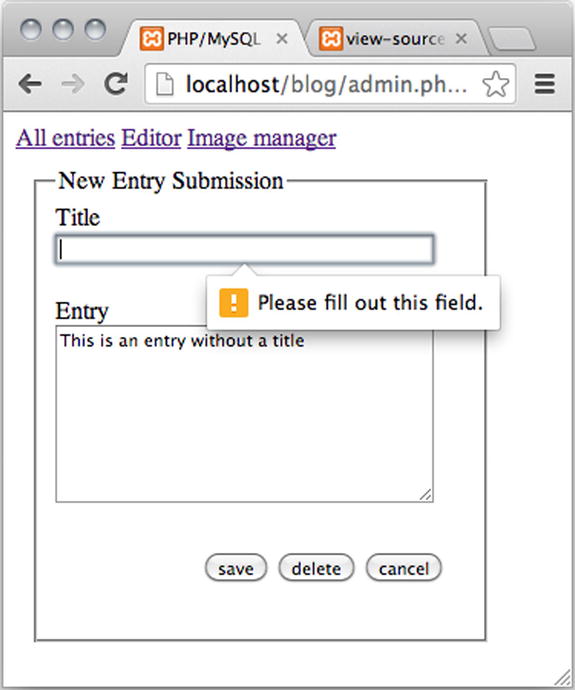
Figure 9-2. Trying to create a blog entry without a title
This solution will work beautifully in most modern browsers, but at the time of this writing, there are some notable exceptions. It will not work in Safari, nor will it work in a number of mobile browsers.
![]() Note Using the required attribute for client-side form validation is new to HTML5. You can see which browsers currently support such form validation at http://caniuse.com/form-validation.
Note Using the required attribute for client-side form validation is new to HTML5. You can see which browsers currently support such form validation at http://caniuse.com/form-validation.
Improving Editor Usability with Progressive Enhancement
Fixing a usability flaw with a simple HTML attribute is great, because it is so easy to implement. Unfortunately, not all browsers support the required attribute. But that is great, too, as this is an opportunity for you to exercise your JavaScript.
The required attribute can be used to prevent form submission for users employing updated versions of Chrome, Firefox, Opera, and Internet Explorer. Apple’s Safari browser doesn’t block form submissions, even if a required field is not filled out. A possible solution would be to use JavaScript to detect whether the required attribute is supported. If it is not, you could use JavaScript to prevent incomplete form submissions. The problem is that when JavaScript asks Safari if it supports required, Safari will claim support. But, in fact, Safari doesn’t really support the required attribute.
You could consider using JavaScript to detect the name of the visiting browser. That is possible through JavaScript’s navigator.userAgent. Unfortunately, Chrome’s navigator.userAgent string has the word Safari in it. So, your JavaScript could easily mistake Chrome for Safari. And as if that weren’t enough, user agent strings can easily be spoofed. So, user agent strings aren’t very reliable.
I propose a different solution: provide a JavaScript solution for all modern browsers. Continue to use the required attribute for fully HTML5-compliant browsers, with JavaScript disabled. Accept that Safari users with JavaScript disabled will be able to create a blog entry with no title.
First of all, you want to make sure that your JavaScript only runs in modern browsers. You don’t want ancient browsers choking on our modern JavaScript. You can use the approach you’ve already tried in Chapter 5. Create a new folder for your JavaScript files. You could call it js. Create a new JavaScript file in js/editor.js.
//complete code for js/editor.js
function init(){
    console.log('your browser understands DOMContentLoaded'),
}

document.addEventListener("DOMContentLoaded", init, false);
Embedding Your External JavaScript
The preceding script uses the DOMContentLoaded event to hide your JavaScript from older browsers. But you can’t test your JavaScript code just yet. Your browser must load the JavaScript file first. To do that, you can open admin.php in your code editor and embed the JavaScript file using the Page_Data->addScript() method you created back in Chapter 5, as follows:
//partial code for admin.php
include_once "models/Page_Data.class.php";
$pageData = new Page_Data();
$pageData->title = "PHP/MySQL blog demo";
$pageData->addCSS("css/blog.css");
//new code: add the Javascript file here
$pageData->addScript("js/editor.js");
//no changes below
Now, you can save and test progress. Open your browser and its JavaScript console. If you’re using Chrome, you can open the console with Cmd+Alt+J, if you are working on a Mac, or Ctrl+Alt+J, on a Windows machine.
Once the browser’s JavaScript console is open, you can navigate your browser to http://localhost/blog/admin.php?page=entries. Note the little output in the console, shown in Figure 9-3. It confirms that your browser runs the JavaScript code.
Figure 9-3. A console message in Chrome
Showing a Warning If Title Is Empty
You want your system to tell the user to enter a title before allowing form submission. So, you need an HTML element to output a message to users. Many polyfills you can find online will create and style such an HTML element dynamically. I want to keep the JavaScript really simple, so I don’t want to create HTML elements with JavaScript. I propose the simpler but less elegant approach of hard-coding an empty HTML element into the view, as follows:
//partial code for views/admin/editor-html.php
//notice the <p id='title-warning'> element added
<form method='post' action='admin.php?page=editor' id='editor'>
 <input type='hidden' name='id' value='$entryData->entry_id' />
    <fieldset>
        <legend>New Entry Submission</legend>
        <label>Title</label>
        <input type='text' name='title' maxlength='150' value='$entryData->title' required/>
        <p id='title-warning'></p>
        <label>Entry</label>
You can use JavaScript to detect when the entry editor form is submitted. If the title is empty, you can prevent form submission and show an error message. The form should only be submitted if the title is not empty. Here’s how to express that in JavaScript:
//Complete code for js/editor.js
//declare new function
function checkTitle (event) {
    var title = document.querySelector("input[name='title']");
    var warning = document.querySelector("form #title-warning");
    //if title is empty...
    if (title.value === "") {
        //preventDefault, ie don't submit the form
        event.preventDefault();
        //display a warning
        warning.innerHTML = "*You must write a title for the entry";
    }
}

//edit existing function
function init(){
    var editorForm = document.querySelector("form#editor");
    editorForm.addEventListener("submit", checkTitle, false);
}

document.addEventListener("DOMContentLoaded", init, false);
The preceding code would work, but fully HTML5-compliant browsers will never execute your checkTitle() function, because the required attribute will cause the browser to show a standard warning. So, a browser such as Chrome would show a standard warning, while Safari would show your JavaScripted warning. It’s not really much of a problem, but the standard warnings of different browsers look different. You can see for yourself, if you test your blog entry editor in Chrome and Firefox. If you want your editor to look similar across multiple browsers, you should write JavaScript to suppress the standard browser warning and show your JavaScript warning instead. It is easy to do, with a tiny change in the init() function declared in js/editor.js, as follows:
//partial code for js/editor.js

//edit existing function
function init(){
    var editorForm = document.querySelector("form#editor");
    var title = document.querySelector("input[name='title']");
    //this will prevent standard browser treatment of the required attribute
    title.required = false;
    editorForm.addEventListener("submit", checkTitle, false);
}
That’s it! If a user comes along with a modern browser, your code will rely on client-side validation using JavaScript. You can see it in action in Safari, in Figure 9-4. Users with fully HTML5-compliant browsers and JavaScript disabled will be served client-side validation using the HTML5 required attribute. Safari users with JavaScript disabled are out of luck: they will be able to create a blog entry with no title. Users running legacy browsers that don’t support the required attribute and don’t support modern JavaScript will simply have to accept that they can create blog entries without titles. Users with such outdated technology will get a less optimal experience, but at least they can create blog entries.
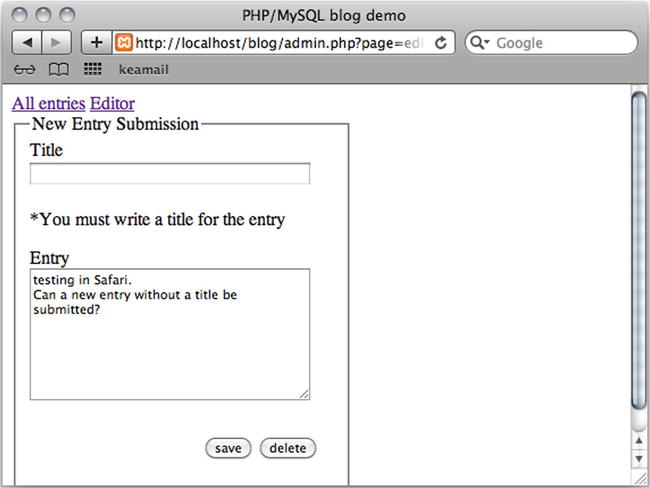
Figure 9-4. Testing editor in Safari with JavaScript enabled. A user cannot submit an entry without a title
Other Usability Flaws
There are other usability flaws in the editor, at this point. One is that administrators have to know a bit of HTML to format the entries in any way. Also, it is a big disadvantage that administrators will probably find it rather cumbersome to use images as part of a blog entry.
As if that weren’t enough, the confirmation message indicating whether an entry has been saved or not can be a bit misleading at times. If you create a new entry and save it, you will see confirmation that the entry was saved. If you continue to edit the entry further, the confirmation message will still show that the entry was saved, even though that is no longer true.
That is not so great. Generally, you don’t want misleading messages! You will continue to improve the usability of the blog entry editor in Chapter 11.
A Coding Challenge: Fix a Usability Flaw
I’d like you to notice a usability flaw that you can try to remedy with PHP. When you load an existing blog entry into the editor, the <legend> element will have a value of New Entry Submission. That’s a misleading <legend>. It fits fine when you create a new blog entry, but when you edit an existing entry, it is bad!
You can change it with PHP. There are, as always, many ways to approach the problem. One approach would be to argue that the problem relates only to the view. That would mean you only have to change code in views/admin/editor-html.php.
If you look in your code, you will see that you already have an $entryData->message. You use it to show different messages at different times. You could take a similar approach and declare a $entryData->legend. You would replace the hard-coded <legend> value with the new $entryData->legend. The bigger problem is assigning an appropriate value to $entryData->legend. When you load an existing entry into the editor, the value of $entryData->legend could be Edit Entry. When you load an empty editor, the value could be New Entry Submission. The challenge is for you to make it happen.
Summary
In this chapter, you have greatly improved the entry editor. It can now delete or edit existing entries, and it provides some client-side validation to enhance the user experience. Back in Chapter 5 you were introduced to the notion of progressive enhancement, which is a common approach to using JavaScript. In this chapter, you have seen another common JavaScript task: using a JavaScript polyfill to remedy inconsistencies across browsers.
In terms of code, this chapter was mostly a repetition of principles already covered. The code is getting more complex, especially the editor controller. Despite the increased complexity, you’re still seeing previously covered principles.
But something has changed radically: you have started to use code to design user experiences. You are no longer solely concerned with the basic problem of getting the code to work. You’re starting to focus more on how it works from a user’s perspective. You are writing code to design systems that communicate with users. This is a topic you will pursue further in subsequent chapters.