![]()
Improving Your Blog with User Comments and Search
This chapter returns to the public face of your blog. At this point, blog visitors can see a list of all the blog entries you wrote and can click an entry to read all of it.
One of the most important features of modern web applications is the ability to allow users to interact via a commenting system. Nearly every blog in existence allows its readers to comment on entries. This adds to the experience of the users and the blog author, by enabling everyone to continue the conversations the author initiates with his posts. This chapter shows you how to add a commenting system to the blog.
This will be an opportunity for you to strengthen your grasp of some of the things you have learned already and pick up another few skills. In this chapter you will
- Design a form for user comments
- Deal with complex views
- Develop a controller script to deal with users interacting with the form
- Create a new database table for user comments
- Use a foreign key to associate comments with blog entries
- Use inheritance to avoid redundant code
- Write a class to provide access to the comment table
Building and Displaying the Comment Entry Form
An essential part of any commenting system is the user interface. You need a form that allows users to compose comments for blog entries. The form is a view. You will also need a corresponding model and a controller. You have to start somewhere. Create a new file in views/comment-form-html.php, as follows:
<?php
//complete code for views/comment-form-html.php
$idIsFound = isset($entryId);
if( $idIsFound === false ) {
trigger_error('views/comments-html.php needs an $entryId'),
}
return "
<form action='index.php?page=blog&id=$entryId' method='post' id='comment-form'>
<input type='hidden' name='entry-id' value='$entryId' />
<label>Your name</label>
<input type='text' name='user-name' />
<label>Your comment</label>
<textarea name='new-comment'></textarea>
<input type='submit' value='post!' />
</form>";
To display the comment form, you need a comment controller. Its job at this early stage will simply be to load the view and return the HTML to have the comment form displayed.
<?php
//complete code for controllers/comments.php
$comments = include_once "views/comment-form-html.php";
return $comments;
So far, the code is short, to the point, and very much like previous code examples. You may notice that the comment form will not show up anywhere in your browser yet. The comment controller loads the comment view. But who should load the comment controller and actually show the comment form?
A Combined View
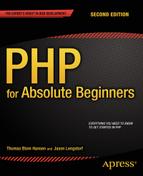
A comment form should only be displayed when a complete entry is displayed. So, the page that shows an entry should also show a comment form: it is a complex view composed of other views. Figure 10-1 shows a simple solution to combine views. Figure out a hierarchy of the parts and load the “secondary controller” from the “primary controller.”
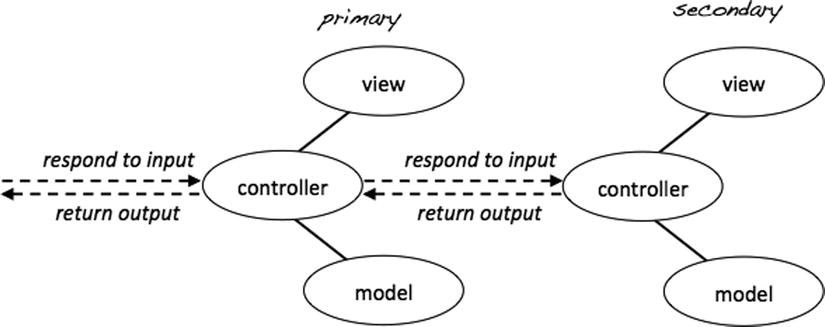
Figure 10-1. Constructing complex views
You have already done this from the front controllers you have made. Take the code in admin.php, for example. It loads a model and a view for making HTML5 pages. Generating an HTML5 page is a major concern for admin.php. But depending on conditions, admin.php further loads either the editor controller or the list-entries controller, each of which will return some content to be embedded on the generated page. So, admin.php is the primary controller, and the subsequently loaded controller is a secondary controller.
The task at hand is to display a blog entry and an HTML form, so users can comment on the entry. In this case, it should be obvious that the primary controller is the blog controller. The comment form is only meaningful in the context of a blog entry. The blog controller loads blog entries. The blog controller should also load the comment controller. Here’s how you can express that in controllers/blog.php:
<?php
//complete code for controllers/blog.php
include_once "models/Blog_Entry_Table.class.php";
$entryTable = new Blog_Entry_Table( $db );

if ( $isEntryClicked ) {
    $entryId = $_GET['id'];
    $entryData = $entryTable->getEntry( $entryId );
    $blogOutput = include_once "views/entry-html.php";

    //new code here: load the comments
    $blogOutput .=include_once "controllers/comments.php";
    //no other changes
} else {
    $entries = $entryTable->getAllEntries();
    $blogOutput = include_once "views/list-entries-html.php";
}
return $blogOutput;
Now you can start testing your progress! Navigate to http://localhost/blog/index.php and click Read more to see one entry displayed. At the very end of the blog entry, you should see the comment form displayed. It shouldn’t come as a big surprise that you cannot submit any new comments just yet. You can see that the form is completely unstyled. It is not a pretty sight. You can style your comment form however you prefer. Here’s a little CSS to get you started. I have added these new CSS rules to my style sheet in css/blog.css.
/*partial code for css/blog.css*/

form#comment-form{
    margin-top:2em;
    padding-top: 0.7em;
    border-top:1px solid grey;
}

form#comment-form label, form#comment-form input[type='submit']{
    padding-top:0.7em;
    display:block;
}
Creating a Comment Table in the Database
Before you can begin working with comments, you need to have a place to store them. Create a table named comment in the simple_blog database. You’ll use this to store all information about comments. You have to store several different kinds of information in this table, as follows:
- comment_id: A unique identifier for the comment. This is the table’s primary key. You can use the AUTO_INCREMENT property, so that new comments are automatically assigned a unique id number.
- entry_id: The identifier of the blog entry to which the comment corresponds. This column is an INT value. The entry_id refers to a primary key in another table. The entry_id is a so-called foreign key.
- author: The name of the comment author. This column accepts a maximum of 75 characters and is of the VARCHAR type.
- txt: The actual comment text. I would have called the column text, but text is a reserved SQL keyword, so I can’t use that. The column’s data type should be TEXT.
- date: The date the comment was posted stored as a TIME_STAMP. You can set a default value for this column: the CURRENT_TIMESTAMP, which will provide a TIME_STAMP for the exact date and time when a user adds a new comment to the table.
To create this table, navigate to http://localhost/phpmyadmin in a browser, select the simple_blog database, and open the SQL tab. Execute the following command to create the comment table:
CREATE TABLE comment (
    comment_id INT NOT NULL AUTO_INCREMENT,
    entry_id INT NOT NULL,
    author VARCHAR( 75 ),
    txt TEXT,
    date TIMESTAMP DEFAULT CURRENT_TIMESTAMP,
    PRIMARY KEY (comment_id),
    FOREIGN KEY (entry_id) REFERENCES blog_entry (entry_id)
)
A comment is a user’s response to one particular blog entry. So, every new comment must be uniquely associated with one blog entry. Your blog will soon show comments, but all comments should not be displayed all the time. When a particular blog entry is displayed, only comments related to that blog entry should be displayed.
It follows that your database must be designed in such a way as to represent a relationship between blog entries and comments. The database design must support that any one comment can be related to only one blog entry. A logical solution is to create the comment table with a column for entry_id, as shown in Table 10-1. That way, one comment will know the entry_id of the entry it is related to.
Table 10-1. Comment Rows Related to Specific Entries
Take a look at the populated comment table shown in Table 10-1. See how any one comment will be explicitly related to a particular entry’s entry_id? This way, every comment knows which blog entry it is related to. Notice also that one blog entry may have many associated comments. The entry with entry_id = 1 has two comments in the preceding example. This kind of relationship is known as a one-to-many relationship in relational database terminology.
Using a Foreign Key
It is very common to use a foreign key constraint when establishing relationships between two tables. You can see how a foreign key constraint is declared in the previous SQL statement. But what is it really for?
A foreign key constraint is just that—a constraint—that is, it restricts something. When a table field is declared with a constraint, you can’t just insert anything into it. A constraint puts a limit on what data will be accepted by the field.
A foreign key constraint is also a reference to a primary key column in a foreign table. In the preceding example, the comment table’s entry_id is a reference to the blog_entry table’s entry_id column.
The used foreign key constraint helps maintain data integrity, because the comment table will only accept comments with an entry_id that can be found in the blog_entry table. In other words, the comment table will only accept comments related to blog entries that exist.
Now you have a database table ready for comments, and every blog entry is displayed with a form for accepting new comments from users. In MVC terminology, you have to write a model for inserting comments and update your controller, so it can respond to form submissions. Generally speaking, controllers should deal with user interactions, whereas models should deal with core logic and manipulate your database. You can start coding either the model or the controller. It is not so important where you start.
Building a Comment_Table Class
Begin with the model, to start somewhere. You have just created a new table in your database. As you may remember, you have already used the table data gateway design pattern for accessing your blog_entry table.
A table data gateway provides a single point of access from your PHP code to one database table. Let’s continue to use the table data gateway pattern by creating a new class to provide a single point of access to the comment table. You can call the new class Comment_Table, so its name clearly indicates what it represents.
![]() Note Here’s a simple rule of thumb for the table data gateway pattern: each one table should have a corresponding table data gateway class. One table, one class!
Note Here’s a simple rule of thumb for the table data gateway pattern: each one table should have a corresponding table data gateway class. One table, one class!
If you think back to the Blog_Entry_Table class, you can get a pretty good idea about what you will need in the new class. To get access to a database table, you’ll need a PDO object. Whenever you instantiate a Blog_Entry_Table, you pass a PDO object as an argument to the constructor. The received PDO object is stored in a $db property, and it seems to do the job nicely. You can reuse that code as it is.
It could also be handy to have a makeStatement() method, just like in Blog_Entry_Table. With a makeStatement() method, your code in Comment_Table could stay nice and DRY (don’t repeat yourself), or at least DRYish, as you will soon see.
To get off to a quick and painless start, you could simply copy the relevant code from the Blog_Entry_Table class and paste it into a new Comment_Table class. Once you have copied the identical code, you could start to declare new methods unique to the Comment_Table. Make a new file called Comment_Table.class.php in the models folder:
<?php
//complete code for models/Comment_Table.class.php
class Comment_Table {
    //code below can be copied from models/Blog_Entry_Table.class.php
    private $db;

    public function __construct ( $db ) {
        $this->db = $db;
    }

    private function makeStatement ( $sql, $data = null ){
        $statement = $this->db->prepare( $sql );
        try{
            $statement->execute( $data );
        } catch (Exception $e) {
            $exceptionMessage = "<p>You tried to run this sql: $sql <p>
                    <p>Exception: $e</p>";
            trigger_error($exceptionMessage);
        }
        return $statement;
    }
} //end of class
Do you remember DRY? Isn’t it a bit of a shame to have two different classes that have two identical methods and one identical property? Duplicate code is a recognized code smell, and the code above surely stinks! The problem is that you have two classes that in some ways are identical.
It is a very common problem—there is even a name for it. There are many solutions for such common problems. I’d like to show you a solution that is unique to object-oriented programming. That solution is called inheritance.
Staying DRY with Inheritance
Using inheritance, you can create a single class definition whereby you keep the code to be shared among several classes. Next, you can create separate subclasses in which you keep the code that’s unique for individual classes, such as your Comment_Table and your Blog_Entry_Table. You can see the idea expressed in Figure 10-2.
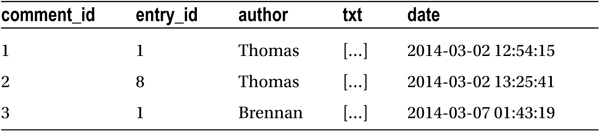
Figure 10-2. Subclasses inherit properties and methods from a parent class
Figure 10-2 illustrates how some code you want to share among a number of classes can be declared in a parent class. All children of that parent will be born with those properties. In Figure 10-2, you can see that both A_Child and Another_Child have a $sharedProperty and a sharedMethod(). These were inherited from the parent class. In Figure 10-2, you can also see that A_Child and Another_Child each have special properties and methods. These are declared in the child class definition. For example, only A_Child has a changeA() method.
You could use that idea to share $db and makeStatement() between the Blog_Entry_Table and the Comment_Table classes. You can see such an architecture in Figure 10-3.
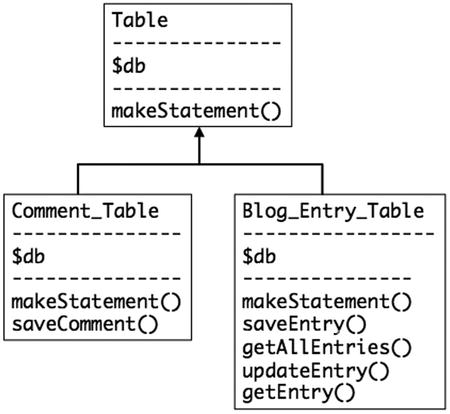
Figure 10-3. Using inheritance to make DRY table data gateway classes
The Comment_Table and Blog_Entry_Table classes will both be born with a $db property and a makeStatement() method inherited from the parent, from the Table class. The code for $db and makeStatement() would be written only once in the Table class. The $db and makeStatement() would still be accessible in Comment_Table and Blog_Entry_Table, because they are both children of the same parent.
Is-a Relationships
In object-oriented terminology, the relationship between a parent class and child class is referred to as an is-a relationship. A Comment_Table is a Table. The Table is a general abstraction that represents the general concept of a database table. The Comment_Table is a representation of a specific database table.
The concept of is-a relationships between objects is something you use in your everyday thinking. Coffee is a beverage. Orange juice also is a beverage. Orange juice and coffee share some characteristics, though they are clearly different. A beverage is the abstract idea of a consumable liquid. Coffee and orange juice are specific kinds of consumable liquids. You could probably come up with many other examples of abstract concepts and their concrete implementations. Object-oriented programming has borrowed a widely used human mode of reasoning and used it to bring hierarchical order to computer programs.
Using Inheritance in Your Code
You can create the solution indicated in Figure 10-3. The code you want to share among subclasses must have public or protected access modifiers. Any property or method with a private access modifier will not be shared through inheritance. Here’s what a general Table class could look like. Create a new file called Table.class.php in the models folder:
<?php
//complete code for models/Table.class.php

class Table {
    //notice protected, not private
    protected $db;

    public function __construct ( $db ) {
        $this->db = $db;
    }

    //notice protected, not private
    protected function makeStatement ( $sql, $data = null ){
        $statement = $this->db->prepare( $sql );
        try {
            $statement->execute( $data );
        } catch (Exception $e) {
            $exceptionMessage = "<p>You tried to run this sql: $sql <p>
                    <p>Exception: $e</p>";
            trigger_error($exceptionMessage);
        }
        return $statement;
    }
}
The protected access modifier is quite similar to the private access modifier you have already used. Protected methods and properties cannot be accessed from the outside. They can only be accessed from inside the class itself. But if you used private here, the makeStatement() method and the $db property would not be available to subclasses.
To make this code available to a subclass such as Comment_Table, you will have to include the Table class definition script in your code and use the keyword extends. Here’s what the almost completely rewritten DRY Comment_Table should look like:
<?php
//complete code for models/Comment_Table.class.php

//include parent class definition
include_once "models/Table.class.php";

//extend current class from parent class
class Comment_Table extends Table{
    //delete all previous code inside class
    //it should be completely empty
}
See how the Comment_Table class is simply an empty code block at this point? It is not at all obvious from the code, but the Comment_Table was “born” with a makeStatement() method and a $db property. You cannot see them in the Comment_Table class, but they are available here. They are inherited from the Table class, because the extends keyword is used; the Comment_Table extends the Table. Because of that, all public and protected methods and properties declared in Table are directly available in the Comment_Table. A Comment_Table is a Table. Figure 10-4 shows the code architecture.
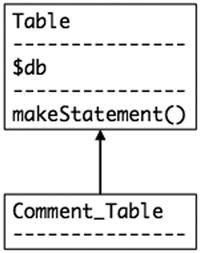
Figure 10-4. A Comment_Table is a special kind of table
Inserting New Comments into the Database
You can add a method to the Comment_Table, so that you can insert new comments into the database. Call the new method saveComment():
<?php
//complete code for models/Comment_Table.class.php

include_once "models/Table.class.php";

class Comment_Table extends Table{

    //declare a new method inside the Comment_Table class
    public function saveComment ( $entryId, $author, $txt ) {
        $sql = "INSERT INTO comment ( entry_id, author, txt)
                VALUES (?, ?, ?)";
        $data = array( $entryId, $author, $txt );
        $statement = $this->makeStatement($sql, $data);
        return $statement;
    }

}
That code should drive home what inheritance is. See how $this->makeStatement() can be used in Comment_Table? It is possible because the makeStatement() method was inherited from the Table class. The Comment_Table is “born” with all public and protected properties and methods declared in the Table class.
Testing the saveComment() Method
It is time to test whether the Comment_Table class and its saveComment() method work. You can hard-code a preliminary comment and insert it just for testing purposes. The comment controller should be responsible for user interaction related to comments, so edit controllers/comments.php:
<?php
//complete code for controllers/comments.php

//include class definition
include_once "models/Comment_Table.class.php";
//create a new object, pass it a PDO database connection object
$commentTable = new Comment_Table($db);
//insert a test comment for entry_id = 1
//assuming an entry_id of 1.
$commentTable->saveComment( 1, "me", "testing, testing" );

$comments = include_once "views/comment-form-html.php";
return $comments;
The preceding test code assumes that you have an entry_id = 1. If you don’t, you can use another entry_id present in your blog_entry database table. When you have written the test code, you can navigate your browser to http://localhost/blog/index.php?page=blog and click any Read more link to run your test code. The code should insert a test comment into your comment table. To see if your code worked, you will have to load http://localhost/phpmyadmin and browse the comment table. You should expect to see one row inserted into your comment table, as shown in Figure 10-5.

Figure 10-5. A row inserted into the comment table, as seen in phpMyAdmin
Notice that the comment_id and date field values were created automatically. The entry_id, author, and txt values are received from the comments controller and inserted by way of the saveComment() method in the Comment_Table object.
Retrieving All Comments for a Given Entry
It is great to have a comment for entry_id = 1 in the database. But it isn’t a particularly useful comment, as long as blog visitors cannot see it in their browser. To display all comments for a given entry, you have to get the data for all comments associated with the given entry’s entry_id. Your Comment_Table should be the single point of access from PHP to the comment database table. Declare a new method in models/Comment_Table.class.php to get all entries for a particular entry_id, as follows:
//partial code for models/Comment_Table.class.php

//declare new method inside the Comment_Table class
public function getAllById ( $id ) {
    $sql = "SELECT author, txt, date FROM comment
            WHERE entry_id = ?
            ORDER BY comment_id DESC";
    $data = array($id);
    $statement = $this->makeStatement($sql, $data);
    return $statement;
}
Take a moment to read the SQL statement used in the preceding code. It will SELECT author, txt, and date columns for all comments associated with a particular entry_id. Remember that the entry_id was declared as a foreign key. It is a reference to the primary key of the blog_entry table. Through the entry_id, you can unambiguously identify one particular blog_entry: you know which blog entry a comment is related to.
The comments will be ordered chronologically by comment_id values in DESCending order. In other words, comments with a higher comment_id value will be listed before comments with a lower comment_id value. The comment_id column is declared as auto_incrementing, which means the very first comment inserted will automatically get a comment_id value of 1. The next comment will get a comment_id value of 2, and so forth. So, the newest comments will have the highest comment_id value. It follows that the SQL statement above lists new comments first, older comments later.
Once again, you can appreciate that the makeStatement() method is inherited from the Table class. You can use the makeStatement() inside the Comment_Table class. Actually, you may recall that makeStatement() was declared with a protected access modifier. That means the makeStatement() method can only be called internally, from inside the class itself. It will be impossible to call makeStatement() from any other PHP script in your system.
Testing getAllById( )
You know it already. You have probably experienced it many times. Whenever you type some code, you may introduce a bug—a programming error—into your code. The only sane thing to do is to write a few lines of code and then test whether the code behaves as intended. Catch bugs in their infancy!
Open the comments controller and write a little code to test if the getAllById() method works as it should. If you call getAllById() with an entry_id of an entry you know has at least one comment associated, you should get back a PDOStatement. Call fetchObejct() of the PDOStatement and you should get a StdClass object representing one row of data from the comment table. You can rewrite controllers/comments.php to test the new getAllById() method, as follows:
<?php
//complete code for controllers/comments.php

include_once "models/Comment_Table.class.php";
$commentTable = new Comment_Table($db);

//query database
$allComments = $commentTable->getAllById( $entryId );
//get first row as a StdClass object
$firstComment = $allComments->fetchObject();

$testOutput = print_r( $firstComment, true );
die( "<pre>$testOutput</pre>" );

//PHP dies before coming to these lines
$comments = include_once "views/comment-form-html.php";
return $comments;
Navigate your browser to http://localhost/blog/index.php?page=blog and click Read more to run the test. If everything went well, you should see an output such as the following:
stdClass Object (
     [author] => me
     [txt] => testing, testing
     [date] => 2014-03-03 10:29:33
)
If you see a similar output, you have confirmed that getAllById() works as intended. The die() function will kill the PHP process, so it will effectively stop PHP in its tracks. It can sometimes be useful to kill a PHP script prematurely for debugging or testing.
Creating a View for Listing Comments
At this point, you should have a confirmed test. You will require a view for displaying all comments. Create a new file in views/comments-html.php:
<?php
//complete code for views/comments-html.php

$commentsFound = isset( $allComments );
if($commentsFound === false){
    trigger_error('views/comments-html.php needs $allComments' );
}

$allCommentsHTML = "<ul id='comments'>";
//iterate through all rows returned from database
while ($commentData = $allComments->fetchObject() ) {
    //notice incremental concatenation operator .=
    //it adds <li> elements to the <ul>
    $allCommentsHTML .= "<li>
        $commentData->author wrote:
        <p>$commentData->txt</p>
    </li>";
}
//notice incremental concatenation operator .=
//it helps close the <ul> element
$allCommentsHTML .= "</ul>";
return $allCommentsHTML;
Hooking Up View and Model to Display Comments
You can comment out or delete the test code in your comments controller. The final step to displaying comments is to load the view that will display all comments retrieved from the database:
<?php
//complete code for controllers/comments.php
include_once "models/Comment_Table.class.php";
$commentTable = new Comment_Table($db);
$comments = include_once "views/comment-form-html.php";

//new code starts here
$allComments = $commentTable->getAllById( $entryId );
//notice the incremental concatenation operator .=
$comments .=include_once "views/comments-html.php";
//no changes below

return $comments;
Check out any blog entry in your browser. You should expect to see the blog entry, then the comment form, and finally, a list of all comments associated with that blog entry.
Inserting a Comment Through the Comment Form
You have a comment form, and comments are displayed. You have also established that your saveComment() method works. It should be a small task to insert new comments received from users through the form. To get input from a form, you need to know what HTTP method the form uses and what name attributes were used in the form.
Using PHP to retrieve form input is a very common task for web developers. It’s something you really should understand thoroughly by the end of this book. I could just assume you know exactly what I mean and that you already understand the topic perfectly, but I’d rather give you an opportunity to test your own understanding. Take a look at the following code and see if you can figure out what method the comment form uses and which name attributes are used for the input and text area elements.
//partial code for views/comment-form-html.php
//make NO code changes
return "
<form action='index.php?page=blog&id=$entryId' method='post' id='comment-form'>
<input type='hidden' name='entry-id' value='$entryId' />
<label>Your name</label>
<input type='text' name='user-name' />
<label>Your comment</label>
<textarea name='new-comment'></textarea>
<input type='submit' value='post!' />
</form>";
It wasn’t a particularly hard challenge, was it? The form method is post. There is an <input> field named user-name, a hidden <input> named entry-id, and a <textarea> named new-comment. Knowing this, it is easy to write a little PHP in the comment controller to insert new comments from users, as follows:
<?php
//complete code for controllers/comments.php
include_once "models/Comment_Table.class.php";
$commentTable = new Comment_Table($db);

//new code here
$newCommentSubmitted = isset( $_POST['new-comment'] );
if ( $newCommentSubmitted ) {
    $whichEntry = $_POST['entry-id'];
    $user = $_POST['user-name'];
    $comment = $_POST['new-comment'];
    $commentTable->saveComment( $whichEntry, $user, $comment );
}
//end of new code

$comments = include_once "views/comment-form-html.php";
$allComments = $commentTable->getAllById( $entryId );
$comments .=include_once "views/comments-html.php";

return $comments;
Point your browser to any blog entry and submit a new comment through the form. You should expect to see the submitted comment listed alongside any other comments you may have for that blog entry. Your commenting system works!
Practice Makes Perfect
You have come a long way since you started reading this book. You can see it when you look at your blog: it is a far cry from the “Hello from PHP” you wrote in Chapter 1. The most important development is the change that has taken place in your mind. You now know some PHP and MySQL. You still need many hours of experience before you get really familiar with what you have learned.
How about trying to apply some of the learned lessons without my instructions? You could change the Blog_Entry_Table class, so that it inherits from Table, to practice inheritance. It would be very similar to what you did with the Comment_Table class.
Or you could provide feedback to users, to let them know that the system has registered a new comment submitted. It would be very similar to the confirmation message you provided in the entry manager.
Here’s another task you could work on: when a user reads a blog entry that has no comments, you could display a message similar to the following:
Be the first to comment this articleYou could do that in the view. You should have PHP count how many rows of comments were returned from the database. If 0 rows were returned, you know there are no comments for the blog entry, and you should output a message like the one preceding.
Now that you have a commenting system, users can stumble on a slightly perplexing system behavior. Imagine that a user reads a blog entry and posts a comment. After that, the user would like to return to the list of all blog entries. So, she clicks the browser’s Back button. But wait! That won’t take the user back to the index. Wouldn’t it be nice if every blog entry had an <a> linking back to index.php? Can you implement such a link?
You will probably find that it slows you down to write your own code. That is only to be expected. But you only learn to write your own code if you start to write your own code—you might as well get started sooner rather than later.
Searching for Entries
You have come a long way with your blogging system. You have probably added a few entries through the entry editor already. Somebody visiting your blog might be looking for something specific you wrote at one time, and they might not remember which entry you wrote it in. You need to give them an option to search through entries.
You should show a search form, so that visitors can enter a search text. You should use any entered search text to perform a search in your database and return any entries that match the entered search term.
Can you see the three responsibilities? You’ll need a view to show a search form and another view to show search results. You’ll need a model to perform the database search and return a result. You’ll need a controller to respond to user interactions. If the form was submitted, the controller should show search results; if not, show the search form.
The Search View
It’s always a good idea to begin with a small step. You can create an HTML form for the search view. It will be nothing fancy. Create a new file in views/search-form-html.php:
<?php
//complete code for views/search-form-html.php
return "<aside id='search-bar'>
    <form method='post' action='index.php?page=search'>
        <input type='search' name='search-term' />
        <input type='submit' value='search'>
    </form>
</aside>";
The view will display an HTML search form. You may be unfamiliar with the search type attribute used on the input element. A search field is simply a special kind of single-line text field. Search fields will remember a user’s previous search terms and present the user with a drop-down list suggesting previous search terms.
Not all browsers support the search type. But any browser that doesn’t support it will default to a basic <input type='text'>, so the search form will still work, even if a browser doesn’t support the search type.
![]() Note To check which browser supports which HTML5 elements, consult http://caniuse.com.
Note To check which browser supports which HTML5 elements, consult http://caniuse.com.
To display the search form, you should consider when you want it to be displayed. It would be nice to display the search form on every page view. To show the search form regardless of what else is displayed, you could load it from the front controller, from index.php. Add one line of code near the end of index.php:
//partial code for index.php
//new code: include the search view before the blog controller
$pageData->content .=include_once "views/search-form-html.php";
//end of new code
$pageData->content .=include_once "controllers/blog.php";

$page = include_once "views/page.php";
echo $page;
Test your progress by loading http://localhost/blog/index.php in your browser. You should see the search form displayed before the list of all blog entries. If you click Read more, you should see one particular blog entry. Notice that the search form is still displayed.
Responding to a User Search
With a search form displayed, it is tempting to write a search term and submit it. Try it, and you will see no result in your browser—search form submissions are not detected. Eventually, you’d want to show a list of search results instead. You can begin with a preliminary search controller. Create a new file in controllers/search.php:
<?php
//complete code for controllers/search.php
return "You just searched for something";
You want the search controller to be loaded from the index, when a search has been performed. If no search has been performed, index.php should load the blog controller. Notice the action attribute of the search form:
//partial code from views/search-form-html.php, don't change anything
<form method='post' action='index.php?page=search'>
Whenever a user submits the search form, a URL variable named page with a value of search will be encoded as part of the request. So when page has a value of search, your web application should show search results. This will be quite easy to achieve from index.php:
//partial code for index.php

//new code starts here, in line 17 in my index.php
$pageRequested =  isset( $_GET['page'] );
//default controller is blog
$controller = "blog";
if ( $pageRequested ) {
    //if user submitted the search form
    if ( $_GET['page'] === "search" ) {
        //load the search by overwriting default controller
        $controller = "search";
    }
}

$pageData->content .=include_once "views/search-form-html.php";
//comment out or delete this line
//$pageData->content .=include_once "controllers/blog.php";
$pageData->content .=include_once "controllers/$controller.php";

//end of changes
$page = include_once "views/page.php";
echo $page;
That’s it. Your front controller will only show either the blog or the search page. The search page will only be displayed when a search has been performed. Test progress by navigating your browser to http://localhost/blog/index.php. You should see the list of blog entries. Now make some search. You should see a short message from the search controller. It says, “You just searched for something,” which basically confirms that the search controller was loaded.
The Search Model
You have a search form view, and you have a preliminary search controller. It is time to work on a search model, so that you can perform an actual search. To perform a search, you will have to query your blog_entry database table. You already have a Blog_Entry_Table class to provide a single point of access to that table. The sensible thing to do would be to add another method to the Blog_Entry_Table. Do the sensible thing in models/Blog_Entry_Table.class.php, as follows:
//Declare new method in Blog_Entry_Table class
public function searchEntry ( $searchTerm ) {
    $sql = "SELECT entry_id, title FROM blog_entry
            WHERE title LIKE ?
            OR entry_text LIKE ?";
    $data = array( "%$searchTerm%", "%$searchTerm%" );
    $statement = $this->makeStatement($sql, $data);
    return $statement;
}
Perhaps the $data array warrants a few words of explanation. Isn’t it strange to create an array with two separate items when the items are identical? Well, the number of unnamed placeholders in your SQL must exactly match the number of items in the array you execute. Because there are two placeholders in the SQL, you need an array with two values to use in the search. In the preceding example, your code will search for the same search term in two different table columns.
![]() Note A ? represents an unnamed placeholder in prepared SQL statements.
Note A ? represents an unnamed placeholder in prepared SQL statements.
Because you search two columns, you need two placeholders in the SQL statement. Because you search for the same search term in both columns, the two placeholders should be replaced with the same value. That is why the $data array should have a length of two, even if the two items are identical.
Searching with a LIKE Condition
The SQL statement above demonstrates an SQL keyword I haven’t used in the previous examples in this book: LIKE. Let’s go through a slightly simpler example and gradually work up to the syntax used previously:
SELECT entry_id, title FROM blog_entry WHERE title LIKE 'test'
That query would return a result set with entry_id and title attributes of any blog_entry rows with a title attribute of exactly test. So, a row with a title of “This is a test” would not be part of the result.
Such a query quite clearly illustrates how LIKE works. But as a search, it is not very useful. To make a more useful search, you could add a wildcard character to the LIKE condition.
SELECT entry_id, title FROM blog_entry WHERE title LIKE 'test%'
The % character represents a wildcard character. A wildcard character represents anything. So the query would return a result set of all rows where the title begins with “test” followed by anything. A row with a title of “test if it works” would be returned. A row with a title of “This is a test” would not be returned. Surely you can work out how two wildcards can greatly improve the query.
SELECT entry_id, title FROM blog_entry WHERE title LIKE '%test%'
Such a query would return a row with a title of “test if it works” and a row with a title of “This is a test.” So, the preceding query would be perfect, if you only wanted to search for entries with the word test in the title. You could easily widen the search and also look for matches in the entry_text column:
SELECT entry_id, title FROM blog_entry WHERE title LIKE '%test%'
OR entry_text LIKE '%test%'
That’s great when searching for the word test. But you can safely assume that your blog visitors will search for other words or phrases. So, you need to create an SQL statement prepared with empty placeholders. PHP can retrieve a visitor’s search term and insert that where the placeholders are. Here is the final SQL statement for searching is:
SELECT entry_id, title FROM blog_entry WHERE title LIKE '%?%'
OR entry_text LIKE '%?%'
This final SQL statement will return entry_id and title for any rows where title or entry_text match the search term submitted from a user.
Test Model
Code in small steps, interspersed with informal tests! You can use print_r() in your controller to test if your searchEntry() method works. You could hard-code a search for a term you know should return a result. I know I have used the word test in a blog entry, so I hard-code a search for test and expect a result. To do that, I update controllers/search.php, as follows:
<?php
//complete code for controllers/search.php
//load model
include_once "models/Blog_Entry_Table.class.php";
$blogTable = new Blog_Entry_Table( $db );

//get PDOStatement object from model
$searchData = $blogTable->searchEntry( "test" );
//get first row from result set
$firstResult = $searchData->fetchObject();
//inspect first row
$searchOutput = print_r($firstResult, true);
$searchForm = include_once "views/search-form-html.php";
$searchOutput .= $searchForm;
//display all output on index.php
return $searchOutput;
Save your code and load http://localhost/blog/index.php in your browser. Now perform some search—it doesn’t matter what you search for. When you submit the search form, you should expect to see the following: a printed object. It will look something like the following:
stdClass Object ( [entry_id] => 3 [title] => This is a test )
A Search Result View
The output you just saw is a representation of a search result. It confirms that the searchEntry() method works. To show a search result in a way a user might appreciate, you’ll need a search view. You have to wrap some HTML around the returned data. Create a new file in views/search-result-html.php:
<?php
//complete code for views/search-results-html.php
$searchDataFound = isset( $searchData );
if( $searchDataFound === false ){
trigger_error('views/search-results-html.php needs $searchData'),
}
$searchHTML = "<section id='search'> <p>
You searched for <em>$searchTerm</em></p><ul>";
while ( $searchRow = $searchData->fetchObject() ){
$href = "index.php?page=blog&id=$searchRow->entry_id";
$searchHTML .= "<li><a href='$href'>$searchRow->title</li>";
}
$searchHTML .= "</ul></section>";
return $searchHTML;
The preceding code assumes the existence of a $searchData variable. If it is not found, an error will be triggered. If the $searchData variable is found, the code will iterate through the result set with a while statement. The while loop will create an <li> element for each blog_entry that matches the search.
Loading a Search Result View from the Controller
To display your search results in the browser, you must load the search result view. Hooking up a view with a model is a task for a controller. Update your search controller, update your code in controllers/search.php:
<?php
//complete code for controllers/search.php
include_once "models/Blog_Entry_Table.class.php";
$blogTable = new Blog_Entry_Table( $db );

$searchOutput = "";
if ( isset($_POST['search-term']) ){
    $searchTerm = $_POST['search-term'];
    $searchData = $blogTable->searchEntry( $searchTerm ) ;
    $searchOutput = include_once "views/search-results-html.php";
}
//delete all the code your wrote for testing the searchEntry method
return $searchOutput;
That’s it. Your front controller will only show either the blog or the search page. The search page will show search results—even if there were no matches.
Exercise: Improving Search
Did you notice a small problem with the search? Try to search for a term you absolutely know has no match in the database. I tried to search for "#€% and, obviously, there was no match. I took a look in the generated HTML source code, and the following is what I found:
<section id='search'>
    <p>You searched for <em>"#€%</em></p>
    <ul></ul>
</section>
That will never be valid HTML, nor is it particularly user-friendly. A small change of code could append a single <li> element to the <ul>. Perhaps something such as No entries match your search. Could you make that change? You will probably need to know that a PDOStatement will hold the value FALSE, if it comes back without a result set.
Summary
You covered a lot of ground in this chapter, both in terms of learning and in improving your blog. Blog visitors will probably mostly notice the commenting system. The commenting system is a game changer, as far as interactive communication is concerned. All of a sudden, you’re not just publishing your thoughts for the world to see. With a commenting system, you are inviting two-way communication between you and your readers.
I really enjoyed the opportunity to show you something about one of the classic characteristics of object-oriented programming: inheritance. It is a very smart way of staying DRY, as long as you don’t overuse it.
It is possible to code long inheritance chains. You could make a Dog class, which is a child of Wolf, which is a child of Canine, which is a child of Quadruped, which is a child of Mammal. But experience shows that shallow inheritance relationships are preferable. Long inheritance chains lead to dependency issues, because the Dog would depend on the presence of the Wolf, which, in turn, depends on Canine, which depends on the Quadruped. Keep your inheritance chains short, and you’ll be fine.
In this chapter, you came face to face with foreign keys in database design and with searching database tables with wildcard characters. Both are important topics you are bound to come across again in your future as a web developer.