![]()
Going Public with Your Blog
You have developed a complete, database-driven blog and even an administration module. But it is all running on your local computer only. Blogs are really about writing for an audience. Your blog will certainly have a limited audience, if it only runs on your local computer. This chapter will show you all you need to know to migrate your blog from your local development environment to an online web host.
The process of bringing your blog online on the Internet involves a few steps.
- You’ll need access to a web hosting service. It should offer an A-pache web server, MySQL, and PHP.
- You’ll need an FTP program, so that you can upload your files from your local computer to your web host.
- You’ll need to export your local database, so that you can import it into your web host’s MySQL database.
Web Host Requirements
You will need a web host for your online blog. It should support the technologies you have used: PHP 5.4 and MySQL 5.x. Your web host should also support FTP, which will allow you to upload your PHP files to the web host.
You have used phpMyAdmin to access your MySQL database. There are other programs that can provide access to MySQL. If this is your first PHP/MySQL project, you should probably look for a web host that provides phpMyAdmin. But understand that phpMyAdmin is not a fixed requirement. I recommend it, because it is the program you have already used.
Do a search for “web host” and look for a solution that suits you. There are free solutions, cheap solutions, and expensive solutions. I assume this is your first PHP/MySQL project, so I recommend you look for a web host that offers live chat support. You may run into problems along the way, and a live chat with a competent support person can solve many small problems.
Exporting and Importing Your Database
Once you have settled on a hosting solution, you can start moving your database from your local development environment to your new web host. Moving a database involves creating an SQL file that includes all SQL statements for creating and populating your tables. Luckily, it is quite easy to do.
Start by opening your XAMPP control panel, and make sure that both Apache and MySQL are running. Point your browser to http://localhost/phpmyadmin and select your simple_blog database. Now, click the Export tab in the top navigation (see Figure 13-1).
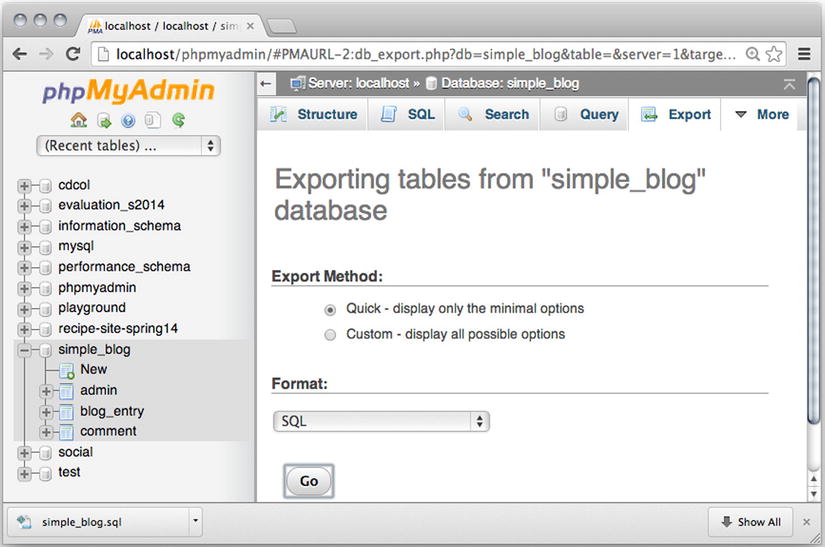
Figure 13-1. Exporting the simple_blog database with phpMyAdmin
To export your simple_blog database with all its tables and content, you simply accept SQL as the export format and then click Go. phpMyAdmin will generate an SQL file called simple_blog.sql. You can find the generated file in your downloads folder. The simple_blog.sql file holds a backup of everything in your simple_blog database.
The next step is for you to access the phpMyAdmin of your web host. You will need to consult information from your web host to find the right URL for accessing phpMyAdmin on your web host. You will require a valid database username and password to log in to phpMyAdmin.
Once you are logged in to phpMyAdmin on your web host, you can prepare to import your simple_blog database. On some web hosts, users are allowed to create a new database. If you can create a new database, I suggest you do so for your project. You could call the new database simple_blog.
If your web host does not allow you to make new databases, you can simply use any premade database for your project. It shouldn’t pose a problem for you.
Select the database you will use for the project and click the Import option in phpMyAdmin’s navigation bar. All you need to do to import your simple_blog is to upload the simple_blog.sql file from your local computer to your web host. Once you click Go, all tables and all data from your simple_blog database should be imported into your new database, running on your web host. You can see for yourself, by browsing the database and the tables, using phpMyAdmin.
Your database is ready, and you can safely move on to the next step.
Preparing Your PHP Files for Upload
Once your database is imported to your web host, you can prepare your PHP files for upload. It doesn’t take much effort. You only have to change the database credentials used in index.php, as follows:
//Partial code for index.php

//comment out or delete localhost credentials
//$dbInfo = "mysql:host=localhost;dbname=simple_blog";
//$dbUser = "root";
//$dbPassword = "";

//declare valid web host credentials
$dbInfo = "mysql:host=[????];dbname= [????]";
$dbUser = "[????]";
$dbPassword = "[????]";
If you use the preceding code example, you will have to replace all instances of [????] with valid values required by your web host. You will probably have to consult your web host documentation, to see which mysql:host to use. The dbname should be the database you used when you imported your simple_blog database in the previous step. Username and password should be whatever username and password you used to log in to phpMyAdmin on your web host.
Once those three lines in index.php are updated with valid credentials, you’re ready to upload your PHP files to your web host.
Uploading Files with FileZilla FTP
FTP (File Transfer Protocol) is the standard protocol used to upload files from a local computer to a web host. Many different programs can be used to work with FTP. You could use a browser or even Komodo Edit.
Perhaps you have already used FTP for uploading an HTML project to a web host. If you are already familiar with an FTP program, I suggest you continue using that.
If this is your first time using FTP, I suggest you download and install the FileZilla FTP client from https://filezilla-project.org/download.php?type=client. I like FileZilla FTP because it is simple, versatile, and easy to use.
To upload your blog files to your web host, you must establish an FTP connection. You will have to consult your web host documentation to see which URL or host to connect to. In FileZilla FTP, you can type the URL of your FTP host into the Host field, as shown in Figure 13-2. You will also have to enter a username and password. Once again, you will have to consult your web host documentation to find your username and password. Once you have entered your credentials, you can click Quickconnect to establish an FTP connection.
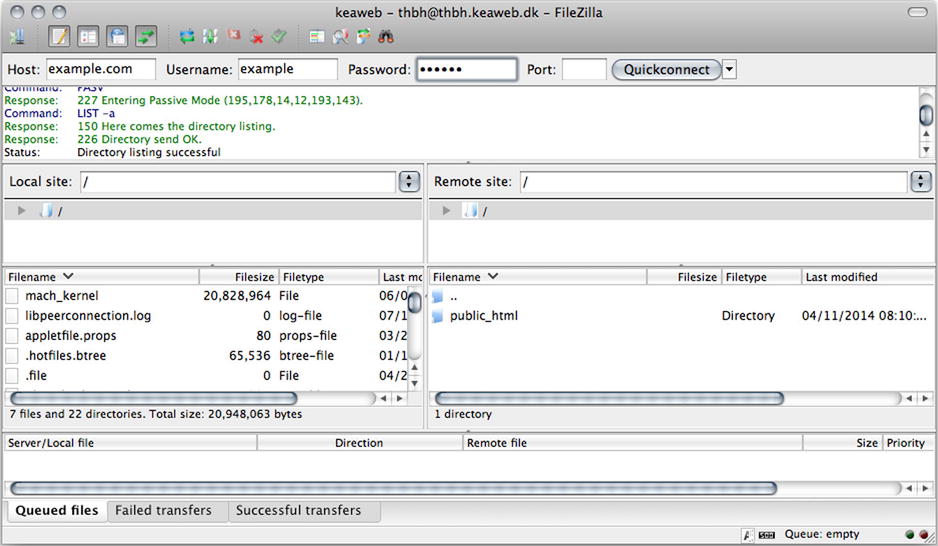
Figure 13-2. FileZilla FTP connected to a web host
Figure 13-2 shows FileZilla connected to a web host. The window on the right-hand side shows files and folders on the web host. The window to the left shows files and folders on my local computer.
Remember how you had to put your PHP files in XAMPP’s htdocs folder? Some web hosts also have such a folder. Whatever you upload to that folder will be available for anybody on the Internet. On your web host, that folder may be called something like htdocs, public_html, or www. Or perhaps your web host will make anything you upload with FTP available on the Internet. Once again, you will have to consult your web host documentation to see how your web host is set up.
You can simply drag and drop files and folders to upload your blog. You would want to upload all the files from XAMPP/htdocs/blog on your local computer and transfer those files and folders to your web host.
Once your PHP files are uploaded, your blog is live on the Internet! To see your work, you should navigate your browser to your domain’s URL. You should see your blog, and you should also be able to log in with your blog administrator credentials, if you navigate to admin.php. Your blog is live, and you can start to write captivating blog posts for your audience: everybody on the Internet.
Summary
This was a short but important chapter. With a few steps, you have taken the blog project and published it on the Internet for the world to see.
You have also come to the end of the book, but that doesn’t mean there is nothing more to learn. Actually, you will probably have to create a few more PHP/MySQL-driven web sites before all the lessons you have learned in this book are fully integrated. The process of developing your competencies further will probably be fun, fascinating, and frustrating. You might consider picking up Beginning PHP and MySQL, From Novice to Professional by W. Jason Gilmore (Apress, 2010). It covers PHP and MySQL concepts in greater detail, and it will take you well beyond the basics covered in this book.