Chapter 8. Services
Services are among the main building blocks in Android. Unlike an activity, a service doesn’t have a user interface; it is simply a piece of code that runs in the background of your application.
Services are used for processes that should run independently of activities, which may come and go. Our Yamba application, for example, needs to create a service to periodically connect to the cloud and check for new statuses from the user’s friends. This service will be always on and always running, regardless of whether the user ever starts the activity.
Just like an activity, a
service has a well-defined life cycle. You as the developer get to define
what happens during transitions between states. Whereas an activity’s
state is managed by the runtime’s ActivityManager, service state is controlled
more by intents. Essentially, whenever an activity needs your service, it
will invoke it through an intent that starts the service. An already
running service can receive the start message repeatedly and at
unanticipated times. You can also stop a service, which is also called
destroying it.
A service can be bound or unbound. Bound services can provide more specific APIs to other applications via an interface called AIDL (Android Interface Definition Language; see Chapter 14). For now, we’ll focus on unbound services, where the life cycle of a service is not tied to the life cycle of the activities that started them. The only states for bound services are started and stopped (destroyed).
In this chapter, you will create a service. The purpose of this service is to run in the background and update your app with the latest timeline from the user’s Twitter account. Initially, the service will just print your friends’ timeline to the logfile. The service will create a separate thread, so you will learn about concurrency in this chapter as well. You will also learn about Toasts and understand the context in which services and activities run.
By the end of this chapter, you will have a working app that can both post to Twitter and periodically check what friends are up to.
The Yamba Application Object
We now have support for preferences in our StatusActivity. We also have the utility
method getTwitter() to help us
get the actual Twitter object that we
use to connect to the online service.
It is likely that we’ll
need some of these features in other parts of our application. Instead
of copying them from file to file, it would be useful if we could put
this code in a separate place that is accessible by most parts of our
app. Android provides just a place for that in the form of an Application object.
An Application object represents the common state
of your entire application. As long as any part of your application is
running, the application object will be created. Most applications use
the default android.app.Application
class that the framework provides. However, you can implement your own
instance of this object and add the common app features to it.
We are going to create
our own subclass of Application class
and call it YambaApplication. The
steps for creating the YambaApplication class are:
Create the Java class representing
YambaApplication.Register the new class with the AndroidManifest.xml file.
The YambaApplication Class
First, we are going to
create a new Java class in the same package as the rest of our
classes. We’ll call this class YambaApplication, and it will extend the
Application base class from the
framework.
Next, we’re going to move common tasks into this base object. We anticipate that more parts of our application are going to need to connect to the online service as well as read the preference data.
Notice in Example 8-1 that the Application object has the usual onCreate() method, but it also provides the
onTerminate() callback as a place
to implement any cleanup that we might want to do. At this point we
don’t have anything to clean up, but this is a good opportunity to
create some logging information so we can see when the application
actually shuts down. We might expand on this later.
package com.marakana.yamba3; import winterwell.jtwitter.Twitter; import android.app.Application; import android.content.SharedPreferences; import android.content.SharedPreferences.OnSharedPreferenceChangeListener; import android.preference.PreferenceManager; import android.text.TextUtils; import android.util.Log; public class YambaApplication1 extends Application implements OnSharedPreferenceChangeListener { //private static final String TAG = YambaApplication1.class.getSimpleName(); public Twitter twitter; //
private SharedPreferences prefs; @Override public void onCreate() { //
super.onCreate(); this.prefs = PreferenceManager.getDefaultSharedPreferences(this); this.prefs.registerOnSharedPreferenceChangeListener(this); Log.i(TAG, "onCreated"); } @Override public void onTerminate() { //
super.onTerminate(); Log.i(TAG, "onTerminated"); } public synchronized Twitter getTwitter() { //
if (this.twitter == null) { String username = this.prefs.getString("username", ""); String password = this.prefs.getString("password", ""); String apiRoot = prefs.getString("apiRoot", "http://yamba.marakana.com/api"); if (!TextUtils.isEmpty(username) && !TextUtils.isEmpty(password) && !TextUtils.isEmpty(apiRoot)) { this.twitter = new Twitter(username, password); this.twitter.setAPIRootUrl(apiRoot); } } return this.twitter; } public synchronized void onSharedPreferenceChanged( SharedPreferences sharedPreferences, String key) { //
this.twitter = null; } }
-
For
YambaApplicationto be a valid application object, it must subclass the framework-providedApplicationclass. Notice that we also moved responsibility for being theOnSharedPreferenceChangeListenerfromStatusActivitytoYambaApplication.-
TwitterandSharedPreferencesare now part of this common object and no longer part ofStatusActivity.-
onCreate()is called when the application is first created. The application is created whenever any of its parts, such as an activity or a service, is first needed.-
onTerminate()is a placeholder for us to do some cleanup when the application is about to shut down. At this point, we just use it for logging purposes.-
We also moved
getTwitter()fromStatusActivitytoYambaApplicationbecause it’s going to be used by other parts of our application and we want to maximize the code reuse. Notice the use of thesynchronizedkeyword here. A synchronized method in Java means that only one thread can be inside of such a method at one time. This is now important because this method could be used by different threads that our application might have.-
onSharedPreferenceChanged()is now also part ofYambaApplicationinstead ofStatusActivity.
Now that we have
YambaApplication and have moved
some responsibilities from StatusActivity to this new class,
we can simplify StatusActivity even
further, as shown in Example 8-2.
-
We now use the
getTwitter()method fromYambaApplicationinstead of keeping it locally. This way, the same method can be reused by other parts of the application that need access to the cloud service.
Update the Manifest File
The final step is to tell our application to use the
YambaApplication class instead of
the default Application class. To
do that, we need to update the Android manifest file and add an
attribute to the <application> element:
<?xml version="1.0" encoding="utf-8"?>
<manifest xmlns:android="http://schemas.android.com/apk/res/android"
  android:versionCode="1" android:versionName="1.0" package="com.marakana.yamba2">
  <application android:icon="@drawable/icon" android:label="@string/app_name"
    android:name=".YambaApplication"> <!---->
    ...
  </application>
  ...
</manifest>-
The attribute
android:name=".YambaApplication"in the<application>element tells the Android system to instantiate ourYambaApplicationobject as the application.
So, at this point we
have successfully moved common functionality from StatusActivity to YambaApplication. This process is also known
as code
refactoring and is a good practice as we keep on adding new
features to our application.
Simplifying StatusActivity
Now that the functionality for getting the Twitter object has been moved to YambaApplication, we can simplify
StatusActivity to refer to that
functionality there. Here’s what our new PostToTwitter AsyncTask would look like:
class PostToTwitter extends AsyncTask<String, Integer, String> {
  // Called to initiate the background activity
  @Override
  protected String doInBackground(String... statuses) {
    try {
    YambaApplication yamba = ((YambaApplication) getApplication()); //
    Twitter.Status status = yamba.getTwitter().updateStatus(statuses[0]); //
      return status.text;
    } catch (TwitterException e) {
      Log.e(TAG, "Failed to connect to twitter service", e);
      return "Failed to post";
    }
  }
  ...
}-
We get the reference to the
Applicationobject via thegetApplication()call in the current context. Since we have a customYambaApplicationobject, we need to cast the genericApplicationintoYambaApplication.-
Once we have the reference to our application object, we can call its methods, such as the
getTwitter()method.
You have seen how we
have refactored our StatusActivity
to move some of the common functionality into a shared Application object. Now that we have done
that, we can create our UpdaterService, which will use some of this
common functionality.
UpdaterService
As mentioned in the introduction to this chapter, we need
a service to run as an always-on background process pulling the latest Twitter statuses into a local database.
The purpose of this pull mechanism is to cache updates locally so our
app can have data even when it’s offline. We’ll call this service
UpdaterService.
Steps to creating a service are:
Create the Java class representing your service.
Register the service in the Android manifest file.
Start the service.
Creating the UpdaterService Java Class
The basic procedure for
creating a service, as with activities and other main building blocks,
is to subclass a Service class
provided by the Android framework.
To create the new service, we need to create a new Java file. Go ahead and select your Java package in the src folder, right-click and choose New→Class, and type in “UpdaterService” as the class name. This will create a new UpdaterService.java file as part of your package.
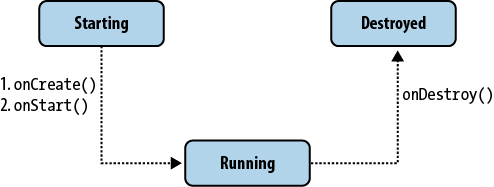
You may recall from Services that a typical service goes through the life cycle illustrated in Figure 8-1.
Next, we want to override some of the main life cycle methods:
To do that, you can use Eclipse tool Source→Override/Implement Methods and select those three methods.
At this point, in the spirit of producing a minimally working app at each stage of learning, we’ll write just a little code that logs a note in each of the overridden methods. So the shell of our service looks like the code in Example 8-3.
package com.marakana.yamba3;

import android.app.Service;
import android.content.Intent;
import android.os.IBinder;
import android.util.Log;

public class UpdaterService1 extends Service {
  static final String TAG = "UpdaterService"; //

  @Override
  public IBinder onBind(Intent intent) { //
    return null;
  }

  @Override
  public void onCreate() { //
    super.onCreate();
    Log.d(TAG, "onCreated");
  }

  @Override
  public int onStartCommand(Intent intent, int flags, int startId) { //
    super.onStartCommand(intent, flags, startId);
    Log.d(TAG, "onStarted");
    return START_STICKY;
  }

  @Override
  public void onDestroy() { //
    super.onDestroy();
    Log.d(TAG, "onDestroyed");
  }
}-
As in all major classes, I like to add the
TAGconstant because I useLog.d()quite a bit.-
onBind()is used in bound services to return the actual implementation of something called a binder. Since we are not using a bound service, we can just returnnullhere.-
onCreate()is called when the service is initially created. It is not called for subsequentstartService()calls, so it is a good place to do work that needs to be done only once during the life of a service.-
onStartCommand()is called each time the service receives astartService()intent. A service that is already started could get multiple requests to start again, and each will causeonStartCommand()to execute.START_STICKYis used as a flag to indicate this service is started and stopped explicitly, which is our case.-
onDestroy()is called just before the service is destroyed by thestopService()request. This is a good place to clean up things that might have been initialized inonCreate().
Update the Manifest File
Now that we have the shell of our service, we have to
define it in the manifest file, just like any other main building
block; otherwise, we won’t be able to call our service. Simply open
AndroidManifest.xml, click on the
right-most tab to see the raw XML code, and add the following within
the <application>
element:
...
  <application android:icon="@drawable/icon" android:label="@string/app_name">
     ...
     <service android:name=".UpdaterService" /> <!--  -->
     ...
  </application>
...-
UpdaterServicedefinition.
Services are equal to activities as Android building blocks, so they appear at the same level in the manifest file.
Add Menu Items
Now that we have the service defined and declared, we need a way to start and stop it. The easiest way would be to add a menu button to our options menu that we have already created. Later on, we’ll have a more intelligent way of starting services, but for now this manual approach is easier to understand.
To add start/stop menu
buttons, we’ll add two more menu items to our
menu.xml resource, just as we created the
Prefs menu item before in The Menu Resource. The updated menu.xml
now looks like the code in Example 8-4.
<?xml version="1.0" encoding="utf-8"?> <menu xmlns:android="http://schemas.android.com/apk/res/android"> <item android:id="@+id/itemPrefs" android:title="@string/titlePrefs" android:icon="@android:drawable/ic_menu_preferences"></item> <!--
-
This is the item we defined in the previous chapter.
-
The
ServiceStartitem has the usualid,title, andiconattributes. This icon is another Android system resource.-
The
ServiceStopitem is similar to theServiceStartitem.
Now that the menu resource has been updated, it’s time to handle those items when the user clicks on them.
Update the Options Menu Handling
To handle new menu
items, we need to update the onOptionsItemSelected() method in StatusActivity, just as we did in
Update StatusActivity to Handle Menu Events. So open your
StatusActivity.java file and locate
the onOptionsItemSelected() method. We now have
a framework in this method to support any number of menu items. To add
support for starting and stopping our service, we launch intents
pointing to our UpdaterService via
startService() and
stopService() calls.
The final code looks like this:
// Called when an options item is clicked
@Override
public boolean onOptionsItemSelected(MenuItem item) {
  switch (item.getItemId()) {
  case R.id.itemServiceStart:
    startService(new Intent(this, UpdaterService.class)); //
    break;
  case R.id.itemServiceStop:
    stopService(new Intent(this, UpdaterService.class));  //
    break;
  case R.id.itemPrefs:
    startActivity(new Intent(this, PrefsActivity.class));
    break;
  }

  return true;
}-
Creates an intent to start
UpdaterService. If the service doesn’t already exist, the runtime calls the service’sonCreate()method. ThenonStartCommand()is called, regardless of whether this service is new or already running.-
Similarly, this uses the
stopService()call to send an intent intended forUpdaterService. This will causeonDestroy()to be called on the service if the service is running. If it isn’t, nothing happens, and this intent is simply ignored.
In this example, we are
using explicit intents to specify exactly which class the intents are
intended for, namely UpdaterService.class.
Testing the Service
At this point, you can restart your application. Note that you do not need to restart the emulator. When your application starts up, click on the menu, and your new buttons should appear in the menu options. You can now freely click on the start and stop service buttons.
To verify that your service is working, open up your LogCat and look for the appropriate log messages that you generated in your service code. Remember from Logging in Android that you can view the LogCat both in Eclipse and via the command line.
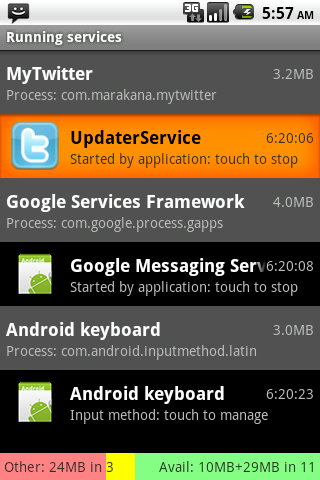
Another way to verify that the service is running is to go to the Android Settings app and see whether it is listed. To do that, go to the Home screen, press Menu, and choose Settings. Then go to Applications→Running services. You should see your service listed, as shown in Figure 8-2.
Your service is now working, although it’s not doing much at this point.
Looping in the Service
By design, our service is supposed to wake up every so
often, check the online service for new status updates, and then go back to “sleep” for some time.
And this work needs to keep on happening forever, until the service is
stopped. A good way to implement this is to have our service run in a
loop and pause execution between iterations. Java provides a Thread.sleep() method
that we can use to make the currently running thread pause and
relinquish CPU for some number of milliseconds.
Another consideration to keep in mind is that the service could require a good deal of time to make its connection to Twitter and pull in friends’ status data. The behavior of networking calls depends on the type of network connection we have at the moment, the responsiveness of the server, and all sorts of other factors that collectively make up the network latency.
If we run our update operation on the default thread, any delay caused by the network update will cause our user interface to block. This in turn will make our application appear sluggish to the user and may even lead to the Android system offering to kill our application by bringing up the “Force Close or Wait” dialog window, as discussed in Threading in Android.
The best solution to this problem is to put the actual work of the network update in a separate thread. To do this, we can use standard Java threading support, as shown in Example 8-5. The work of a service should often be in a separate thread from the main UI thread, regardless of how little time you expect the service to take. You always need to separate the noninteractive processing from user interaction. When you have network activity, as in Yamba, it’s even more important to keep it separate, but the principle applies to any service.
package com.marakana.yamba3; import android.app.Service; import android.content.Intent; import android.os.IBinder; import android.util.Log; public class UpdaterService2 extends Service { private static final String TAG = "UpdaterService"; static final int DELAY = 60000; // a minutepublic Updater() { super("UpdaterService-Updater"); //
} @Override public void run() { //
UpdaterService2 updaterService = UpdaterService2.this; //
while (updaterService.runFlag) { //
Log.d(TAG, "Updater running"); try { // Some work goes here... Log.d(TAG, "Updater ran"); Thread.sleep(DELAY); //
} catch (InterruptedException e) { //
updaterService.runFlag = false; } } } } // Updater }
-
Specifies the constant for the delay between network updates. We could make this configurable via preferences as well.
-
This flag helps us know whether the service is currently running.
-
Updateris the separate thread that performs the actual network update. Because the thread needs to be created only once, we do so in the service’sonCreate()method.-
When the service is to start, its
onStartCommand()method is called. This is also a good place to start ourUpdaterthread and update the flag identifying it as running.-
Similarly,
onDestroy()is a good place to stop our network update thread and update the flag to show that it is no longer running.-
To stop the actual thread from running, we invoke
interrupt()on it. We also set it tonullto help the garbage collection process clean it up.-
This is where we define the
Updaterclass. It is a thread, so it extends Java’sThreadclass.-
The purpose of this is to simply give our thread a name. Having a name helps identify various running threads and aids in debugging.
-
A Java thread must provide a
run()method. This is where the actual work is done.-
This simply creates a reference to our service, of which this thread is an inner class.
-
This is the loop that keeps this network update going as long as the service is not stopped. Remember that
runFlagis set in the service’sonStartCommand()andonDestroy()methods.-
The call to
Thread.sleep()pauses the execution of this particularUpdaterthread for some number of milliseconds. Earlier we set ourDELAYconstant to one minute.-
When we signal
interrupt()to a running thread, it will cause anInterruptedExceptionin therun()method. We handle the exception simply by setting therunFlagto false so the thread doesn’t keep trying to run again until it is restarted.
Testing the Service
At this point, you can run the application and start the service. If you observe the logfile, you’ll notice that every minute or so the service logs that it ran our job. Also, stopping the service will stop further execution of the job.
Here’s the LogCat output of what is going on with our service:
D/UpdaterService( 3494): onCreated
D/UpdaterService( 3494): onStarted
D/UpdaterService( 3494): Updater running
D/UpdaterService( 3494): Updater ran
D/UpdaterService( 3494): Updater running
D/UpdaterService( 3494): Updater ran
...
D/UpdaterService( 3494): onDestroyed
As you can see, the service was created and started. It also ran couple of times before it finally got destroyed.
Pulling Data from Twitter
We now have a framework and are ready to make the actual
connection to the online Twitter-like service, pull the status data, and
display that data in our application. Twitter and Twitter-like services offer many different APIs to
retrieve our friends’ updates. The jtwitter.jar
library exposes most of them to us via the Twitter class. Perhaps one of the most
appropriate methods is getFriendsTimeline(),
which returns the 20 most recent posts made over the past 24 hours from
the user and her friends.
To use this Twitter API
feature, we need to connect to the online service. And to do that, we
need the username, password, and root API for our online service. As you
recall from the previous chapter, we have already refactored most of
this functionality into the YambaApplication object
(see The Yamba Application Object). We can reuse all
those features here because our service is part of the same application
and as such has access to the same Application object.
However, we do need to make
a minor update to YambaApplication,
because we would also like to know whether our service is running. To do
that, we’ll add a flag to YambaApplication and provide setter
and getter methods to access and update that flag:
public class YambaApplication extends Application
  implements OnSharedPreferenceChangeListener {
  private boolean serviceRunning; //
  ...

  public boolean isServiceRunning() { //
    return serviceRunning;
    }

  public void setServiceRunning(boolean serviceRunning) { //
    this.serviceRunning = serviceRunning;
    }
}-
The flag that indicates whether the service is running. Note that this flag is private to this class, so nobody else can directly access it and change it.
-
The public method to check the status of the
serviceRunningflag.-
Another public method to set the state of the
serviceRunningflag.
Now we can write new code
for UpdaterService and have
it connect to the online API to pull the latest status updates from our
friends. Example 8-6 shows the final version.
package com.marakana.yamba3; import java.util.List; import winterwell.jtwitter.Twitter; import winterwell.jtwitter.TwitterException; import android.app.Service; import android.content.Intent; import android.os.IBinder; import android.util.Log; public class UpdaterService extends Service { private static final String TAG = "UpdaterService"; static final int DELAY = 60000; // wait a minute private boolean runFlag = false; private Updater updater; private YambaApplication yamba; //
-
This variable allows access to the
YambaApplicationobject that contains our shared features, such as a way to read preferences and connect to the online service.-
We get the reference to our
YambaApplicationobject by using thegetApplication()call.-
Once we start the service, we update the
serviceRunningflag in the shared application object,YambaApplication.-
Similarly, when the service stops, we update the flag in the application object.
-
We are using Java generics to define the
timelinevariable as aListofTwitter.Statusinstances.-
We call
getTwitter()inYambaApplicationto get thetwitterobject, and then callgetFriendsTimeline()on it to get the last 20 status posts from the past 24 hours. Note that this is the actual method that implements the web service call to our cloud service. As such, it could take some time to complete, depending on the network latency. Because we run this in our dedicated thread, we won’t affect the main user interface thread while we wait for the network operation to complete.-
A network call can fail for any number of reasons. Here we handle failure by printing the stack trace of what went wrong. The actual printout will be visible in LogCat.
-
Now that we have initialized the
timelinelist, we can loop over it. The easiest approach is to use Java’s “for each” loop, which automatically iterates over our list, assigning each element in turn to thestatusvariable.-
For now, we simply print out the statuses of who said what to the LogCat output.
Testing the Service
Now we can run our application, start the service, and see the list of our friends’ statuses in the LogCat:
D/UpdaterService(  310): Marko Gargenta: it is great that you got my message
D/UpdaterService(  310): Marko Gargenta: hello this is a test message from my phone
D/UpdaterService(  310): Marko Gargenta: Test
D/UpdaterService(  310): Marko Gargenta: right!
...
Summary
We now have a working service, which we start and stop and in a relatively crude, manual way. The service connects to the cloud service and pulls down the status posts from our friends. For now, we just print this data in the LogCat, but in the next chapter we’ll insert the data into the database.
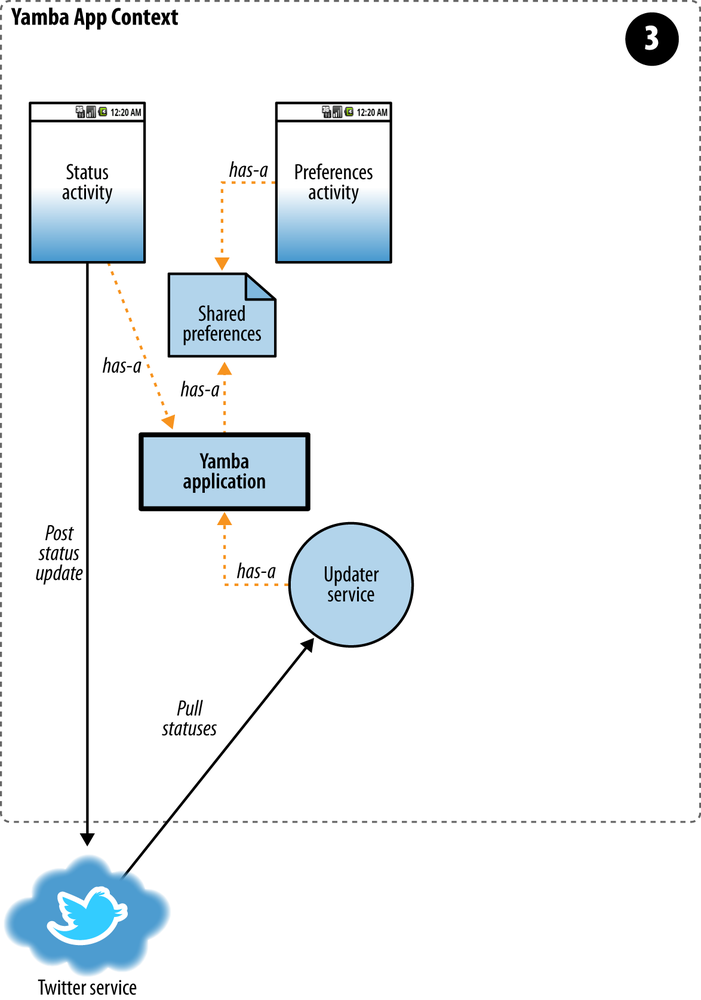
Figure 8-3 illustrates what we have done so far as part of the design outlined earlier in Figure 5-4.