Chapter 10. Lists and Adapters
In this chapter, you will
learn how to create selection widgets, such as a ListView. But this isn’t just a chapter about
user interface elements. We are deepening our understanding of data from
the previous chapter by learning how to read data from the status database
and first simply output it to the screen as scrollable text. You will then
learn about adapters in order to connect your database directly with the
list and create a custom adapter to implement some additional
functionality. You will link this new activity with your main activity so
that the user can both post and read tweets.
By the end of this chapter, your app will be able to post new tweets, as well as pull them from Twitter, store them in the local database, and let the user read the statuses in a nice and efficient UI. At that point, your app will have three activities and a service.
TimelineActivity
We’re going to create a new activity called TimelineActivity to display all the statuses
from our friends. This activity pulls the data from the database and
displays it on the screen. Initially, we do not have a lot of data in
the database, but as we keep on using the application, the amount of
statuses might explode. Our application needs to account for
that.
We are going to build this activity in a few steps, keeping the application whole and complete as we make each improvement:
The first iteration of
TimelineActivityuses aTextViewto display all the output from the database. Since there may be quite a bit of data, we will useScrollViewto wrap our text and provide scroll bars.The second iteration uses the much more scalable and efficient
ListViewandAdapterapproach. In this step, you will learn how adapters and lists work.Finally, we will create a custom
Adapterto handle some additional business logic. At this point, we are going under the hood of an adapter and adding custom processing. You’ll understand the purpose and usage of adapters better after this exercise.
Basic TimelineActivity Layout
In this first iteration,
we are creating a new layout for the TimelineActivity. This layout initially uses a
TextView to display all the data that
we have in the database. This is fine initially when we don’t have too
many statuses to show.
Introducing ScrollView
Since it’s unlikely
that all our data will fit on a single page, we need a way to scroll
the text. To do that, we use ScrollView. ScrollView is like a window that uses scroll
bars to display part of a larger component that takes more space than
the screen provides. To make some potentially large views scrollable,
you wrap them with this ScrollView.
For example, we have a printout of friends’ statuses in the form of a
TextView. As more statuses are
added, this TextView could become
large. In order to make it scrollable on a small screen, we put it
into a ScrollView.
A ScrollView can contain only one direct
child. If you want to combine multiple views into a single view that
scrolls, you first need to organize those views into another layout,
like you did previously in The StatusActivity Layout,
and than add that layout into the ScrollView.
Typically you want
ScrollView to take all the
available space on the screen, so you will specify its layout width
and height as fill_parent.
A ScrollView usually is not manipulated from
Java, so it doesn’t require an id.
In Example 10-1, we wrap our TextView with a ScrollView so that when there’s a lot of
text to display, ScrollView
automatically adds scroll bars.
<?xml version="1.0" encoding="utf-8"?> <LinearLayout xmlns:android="http://schemas.android.com/apk/res/android" android:orientation="vertical" android:layout_height="fill_parent" android:layout_width="fill_parent" android:background="@drawable/background"> <!-- Title--> <TextView android:layout_width="wrap_content" android:layout_height="wrap_content" android:layout_gravity="center" android:layout_margin="10dp" android:text="@string/titleTimeline" android:textColor="#fff" android:textSize="30sp" /> <!-- Text output wrapper
--> <ScrollView android:layout_height="fill_parent" android:layout_width="fill_parent"> <!-- Text output
--> <TextView android:layout_height="fill_parent" android:layout_width="fill_parent" android:id="@+id/textTimeline" android:background="#6000" /> </ScrollView> </LinearLayout>
-
This is the title that we show at the top of this activity’s screen. Notice that we defined the
titleTimelinestring resource in the /res/values/strings.xml file, just like we did before in Strings Resource.-
The
ScrollViewthat wraps ourTextViewand adds scroll bars as needed.-
The
TextViewthat shows the actual text, in this case our friends’ statuses from the database.
Creating the TimelineActivity Class
Now that we have the
layout file, we need to create the TimelineActivity class. Just as with any other Java file, go to the
Eclipse Package Explorer, right-click on your com.marakana.yamba package, choose
New→Class, and name
it TimelineActivity.
And just as before,
whenever we create a new Java class that is also a main building
block—an activity, service, broadcast receiver, or content provider—we
first subclass a base class provided by the Android framework. In the
case of activities, that class is Activity.
The method we almost
universally override in any activity is onCreate(). This is a
great place for us to initialize the database. The flip side of the coin is
onDestroy(), a good
place to clean up anything that we create in onCreate(). In this case, we close the
database in onDestroy(). Because
we’d like the data to be as fresh as possible, we put the code for
querying the database and outputting the data in onResume(), the
method called every time this activity is brought up front. Example 10-2 shows our code.
package com.marakana.yamba5; import android.app.Activity; import android.database.Cursor; import android.database.sqlite.SQLiteDatabase; import android.os.Bundle; import android.widget.TextView; public class TimelineActivity1 extends Activity { //} @Override protected void onResume() { super.onResume(); // Get the data from the database cursor = db.query(DbHelper.TABLE, null, null, null, null, null, DbHelper.C_CREATED_AT + " DESC"); //
startManagingCursor(cursor); //
// Iterate over all the data and print it out String user, text, output; while (cursor.moveToNext()) { //
user = cursor.getString(cursor.getColumnIndex(DbHelper.C_USER)); //
text = cursor.getString(cursor.getColumnIndex(DbHelper.C_TEXT)); output = String.format("%s: %s ", user, text); //
textTimeline.append(output); //
} } }
-
This is an activity, so we start by subclassing the Android framework’s
Activityclass.-
We need access to the database to get the timeline data.
onCreate()is a good place to connect to the database.-
Once
dbHelperopens the database file, we need to ask it for the actual database object. To do that, we can use eithergetReadableDatabase()orgetWritableDatabase(). In this case, we are only reading the data from the timeline, so we open the database for reading only.-
At some point we need to close the database and release that resource. If the database was opened in
onCreate(), the counterpart to that would beonDestroy(). So, we close the database there. Remember thatonDestroy()is called only when the system has to free up resources.-
To query the data from the database, we use the
query()method. This method seems to contain almost endless parameters, but most of them map nicely to various parts of the SQLSELECTstatement. So this line is equivalent to SQL’sSELECT * FROM timeline ORDER BY created_at DESC. The variousnullvalues refer to parts of theSELECTstatement we are not using, such asWHERE,GROUPING, andHAVING. The data returned to us is of typeCursor, which is an iterator.-
startManagingCursor()is a convenience method that tells the activity to start managing the cursor’s life cycle the same way it manages its own. This means that when this activity is about to be destroyed, it will make sure to release any data referred to by the cursor, thus helping Java’s garbage collector clean up memory more quickly. The alternative is for us to add code manually in various override methods and worry about cursor management ourselves.-
cursor, if you recall from Cursors, represents all the data we received from the databaseSELECTstatement that was effectively executed by ourquery()method. This data is generally in the form of a table, with many rows and columns. Each row represents a single record, such as a single status in our timeline. Each row also has columns that we predefined, such as_id,created_at,user, andtxt. As we mentioned before,cursoris an iterator, meaning we can step through all its data one record at a time. The first call tocursor’smoveToNext()positions the cursor at the start.moveToNext()stops when there’s no more data to process.-
For each record that the cursor currently points to, we can ask for its value by type and column index. So
cursor.getString(3)returns a string value of the status, andcursor.getLong(1)gives us the timestamp indicating when this record was created. Refer back to Chapter 9 to see how we define strings such asC_USERandC_TEXTin our program that map to column names in the database. However, having hardcoded column indices is not a good practice, because if we ever change the schema, we’ll have to remember to update this code. Also, the code is not very readable in this form. A better practice is to ask the database for the index of each column. We do that with thecursor.getColumnIndex()call.-
We use
String.format()to format each line of the output. Because we chose theTextViewwidget to display the data, we can only display text, or in other words, formatted strings. In a later iteration of this code, we’ll improve on this.-
We finally append that new line of output to our text view
textTimelineso the user can see it on the screen.
Although this approach
works for smaller data sets, it is not optimal or recommended. The
better approach is to use a ListView to represent the list of statuses
stored in the database. ListView,
which we’ll use in the next version of our TimelineActivity, is much more scalable and
efficient.
About Adapters
A ScrollView will work for a few dozen records.
But what if your status database has hundreds or even thousands of
records? Waiting to get and print them all would be highly inefficient.
The user probably doesn’t even care about all of the data anyhow.
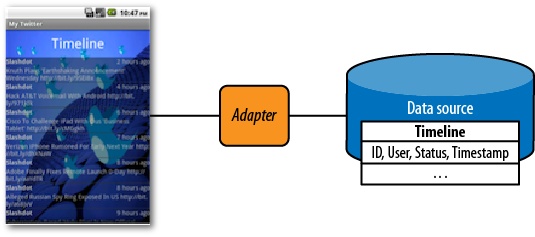
To address this issue,
Android provides adapters. These are a smart way to connect a View with some kind of data source (see Figure 10-1). Typically, your view would be a ListView and the data would come in the form
of a Cursor or Array. So adapters come as subclasses of
CursorAdapter or ArrayAdapter.
Adding a ListView to TimelineActivity
As before, our first
stop in upgrading our applications is our resources file. We’ll add a
ListView to the timeline layout by
editing timeline.xml, shown in Example 10-3.
<?xml version="1.0" encoding="utf-8"?> <LinearLayout xmlns:android="http://schemas.android.com/apk/res/android" android:orientation="vertical" android:layout_height="fill_parent" android:layout_width="fill_parent" android:background="@drawable/background"> <TextView android:layout_width="wrap_content" android:layout_height="wrap_content" android:layout_gravity="center" android:layout_margin="10dp" android:text="@string/titleTimeline" android:textColor="#fff" android:textSize="30sp" /> <!--
-
Adding
ListViewto your layout is like adding any other widget. The main attributes areid,layout_height, andlayout_width.
ListView versus ListActivity
We could have used
ListActivity as the parent class
for our TimelineActivity. ListActivity is an activity that
has a ListView. Either approach
would work, but we chose to subclass Activity and create ListView separately to provide
step-by-step, incremental learning.
ListActivity is slightly easier to use in
cases where the built-in ListView
is the only widget in the activity. ListActivity also makes it very easy to
assign an existing array of elements to its list via the XML
binding. However, we are using a Cursor for data and not an array (because
our data comes from the database), and we do have an additional
TextView for the scrollview’s
title, so the simplicity of ListActivity in this case is outweighed by
the customization we require.
Creating a Row Layout
There’s one more XML file to take care of. Although timeline.xml describes the entire activity, we also need to specify what a single row of data looks like—that is, a single line item on the screen that will show information such as who said what and when.
The easiest way to do
that is to create another XML file just for that row. As for any new
XML file, we use the Android New XML File dialog window: File→New→Android
New XML File. Let’s name this file row.xml and
select Layout for the type.
For this layout, we
chose one LinearLayout with two
lines arranged vertically. The first line consists of the user and
timestamp, and the second contains the actual status message. Notice
that the first line uses another LinearLayout to position the user and
timestamp horizontally next to each other.
The row of data in the
ListView is represented by a
custom layout defined in the
row.xml file, shown in Example 10-4.
<?xml version="1.0" encoding="utf-8"?> <!--
-
The main layout for the entire row. It is vertical because our row consists of two lines.
-
A layout that runs horizontally and represents the first line of data, namely the user and timestamp.
-
The user who posted this update.
-
The timestamp indicating when it was posted. It should be a relative time (e.g., 10 minutes ago).
-
The actual status.
Creating an Adapter in TimelineActivity.java
Now that we have the XML files sorted out, we are ready
to update the Java code, shown in Example 10-5. First,
we need to create the adapter. Adapters generally come in two flavors:
those that represent array data and those that represent cursor data.
Since our data is coming from the database, we are going to use the
cursor-based adapter. One of the simplest of those is SimpleCursorAdapter.
SimpleCursorAdapter requires us to describe
a single row of data (which we do in row.xml),
the data (a cursor in our case), and the mapping for a single record
of data to the single row in the list. The last parameter maps each
cursor column to a view in the list.
package com.marakana.yamba5;

import android.app.Activity;
import android.database.Cursor;
import android.database.sqlite.SQLiteDatabase;
import android.os.Bundle;
import android.widget.ListView;
import android.widget.SimpleCursorAdapter;

public class TimelineActivity2 extends Activity {
  DbHelper dbHelper;
  SQLiteDatabase db;
  Cursor cursor;  //
  ListView listTimeline;  //
  SimpleCursorAdapter adapter;  //
  static final String[] FROM = { DbHelper.C_CREATED_AT, DbHelper.C_USER,
      DbHelper.C_TEXT };  //
  static final int[] TO = { R.id.textCreatedAt, R.id.textUser, R.id.textText }; //

  @Override
  protected void onCreate(Bundle savedInstanceState) {
    super.onCreate(savedInstanceState);
    setContentView(R.layout.timeline);

    // Find your views
    listTimeline = (ListView) findViewById(R.id.listTimeline);  //

    // Connect to database
    dbHelper = new DbHelper(this);
    db = dbHelper.getReadableDatabase();
  }

  @Override
  public void onDestroy() {
    super.onDestroy();

    // Close the database
    db.close();
  }

  @Override
  protected void onResume() {
    super.onResume();

    // Get the data from the database
    cursor = db.query(DbHelper.TABLE, null, null, null, null, null,
        DbHelper.C_CREATED_AT + " DESC");
    startManagingCursor(cursor);

    // Set up the adapter
    adapter = new SimpleCursorAdapter(this, R.layout.row, cursor, FROM, TO);  //
    listTimeline.setAdapter(adapter); //
  }

}-
Cursor to all the status updates that we have in the database.
-
listTimelineis ourListViewthat displays the data.-
adapteris our custom adapter, explained in the text that follows this example.-
FROMis a string array specifying which columns in the cursor we’re binding from. We use the same strings already used to refer to columns in our program.-
TOis an array of integers representing IDs of views in the row.xml layout to which we are binding data. The number of elements inFROMandTOmust be the same, so that element at index 0 inFROMmaps to element 0 inTO, and so on.-
We get the
ListViewfrom the XML layout.-
Once we have the data as a cursor, the layout of a single row from the row.xml file, and the
FROMandTOconstants for mapping the data, we are ready to create theSimpleCursorAdapter.-
Finally, we need to tell our
ListViewto use this adapter.
At this point, TimelineActivity is complete, but not yet
registered with the manifest file. We’ll do that in the next section.
However, if we were to run this activity, you’d quickly notice that
the timestamp doesn’t look quite the way we imagined it.
Remember that we are
storing the status creation time in the database as a long value representing the number of
milliseconds since January 1st, 1970. And since that’s the value in
the database, that’s the value we show on the screen as well. This is
the standard Unix
time, which is very useful for representing actual points in
time. But the value is not very meaningful to users. Instead of
showing value 1287603266359, it
would be much nicer to represent it to the user as “10 Minutes Ago.”
This friendly time format is known as relative
time, and Android provides a method to convert from one
format to the other.
The question is where
to inject this conversion. As it stands right now, the SimpleCursorAdapter is capable only
of mapping straight from a database value to layout view. This doesn’t
work for our needs, because we need to add some business logic in
between the data and the view. To do this, we’ll create our own
adapter.
TimelineAdapter
TimelineAdapter is our custom adapter, shown
in Example 10-6. Although SimpleCursorAdapter did a
straightforward mapping of data in the database to views on the
screen, we had an issue with the timestamp. The job of TimelineAdapter is to inject some business
logic to convert the Unix timestamp to relative time. The method in
SimpleCursorAdapter that creates a
displayable view from input data is bindView(), so we’ll
override that method and ask it to massage the data before it is
displayed.
Typically, if you are not sure which method to override, look at the online documentation for the particular system class that you are modifying (in this case, http://developer.android.com/reference/android/widget/SimpleCursorAdapter.html).
package com.marakana.yamba5;

import android.content.Context;
import android.database.Cursor;
import android.text.format.DateUtils;
import android.view.View;
import android.widget.SimpleCursorAdapter;
import android.widget.TextView;

public class TimelineAdapter extends SimpleCursorAdapter { //
  static final String[] FROM = { DbHelper.C_CREATED_AT, DbHelper.C_USER,
      DbHelper.C_TEXT }; //
  static final int[] TO = { R.id.textCreatedAt, R.id.textUser, R.id.textText }; //

  // Constructor
  public TimelineAdapter(Context context, Cursor c) { //
    super(context, R.layout.row, c, FROM, TO);
  }

  // This is where the actual binding of a cursor to view happens
  @Override
  public void bindView(View row, Context context, Cursor cursor) { //
    super.bindView(row, context, cursor);

    // Manually bind created at timestamp to its view
    long timestamp = cursor.getLong(cursor
        .getColumnIndex(DbHelper.C_CREATED_AT)); //
    TextView textCreatedAt = (TextView) row.findViewById(R.id.textCreatedAt); //
    textCreatedAt.setText(DateUtils.getRelativeTimeSpanString(timestamp)); //
  }

}-
To create our own custom adapter, we subclass one of the Android standard adapters, in this case the same
SimpleCursorAdapterwe used in the previous section.-
This constant defines the columns of interest to us in the database, as in the previous example.
-
This constant specifies the IDs of views that we’ll map those columns to.
-
Because we’re defining a new class, we need a constructor. It simply calls the parent constructor using
super.-
The only method we override is
bindView(). This method is called for each row to map its data to its views, and it’s where the gist of the adapter work happens. In order to reuse most of the data-to-views mapping provided bySimpleCursorAdapter, we callsuper.bindView()first.-
To override default mapping for the timestamp, we first get the actual timestamp value from the database.
-
Next, we find the specific
TextViewin the row.xml file.-
Finally, we set the value of
textCreatedAtto the relative time since the timestamp. To do this, we use the Android SDK methodDateUtils.getRelativeTimeSpanString().
At this point, we can
further simplify our TimelineActivity
class because we moved some of the adapter details to TimelineAdapter. Example 10-7
shows this simplified code.
package com.marakana.yamba5;

import android.app.Activity;
import android.database.Cursor;
import android.database.sqlite.SQLiteDatabase;
import android.os.Bundle;
import android.widget.ListView;

public class TimelineActivity3 extends Activity {
  DbHelper dbHelper;
  SQLiteDatabase db;
  Cursor cursor;
  ListView listTimeline;
  TimelineAdapter adapter;  //

  @Override
  protected void onCreate(Bundle savedInstanceState) {
    super.onCreate(savedInstanceState);
    setContentView(R.layout.timeline);

    // Find your views
    listTimeline = (ListView) findViewById(R.id.listTimeline);

    // Connect to database
    dbHelper = new DbHelper(this);
    db = dbHelper.getReadableDatabase();
  }

  @Override
  public void onDestroy() {
    super.onDestroy();

    // Close the database
    db.close();
  }

  @Override
  protected void onResume() {
    super.onResume();

    // Get the data from the database
    cursor = db.query(DbHelper.TABLE, null, null, null, null, null,
        DbHelper.C_CREATED_AT + " DESC");
    startManagingCursor(cursor);

    // Create the adapter
    adapter = new TimelineAdapter(this, cursor);  //
    listTimeline.setAdapter(adapter); //
  }

}-
We change
SimpleCursorAdaptertoTimelineAdapter.-
Create a new instance of the
TimelineAdapter, and pass it the context and the data.-
Set our
ListViewto connect to the data via the adapter.
One of the shortcomings
of overriding bindView() is that we
use super.bindView() to bind all
views first, and then replace its behavior for one particular element.
This is somewhat wasteful. The final version of our application in this
chapter will optimize the process.
ViewBinder: A Better Alternative to TimelineAdapter
Instead of creating a new TimelineAdapter that is a subclass of SimpleCursorAdapter and overriding its
bindView() method, we
could attach the business logic directly to the existing SimpleCursorAdapter. This approach is more
efficient because we are not overriding bindView() and we do not require a separate
custom adapter class.
To attach business logic
to an existing SimpleCursorAdapter,
use its setViewBinder() method.
We will need to supply the method with an implementation of ViewBinder. ViewBinder is an interface that specifies
setViewValue(), where
the actual binding of a particular date element to a particular view
happens.
Again, we discovered the setViewBinder() feature of this SimpleCursorAdapter framework class by reading
its reference documentation.
Note
When importing ViewBinder, make sure it is android.widget.SimpleCursorAdapter.ViewBinder as there are multiple options.
In our final iteration of
Adapter, we create a custom ViewBinder as a constant and attach it to the
stock SimpleCursorAdapter, as shown
in Example 10-8.
  ...

  @Override
  protected void onResume() {
    ...
    adapter.setViewBinder(VIEW_BINDER); //
    ...
  }

  // View binder constant to inject business logic that converts a timestamp to
  // relative time
  static final ViewBinder VIEW_BINDER = new ViewBinder() { //

    public boolean setViewValue(View view, Cursor cursor, int columnIndex) { //
      if (view.getId() != R.id.textCreatedAt)
        return false; //

      // Update the created at text to relative time
      long timestamp = cursor.getLong(columnIndex); //
      CharSequence relTime = DateUtils.getRelativeTimeSpanString(view
          .getContext(), timestamp); //
      ((TextView) view).setText(relTime); //

      return true; //
    }

  };

...-
We attach a custom
ViewBinderinstance to our stock adapter.VIEW_BINDERis defined later in our code.-
The actual implementation of a
ViewBinderinstance. Notice that we are implementing it as an inner class. There’s no reason for any other class to use it, and thus it shouldn’t be exposed to the outside world. Also notice that it isstatic final, meaning that it’s a constant.-
The only method that we need to provide is
setViewValue(). This method is called for each data element that needs to be bound to a particular view.-
First we check whether this view is the view we care about, i.e., our
TextViewrepresenting when the status was created. If not, we returnfalse, which causes the adapter to handle the bind itself in the standard manner. If it is our view, we move on and do the custom bind.-
We get the raw timestamp value from the cursor data.
-
Using the same Android helper method we used in our previous example,
DateUtils.getRelativeTimeSpanString(), we convert the timestamp to a human-readable format. This is that business logic that we are injecting.-
Update the text on the actual view.
-
Return
trueso thatSimpleCursorAdapterdoes not processbindView()on this element in its standard way.
Updating the Manifest File
Now that we have the TimelineActivity, it would make sense to make
it the “main” activity for our Yamba application. After all, users are
more likely to check what their friends are doing than to update their
own status.
To do that, we need to
update the manifest file. As usual, we’ll list TimelineActivity within the <activity> element in the
AndroidManifest.xml file, just as we added the
preference activity to the manifest file in Update the Manifest File:
<activity android:name=".TimelineActivity" />
Now, in order to make
TimelineActivity the main entry point
into our application, we need to register it to respond to certain
intents. Basically, when the user clicks to start
your application, the system sends an intent. You have to define an
activity to “listen” to this intent. The activity does that by
filtering the intents with an IntentFilter. In XML, this is within the
<intent-filter> element, and it
usually contains at least an <action> element representing the actual
intent action we’re interested in.
You might have noticed
that StatusActivity had some extra
XML compared to PrefsActivity. The extra code is the
intent filter block, along with the action that it’s filtering for.
There is a special action
named android.intent.action.MAIN that
simply indicates this is the main component that should be started when
the user wants to start your application. Additionally, the <category> element tells the system that
this application should be added to the main Launcher application so
that the user can see its app icon along with all the other icons, click
on it, and start it. This category is defined as android.intent.category.LAUNCHER.
So, to make TimelineActivity the main entry point, we
simply list it and move the code from the StatusActivity declaration over to the
TimelineActivity declaration, as
shown in Example 10-9.
<?xml version="1.0" encoding="utf-8"?> <manifest xmlns:android="http://schemas.android.com/apk/res/android" android:versionCode="1" android:versionName="1.0" package="com.marakana.yamba5"> <application android:icon="@drawable/icon" android:label="@string/app_name" android:name=".YambaApplication"> <activity android:name=".TimelineActivity" android:label="@string/titleTimeline"> <intent-filter> <!--
-
<intent_filter>registers this particular activity with the system to respond to certain intents.-
Tells the system that this is the main activity to start when users start your application.
-
The category
LAUNCHERtells the Home application to add this application into the list displayed in the launcher drawer.-
StatusActivityno longer needs any intent filters.
Initial App Setup
Now when the user runs our application, the Timeline screen will show up first. But unless the user knows she should set up the preferences and start the service, there will be no data and very little hand-holding telling her what to do.
One solution is to check whether preferences exist, and if they do not, redirect the user to the Preference activity with a message telling her what to do next:
...
@Override
protected void onCreate(Bundle savedInstanceState) {
  ...
  // Check whether preferences have been set
  if (yamba.getPrefs().getString("username", null) == null) { //
    startActivity(new Intent(this, PrefsActivity.class)); //
    Toast.makeText(this, R.string.msgSetupPrefs, Toast.LENGTH_LONG).show(); //
  }
  ...
}
...-
We check whether a particular preference has been set. In this case, I’ve chosen to check
usernamebecause it’s likely to be set if any preferences at all are set. Since the preferences do not exist the first time the user runs the application, this means the value ofusername(or any other preference item we choose) will benull.-
We start the
PrefsActivity. Note thatstartActivity()will dispatch an intent to the system, but the rest ofonCreate()will execute as well. This is good because we’re likely going to come back to the Timeline activity once we’re done setting up preferences.-
We display a little pop-up message, i.e., a
Toast, telling the user what to do. This assumes that you have created the appropriatemsgSetupPrefsin your strings.xml file.
Base Activity
Now that we have a Timeline activity, we need to give it an options menu, just as we did for our Status activity in The Options Menu. This is especially important because the Timeline activity is the entry point into our application, and without the menu, the user cannot easily get to any other activity or start and stop the service.
As one approach, we could copy and paste the code we already have from the Status activity, but that’s rarely a good strategy. Instead, we’ll do what we usually do: refactor the code. In this case, we can take out the common functionality from the Status activity and place it in another activity that will serve as the base. See Figure 10-2.
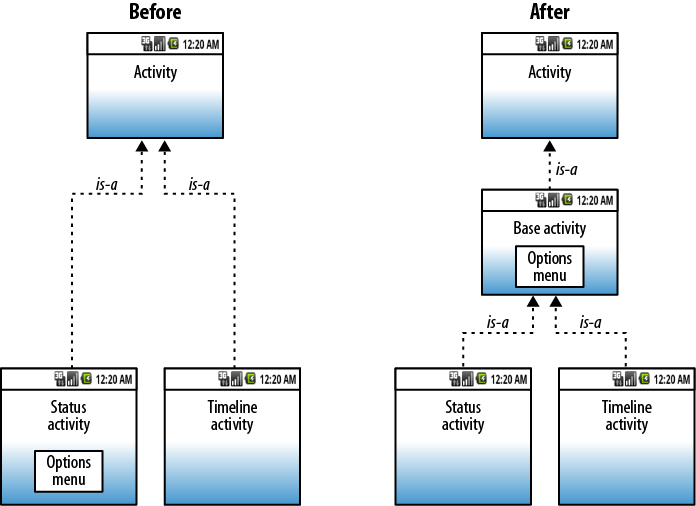
To do that, we’ll create a
new class called BaseActivity and
move the common functionality into it. For us, the common functionality
includes getting the reference to the YambaApplication
object, as well as the onCreateOptionsMenu() and onOptionsItemSelected()
methods that support the options menu.
Toggle Service
While we’re at it, instead of having Start Service and
Stop Service menu buttons, it would be nice to provide just one button
that toggles between Start and Stop. To do that, we’ll change our menu
and add onMenuOpened() to the
base activity to dynamically update the title and images for this
toggle item.
First, we’ll update the menu.xml file to include our new toggle menu item, as shown in Example 10-11. At the same time, we’ll remove the Start Service and Stop Service items because our toggle feature makes them obsolete.
<?xml version="1.0" encoding="utf-8"?> <menu xmlns:android="http://schemas.android.com/apk/res/android"> <item android:id="@+id/itemStatus" android:title="@string/titleStatus" android:icon="@android:drawable/ic_menu_edit"></item> <item android:title="@string/titleTimeline" android:id="@+id/itemTimeline" android:icon="@android:drawable/ic_menu_sort_by_size"></item> <item android:id="@+id/itemPrefs" android:title="@string/titlePrefs" android:icon="@android:drawable/ic_menu_preferences"></item> <item android:icon="@android:drawable/ic_menu_delete" android:title="@string/titlePurge" android:id="@+id/itemPurge"></item> <!--
-
This new
itemToggleServicenow replaces bothitemServiceStartanditemServiceStop.
Next, we need to override
onMenuOpened() in the base activity
to change the menu item dynamically, shown in Example 10-12.
package com.marakana.yamba5; import android.app.Activity; import android.content.Intent; import android.os.Bundle; import android.view.Menu; import android.view.MenuItem; import android.widget.Toast; /** * The base activity with common features shared by TimelineActivity and * StatusActivity */ public class BaseActivity extends Activity { //
-
BaseActivityis anActivity.-
We declare the shared
YambaApplicationto make it accessible to all the other subclasses.-
In
onCreate(), we get the reference toyamba.-
-
onOptionsItemSelected()is also moved over fromStatusActivity. Notice, however, that it now checks foritemToggleServiceinstead of start and stop service items. Based on the state of the service, which we know from the flag inyamba, we request either to start or to stop the updater service.-
onMenuOpened()is the new method called by the system when the options menu is opened. This is a good callback for us to implement the toggle functionality. We’re given themenuobject that represents the options menu.-
Within the menu object, we find our new toggle item so that we can update it based on the current state of the updater service.
-
We check whether the service is already running, and if it is, we set the appropriate title and icon for the toggle item. Notice that here we’re setting up the title and icon programmatically using the Java APIs instead of the XML, which we used initially to set up the menu in menu.xml.
-
If the service is stopped, we set the icon and title so that user can click on it and start the service. This way our single toggle button communicates the service’s current state.
Now that we have a
BaseActivity class, let’s update
our Timeline activity to use it. Example 10-13 shows
what the completed Timeline activity looks like.
package com.marakana.yamba5; import android.content.Intent; import android.database.Cursor; import android.os.Bundle; import android.text.format.DateUtils; import android.view.View; import android.widget.ListView; import android.widget.SimpleCursorAdapter; import android.widget.TextView; import android.widget.Toast; import android.widget.SimpleCursorAdapter.ViewBinder; public class TimelineActivity extends BaseActivity { //
-
For starters, we now subclass our
BaseActivityinstead of just the system’sActivity. This way we inherit theyambaobject as well as all the support for the options menu.-
This is where we check whether preferences are already set. If not, we’ll redirect the user to the Preference activity first.
-
On resuming this activity, we set up the list. This is a private method, shown later in the code.
-
When this activity is closed, we want to make sure we close the database to release this resource. The database is opened by the call to
getStatusUpdates()in theyambaapplication.-
setupList()is the convenience method that gets the data, sets up the adapter, and connects it all to the list view.-
This is where we attach the view binder to the list, as discussed earlier in ViewBinder: A Better Alternative to TimelineAdapter.
-
ViewBinderis defined here.
At this point, we’ve
done a lot of the refactoring work on our Timeline activity. We can
also simplify the Status activity by cutting out the code related to
the options menu. This also helps separate functional concerns among
BaseActivity, StatusDate, and TimelineActivity.
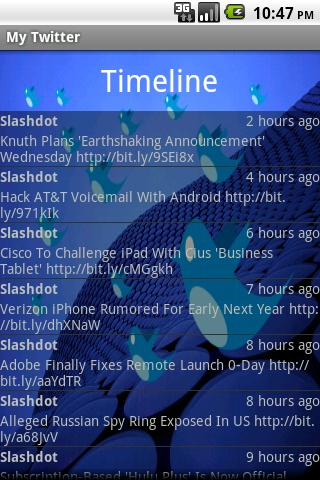
Figure 10-3 shows what the final Timeline activity screen looks like.
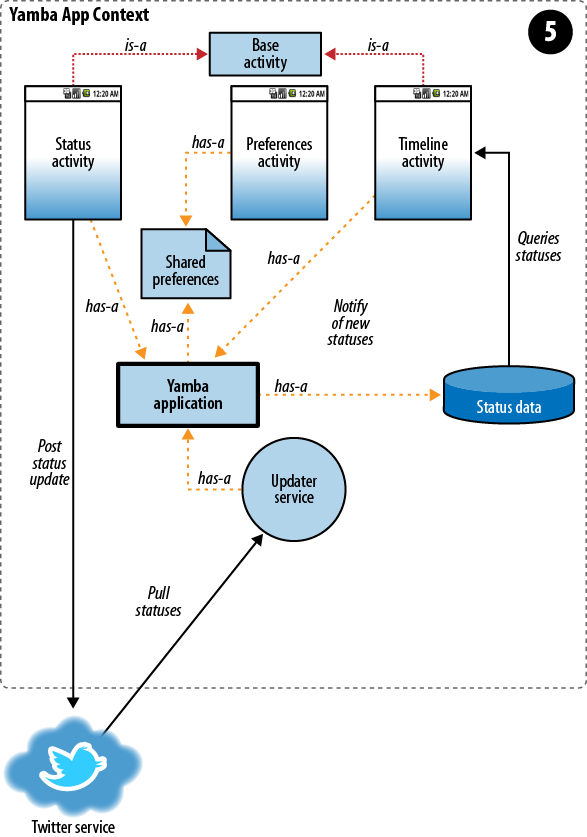
Summary
At this point, Yamba can post a new status as well as list the statuses of our friends. Our application is complete and usable.
Figure 10-4 illustrates what we have done so far as part of the design outlined earlier in Figure 5-4.