
Chapter 5. Yamba Project Overview
The best way to learn is by an example, and that example has to meet certain criteria. After working with thousands of new Android developers and using various example applications to explain some of the unique concepts that this platform has to offer, I concluded that the best example has to be:
- Comprehensive
A good example app should demonstrate most of the aspects of the application framework that are unique to Android. Additionally, there should be a good reason to use a specific feature in order to get the job done. This is important in order to create the right motivation for those new to Android.
- Familiar
The example application should be simple to understand. We want to focus on design and implementation, and not on features and benefits.
The Yamba Application
The application I picked for this book is a Twitter-like application. We call it Yamba, which stands for Yet Another Micro Blogging App. Yamba lets a user connect to a service such as Twitter, pull down friends’ statuses, and update that user’s own status.
Yamba covers most of the main Android building blocks in a natural way. As such, it’s a great sample application to illustrate both how various components work individually and how they fit together. Services such as Twitter are more or less familiar to most people, so the features of the application do not require much explanation.
Figures 5-1 through 5-3 show what a finished product could look like.
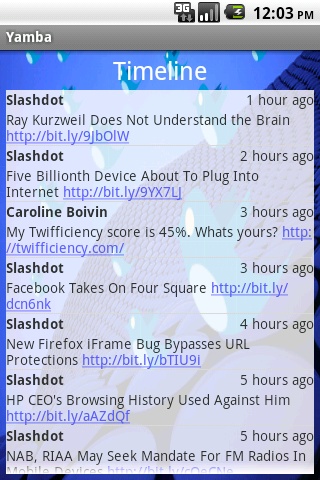
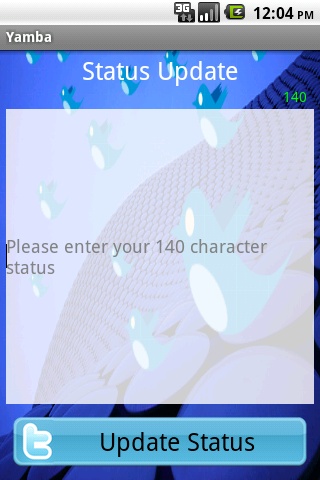
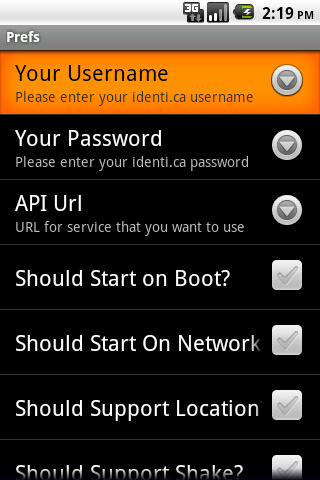
Figure 5-1 shows how Yamba displays a list of status messages from your friends. Figure 5-2 shows the initial Yamba screen, and Figure 5-3 shows the user preferences.
Design Philosophy
We’re going to adopt a certain design philosophy in tackling this project. This philosophy will help guide us in our development and serve as a north star when in doubt about what to do next. Spelling out the design philosophy here should also help eliminate some confusion in the process we’re following:
- Small increments
The Yamba application will start out small and will constantly grow in functionality and complexity. Initially, the app will not do much, but it will grow organically one step at a time. Along the way, we’ll explain each step so that you’re expanding your skills as you go.
- Always whole and complete
The application must always work. In other words, we’ll add new features in small, self-contained chunks and pull them back into the main project so that you can see how it fits together as a whole. The application must always work at each stopping point.
- Refactoring code
Once in a while, we’ll have to take a step back and refactor the application to remove duplicate code and optimize the design. The goal is to reuse the code and not reinvent the wheel. But we are going to cross those bridges as we get to them, providing the motivation for refactoring along the way. This process will teach you about some general software development best practices as well.
Project Design
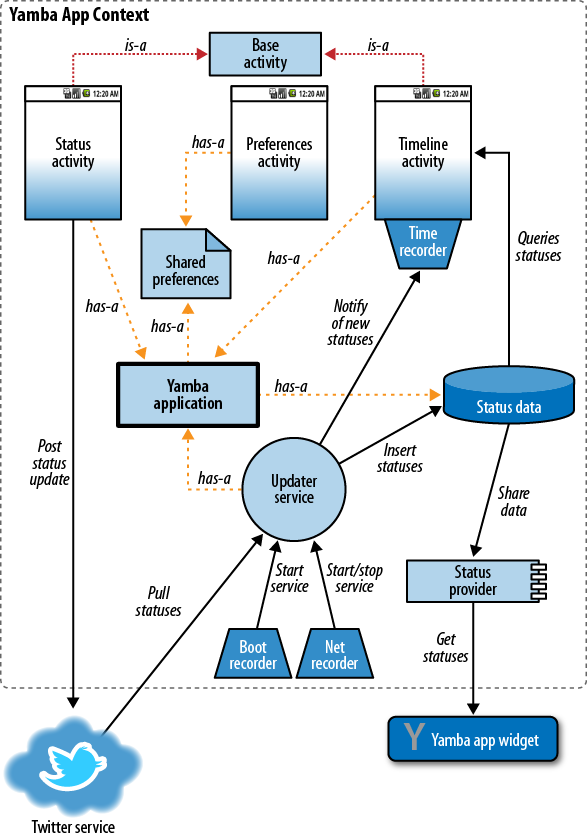
If you remember from Chapter 4, an Android application is a loose collection of activities, services, content providers, and broadcast receivers. These are the components from which we put together an application. Figure 5-4 shows the design of the entire Yamba application, which incorporates most of the main Android building blocks.
Part 1: Android User Interface
This part, covered in Chapter 6, will focus on developing the first component of the Yamba application: the Status Update screen. Our tasks are building an activity, networking and multithreading, and debugging.
Building an Activity
We are going to start by introducing the Android user interface (UI) model. In its UI, Android is quite different from some other paradigms that you might be familiar with. The unique feature is its dual approach to UI via both Java and XML.
In this chapter, you will learn how to develop the user interface for Figure 5-2, where the user updates her status. Through this process, you will use XML and Java to put together a working UI. You will learn about Layouts and Views, units in Android, how to work with images, and how to make the UI look pretty.
Our approach will focus on best practices in UI development so that your application looks good and works well on any Android device, regardless of screen size and resolution.
Networking and Multithreading
Once we have a working screen, we will want to post the user input to the cloud service. For that purpose, we are going to use a third-party library to help us with the Twitter API web service calls.
While making the network calls, you’ll notice that the UI starts behaving sluggishly, due to the unpredictable nature of the network. The network latency might even cause our application to stop responding. At that point, we will introduce multithreading in Android and explain how to develop an app that works well regardless of external circumstances.
Part 2: Preferences, Filesystem, Options Menu, and Intents
This part, covered in Chapter 7, is all about the preferences screen. At the end of this part, your Yamba application will have two screens, one for status updates and the other for setting up the preferences. At this point, Yamba is configurable for various users and starts being a useful app. The elements we’ll create at this stage are the activity, the menu system and intents, and the filesystem.
The Activity
First, we’ll create the screen, which is an activity, one of Android’s basic building blocks. You will see the steps involved and understand what it takes to create new screens.
Menu System and Intents
Next, we’ll need a way to get to that screen. For that purpose, we’ll introduce a menu system in Android and show how it works. You will also learn about intents and how to send these to open up a specific activity.
Part 3: Android Services
In this part, covered in Chapter 8, introduces background services. By the end of this part, your Yamba application will be able to periodically connect to the cloud and pull down your friends’ status updates.
Services
Android services are very useful building blocks. They allow a process to run in the background without requiring any user interface. This is perfect for Yamba, as we’ll have an update process connect to the cloud periodically and pull the data. In this section, you will also learn about multithreading considerations as they apply to background services.
Application Object
At this point, we’ll notice repetition in the code and recognize
that our system is no longer as elegant as it could be. So we are
going to introduce the Application
object as a way to refactor Yamba and make it easier to scale.
Part 4: Working with Databases
We now have the data from our updater service but still need a place to store it. In this part, covered in Chapter 9, we’ll introduce you to Android’s support for databases. By the end of that chapter, our data from the cloud will be persisted in the database.
SQLite and Android’s Support for It
Android ships with a built-in database called SQLite. In addition to this cool little database, the Android framework offers a rich API that makes SQLite easier for us to use. In this section, you will learn how to use SQLite and the API for it. You do not have to be an SQL buff to understand what is going on, but some basic understanding of SQL always helps.
Refactoring the Code Again
At this point, we’ll have yet another opportunity to refactor and streamline our code. There will be a strong motivation for refactoring at that moment, and the effort will be further rewarded in later chapters.
Part 5: Lists and Adapters
It might sound like we’re back in UI mode, but Lists and Adapters are more organizational aids than user interface elements in Android. They form very powerful components that allow our tiny UI to connect to very large datasets in an efficient and scalable manner. In other words, users will be able to use Yamba in the real world without any performance hits in the long run.
Currently the data is all there in the database, but we have no way to view it. In this part, covered in Chapter 10, the Yamba application will get the much-needed Timeline Activity and a way for the user to see what his friends are chatting about online.
Timeline Activity
We’re going to develop this third and final activity in multiple stages. First, we’ll use our existing knowledge of the Android UI and put something together. It will work, sort of. Next, we’ll improve on that design. The app will look better, but it still won’t be ready for the prime time because our design won’t be able to handle real-world usage. Finally, we’ll get it right by introducing Lists and Adapters to the mix to use them to tie the data to our user interface.
More Refactoring?
We’ll have yet another opportunity to refactor our code by introducing a base activity for all our common activity needs. This will give the user a more consistent feel for the app across multiple screens and will make it easier for us to manage the code going forward.
Part 6: Broadcast Receivers
In this part, covered in Chapter 11, we’ll equip Yamba with receivers so it can react to events around it in an intelligent way. For that purpose, we’ll use broadcast receivers.
Boot and Network Receivers
In our example, we want to start our updates when the device is powered up. We also want to stop pulling the data from the cloud when the network is unavailable, and start it again only when we’re back online. This goal will introduce us to one type of broadcast receiver.
Timeline Receiver
This type of receiver will exist only at certain times. Also, it won’t receive messages from the Android system, but from other parts of our own Yamba application. This will demonstrate how we can use receivers to put together loosely coupled components in an elegant and flexible way.
Permissions
At this point in the development process you know how to ask for system permissions, such as access to the Internet or filesystem. In this section we’ll learn how to define our own permissions and how to enforce them. After all, Yamba components might not want to respond to any other application for some Yamba-specific actions.
Part 7: Content Providers
In this part, covered in Chapter 12, we’ll revisit content providers and refactor our database code to use them. To demonstrate that it all works, we’ll throw in an Android App Widget.
Status Data
Our status data is OK the way it is if nobody else cares about it. But what if we want to expose some of this data to the rest of the system? After all, other applications might leverage our friends’ timelines in new and creative ways. To do that, we’ll create a content provider and expose our status data.
Android Widgets
But who will remember to pull up our app? To demonstrate the usefulness of our new status data, we’ll put together an app widget. App widgets are those little components that the user can put on the home screen to see weather updates and such. We’ll create a widget that will pull the latest status update from the Yamba database via the status data content provider and display it on the home screen.
Part 8: System Services
The Android OS comes with many useful system services, which include processes you can access easily to ask for things such as your location, sensor readings, WiFi hotspots, and much more. In this part, covered in Chapter 13, you will add some cool new features to Yamba, such as the user’s current location.
Compass and Location
This example will illustrate how system services work in general, and you will walk away understanding some common patterns for using these services. We’ll illustrate building a compass app using sensors, and later, we’ll put this knowledge to use by letting Yamba display the user’s location when posting status updates.
Intent Service, Alarms, and Notifications
It turns out that some of the cool features provided by Android services can make our Updater service much simpler. So we’ll refactor our code yet again. This time, we’ll introduce Intent Services that respond to intents. But we’re going to need something to fire off these intents on a regular basis, and for that we’ll use the Alarm service. We’ll also add a feature to notify the user of new updates by putting a notification in the notification bar. For that, we’ll use the Notification service. All this refactoring will create a substantially more elegant solution to our Updater service needs.
Summary
This chapter is intended as a road map for the next eight chapters. By the end of all these iterations, you will have built a medium-size Android app from scratch. Even more, you will understand various constructs and how to put them together into a meaningful whole. The hope is that you’ll start developing a way of thinking in Android.