
Chapter 8. Designing the Web Component
In this chapter:
As we described in Part I, the KanDoIT company wants to provide an enhanced service for its customers. The aim is to provide new pages in the KanDoIT web site that allow clients to check their accounts online, using a browser. The web pages presented to customers must comply with existing corporate style guidelines and be easy to maintain without any need to change application code. The solution will connect to the existing business logic component, access customer data and return a dynamically generated web page without the user ever knowing that CICS is performing the data processing behind the scenes.
This Part builds on Part III, and essentially covers the implemention of a CORBA client in a web server environment. The sample application presented here to meet these requirements is quite simple in its design and it does not address the complex issues of security.
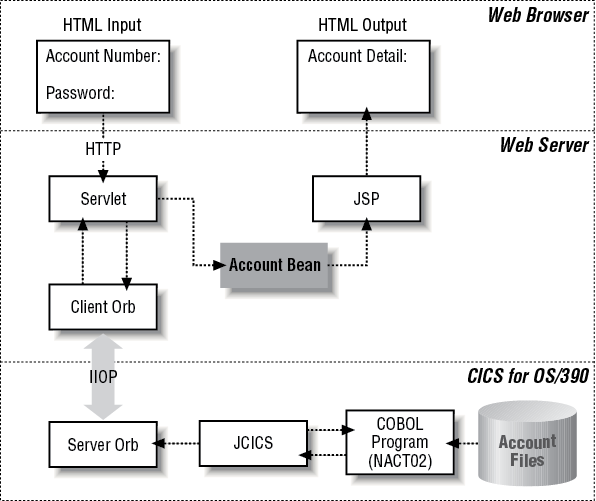
For the web component we describe how to create the HTML pages by which customers can make requests, how to write a Java servlet to handle requests and retrieve data from CICS using CORBA, and how to create dynamically generated web pages using Java Server Pages (JSP) and JavaBeans. The design is typical for a web application, in that it follows the three-tier model, or perhaps more accurately, the n-tier model.
In this model, the user interface, the business logic, and the backend data management processes are separated by platform. Figure 8-1 shows the overall design.
The Java component, which wrappers the COBOL program on CICS, is described in Chapter 7.
Understanding What the Component Needs To Do
For the KanDoIT users, customers with web access, the web component needs to provide:
An input form into which customers can enter their account number and password
An output screen to display the customer’s account details
This is the presentation layer for the component; the customer submits the input form and views the account details on their web browser. The design of the presentation layer is described in more detail in the next section, Designing the Web Interface.
Between the user submitting a request with their input parameters, and receiving output (of their account details) in their browser, there must be some processing to generate a response. The input parameters must be checked for validity, and then passed on to the CICS application to retrieve the appropriate customer data from its database. Then, using that data, a new web page is generated and returned to the user.
A web server (a server connected to the Internet, dedicated to serving web pages) is typically used to deliver static web pages in response to users requesting HTML documents via HTTP from their web browsers. However, the web server could also return the output of a program, which in this case we want to be the data returned by the CICS application. In our example, the web server provides the following services:
Listens for an HTTP request for account details, issued by the user’s web browser.
Invokes a program to connect to and request data from the CICS application.
Formats the data returned from the CICS application into HTML.
Returns the HTML document to the user’s web browser.
The design of the data processing logic is described in more detail in Designing the Web Server Components later in this chapter.
Designing the Web Interface
The design of the user interface that KanDoIT’s customers will use to access their account data should adhere to the existing corporate web style guidelines. Three new web pages are required to support the new customer account application:
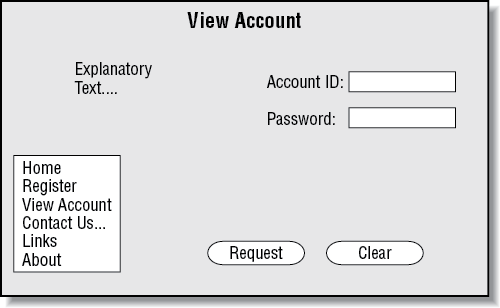
The View Account page (see Figure 8-2) design might be sketched out like this:
The standard navigation links for KanDoIT’s web site appear to the left. Two form fields marked Account ID and Password allow the user to enter required input parameters. The Request button is used to send the request to the web server and the Clear button can be used to reset the form fields.
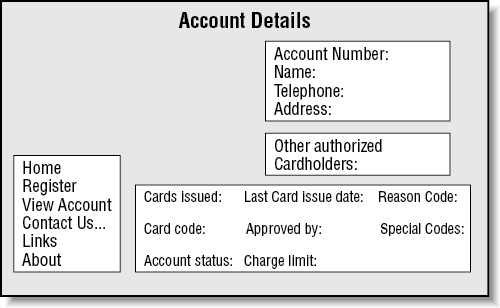
The KanDoIT web designers decide that the Account Details page should show the same information as the original COBOL application running in CICS (see Part V). The fields to display might be formatted as shown in Figure 8-3.
Again, the KanDoIT navigation links are placed to the left, and the remaining data fields organized into logical groups, such as customer details, authorized cardholders, and card details.
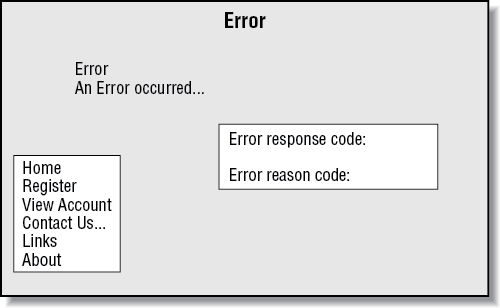
The error page uses the same basic structure. See Figure 8-4 for details.
How we go about converting these page designs into actual web browser compatible pages is described in detail in Chapter 9.
Designing the Web Server Components
The web server’s job is to listen for requests for account details, validate input parameters, connect to CICS, pass on the request to the CICS application, format the returned data into HTML and return a web page to the user’s browser. All of these tasks can be handled by a special type of program running in the web server environment called a servlet.
In Chapter 9, we can divide the specific tasks further among three distinct components:
A Java servlet to process the request and connect to CICS
A JavaBean to temporarily hold information about the customer
Java Server Pages (JSP) to automatically format the returned data into HTML
Let’s look at these web server components in more detail.
The Java Servlet
The Common Gateway Interface (CGI) was one of the first practical techniques for creating dynamic content. With CGI, a web server can forward HTTP requests to an external program. The output of this program is then returned to the client browser. CGI is more-or-less platform-independent and is very popular. However, CGI has many drawbacks that affect web application performance and it is particularly resource-intensive. There are several proprietary solutions that work only on certain web servers, such as server extension APIs, Active Server Pages, and server-side JavaScript. These are by no means perfect solutions, as they can be difficult to develop, increase the risk of crashing the web server, or they work in very specific environments.
A servlet is a Java program (class) that runs on a web server. It can be loaded dynamically to expand the function of a server. Servlets are commonly used in web servers to replace CGI scripts. A servlet is similar to a proprietary server extension, except it runs inside a Java Virtual Machine (JVM) on the server, so it is safe and portable.
Unlike CGI, which uses multiple processes to handle separate programs and/or separate requests, servlets are all handled by separate threads within the web server process. This means servlets are efficient and scalable. Another advantage is portability: Java runs anywhere there is a JVM and all major web servers support servlets. Because servlets are written in Java, they give you access to all the benefits that the Java language provides, namely networking and URL access, multithreading, image manipulation, data compression, database connectivity, remote method invocation (RMI), CORBA connectivity, and object serialization, among others.
Servlets inherit the strong type safety of the Java language and, because Java doesn’t use pointers, servlets are generally safe from memory management problems. Servlets handle errors safely using exception processing, which won’t crash the server.
Servlet code is clean, object-oriented, modular, and quite simple. Servlets can take advantage of a huge library of third-party Java classes and JavaBean components, including new Enterprise JavaBeans.
For the purposes of our example web application, the servlet we will develop performs the following functions:
Checks that the account number and password parameters entered by the user are in a valid format.
Instantiates a JavaBean to store the parameters and the details that are received from CICS.
Invokes a method on a remote Java Account object running in CICS, using IIOP.
Returns the appropriate Java Server Page (JSP) to the browser.
The servlet is automatically invoked whenever a request for this specific servlet is received from a web browser. The request is initiated when a customer submits the View Account page by clicking on the Request button.
The JavaBean
A JavaBean, often referred to simply as a bean, is a reusable Java component built using Sun’s JavaBeans technology. In our sample application, our JavaBean is called AccountBean. The purpose of AccountBean is to store the details of the customer account returned from the call to the Account object in CICS. So, for example, it contains first name, last name, telephone number, account balance, and so on. This information is then used by the JSP to build the HTML that is returned to the user’s web browser.
The Java Server Pages (JSP files)
Java Server Pages (JSP files) technology is a convenient way to generate dynamic page content. JSP files allow the application server to dynamically add content to your HTML pages before they are sent to a requesting browser. The dynamic content can come from any available databases and file systems to provide web visitors with timely and accurate data.
The JSP files created by the WebSphere Studio wizards contain the following HTML tags and JSP tags defined by the JSP specification. This allows us to retrieve data directly from JavaBeans:
- A JSP <BEAN> tag
To access a JavaBean when the page is processed
- JSP <INSERT> tags
To embed variables in the page
- HTML tags
To format the variable data
- JSP <REPEAT> tags
To repeat a block of HTML tagging that contains <INSERT> tags and the HTML formatting tags
When the Application Server processes the JSP file, it:
Instantiates the JavaBean
Puts the resulting data into the output page (replacing the special tags)
Returns it as an HTML file
You can customize the JSP file, adding your own text and images using JavaScript, HTML, or JSP tagging. These tags and script are included in the HTML file created by the application server and returned to the requesting browser.
For our sample, we make use of the account details stored in our AccountBean JavaBean. As an example, if we want to include the account number property in the HTML output we would include a tag similar to this in the account details JSP file:
<INSERT BEAN="KanDoItServlet" PROPERTY="accountnum"></INSERT>
For more information, see Creating the Java Server Page File in Chapter 9.
Why Design It This Way?
There are many ways the web component could have been designed. So why have we done it this way? There are several compelling reasons:
By using a servlet rather than an applet, we are ensuring that any customer with web access can use the component, regardless of what web browser they are using.
Servlets produce better performance than CGI programs performing a similar function.
Because the servlet and JSPs run on the web server we can upgrade or even completely change function and presentation of data without any dependency on user’s client software.
Using CORBA (see below) we can communicate directly with our account object running in the CICS server over a TCP/IP network.
CORBA is both cross-platform and cross-language—we’ve implemented our CORBA client in Java so we can invoke it directly within our servlet.
The servlet could have included code to perform HTML conversion, but it would then be doing two jobs: processing and presentation. If you later wished to change the way in which data was presented in the web browser, you would have to change the servlet and recompile it. By using JSP to generate the HTML, and inserting placeholders for any dynamic data, the presentation logic is kept apart from the processing logic and it is easier to maintain and update.
Designing the CORBA Client Implementation
In Part III we introduced CORBA and described how to define and implement a Java object in the CICS environment that can be invoked by a remote client.
Normally, the developer of the CORBA client code would start work from the same IDL description of the server object as the developer of the CORBA server implementation and generate client stub classes. Since we already developed a test client in Part III, we will integrate it into the web server component part of our sample application.
The CORBA client can be instantiated by the servlet to invoke the remote methods on our account object (in CICS). The CORBA client performs the following tasks:
Instantiates and initializes the client ORB
Locates the server using a stringified object reference (see “Programming the Web Component” in Chapter 9)
Obtains a reference to the remote object
Invokes the
getAccount method on the remote objectStores the returned account details (and error codes) in the corresponding AccountBean fields
What’s Next…
Now that you have some idea what we are trying to achieve, Let’s look at the actual programming that is involved in Chapter 9.