Chapter 9. Programming the Web Component
In this chapter:
This chapter introduces a number of recent web technologies and describes how to build a website, build and deploy servlets, create Java Server Pages (JSP), and create and build a JavaBean. In addition, this chapter shows you how to incorporate the CORBA client that you developed in Part III.
Tools
This section describes the configuration of those tools so that you can follow through the sample application more easily. You need to have access to the following: a web server, this book uses WebSphere Application Server (WAS) to provide servlet support, WebSphere Studio for the development of your servlets, and NetObjects Fusion or other web page servers to develop your web pages.
Install and Configure a Web Server
When you have successfully installed your web server (for example, IBM HTTP Server), you can create an alias to point your web server at the directory where you have your HTML files. To do this:
Edit the httpd.conf file found in the Program FilesIBM HTTP Serverconf directory and add a directive for a user directory to contain your web pages:
UserDir "C:/userpages"
UserDir may already be defined for your web server.
Set up an alias for /cicsadp. This will redirect requests for http://servername/cicsadp/ to the index.html file in the folder /userpages/cicsadp/index.html:
Alias /cicsadp/ "C:/userpages/ciscadp/"
Use Windows Explorer to create a cicsadp folder under /userpages.
Using WebSphere Studio
To use WebSphere Studio, you need to set up a project and configure a publishing server so that when you have completed your development work you can transfer the files to a directory on the web server. When WebSphere Studio is successfully installed, create an empty project called KanDoIT; we’ll populate with files from the CD-ROM later. The following instructions guide you through setting up a project:
Start WebSphere Studio, and create a new project called KanDoIT. To do this select File and New project, as shown in Figure 9-1. In the New project dialog box, enter details about the project then click OK.
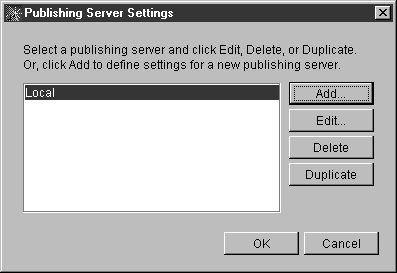
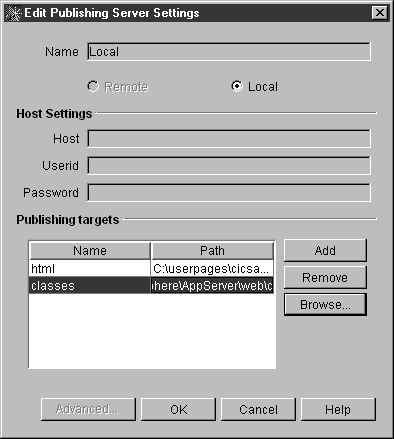
Select the KanDoIT project. Go to the Toolbar and select Options and Publishing Servers… Either edit the local definition or add a new publishing server setup. Figure 9-2 shows the screen.
Select Edit and enter the pathname for your HTML files and classes, for example:
html destination:C:userpagescicsadp
classes destination:'C:WebSphereAppServerwebclasses'
Select the Browse button and find the directory where you plan to publish your HTML and class files; see Figure 9-3. Then click OK twice.

Servlet Configuration
WebSphere Application Server Version 2.0 provides your web server with support for servlets. Before you can use it with our sample application, you need to add the name of your servlet and create an alias that can be used in the form of the input page later. This will identify the servlet that it should invoke when it is submitted. To add your servlet’s name and create an alias, follow these guidelines:
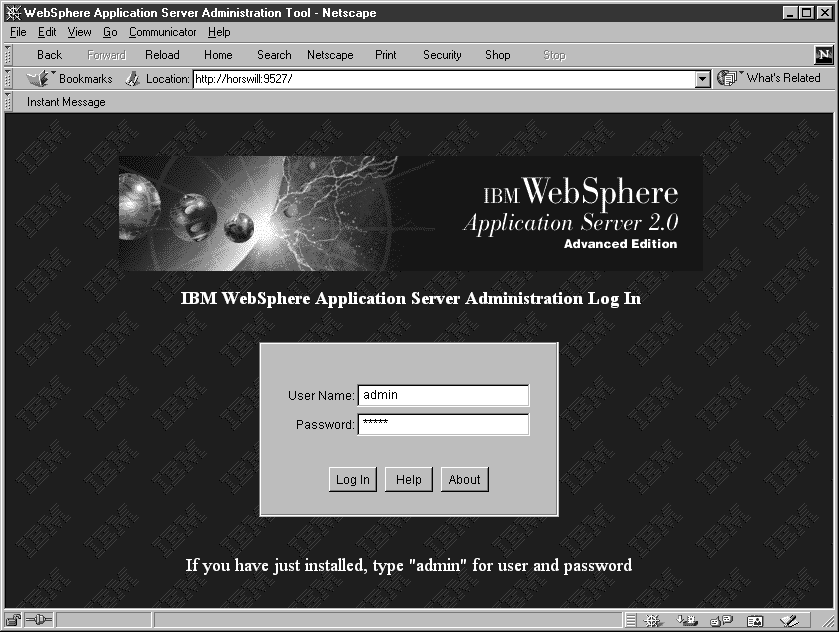
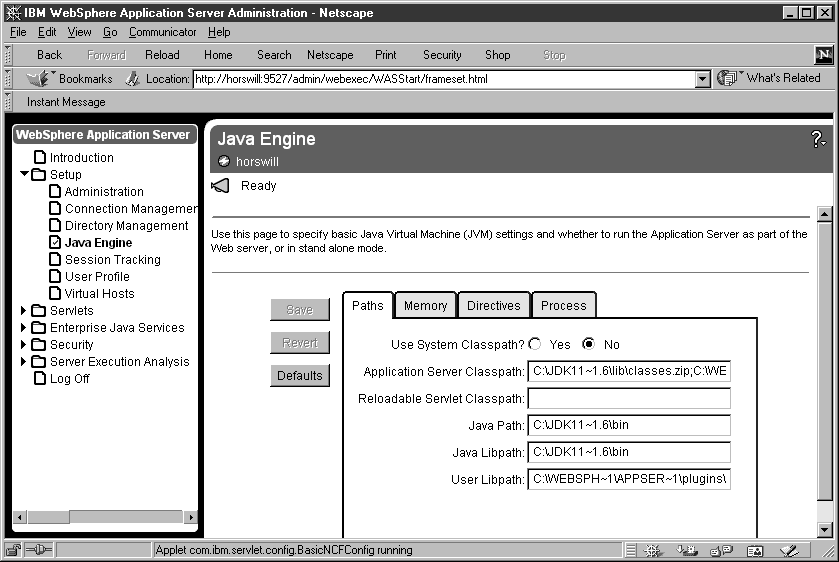
When WebSphere Application Server is successfully installed and sample web pages are deployed, open your web browser and enter the URL http://servername:9527 to bring up the Websphere Application Server administration screen. Alternatively use the Start menu → Programs → IBM WebSphere → Application Server V2.0 → Administration and you’ll see the panel as shown in Figure 9-4.
Log in as administrator (admin and your password) and select Setup followed by Java Engine. This allows you to check that the CLASSPATH environment variable is correctly configured for your system. In this example, we’re using JDK 1.1.8, which is supplied on the CD-ROM in the folder: Web ComponentJDK1.1.8.
Building the Web Site
Although it is quite possible to create web pages by starting with an empty file and writing your own HTML, there are numerous products which make it much easier to create and maintain web pages by generating HTML. You can then customize the HTML, to refine the design or adhere to your own corporate style. Such products include NetObjects Fusion, Microsoft FrontPage, Macromedia’s DreamWeaver, or Borland’s JBuilder.
The web designers at the KanDoIT company decide to use the NetObjects Fusion product to generate their new web interface. NetObjects Fusion enables you to create web sites quickly and efficiently in a WYSIWYG environment. There are page layout systems that allow you to draw the various components you want for your site and arrange them on a page. The tool then generates all the HTML.
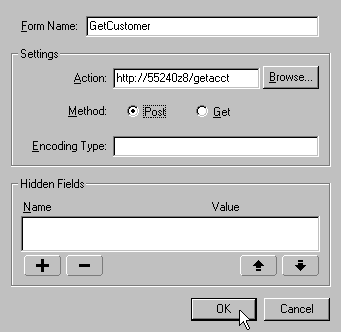
Their first objective is to create a view account request form that reflects the design described in Designing the Web Interface in Chapter 8. We have called the HTML file that is generated by NetObjects Fusion for the view account form, view-acct.html. We are not only designing the look of the form but also we are setting the properties of the form (see Figure 9-5), so that when the user clicks the Request button, the KanDoIt servlet is invoked. The form settings properties dialog box allows you to set these.
In the HTML of view-acct.html, the definition of the form begins as follows:
<FORM METHOD=POST ACTION="/getacct">
In this line the action is /getacct. That is the alias we defined through the WebSphere Application Server administration tool earlier in this chapter. In our example, /getacct is mapped to the KanDoIt.KanDoItServlet. The POST method is used to ensure that we don’t reveal the parameters we used to call the servlet (which would happen if we used a get). Figure 9-6 shows the finished form.

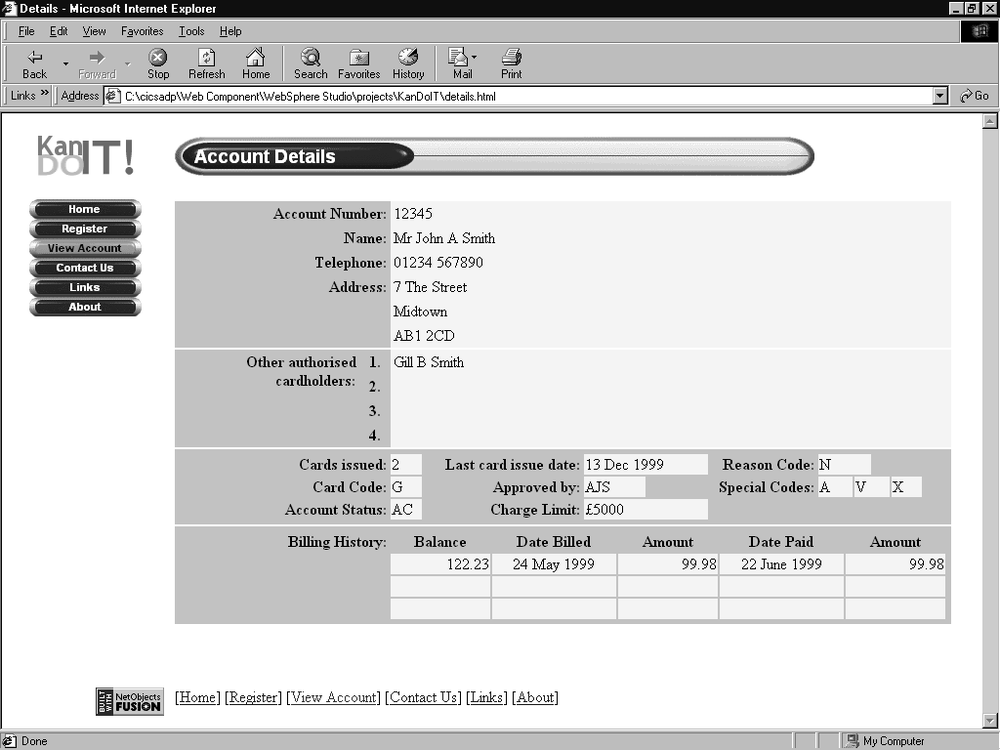
The Account Details output screen that is returned to the customer after they have entered a valid account number and password is also generated using NetObjects Fusion. Figure 9-7 shows the Account Details page. When you are creating this form it is important to remember that what you are creating is the basis of the Java Server Page (JSP) file that we want to call from the servlet. We have designed the details.html file so that it satisfied corporate standards but then we hardcoded the data fields, so that we know what to replace with dynamically generated data, that is, the hardcoded items are used as placeholders. After we have edited the file to replace the placeholders with the bean reference field, we will rename this file from details.html to details.jsp:
<INSERT BEAN="KanDoITServlet" PROPERTY="acctStatus"></INSERT>
The remainder of this chapter describes the creation of the programs that are involved in the process, from the moment a customer enters their account ID and password, until the moment the account details appear on the screen.
Programming the Web Server Components
As described in Designing the Web Server Components in Chapter 8, there are three web server components in the overall design of the web application:
A Java servlet, which we’re naming KanDoItServlet. (See Creating KanDoItServlet)
A JavaBean, which we’re naming AccountBean. (See Creating AccountBean)
A Java Server Pages (JSP) file, which we’ll name details.jsp. (See Creating the Java Server Page File)
A final stage is incorporating the CORBA client into the KanDoItServlet (See Incorporating the CORBA Client).
We decided to use IBM’s WebSphere Studio product to create these components as it was a product that drew together the development and the deployment of servlets, JavaBeans, and JSP pages. WebSphere Studio is a visual layout tool for creating and maintaining dynamic web pages using JSPs, full HTML, and JavaScript. It uses wizards to help you generate database-driven pages.
It would be possible to use other tools, such as VisualAge for Java, or generate the code manually, using your favorite editor. In this chapter, we walk you through the process of creating the code using WebSphere Studio, as well as looking at the code itself.
The overall design of the web component, as shown in Figure 8-1, shows how the web server components fit together. The best sequence for creating these components is:
AccountBean
KanDoItServlet
details.jsp and error.jsp file
The reason for this is that the servlet wizard requires a bean, and the changes to the JSP file require knowing the field names in the bean. However, before creating any of the components, the first stage, using WebSphere Studio, is to create a project to contain the components.
Creating a WebSphere Studio Project
WebSphere Studio is the main development tool that we will be using in this chapter. If you followed the configuration of WebSphere Studio, you will have already created a new project called KanDoIT. If you didn’t, then you need to create one now:
Start WebSphere Studio, and create a new project called KanDoIT. To do this, go to the toolbar, select File → New Project. In the New project dialog box, enter details about the project then click OK; see Figure 9-8 for an example of the screen.
A new project is created with an empty classes folder. This chapter describes in detail the steps that you need to follow to build up your own project.
Alternatively, you can copy the directory and its contents from Web ComponentWebsphere StudioprojectsKanDoIT to the WebSpherestudioprojects directory. This was created when you set up the KanDoIT project.
If you loaded the files into the KanDoIt project, you have to refresh the project before they become visible. Highlight the KanDoIT project, right click, and select Refresh.
Now we can get down to the business of understanding the working parts of the web component.
Creating AccountBean
The process of creating AccountBean using WebSphere Studio means that you need to know the names of all of the properties that you want to store in the bean. These properties are the names of the fields that we have used in other parts of this book—in both Part V and Part VI. To create AccountBean using WebSphere Studio:
Highlight your KanDoIT project root folder and click on the Studio Wizard icon
 (top righthand corner), as shown in Figure 9-8.
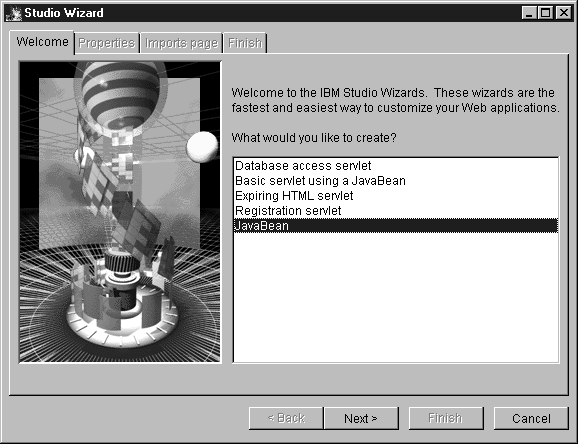
In the dialog box that appears (see Figure 9-9), select JavaBean, and click Next.
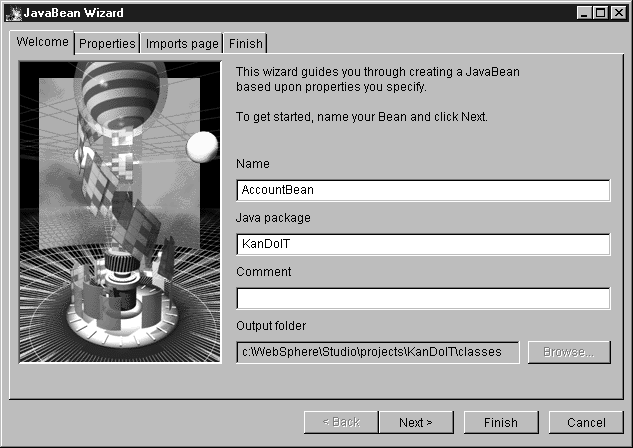
Specify the name of your JavaBean (in the case of the sample application, AccountBean), then click Next to enter Properties; see Figure 9-10.
Add the names of all of the properties that you want to store in the JavaBean. Here, we want to match the names of the account detail fields in the customer VSAM file. See Example 9-1 for the list of property names you should enter for the sample. Figure 9-11 shows the Properties panel for the JavaBean Wizard.
Click Next to move to the Imports page tab, leave these settings as they are. Click Next and then Finish to complete the wizard. A message appears saying that the code is being compiled.
Select the KanDoIt project, right-click and select Refresh to see the results of your efforts. The usual fastpath of F5 is available as well.
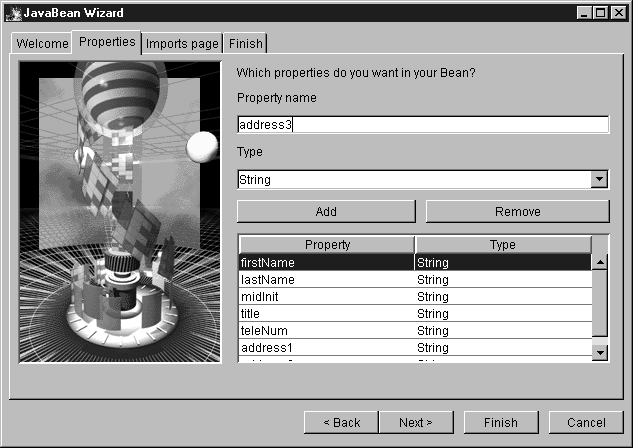
FirstName
LastName
MidInit
Title
TeleNum
Address1
Address2
Address3
Auth1
Auth2
Auth3
Auth4
NumIssues
IssueDay
IssueMonth
IssueYear
IssueReason
CardCode
ApproverCode
SpecialCode1
SpecialCode2
SpecialCode3
AcctStatus
CreditLimit
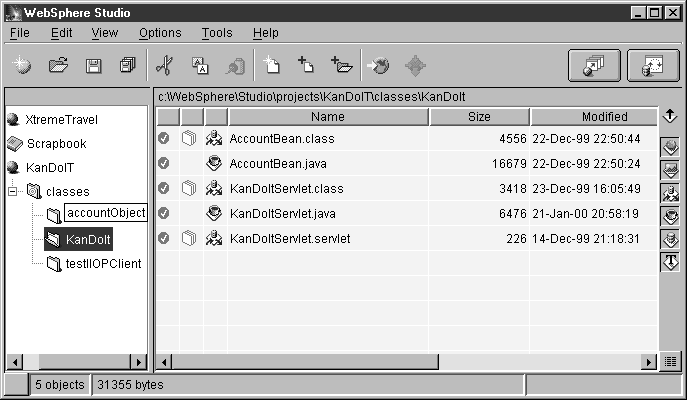
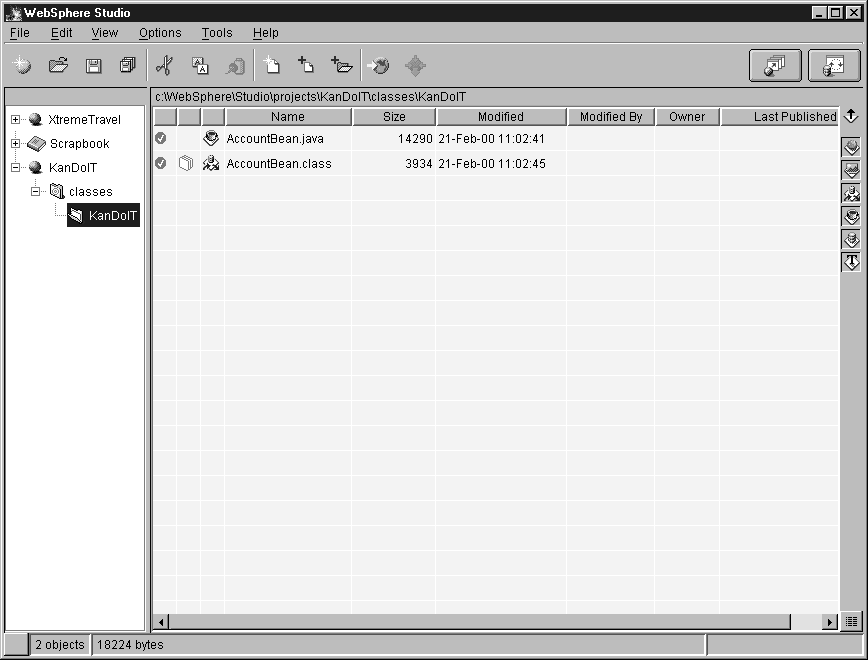
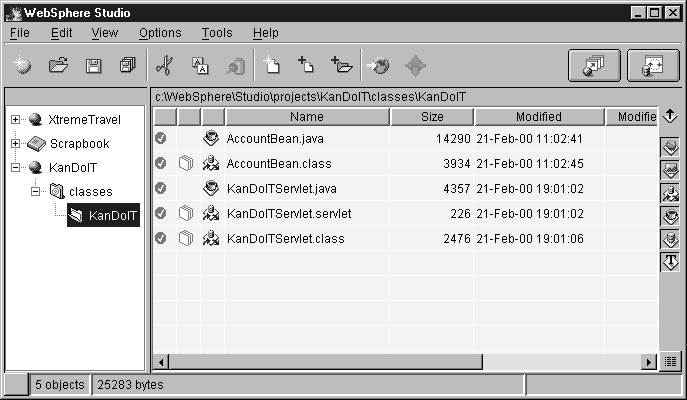
The classes folder is now populated with a KanDoIT folder that contains the following files:
See Figure 9-12 for the details.
Tip
The ![]() icon next to AccountBean.class shows that this file is set to be published. This means that it is ready to be copied to the correct location on the target web server.
icon next to AccountBean.class shows that this file is set to be published. This means that it is ready to be copied to the correct location on the target web server.
Looking at the coding in AccountBean
If you want to view or edit the source Java code for AccountBean, double-click on the AccountBean.java file. This invokes your editor, in our case NetObjects ScriptBuilder Version 3.0, as shown in Figure 9-13. You can see the code that has been generated by the WebSphere Studio wizard.
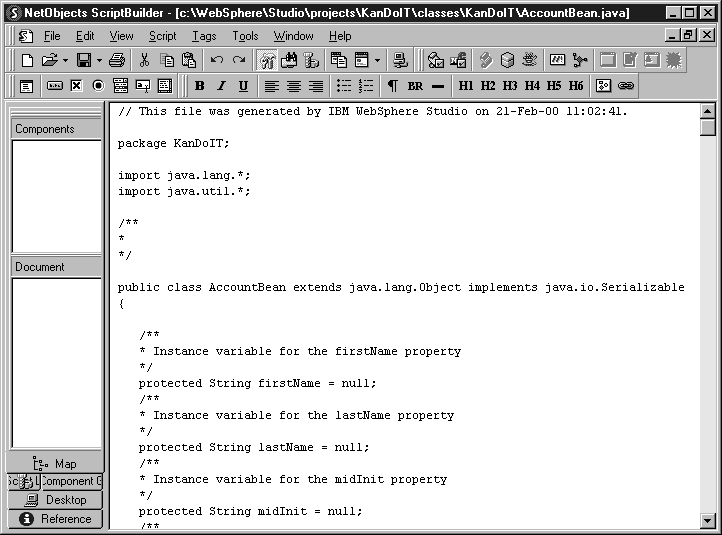
What follows are declarations of the string variables you defined in the Properties tab. These match the fields in the VSAM customer data file. All of these variables are defined as protected, which means they can only be modified by methods defined within the AccountBean class, as shown in Example 9-2.
/**
* Instance variable for the accountNum property
*/
     protected String accountNum = null;

/**
* Instance variable for the password property
*/
     protected String password = null;
These string variables are used to hold the account’s variable fields—account number and password, as shown in Example 9-3. These are the same account number and password that the customer enters in the View Account form on the web browser.
/**
* Instance variable for the lastName property
*/
     protected String lastName = null;
/**
* Instance variable for the firstName property
*/
     protected String firstName = null;
The remaining fields will contain the customer information from the VSAM data file, for example address, telephone number, and so on.
Further down the AccountBean code, we find the getter and setter methods for each variable, as shown in Example 9-4. These enable other Java classes to read the value of a property or set the value of a property, without modifying the property directly.
/* Get method for the accountNum property
* @return the value of the property
*/
public String getAccountNum()   {
       return accountNum;
      }
/* Set method for the accountNum property
*
* @param value the new value for the proprety
*/
public void setAccountNum(String value)   {
      this.accountNum = value;
      }
Creating KanDoItServlet
The KanDoItServlet servlet has three main tasks:
The process for creating KanDoItServlet using WebSphere Studio is described here:
Select the KanDoIT root folder to highlight it, then click the Studio Wizard button on the toolbar—as you did in Figure 9-8.
In the wizard dialog box that appears (Figure 9-14), select Basic servlet using a JavaBean, click Next. Specify the name of your servlet (in this case, KanDoItServlet) and click Next.
Select KanDoIT.AccountBean from the pull-down list, and check the Store this Bean in the user’s session option, click Next to move to the Input page tab.
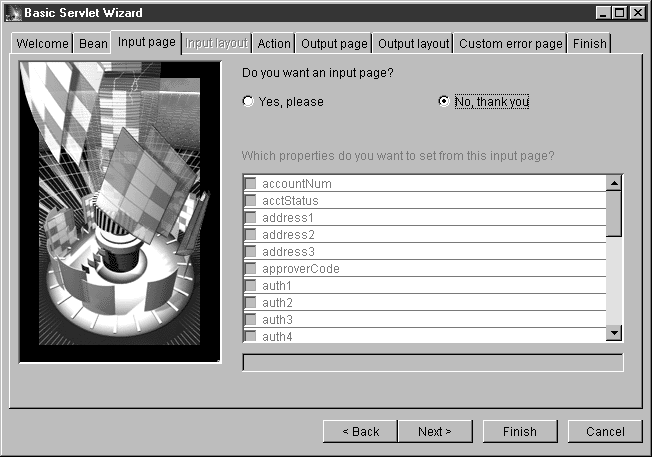
In the Input page (Figure 9-15), the fields you specified in
AccountBeanappear in the window. Select No, thank you in response to the question Do you want an input page?, click Next to move to the Action page; see Figure 9-14.On the Action page, select No, thank you, click Next to move to the Output page.
On the Output page tab (Figure 9-16), click Yes, please and check all of the properties you want to display. In the sample application, this is everything except password, errorReason, errorResponse, and class. This indicates that we want to generate a sample JSP page which will come in useful when we convert our HTML files to JSP files. Click Next to move to the Output Layout page; see Figure 9-16.
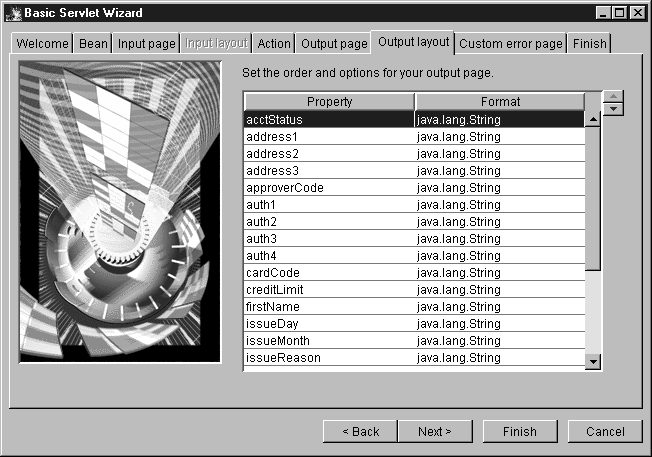
In the Output layout page (Figure 9-17), you can arrange the fields so that they are displayed in the order you want by selecting the fields and using the arrow keys.
Finally, click Next to move to the Custom error page tab. Select No, thank you, click Next to move to the Finish tab, then click Finish to complete the wizard.

Now when you look at the KanDoIT folder (Figure 9-18), you will find three new files:
Tip
The ![]() icon next to KanDoItServlet.class and KanDoItServlet.servlet shows that these files are set to be published. If you click on the KanDoIT project folder, you’ll see that there is also one new file in the root folder.
icon next to KanDoItServlet.class and KanDoItServlet.servlet shows that these files are set to be published. If you click on the KanDoIT project folder, you’ll see that there is also one new file in the root folder.

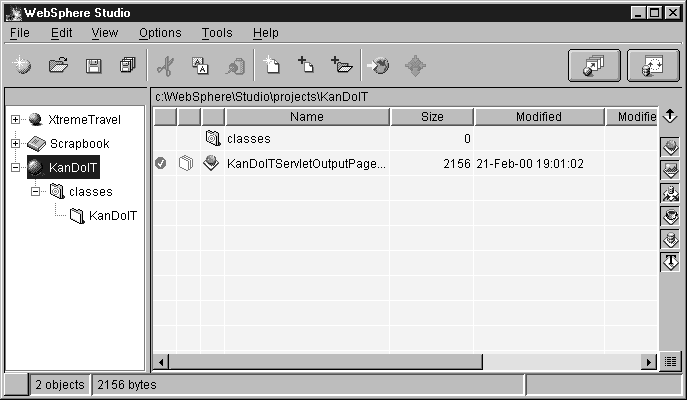
WebSphere Studio has automatically created a skeleton JSP file, and named it KanDoItServletOutputPage.jsp. This is in the KanDoIT root folder; see Figure 9-19.
Creating the Java Server Page File
The KanDoItServletOutputPage.jsp file is generated by WebSphere Studio. It contains the code that displays the contents of the specified fields in AccountBean, but without any HTML formatting. What we want to do now is to take the HTML file that was generated in the HTML editor, for example, NetObjects Fusion, and convert it into a JSP file that references dynamically generated data:
Double-click on KanDoItServletOutputPage.jsp in the KanDoIT root folder. This opens the NetObjects ScriptBuilder and allows you to edit the file.
Locate the details.html file in the KanDoIt root directory. If it isn’t in your project folder, use File, Add File and browse to find the file on the CD-ROM.
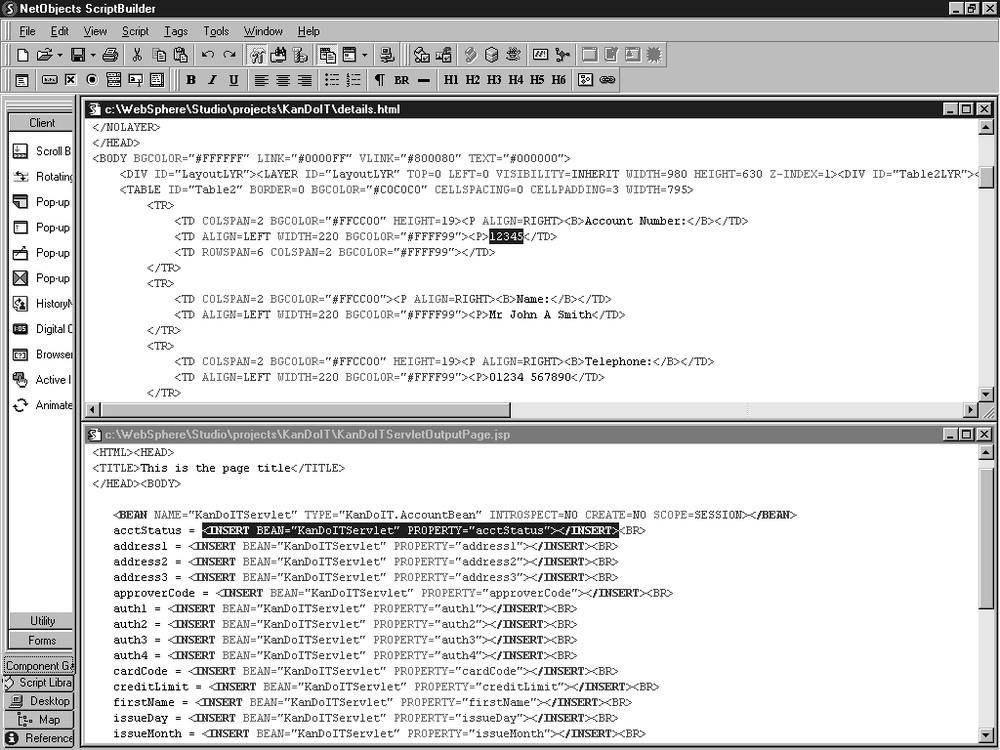
Edit the details.html file in NetObjects ScriptBuilder, use windows → tile option so that you can see both the details.html and KanDoItServletOutputPage.jsp source files, as shown in Figure 9-20.
Locate the hard-coded field values in details.html. In Figure 9-21 this is, for example, 12345 and replace them with the corresponding tags from the sample JSP file; see Figure 9-22). For example:
<INSERT BEAN="KanDoITServlet" PROPERTY="accountNum"></INSERT>
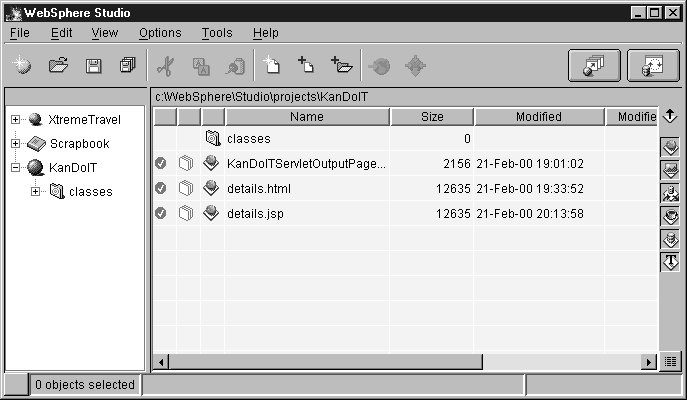
After making the required changes, save the modified details.html file as details.jsp. Close ScriptBuilder and return to WebSphere Studio and refresh the project display (F5). The details.jsp file will now appear in the list of project files in the KanDoIt root directory.
Examining the details of the Java Server Page
The early part of the file is standard HTML, as generated by your web editor. The changes begin after the <BODY… tag, as shown in Example 9-5.
In Example 9-5, the first highlighted line in the code fragment shows the <BEAN … tag, in which a reference to the JavaBean is created. This is used by the <INSERT BEAN… tags that follow. Rather confusingly, WebSphere Studio uses as its reference ID the name of the Java servlet, in this case KanDoItServlet. If you wish, you can change this name to avoid potential confusion.
Later in the code fragment, you’ll see an <INSERT BEAN… tag, which inserts the accountNum value that has been stored in AccountBean. The value is displayed next to the text string Account Number, as defined two lines earlier. The same change has to be made for all the other fields.
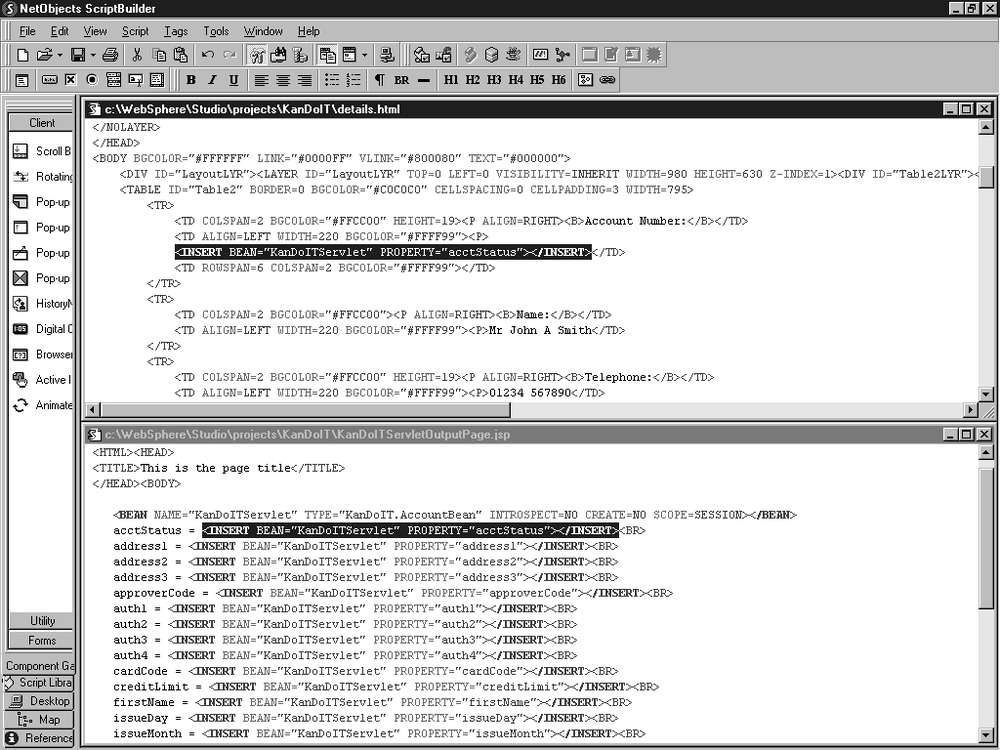
<BODY BGCOLOR="#FFFFFF" LINK="#0000FF" VLINK="#800080" TEXT="#000000"><BEAN NAME="KanDoITServlet" TYPE="KanDoIT.AccountBean" INTROSPECT=NO CREATE=NOSCOPE=SESSION></BEAN><DIV ID="LayoutLYR"><LAYER ID="LayoutLYR" TOP=0 LEFT=0 VISIBILITY=INHERIT WIDTH=980 HEIGHT=630 Z-INDEX=1><DIV ID="Table2LYR"><LAYER ID="Table2LYR" VISIBILITY=INHERIT TOP=90 LEFT=177 WIDTH=795 HEIGHT=470 Z-INDEX=1> <TABLE ID="Table2" BORDER=0 BGCOLOR="#C0C0C0" CELLSPACING=0 CELLPADDING=3 WIDTH=795> <TR> <TD COLSPAN=2 BGCOLOR="#FFCC00" HEIGHT=19><P ALIGN=RIGHT><B>Account Number:</B></TD> <TD ALIGN=LEFT WIDTH=220 BGCOLOR="#FFFF99"><P><INSERT BEAN="KanDoITServlet" PROPERTY="accountNum"></INSERT></TD><TD ROWSPAN=6 COLSPAN=2 BGCOLOR="#FFFF99"></TD>
We now have a JavaBean named AccountBean, a JSP file that will generate output HTML with data picked up directly from AccountBean, and a Java servlet. The final stage is to modify the servlet that was generated by WebSphere Studio, so that it does the following:
Before we go further we need to create an equivalent error.jsp file using the same method we have described earlier.
Creating the Error JSP File
There are three steps needed to set up the error JSP file. They are:
Create an error.html file
Edit the error.html so that it includes the reason and response BEAN tags
Save the resulting error.jsp file
The process is very similar to the one described for the creation of the details.jsp file (see Creating the Java Server Page File, earlier in this chapter).
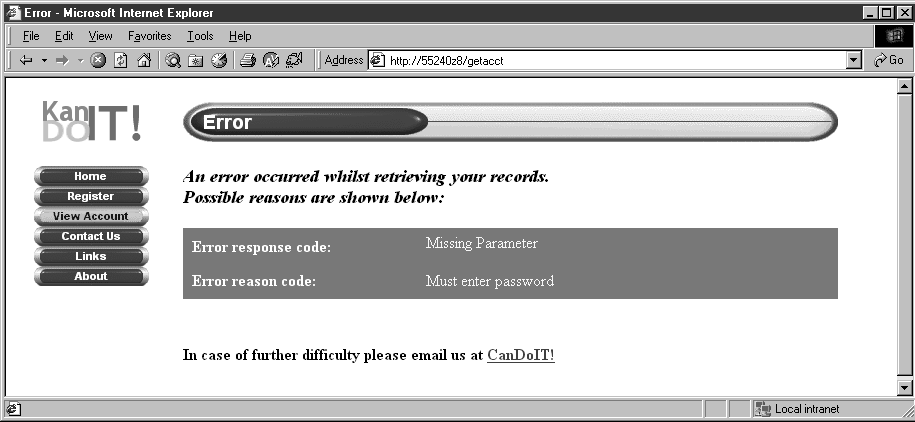
If a customer does fail to enter a password, the panel as shown in Figure 9-23 is displayed.
Modifying KanDoItServlet.java
There are two methods that you need to include in the sample: deciding which JSP page to return to the user, and instantiating the ClientStub class so that we can get data from CICS using IIOP:
- Deciding which JSP page to return
The servlet determines which JSP file to output whether it should be the details.jsp or the error.jsp. Initially we have to add a variable to hold the name of the JSP file that we want to display. The code to do this is:
String pageToDisplay;
Later in the code you will see that it returns the error.jsp file if either the account number is incorrect or the password has not been entered. The code for this is:
String inAcctNum = getParameter(request, "custacno", true, true, true, null);
String inPassword = getParameter(request, "password", true, true, true, null);
       pageToDisplay = "/~CICS_Primer/error.jsp";
Depending on the response code from CICS, we can set the pageToDisplay variable to either details.jsp or error.jsp. If the account number and the password are valid entries, then pageToDisplay returns the details.jsp. This causes the JSP file to be compiled and replace all the BEAN tags with the appropriate values from the AccountBean. The Account Details page is sent to the client browser. If the values are invalid the code determines what error reason and error response to return with the error.jsp file to the user. Example 9-6 shows the full code for the KanDoItServlet servlet.
- Instantiating the ClientStub object
The purpose of this is to allow the servlet to communicate with the client ORB. At the beginning of the file, we import the testIIOPClient class that we developed in Chapter 7. This instantiates a ClientStub object so we can request data from CICS using IIOP. The code to do this is:
import testIIOPClient.*;
This package (testIIOPClient) includes the ClientStub class, which in turn imports the necessary AccountObject helper classes. After doing some validation on the input parameters (see Example 9-6) we then instantiate ClientStub:
new ClientStub(inAcctNum, KanDoItServlet);
After you have completed the modifications you need to recompile KanDoItServlet.java. Example 9-6 shows the code is the KanDoItServlet.java file. The lines that you need to edit are highlighted.
// This file was generated by IBM WebSphere Studio Release 1.0 on 14-Dec-99 16:18:31. package KanDoIt;import testIIOPClient.*;/****/public class KanDoItServlet extends com.ibm.servlet.PageListServlet implements java.io.Serializable {* Process incoming requests for information * * @param request Object that encapsulates the request to the servlet * @param response Object that encapsulates the response from the servlet */ public void performTask(javax.servlet.http.HttpServletRequest request, javax.servlet.http.HttpServletResponse response) {String pageToDisplay;try { javax.servlet.http.HttpSession session = request.getSession(true); // Instantiate the bean and store it in the request so it can be accessed // by the called page KanDoIt.AccountBean KanDoItServlet = null; KanDoItServlet = (KanDoIt.AccountBean) java.beans.Beans.instantiate (getClass().getClassLoader(), "KanDoIt.AccountBean"); // Store the bean in the session so it can be accessed by other servlets as // the user navigates the site session.putValue("KanDoItServlet", KanDoItServlet);// get input parameters from HTTP requestString inAcctNum = getParameter(request, "custacno", true, true, true, null);String inPassword = getParameter(request, "password", true, true, true, null);pageToDisplay = "/~CICS_Primer/error.jsp";// check we have both input parameters - if not issue errorif ( inAcctNum.equals("") || inPassword.equals("") ) {KanDoItServlet.setErrorResponse("Missing Parameter");if ( inAcctNum.equals("") ) {KanDoItServlet.setErrorReason("Must enter account code");} else {KanDoItServlet.setErrorReason("Must enter user password");else if ( inAcctNum.length() != 5 || inPassword.length() > 8 ) {KanDoItServlet.setErrorResponse("Length error");if ( inAcctNum.length() != 5 ) {KanDoItServlet.setErrorReason("Account code must be 5 characters");} else {KanDoItServlet.setErrorReason("Password is 1-8 characters");}} else {// Initialize the bean accountNum property from the parametersKanDoItServlet.setAccountNum(inAcctNum);// Initialize the bean password property from the parametersKanDoItServlet.setPassword(inPassword);// Pass acccount bean reference to Client stub and retrieve// accountdata directly into the account beannew ClientStub(inAcctNum, KanDoItServlet);// if no error from CICS, set URL of JSP to display with account// detailsif (KanDoItServlet.getErrorReason().equals("0000") && KanDoItServlet.getErrorResponse().equals("0000")) {pageToDisplay = "/~CICS_Primer/details.jsp";} else {if (KanDoItServlet.getErrorResponse().equals("0013") &&KanDoItServlet.getErrorReason().equals("0080")) {KanDoItServlet.setErrorResponse("Not found");KanDoItServlet.setErrorReason("Account " + inAcctNum + "does not exist");}}}// Use callPage to invoke the JSP file and pass the current request object((com.sun.server.http.HttpServiceResponse)response).callPage( pageToDisplay, request);} catch (Exception theException) {handleError(request, response, theException);}}/***************************************************************************** * Returns the requested parameter * * @param request Object that encapsulates the request to the servlet * @param parameterName The name of the parameter value to return * @param checkRequestParameters when true, the request parameters are searched * @param checkInitParameters when true, the servlet init parameters are searched * @param isParameterRequired when true, an exception is thrown when the parameter cannot be found * @param defaultValue The default value to return when the parameter is not found * @return The parameter value * @exception java.lang.Exception Thrown when the parameter is not found */ public java.lang.String getParameter(javax.servlet.http.HttpServletRequest request, java.lang.String parameterName, boolean checkRequestParameters, boolean checkInitParameters, boolean isParameterRequired, java.lang.String defaultValue) throws java.lang.Exception { java.lang.String[] parameterValues = null; java.lang.String paramValue = null; // Get the parameter from the request object if necessary. if (checkRequestParameters) { parameterValues = request.getParameterValues(parameterName); if (parameterValues != null) paramValue = parameterValues[0]; } // Get the parameter from the servlet init parameters if // it was not in the request parameter. if ( (checkInitParameters) && (paramValue == null) ) paramValue = getServletConfig().getInitParameter(parameterName); // Throw an exception if the parameter was not found and it was required. // The exception will be caught by error processing and can be // displayed in the error page. if ( (isParameterRequired) && (paramValue == null) ) throw new Exception(parameterName + " parameter was not specified."); // Set the return to the default value if the parameter was not found if (paramValue == null) paramValue = defaultValue; return paramValue; } /***************************************************************************** * Process incoming HTTP GET requests * * @param request Object that encapsulates the request to the servlet * @param response Object that encapsulates the response from the servlet */ public void doGet(javax.servlet.http.HttpServletRequest request, javax.servlet.http. HttpServletResponse response) { performTask(request, response); } /***************************************************************************** * Process incoming HTTP POST requests * * @param request Object that encapsulates the request to the servlet * @param response Object that encapsulates the response from the servlet */ public void doPost(javax.servlet.http.HttpServletRequest request, javax.servlet.http. HttpServletResponse response) { performTask(request, response); } }
Modifying ClientStub.java
There are a number of small changes that you need to make to the ClientStub.java file. They are:
Change the constructor so that it includes a reference to the AccountBean:
public ClientStub(String acctID,
KanDoIt.AccountBean KanDoItServlet)Invoke the getDetails method including that AccountBean reference:
getDetails(ai, acctID,
KanDoItServlet);Add these line to set the error response and reason fields in the AccountBean:
KanDoItServlet.setErrorReason(acctData.reascode);
KanDoItServlet.setErrorResponse(acctData.respcode);
Change all the System.out.println lines to set the corresponding fields in the AccountBean with the values returned from the IIOP request:
KanDoItServlet.setFirstName(acctData.firstname);
KanDoItServlet.setLastName(acctData.lastname);
The AccountBean class source code is generated by the bean wizard in WebSphere Studio. It contains all the fields we specified that we want to store from the account Object. The contents are picked up by the JSP file, detail.jsp.
After you have completed the modifications you need to recompile ClientStub.java.
Example 9-7 shows the code is the ClientStub.java file. The lines that you need to edit are highlighted.
package testIIOPClient;
import accountObject.*;
import java.io.*;
import org.omg.CORBA.*;
import org.omg.CosLifeCycle.*;
import org.omg.CosNaming.*;
/**
 * This type was created in VisualAge.
 */
public class ClientStub {
/**
 * ClientStub constructor comment.
 */
public ClientStub(String acctID, KanDoIt.AccountBean KanDoItServlet) {
String factoryIOR;
AccountInterface ai = null;
try  {
     // create and initialize the ORB
     System.out.println("Client: creating and initializing the ORB");
     ORB orb = ORB.init();
     // create the generic factory
     System.out.println("Client: creating the generic factory");
     factoryIOR = getFactoryIOR();
     org.omg.CORBA.Object genFacRef = orb.string_to_object(factoryIOR);
     System.out.println("Client: narrowing the generic factory");
     GenericFactory fact = GenericFactoryHelper.narrow(genFacRef);
     // use generic factory to make HelloWorld object
     System.out.println("Client: using generic factory to make accountObject object");
     NameComponent nc = new NameComponent("accountObject::AccountInterface", "object
interface");
     NameComponent key[] = {nc};
     NVP mycriteria[] = {};
     System.out.println("about to create object reference");
     org.omg.CORBA.Object objRef = fact.create_object(key, mycriteria);
     System.out.println("about to narrow");
     ai = AccountInterfaceHelper.narrow(objRef);
     getDetails(ai, acctID, KanDoItServlet);
}
// Catch NoFactory
catch (org.omg.CosLifeCycle.NoFactory nf)  {
     System.out.println(
     "Client: NoFactory thrown by create_object for accountObject::AccountInterface");
     System.out.println("                  - check server program with alias +
                                  accountObject.jll is available on the CICS server");
}
// Catch any unexpected exceptions
catch (Exception e)  {
     System.out.println("Client: Unexpected exception : " + e);
     e.printStackTrace(System.out);
}
}
/**
 * This method was created in VisualAge.
 * @param ai accountObject.AccountInterface
 */
public void getDetails(accountObject.AccountInterface ai, String acctID, KanDoIt.
AccountBean KanDoItServlet) {
     // Invoke the getAccount method
     System.out.println("Client: invoking getAccount method on accountObject object");
     AccountData acctData = ai.getAccount(acctID);
     KanDoItServlet.setErrorReason(acctData.reascode);
     KanDoItServlet.setErrorResponse(acctData.respcode);
     if (acctData.respcode.equals("0000") && acctData.reascode.equals("0000")) {
          KanDoItServlet.setFirstName(acctData.firstname);
          KanDoItServlet.setLastName(acctData.lastname);
          KanDoItServlet.setMidInit(acctData.midinit);
          KanDoItServlet.setTitle(acctData.title);
          KanDoItServlet.setTeleNum(acctData.telnum);
          KanDoItServlet.setAddress1(acctData.addr1);
          KanDoItServlet.setAddress2(acctData.addr2);
          KanDoItServlet.setAddress3(acctData.addr3);
          KanDoItServlet.setAuth1(acctData.auth1);
          KanDoItServlet.setAuth2(acctData.auth2);
          KanDoItServlet.setAuth3(acctData.auth3);
          KanDoItServlet.setAuth4(acctData.auth4);
          KanDoItServlet.setNumIssues(acctData.cards);
          KanDoItServlet.setIssueDay(acctData.issueday);
          KanDoItServlet.setIssueMonth(acctData.issuemonth);
          KanDoItServlet.setIssueYear(acctData.issueyear);
          KanDoItServlet.setIssueReason(acctData.reason);
          KanDoItServlet.setCardCode(acctData.code);
          KanDoItServlet.setApproverCode(acctData.approver);
          KanDoItServlet.setSpecialCode1(acctData.scode1);
          KanDoItServlet.setSpecialCode2(acctData.scode2);
          KanDoItServlet.setSpecialCode3(acctData.scode3);
          KanDoItServlet.setAcctStatus(acctData.status);
          KanDoItServlet.setCreditLimit(acctData.limit);
     }  else  {                               // non-zero return code
         System.out.println("An error occurred: ");
         System.out.println("Response Code: " + acctData.respcode);
         System.out.println("Reason Code: " + acctData.reascode);
         System.out.println("Account ID: " + acctData.acctid);
         System.out.println("CICS Function: " + acctData.cicsfunc);
     }
}
/**
 * This method was created in VisualAge.
 * @return java.lang.String
 * @exception java.io.IOException The exception description.
 */
public String getFactoryIOR() throws IOException {
String line;
final String filename = "C://IORFiles/genfac.ior";
FileInputStream in = null;
InputStreamReader isr = null;
BufferedReader br = null;
try  {
     in = new FileInputStream(filename);
     isr = new InputStreamReader(in);
     br = new BufferedReader(isr);
}
catch(IOException e)  {
     System.out.println("Client: Error opening file " + filename);
     throw e;
} try {
     line = br.readLine();
     System.out.println("IOR:" + line);// for diagnostics
     }
     catch(IOException e)  {
          System.out.println("Client: Error reading file " + filename);
          throw e;
     }
return line;
     }
}
Publishing Your Files
Now that you have completed the WebSphere Studio project, you have all the HTML, JSP, servlets, Java classes that you need together with the CORBA client Java and class files. At this point you need to publish the files on the web server:
Select the KanDoIT project, right-click and choose Publish. All the files that are marked for publication will be transferred to your web server. You will be prompted to select a publishing server, for example, local. This was defined at the beginning of this chapter.
Shut down and restart your web server to apply your changes. If you are using the latest version of WebSphere Application Server, you may not have to do this.
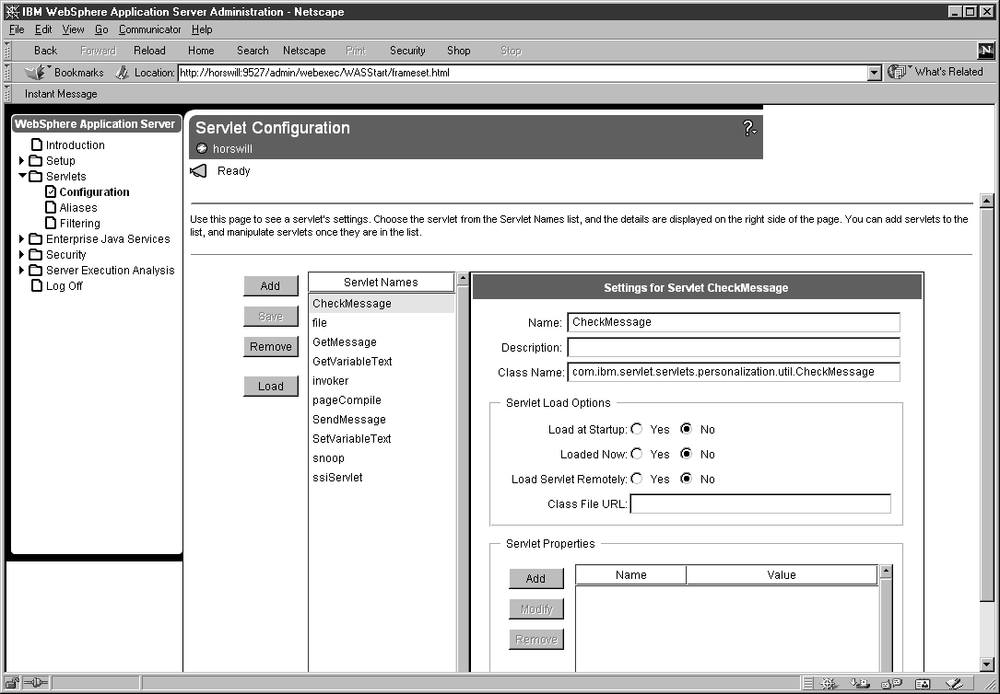
To define the servlet and its alias, select Servlets followed by the Configuration option. Later in the chapter we will be describing how to develop the servlet. Figure 9-24 shows the screen.
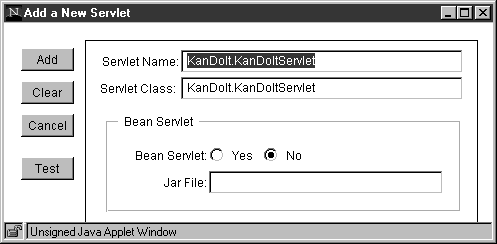
Click the Add button to add a servlet and enter KanDoIt.KanDoItServlet for the servlet name and class name; now click Add. Figure 9-25 shows the screen.
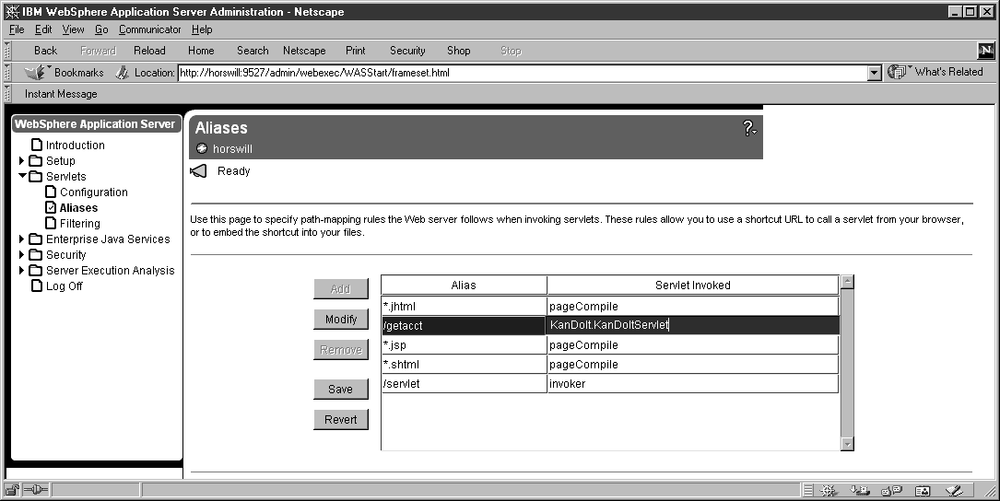
Now you need to create an alias that you will use later to access the servlet. Select Servlets followed by the Configuration option, now click Add (see Figure 9-26).
Click the Add button to add an alias and enter
/getacctfor the alias and KanDoIt.KanDoItServlet for the servlet invoked, now click Save.You are finally ready to test your work.
Testing the Sample
Open your web browser and enter the URL http://servername/cicsadp/ where cicsadp is the name you defined in the httpd.conf file of your web server. This brings up the home page for the KanDoIT web site.
Navigate to the View Account page, click the view account button and enter an account number, for example, 10000 and password (any password since we have not covered security at all). This should return the account details page, populated with information for account number 10000.
Now test the error page. Return to the home page and enter the account number but this time without a password. This should return the error page with the error reason code and the error response code as shown in Figure 9-23.