
Chapter 15. Programming the MQSeries-CICS Bridge
In this chapter:
This chapter describes the process of building the Java GUI and the coding of the application. In addition, it describes the way to set up communication between MQSeries for Windows NT and MQSeries for OS/390.
Building the Java GUI
The Java GUI has been written in Swing, which provides a larger set of components and which can produce more aesthetically pleasing results than the Java Abstract Window Toolkit (AWT). Swing is a subset of Java Version 1.2, which is used to develop GUIs. In particular, the JTable object used in Swing has been used to create the main panel. The JTable for the main panel is set up in MQClient.java. Within this class, the menu bar (instance of JMenuBar) and associated controls are created. The data entry area consists of a combination box (instance of JCombo) and a click button (instance of Jbutton) to submit the request. The results are displayed within a panel (instance of JPanel) where a four-section grid layout, as described in Designing the Graphical User Interface in Chapter 14, is used. The full source code can be found in the MQSeries-Java Client directory on the CD that accompanies this book.
The Java GUI has deliberately been kept simple. The main purpose of this application is to show the mechanism used to obtain data from a CICS program using MQSeries messaging.
Tip
If you want to know more about Swing, refer to either http://ibm.com/java/jdk/index.html or http://java.sun.com.
Coding the Java Application
There are seven steps that are involved in developing this part of the application:
Coding the Java Application
To provide the connection to an MQSeries queue manager, we have created a Java class MQCommunicator. It looks like this:
public class MQCommunicator {.......}The full code is on the accompanying CD in the directory called mqseries-java clientMQCommunicator.class.
MQSeries provides a number of Java classes, which we can access on Windows NT by importing the package com.ibm.mq.*. In order to make a connection to the relevant queue manager we need to supply the following information:
The IP address of the host machine on which the OS/390 queue manager that we are going to use is located
The name of the Windows NT queue manager
The name of the MQI channel that makes the connection from the MQSeries client to the Windows NT queue manager (named in the previous bullet)
The request queue where we put the MQSeries message containing details of the customer account number
The reply-to queue onto which we get the response message containing the customer details supplied by the NACT02 application
The code looks like this:
// Setup MQ object

MQComms=newMQCommunictaor(hostname,qManager,channel,requestQueue,replyQueue);
Using the MQSeries supplied environment class MQEnvironment, we set the variables for the host name, queue manager, and the communications port to use:
MQEnvironment.hostname =hostname; // ARG#1 MQEnvironment.channel =channel; // ARG#2 MQEnvironment.port = 1414; // Hard code port
The communications port in this case has the system default value of 1414. When no value is set for the port, this value will normally be assumed. This is important if you are using more than one port.
Connection to the selected queue manager is then made by creating an instance of the MQSeries supplied object MQQueueManager:
qMgr = new MQQueueManager(qManager);Opening the Relevant MQSeries Queues
Once we have established the connection, we can open the MQSeries queues for use. requestQueue and replyQueue are instances of the MQSeries supplied object MQQueue.
To enable the request queue so that we can place messages on it, we set the relevant open option:
openOptions = MQC.MQOO_OUTPUT ; // Open queue to perform MQPUTs
This information is then supplied with the open request:
requestQueue = qMgr.accessQueue(aRequestQueue, openOptions,
                   null,           // queue manager on which the queue is defined
                   null,           // no dynamic queue name
                   null);         // no alternate user id
The use of null for the queue manager name denotes that the queue is defined to the queue manager to which this MQQueueManager object is connected.
Similarly, we enable the reply-to queue so that we can get the response message:
openOptions = MQC.MQOO_INPUT_AS_Q_DEF ;
replyQueue = qMgr.accessQueue(aReplyQueue, openOptions,
                   null,            // queue manager on which the queue is defined
                   null,             // no dynamic queue name
                   null);           // no alternate user id
Warning
We have used some MQSeries constants in the previous examples such as MQC.MQOO_OUTPUT…. There are a number of such constants defined by MQSeries which are similar across the different platforms supported by MQSeries. All Java versions of these classes are prefixed by MQC. The MQOO indicates that this is an open option. MQMT would indicate a message type option.
Creating the MQSeries Message
To create an instance of the MQSeries object MQMessage:
sendMessage = new MQMessage();
Default values for the message can be used for most of the message options. The following changes need to be made:
Add the COMMAREA fields to the message buffer:
MQMessage.WriteString
.
Add COMMAREA structure
Under certain circumstances, the message format required for the MQSeries CICS DPL bridge contains an additional structure compared with standard MQSeries messages.
For our simple example (which only starts one program), this MQCIH structure is not required. The MQCIH is required when you want to do one of the following:
Run a 3270 transaction
Run the bridge with AUTH=VERIFY_*
Include more than one program in a unit of work
The MQCIH header is placed at the start of the message buffer.
Adding the CICS Program Name and COMMAREA Fields to the Message Buffer
The contents of the request COMMAREA for this application always contain the same supplied values apart from the customer account number keyfield. We have chosen to store the COMMAREA fields before the customer account number key-field in the string bufferFront. The fields following the customer account number keyfield are stored in the string bufferEnd.
The bufferFront string is composed as follows:
bufferFront = "NACT02" +   // Program name
         "V1A"+            // Version
         "E"+              // Request type
         "    "+           //
         "    "+
         "     "
We need to supply the remainder of the COMMAREA after the customer account number. It consists of only spaces. As a result, bufferEnd is a string of 378 spaces.
These values are now used to create the message buffer string:
String buffer = new String(bufferFront + customerNumber + bufferEnd);
The customerNumber field is a 5-character string holding the customer account number value.
This is then written to the MQSeries message instance sendMessage:
sendMessage.writeString(buffer);
Sending the Request Message to the Bridge Queue on MQSeries for OS/390
MQSeries provides an object to specify options for the message being put onto a queue. In most cases the default options are acceptable. We create an instance of this MQPutMessageOptions object pmo:
// Specify the message options...(default)
MQPutMessageOptions pmo = new MQPutMessageOptions();
The message can now be placed on the appropriate queue:
requestQueue.put(sendMessage, pmo);
Receiving the Response Message.
The response message is recognized by its correlation ID (CorrelId), which matches the original message ID (msgId) passed with the request message. The application copies the global: message ID of the request message into the correlation ID of a new MQMessage object, in this case, the response message.
In a similar way to which we built the request message, we first create an instance of the MQSeries object MQGetMessageOptions, which is used to set the options for getting the response message:
MQGetMessageOptions gmo = new MQGetMessageOptions();
You can modify the default values of this new instance gmo as follows:
Specify that you will wait for the message if it is not already on the reply-to queue. Also that the incoming message should be converted to the correct CCSID for your machine if required:
gmo.options = MQC.MQGMO_WAIT MQC.MQGMO_CONVERT;
Specify the length of wait as 300 seconds:
gmo.waitInterval = 300000;
We already have the required MQSeries message object in the instance StoredMessage which is supplied as the parameter replyMessage. The code to get the message is:
ReplyQueue.get(replyMessage,gmo);
Checking for CICS-Related Errors
The COMMAREA returned by NACT02 within the response message contains a response code and reason code. These need to be checked in order to determine whether the request to retrieve the customer details was successful or whether some error was encountered. For a non-zero return code, the following need to be checked:
No record exists for the customer account number supplied.
The record is currently not accessible. This occurs if a lock has been put on the record where updating is in progress.
The data supplied to CICS contains an error.
The CICS system has abended for some reason.
Some other CICS-related error has occurred. This is a catchall and details of the EXEC Interface Block (EIB) values EIBRESP and EIBRESP2 are provided in the CICSresponseCode and CICSreasonCode fields, as shown in Example 15-1, which is an example of the coding involved in checking whether the record exists or is locked.
//informUser("Message received!");
//print("Message is: "+messageReturned);
//Check that inquire has been successful
CICSresponseCode = messageReturned.substring(12,16);
print(">CICS response code" +CICSresponseCode+"#");

CICSreasonCode=messageReturned.substring(16,20);
print(">CICS reason code" + CICSreasonCode+"#");
if (CICSresponseCOde.equals("0000")){
    //Strip off the fields preceding the customer record
    customerDetails = messageReturned.substring(25,408);
    AccountRecord retrieved=new AccountRecord(customerDetails);
    displayRecord(retreived);
    return;
}
//No valid record to display so clear fields
clearDisplay();
    //Check out error response returned by CICS
    if(CICSresponseCode.equals("0013")){
        informUser("No record can be found for the custimer number given.")
        return;
    }
    if(CICSresponseCode.equals("LOCK")){
        informUser("The requested record is currently unavailable, possibly being
            updated."
                     + "
Please try again later.");
         return;
    }
    if(CICSresponseCode.equals("ABND")){
        informUser("Please inform the systems administrator the the CICS system has"
            +"
abnormally ended with code" + CICSreasonCode + "Severe Error");
        return;
    }
    if((CICSresponseCode.equals("FRMT")) & (CICSreasonCode.equals("LENE")){
        informUser("Please inform the systems administrator that the call to the CICS
            program" + "
has failed due to an error in the length of the data
            supplied.");
    }
    if((CICSresponseCode.equals("FRMT")) & (CICSreasonCode.equals("REQE"))){
        informUser("Please inform the systems administrator that the call to the CICS
             program + "
has failed due to an error in the type of request made.");
    }
    informUser("Please inform the systems administrator that the call to the CICS
         program + "
has failed with the following error" + "
         nEIBRESP="CICSresponseCode+"EIBRESP2=" CICSreasonCode);
    }finally{
        enableDisableListitems(true);
    }
Displaying the Relevant Information
The next step is to create retrieved, a new instance of AccountRecord and pass the appropriate portion of the response message string as a parameter. The constructor class for this instance of AccountRecord uses the supplied string held in customerDetails to construct the various fields that make up the customer information returned within the COMMAREA from the NACT02 program. The basic method is to assign substrings based on position to the various declared fields of the AccountRecord structure. A getfieldname method is provided for each record field so that the fields can be easily retrieved by other Java classes. The code looks like:
AccountRecord retrieved = new AccountRecord(customerDetails);
The MQClient method displayRecord can then be used to populate the various fields displayed on our main panel:
displayRecord(retrieved);
Setting Up MQSeries and CICS
There are six steps that you need to do to set up the MQSeries-CICS bridge:
Define MQSeries for Windows NT
Before you start, we have included a series of files on the CD that create and start all the queue manager, queues, and channels that you need on MQSeries for Windows NT. Of course, you have to edit the files so that the IP address, queue, and channel names are appropriate. The first three steps are found in MQSeries-Java ClientMQSeries Client directory.
There are a number of standard definitions supplied by MQSeries that can be used to quickly set up the relevant required MQSeries objects. There may well be a suitable MQSeries set up on your machine that can be modified to enable communications with the CICS system.
Before you start, you need to know the IP address of the OS/390 machine you intend to communicate with, the name of the queue manager on that machine, and the name of the message channels that will be used to send messages to and from that machine.
The commands can be entered from a command prompt. Alternatively, MQSeries for Windows NT Version 5.1 supplies a Graphical User Interface, known as MQSeries Explorer, that can be used. To start MQSeries Explorer select Start, Programs, IBM MQSeries, and MQSeries Explorer. When you’ve defined the queues and queue managers, you’ll see the following screen shown in Figure 15-1.
Alternatively, you can use the following command files that we have provided on the CD-ROM. To do this:
Copy the MQSeries-Java Client directory from the CD to a suitable directory on your workstation.
Edit the file cicsadpMQSeries-Java ClientMQSeriesClient1. Start MQSeries.cmd so that the queue manager name is correct for your system. Then run the command file. This stops any existing queue manager that has the same name as the one you have chosen. It then deletes the queue manager before creating and starting your new queue manager.
Edit the file cicsadpMQSeries-Java ClientMQSeriesClientadmvs.DEF to add the IP address of your OS/390 system.
Run the command file called cicsadpMQSeries-Java ClientMQSeriesClient2. Load MQ for MVS Definitions.cmd; this defines the queue and channel names for your MQSeries for Windows NT server as they are defined in admvs.DEF.
Run the command file cicsadpMQSeries-Java ClientMQSeriesClient3. Start SevicesMVS.cmd; this starts the queue manager and the sender channel.

You can also enter the commands from a command prompt, which if you are using MQSeries from other platforms, you will have to:
Start MQSeries on Windows NT, if it not already running. Open the Control Panel, and select Services, highlight MQSeries, and select Start.
Set up a default queue manager called NTQMGR:
crtmqm -q NTQMGR
Start the queue manager:
strmqm
Set up the various MQSeries objects required such as queues, channels, and their identifiers. The following commands are contained in a definitions file MQSeries-Java ClientMQSeries Clientadmvs.def and build on the standard definitions supplied by MQSeries for Windows NT. You need to edit the name of the queue manager on your OS/390 machine (it is called MQQ1 in the following example) and CONNAME to be the IP address of your host machine.

- The transmission queue
The transmission queue is used to hold data to be sent on the message channel NTQMGR.TO.MQQ1 to your OS/390 machine, see (a) on Figure 15-2.
DEFINE QLOCAL('NT.XMIT') REPLACE + TRIGDATA(NTQMGR.TO.MQQ1) + TRIGGER + INITQ(SYSTEM.CHANNEL.INITQ) + USAGE(XMITQ)- QLOCAL(q-name)
A local queue is one that is owned by the queue manager to which it is being defined.
q-nameis the local name of the queue (NT.XMIT). This is required. The name must not be the same as any other queue name (of whatever queue type) currently defined on this queue manager (unless REPLACE is specified).- TRIGDATA
The data that is inserted in the trigger message. The maximum length of the string is 64 bytes. For a transmission queue on AIX, HP-UX, OS/2 Warp, OS/400, Sun Solaris, or Windows NT, you can use this parameter to specify the name of the channel to be started.
- NOTRIGGER and TRIGGER
Whether trigger messages are written to the initiation queue (named by the INITQ attribute) to trigger the application (named by the PROCESS attribute), NOTRIGGER means that triggering is not active, and trigger messages are not written to the initiation queue. This is the default supplied with MQSeries, but your installation might have changed it. TRIGGER means triggering is active, and trigger messages can be written to the initiation queue.
- INITQ
The local name of a local queue (known as the initiation queue) on this queue manager, to which trigger messages relating to this queue are written.
- USAGE
Queue usage can be either NORMAL where the queue is not a transmission queue, or XMITQ where the queue is a transmission queue. A transmission queue is used to hold messages that are destined for a remote queue manager. When an application puts a message to a remote queue, the message is stored on the appropriate transmission queue until it has been successfully transmitted and stored by the remote queue manager.
- Remote definition of the CICS bridge queue
This is the remote definition of the CICS bridge queue, SYSTEM.CICS.BRIDGE. QUEUE, on the OS/390 machine’s queue manager (MQQ1); see (b) on Figure 15-2. The code looks like this:
DEFINE QREMOTE('NT.REMOTE') REPLACE + RNAME('SYSTEM.CICS.BRIDGE.QUEUE') + RQMNAME('MQQ1') + XMITQ('NT.XMIT')- QREMOTE(string)
A remote queue is one that is owned by another queue manager that application processes connected to this queue manager need to access. This is required.
- RNAME(string)
The name of remote queue. This is the local name of the queue as defined on the queue manager specified by RQMNAME. If this definition is used for a local definition of a remote queue, RNAME must not be blank when the open occurs.
- RQMNAME(string)
The name of the remote queue manager on which the queue RNAME is defined. If an application opens the local definition of a remote queue, RQMNAME must not be blank or the name of the local queue manager. When the open occurs, if XMITQ is blank, there must be a local queue of this name, which is to be used as the transmission queue.
- XMITQ(string)
The name of the transmission queue to be used for forwarding messages to the remote queue, for either a remote queue or for a queue-manager alias definition. If XMITQ is blank, a queue with the same name as RQMNAME is used instead as the transmission queue.
- The MQI channel
This defines the MQI channel, CLIENT.TO.NTQMGR, used to send messages between the MQSeries client and MQSeries server on your Windows NT machine; see (c) on Figure 15-2. The definition looks like this:
DEFINE CHANNEL('CLIENT.TO.NTQMGR') CHLTYPE(SVRCONN) TRPTYPE(TCP) + MCAUSER(' ')- CHLTYPE
This specifies the channel type and is required. It must follow immediately after the (channel-name) parameter on all platforms except OS/390. There are various options, but the ones that we use in this sample are SVRCONN (Server-connection channel), SDR (Sender channel), and RCVR (Receiver channel).
- TRPTYPE
This specifies the transport type to be used.
- MCAUSER
This specifies the message channel agent user identifier. If it is blank, the message channel agent uses its default user identifier.
- The message channel (Sender)
This defines the Windows NT message channel, NTQMGR.TO.MQQ1, used to send messages to the queue manager MQQ1 on your OS/390 machine; see (d) on Figure 15-2. The definition looks like this:
DEFINE CHANNEL('NTQMGR.TO.MQQ1') CHLTYPE(SDR) TRPTYPE(TCP) + XMITQ('NT.XMIT') + CONNAME('<<Your IP Address>>') + MCAUSER(' ') REPLACE- CONNAME
This specifies the IP address of the host machine.
The other options are described as for the other definitions.
- The message channel (Receiver)
This defines the message channel, MQQ1.TO.NTQMGR, used to receive messages from the queue manager, MQQ1, on your OS/390 machine; see (e) on Figure 15-2. The definition looks like this:
DEFINE CHANNEL('MQQ1.TO.NTQMGR') + CHLTYPE(RCVR) + TRPTYPE(TCP) + SEQWRAP(999999999) + MCAUSER(' ') REPLACE- SEQWRAP
When this value is reached, sequence numbers wrap to start again at 1. This value is non-negotiable and must match in both the local and remote channel definitions.
- The reply-to queue
This defines the queue used to receive response messages from our OS/390 machine; see (f) on Figure 15-2. The definition looks like this:
DEFINE QLOCAL('MQI.ECI.REPLY.QUEUE') REPLACE + DEFPSIST(YES) + SHARE- DEFPSIST
This specifies the message persistence to be used when applications specify the MQPER_PERSISTENCE_AS_Q_DEF option. There are two options: NO, which specifies that messages on this queue are lost across a restart of the queue manager. This is the default supplied with MQSeries, but your installation might have changed it. YES specifies that messages on this queue survive a queue manager restart.
Starting MQSeries for Windows NT
These definitions can be implemented using the following command. The results and any error messages are written to admvs.out:
runmqsc "< admvs.def > admvs.out"
Provided there have been no errors in establishing the channel connections, the Windows NT machine now has all the required definitions to send and receive messages from the queue manager MQQ1 on the OS/390 machine.
Error messages relating to the channel can normally be found in an error log Amqerrnn.log where nn is a number such as “01”. A typical directory for this log file is:
C:mqmqmgrsNTQMGRerrors
At this point you will have all the definitions ready on your Windows NT system and now need a similar set of definitions on MQSeries for OS/390.
Setting Up MQSeries for OS/390
Setting up MQSeries and its definition to CICS on the OS/390 server machine would normally be handled by a system programmer who has been assigned that responsibility. The full details of setting up your MQSeries server can be found in the MQSeries for OS/390: System Management Guide.
Assuming that MQSeries has been installed and a queue manager set up, the following shows the steps that the system programmer would have to undertake to allow the MQSeries-CICS DPL bridge to work:
- Defining MQSeries to CICS
Two install groups are supplied by MQSeries for this purpose: CSQCKB and CSQCAT1. CSQ4CKBC and CSQ4B100 are the member names in your partitioned data sets (PDS).
- Preparing to run the MQSeries-CICS bridge
Before you can run the MQSeries-CICS bridge you must ensure that your OS/390 system has both the CICS and MQSeries components installed.
Setting Up CICS To Use the MQSeries-CICS Bridge
You need to define the following CICS bridge transactions and programs using the resource definition utilities DFHCSDUP and CSQ4CKBC as input:
Program or Transaction | Description |
CKBR | Bridge monitor transaction |
CSQCBR00 | Bridge monitor program |
CKBP | Bridge ProgramLink transaction |
CSQCBP00 | Bridge ProgramLink program |
CSQCBP10 | Bridge ProgramLink abend handler program |
CSQCBTX | Bridge error messages |
Tip
Add the group CSQCKB to your start-up group list.
The CICS bridge uses CICS temporary storage IDs with the prefix CKB. You should make sure these are not recoverable.
By default, your CICS DPL programs run under transaction code CKBP. You need to change the TASKDATALOC attribute if you are going to run 24-bit programs. If you wish to run your programs under different transaction codes, you need to install copies of the definition of CKBP, changing the transaction name to the ones of your choice.
Defining MQSeries for OS/390 Objects
The most straightforward way to define queues and channels on OS/390 is to have a PDS member with all the definitions in it and include it in the CSQINP2 DD concatentation of the startup job. For the purposes of this book we are using option 6 from ISPF so that we can step through and describe each of the definitions.
We need to define two queues, a local queue as our transmission queue and a remote queue. In addition, we need to define both the SENDER and RECEIVER channels:
Log on to your OS/390 system, enter ISPF, select option 6.
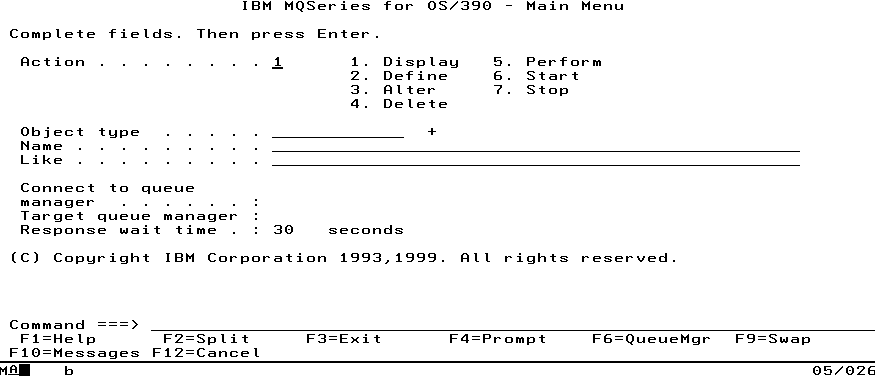
On the command line enter CSQOREXX. The screen shown in Figure 15-3 appears.
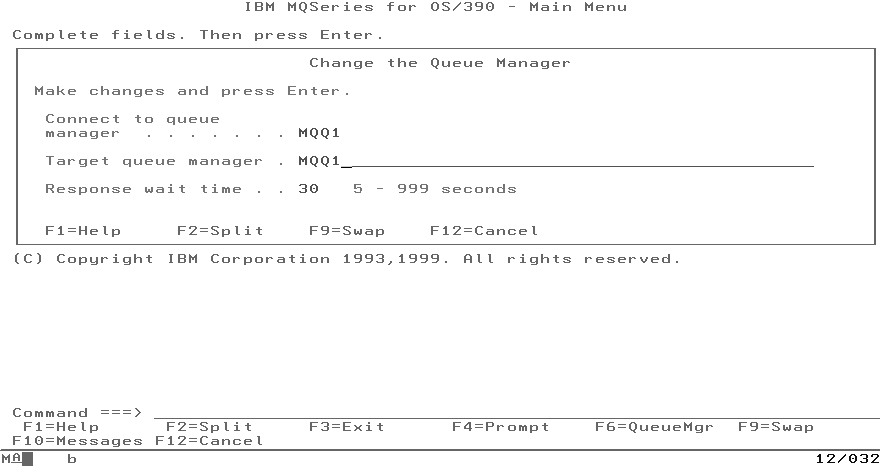
Press PF6 to enter the name of your queue manager for the Target queue manager; for example, MQQ1 (see Figure 15-4). Leave the Response wait-time entry as 30 seconds; this is probably a realistic time for the purposes of most samples. Press Enter to save your entries and return to the original screen.
On the original screen, you can enter the Object type. The first definition that we make is the name of the transmission queue on OS/390. This is called NTQMGR in Figure 15-2. If you are following the sample, enter QLOCAL for the object type and NTQMGR for the Name. Select option 2 to define your queue and press Enter. On Figure 15-5, change Usage to X to show that this is a transmission queue. If you want to see the remainder of the options, press PF8, however, for our sample you don’t need to change anything else.
Tip
F4 provides you with a prompt that lists all the objects that you can enter. They are grouped as queue objects, channel objects, cluster objects, and other objects.
You need to define a transmission queue and a receiver channel on OS/390 so that you can send data to your Windows NT system:
- The transmission queue
The transmission queue is used to hold data to be sent on the message channel MQQ1.TO.NTQMGR to your Windows NT machine. This is called NTQMGR and has Usage option set to X to denote that it is used as a transmission queue.
- Defining The RECEIVER channel (NTQMGR.TO.MQQ1)
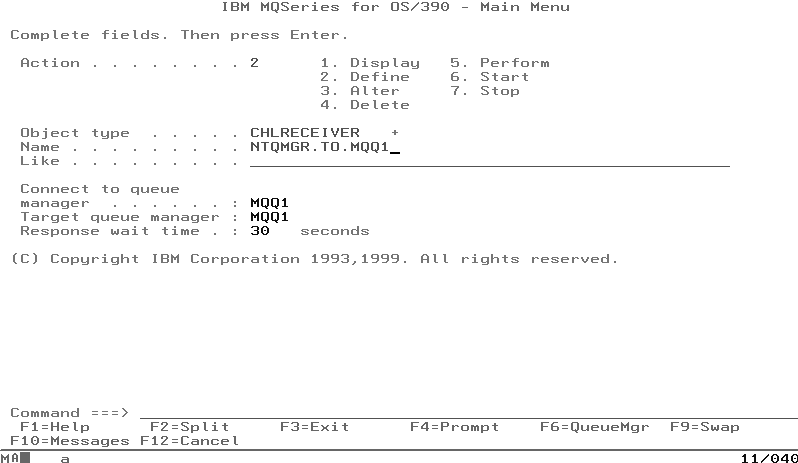
The definition of the message channel NTQMGR.TO.MQQ1 is used to send messages from your Windows NT machine to the queue manager MQQ1 on your OS/390 machine. From the ISPF screen enter CHLRECEIVER and the name of the channel (see Figure 15-6). The name must match the name used for the sender channel of your MQSeries for Windows NT server.
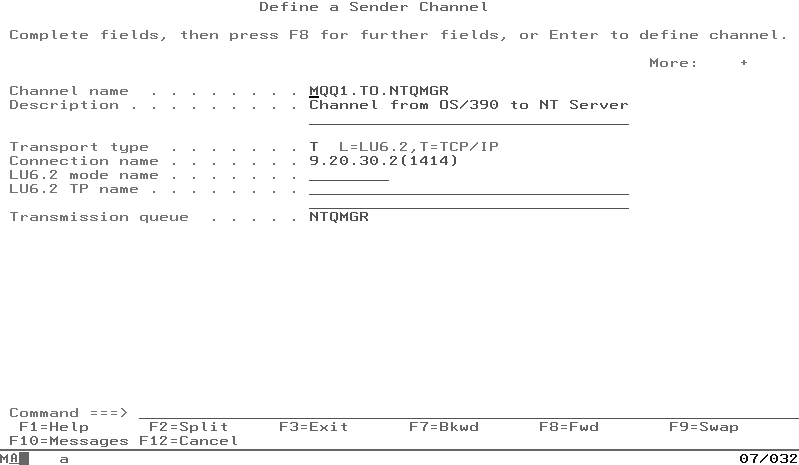
- The SENDER channel (MQQ1.TO.NTQMGR)
The definition of the message channel MQQ1.TO.NTQMGR is used to send messages to the reply-to queue on the Windows NT machine from the queue manager, MQQ1, on your OS/390 machine. From the ISPF screen enter CHLSENDER and the name of the channel. Change the Transport type to T for TCP/IP and for the Connection name enter the IP address of your MQSeries for Windows NT server together with the port number (MQSeries listens on port number 1414 by default). Finally, enter the name of your transmission queue (see Figure 15-7). The name must match the name used for the receiver channel of your MQSeries for Windows NT server.
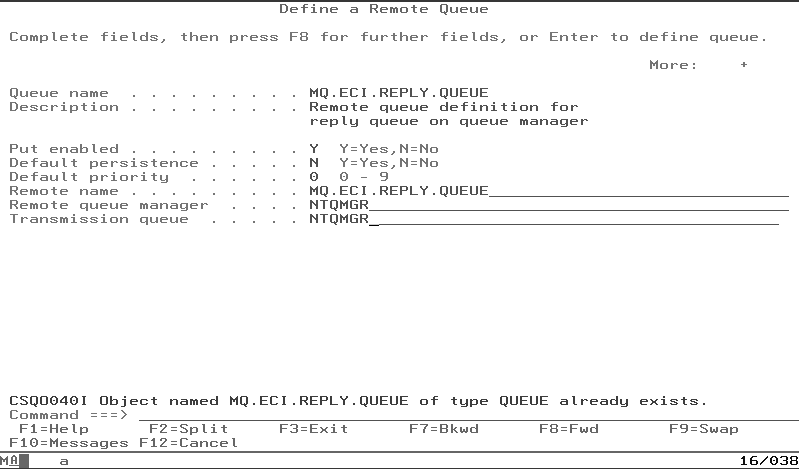
- Defining the remote queue (MQI.ECI.REPLY.QUEUE)
The remote definition of the queue is used to receive response messages from our OS/390 machine. Here you define the queue name, the remote name, remote queue manager and the transmission queue (see Figure 15-8).
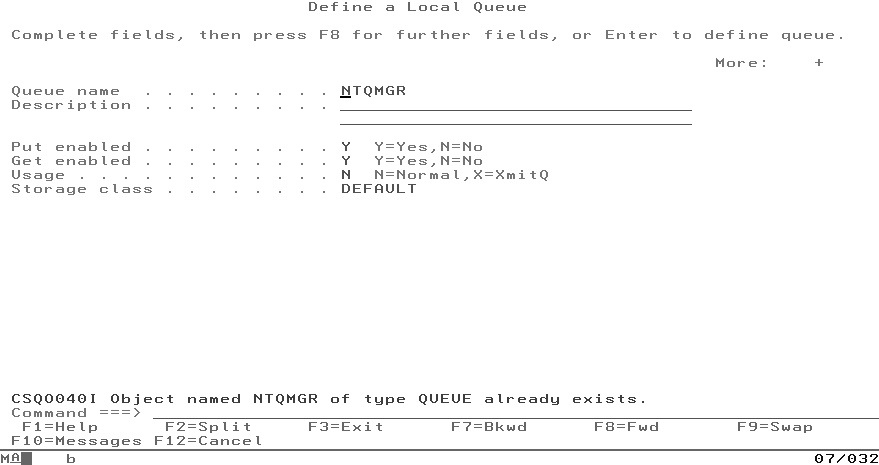
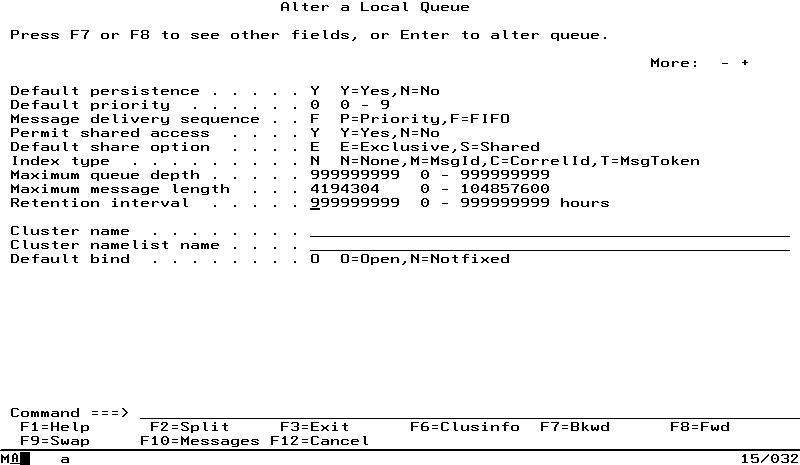
- Defining a local queue for the bridge queue
The bridge queue is used in the transfer of messages from MQSeries to the CICS DPL bridge task. For the sample application we have defined a local queue as SYSTEM.CICS.BRIDGE.QUEUE. To define a local queue press PF4 from the main menu and select action 2 . Press PF12 to return to the main menu. Enter the name of your local queue, select option 3 to alter the definition and then PF8 to find the attributes as shown in Figure 15-9. You must set the following attributes:
If recovery is required, you need to define the following:
- DEFPSIST (Default persistence)(YES)
Set messages as persistent on the queue by default if recovery is required.
- HARDENBO (Harden Backout counter)
If DEFPSIST(YES) is set, set HARDENBO to ensure messages are not reprocessed erroneously after an emergency restart.
Starting Your Channel
Finally, return to the main menu and select option 6 to start the SENDER Channel. Enter CHLSENDER as the object type and the name of your sender channel MQQ1.TO.NTQMGR. Now press Enter.
Connecting to MQSeries from Your CICS Region
Having started the MQSeries channels, you now have to start the MQSeries-CICS bridge monitor from your CICS region:
Log on to your CICS region and enter transaction CKQC if you are authorized to do so, or ask your systems administrator. Figure 15-10 shows the screen.
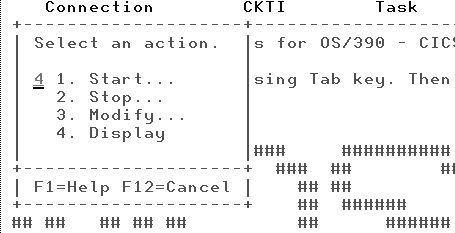
With the cursor under Connection, press Enter. Figure 15-11 shows you that option 4 has been highlighted, which shows that your MQSeries system is already running. If it was not running, option 1 would be displayed inviting you to start the connection to MQSeries.
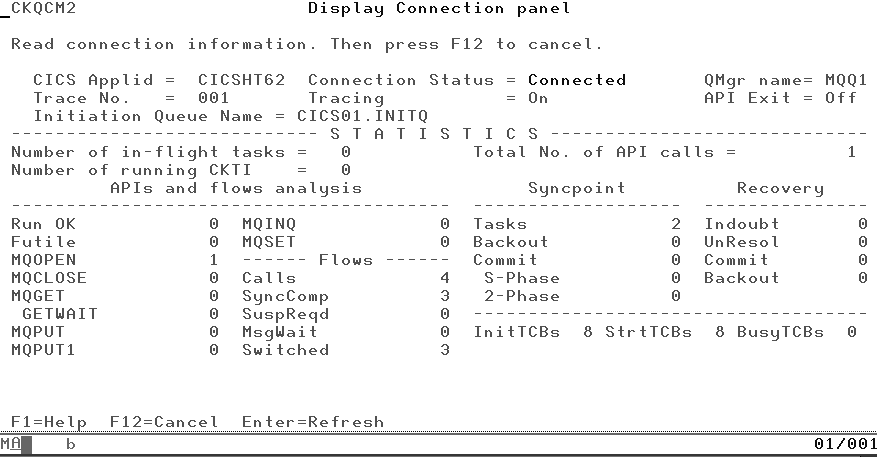
Check that you are connected to your queue manager by pressing Enter. Figure 15-12 shows the name of your CICS region and that you are connected to a queue manager called MQQ1. If you are not connected, return to the previous screen and enter option 1 to start the connection. We don’t need to go into the details of the INITQ (initiation queue) in this book; instead, we start the CICS to MQSeries connection manually.

Starting the CICS Bridge
The following guidelines will help you start the CICS bridge:
Return to your CICS region and enter the transaction CKBR to start your CICS bridge monitor. However, this locks your terminal for as long as the CICS bridge monitor is running. If you have forgotten where the CICS bridge monitor fits into this scene, look back at Figure 14-5.
Alternatively, you can enter CECI START TRANSACTION(CKBR), which runs the transaction independently of your terminal. To check if the transaction is running, enter CEMT INQUIRE TASK.
Starting the Listener on OS/390
You may have to stop and restart the listener to be sure that the application works. To do this:
Go to the IBM MQSeries for OS/390 Main Menu (using CSQOREXX).
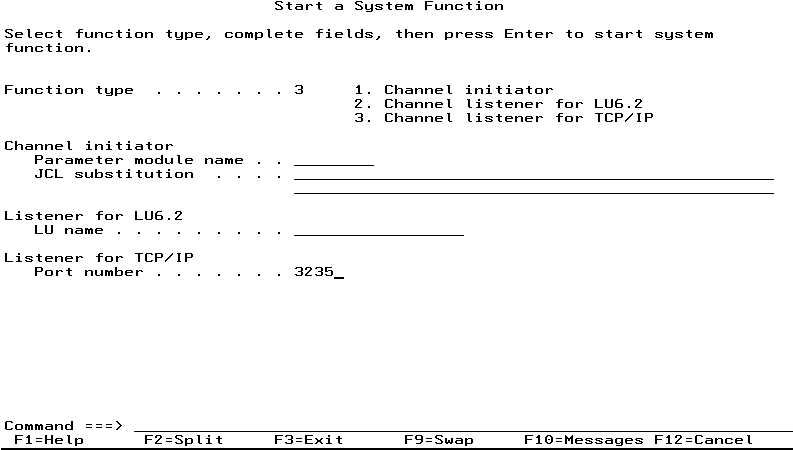
For the object type enter SYSTEM and select 7 to stop the listener or 6 to start the listener. The important thing here is to ensure that the port number of your sender channel on Windows NT matches the port number that your OS/390 systems is listening on. You can redefine the port number just before you start the listener as shown in Figure 15-13.
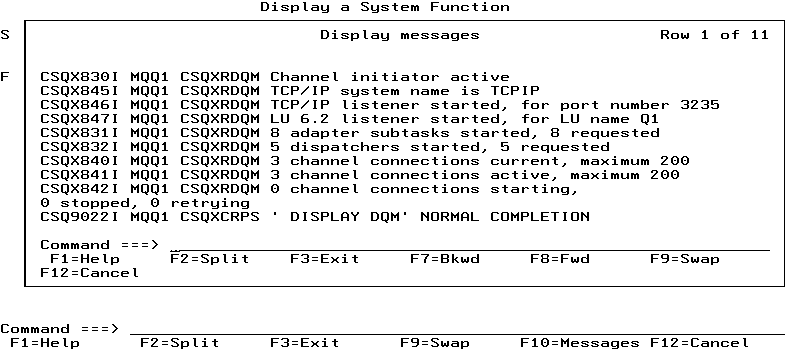
To check that OS/390 is listening on the same port number that the Windows NT Sender channel, choose option 1 from the MQSeries for OS/390 Main Menu and enter SYSTEM for the Object type. On the “Display a System Function” screen, select option 1 for distributed queueing; the next screen shows you the port number that your system is using, as shown in Figure 15-14.
Running the Application for the Workstation
The following guidlines will help you run the application for the workstation:
Copy the files from the CD directory called MQSeries-Java Client to your workstation.
Change directory to the MQSeries Client and edit the admvs.def file to refer to the queue manager on MQSeries for OS/390. Also edit CONNAME and change the IP address.
If you have changed the names of any variable, you need to check the three command (.cmd) files and edit them accordingly.
Run each of the three command (.cmd) files:
Start MQSeries
Load MQ for MVS definitions
Start ServicesMVS
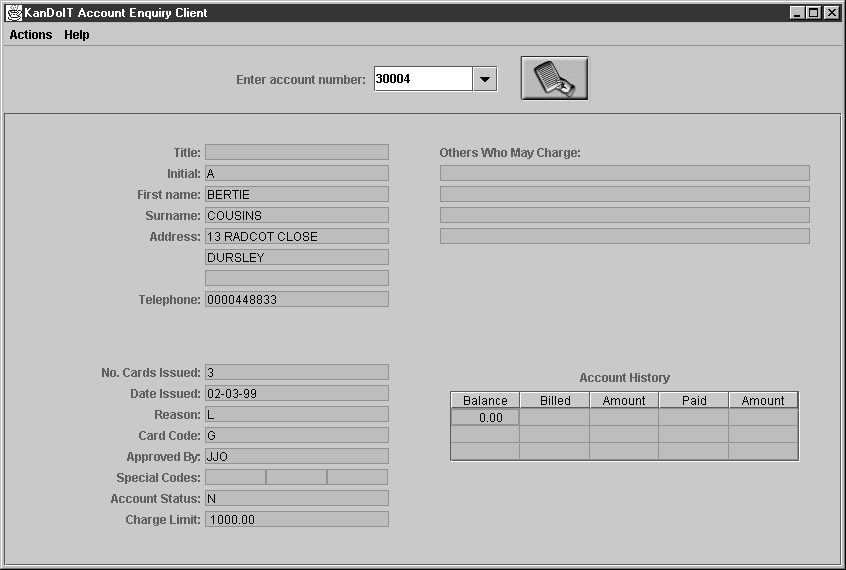
Change to the directory called MQSeries-Java Clients and run 4.Client. This starts the MQClient Java program (see Figure 15-15).
Troubleshooting
Table 15-1 lists the ways of checking errors that may occur when you are trying to make the connections between CICS and MQSeries and Windows NT and OS/390.
What’s Next…
At the end of this exercise you should be able to run the MQSeries client and enter account numbers to get back the details of the customer accounts. The main concept that you should understand is the way the the queues and channels interrelate between MQSeries for OS/390 and MQSeries for Windows NT. Secondly, you should have an understanding of the way that CICS and MQSeries interact on an OS/390 system.