
Chapter 3. jQuery Events and Functions: Making Things Happen on Your Page
jQuery makes it easy to add action and interactivity to any web page. In this chapter, we’ll look at making your page react when people interact with it. Making your code run in response to user actions takes your website to a whole new level. We’ll also look at building reusable functions so you can write the code once and use it multiple times.
Your jQuery skillz are in demand again
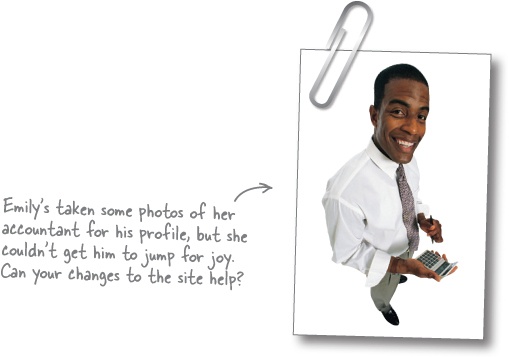
Emily was pleased with the work you did for her Jump for Joy promotion, but she’s met with her accountant and now has a few changes she’d like you to make.
From: Jump for Joy |
Subject: RE: Jump for Joy Promotion |
Hey, |
You did a great job of making the web promotion work! I met with my accountant and crunched some numbers on the success of the promotion. |
My accountant suggested some changes to the app that should bring in more sales. |
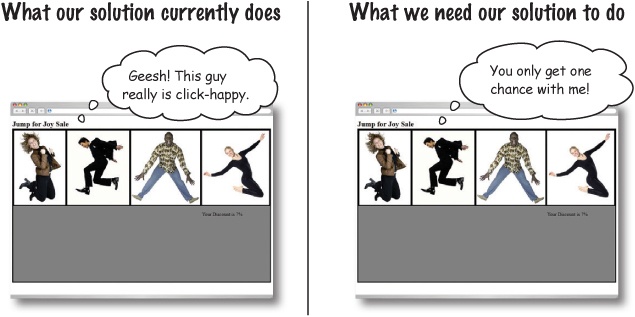
Visitors should still get four options to pick from for the chance to receive a discount. However, now let’s make it the same discount amount each time. My accountant recommends offering 20% off visitors’ purchases before they check out. That should be more enticing for them. |
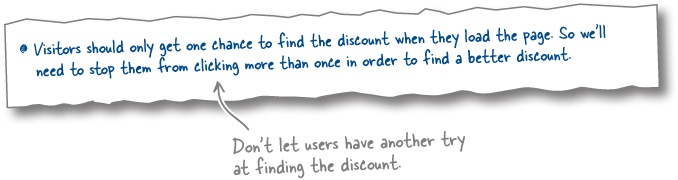
Visitors should only get one chance to find the discount code, which should be in a random square for each visit. If a visitor finds the discount code when she clicks, show it to her on the screen before she proceeds. Otherwise, show her the box where the code was hiding. |
Think you can do this as well as you did the first part? |
-- |
Emily Saunders |
jumpforjoyphotos.hg |
The money man has a point...
Making the promotion limited to only one square keeps Emily from having to hand out so many discount codes, and it keeps people clicking around the site. Seems like these new features are all about clicking...
Making your page eventful
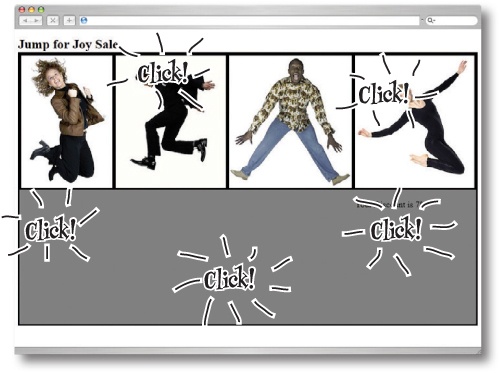
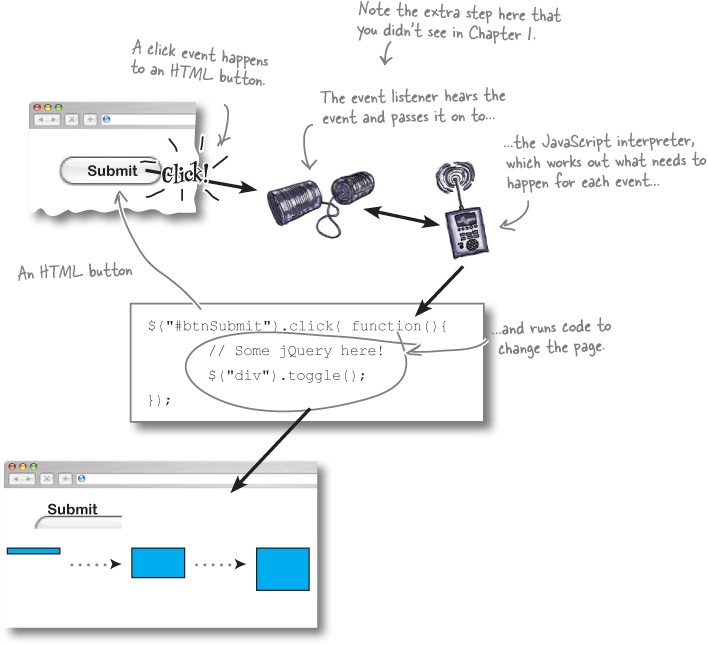
The Jump for Joy application is all about the clicks. In jQuery and JavaScript, a click is referred to as an event (there are plenty of other events, but for our purposes, we’ll just focus on clicks for now). An event is a mechanism that allows you to run a piece of code when something happens on the page (like a user clicking a button). The code that gets run is a function, and functions allow you to make your jQuery more efficient and reusable. We’ll look more closely at functions in a minute, but for now, let’s look at how a click event really works.
Good question.
Event listeners are a part of the Document Object Model (DOM). You can add them to any page, so you don’t have to rely on users clicking links and buttons to make things happen. Let’s take a closer look.
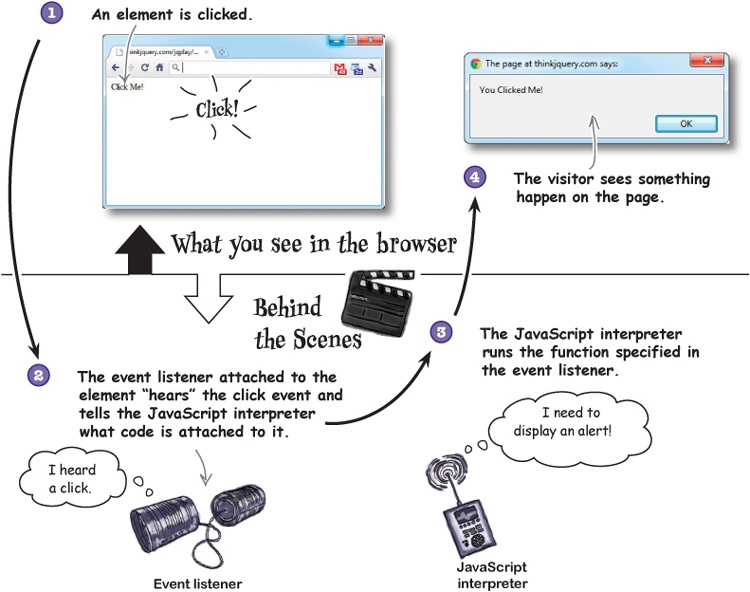
Behind the scenes of an event listener
Event listeners are the browser’s way of paying attention to what a person does on a page, and then telling the JavaScript interpreter if it needs to do something or not.
jQuery gives us very easy ways to add event listeners to any element on the page, so users are no longer just clicking on links and buttons!

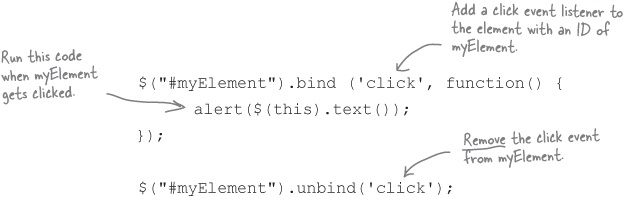
Binding an event
When we add an event to an element, we call this binding an event to that element. When we do this, the event listener knows to tell the JavaScript interpreter what function to call.
There are two ways of binding events to elements.
Method 1
We use this method to add events to elements as the page is getting loaded.
This is often known as the convenience method.

Method 2
We use this method just like Method 1, but we can also use it to add events to elements that get added to the page after it is loaded, like when we create new DOM elements.
Watch it!
Method 1—the convenience method—is simply a shortcut for Method 2, but only when the DOM elements exist already.
jQuery offers many shortcuts like this to help you keep your code cleaner. They are known as convenience methods because they are included solely for ease of use—but they do have limits. You’ll want to use Method 2 to add events to new DOM elements that you create within your code, like if you added a new clickable image, or a new item to a list that you want the user to interact with.
Triggering events
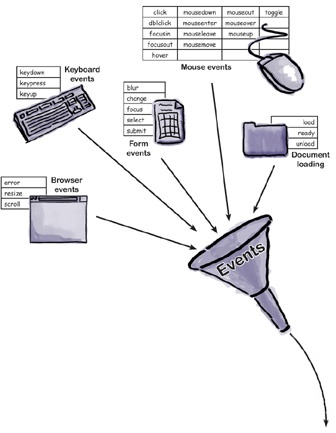
Events can be triggered by a wide variety of things on any given page. In fact, your entire browser is eventful, and pretty much any part of it can trigger events!

Removing an event
Just like binding events to elements, you often need to remove events from elements—for example, when you don’t want people to click a submit button twice on a form, or you only want to allow them to do something once on a page. That’s just what you need for these new Jump for Joy requirements.
After an element has an event bound to it, we can remove that event from the element so it doesn’t get triggered.
To remove one event
The unbind command tells the web browser to no longer listen for this particular event for this element.
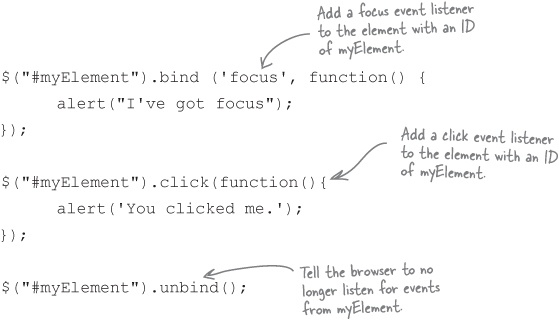
To remove all events
Let’s see how events can help us tackle the first requirement.
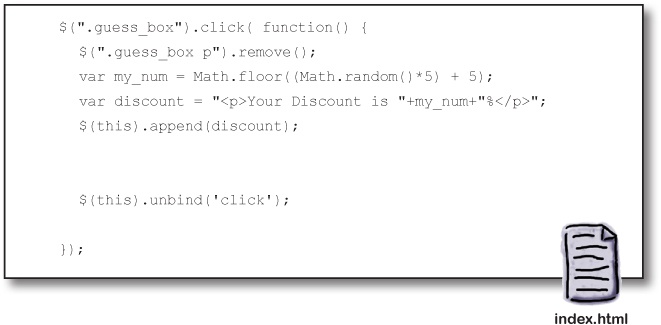
Using what you know about $(this) and what you learned about events, update the code from the last chapter and add in the code to remove the click event from the div sections.
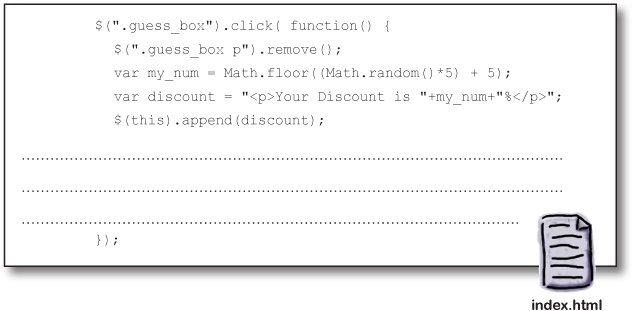
Using what you know about $(this) and what you learned about events, update the code from the last chapter and add in the code to remove the click event from the div sections.
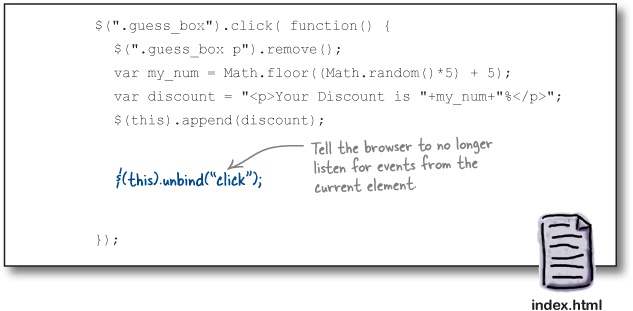

You’re right, it’s not removing the click from all the events yet.
This only removes the click from whatever box you click on. You could still click on the other boxes. If only you could stop the click happening on each of the other elements...
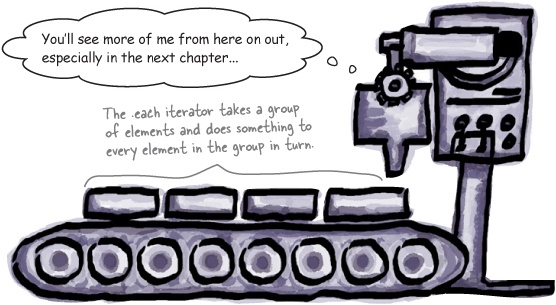
Going through the motions elements
Oftentimes, we need to interact with a group of elements one by one.
Thankfully jQuery gives us the ability to loop through groups of elements, based on whatever selector we choose. Looping, also known as iteration, is simply going through a group of elements one at a time, and doing something to each element along the way.
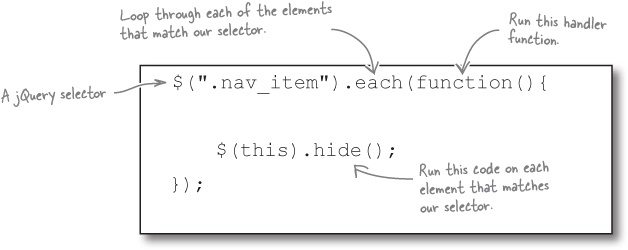
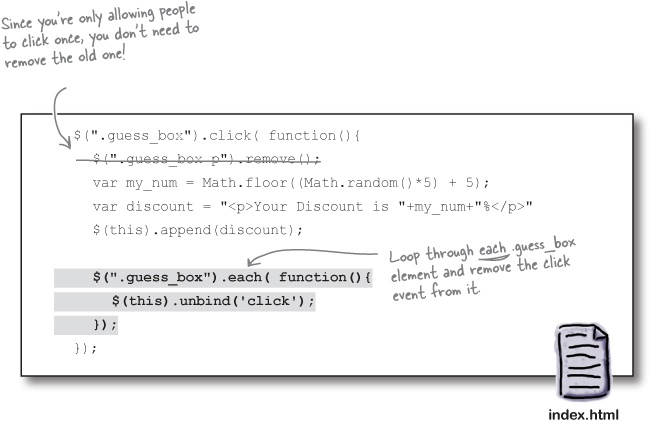
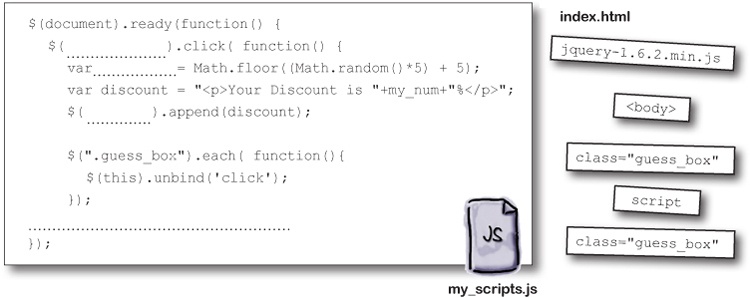
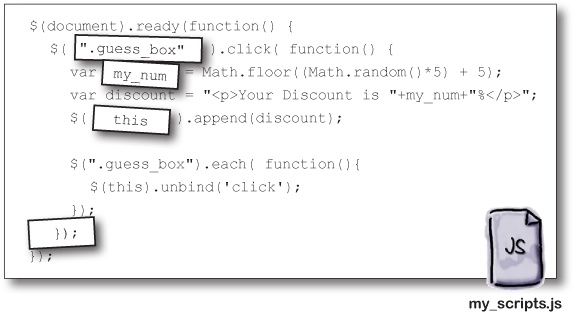
Write the code to use iteration to remove the click event from every clickable box on your Jump for Joy page. Also, read your code carefully to see if there are any pieces you don’t need anymore.
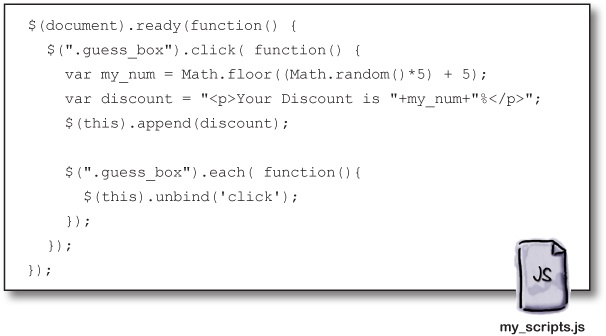
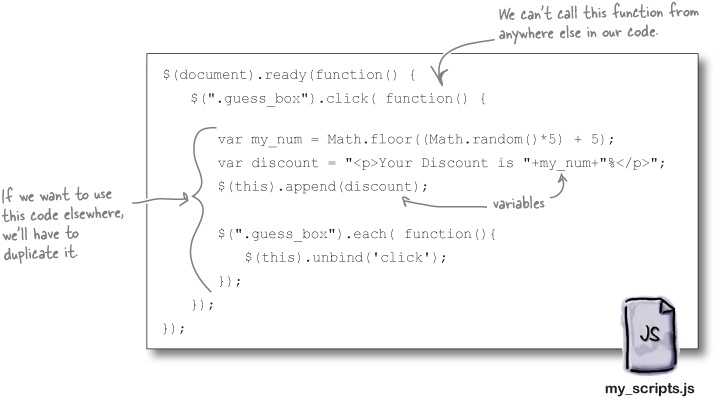
Calling the .each method on the .guess_box class loops through all of the elements with that class. You can then unbind the click method from each one of them in turn. You also no longer need our .remove code; since visitors can only click once, there won’t be anything to remove anymore.
Good thinking. In fact, there are several reasons to create a separate file for your jQuery code:
You can include it in more than one page (code reuse).
Your page will load faster.
The HTML code you write will be cleaner and easier to read.
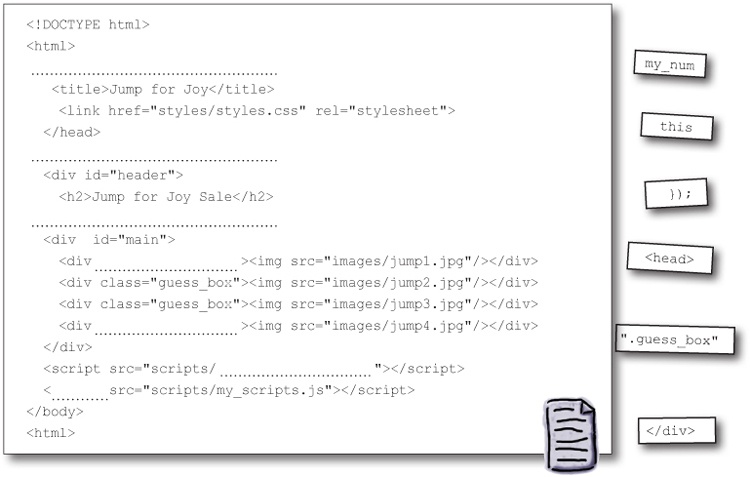
You already know how to include CSS files, and you’ve seen how to include the jQuery library. Including your own JavaScript/jQuery file is no different!
Using your favorite text editor, create a file called my_scripts.js and save it in the scripts folder.
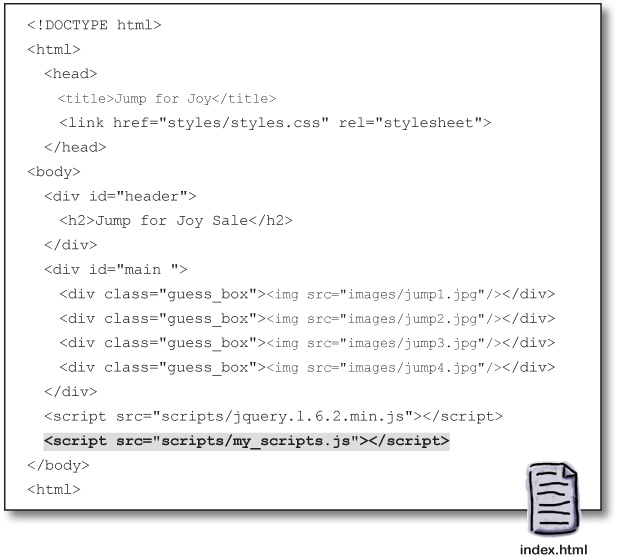
Take all the JavaScript and jQuery code from our index.html file and move it into this new file. There is no need to put the
<script>and</script>tags in the new file.Create the link to this file in your HTML page by putting the following code just before the closing
</body>tag.
Your project structure
You just made some important changes to how your files are structured. Let’s look at how these all fit together. We’ve added several things since the last time we looked at it.
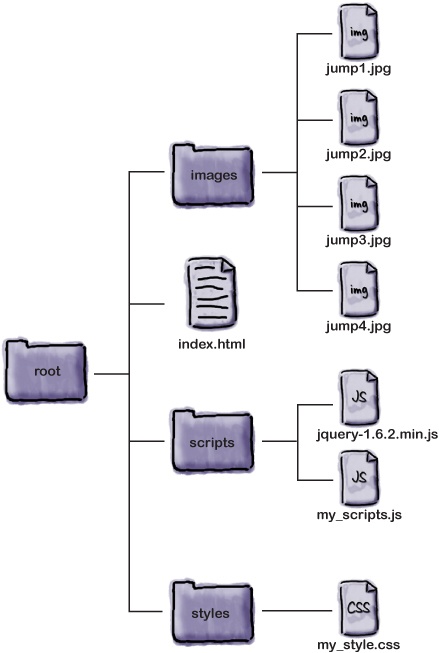
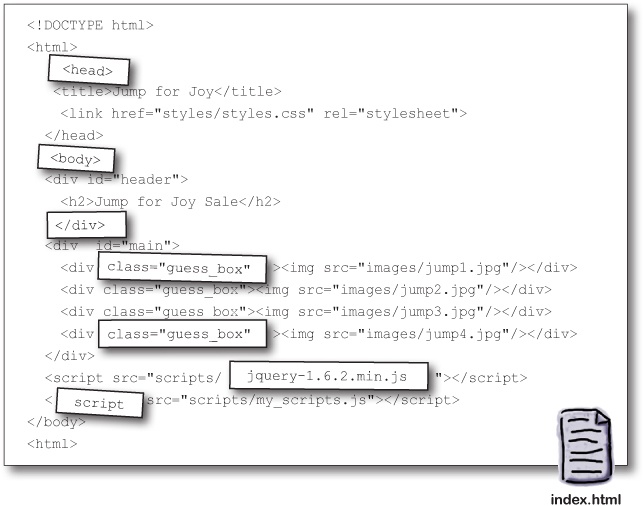
Use the magnets below to organize your project files so you know how to separate out your HTML, CSS, and jQuery code. Let’s make sure you can get this right every time.
Making things function-al
Now that we’ve seen how to add and remove events on our page, let’s look at another important feature that will help us master our websites with jQuery: functions.
A function is a block of code, separate from the rest of your code, that you can execute wherever you want in your script.
Believe it or not, we’ve been using functions all throughout the book. Remember these?
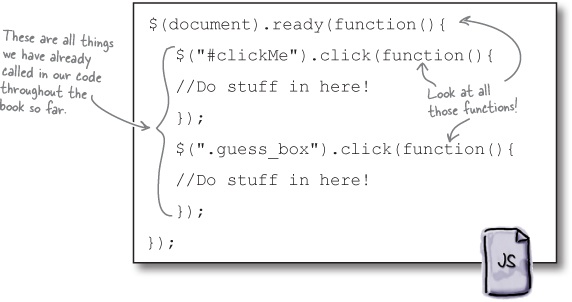
jQuery provides a lot of functions for you, but you can also write your own custom functions to provide features not supplied by jQuery. By creating a custom function, you can use your own code again and again without repeating it in your script. Instead, you just call the function by name when you want to run its code.
Custom functions allow you to organize a chunk of jQuery code by name so that it can be easily reused.
The nuts and bolts of a function
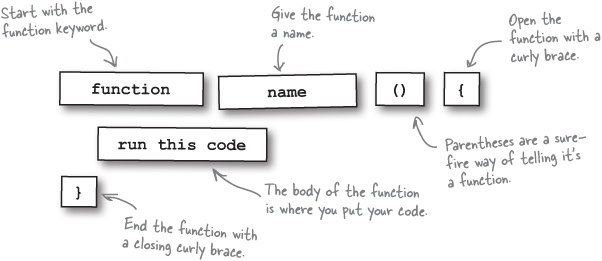
To create a function, you need to use a consistent syntax that ties the name of the function with the code that it runs. This is the syntax for the most basic JavaScript function:
Giving functions names
There are two ways to give names to functions.
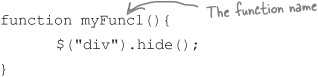
Function declaration
The first method is a function declaration, which defines a named function variable without requiring variable assignment. This one starts with function, like so:
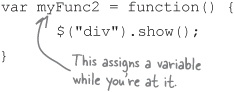
Function expression
A named function expression defines a function as part of a larger expression syntax (typically, a variable assignment):
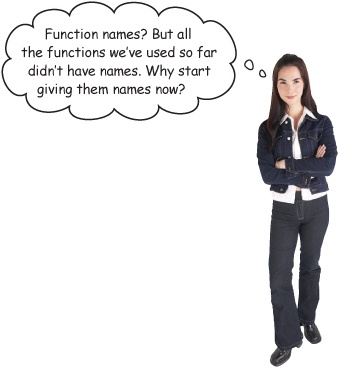
Good point.
Naming your functions allows you to call them from more than one place in your code. Unnamed functions—also known as anonymous functions—are pretty limited in how you can use them. Let’s look at anonymous functions in more detail so you can see how limiting it is not to have a name.
The anonymous function
Anonymous, or self-executing, functions don’t have a name, and they get called immediately when they’re encountered in the code. Also, any variables declared inside these functions are available only when the function is running.
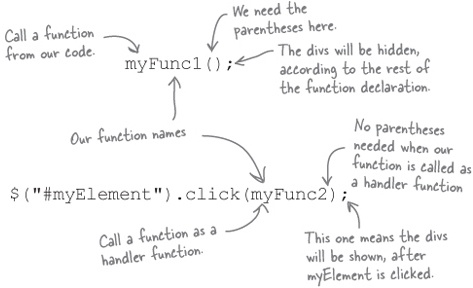
Named functions as event handlers
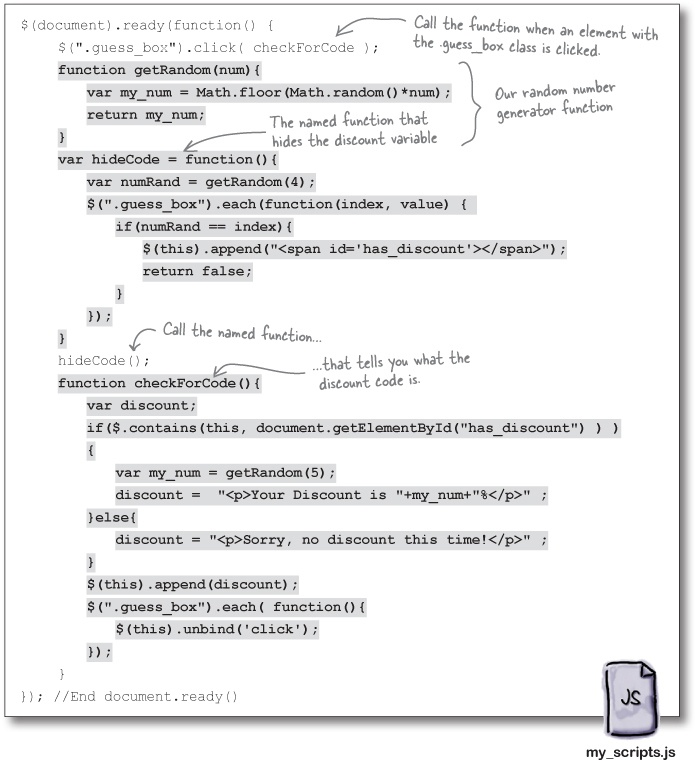
Earlier, we saw how anonymous functions can be used as handler functions for events. We can also use our own custom, named functions as these handlers, and call them directly from our code. Let’s look closer at the two functions we named two pages ago.
Function expression
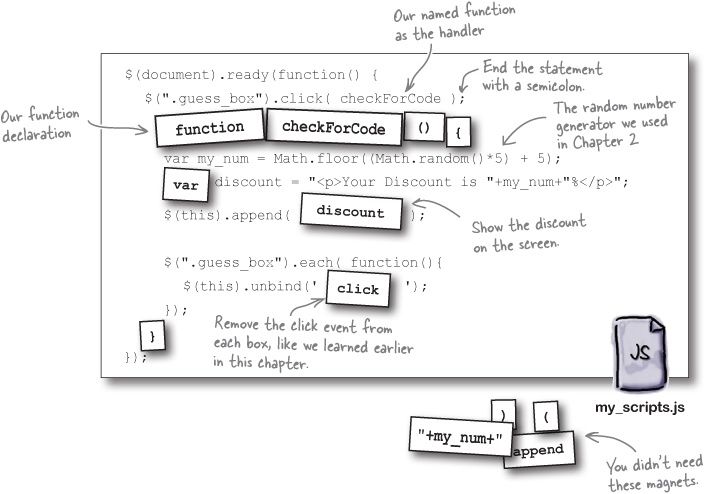
See if you can arrange the magnets to move the code that checks for the discount code into its own named function called checkForCode, and use it as the handler for the click event on the boxes.
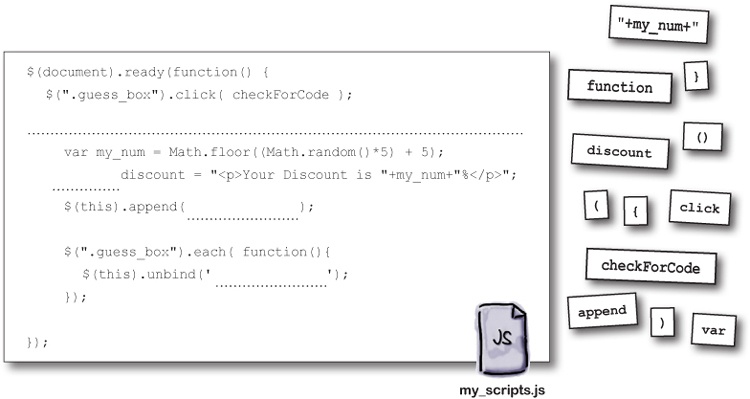
See if you can arrange the magnets to move the code that checks for the discount code into its own named function called checkForCode, and use it as the handler for the click event on the boxes.
Do this!
Nice work! Once you update your code file with this code, you’ll have created your first function and used it as a handler function in your click event.
Brain Power
How would you create a function to hide the discount code in a random box, and another to generate a random number for the discount code itself?
Hint: Now that it’s part of a function declaration, you can use the random number generator in both our existing checkForCode function AND your soon-to-be-made function to put the discount code in a random box.
Sometimes we want functions to do a task repeatedly, but have the result change depending on information we give it.
Our functions can accept variables passed into them—as you recall from Chapter 2, a variable is used to store information that can change over time. We’ve already looked at variables. Let’s remind ourselves how they work.

We’re already using some variables in our code, remember?
Passing a variable to a function
When variables are added (or passed) into functions, they are known as arguments. (Sometimes you may see them referred to as parameters too.) Let’s take a closer look at how to pass an argument to a function.
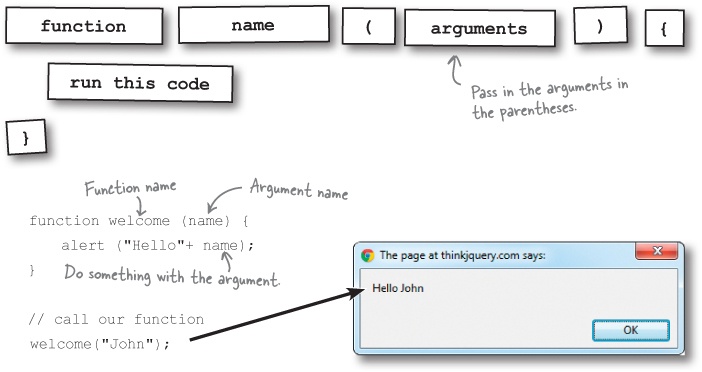
The function doesn’t need to know what’s contained in the variable; it just displays whatever is currently stored. That way, you can change what the function displays simply by changing the variable, instead of having to change your function (which wouldn’t make it a very reusable function!).
Relax
Combining variables and functions might seem a bit hairy.
But really, you can think of your function as a recipe—in this case, let’s say it’s for making a drink. You have the basic, repeatable steps for assembling a drink—a shot of this, a splash of that, swirl together, etc.—that compose your function, and the ingredients are your variables that you pass in. Gin and tonic, anyone?
Functions can return a value, too
Returning information from a function involves using the return keyword, followed by what should be returned. The result is then returned to the code that called the function, so we can use it in the rest of our code.
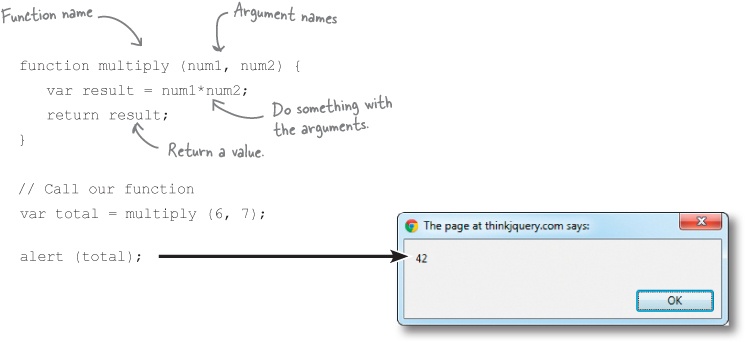
The return type can be a number, a string of text, or even a DOM element (object).
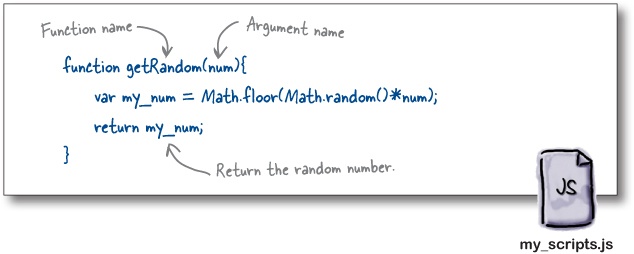
Now that you can create your own functions, add a new function to your my_scripts.js file that accepts a single argument (called num), and then returns a random number based on the argument you give it. Call the function getRandom.
Hint: Remember the code that you have already used to generate a random number. Think where you’d place it to call the function.
Now that you can create your own functions, add a new function to your my_scripts.js file that accepts a single argument (called num), and then returns a random number based on the argument you give it. Call the function getRandom.
Jim: Well, along with our new getRandom function, we still need another one...
Frank: ...Right, one to put the discount code in a random box that can use the getRandom function.
Joe: That makes sense. Then, after a click happens, we can check to see if the user clicked the right box.
Jim: Wait, what? How can we tell if someone clicked on the right box?
Frank: Conditional logic!
Jim: What?
Frank: Conditionals allow us to check for a particular situation and run the code accordingly.
Joe: So we could say, check if a variable has a certain value, or if two values are equal?
Frank: Exactly! We can even check if there is an element inside another element, which I think will help us here.
Jim: Wow, I can’t wait to see this!
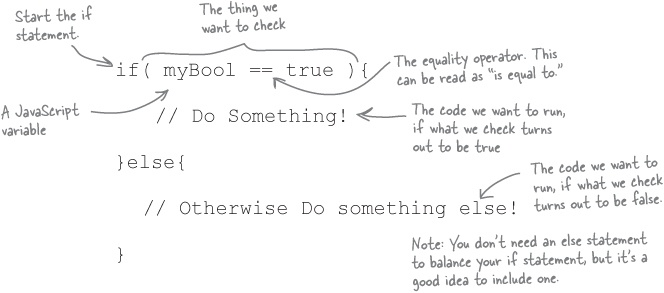
Use conditional logic to make decisions
jQuery uses JavaScript’s conditional logic features. Using conditional logic, you can run different code based on decisions you want your code to make, using information it already has. The code below is just one example of conditional logic with JavaScript. We’ll look at some others in Chapter 6.
See if you can arrange the magnets to create a new named function called hideCode that uses conditional logic to hide a new span element, with the ID of has_discount, in one of the existing clickable .guess_box div elements randomly each time.
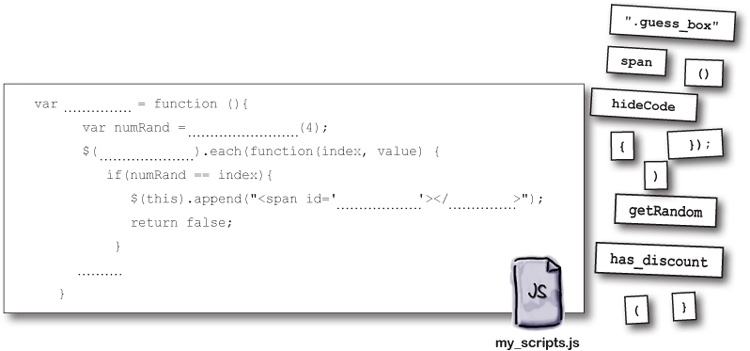
See if you can arrange the magnets to create a new named function called hideCode that uses conditional logic to hide a new span element, with the ID of has_discount, in one of the existing clickable .guess_box div elements randomly each time. Here’s our solution.

Watch it!
The index of an element in a list refers to where it appears on the list.
Indexes always start at 0.
So, the first element in the list has an index of 0, the second has an index of 1, and so on. We’ll see more about using the index when we look at arrays and loops in Chapter 6.

Frank: Yes, they are. But now that you’ve hidden the code, can you find it again?
Jim: Oh, uh, good question. I don’t know.
Joe: I’m guessing we’ll need some of this conditional magic again?
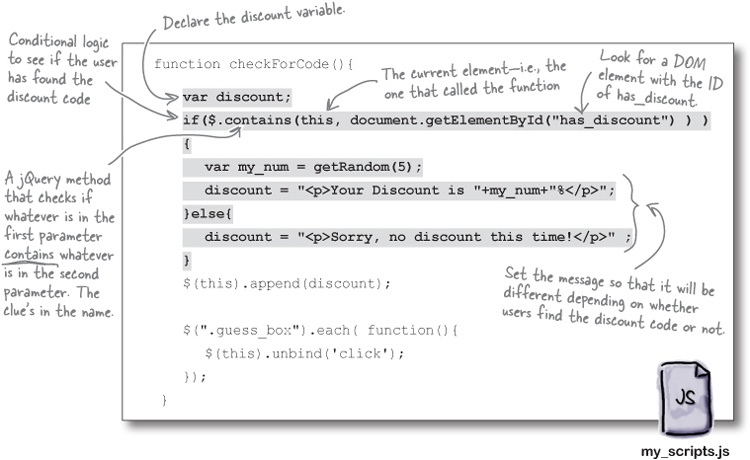
Frank: Exactly. Now, rather than picking a random index in our list of .guess_box elements, we’ll have to loop through them again to see if they contain our has_discount element.
Joe: “Contain?” Hey, Frank, you might be on to something there.
Frank: Yep. Let’s take a look at what jQuery has along these lines.
Do this!
Update your checkForCode function to include some new code based on Jim, Frank, and Joe’s discovery.
Time to add some custom functions: one for generating a random number, one for hiding the code, and one for checking for the discount code.
Jump for Joy needs even more help
Just when you thought you were done with the Jump for Joy campaign, it looks like Emily has a few more requirements...
From: Jump for Joy |
Subject: RE: Jump for Joy Promotion |
Hey, |
Thanks so much for all your work on this. |
I was wondering, is there a way you could highlight the box before people click on it? That way, they’ll know which box they’re on, and it will lessen any confusion before they click. |
Also, instead of popping up the code, can you put it into its own easy-to-read area below the boxes on the screen? Can the discount code be some text together with a number? I was thinking that might be nice... Oh, and can the number be bigger than just between 1 and 10? How about up to 100? |
Let me know if you think we can make these little changes! |
-- |
Emily Saunders |
jumpforjoyphotos.hg |
Methods can change the CSS
To complete our solution, we’ll need to highlight whatever box the user is hovering over before she clicks. The easiest way we can change how an element looks is with CSS and CSS classes.
Thankfully, jQuery provides an easy way to give elements CSS classes and remove them again, with a few easy-to-use methods. Let’s have a look at how we can put them to use in our solution.
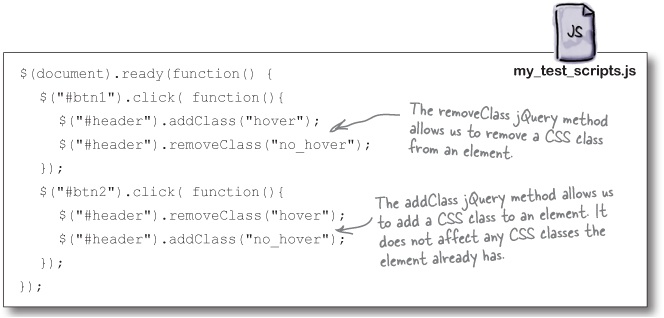
Create these new files, separate from your Jump for Joy files, so you can observe these methods in action. That should help you figure out how you can highlight the box before a user clicks on it.
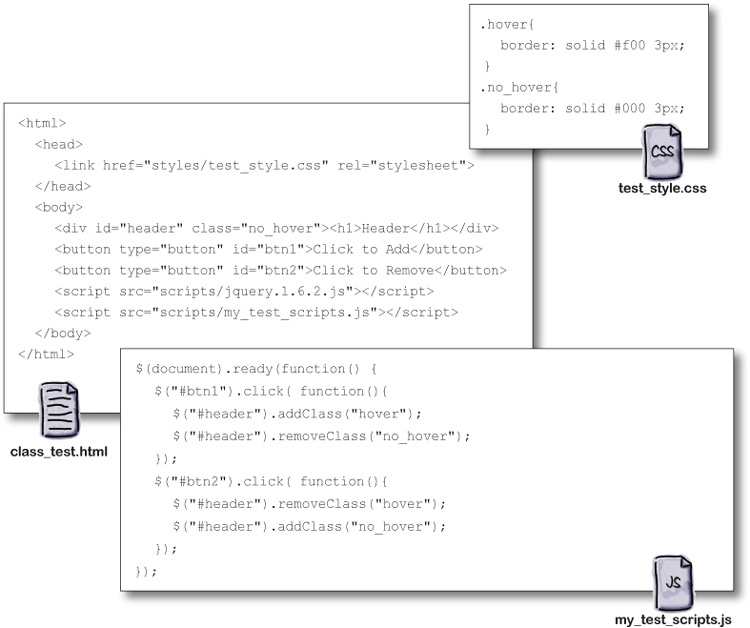
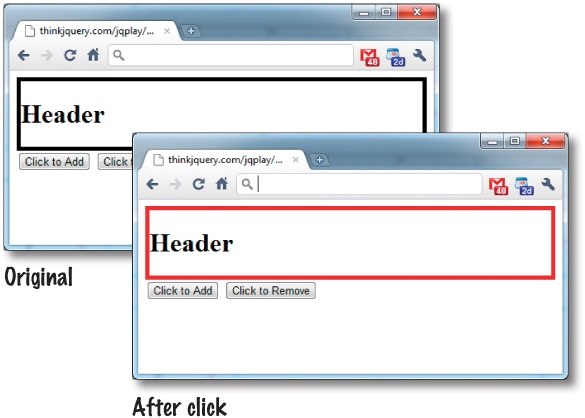
Open your newly created class_test.html file in your browser. After clicking on the Add button, your class gets applied to the div, with the ID of header. Clicking the Remove button removes the class again!
Yes, it does. And it’s just as easy...
You can switch up the CSS for any event type. But for this solution, you’ll need another event to help you out. Take a look at the list back in Triggering events and see if you can figure out which event you’ll need to use.
Add a hover event
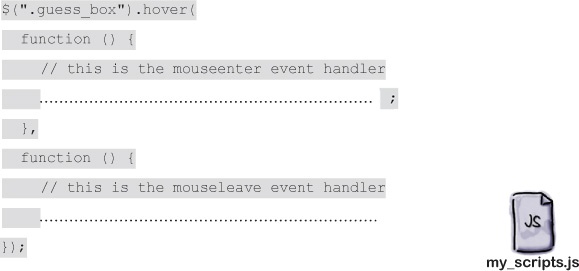
The hover event can take two handler functions as parameters: one for the mouseenter event and another for the mouseleave event. These handler functions can be named or anonymous functions. Take a closer look at the test script you just used to see how we can use the hover event to apply behavior to an element during the time the mouse is over the element.
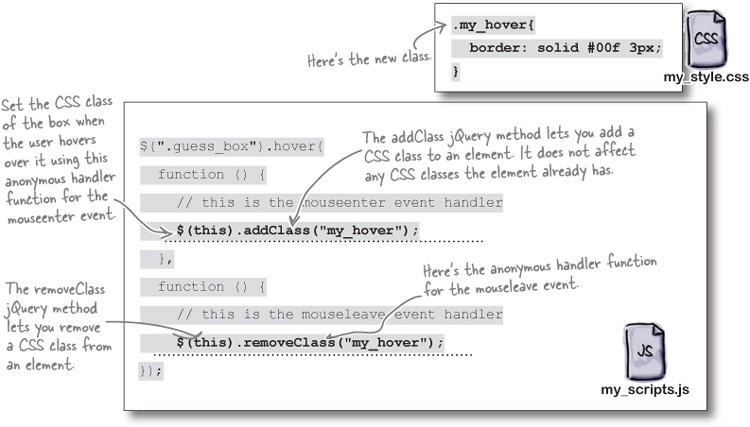
Update your my_style.css and my_scripts.js files so that the image boxes are highlighted when the user places the cursor over them. You’ll need a new CSS class to apply the hover to, and two handler functions in your script file (after your checkForCode function) that use the addClass and removeClass methods to set the CSS class. We’ve started those for you; you just need to write in the functions below.


You’re almost there...
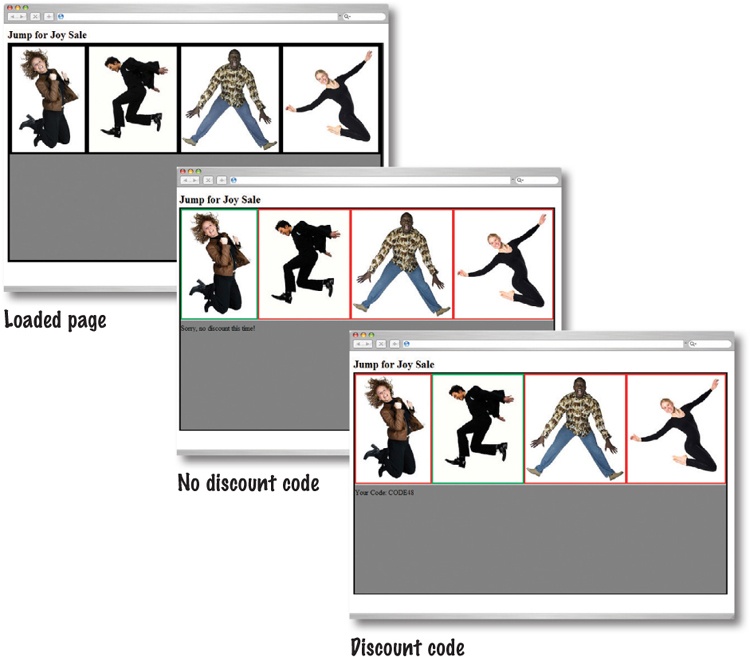
That’s definitely good progress, but the message still appears in the wrong place, and it doesn’t look the way you were asked to make it look. Plus, there’s still one requirement from the first email we didn’t cover yet. Here’s the requirements list as it stands right now:
Highlight whatever box visitors are on before they click it, so they know for sure what option they are choosing.
Put the discount code into its own area on the screen. The discount code should be text and a number between 1 and 100.
After the visitor has made his guess and clicked on a box, the answer should be revealed as to whether or not he got it right. If he chose correctly, show him the discount so he can apply it to his order.
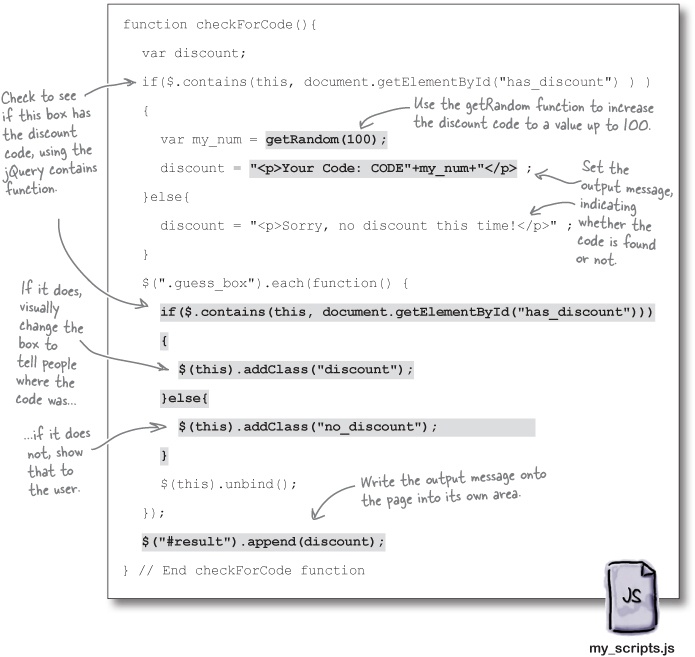
Update your checkForCode function to complete these last three things:
Put the discount code in its own area on the screen.
Make the code a combination of letters and a number between 1 and 100.
Show the visitor where the code was hiding, if she guessed wrong.
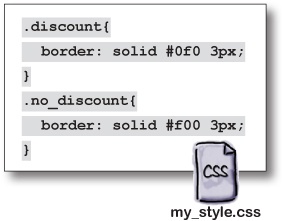
To help you out, we’ve created these CSS classes that you can add to your my_styles.css file to indicate if the code was found or not.
While you’re at it, add a span element with the ID of result below the four boxes to display the discount code.
Now you’ve updated your checkForCode function with all the pieces you were asked for: a separate place on the screen for a discount code, a discount code consisting of text and a number up to 100, and indications of where the discount code was, after the visitor clicks.
Now that you’ve updated your checkForCode function, test out all the new features on the Jump for Joy website. (For comparison, your code should look like what is in this file: http://thinkjquery.com/chapter03/end/scripts/my_scripts.js.)
Your jQuery Toolbox
You’ve got Chapter 3 under your belt and now you’ve added events, reusable functions, and conditionals to your toolbox.
Functions
Reusable chunks of code that you can use elsewhere in your code...
...but only if they are named.
Unnamed functions only run right where they are called in the code and can’t be used anywhere else.
You can pass variables (or arguments or parameters) to functions, and functions can return results, too.