
Chapter 9. Handling JSON Data: Client, Meet Server

As useful as reading data from an XML file was, that won’t always cut the mustard. A more efficient data interchange format (JavaScript Object Notation, aka JSON) will make it easier to get data from the server side. JSON is easier to generate and read than XML, too. Using jQuery, PHP, and SQL, you’ll learn how to create a database to store information so you can retrieve it later, using JSON, and display it on the screen using jQuery. A true web application superpower!
Webville MegaCorp’s Marketing Department doesn’t know XML
Subject: Re: 42nd Annual Bit to Byte Race results page |
Hey Web Design Team, |
We really like the updates you’ve made to the website. |
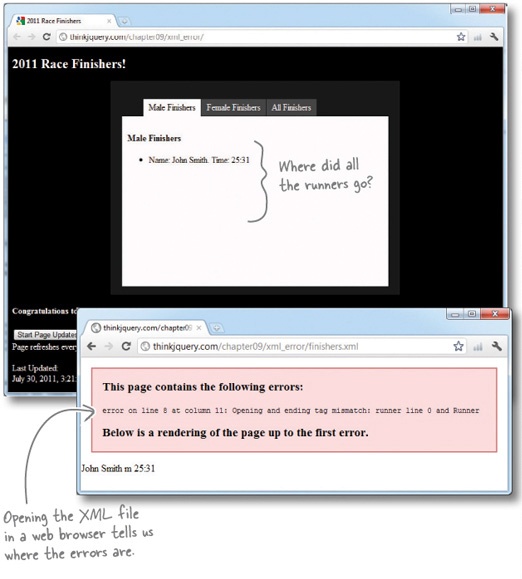
We have a problem though: nobody in our office knows XML! So we don’t know how to add new finishers to the race website. |
We’ve tried, but every time we get it wrong, it makes the website do some strange things... Finishers don’t show, or fields disappear from the page even though they’re in the XML file. It’s very odd. |
What we’d really like is some way to just type into a few boxes and click a button to add a finisher. Can you make this happen? |
And if we make a mistake, can you make it so we don’t break the whole site? |
I know it’s only three days until we all fly out to Hawaii, but we’d really like this working before we go. Do you think you can make it in time? |
-- |
Dionah C. Housney |
Head of Marketing |
Webville MegaCorp |

XML errors break the page
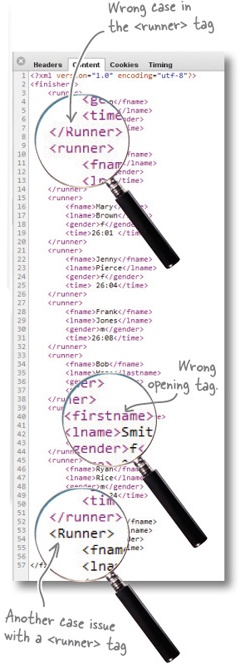
When there are errors in the XML, the logic that we wrote to read and parse that XML fails. These errors mainly happen when there are issues with the tags, like forgetting to close a tag or having the wrong case in the tag name. However, data in the tags can also cause XML some problems if it’s not encoded for use in XML properly.
Collect data from a web page
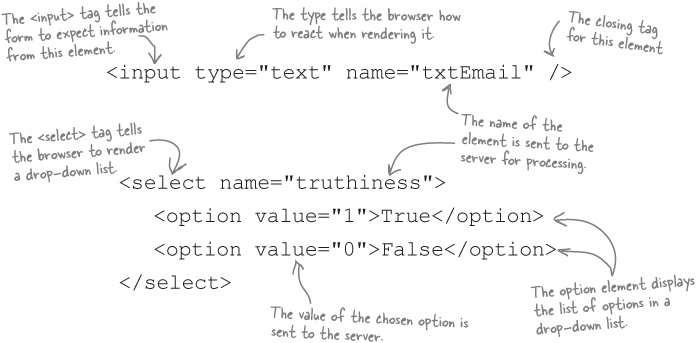
Odds are, you’ve already thought of using an HTML form. With a form, you can collect all sorts of data and send it to the server for processing. Forms have several different types of elements used to collect various types of data. We’ll look at forms in much more detail in Chapter 10, but for now, let’s just use two of the most basic form elements: a text box and a drop-down list. You may be a pro at forms already, but let’s just take a quick look so we know what we’re dealing with here.
That should work and be easy to do, since we’ve already figured out how to add tabs.
Then we can work on how we’re going to store/retrieve that data to display in the Finishers lists.
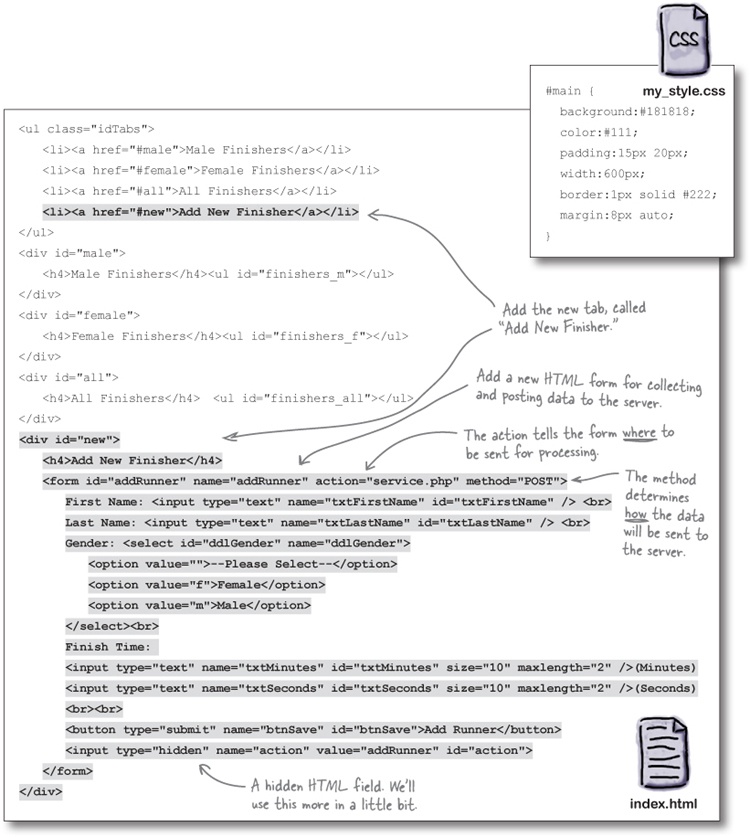
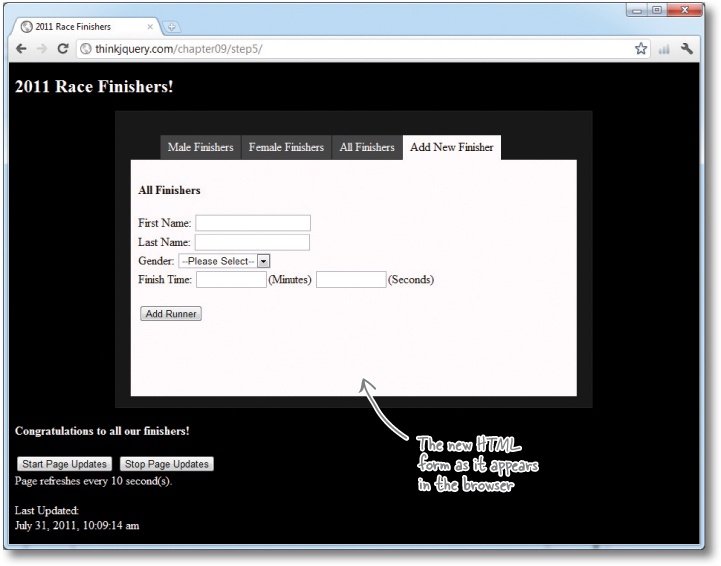
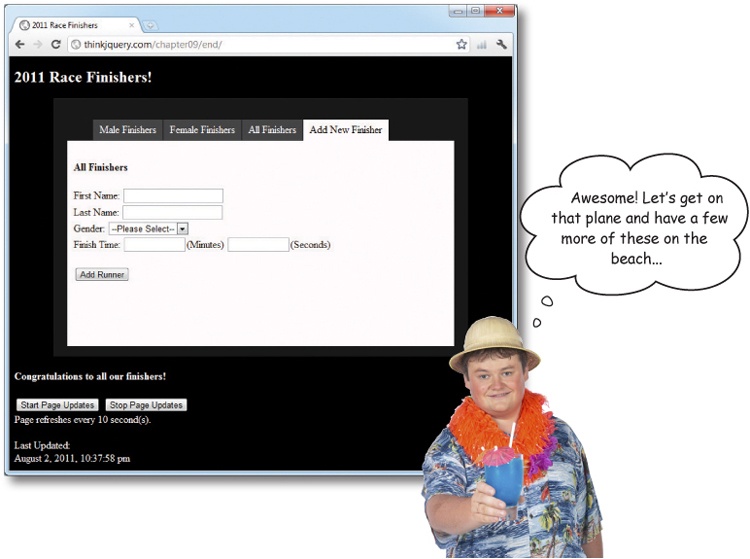
Update your index.html file with an additional tab to add new finishers via a form. Also update the entry in your my_style.css file to make the element with the ID of main wider.
What to do with the data
Now we need to send the data collected by the form to the server and store it somehow. To do that, we’re going to use another language, PHP, to insert the data into a database. Don’t worry! We’ll get you up to speed on PHP and databases in a bit, but first let’s focus on how we get our form data to the server.
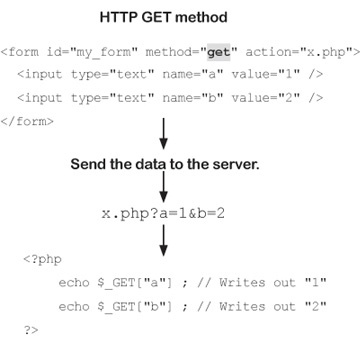
There are two methods of sending the data to the server using HTTP: GET and POST. The main difference between GET and POST is how the data is sent to the server. GET will append the form field names and values onto the end of the URL as key/value pairs. PHP can read this information out of an associative array called $_GET[], which is sent to the server when the form is submitted. The data is visible after the ? in the URL.
POST sends the data—also in an associative array, but encoded differently—and is not visible to the end user in the URL. The $_POST[] associative array contains all the information from the form elements. This, like the $_GET[] array, is a series of key/value pairs of the form element names and values.

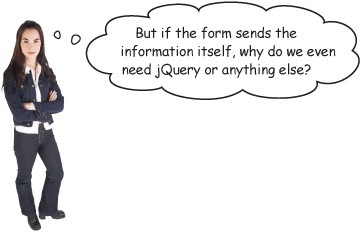
Yes, the form could send the information...
But, like we mentioned about the benefits of jQuery and Ajax in the previous chapter, you don’t have to reload the entire page to get or send data, so the user won’t see the whole page reload each time. However, before you send the data to the server using jQuery and Ajax, you need to get it ready for sending.
Format the data before you send it
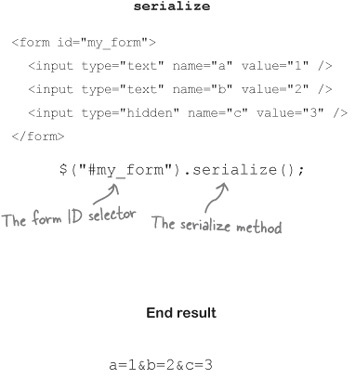
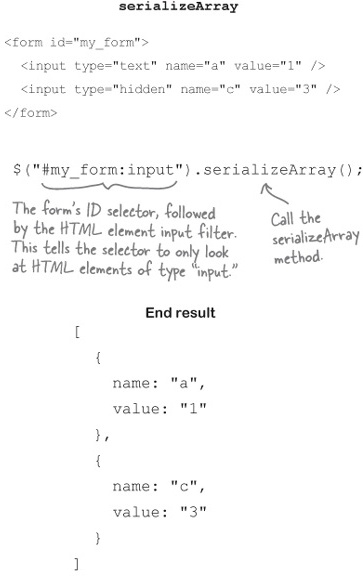
Before we can send information to the server (using Ajax), we need to do a little prepping to get it into a format that the Ajax call can send and the server will understand. To do this, we serialize our data into a single object, so the Ajax call can send it as one single package. jQuery offers two form helper methods for serializing data: serialize and serializeArray. The former will join all the inputs of your form into a single string of key/value pairs, separated by ampersands (&). The latter will create an associative array of key/value pairs, which is still a single object but is much more structured than the result of the simple serialize method. We’ll take a look at both, but we’re going to use serializeArray for our marathon data.
Send the data to the server
jQuery provides a shortcut method, post, dedicated to sending data to the server. The post method takes several parameters, including the URL you want to send your information to, the information you want to send, and a handler function that will run when the POST is complete.

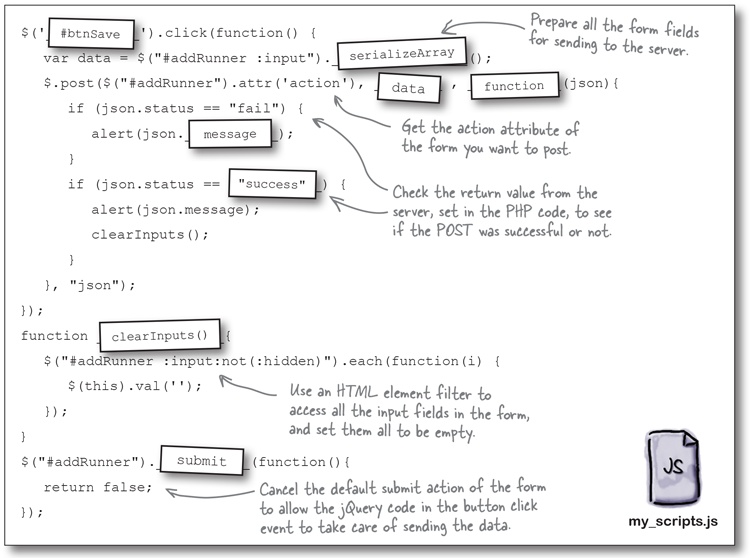
Create a click event listener on #btnSave that takes all the data in the form and serializes it. Then send this information to the server using a jQuery post method. Get the URL to post to from the action attribute of the form. Also, create a clearInputs function that sets all values of the form fields to blank, if the post is successful. You will also need to cancel the default submit action of the form (by returning false), using a .submit listener on the form with the ID of addRunner.
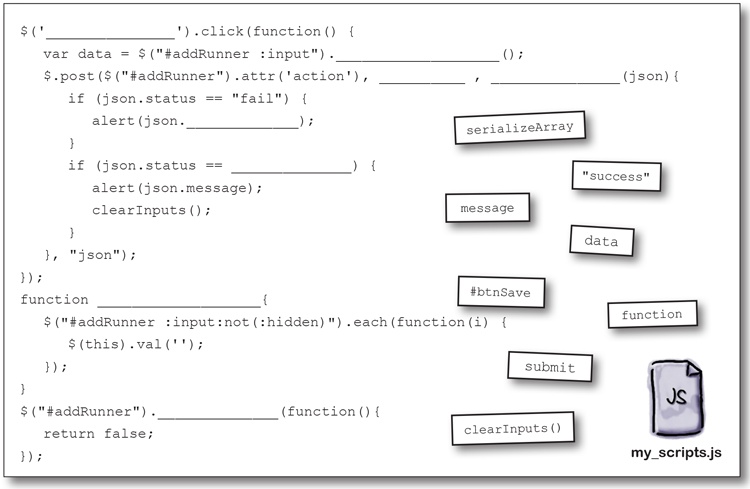
Create a btnSave click action that takes all the data in the form and serializes it. Then send this information to the server using a jQuery post method. Get the URL to post to from the action attribute of the form. Also, create a clearInputs function that sets all values of the form fields to blank if the post is successful. You will also need to cancel the default submit action of the form, using a .submit listener on the form, with the ID of addRunner.
Store your data in a MySQL database
Relational Database Management Systems (RDBMS) are extremely organized applications designed to store, organize, and remember relationships between your various pieces of data.
Often called database servers, they come in various shapes and sizes (and costs). For our purposes, we’ll use a free database server called MySQL. You communicate with a database server in a language it can understand, which in our case is SQL. A database server typically runs alongside a web server, sometimes on the same server, and they work in concert to read and write data and deliver web pages.
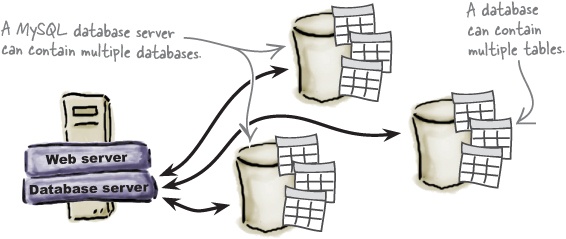
MySQL stores data inside of database tables.
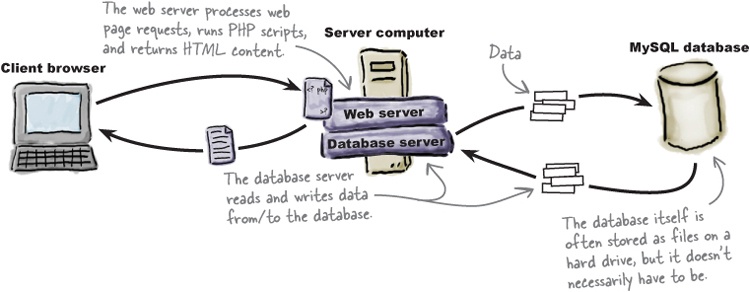
MySQL databases are organized into tables, which store information as rows and columns of related data. Most web applications use one or more tables inside a single database, sort of like different file folders within a file cabinet.
SQL is the query language used to communicate with a MySQL database.
Create your database to store runner info

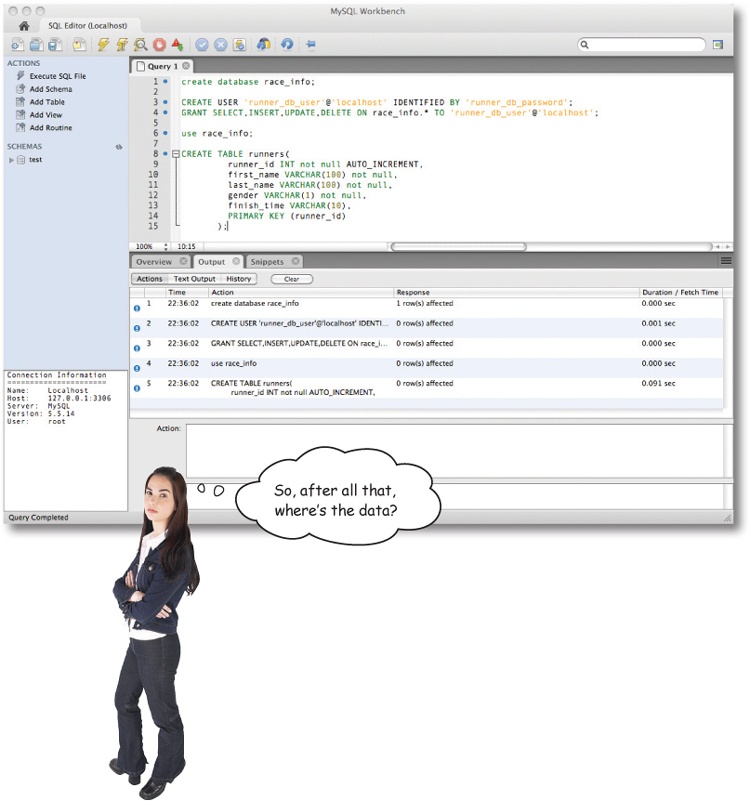
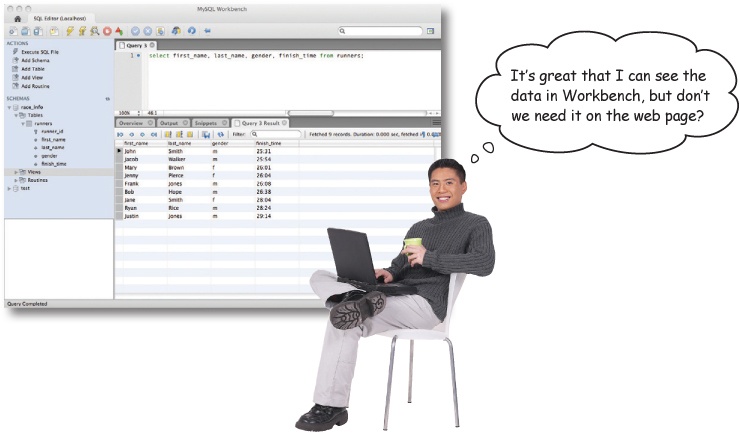
To get your database, table, and users set up, we’ve written the SQL for you. Open up MySQL Workbench, open a new connection, and run the following SQL.
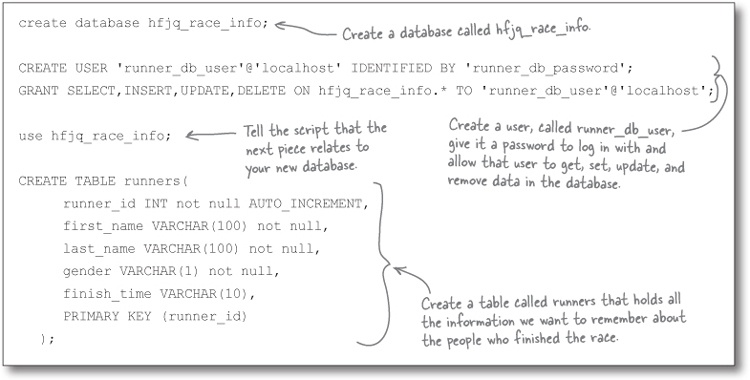
Open up MySQL Workbench and open a connection to the server. Paste the SQL from the previous page into the Query pane and press the lightning icon to run the SQL code. You should get success messages in the Output pane at the bottom.
We’ll get to that next.
The SQL you just ran creates a database, creates a user, grants access to the database for the new user and creates a table to store the runner info. Let’s see how you can put some data in there.
Anatomy of an insert statement
There is one primary way of putting data into our database, another way to change/update it, and a third to get it back out again. We’ll look at getting data out in a bit, but for now, let’s focus on putting data into our database tables.
To put data into database tables, we use an insert statement.
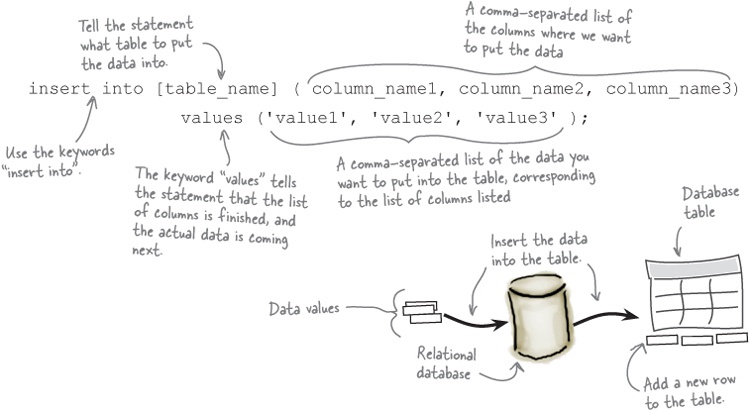
insert statements allow you to put information into a single table. They are mostly used to insert one record at a time, but some advanced SQL users can create insert statements that add multiple rows to the table. For our purposes, however, we’ll stick to the one-at-a-time syntax.
It’s recommended that you specify the columns in the order you want to insert your data, although it’s not necessary. Not specifying the columns can lead to data issues, since it will automatically put the first value in the first column, the second value in the second column, etc. You’ll need very intimate knowledge of your data tables to be confident of using this method.
Watch it!
The order of the column names and values matters!
The values must be listed in the exact same order as the columns. That’s how the database knows where to put the data.
Now that you’ve written all the SQL necessary for inserting the runners into your database tables, open up MySQL Workbench and run your code.
insert into runners (first_name, last_name, gender, finish_time)
   values ('John','Smith','m','25:31') ;
insert into runners (first_name, last_name, gender, finish_time)
values (‘Jacob’,‘Walker’,‘m’,‘25:54’) ;
insert into runners (first_name, last_name, gender, finish_time)
values (‘Mary’,‘Brown’,‘f’,‘26:01’) ;
insert into runners (first_name, last_name, gender, finish_time)
values (‘Jenny’,‘Pierce’,‘f’,‘26:04’) ;
insert into runners (first_name, last_name, gender, finish_time)
values (‘Frank’,‘Jones’,‘m’,‘26:08’) ;
insert into runners (first_name, last_name, gender, finish_time)
values (‘Bob’,‘Hope’,‘m’,‘26:38’) ;
insert into runners (first_name, last_name, gender, finish_time)
values (‘Jane’,‘Smith’,‘f’,‘28:04’) ;
insert into runners (first_name, last_name, gender, finish_time)
values (‘Ryan’,‘Rice’,‘m’,‘28:24’) ;
insert into runners (first_name, last_name, gender, finish_time)
values (‘Justin’,‘Jones’,‘m’,‘29:14’) ;
Time for a new language: PHP.
Don’t worry! We’ll give you just enough PHP chops to do all the server-side communication you need—including talking to a database server—and that’s it.
Use PHP to access the data
PHP is a programming language, and it needs an environment to run in: a web server with PHP support. PHP scripts and web pages that rely on the scripts must be placed on a real web server, as opposed to just opening a script directly from a local filesystem.
Note
If you do have a web server installed locally and it has PHP support, then you can test out PHP scripts directly on your local computer.
Web browsers know nothing about PHP and, therefore, have no ability to run PHP scripts.
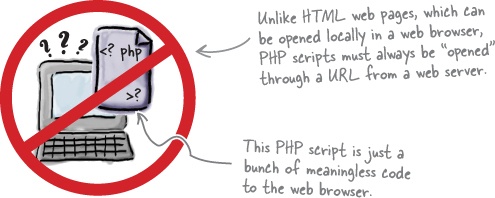
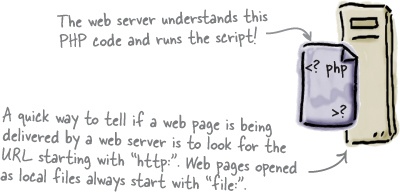
Web servers with PHP support are equipped to run PHP scripts and turn them into HTML web pages that browsers can understand.
PHP scripts must be run on a web server or they won’t work.
There will be jQuery, we promise.
But first, let’s look at how we get our PHP file to handle POST data, too, so it can write it into the database. We’ll also look at some of the important things to remember when dealing with sending information to your server.
Handle POST data on the server
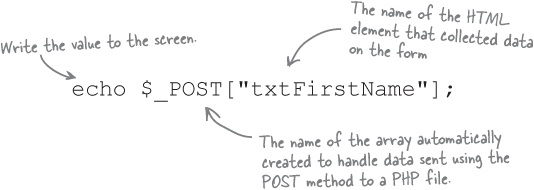
We’ve already looked at the special object created to handle the transportation of information from the form in the browser to the server: the $_POST object. It’s an associative array of all the information you sent, using the name (not the IDs) of the HTML elements as the key for the associative array, and the information in the HTML element as the value of the associative array. The PHP code on the server reads the $_POST object and determines what information has been sent to the server.
You can get the information back out of this array by using the key you sent with it (the name of the HTML element). This will return the value in your PHP script.

We’re almost at the point where we can grab the data back out of the database and figure out how to display it in our Finishers lists. But first, we need a little more PHP to get us connected to the database...
Connect to a database with PHP
Remember how when you went through the PHP installation process, you selected a particular library near the end of the process?
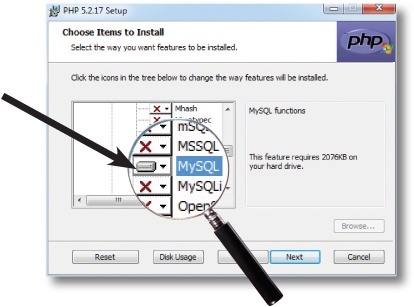
This library will enable PHP to talk to the MySQL database. We’ll use this library to connect to the database we’ve created so we can start reading out the runner data.
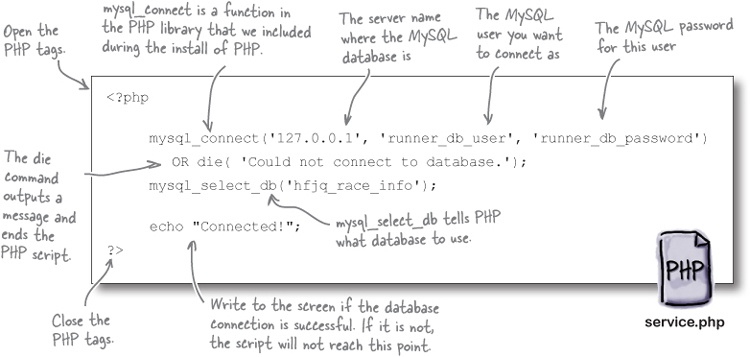
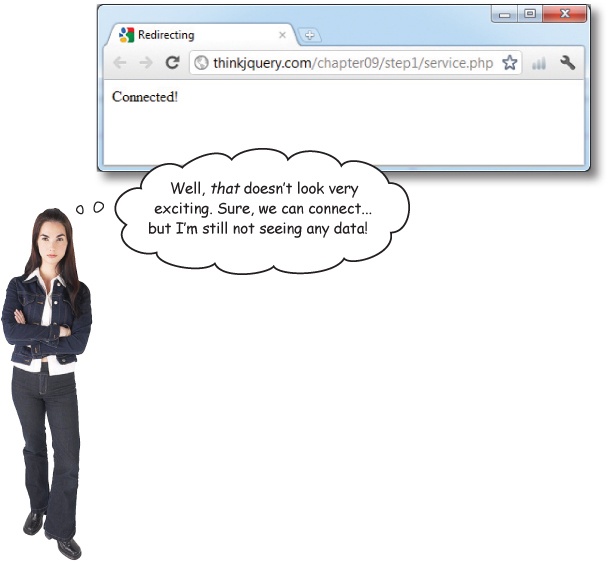
Open up your favorite text editor and add the code from the previous page. Save the file as service.php in the same directory as your index.html file for this chapter. Open service.php in your browser to see the results of your database query.
Don’t forget, the PHP code must run through your web server, so the URL should say http://, not file://.
You’re right.
Just like INSERT-ing, there’s a special syntax for reading the data back out again. Let’s look at how that works.
Use select to read data from a database
To read data from databases, we use a select statement, and the data is returned in a resultset. The resultset is a collection of all the data you asked for in your select query. Using a select statement, you can also join several tables, so you can get data from more than one table in the same resultset.
Note
For plenty more info on PHP, SQL, databases, and tables, pick up a copy of Head First PHP & MySQL.
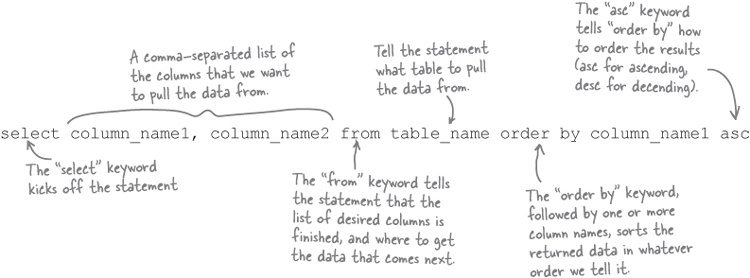
The SQL select statement retrieves columns of data from one or more tables and returns a resultset.
Get data with PHP
Up to now, we’ve looked at some very basic PHP and some not-so-basic PHP. We’ve seen how to write some basic information to the screen and how to connect to a database and write a select statement to get information out of a database. Now let’s see how we can get information from a database and write that information to the screen.
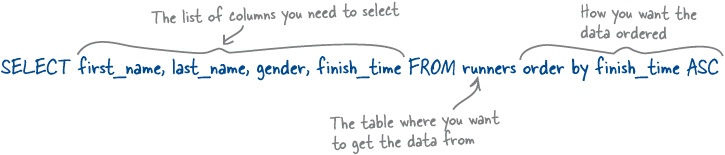
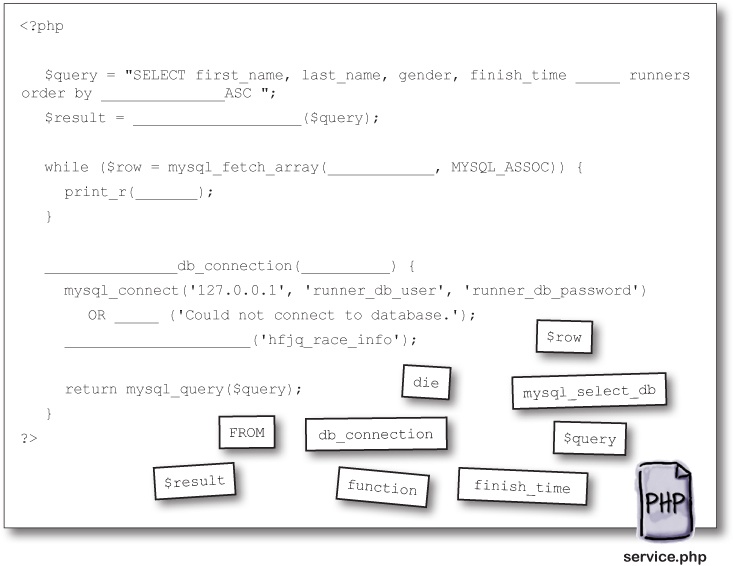
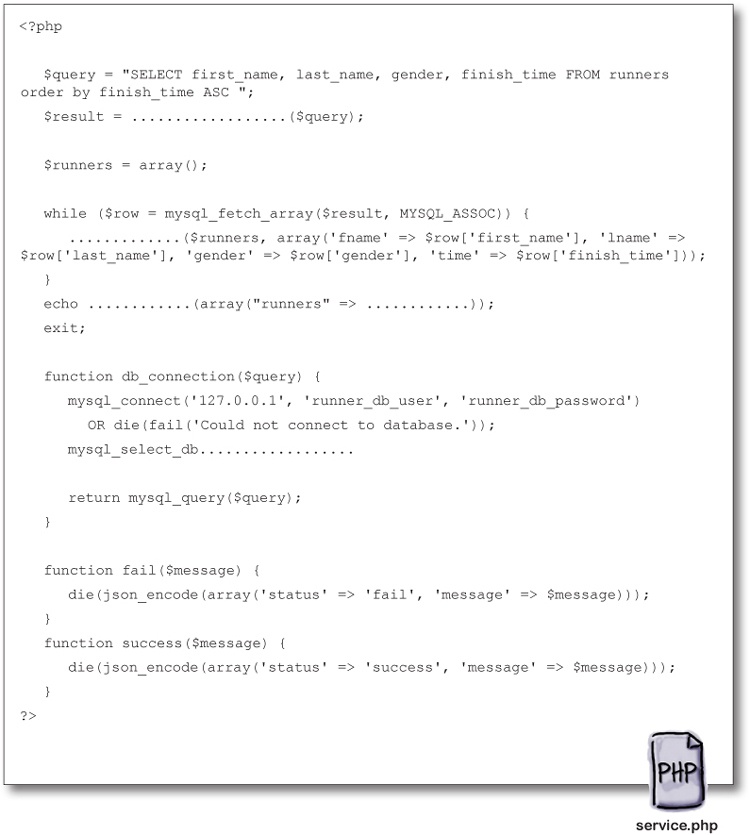
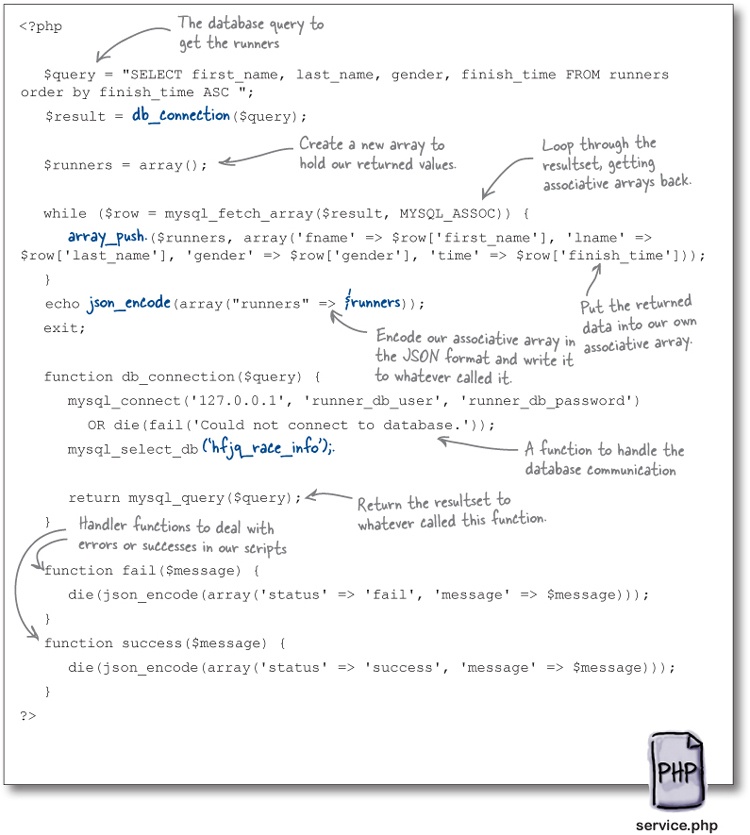
Rearrange the magnets below to complete the PHP code that creates a function called db_connection, which manages the database connections. Also create a $query variable and set its value to be the select statement you wrote earlier that selects all the runners from the database. Then create a $result variable that will call the db_connection function, which passes the $query variable as a parameter. Last, using a while loop, go through each row of the resultset—which is an associative array—and print it to the screen.
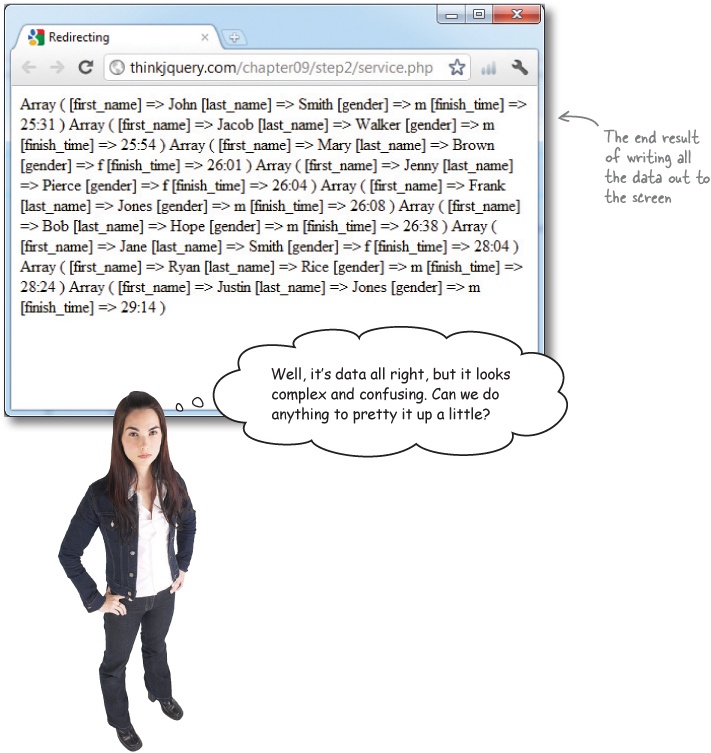
With just a little bit of PHP, you’re now grabbing the data from the database and getting the results returned in an array that can be displayed on your web page.

Update your service.php file with the code you just created and then open it in your browser to see the results of your database query. Don’t forget, the PHP code must run through your web server, so the URL should say http://, not file://.
Definitely.
What we see there is just a bunch of arrays written to the screen. They do contain the data we need, but not quite in the format we want. Luckily, there’s an efficient method for arranging data in a format perfect for defining data structures.
JSON to the rescue!
JSON, short for JavaScript Object Notation, is a lightweight data-interchange format. It is easy for humans to read and write. It is easy for machines to parse and generate. That’s what makes it perfect for structuring and transferring data. It’s based on a subset of the standard used to define JavaScript, and is language independent. That means it can be used with pretty much any programming language. It is more efficient at transferring data than XML, and is based on name/value pairs, like associative arrays. The values in JSON can be strings, numbers, arrays, objects, Boolean values (true or false) or null.
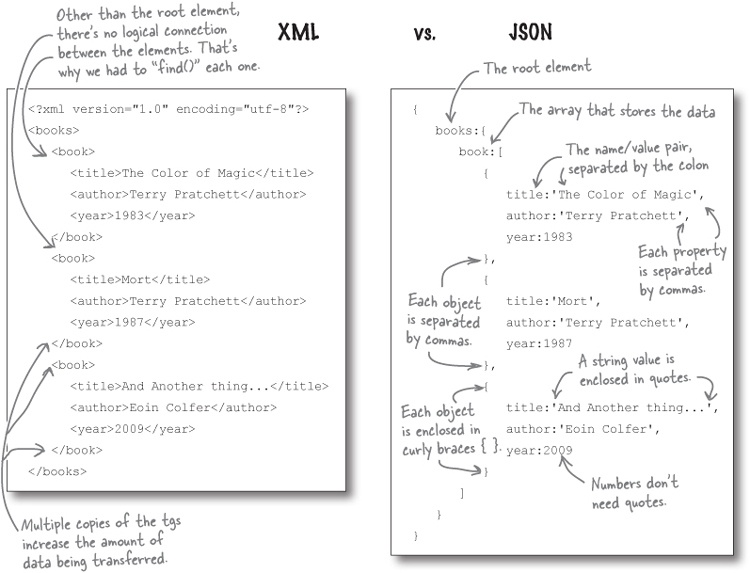
To access the information in the JSON object, you can use the same notation that you do for any other object: the dot (.) notation. Arrays inside the JSON object are like other JavaScript arrays and have the same properties, like length. In our example JSON object above, you would find out how many books were returned by using books.book.length. Different JSON objects will have different structures, so you might not need as many dots to access the array object.
jQuery + JSON = Awesome
Since JSON is so prevalent and easy to use, the good folks at jQuery built a special shortcut just for dealing with getting JSON data: the getJSON method.
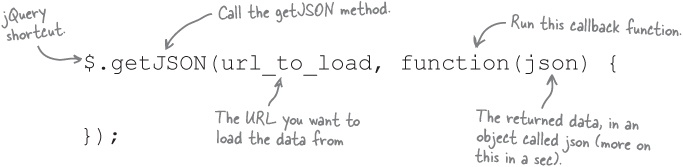
If this seems familiar, that’s because it’s almost the same as the post method we used earlier to get the data from the form. This simple method is a shortcut for the ajax method, with several parameters already set for you. To make this call without the shortcut, it would look like this:
Yes, we can.
As luck would have it, the PHP folks thought of this already. Let’s have a look at a few more PHP basics, and then see how to combine those with other PHP functions to get our data in JSON.
A few PHP rules...
Let’s face it, nobody really likes a bunch of coding rules, but there are just a few more things about PHP—much of which are syntax—that we should take a look at to help you wrangle your data for jQuery. Thankfully, we’ve already seen many of these concepts in relation to JavaScript, so we’ll keep this as quick and painless as possible...
PHP basics
All PHP code needs to be wrapped with
<?phpand?>tags.You can intersperse PHP with HTML, using the
<?phpand?>tags around your PHP codeAll lines of PHP code must end with a semicolon (;).
Rules for variables
All variables must start with a dollar sign ($).
After that, they must contain at least one letter or underscore, and then any combination of letters, numbers, or underscores.
Dashes ( - ), spaces ( ), and all special characters (except for $ and _) are not allowed in variable names.
Rules for loops
PHP also contains
for,while, anddo...whileloops—all with the same syntax as JavaScript.PHP also contains an extra loop mechanism called the
foreachloop, which will go through all the elements of an array one by one, using theaskeyword until it reaches the end, and then stopping automatically.
A few (more) PHP rules...
There are a few more rules that will help us get the data we need, format it correctly, and get it onto our web pages.
Rules for arrays
You can create new arrays using the
arraykeyword, similar to JavaScript.You can access the array values using the index of the item, in square brackets [ ], like JavaScript. They are also zero-indexed, like JavaScript.
Arrays can also be associative, which means you can use a key to access the item in the array, instead of the index. These are called key/value pairs.
To assign a value to a key in an associative array, you use the => operator.
Rules for conditionals
The
ifstatement has the same syntax as JavaScript, as does theelseclause, and theelse ifclause.The comparison operators are all the same as JavaScript.
Logical operators are also the same as in JavaScript, with the addition of descriptive words—
and,or, andnot—which can be used in place of the operators.
Format the output using PHP
OK, now that we’ve got that out of the way, let’s see what PHP can do for us! The json_encode function in PHP allows you to take an associative array and convert it into a JSON-encoded string of values.

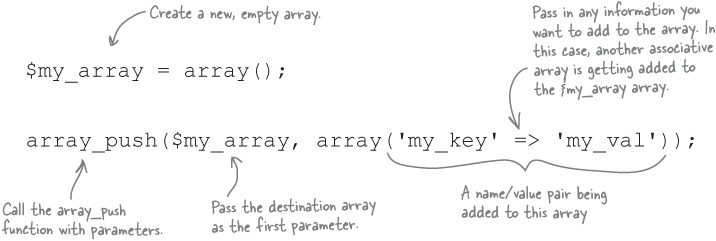
But before we can encode the data, it must be in a single associative array. We’ve already seen a method to loop through the resultset and see each associative array in there. What we need is a way to take each of these arrays and combine them into a single one. Using the PHP function array_push, we can add new items onto the end of an array.
Geek Bits
The json_encode function only became available in PHP version 5.2. If you’re using a version earlier than that, either update your version of PHP or type “json_encode PHP alternatives” into your favorite search engine, and you’ll find out just how the folks at PHP created that function. That way, you can create your own so you can take advantage of its cool features.
Relax
You’ve just put a bunch of new learning about PHP, MySQL, and JSON into your brain. We’re about to dive into a big exercise to pull everything together, so take a quick break and have a cup of coffee, take a walk, or do something else to give your brain a rest and get ready for what’s to come. When you’re done, turn the page and dive in.
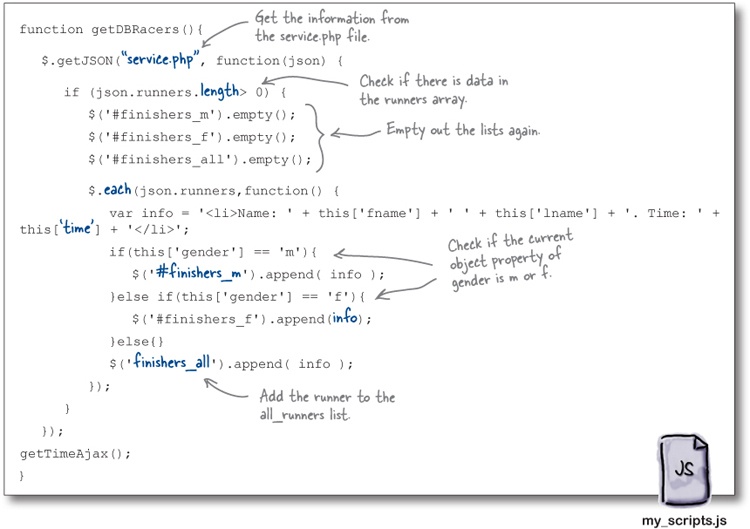
Update your my_scripts.js file with a new function, called getDBRacers, which calls the service.php file. This call should return a JSON object and then should alert out the number of runners that were returned. Also update the startAJAXCalls timer to call this new function instead of the getXMLRunners function. Then, update service.php to send back the runners’ retrieved data from the database, JSON-encoded.
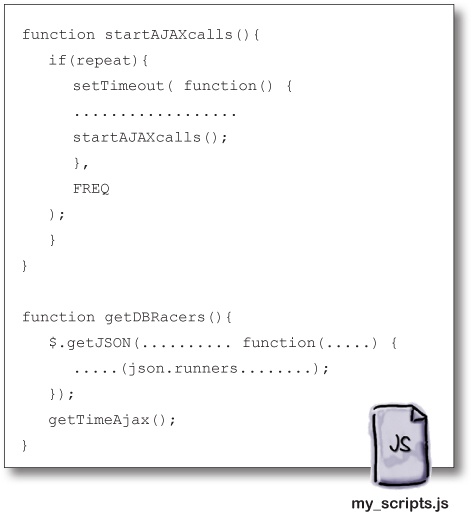
Your my_scripts.js file now has a new function, called getDBRacers, which calls the service.php file. There is no need for the old getXMLRunners function anymore, so you can get rid of that. The new function accepts JSON returned from the service.php file and alerts out the number of runners that was returned. The startAJAXCalls timer function has also been updated to call the new function. The service.php file has been updated to send back the runners retrieved from the database, JSON-encoded and ordered by finish_time, starting with the lowest first.
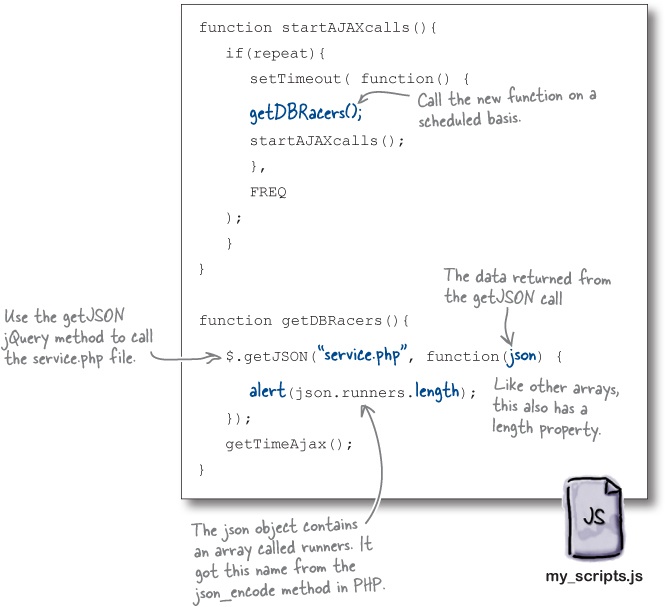
Update your service.php and my_scripts.js file with the code you just created, and open index.html in your browser. Open the “Network” tab in the Developer tools, and you’ll see the JSON information getting loaded in.

Not quite.
We know that we have the data in JSON format, since it was our own PHP code that created it. Now we’ll (finally) take a closer look at that JSON object we kept telling you we’d get to, so we can get the data back out.
Access data in the JSON object
The json_encode function in PHP allows us to convert an associative array into a JSON-encoded string of values. These values can then be accessed in JavaScript as associative arrays too, so we can loop through them and interact with them in the same way we interact with other arrays.
When we were using XML, we had to scan through the data to find the next runner. Then, once we found a runner, we again had to find if the runner was male or female. Remember that JSON object that gets returned from json_encode? With the JSON object, we can directly access its properties, using the dot (.) notation. It contains a single array, called runners, as a property. And, once we have the array, we can use the key of the associative array to know if the runner is male or female—which is much more efficient than looking for it each time.
Update your getDBRunners function to read the JSON object from service.php. Then, use conditional logic to decide which list the runner goes in. But watch out! Only do that if there are actually runners returned in the JSON object.
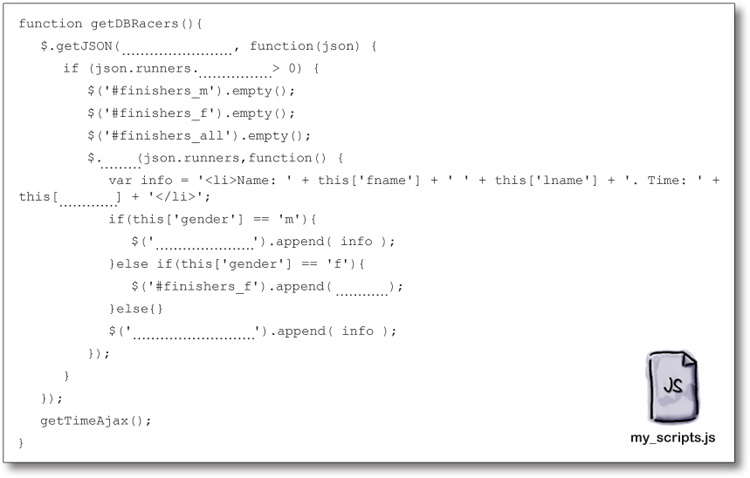
Using conditional logic and the information returned in the JSON object, you can determine which list the runner should go in. Like before, the runners should also always be added to the all_finishers list.
Geek Bits
We can use the each method to loop through all the elements in the array returned in the JSON object. This method is slightly different from the (selector).each method, since it can iterate over non-jQuery arrays, like our runners array.
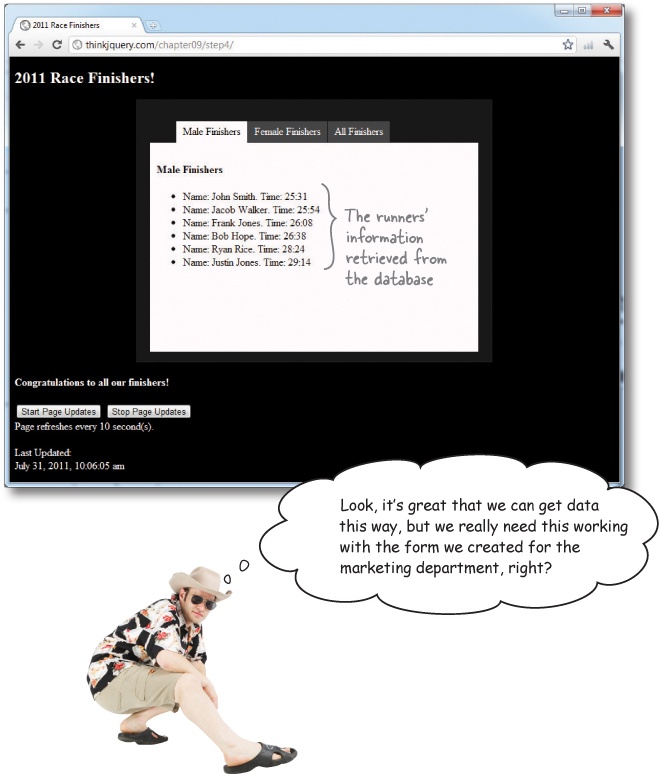
Update the getDBRacers function in your my_scripts.js file. Then open up index.html and see your runners get loaded from a MySQL database, using Ajax, JSON, and PHP.
Good point.
Once we get that part finished, aloha Waikiki! Let’s make sure the data Marketing is putting in doesn’t get us into any trouble first.
Data sanitization and validation in PHP
With the increase of spam bots and hackers trying to get ownership of your dataset for nefarious purposes, you should never trust the data that is entered into a web form. It’s always a good idea to validate and sanitize any data sent to your server before you insert it into your database. This ensures that you got the type of data you expected for a particular field (validation) and that the data you received doesn’t contain anything that could be potentially dangerous to your server or database (sanitization). This can help protect you against issues like SQL injections, drive-by cross-site scripting issues, and lots of other nasty things you can find out more about online. For our application, we’ll use some nifty PHP methods to clean up our data and make sure the correct data is used.
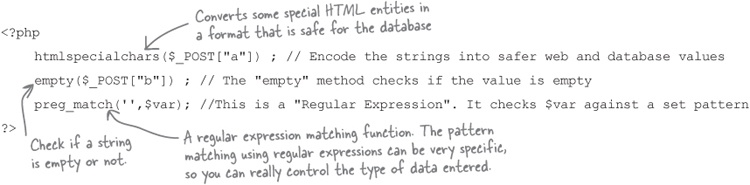
There are many other functions you could also look at for data sanitization; these include htmlentities, trim, stripslashes, mysql_real_escape_string, and many more. You can find a bunch more of these in Chapter 6 of Head First PHP & MySQL.
Use the same PHP file for multiple purposes
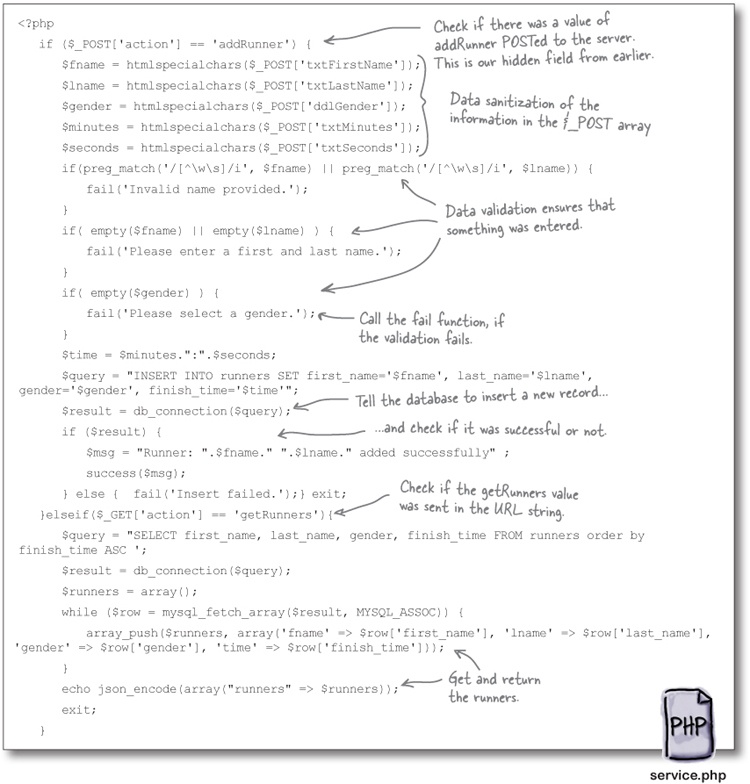
We’ve looked at the two ways of sending data to the server to be processed by PHP: POST and GET. In combination with some conditional logic, we can detect if there was a POST or a GET request to our PHP file and act accordingly. Remember that hidden field we added to our form a few pages ago?
<input type="hidden" name="action" value="addRunner" id="action">
We can watch for this value in the POST, and know that we posted a form. Then, we can run some data validation and sanitization functions to make sure we got all the data we want. Similarly, if we update the getJSON call to get the runners from the database with a URL parameter (for the $_GET PHP object), we can target just that code in the PHP file to run. That way, we’ll only have one PHP file to maintain.


Update your service.php file with the following code. It will handle both the GET and POST of information. You’ll also need to include the db_connection, success, and fail functions from before.

Do this!
Update the getJSON call to include a URL parameter called action with a value of getRunners to tell the service.php file to return the runners.
After updating your service.php and my_scripts.js files, open up index.html in your browser. You should see runners getting loaded in. You should also be able to add new runners to the list using the form on the new tab you created.
It’s time to sit back and give your left brain something to do. It’s your standard crossword; all of the solution words are from this chapter.

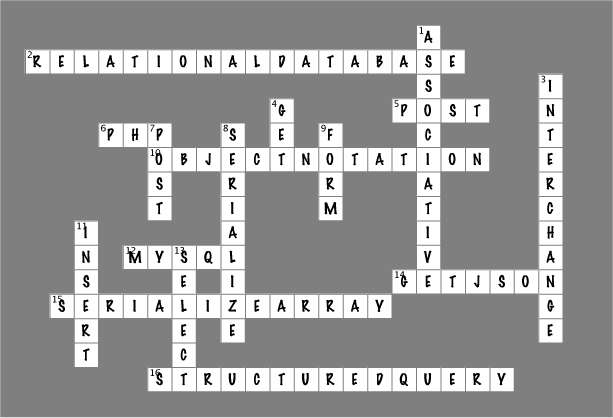
Across | Down |
2. __________ ________ Management Systems (RDBMS) are extremely organized applications designed to store, organize, and remember relationships between your various pieces of data. 5. A jQuery shortcut method that’s dedicated to sending data to the server. The method takes several parameters: URL, the information you want to send, and a handler function that will run after the data is sent. 6. Server-side scripting language often used to send data collected in a form to the server. 10. JSON = Java Script ______ ________. 12. Popular, open source database server that you can download for free. 14. The jQuery shortcut for getting JSON information from a server. 15. Another jQuery form helper method that will create an associative array of key/value pairs (which happens to make for great structured storage). 16. SQL = _________ _____ Language. | 1. A special type of array that holds its information in name/value pairs. 3. JSON and XML are two types of data-___________ formats that jQuery and PHP can pass back and forth to each other. 4. One of two methods used to send data to the server from an HTML form. This one will append the form field names and their values onto the end of the URL. 7. One of two methods used to send data to the server from an HTML form. This one also sends data, but doesn’t make that data visible in the URL string. 8. The jQuery form helper method that will join all the inputs of your form into a single string of key/value pairs, separated by ampersands (&). 9. HTML element to use when you want to collect data on a web page and send it to a server for processing. 11. The SQL command used to put data into a table. 13. The SQL command to retrieve data from a database table. |
Your jQuery/Ajax/PHP/MySQL Toolbox
You’ve got Chapter 9 under your belt, and now you’ve added some basic PHP, MySQL, JSON, and more Ajax to your toolbox.
MySQL
Lets you store data in databases and tables and insert and retrieve information using the SQL language.
SQL
A query language for interacting with database applications like MySQL.
JSON
Use the getJSON function to get JSON-encoded data from a server. This returns a JSON object.
Data can be sent from a form using the post method. Before you send the data, you need to format it using serializeArray.
PHP
A server-side scripting language that lets you manipulate web page content on the server before a page is delivered to the client browser.
PHP script
A text file that contains PHP code to carry out tasks on a web server.