Chapter 5. Working with the File System
AIR on iOS provides access to the file system to read, write, and update files of all types. This functionality can be very useful not only for reading existing files but also for storing files, media, data, and so on. This chapter will demonstrate how to read and write text files, browse the file system for media files, and create and write to an SQLite database.
File System Access
Just as in the desktop version of Adobe AIR, AIR on iOS provides you access to the file system. The usage is exactly the same.
Folder Aliases
To access the file system you can navigate using several folder
static alias properties of the File class.
Let’s review the code below. On application complete, the
application1_applicationCompleteHandler method is
called and the static File properties are read and
written to a String variable. This
String variable is written to the
text property of a TextArea
component. Figure 5-1 shows the
results:
<?xml version="1.0" encoding="utf-8"?>
<s:Application xmlns:fx="http://ns.adobe.com/mxml/2009"
                  xmlns:s="library://ns.adobe.com/flex/spark"
                  applicationComplete="application1_applicationCompleteHandler(event)">
    <fx:Script>
          <![CDATA[
               import mx.events.FlexEvent;

               protected function application1_applicationCompleteHandler(event:FlexEvent):void
               {
                     var s:String = "";                     s += "File.applicationDirectory : "
+ File.applicationDirectory.nativePath + "

";
                     s += "File.applicationStorageDirectory : "
+ File.applicationStorageDirectory.nativePath + "

";
                     s += "File.desktopDirectory: "
+ File.desktopDirectory.nativePath + "

";
                     s += "File.documentsDirectory : "
+ File.documentsDirectory.nativePath + "

";
                     s += "File.userDirectory : "
+ File.userDirectory.nativePath + "

";
                     info.text = s;
               }

          ]]>
    </fx:Script>
    <fx:Declarations>
          <!-- Place non-visual elements (e.g., services, value objects) here -->
    </fx:Declarations>

    <s:Label text="File System Paths" top="10" width="100%" textAlign="center"/>

    <s:TextArea id="info" width="100%" height="100%" top="40" editable="false"/>

</s:Application>
Read and Write to the File System
Adobe AIR provides you with the ability to read and write files to the file system. The following example will create a new file and then read it back.
Let’s review the code below. There are two
TextArea and two Button components
that make up this sample. The first TextArea (with
the id of contents) will hold the
contents of what is to be written to the file, and the second (with the
id of results) will output the
file contents when read back. The application can be seen in Figure 5-2.
Clicking on the Button with the label of Save
will call the button1_clickHandler method. Within the
button1_clickHandler method, an instance of
File is created with the name
file, the path is resolved to the
userDirectory, and “samples/test.txt” is passed in to
the resolvePath method. An instance of
FileStream with the name stream
is created to write the data to the file. The open method is called on
the stream object and the file, and FileMode.WRITE is passed in, which will open
the file with write permissions. Next, the
writeUTFBytes method is called and the
contents.text is passed in. Finally, the stream is
closed.
Clicking on the Button with the label of
Load will call the
button2_clickHandler method. Within the
button2_clickHandler method, an instance of
File is created with the name
file, the path is resolved to the
userDirectory, and “samples/test.txt” is passed in to
the resolvePath method. An instance of
FileStream with the name stream
is created to read the data from the file. The open method is called on
the stream object and the file, and FileMode.READ is passed in, which will open
the file with write permissions. Next, the
readUTFBytes method is called, the
stream.bytesAvailable is passed in, and the results
are set to the results.text property of the second
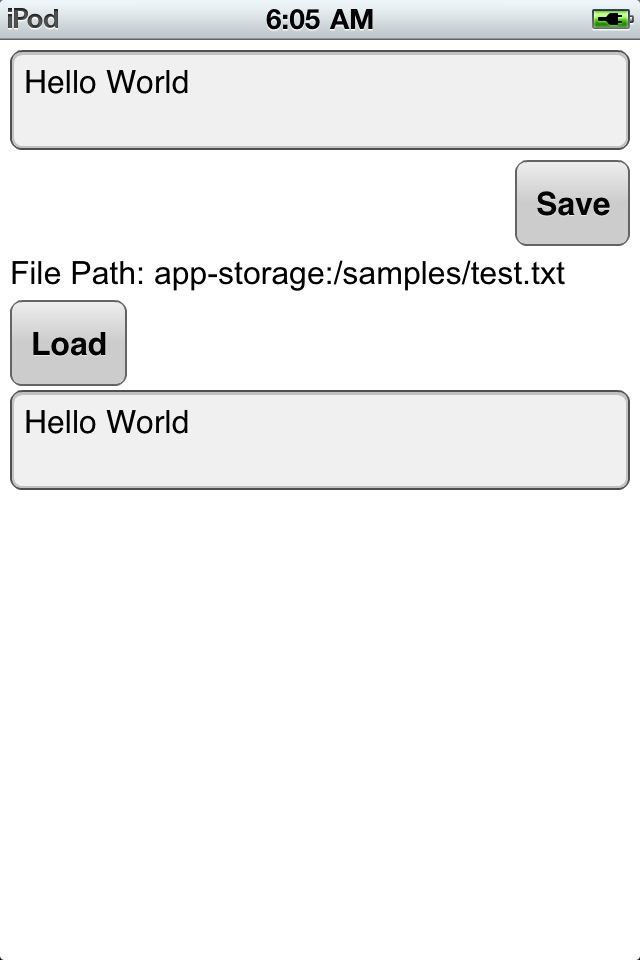
TextArea. Finally, the stream is closed. Figure 5-3 shows the contents
of the file within the result’s TextArea and the path
to the newly created file:
<?xml version="1.0" encoding="utf-8"?>
<s:Application xmlns:fx="http://ns.adobe.com/mxml/2009"
                  xmlns:s="library://ns.adobe.com/flex/spark">

    <fx:Script>
          <![CDATA[

               protected function button1_clickHandler(event:MouseEvent):void
               {
                     var file:File = File.applicationStorageDirectory.resolvePath("samples/test.txt");
                     var stream:FileStream = new FileStream()
                     stream.open(file, FileMode.WRITE);
                     stream.writeUTFBytes(contents.text);
                     stream.close();
               }

               protected function button2_clickHandler(event:MouseEvent):void
               {                     var file:File = File.applicationStorageDirectory.resolvePath("samples/test.txt");
                     var stream:FileStream = new FileStream()
                     stream.open(file, FileMode.READ);
                     results.text = stream.readUTFBytes(stream.bytesAvailable);
                     path.text = "File Path: " + file.url;
                     stream.close();
               }

          ]]>
    </fx:Script>

    <fx:Declarations>
          <!-- Place non-visual elements (e.g., services, value objects) here -->
    </fx:Declarations>

    <s:TextArea id="contents" left="10" right="10" top="10" height="100"/>
    <s:Button right="10" top="120" label="Save" click="button1_clickHandler(event)"/>
    <s:Label id="path" left="10" top="160"/>
    <s:Button left="10" top="200" label="Load" click="button2_clickHandler(event)"/>
    <s:TextArea id="results" left="10" right="10" top="280" height="100" editable="false"/>
</s:Application>
SQLite Databases
Just as within Adobe AIR on the desktop, you can utilize an SQLite database for storing data on a mobile device. The example below will create a database, use a simple form to save data to that database, and retrieve and display the stored data.
Let’s review the code below. At the top you will see the database
file defined as a file called users.db within the
userDirectory. Next, the
SQLConnection is defined. Finally, there are several
SQLStatements declared and SQL strings defined, which
will be used for working with the database.
Within the applicationComplete event handler, the
SQLConnection is initiated and two event listeners are
added to listen for SQLEvent.OPEN and
SQLErrorEvent.ERROR. Finally, the
openAsync method is called and the
db file is passed in.
After the database is opened, the openHandler
function is called. Within this function, the SQLEvent.OPEN event listener is removed. Next,
the createTableStmt is created, configured, and
executed. This statement will create a new table called
Users if it doesn’t yet exist. If this statement is
successful, then the createResult method is called.
Within the createResult method, the SQLEvent.RESULT event is removed and the
selectUsers method is called.
Within the selectUsers method, the
selectStmt is created, configured, and executed. This
statement will return all rows within the Users table. This data is then
stored within the selectStmt. If this statement is
successful, then the selectResult method is called.
Within the selectResult method, the data is read from
the selectStmt by using the
getResults method. It is then cast to an
ArrayCollection and set to the
dataProvider of a DataGroup, where
it is shown on screen by formatting within an
itemRenderer named
UserRenderer.
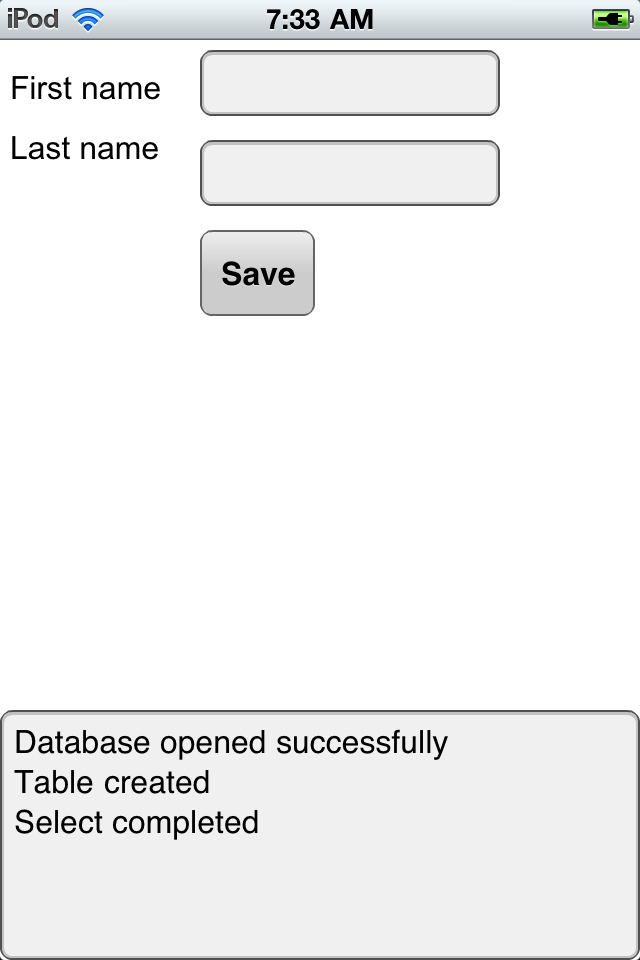
All of the processes just described occur as chained events when the application loads up. So if there is any data in the database from previous usage, it will automatically display when the application is loaded. This can be seen in Figure 5-4.
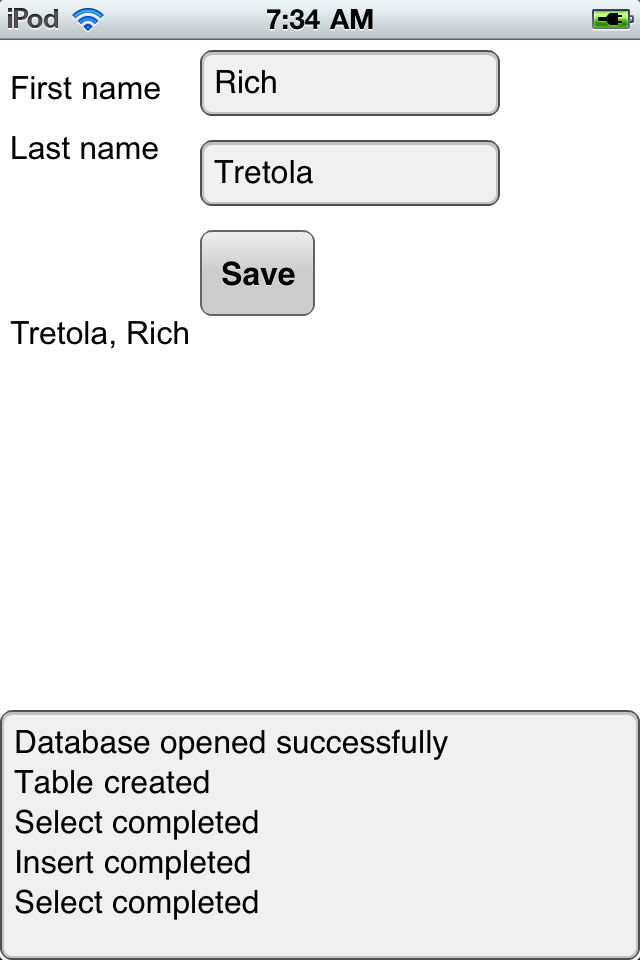
The only remaining functionality is the ability to add a new user.
There are two text fields with the ids of
firstName and lastName, and a
Button that when clicked will call the
button1_clickHandler function. Within the
button1_clickHandler function, the
insertStmt is created, configured, and executed. Notice
that within the insertStmt configuration, the
parameters firstName and lastName
that were defined in the insertSQL method are set to the
text properties of the firstName and
lastName TextInput components. If this statement is
successful, then the insertResult method is called.
Within the insertResult method, the
selectUsers method is called and the
DataGroup is updated, showing the newly added data.
This can be seen in Figure 5-5:
Here is the code for the main application:
<?xml version="1.0" encoding="utf-8"?>
<s:Application xmlns:fx="http://ns.adobe.com/mxml/2009"
                  xmlns:s="library://ns.adobe.com/flex/spark"
                  applicationComplete="application1_applicationCompleteHandler(event)">
    <fx:Script>
          <![CDATA[
               import mx.collections.ArrayCollection;
               import mx.events.FlexEvent;

               private var db:File =
File. applicationStorageDirectory.resolvePath("users.db");
               private var conn:SQLConnection;

               private var createTableStmt:SQLStatement;
               private var createTableSQL:String = "CREATE TABLE IF NOT EXISTS User (" +
                                                   "userId INTEGER PRIMARY KEY
                                                       AUTOINCREMENT," +
                                                   "firstName TEXT," + "lastName TEXT)";

               private var selectStmt:SQLStatement;
               private var selectSQL:String = "SELECT * FROM User";

               private var insertStmt:SQLStatement;
               private var insertSQL:String = "INSERT INTO User (firstName, lastName)" +
                                                               "VALUES (:firstName, :lastName)";

               protected function application1_applicationCompleteHandler(event:FlexEvent):void
               {
                     conn = new SQLConnection();
                     conn.addEventListener(SQLEvent.OPEN, openHandler);
                     conn.addEventListener(SQLErrorEvent.ERROR, errorHandler);
                     conn.openAsync(db);
               }

               private function openHandler(event:SQLEvent):void {
                     log.text += "Database opened successfully";
                     conn.removeEventListener(SQLEvent.OPEN, openHandler);
                     createTableStmt = new SQLStatement();
                     createTableStmt.sqlConnection = conn;
                     createTableStmt.text = createTableSQL;
                     createTableStmt.addEventListener(SQLEvent.RESULT, createResult);
                     createTableStmt.addEventListener(SQLErrorEvent.ERROR, errorHandler);
                     createTableStmt.execute();
               }

               private function createResult(event:SQLEvent):void {
                     log.text += "
Table created";
                     conn.removeEventListener(SQLEvent.RESULT, createResult);
                     selectUsers();
               }

               private function errorHandler(event:SQLErrorEvent):void {
                     log.text += "
Error message: " +  event.error.message;
                     log.text += "
Details: " +  event.error.details;
               }

               private function selectUsers():void{
                     selectStmt = new SQLStatement();
                     selectStmt.sqlConnection = conn;
                     selectStmt.text = selectSQL;
                     selectStmt.addEventListener(SQLEvent.RESULT, selectResult);
                     selectStmt.addEventListener(SQLErrorEvent.ERROR, errorHandler);
                     selectStmt.execute();
               }

               private function selectResult(event:SQLEvent):void {
                     log.text += "
Select completed";
                     var result:SQLResult = selectStmt.getResult();
                     users.dataProvider = new ArrayCollection(result.data);
               }

               protected function button1_clickHandler(event:MouseEvent):void
               {
                     insertStmt = new SQLStatement();
                     insertStmt.sqlConnection = conn;
                     insertStmt.text = insertSQL;
                     insertStmt.parameters[":firstName"] = firstName.text;
                     insertStmt.parameters[":lastName"] = lastName.text;
                     insertStmt.addEventListener(SQLEvent.RESULT, insertResult);
                     insertStmt.addEventListener(SQLErrorEvent.ERROR, errorHandler);
                     insertStmt.execute();
               }

               private function insertResult(event:SQLEvent):void {
                     log.text += "
Insert completed";
                     selectUsers();
               }

          ]]>
    </fx:Script>
    <fx:Declarations>
          <!-- Place non-visual elements (e.g., services, value objects) here -->
    </fx:Declarations>

    <s:Label text="First name" top="35" left="10"/>
    <s:TextInput id="firstName" left="150" top="10" width="300"/>

    <s:Label text="Last name" top="95" left="10"/>
    <s:TextInput id="lastName" left="150" top="70" width="300"/>

    <s:Button label="Save" click="button1_clickHandler(event)" top="130" left="150"/>

    <s:Scroller height="200" width="100%" left="10" right="10" top="200">
          <s:DataGroup id="users" height="100%" width="95%"
                           itemRenderer="UserRenderer">
               <s:layout>
                     <s:VerticalLayout/>
               </s:layout>
          </s:DataGroup>
    </s:Scroller>

    <s:TextArea id="log" width="100%" bottom="0" height="250"/>

</s:Application>
The code for the UserRenderer:
<?xml version="1.0" encoding="utf-8"?>
<s:ItemRenderer xmlns:fx="http://ns.adobe.com/mxml/2009"
                          xmlns:s="library://ns.adobe.com/flex/spark">
    <s:Label text="{data.lastName}, {data.firstName}"/>
</s:ItemRenderer>