OS X has a spectacular reputation for stability and security. At this writing, there still hasn’t been a single widespread OS X virus—a spectacular feature that makes Windows look like a waste of time. There’s also no Windows-esque plague of spyware (downloaded programs that do something sneaky behind your back).
Part of the reason is that OS X was designed with security in mind from the very beginning. Listed below are a few of the many drafty corners of a typical operating system that Apple has solidly plugged:
OS X has always come from the factory with all its ports shut and locked.
Ports are channels that remote computers use to connect to services on your computer: one for instant messaging, one for Windows’ remote-control feature, and so on. It’s fine to have them open if you’re expecting visitors. But if you’ve got an open port that exposes the soft underbelly of your computer without your knowledge, you’re in for a world of hurt. Open ports are precisely what permitted viruses like Blaster to infiltrate millions of PCs in the Windows XP days.
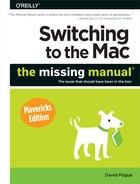
In OS X, no program (like a virus) can install itself without your awareness. You’re notified at every juncture when anything is trying to install itself on your Mac. In fact, every time you try to download something, either in Safari or Mail, that contains executable code (a program, in other words), a dialog box warns you that it could conceivably harbor a virus—even if your download is compressed as a .zip file (Figure 14-13).
Unlike certain other operating systems, OS X doesn’t even let an administrator touch the files that drive the operating system itself without pestering you to provide your password and grant it permission to do so. An OS X virus could theoretically wipe out all your files, but it wouldn’t be able to access anyone else’s stuff—and it couldn’t touch the operating system itself.
You probably already know about the Finder’s Secure Empty Trash option (The Spotlight Window). But an option on the Erase tab of the Disk Utility program can do the same super-erasing of all free space on your hard drive. We’re talking not just erasing, but recording gibberish over the spots where your files once were—once, seven times, or 35 times—utterly shattering any hope a hard-disk recovery firm (or spy) might have had of recovering passwords or files from your hard drive.
Safari’s Private Browsing mode means you can freely visit Web sites without leaving any digital tracks—no history, no nothing.
Those are only a few tiny examples. Here are a few of OS X’s big-ticket defenses.
This security feature is going to send every Eastern European teenage hacker into therapy.
Nasty programs aren’t very common on the Mac to begin with. But now, unless you turn Gatekeeper off, downloading a program that’s secretly designed to damage your Mac is virtually impossible.
Gatekeeper won’t even let you install programs that haven’t been proved to be safe (Figure 14-14).
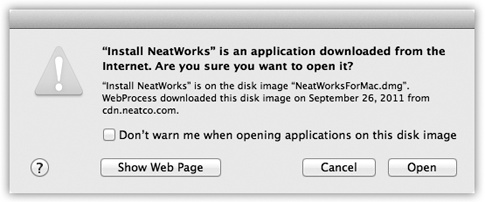
There’s no Gatekeeper app or even a Gatekeeper System Preferences icon. Instead, to find Gatekeeper, you open System Preferences→Security & Privacy→General. At the bottom of this screen (Figure 14-14, top), you see three options. These three humble buttons are Gatekeeper.
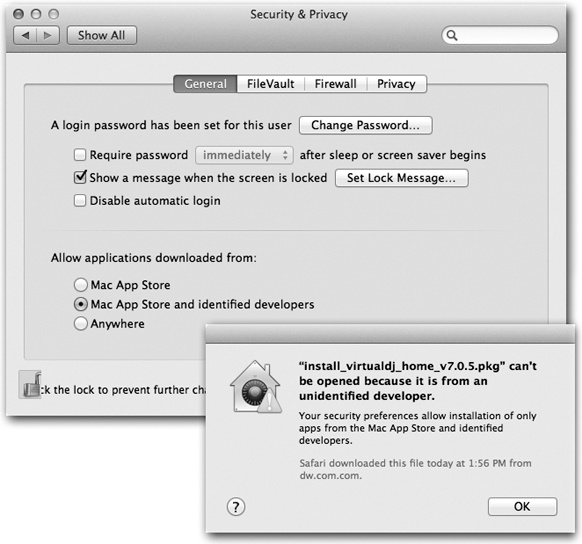
Figure 14-14. Top: The “Allow applications downloaded from” options are, in fact, the face of Gatekeeper. Bottom: If you try to open a downloaded program that Apple can’t vouch for, you get this admonishing dialog box.
Your choices, under “Allow applications downloaded from,” are:
Mac App Store. This is the safest option. Every program that Apple allows into its Mac App store is safe. Each has been tested by Apple to make sure that, among other things, it’s both sandboxed (blocked from accessing parts of the Mac that it doesn’t need) and digitally signed (set up to notify that Mac if it’s been altered in any way since it left the software company).
So what happens if you try to download a program that didn’t come from the App Store? The Mac won’t let you install it, period.
Mac App Store and identified developers. This option, the factory setting, lets you download and install both App Store programs and those from “identified developers.” That means software companies that have registered with Apple and received, in turn, an encrypted code (a “certificate”) that’s embedded in their programs.
This certificate lets Apple track who created the app, and also digitally signs it, as described above. Now, Apple may not know this software company, and Apple doesn’t inspect its software. But if anybody reports that some program is actually a virus in disguise, Apple can instantly add that program to its blacklist—and prevent millions of other people from installing it. (Mavericks updates its blacklist once a day.)
Anywhere. This button turns Gatekeeper off (after presenting an “Are you sure?” message). You’re free to download and install any programs you want, with no checking for their hygiene.
Tip
Don’t turn on Anywhere just because there’s one particular non-kosher app you want to run. In that case, it’s smarter to leave Gatekeeper turned on—and override Gatekeeper just for that one app. To do so, right-click (or two-finger click) the program’s icon; from the shortcut menu, choose Open.
Gatekeeper is a pretty powerful disincentive for the world’s bad eggs; if millions of people leave Gatekeeper turned on, the bad guys might as well not even bother. Their apps will never be downloaded and can therefore never spread.
There are, however, some important limitations to note:
Gatekeeper doesn’t uninstall programs you’ve already installed. (Once you’ve run any program once, Gatekeeper never checks it again.)
Gatekeeper is intended to stop bad software that you get by downloading. It doesn’t do anything about programs you’ve installed from, for example, a DVD or USB drive.
It doesn’t stop Flash and Java programs.
Overall, Gatekeeper is a pretty convincing barrier to a Windows-like nightmare scenario, where some virus breaks out into the wild and takes down hundreds of thousands of computers. If most people leave the factory setting selected—and they will—that outcome is virtually impossible.
If you have a broadband, always-on connection, you’re open to the Internet 24 hours a day. It’s theoretically possible for some cretin to use automated hacking software to flood you with data packets or take control of your machine. OS X’s firewall feature puts up a barrier to such mischief. To turn it on, click the ![]() on the Firewall pane, authenticate yourself, and then click Start.
on the Firewall pane, authenticate yourself, and then click Start.
Note
You don’t need to turn on this firewall if your Mac connects to the Internet through a wired or wireless router (including the AirPort base station). Virtually every router already has a built-in firewall that protects your entire network. (Similarly, if you’re using the Internet Sharing feature described on WiFi Connections, turn on the firewall only for the first Mac, the one connected right to the Internet.)
In short: Use the firewall only if your Mac is connected directly to a cable modem, DSL box, or dial-up modem.
Fortunately, it’s not a complete barrier. One of the great joys of having a computer is the ability to connect to other computers. Living in a cement crypt is one way to avoid getting infected, but it’s not much fun.
Therefore, you can turn the firewall on by opening System Preferences→Security→Firewall tab, authenticating, and clicking Turn On Firewall. But you can also fine-tune the blockade.
To do that, click Firewall Options; you see something like Figure 14-15 at top. As you can sort of tell, OS X lets you allow or block Internet connections individually for each program on your Mac. Here’s what you’ll find there:
Block all incoming connections. This option might be better known as Paranoid Mode. You’re allowed to do email and basic Web surfing and a few other deep-seated services that OS X needs to get by. But all other kinds of network connections are blocked, including screen sharing, iTunes music sharing, and so on. This is a hard-core, meat-fisted firewall that, for most people, is more trouble than it’s worth.
Figure 14-15. Top: The OS X firewall starts with a simple button click. The fun stuff doesn’t begin until you click Firewall Options at the bottom (it’s covered up in this shot, but it’s there). Bottom: This pane lists the programs that have been given permission to receive communications from the Internet. At any point, you can change a program’s Block/Allow setting, as shown here. You can also click the + button to navigate to your Applications folder and manually choose programs for inclusion.
Tip
As you can tell from the wording of this item, OS X’s firewall blocks only incoming connections, which covers most of the dangerous stuff. But if you’d also like your Mac to block outgoing Internet connections, you can install a shareware firewall program like LittleSnitch. It’s available on this book’s “Missing CD” page at www.missingmanuals.com.
[List of individual programs]. If the firewall is on but you haven’t turned on “Block all,” then the Mac uses this list of individual programs and features to determine what’s allowed to accept network connections.
Above the horizontal line (Figure 14-15, bottom), features of OS X itself are listed. They get added to this list automatically when you turn them on in System Preferences: File Sharing, Printer Sharing, and so on.
Non-Apple programs can gain passage through your firewall, too. You can add one to the list manually by clicking the
 button below the list and choosing it by hand; or you can simply respond to the request box that pops up whenever a new program wants to accept incoming Internet connections.
Click Allow for each such request (unless, of course, you see a request for an app called SneakyPoisonVirus or something). As you do so, their names get added to the list of programs in this dialog box.
For each program, you can use the pop-up menu beside its name to specify either “Allow incoming connections” or “Block incoming connections,” depending on your level of paranoia.
Automatically allow signed software to receive incoming connections. Signed software means programs that Apple recognizes as coming from legitimate companies. Anything from Adobe or Microsoft, for example, has got to be OK, right? (Insert your own wisecrack here.)
Note
OK, technically, a signed program is one whose authenticity is confirmed by a third party—a “certificate authority” company like VeriSign or GoDaddy. A system of invisible keys (security numbers) confirms that the software did indeed come from the creators it claims it came from, no matter how many detours it took to reach you.
One more point: When you explicitly grant permission to a program, as described below, you’re signing that program.
If this checkbox is not turned on, then each time you run a new program for the first time, you’ll be interrupted so that the Mac can ask if it’s OK to permit Internet connections. The “signed software” box cuts down on the interruptions, since well-known apps are assumed not to be viruses or spyware.
Enable stealth mode. This is designed to slam shut the Mac’s back door to the Internet. See, hackers often use automated hacker tools that send out “Are you there?” messages. They’re hoping to find computers that are turned on and connected full time to the Internet. If your machine responds, and they can figure out how to get into it, they’ll use it, without your knowledge, as a relay station for pumping out spam or masking their hacking footsteps.
“Enable stealth mode,” then, makes your Mac even more invisible on the network; it means your Mac won’t respond to the electronic signal called a ping. (On the other hand, you won’t be able to ping your machine, either, when you’re on the road and want to know if it’s turned on and online.)
Note
You might have noticed that there doesn’t seem to be any option to turn on firewall logging, which creates a little text file where OS X records every attempt that anyone from the outside makes to infiltrate your Mac. Logging is available, though—in fact, it’s turned on all the time. To view the log, open the Applications→Utilities→Console program. In the left-side list, expand the /private/var/log heading, and click appfirewall.log.
FileVault is one of OS X’s most powerful security features. Understanding what it does, however, may take a little slogging.
As you know, the accounts system is designed to keep people out of one another’s stuff. Ordinarily, for example, Chris isn’t allowed to go rooting through Robin’s email and files.
Until FileVault came along, though, there were all kinds of ways to circumvent this protection system. A sneak or a show-off could start up the Mac in FireWire disk mode, for example, or even remove the hard drive and hook it up to a Linux machine or another Mac.
In each case, they’d then be able to run rampant through everybody’s files, changing or trashing them with abandon. For people with sensitive or private files, the result was a security hole bigger than Oprah’s bank account.
FileVault is an extra line of defense. When you turn on this feature, your Mac automatically encrypts (scrambles) everything on your startup hard drive—not just what’s in your Home folder. Every time you create or save a new file, it, too, is insta-encrypted.
Note
FileVault uses something called XTS-AES 128 encryption. How secure is that? It would take a password-guessing computer 149 trillion years before hitting pay dirt. Or, in more human terms, slightly longer than the “Lord of the Rings” movie trilogy.
This means that unless someone knows (or can figure out) your password, FileVault renders your files unreadable for anyone but you and your computer’s administrator—no matter what sneaky tricks they try to pull. (You can, if you like, authorize other account holders to get in, too.)
You won’t notice much difference when FileVault is turned on. You log in as usual, clicking your name and typing your password. Only a slight pause as you log out indicates that OS X is doing some housekeeping on the encrypted files: freeing up some space and/or backing up your home directory with Time Machine.
Tip
This feature is especially useful for laptop owners. If someone swipes or “borrows” your laptop, they can’t get into your stuff without the password.
Here are some things you should know about FileVault’s protection:
It’s useful only if you’ve logged out. Once you’re logged in, the entire drive is unlocked and accessible. If you want the protection, log out before you wander away from the Mac.
An administrator can access your files, too. According to OS X’s caste system, anyone with an Administrator account can theoretically have unhindered access to his peasants’ files—even with FileVault on—if that administrator has the master password (the recovery key) described below.
FileVault 2 relies on the Recovery HD partition. You can read about this secret chunk of your hard drive on Recovery Mode: Three Emergency Disks. For now, the point is that if you’ve deliberately reformatted your hard drive in some nonstandard way, you may not be able to use FileVault 2.
FileVault can encrypt external drives, too—even flash drives. The controls to do this, though, are in a totally different place—not in System Preferences at all. Instead, open Disk Utility (in your Utilities folder). Erase the external drive using Mac OS Extended (Journaled, Encrypted) format. (And, yes, you have to erase the drive before you can encrypt it.)
Old FileVault still works. If you upgraded your Mac from Snow Leopard, and you were using FileVault before, the protected accounts still work as they always have. But you won’t be able to use FileVault 2 unless you first turn the old FileVault off for those old accounts. That’s a good idea anyway, since FileVault 2 is so much better.
You can turn FileVault off at any time. Just revisit the FileVault pane in System Preferences. (It takes time to decrypt your drive, but you can keep right on working.)
If you forget your password and your administrator forgets the recovery key, you’re toast. If this happens, your data is permanently lost. You have no choice but to erase your hard drive and start from scratch.
To turn FileVault on, proceed like this:
In System Preferences, click Security & Privacy, and then click FileVault. Click the
 , authenticate yourself, and then click Turn On FileVault.
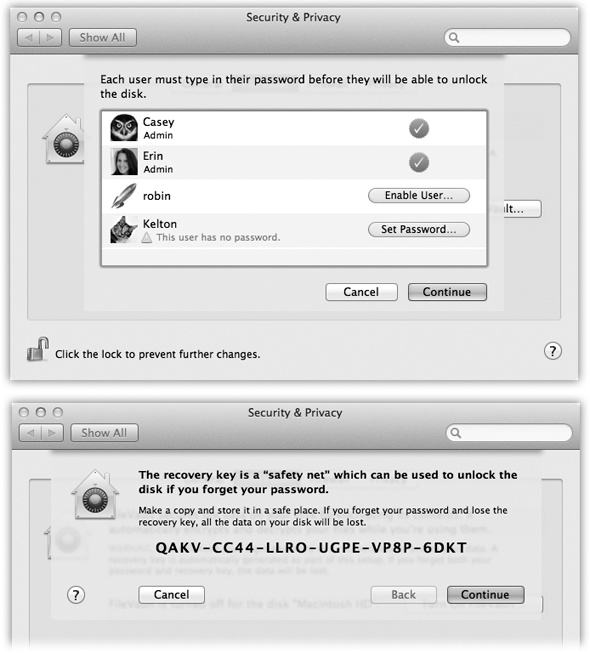
A list of account holders appears (Figure 14-16, top). The button next to each one, Enable User, might sound like you’re about to lead someone into drug addiction, but it’s actually your chance to specify who else can unlock the disk by logging in.
Note
If an account has no password, you have to add one first. Click the Set Password button that appears.
Figure 14-16. Top: You have to explicitly give permission to each person you want to allow to log in to your FileVault-protected Mac. Also, you won’t get away with no-password accounts for this trick; Kelton, shown here, won’t be able to unlock the disk at all. Click Set Password to add a password to this account. Bottom: Here’s your recovery key: a skeleton key that can get you into your encrypted Mac even if the idiot administrator forgets his password. (You have no idea how often this happens.)
For each person you want to be able to log into this Mac with her own password, click Enable User. Type in that person’s password and click OK. When you’re finished, click Continue.
(Anyone in this list to whom you don’t give access can still use the Mac—but only after persuading an administrator to come over and type in his name and password.)
Now, in huge type, the Mac displays your recovery key.
The recovery key is an override password that gives an administrator full power to access any account, even without knowing the account holder’s password, or to turn off FileVault for any account.
The thinking goes like this: Yeah, yeah, the peons with Standard accounts forget their account passwords all the time. But with FileVault, a forgotten password would mean the entire hard drive is locked forever—so Apple gave you, the technically savvy administrator, a back door. (And you, the omniscient administrator, would never forget the recovery key—right?)
Print or copy down the recovery key. Click Continue.
Because a forgotten password and recovery key could be absolutely devastating to your life, Apple handles this whole business like nuclear secrets (and so should you). Now, for example, a message appears that says, “Apple can store the recovery key for you.” It’s a really great idea to take advantage of this option.
If you click “Store the recovery key with Apple,” then the box expands and you’re asked to type in the answers to three security questions (you can choose the questions from the pop-up menus): “What’s your maternal grandmother’s middle name?” for example. Don’t mess this up; if you can’t remember the answers, you won’t get your recovery key from Apple.
After answering the “Store the recovery key” screen, click Continue. On the following screen, click Restart.
When you log in again, the Mac begins the process of encrypting your entire hard drive. This process takes a long time (the FileVault pane in System Preferences shows you the estimated remaining time), but you can keep using your Mac in the meantime; in theory, you won’t feel much of a slowdown at all while the encrypting is going on. You can even restart or shut down the computer.
You shouldn’t notice any speed hit as you work with an encrypted disk, either. You’ll notice only a few small security-related changes. For example, you’ll be asked for your password every time you wake the computer or exit the screen saver.
As you read earlier in this chapter, the usual procedure for finishing up a work session is for each person to choose ![]() →Log Out. After you confirm your intention to log out, the login screen appears, ready for the next victim.
→Log Out. After you confirm your intention to log out, the login screen appears, ready for the next victim.
But sometimes people forget. You might wander off to the bathroom for a minute, but run into a colleague there who breathlessly begins describing last night’s date and proposes finishing the conversation over pizza. The next thing you know, you’ve left your Mac unattended but logged in, with all your life’s secrets accessible to anyone who walks by your desk.
You can tighten up that security hole, and many others, using the options in the Security & Privacy→General panel of System Preferences:
Require password [immediately] after sleep or screen saver begins. This option gives you a password-protected screen saver that locks your Mac when you wander away. Now, whenever somebody tries to wake up your Mac after the screen saver has appeared (or when the Mac has simply gone to sleep according to your settings in the Energy Saver panel of System Preferences), the “Enter your password” dialog box appears. No password? No access.
The pop-up menu here (which starts out saying “immediately”) is a handy feature. Without it, the person most inconvenienced by the password requirement would be you, not the evil snitch from Accounting; even if you just stepped away to the bathroom or the coffee machine, you’d have to unlock the screen saver with your password. It would get old fast.
Instead, the password requirement can kick in only after you’ve been away for a more serious amount of time—5 minutes, 15 minutes, an hour, whatever. You can still put the Mac to sleep, or you can still set up your screen saver to kick in sooner than that. But until that time period has passed, you’ll be able to wake the machine without having to log in.
(Super-geeky bonus fact: You can use a Unix command in Terminal, described on Saving a report, to specify any time interval—not just the canned choices in the pop-up menu. The magic command is defaults -currentHost write com.apple.screensaver askForPasswordDelay -int 1800, where the final number specifies how many seconds should elapse before a password is required.)
Disable automatic login. This is just a duplicate of the Automatic Login on/off switch described on Setting Up the Login Process. Apple figured that this feature really deserved some presence on a control panel called Security & Privacy.
Show a message when the screen is locked. Whatever you type into this box will appear on the login screen (where you click your name in the list) or the screen saver..
If you click the Advanced button (it’s at the bottom of the Security & Privacy pane of System Preferences), you get these three bonus tweaks:
Require an administrator password to access system preferences with lock icons. Ordinarily, certain System Preferences changes require an administrator’s approval—namely, the ones that affect the entire computer and everyone who uses it, like Date & Time, Users & Groups, Network, Time Machine, and Security & Privacy. If you’re not an administrator, you can’t make changes to these panels until an administrator has typed in her name and password to approve your change.
However, once Mr. Teacher or Ms. Parent has unlocked one of those secure preference settings, they’re all unlocked. Once the administrator leaves your desk, you can go right on making changes to the other important panels (Network and Time Machine and Security & Privacy) without the administrator’s knowledge.
Unless this “Require an administrator password” box is turned on, that is. In that case, an Administrative account holder has to enter her name and password to approve each of those System Preferences panes individually.
Log out after [60] minutes of inactivity. You can make the Mac sign out of your account completely if it figures out that you’ve wandered off (and it’s been, say, 15 minutes since the last time you touched the mouse or keyboard). Anyone who shows up at your Mac will find only the standard login screen.
Automatically update safe downloads list. This option refers to Apple’s master list of viruses and spyware, which Mail and Safari block automatically. That list, of course, is changing all the time as Apple discovers new nasties; this option tells your Mac to update itself with Apple’s master list automatically.
Plenty of software features require you to make up a password: Web sites, accounts, networked disks, and so on. No wonder most people wind up trying to use the same password in as many situations as possible. Worse, they use something easily guessable like their names, kids’ names, spouse’s names, and so on. Even regular English words aren’t very secure, because hackers routinely use dictionary attacks—software that tries to guess your password by running through every word in the dictionary—to break in.
To prevent evildoers from guessing your passwords, OS X comes with a good-password suggestion feature called the Password Assistant (Figure 14-17). It cheerfully generates one suggestion after another for impossible-to-guess passwords (recharges8@exchangeability, anyone?).
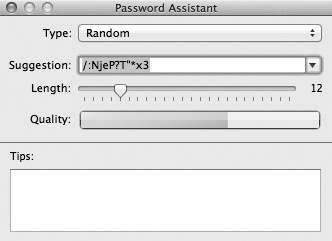
Figure 14-17. Anyplace you’re supposed to make up a password, including in the Users & Groups pane of System Preferences, a key icon appears. When you click it, the Password Assistant opens. Use the pop-up menu and the Length slider to specify how long and unguessable the password should be. The Quality graph shows you just how tough it is to crack this password. (In the Type pop-up menu, you might wonder about FIPS-181. It stands for the Federal Information Processing Standards Publication 181, which sets forth the U.S. government’s standard for password-generating algorithms.)
Fortunately, you won’t have to remember most of them, thanks to the Keychain password-memorizing feature described at the end of this chapter. (The only password you have to memorize is your account password.)
The information explosion of the computer age may translate into bargains, power, and efficiency, but as noted above, it carries with it a colossal annoyance: the proliferation of passwords we have to memorize. Shared folders on the network, Web sites, FTP sites—each requires another password.
Apple has done the world a mighty favor with its Keychain feature. (It’s something like an earlier, not-Internet-based version of the iCloud Keychain described on Synchronized Passwords.) Whenever you log into OS X and type in your password, you’ve typed the master code that tells the computer, “It’s really me. I’m at my computer now.” From that moment on, the Mac automatically fills in every password blank you encounter, whether it’s a Web site in Safari, a shared disk on your network, a wireless network, an encrypted disk image, or an FTP (File Transfer Protocol) program like Transmit or Cyberduck. With only a few exceptions, you can safely forget all your passwords except your login password.
These days, all kinds of programs and services know about the Keychain and offer to store your passwords there. For example:
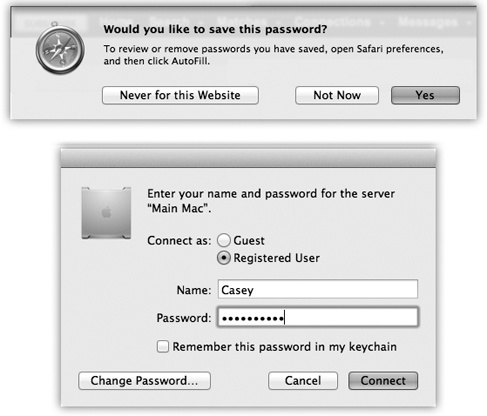
In Safari, whenever you type your name and password for a certain Web page and then click OK, a dialog box asks: “Would you like to save this password?” (See Figure 14-18, top.)
Figure 14-18. Top: Safari is one of several Internet-based programs that offer to store your passwords in the Keychain; just click Yes. The next time you visit this Web page, you’ll find your name and password already typed in. At any time, you can see a complete list of the memorized Web passwords by choosing Safari→Preferences→Passwords. Bottom: When you connect to a server (a shared disk or folder on the network), just turn on “Remember this password in my keychain.”
Note
This offer is valid only if, in Safari→Preferences→AutoFill tab, “User names and passwords” is turned on. If not, the “Would you like to save this password?” message never appears.
Note, too, that some Web sites use a nonstandard login system that also doesn’t produce the “Would you?” message. Unless the Web site provides its own “Remember me” or “Store my password” option, you’re out of luck; you’ll have to type in this information with every visit.
When you connect to a shared folder or disk on the network, the opportunity to save the password in your Keychain is equally obvious (Figure 14-18, bottom).
You also see a “Remember password (add to Keychain)” option when you create an encrypted disk image using Disk Utility.
Mac email programs, like Mail and Entourage/Outlook, store your email account passwords in your Keychain. So do FTP programs; check their Preferences dialog boxes.
Your iCloud account information is stored in the Keychain, too (as you entered it on the iCloud pane of System Preferences).
A “Remember password” option appears when you type in the password for a wireless network or an AirPort base station.
The iTunes program memorizes your iTunes Store password, too.
If you work alone, the Keychain is automatic, invisible, and generally wonderful. Login is the only time you have to type a password. After that, the Mac figures, “Hey, I know it’s you; you proved it by entering your account password. That ID is good enough for me. I’ll fill in all your other passwords automatically.” In Apple parlance, you’ve unlocked your Keychain just by logging in.
But there may be times when you want the Keychain to stop filling in all your passwords, perhaps only temporarily. Maybe you work in an office where someone else might sit down at your Mac while you’re getting a candy bar.
Of course, you can have OS X lock your Mac—Keychain and all—after a specified period of inactivity (The Password Assistant).
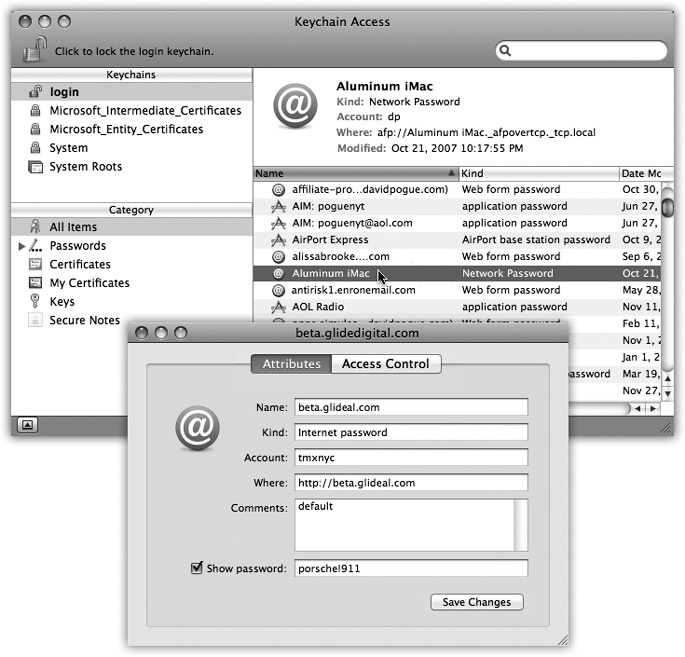
But if you want to lock the Keychain manually, so that no passwords are autofilled in until you unlock it again, you can use any of these methods. Each requires the Keychain Access program (in your Applications→Utilities folder):
Lock the Keychain manually. In the Keychain Access program, choose File→Lock Keychain “login” (⌘-L), or just click the big
button in the toolbar (Figure 14-19).Choose Lock Keychain “login” from the Keychain menulet. To put the Keychain menulet on your menu bar, open Keychain Access, choose Keychain Access→Preferences→General. Turn on “Show keychain status in menu bar.”
Lock the Keychain automatically. In the Keychain Access program, choose Edit→Change Settings for Keychain [your name]. The resulting dialog box lets you set up the Keychain to lock itself, say, 5 minutes after the last time you used your Mac, or whenever the Mac goes to sleep. When you return to the Mac, you’re asked to re-enter your account password in order to unlock the Keychain, restoring your automatic-password feature.
Figure 14-19. In the main Keychain list, you can double-click a listing for more details about a certain password—including the actual password it’s storing. To see the password, turn on “Show password.” The first time you try this, you’re asked to prove your worthiness by entering your Keychain password (usually your account password). If you then click Always Allow, you won’t be bothered for a password-to-see-this-password again.
Whenever the Keychain is locked, OS X no longer fills in your passwords.
Note
As noted above, you unlock your Keychain using the same password you use to log into OS X, but that’s just a convenience. If you’re really worried about security, you can choose Edit→Change Password for Keychain [your name], thereby establishing a different password for your Keychain, so that it no longer matches your login password.
Of course, doing so also turns off the automatic-Keychain-unlocking-when-you-log-in feature.
To take a look at your Keychain, open the Keychain Access program. By clicking one of the password rows, you get to see its attributes—name, kind, account, and so on (Figure 14-19).