
2 An Essential Rule for Digital Black and White Photography: Always Photograph in RAW Mode
If you are just beginning to photograph digitally, you may be pleasantly surprised at the high-quality images that a good camera is capable of, even in the compressed JPEG format. For most situations, a skillfully taken photo in compressed JPEG mode is good enough at first glance. For the sake of convenience, it’s tempting to stay with this format because it uses up a lot less memory and there is no need to determine which RAW converter to load onto the computer. However, to surrender to convenience is a mistake in spite of the apparently satisfactory image quality of the JPEG format. This is especially important for black and white photography. Most of the high-end digital cameras have—in addition to the JPEG and sometimes the TIFF formats—the option of photographing in the so-called RAW mode. As the name indicates, all available RAW data is saved the moment you take the photo. Numerous automatic image-editing functions such as white balance, sharpening, and tone value correction are eliminated at first. Instead, the data is generally stored with 12-bit or even 16-bit color depth, as opposed to the 8 bits of JPEG mode. This greater color depth means a considerably wider tonal range. In order to open the data photographed in RAW mode, a RAW converter is needed. And this is where, unfortunately, every manufacturer clings to its own proprietary and very secret concoction. Although Adobe has suggested developing a uniform RAW format, the large manufacturers such as Canon and Nikon still won’t have anything to do with it. And yet, when it comes to optimum image quality, there is no way around using the RAW format: Photographs taken with this format have considerably better light scope, which means that photos shot in RAW format reproduce the brightest spots and the darkest shadows in backlit images more faithfully than photos taken in JPEG format. Thus, backlit skies taken in RAW format not only have more natural colors, they also have better differentiation.
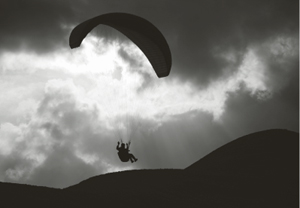
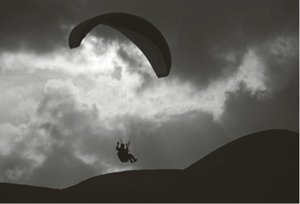
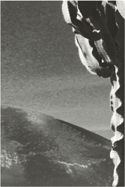
Let’s look at two photos of a paraglider:
In the photo taken in JPEG mode (figure 2–1), the lit areas are not well differentiated and are partly washed out, despite having used a gradient filter that gradually darkens the sky toward the top—a typical phenomenon from the beginnings of digital photography that made good backlit photos almost impossible.
When you now look at the image captured simultaneously in RAW mode (figure 2–2) with exactly the same image data, you will see that all lit areas are still very well differentiated and traced. And that is precisely the point when it comes to a digitally-taken backlit photo: If the lights in the image are “washed out,” you cannot subsequently improve it.
For this reason, it is especially important in backlit photos to use the black or red blinking information indicator on your camera’s liquid crystal display (LCD), available on most good digital cameras, to see in the display what sections have possibly washed-out lit areas. If you photograph in RAW mode, you can correct an underexposed photo by brightening the underexposed areas with the RAW converter. By the way, the advantage of the RAW mode in backlit images applies to both black and white and color photography. However, for black and white photography there is one especially important criterion which demands that a photo be taken in RAW mode: You will later learn that it often makes sense to convert photos that should have a dramatic, high-contrast sky using the Photoshop yellow filter preset to subtract a major portion of the blue tones. But when you do this with a photo taken in JPEG (even if it looked good in color), its tonal values will develop dirty transitions and an unpleasant image noise that you will clearly recognize in bigger enlargements. On the other hand, a TIFF file that originated in RAW mode can handle a conversion using the yellow filter preset or one that subtracts a high proportion of the blue tones and retains fine tonal transitions and little image noise.
Let’s look at an example. In the photo of the volcanic island of Lanzarote (figure 2–3), the task was to convert the sky to a higher contrast black and white. The best result was obtained by using the yellow filter preset during conversion. If the sky had been slightly hazy, a polarizing filter in a crossed (90°) position and the yellow filter preset would create a nice, contrasty black and white image. If you enlarge this image 100% and crop it (figure 2–4), you will see how little image noise there is in the TIFF file converted from RAW format. If you take exactly the same steps with an identical photo in JPEG format, you will see that the same crop enlarged by 100% (figure 2–5) has much more image noise and a much rougher transition in the gray tones. The difference can be readily seen in 16″ × 24″ prints. Therefore, the following rule applies especially for fine art prints: Always photograph in RAW mode and print from a TIFF file because although TIFF takes up to five times more memory than JPEG, the results are worth the required memory space. In addition, there are good external hard disks with almost unlimited memory capacity (Lacie, for example) that are more economical than the corresponding number of films would have been.
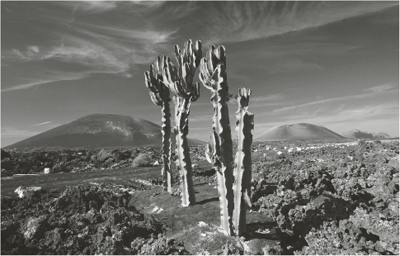
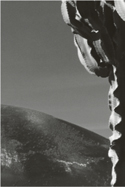
Figure 2–4 TIFF file converted from RAW format
It is essential to work with a high-quality RAW converter. Photoshop’s built-in converter has some obvious weaknesses when it comes to making extreme enlargements—for example, it often produces zigzags in high-contrast lines that are not present in the JPEG original. The best RAW converter I have tested is Phase One’s Capture One. The package shows none of the inherent weaknesses that Photoshop displays and produces excellent-quality files for making large-format enlargements.